How to Set Up Multiple Results Pages
A quiz can show more than one results page, with different content on each. Follow the instructions below to add one.
Warning
A second results page adds complexity, can produce unexpected product recommendations, and slows the quiz down. One results page sells best.
A second page is worth adding in a few cases:
- Personalized discounts: Show different discounts (or no discount) based on customer preferences or responses.
- Email collection strategies: Offer unique results based on whether the customer leaves their email address or not.
- Simpler conditional logic: a long list of similar conditional blocks is easier to manage as several named pages.
- Special cases: a medical or supplements company may need a page telling the customer they are not eligible for a product, and why.
Weigh that against your quiz goals before you turn this on.
- Open the Quiz builder.
- Go to the Results page tab.
-
Scroll down and click
+ Add results page. A second page appears below the first.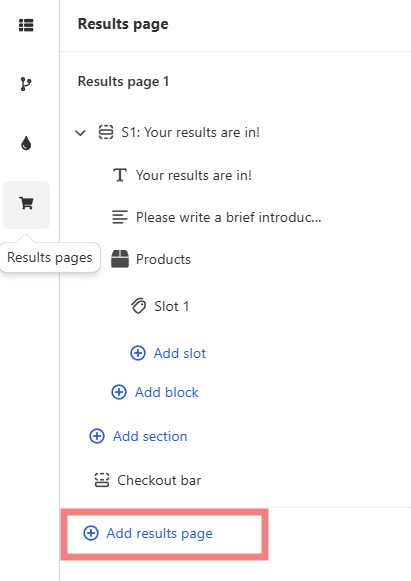
-
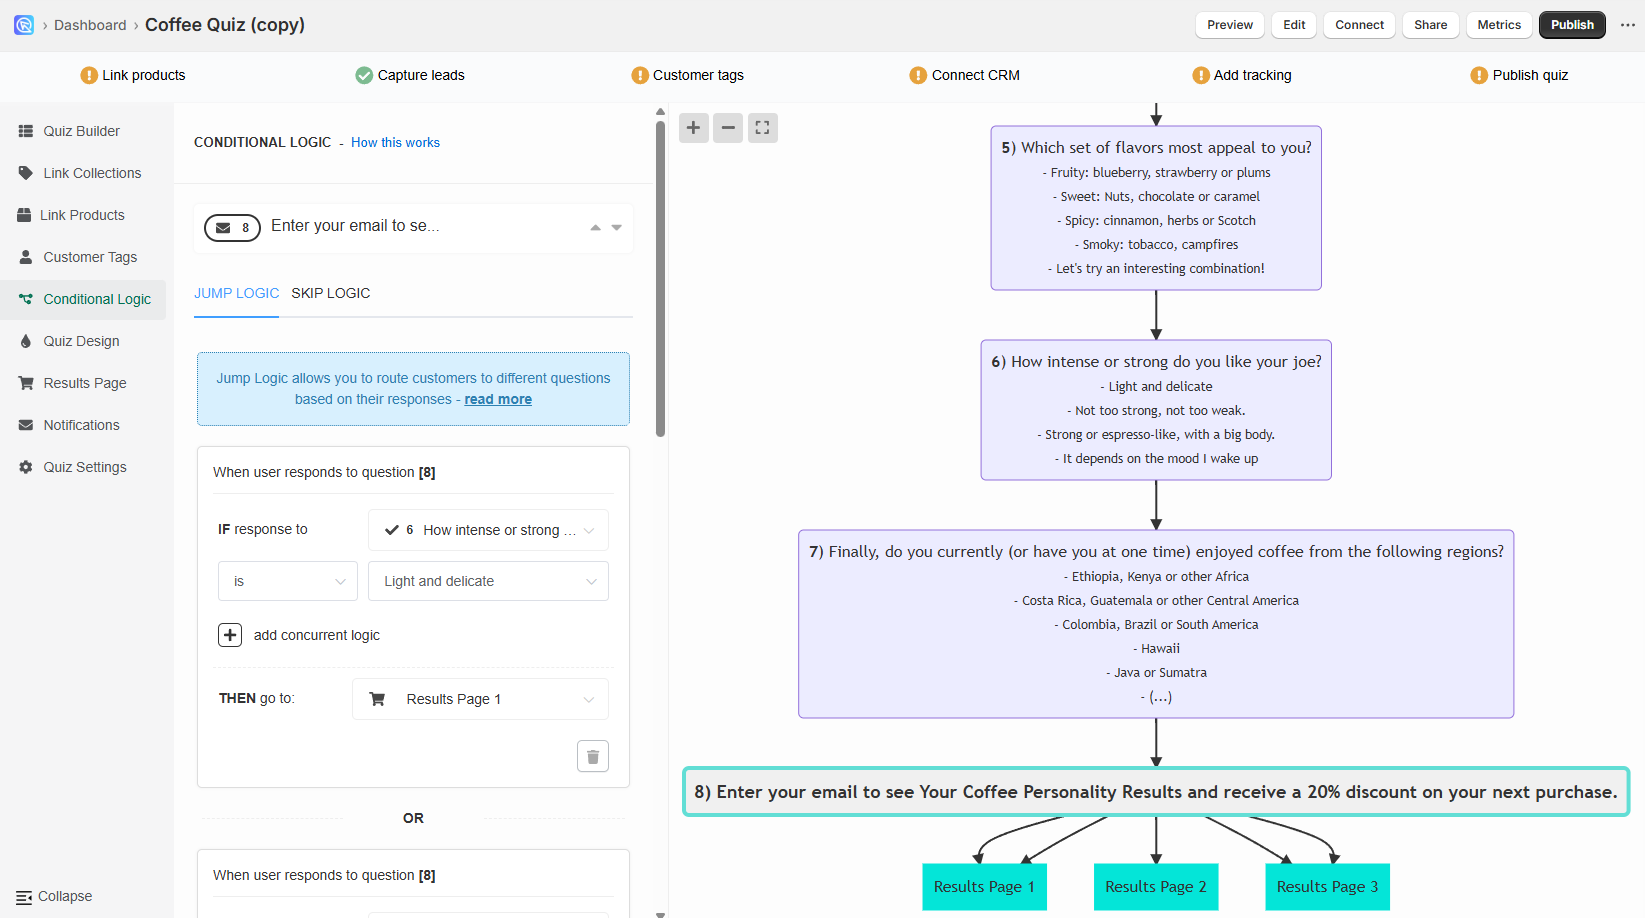
Open the Conditional logic tab. Extra pages do nothing on their own. Jump logic is what sends each customer to the right one.
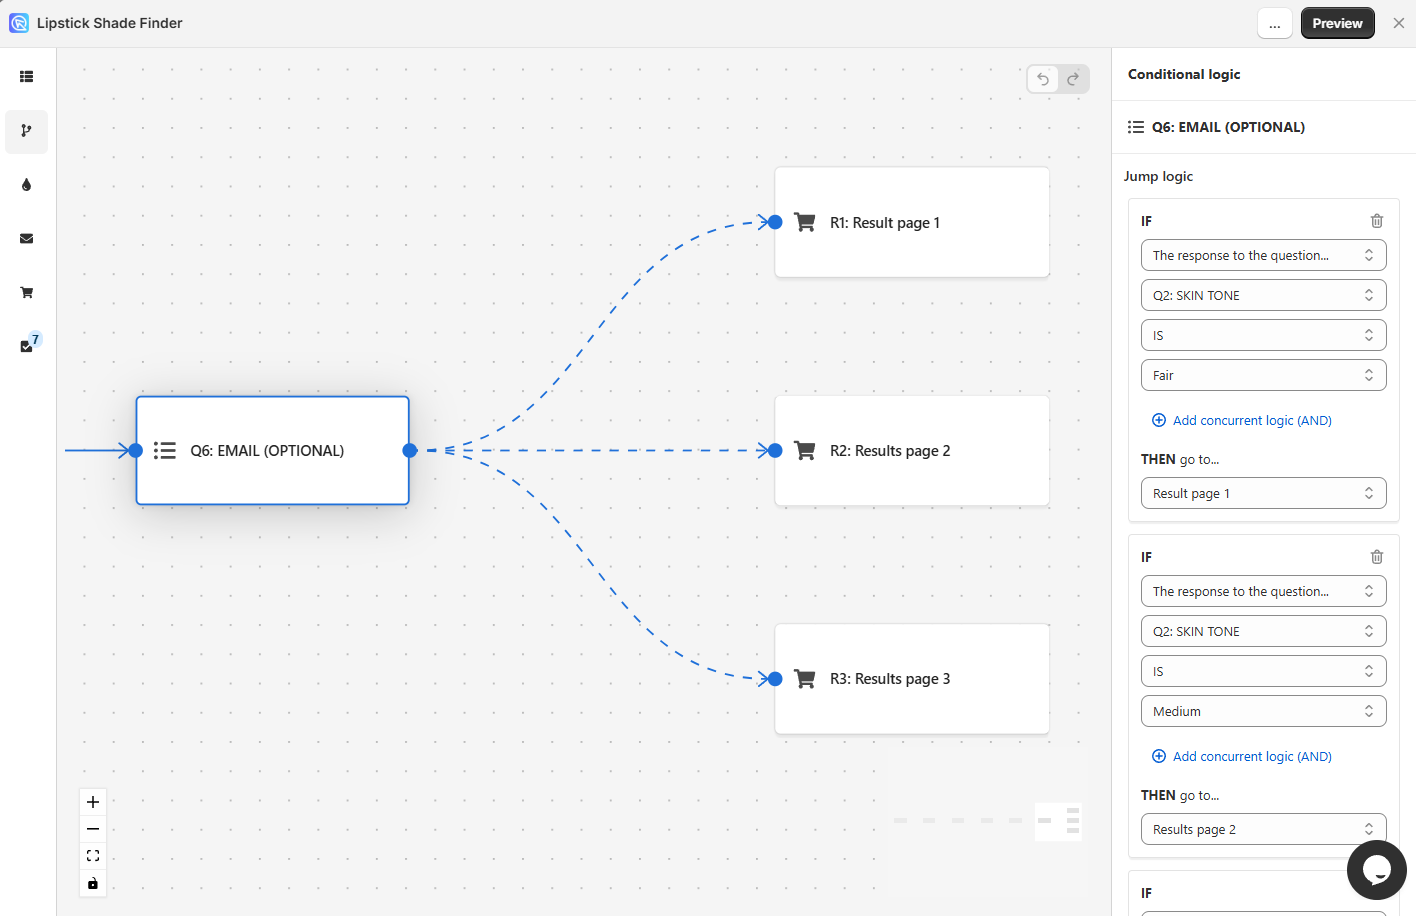
-
Find the last question before the results, and add Jump logic rules there. Each rule sends the customer to a particular results page.
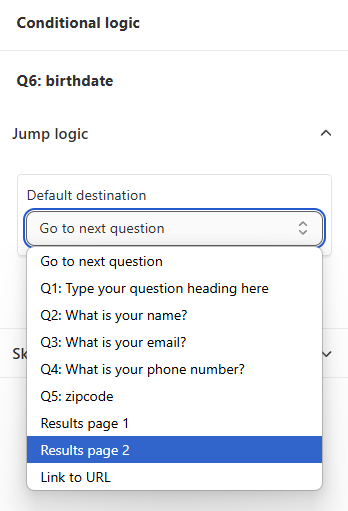
How to use jump logic covers the rules in full.
-
Click the top-right
Savebutton to update the preview and the live quiz.
- Open the Quiz Builder.
- Go to the Results Page tab and open the Results Page Settings.
- On the Advanced tab, scroll to
Multiple Results Pagesand clickactivate. -
Click the new
MULTIPLE RESULTS PAGEStab. The menu lists every results page in this quiz.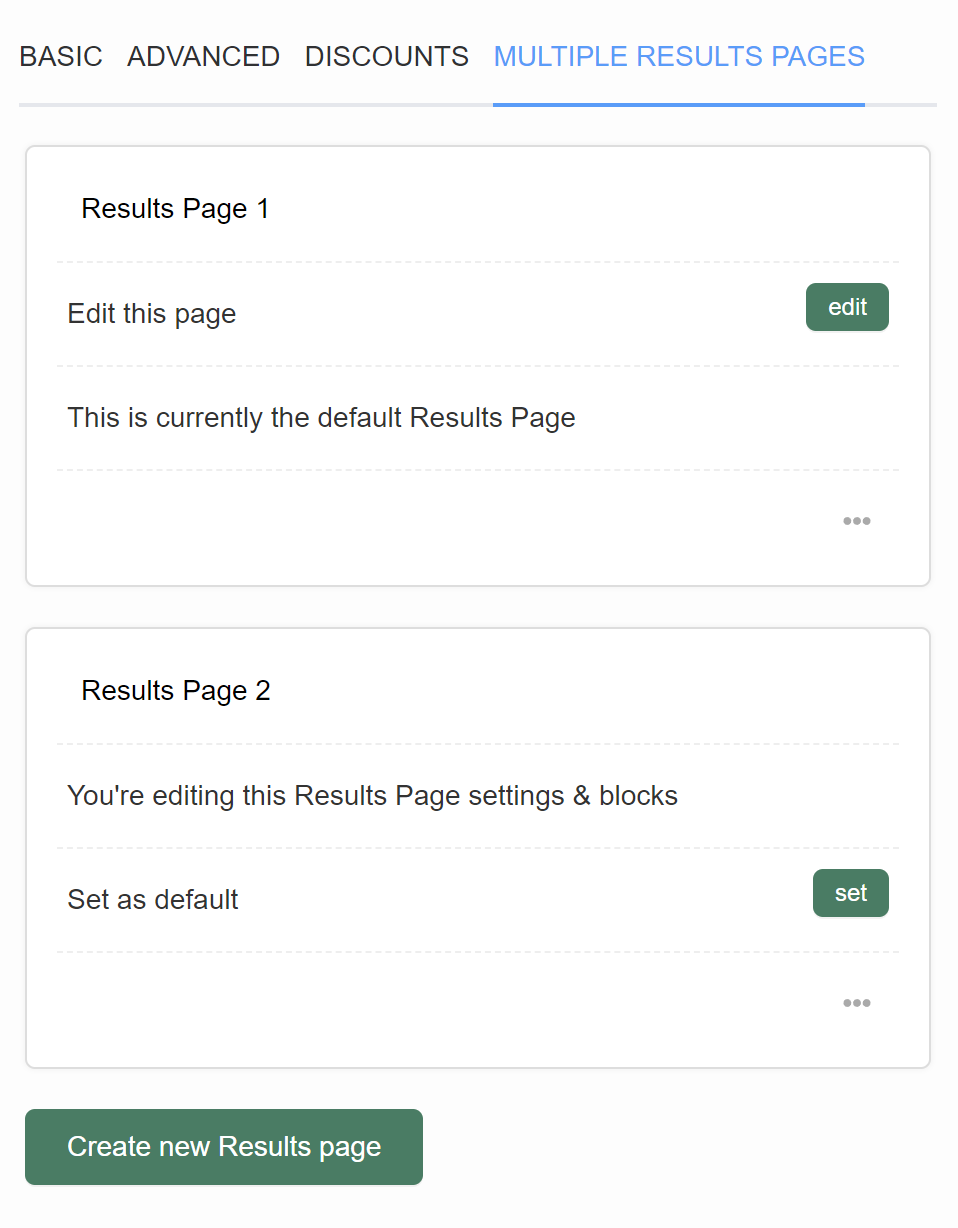
-
Click
This is currently the default Results Pageto renameResults Page 1. That page is the default until you change it. - Click
Create new Results Pageto add another. - Click
setto make the new page the default, oreditto change its contents. The quiz builder switches to that page, where you set its own discounts, content, product blocks and settings. -
Open the Conditional Logic tab. Extra pages do nothing on their own. Jump Logic is what sends each customer to the right one.
-
Find the last question before the results, and add Jump Logic rules there. Each rule sends the customer to a particular results page.
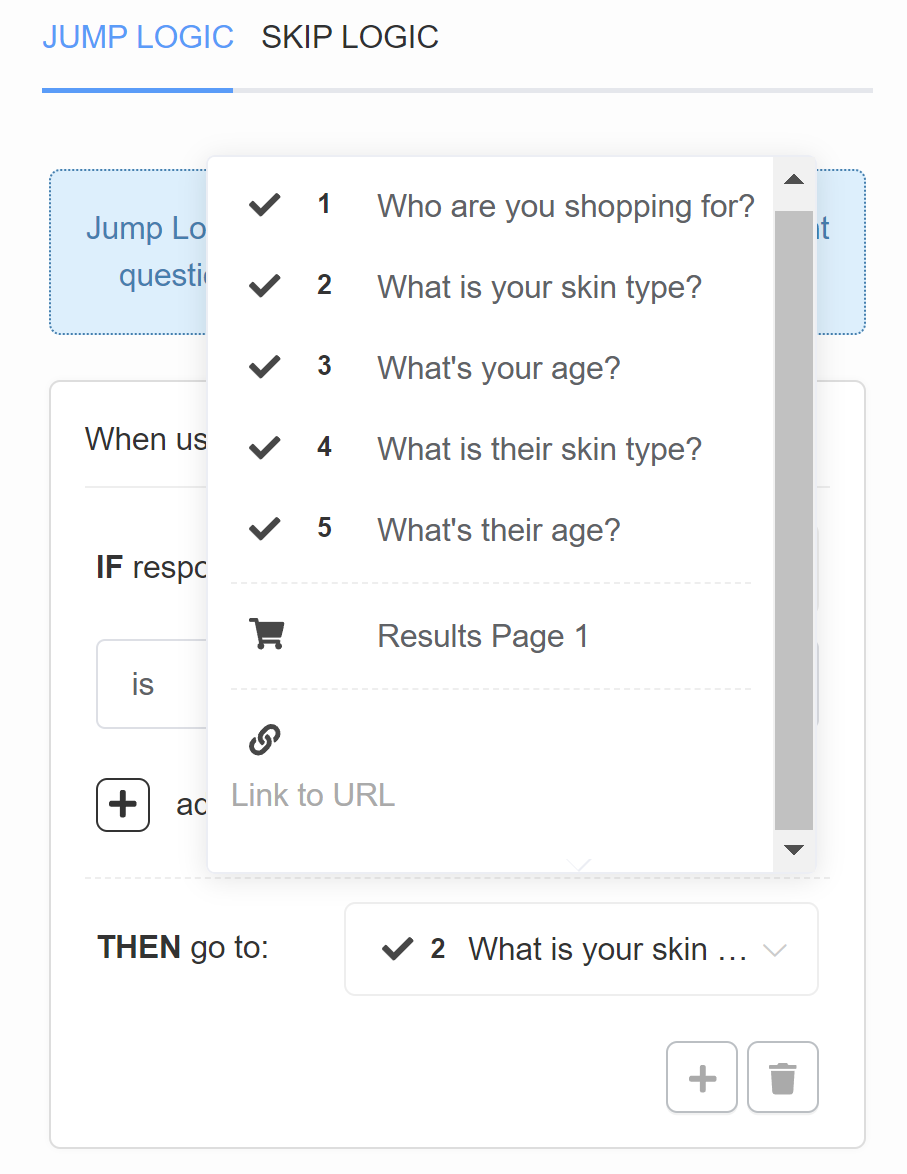
How to use jump logic covers the rules in full.
-
Click the top-right
Publishbutton to update the preview and the live quiz.
- Open the Quiz Builder.
- Go to the Results Page tab and open the Results Page Settings.
- On the Advanced tab, scroll to
Multiple Results Pagesand clickactivate. -
Click the new
MULTIPLE RESULTS PAGEStab. The menu lists every results page in this quiz. -
Click
This is currently the default Results Pageto renameResults Page 1. That page is the default until you change it. - Click
Create new Results Pageto add another. - Click
setto make the new page the default, oreditto change its contents. The quiz builder switches to that page, where you set its own discounts, content, product blocks and settings. -
Open the Conditional Logic tab. Extra pages do nothing on their own. Jump Logic is what sends each customer to the right one.
-
Find the last question before the results, and add Jump Logic rules there. Each rule sends the customer to a particular results page.
How to use jump logic covers the rules in full.
-
Click the top-right
Publishbutton to update the preview and the live quiz.
- Open the Quiz Builder.
- Go to the Results Page tab and open the Results Page Settings.
- On the Advanced tab, scroll to
Multiple Results Pagesand clickactivate. -
Click the new
MULTIPLE RESULTS PAGEStab. The menu lists every results page in this quiz. -
Click
This is currently the default Results Pageto renameResults Page 1. That page is the default until you change it. - Click
Create new Results Pageto add another. - Click
setto make the new page the default, oreditto change its contents. The quiz builder switches to that page, where you set its own discounts, content, product blocks and settings. -
Open the Conditional Logic tab. Extra pages do nothing on their own. Jump Logic is what sends each customer to the right one.
-
Find the last question before the results, and add Jump Logic rules there. Each rule sends the customer to a particular results page.
How to use jump logic covers the rules in full.
-
Click the top-right
Publishbutton to update the preview and the live quiz.
- Open the Quiz Builder.
- Go to the Results Page tab and open the Results Page Settings.
- On the Advanced tab, scroll to
Multiple Results Pagesand clickactivate. -
Click the new
MULTIPLE RESULTS PAGEStab. The menu lists every results page in this quiz. -
Click
This is currently the default Results Pageto renameResults Page 1. That page is the default until you change it. - Click
Create new Results Pageto add another. - Click
setto make the new page the default, oreditto change its contents. The quiz builder switches to that page, where you set its own discounts, content, product blocks and settings. -
Open the Conditional Logic tab. Extra pages do nothing on their own. Jump Logic is what sends each customer to the right one.
-
Find the last question before the results, and add Jump Logic rules there. Each rule sends the customer to a particular results page.
How to use jump logic covers the rules in full.
-
Click the top-right
Publishbutton to update the preview and the live quiz.
- Open the Quiz Builder.
- Go to the Results Page tab and open the Results Page Settings.
- On the Advanced tab, scroll to
Multiple Results Pagesand clickactivate. -
Click the new
MULTIPLE RESULTS PAGEStab. The menu lists every results page in this quiz. -
Click
This is currently the default Results Pageto renameResults Page 1. That page is the default until you change it. - Click
Create new Results Pageto add another. - Click
setto make the new page the default, oreditto change its contents. The quiz builder switches to that page, where you set its own discounts, content, product blocks and settings. -
Open the Conditional Logic tab. Extra pages do nothing on their own. Jump Logic is what sends each customer to the right one.
-
Find the last question before the results, and add Jump Logic rules there. Each rule sends the customer to a particular results page.
How to use jump logic covers the rules in full.
-
Click the top-right
Publishbutton to update the preview and the live quiz.
This article explains how to set up multiple results pages in the RevenueHunt app.