Getting Started with Product Recommendation Quiz in the RevenueHunt App
In this tutorial you will see an overview of the most important features of the RevenueHunt app.
What you will learn
- how to quickly find your way around the app
- how to find different sections in the app
- how to add your first quiz
- how to link and recommend products
- how to find sections that edit the quiz content and design
- how to find quiz settings and integrations
- how to find quiz analytics and responses
- how to find quiz share and publish options
In this tutorial you will see an overview of the most important features of the RevenueHunt app.
What you will learn
- how to quickly find your way around the app
- how to find different sections in the app
- how to add your first quiz
- how to link and recommend products
- how to edit the quiz content and design
- how to find quiz share and publish options
In this tutorial you will see an overview of the most important features of the RevenueHunt app.
What you will learn
- how to quickly find your way around the app
- how to find different sections in the app
- how to add your first quiz
- how to link and recommend products
- how to edit the quiz content and design
- how to find quiz share and publish options
In this tutorial you will see an overview of the most important features of the RevenueHunt app.
What you will learn
- how to quickly find your way around the app
- how to find different sections in the app
- how to add your first quiz
- how to link and recommend products
- how to edit the quiz content and design
- how to find quiz share and publish options
In this tutorial you will see an overview of the most important features of the RevenueHunt app.
What you will learn
- how to quickly find your way around the app
- how to find different sections in the app
- how to add your first quiz
- how to link and recommend products
- how to edit the quiz content and design
- how to find quiz share and publish options
In this tutorial you will see an overview of the most important features of the RevenueHunt app.
What you will learn
- how to quickly find your way around the app
- how to find different sections in the app
- how to add your first quiz
- how to link and recommend products
- how to edit the quiz content and design
- how to find quiz share and publish options
Welcome to RevenueHunt!
Before you start collecting leads and making sales, here is a quick tour of the RevenueHunt app.
Dashboard
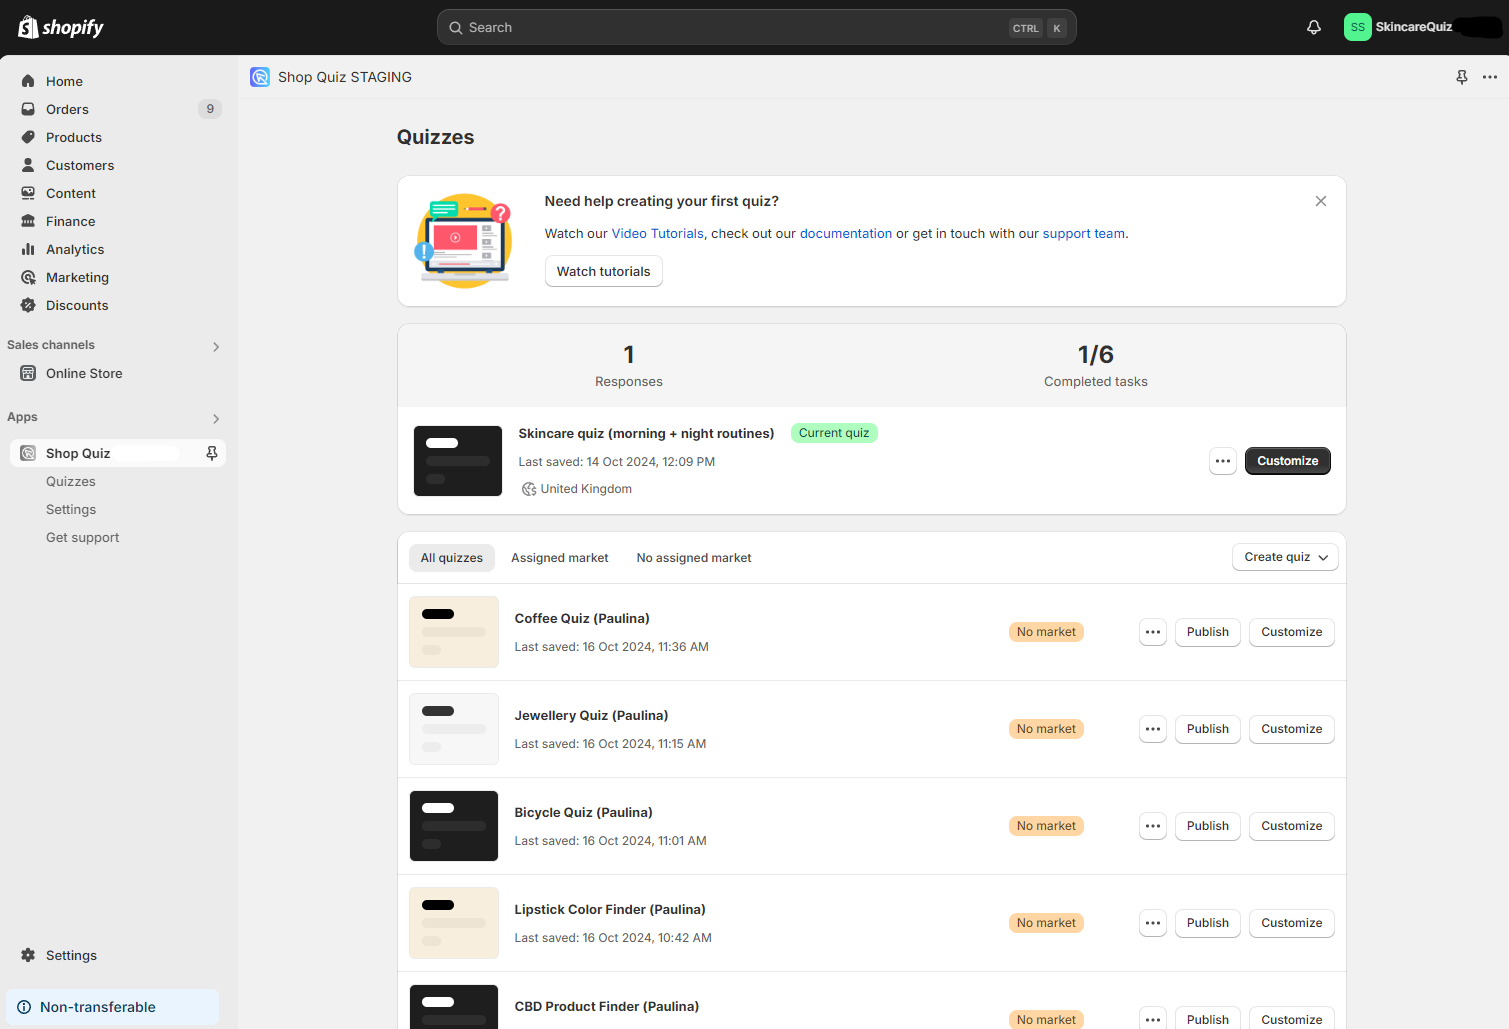
- Still on the legacy app? Click
Switch to Built for Shopifyand follow the steps to grant the permissions. This tutorial covers the Built for Shopify version. - Log in to the RevenueHunt app. The first screen is the
Quizzesdashboard, which holds every quiz you create. - Click
Create new quizto start a project. Build it from scratch, or start it with the Quiz Copilot AI assistant or a ready-made template.
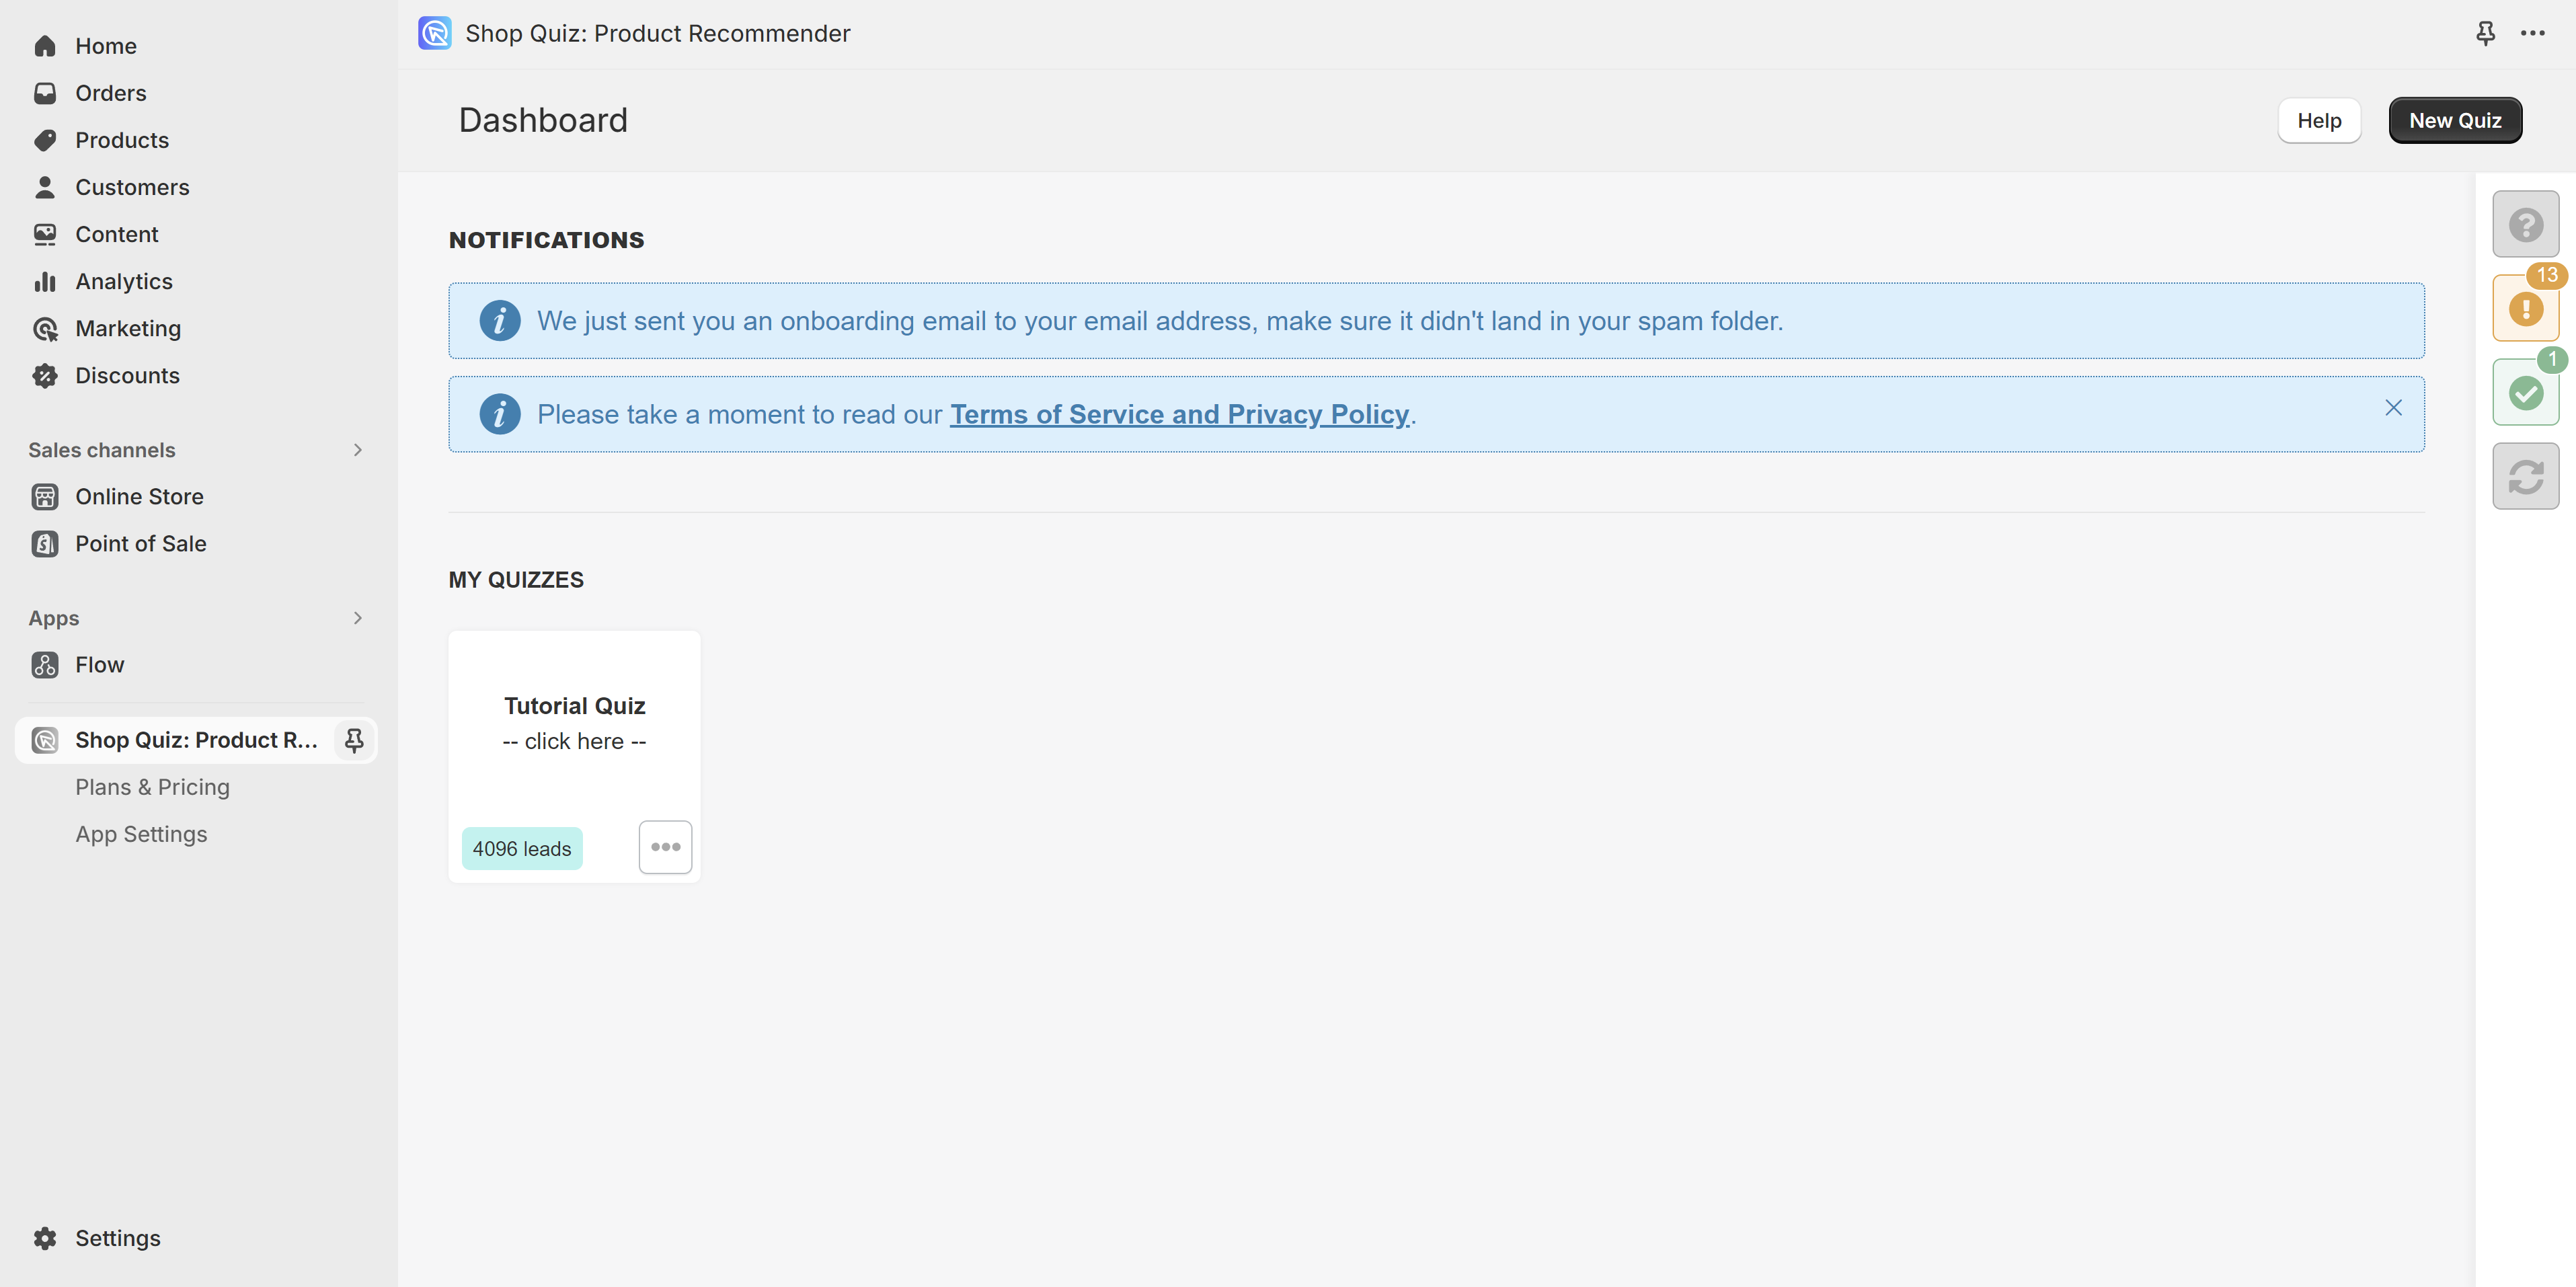
- Log in to the RevenueHunt app. The first screen is your Dashboard, which holds every quiz you create.
- Check the Success Checklist on the right. It shows how far you have got with your quiz.
- Click
+ new quizto create a project. Build it from scratch, or start from a ready-made template.
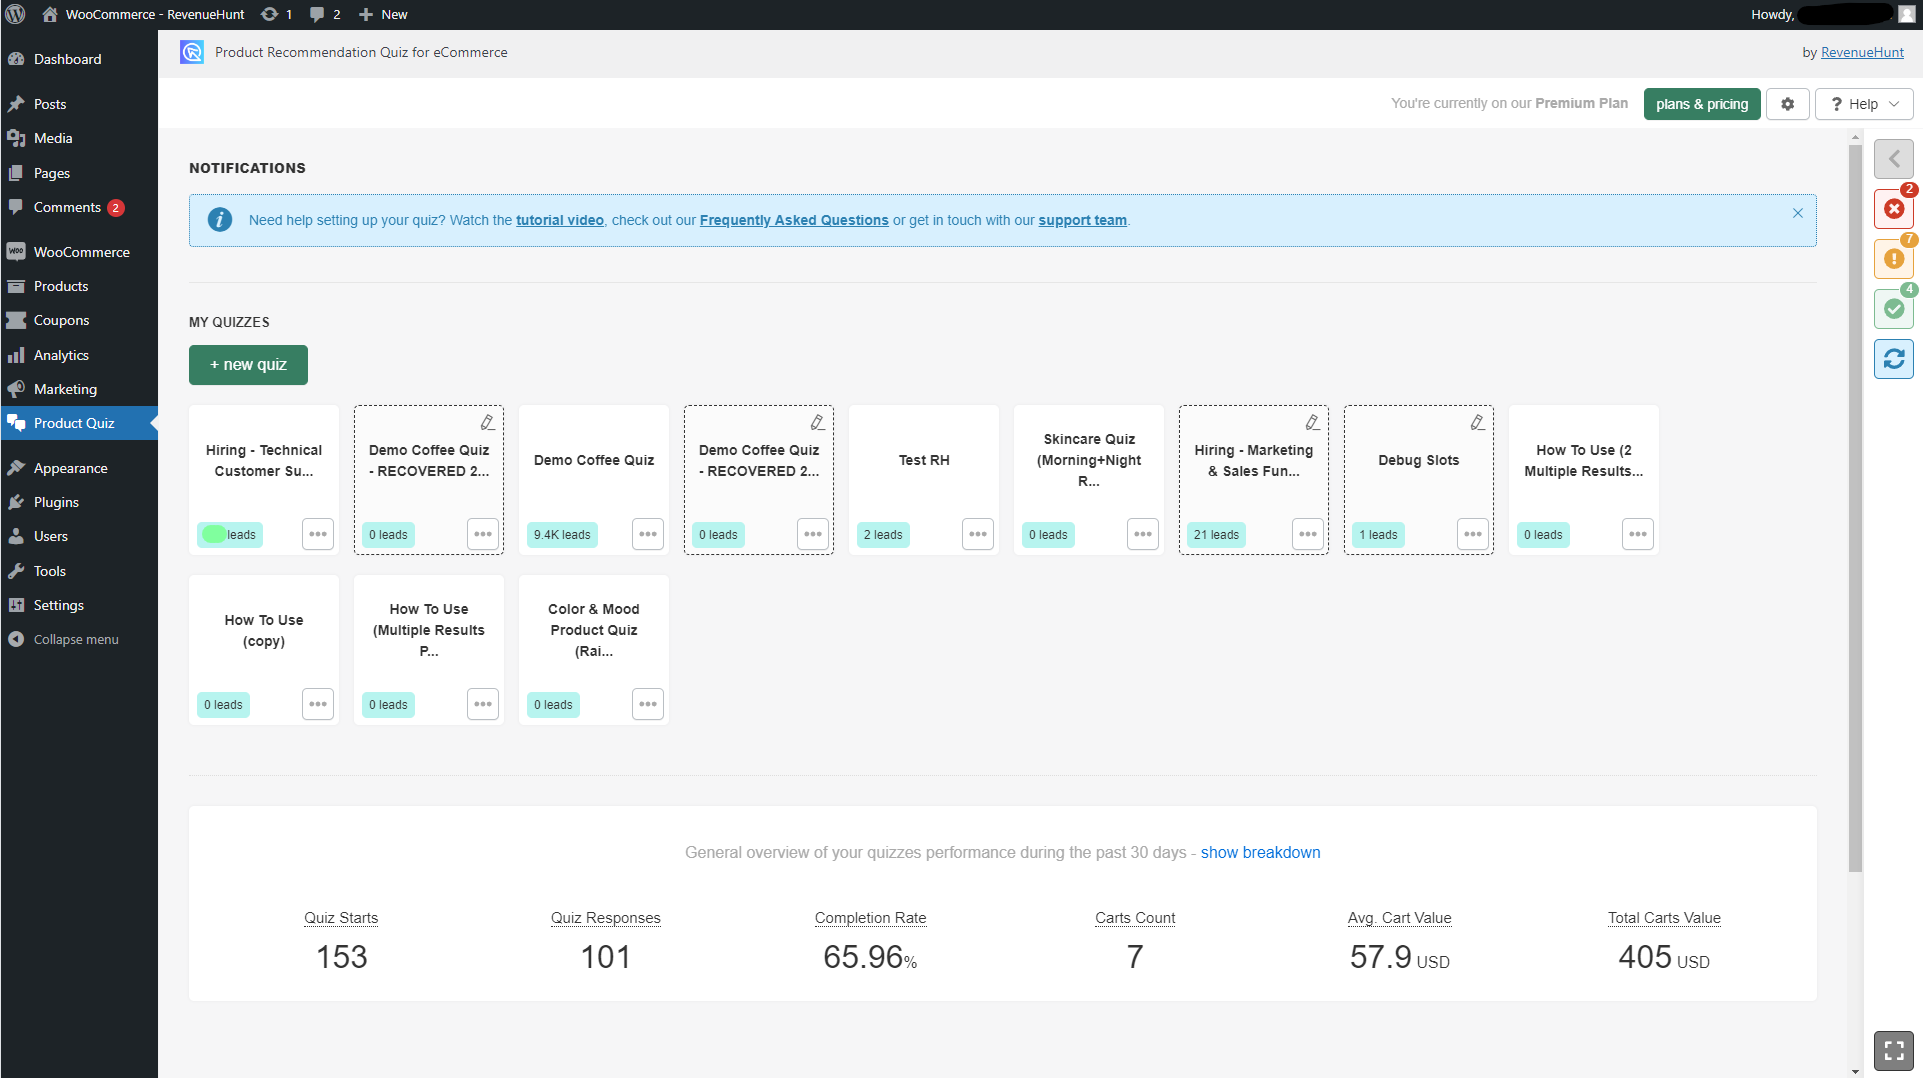
- Log in to the RevenueHunt app. The first screen is your Dashboard, which holds every quiz you create.
- Check the Success Checklist on the right. It shows how far you have got with your quiz.
- Click
+ new quizto create a project. Build it from scratch, or start from a ready-made template.
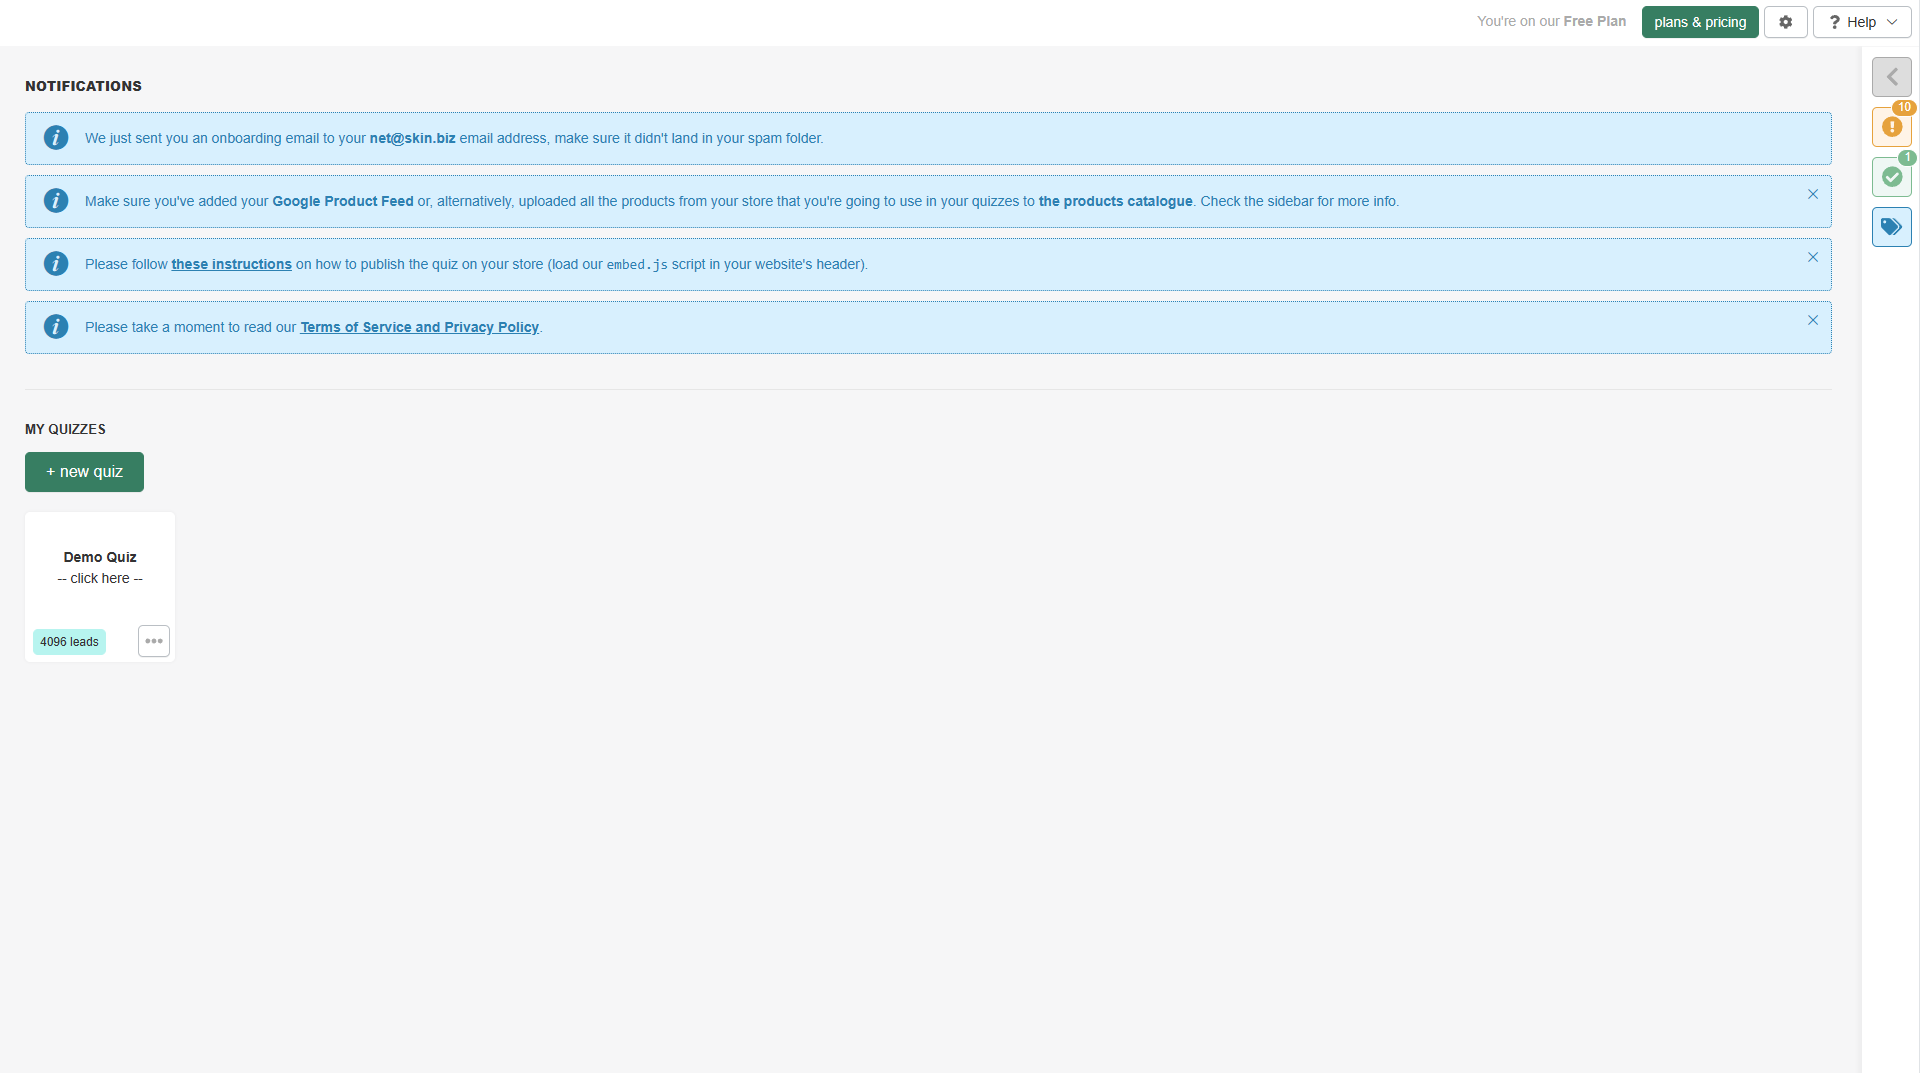
- Log in to the RevenueHunt app. The first screen is your Dashboard, which holds every quiz you create.
- Check the Success Checklist on the right. It shows how far you have got with your quiz.
- Click
+ new quizto create a project. Build it from scratch, or start from a ready-made template.
- Log in to the RevenueHunt app. The first screen is your Dashboard, which holds every quiz you create.
- Check the Success Checklist on the right. It shows how far you have got with your quiz.
- Click
+ new quizto create a project. Build it from scratch, or start from a ready-made template.
- Log in to the RevenueHunt app. The first screen is your Dashboard, which holds every quiz you create.
- Check the Success Checklist on the right. It shows how far you have got with your quiz.
- Click
+ new quizto create a project. Build it from scratch, or start from a ready-made template.
Quiz builder
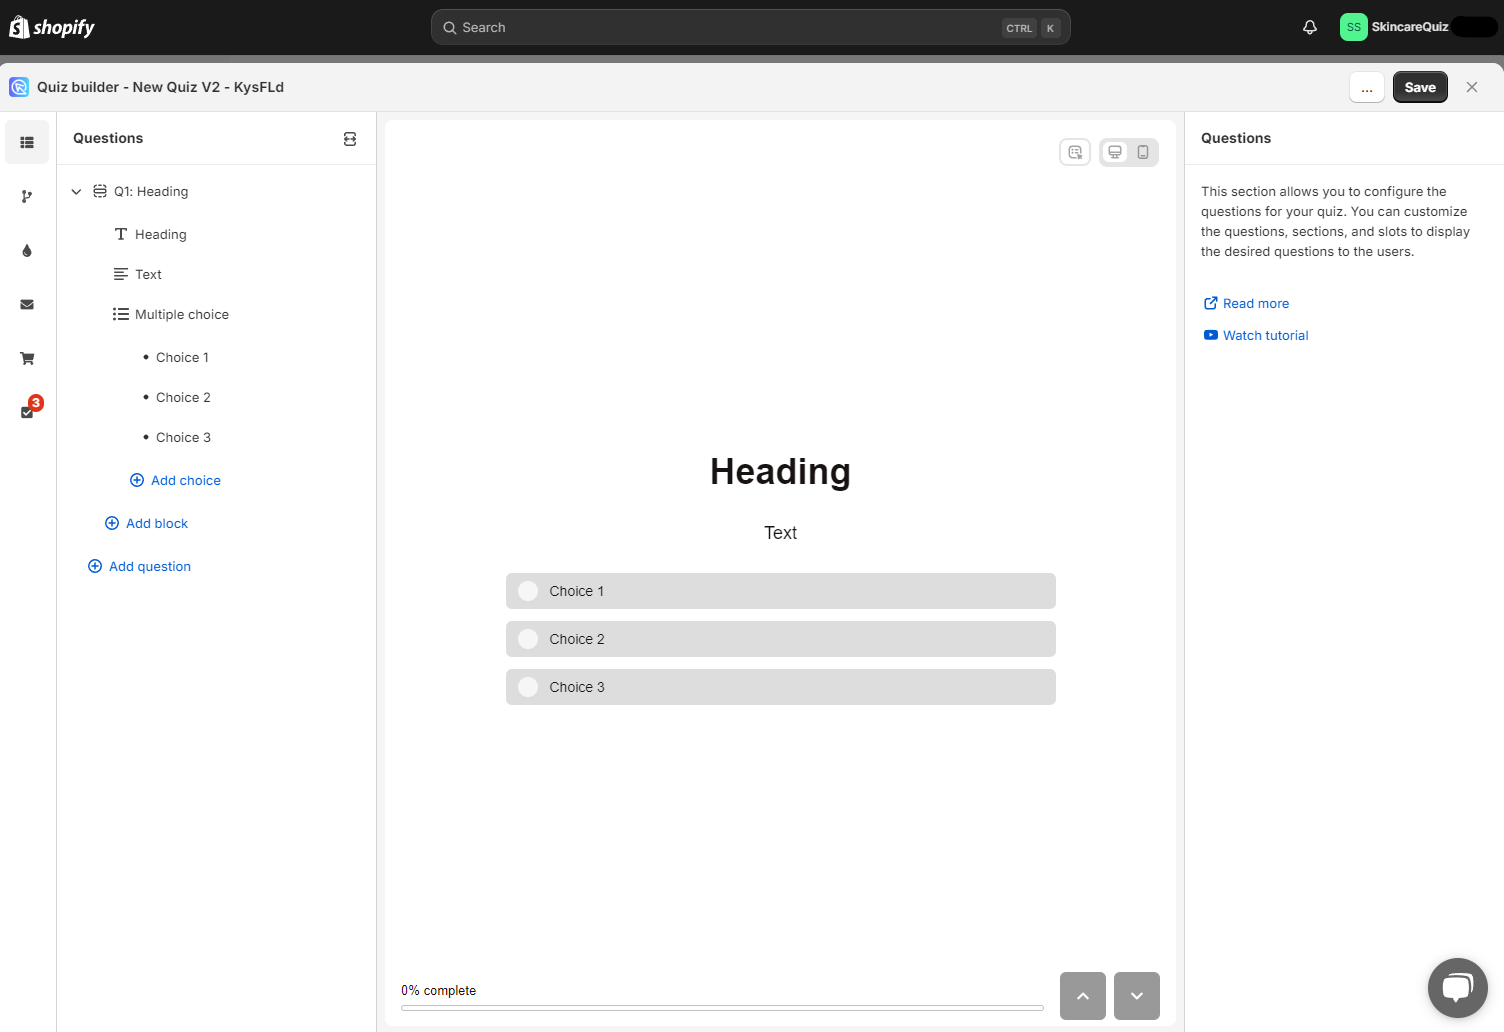
This is where you create your quiz.
- Click
+ Add Questionand pick a question type. - Drag and drop the questions to reorder them.
- Click a question card to open its settings on the right. There you can make a question optional, or allow multiple answers.
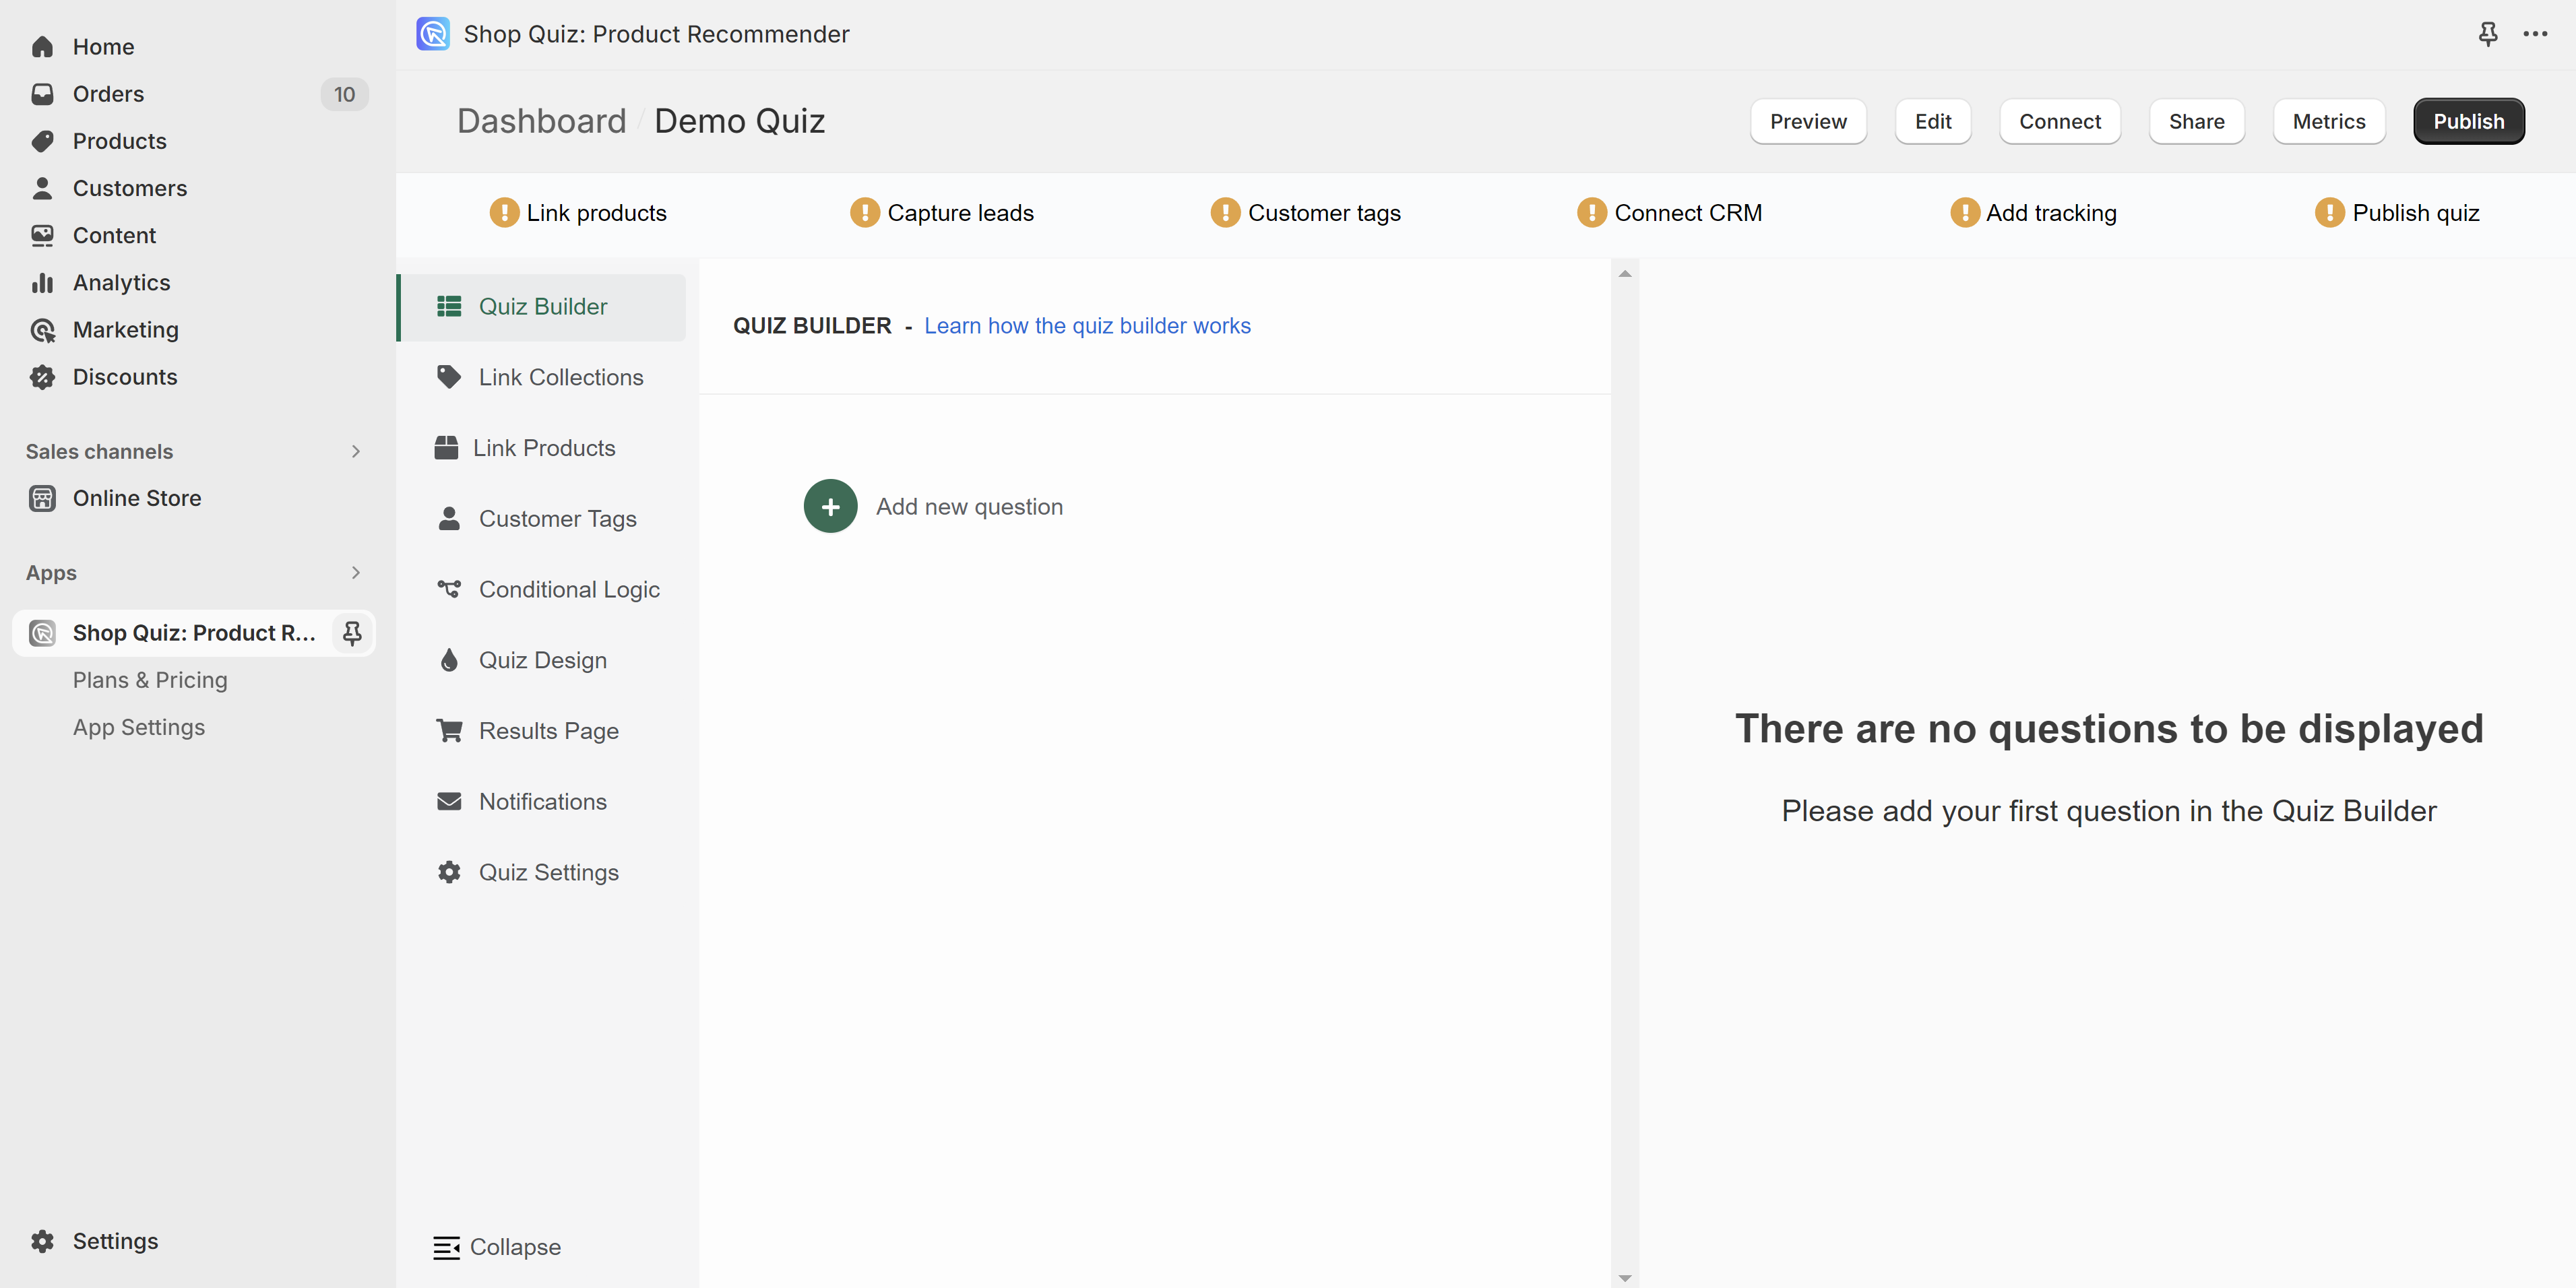
This is where you create your quiz.
- Click the
+sign to add a question, then pick the type you want. - Drag and drop the questions to reorder them.
- Click the wrench icon to open the question settings. There you can make a question optional, or allow multiple answers.
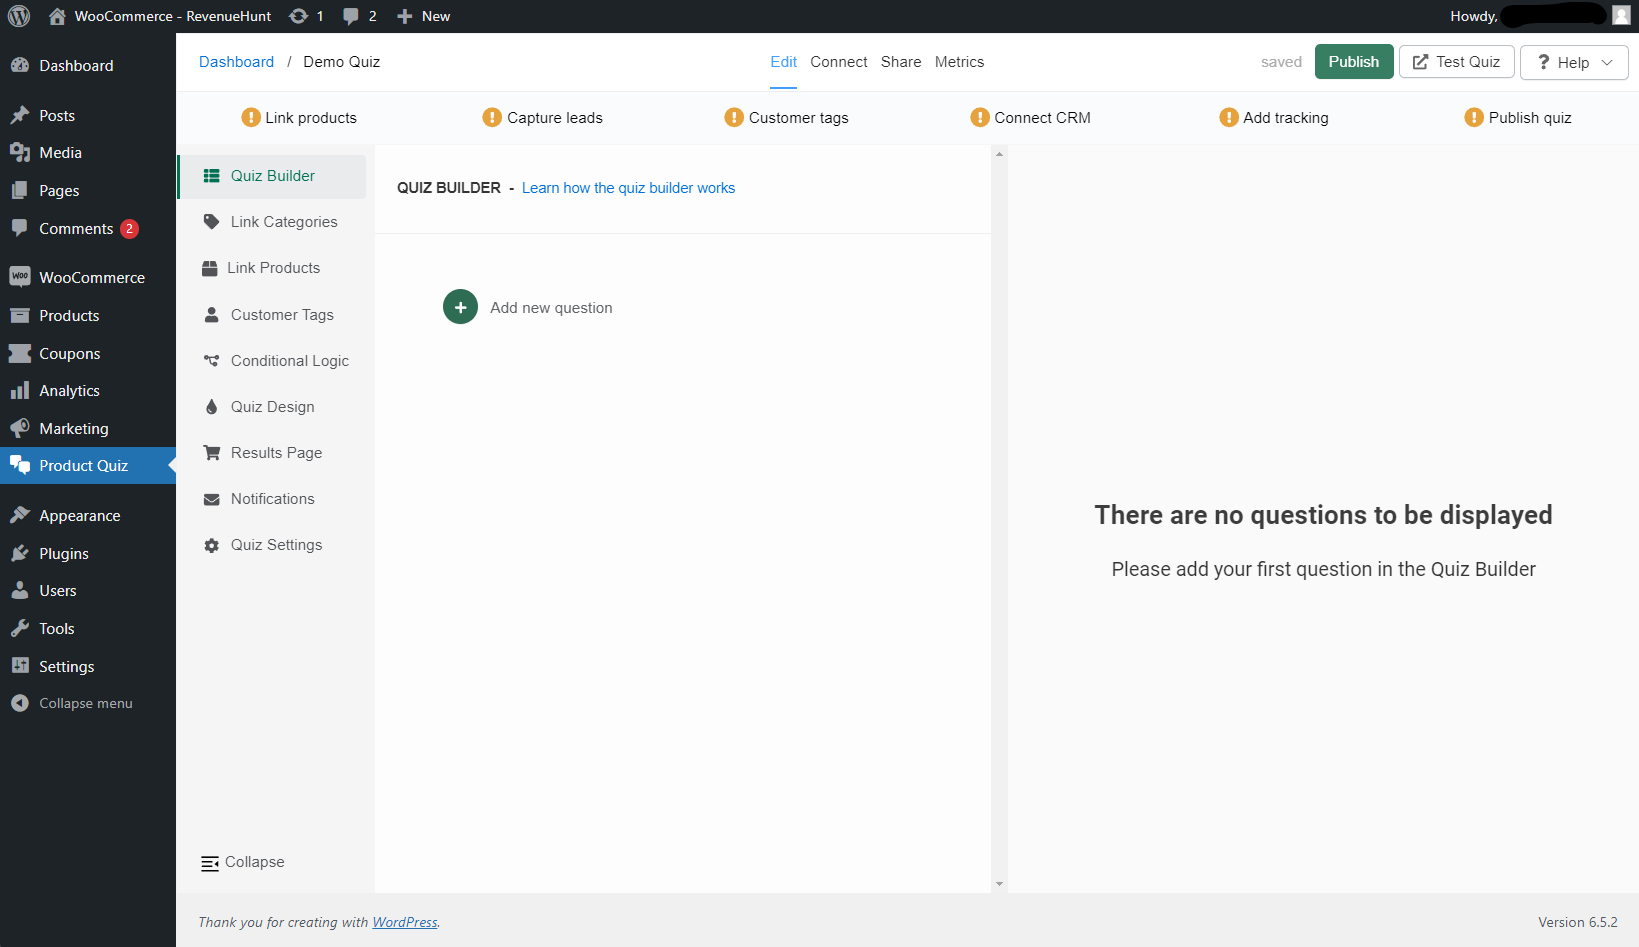
This is where you create your quiz.
- Click the
+sign to add a question, then pick the type you want. - Drag and drop the questions to reorder them.
- Click the wrench icon to open the question settings. There you can make a question optional, or allow multiple answers.
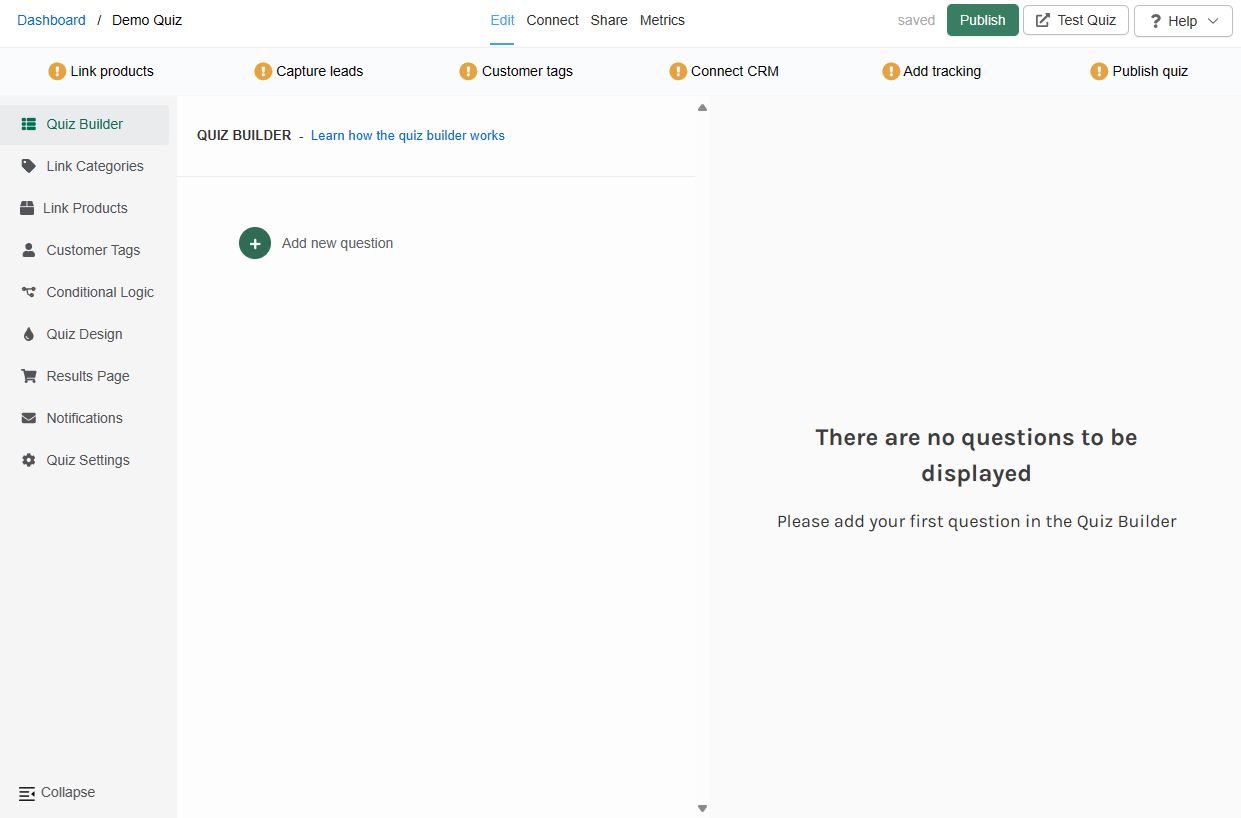
This is where you create your quiz.
- Click the
+sign to add a question, then pick the type you want. - Drag and drop the questions to reorder them.
- Click the wrench icon to open the question settings. There you can make a question optional, or allow multiple answers.
This is where you create your quiz.
- Click the
+sign to add a question, then pick the type you want. - Drag and drop the questions to reorder them.
- Click the wrench icon to open the question settings. There you can make a question optional, or allow multiple answers.
This is where you create your quiz.
- Click the
+sign to add a question, then pick the type you want. - Drag and drop the questions to reorder them.
- Click the wrench icon to open the question settings. There you can make a question optional, or allow multiple answers.
Link products
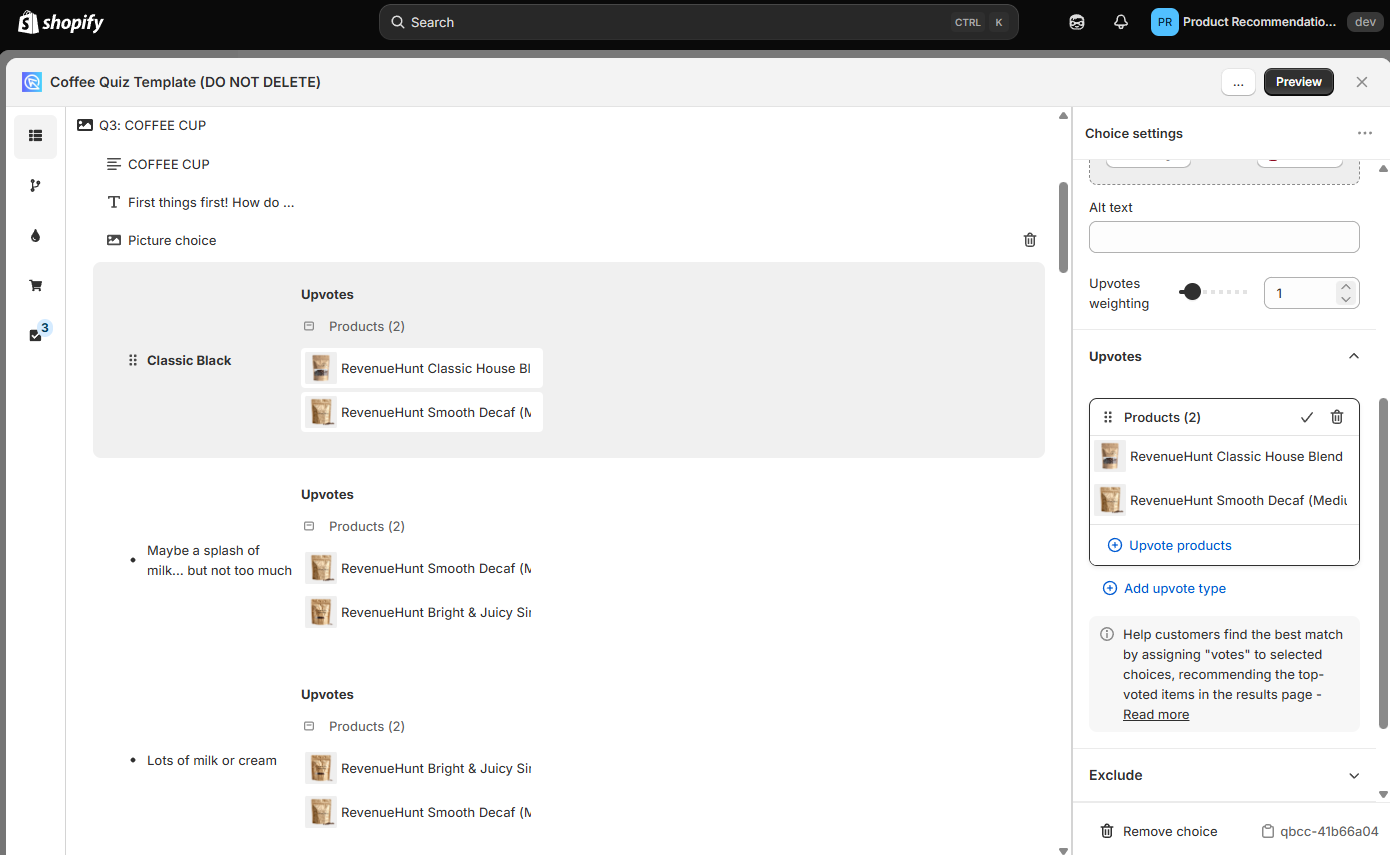
Once you are happy with the quiz design, open the choice settings > Upvote to add products and collections to each question.
The quiz works like an upvoting system:
- Products are linked to each choice.
- Every time a customer selects an answer, those linked products get an upvote.
- At the end of the quiz, the Results page shows the top-upvoted products first, sorted by the number of upvotes.
Alternatively, you can use Display logic to set up conditions for when certain fixed content or products should be visible on the Results page.
Remember to customize your Results page. Add helpful information, choose how many products to recommend, or group items into slots to suggest full bundles or routines.
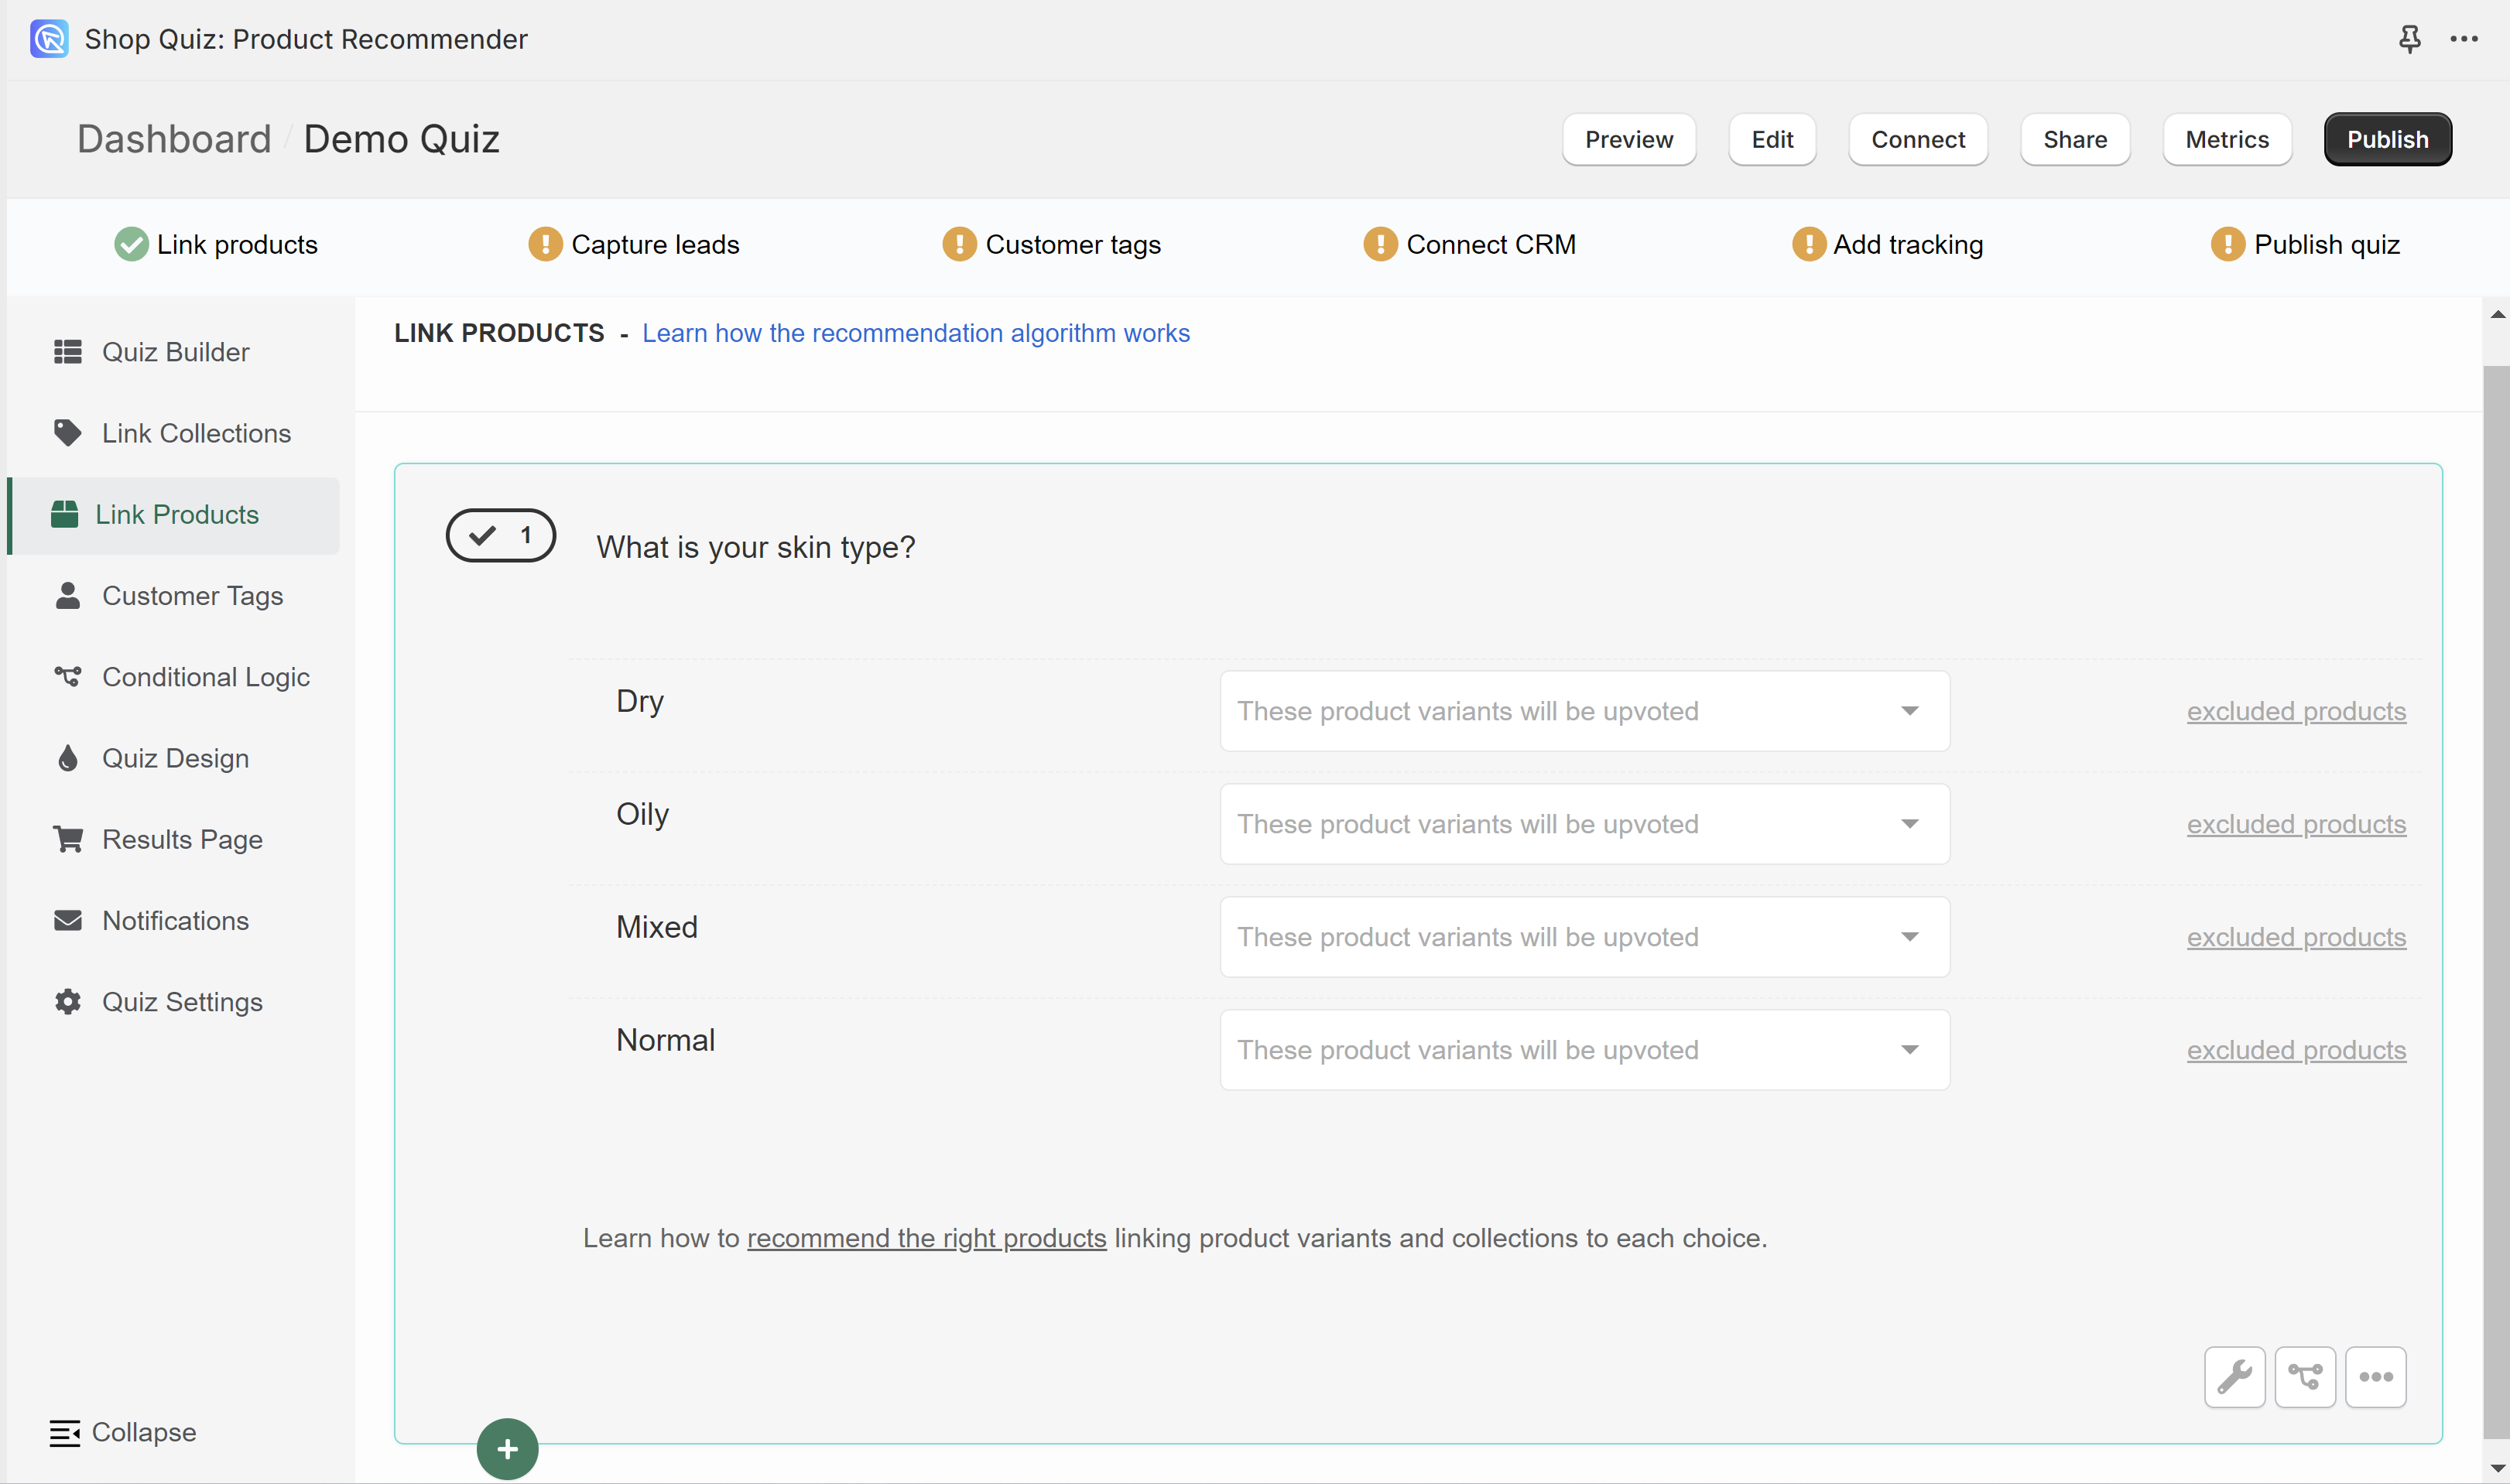
Once you are happy with the design, you can add products and collections to each question.
The quiz works like an upvoting system:
- Products are linked to each choice.
- When a customer picks that choice, all linked products receive one upvote.
- After the customer takes the quiz, the results page will show the products sorted by the number of upvotes.
Make sure to also edit the Results Page.
Here you can write information for the customer and choose how many products are recommended. You can also group products into slots to recommend a whole package.
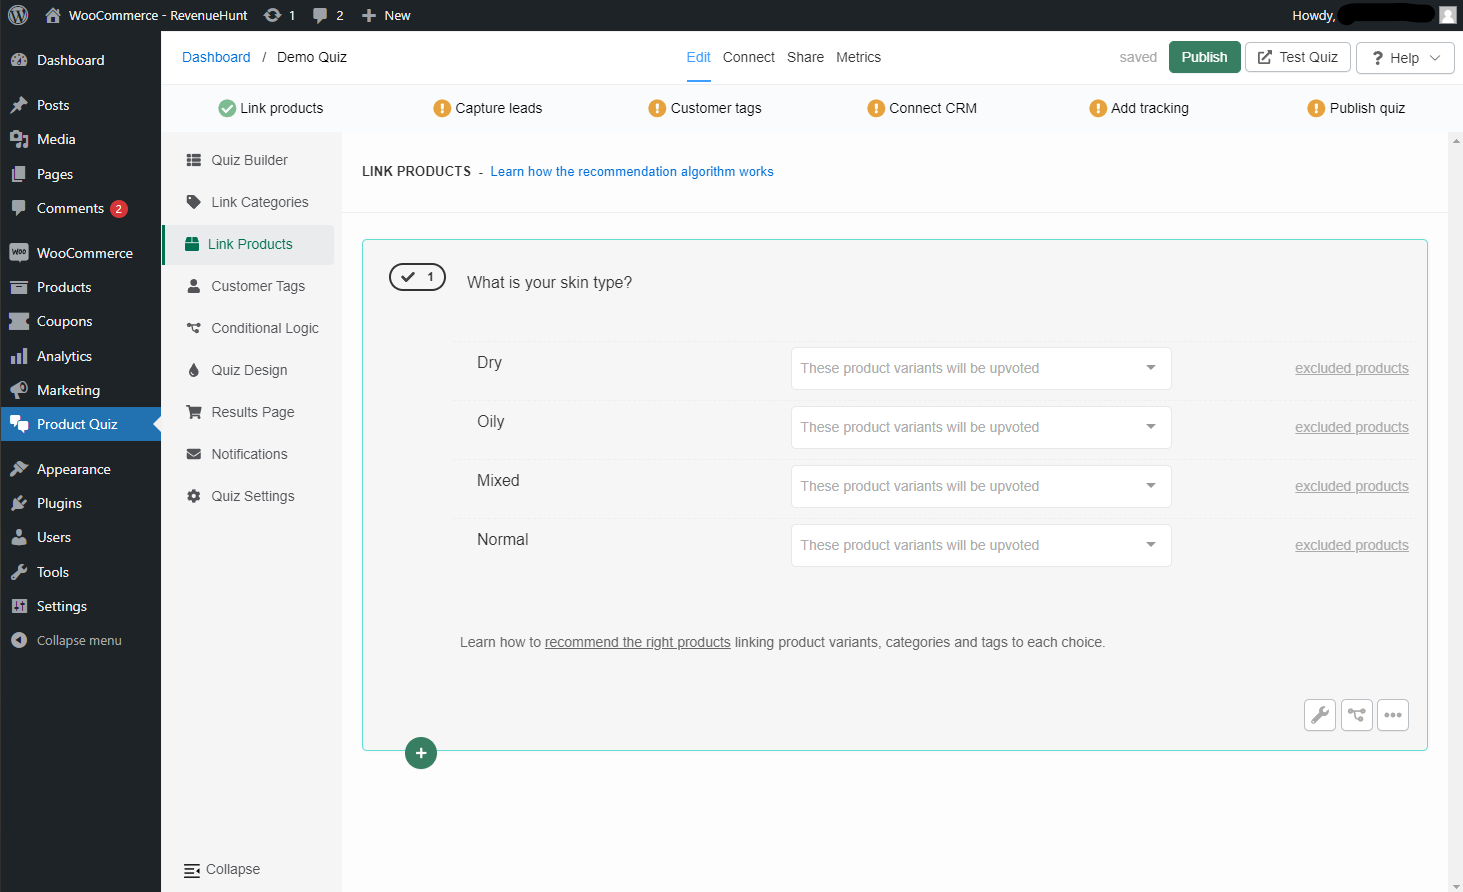
Once you are happy with the design, you can add products and collections to each question.
The quiz works like an upvoting system:
- Products are linked to each choice.
- When a customer picks that choice, all linked products receive one upvote.
- After the customer takes the quiz, the results page will show the products sorted by the number of upvotes.
Make sure to also edit the Results Page.
Here you can write information for the customer and choose how many products are recommended. You can also group products into slots to recommend a whole package.
Once you are happy with the design, you can add products and collections to each question.
The quiz works like an upvoting system:
- Products are linked to each choice.
- When a customer picks that choice, all linked products receive one upvote.
- After the customer takes the quiz, the results page will show the products sorted by the number of upvotes.
Make sure to also edit the Results Page.
Here you can write information for the customer and choose how many products are recommended. You can also group products into slots to recommend a whole package.
Once you are happy with the design, you can add products and collections to each question.
The quiz works like an upvoting system:
- Products are linked to each choice.
- When a customer picks that choice, all linked products receive one upvote.
- After the customer takes the quiz, the results page will show the products sorted by the number of upvotes.
Make sure to also edit the Results Page.
Here you can write information for the customer and choose how many products are recommended. You can also group products into slots to recommend a whole package.
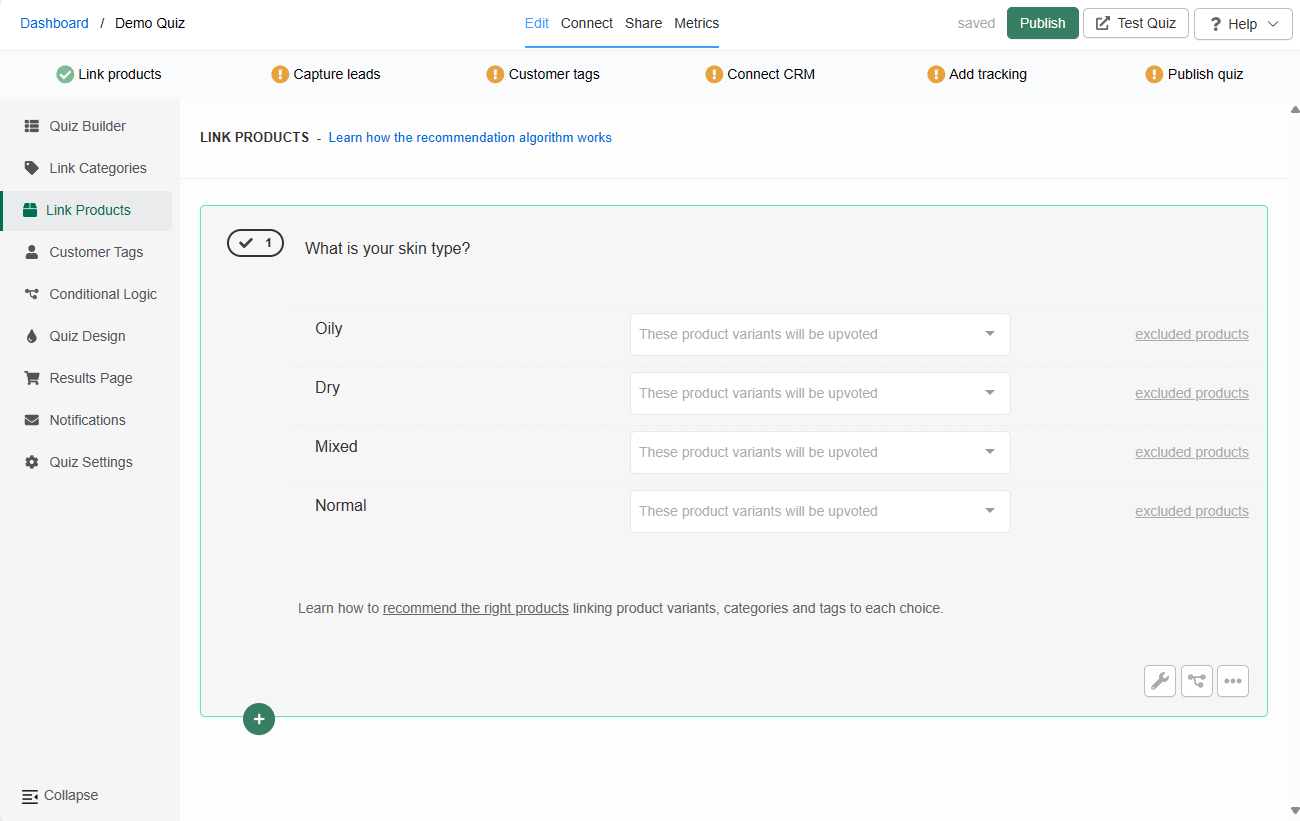
Once you are happy with the design, you can add products and collections to each question.
The quiz works like an upvoting system:
- Products are linked to each choice.
- When a customer picks that choice, all linked products receive one upvote.
- After the customer takes the quiz, the results page will show the products sorted by the number of upvotes.
Make sure to also edit the Results Page.
Here you can write information for the customer and choose how many products are recommended. You can also group products into slots to recommend a whole package.
Quiz design
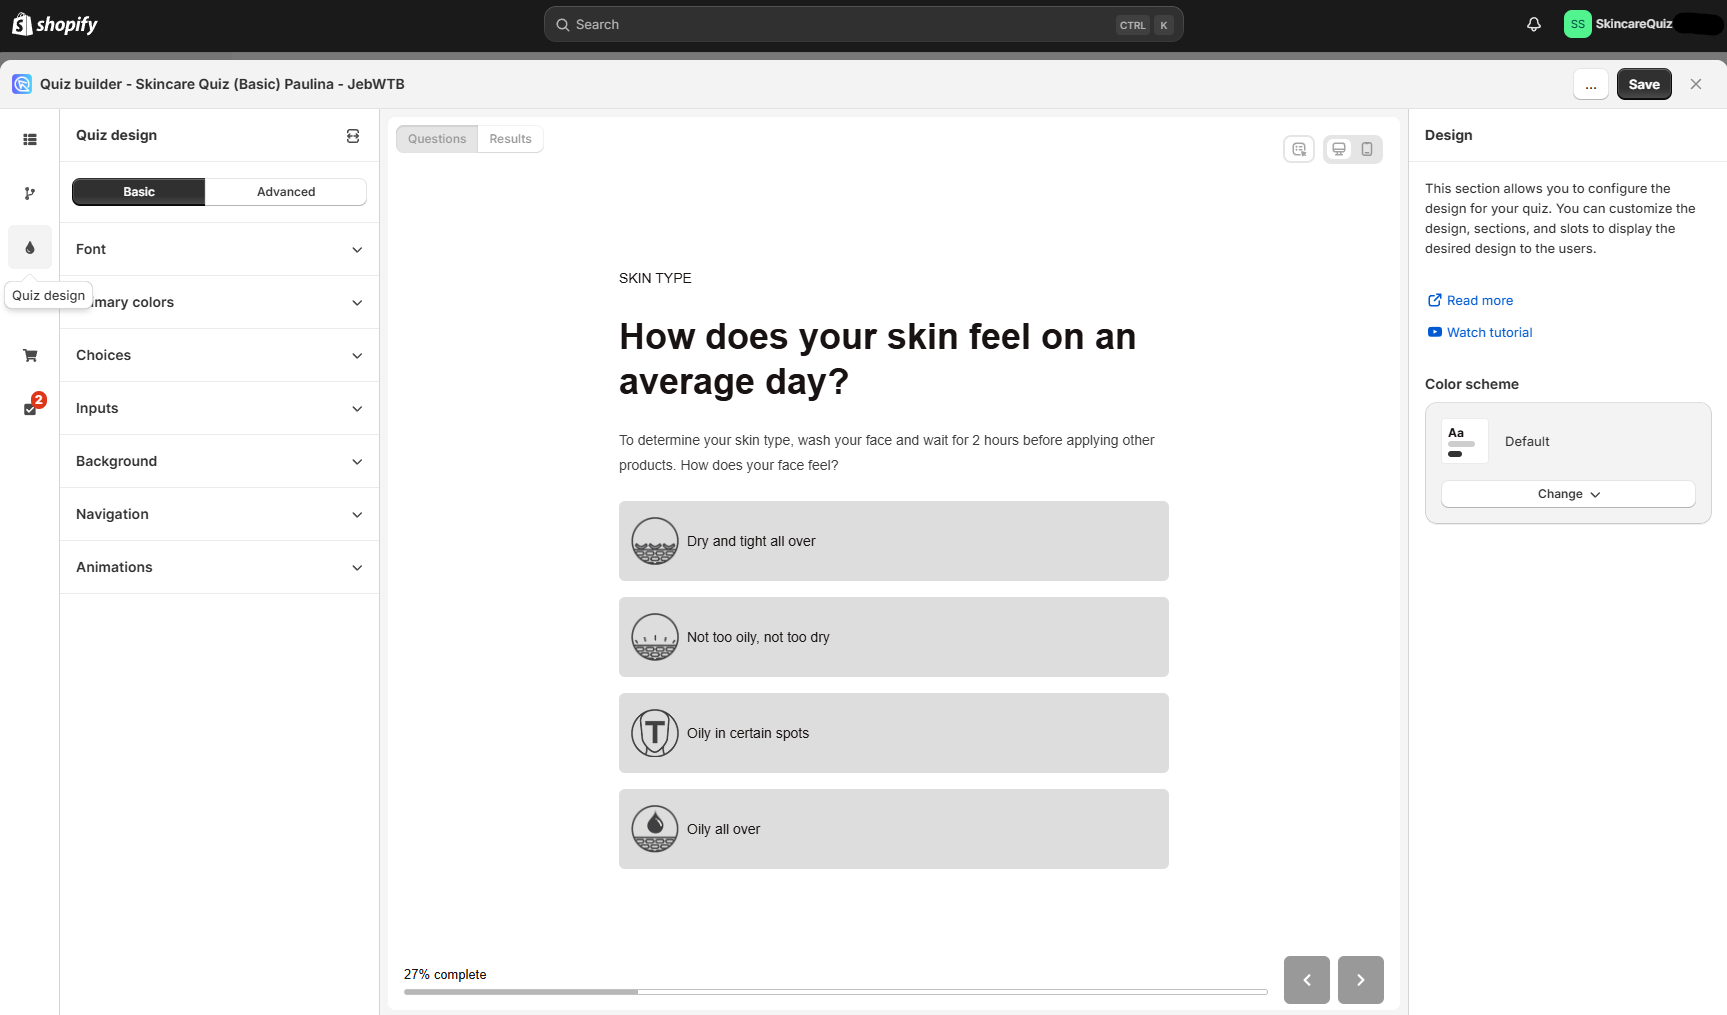
This is where you can customize your quiz design.
- Go to
Design. The Theme Gallery holds ready-made themes, or you can create your own. - Set the fonts, the button colors and the background images.
- Adjust the animations and transitions, or add custom CSS to match your store branding.
- Click
Save.
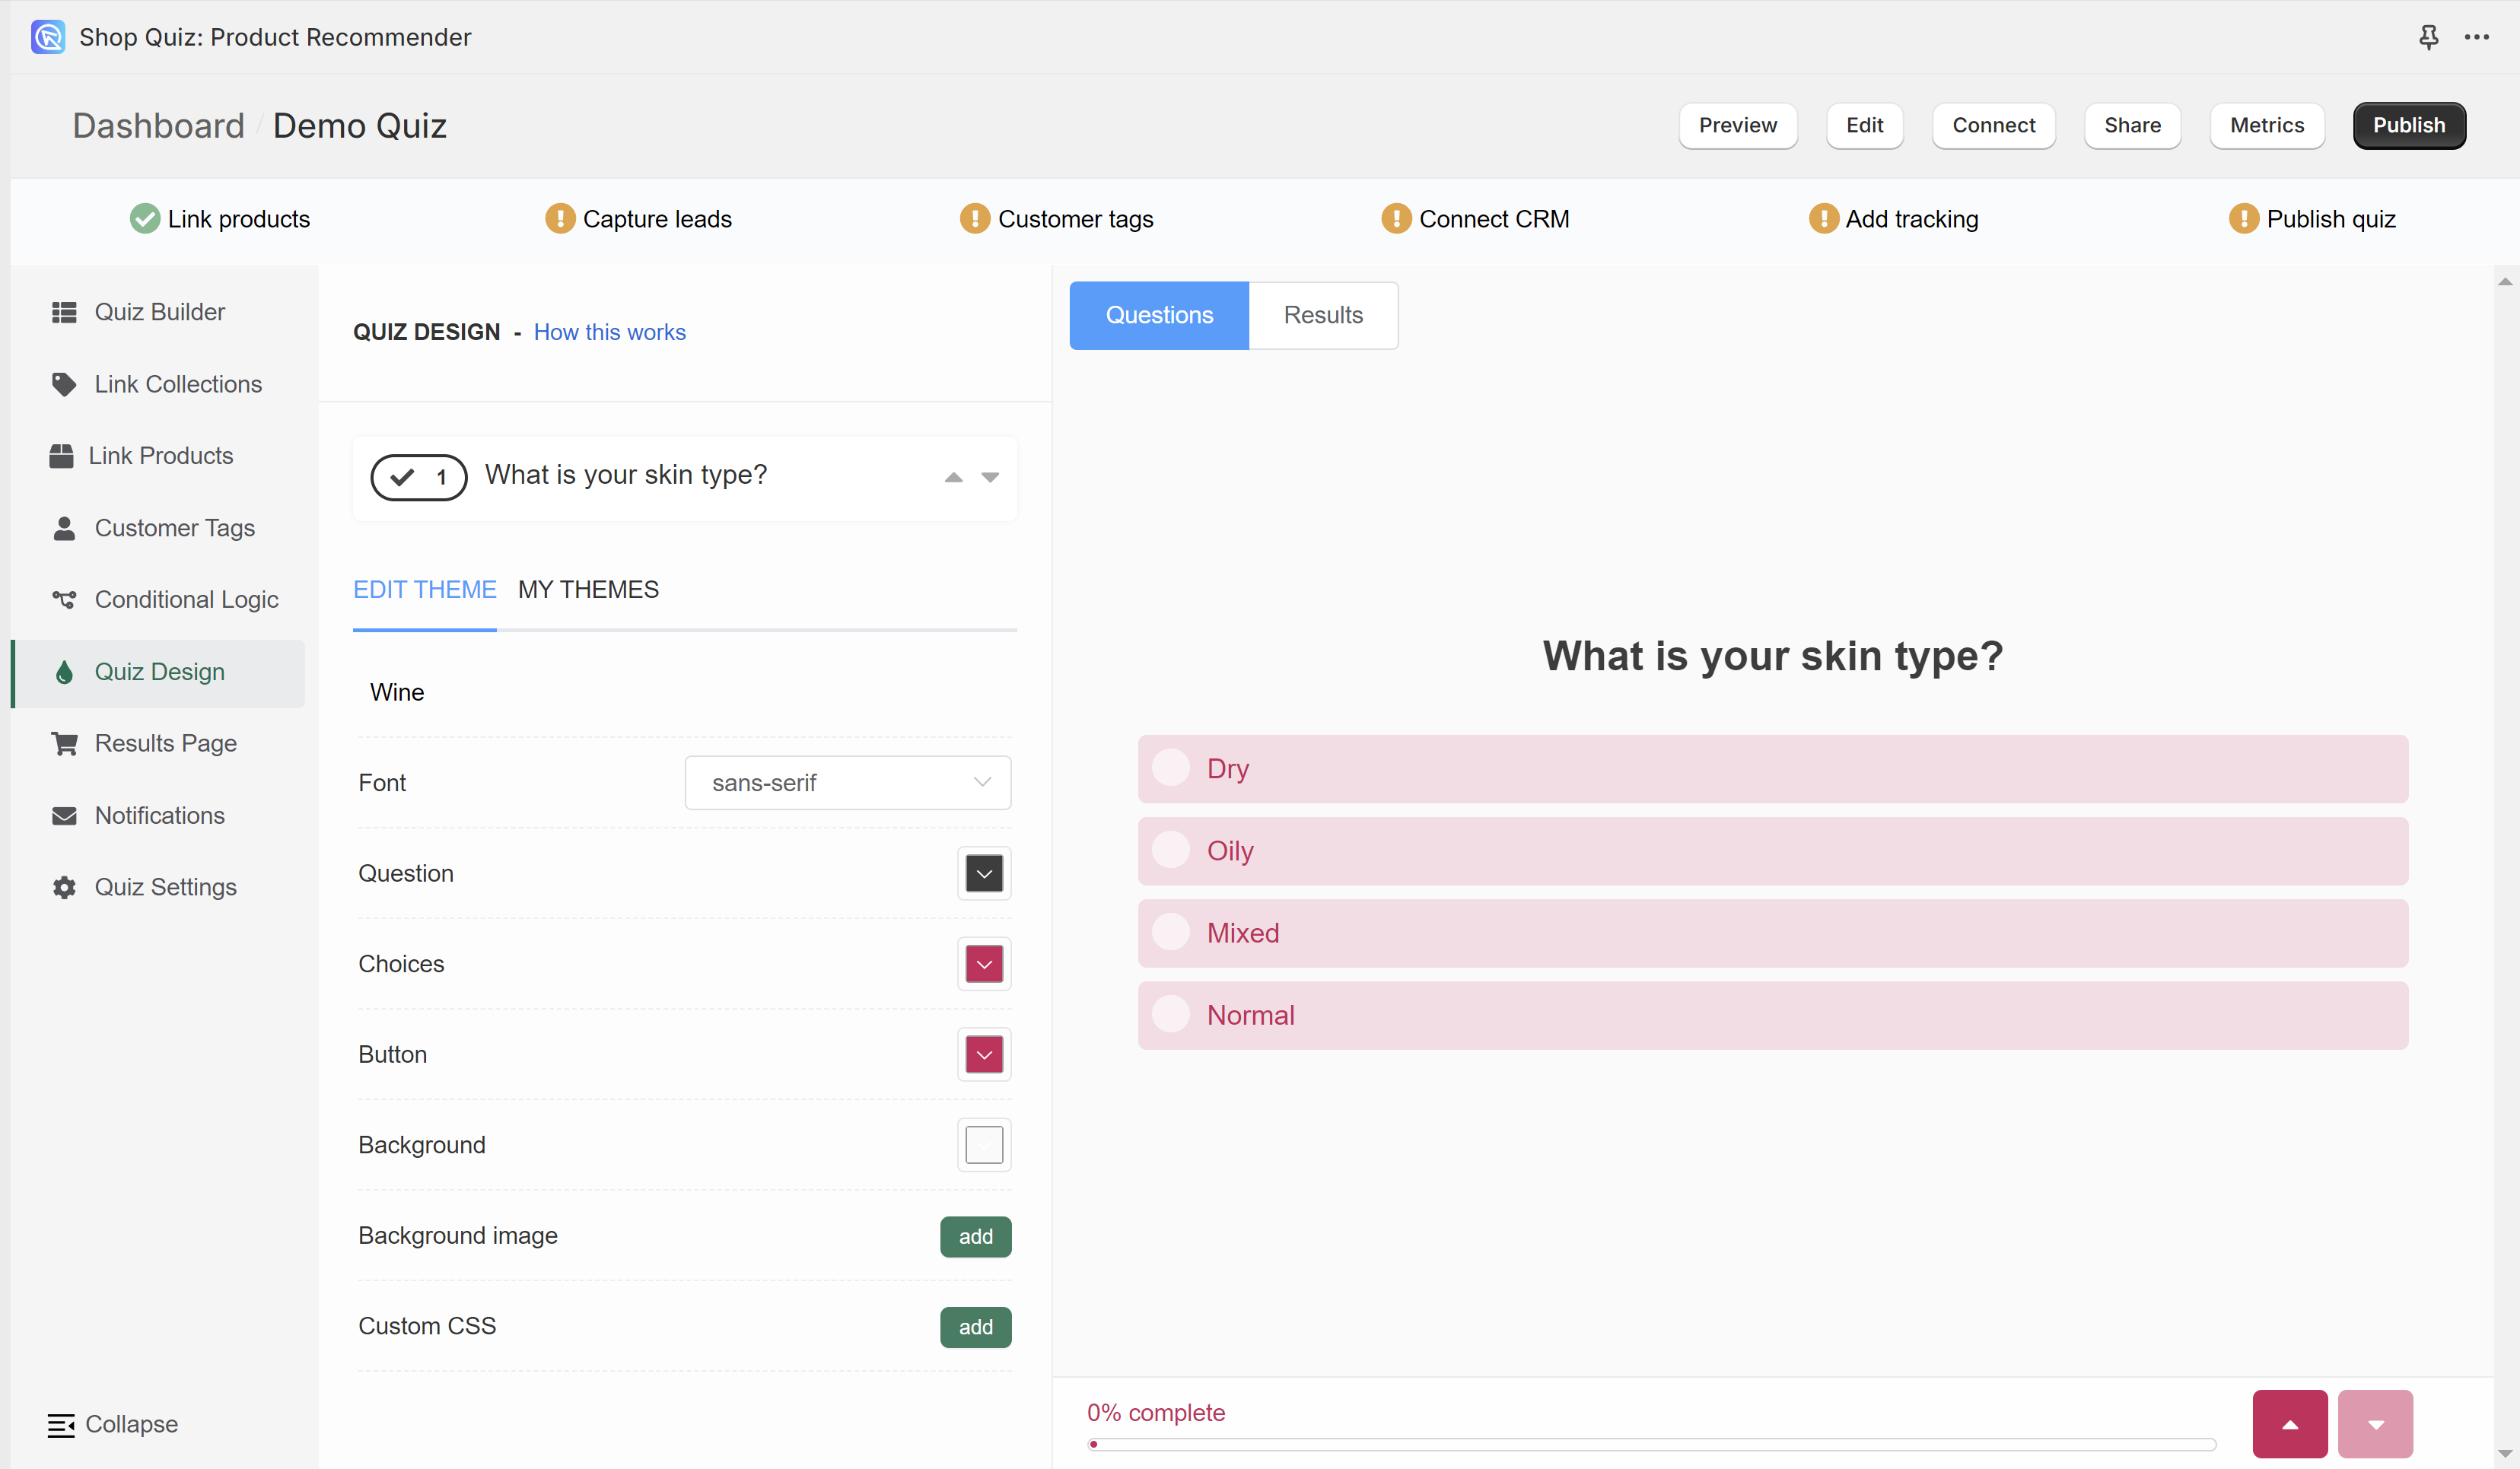
This is where you can customize your quiz design.
- Pick a theme from the theme gallery.
- Or click
Editin the top menu to build your own. - Set the font, the text colors and the background image.
- Add custom CSS to match the quiz to your store.
All the changes you make will be saved automatically.
This is where you can customize your quiz design.
- Pick a theme from the theme gallery.
- Or click
Editin the top menu to build your own. - Set the font, the text colors and the background image.
- Add custom CSS to match the quiz to your store.
All the changes you make will be saved automatically.
This is where you can customize your quiz design.
- Pick a theme from the theme gallery.
- Or click
Editin the top menu to build your own. - Set the font, the text colors and the background image.
- Add custom CSS to match the quiz to your store.
All the changes you make will be saved automatically.
This is where you can customize your quiz design.
- Pick a theme from the theme gallery.
- Or click
Editin the top menu to build your own. - Set the font, the text colors and the background image.
- Add custom CSS to match the quiz to your store.
All the changes you make will be saved automatically.
This is where you can customize your quiz design.
- Pick a theme from the theme gallery.
- Or click
Editin the top menu to build your own. - Set the font, the text colors and the background image.
- Add custom CSS to match the quiz to your store.
All the changes you make will be saved automatically.
Save & preview
On the left you also see the Success checklist. It helps you track your progress and make sure everything is set up correctly.
- Click the
Savebutton to save your changes. - Click
Previewto test the quiz.
- Click the top-right
Publishbutton to update the preview and the live quiz. - Click
Previewto test the quiz.
- Click the top-right
Publishbutton to update the preview and the live quiz. - Click
Previewto test the quiz.
- Click the top-right
Publishbutton to update the preview and the live quiz. - Click
Previewto test the quiz.
- Click the top-right
Publishbutton to update the preview and the live quiz. - Click
Previewto test the quiz.
- Click the top-right
Publishbutton to update the preview and the live quiz. - Click
Previewto test the quiz.
Share / publish
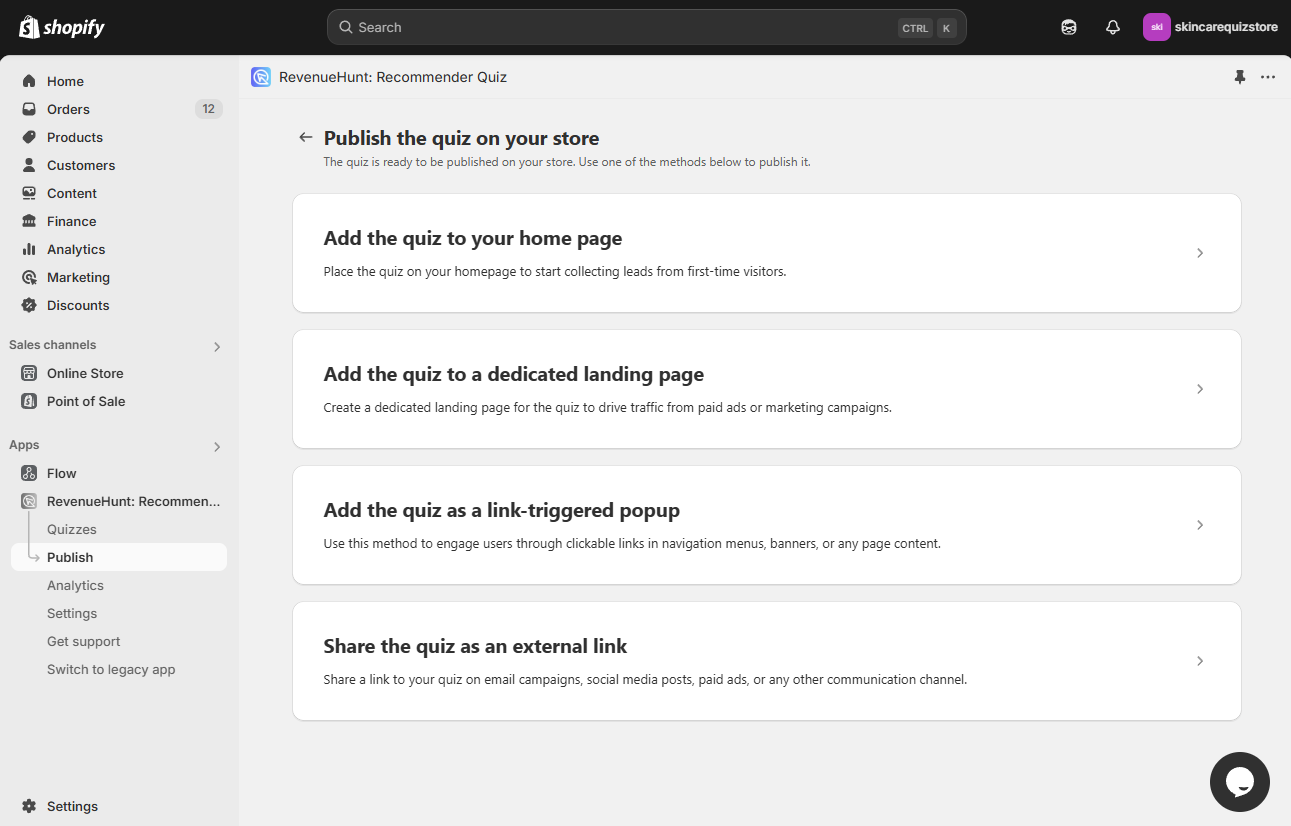
Now you can publish the quiz on your website.
When you are ready to go live, go to the Publish section. Your quiz dashboard has instructions for embedding the quiz on your website. You can use a menu link, a Take the Quiz button, an inline quiz, or an automatic popup.
- Click on the publishing method cards to see instructions and extra settings.
The choice is yours.
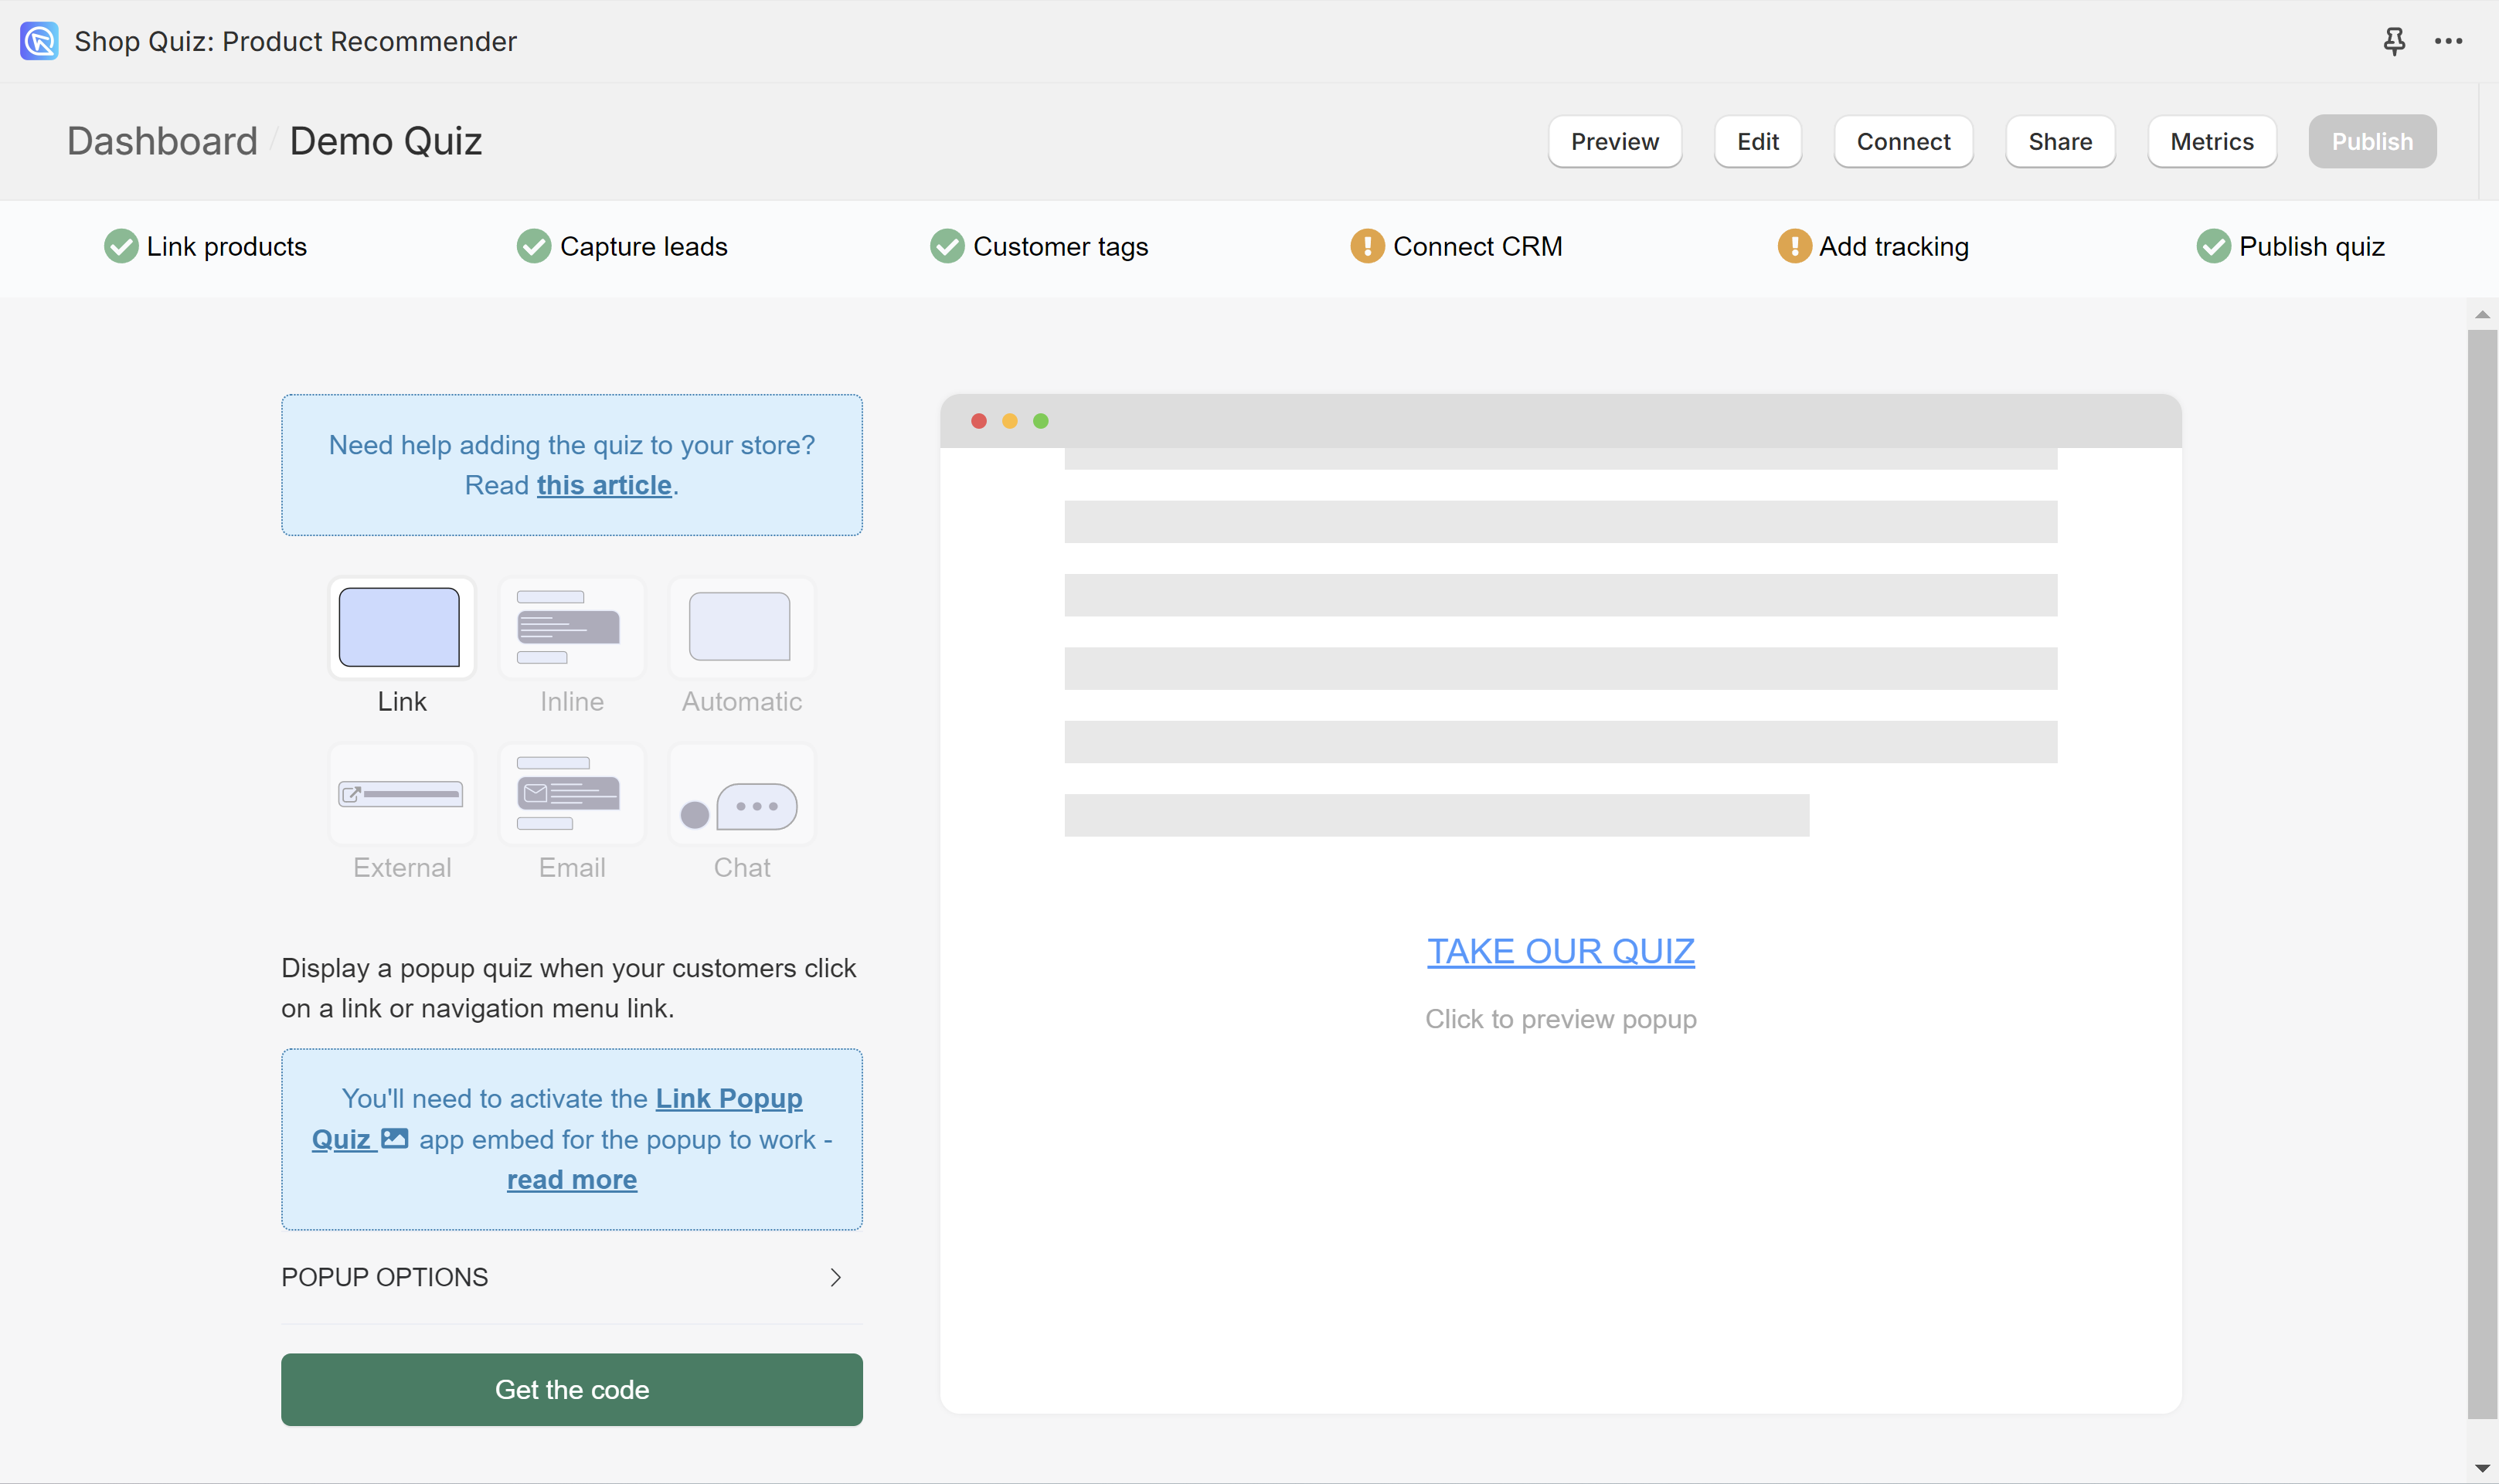
Now you can publish the quiz on your website.
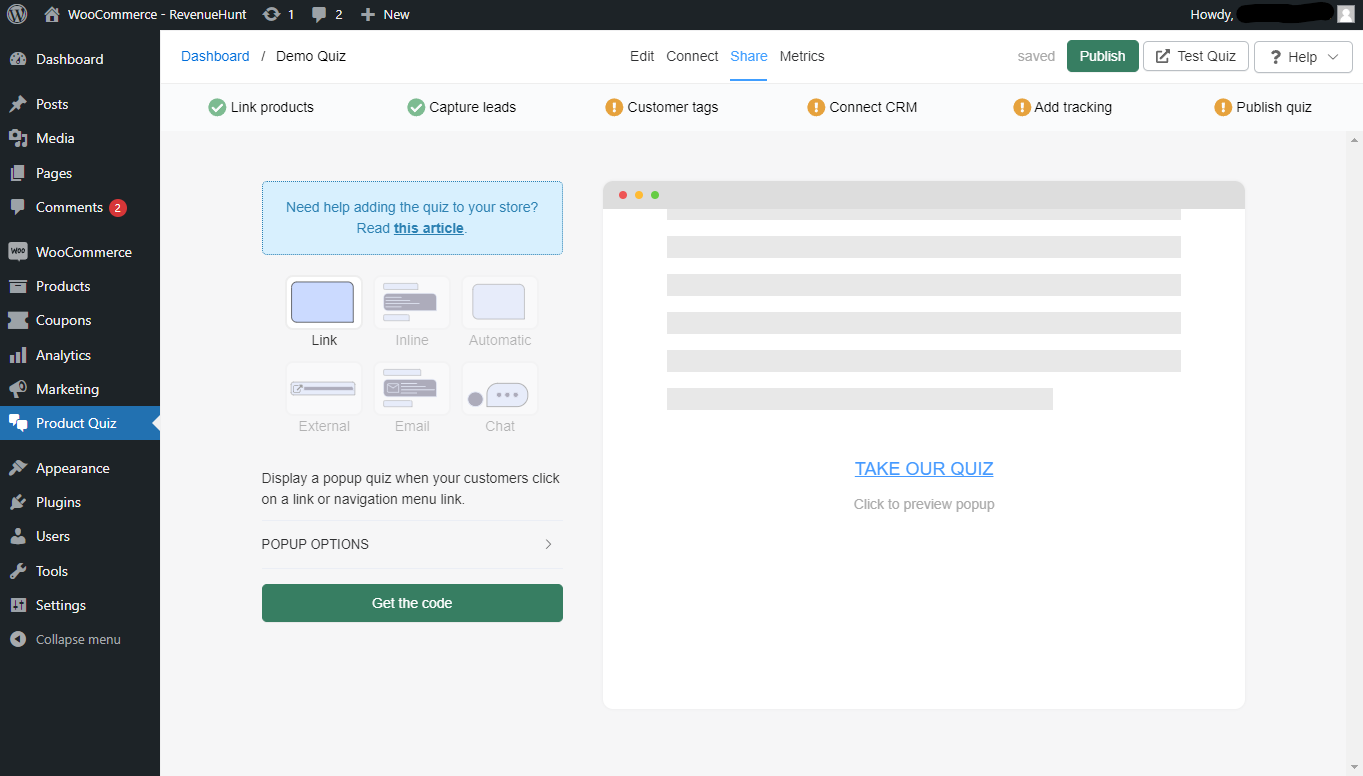
In the Share tab of the Quiz Builder, you can choose how to publish the quiz on your website or how to share it with your customers.
- Click on the option tiles to see instructions and extra settings.
- You can embed a link to the quiz in your website's menu, or add a take the quiz button. You can also place the quiz inline with your page content, or make it an automatic popup.
The choice is yours.
Now you can publish the quiz on your website.
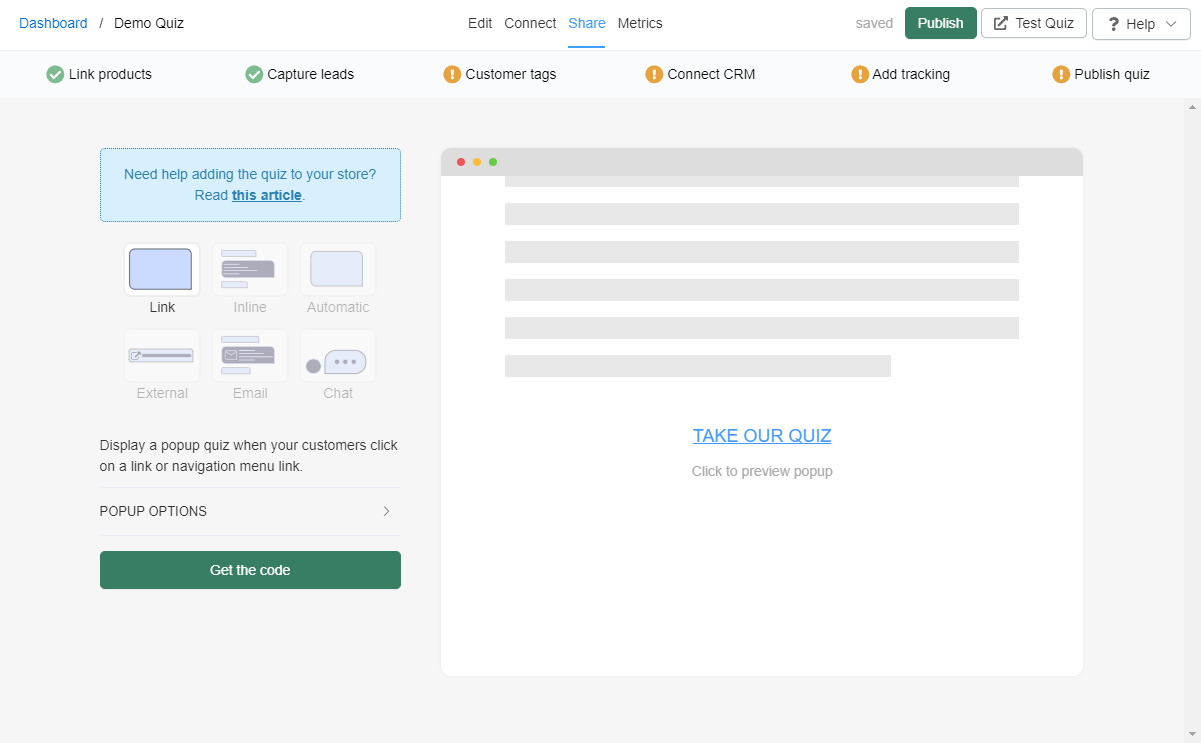
In the Share tab of the Quiz Builder, you can choose how to publish the quiz on your website or how to share it with your customers.
- Click on the option tiles to see instructions and extra settings.
- You can embed a link to the quiz in your website's menu, or add a take the quiz button. You can also place the quiz inline with your page content, or make it an automatic popup.
The choice is yours.
Now you can publish the quiz on your website.
In the Share tab of the Quiz Builder, you can choose how to publish the quiz on your website or how to share it with your customers.
- Click on the option tiles to see instructions and extra settings.
- You can embed a link to the quiz in your website's menu, or add a take the quiz button. You can also place the quiz inline with your page content, or make it an automatic popup.
The choice is yours.
Now you can publish the quiz on your website.
In the Share tab of the Quiz Builder, you can choose how to publish the quiz on your website or how to share it with your customers.
- Click on the option tiles to see instructions and extra settings.
- You can embed a link to the quiz in your website's menu, or add a take the quiz button. You can also place the quiz inline with your page content, or make it an automatic popup.
The choice is yours.
Now you can publish the quiz on your website.
In the Share tab of the Quiz Builder, you can choose how to publish the quiz on your website or how to share it with your customers.
- Click on the option tiles to see instructions and extra settings.
- You can embed a link to the quiz in your website's menu, or add a take the quiz button. You can also place the quiz inline with your page content, or make it an automatic popup.
The choice is yours.
App settings
In App settings you can choose a default quiz for each Shopify market and language you have set up in your store. Every customer then gets a personalized experience.
App settings holds the settings that apply to the whole account rather than to one quiz. Set your contact email and notifications under General, and keep your product data current under Catalogue. Under SMTP you can send the quiz emails from your own address.
App settings holds the settings that apply to the whole account rather than to one quiz. Set your contact email and notifications under General, and keep your product data current under Catalogue. Under SMTP you can send the quiz emails from your own address.
App settings holds the settings that apply to the whole account rather than to one quiz. Set your contact email and notifications under General, and keep your product data current under Catalogue. Under SMTP you can send the quiz emails from your own address.
App settings holds the settings that apply to the whole account rather than to one quiz. Set your contact email and notifications under General, and keep your product data current under Catalogue. Under SMTP you can send the quiz emails from your own address.
App settings holds the settings that apply to the whole account rather than to one quiz. Set your contact email and notifications under General, and keep your product data current under Catalogue. Under SMTP you can send the quiz emails from your own address.
Connect / integrations
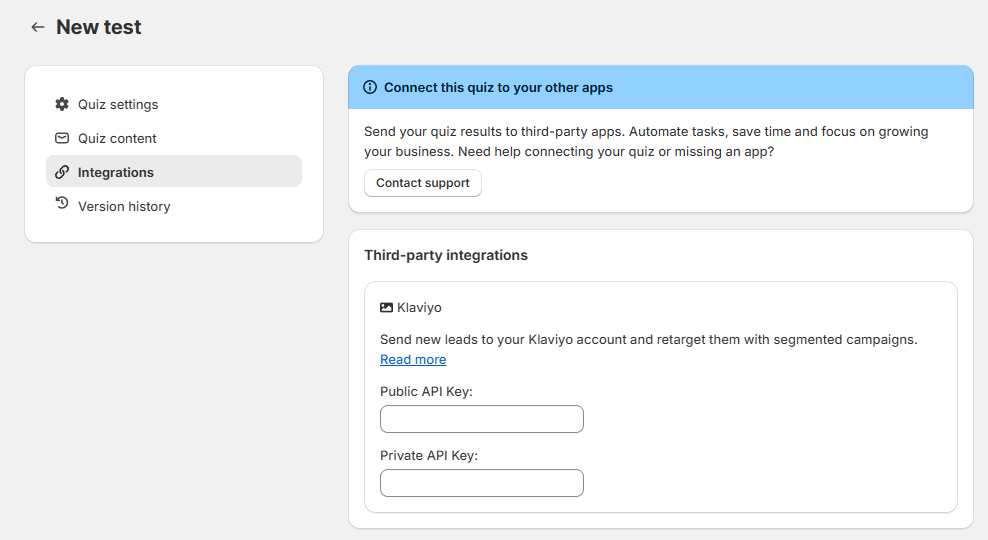
To do more with your quiz, connect the RevenueHunt app to other tools.
- Click on the
Integrationstab to see all available integrations. - To set this up, select a platform like Klaviyo, Zapier, or Meta Pixel and click
connect.
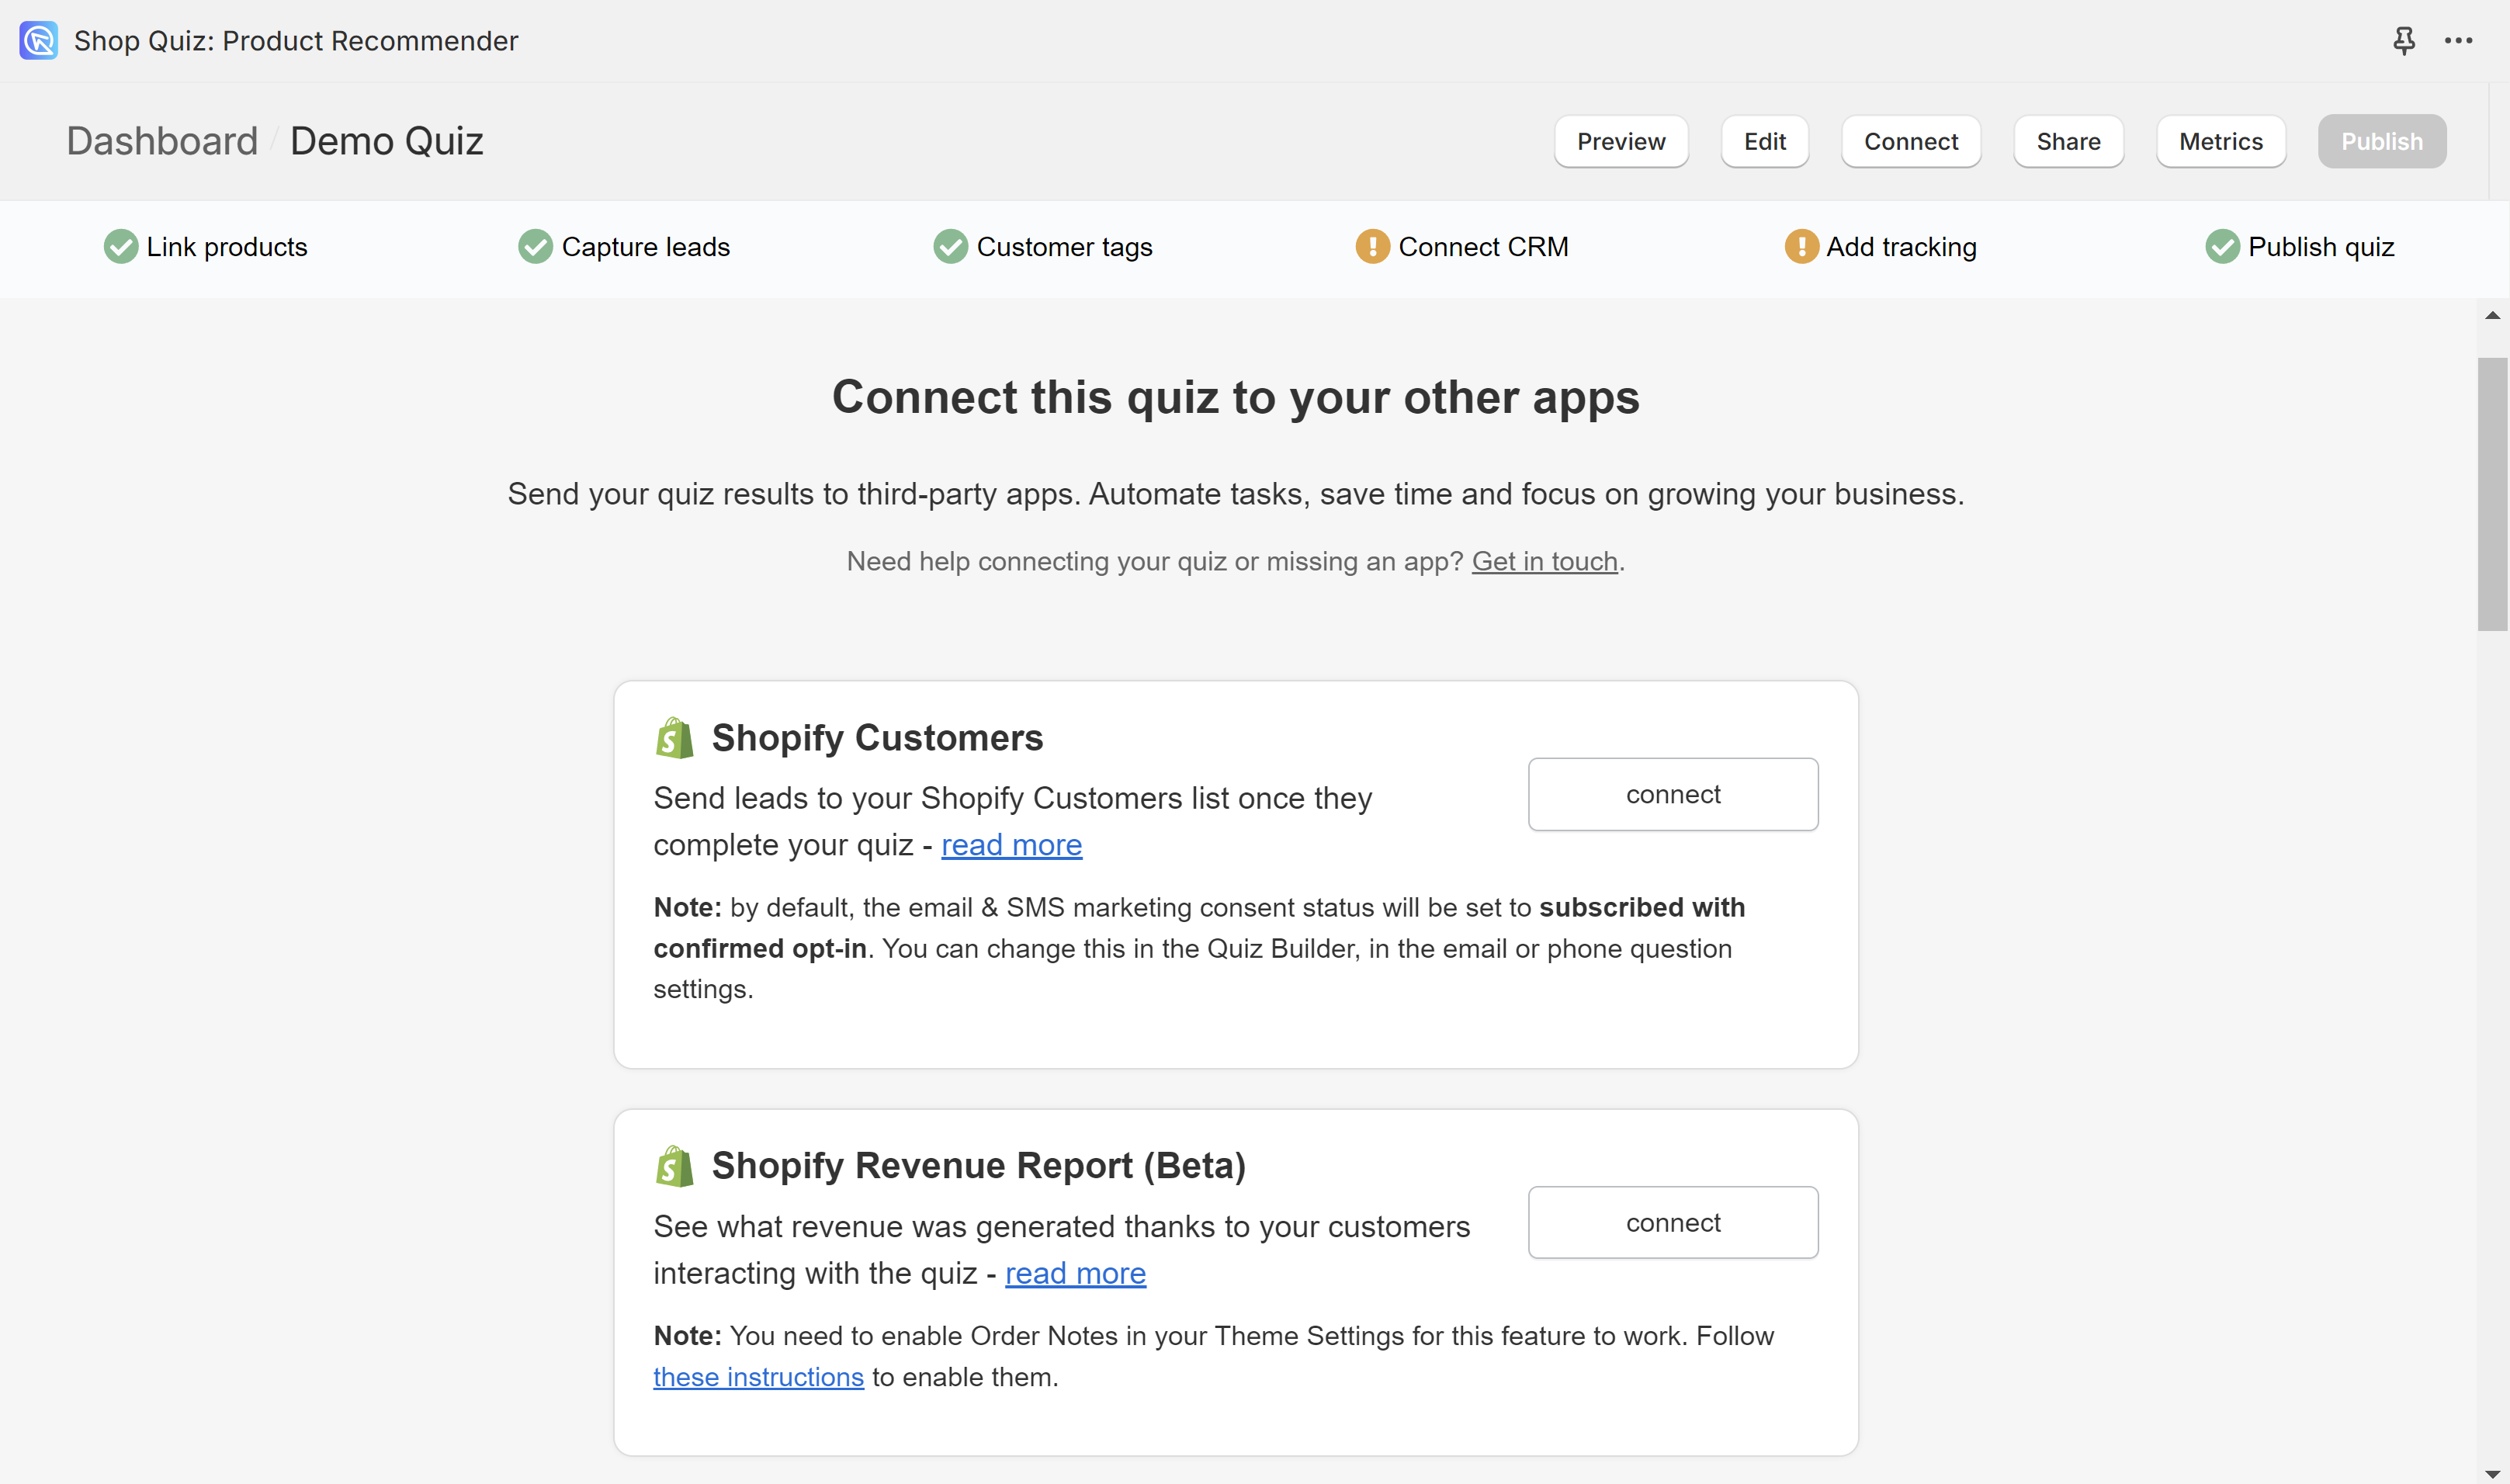
To do more with your quiz, connect the RevenueHunt app to other tools.
- The
Connectsection lists every integration. - To set this up, select a platform and click
connect.
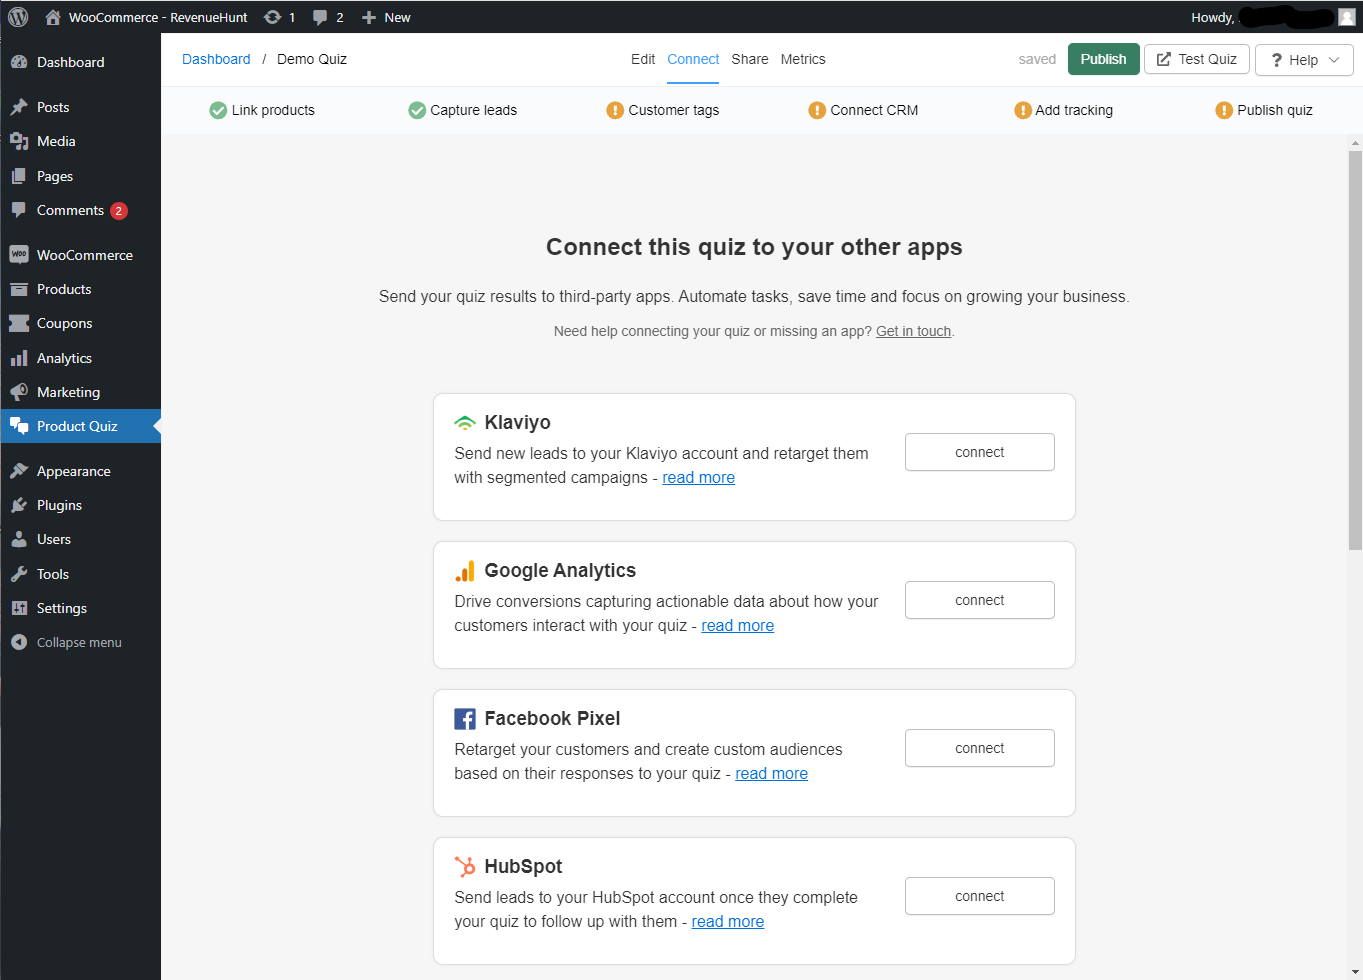
To do more with your quiz, connect the RevenueHunt app to other tools.
- The
Connectsection lists every integration. - To set this up, select a platform and click
connect.
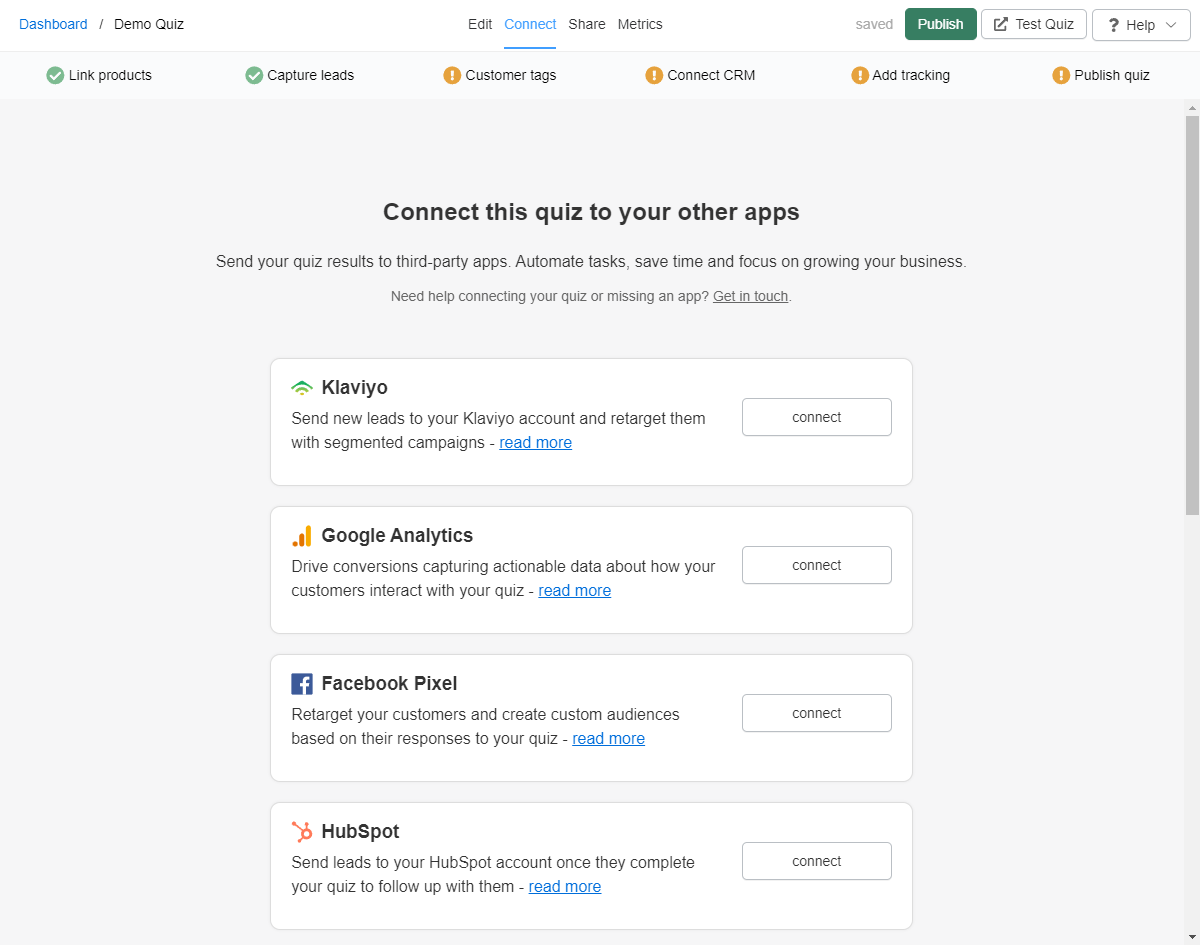
To do more with your quiz, connect the RevenueHunt app to other tools.
- The
Connectsection lists every integration. - To set this up, select a platform and click
connect.
To do more with your quiz, connect the RevenueHunt app to other tools.
- The
Connectsection lists every integration. - To set this up, select a platform and click
connect.
To do more with your quiz, connect the RevenueHunt app to other tools.
- The
Connectsection lists every integration. - To set this up, select a platform and click
connect.
Metrics / analytics
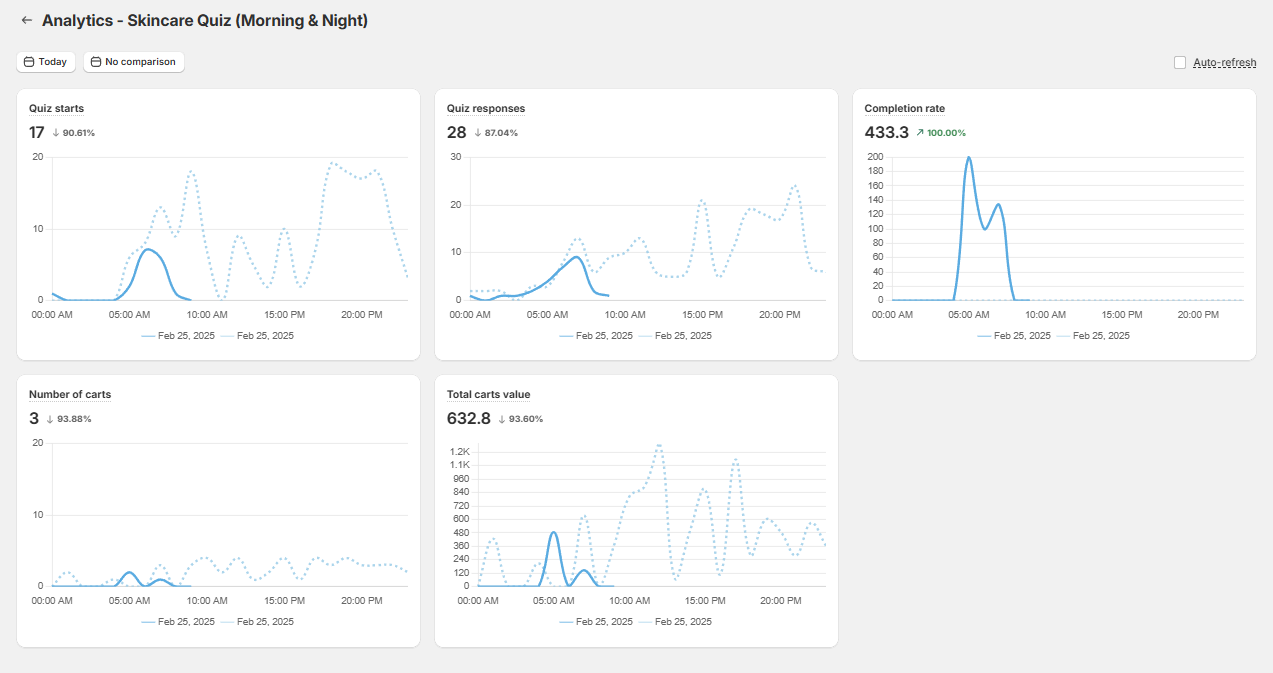
The Metrics panel is where you analyze quiz responses.
- Click on the
Analyticstab to see an overview of your results. It covers how many people viewed the quiz, how many started it, and how many responses you received. - The
Responsestab lets you look at individual customers and see how they answered each question. - You can download all responses to a CSV file by clicking on the export button.
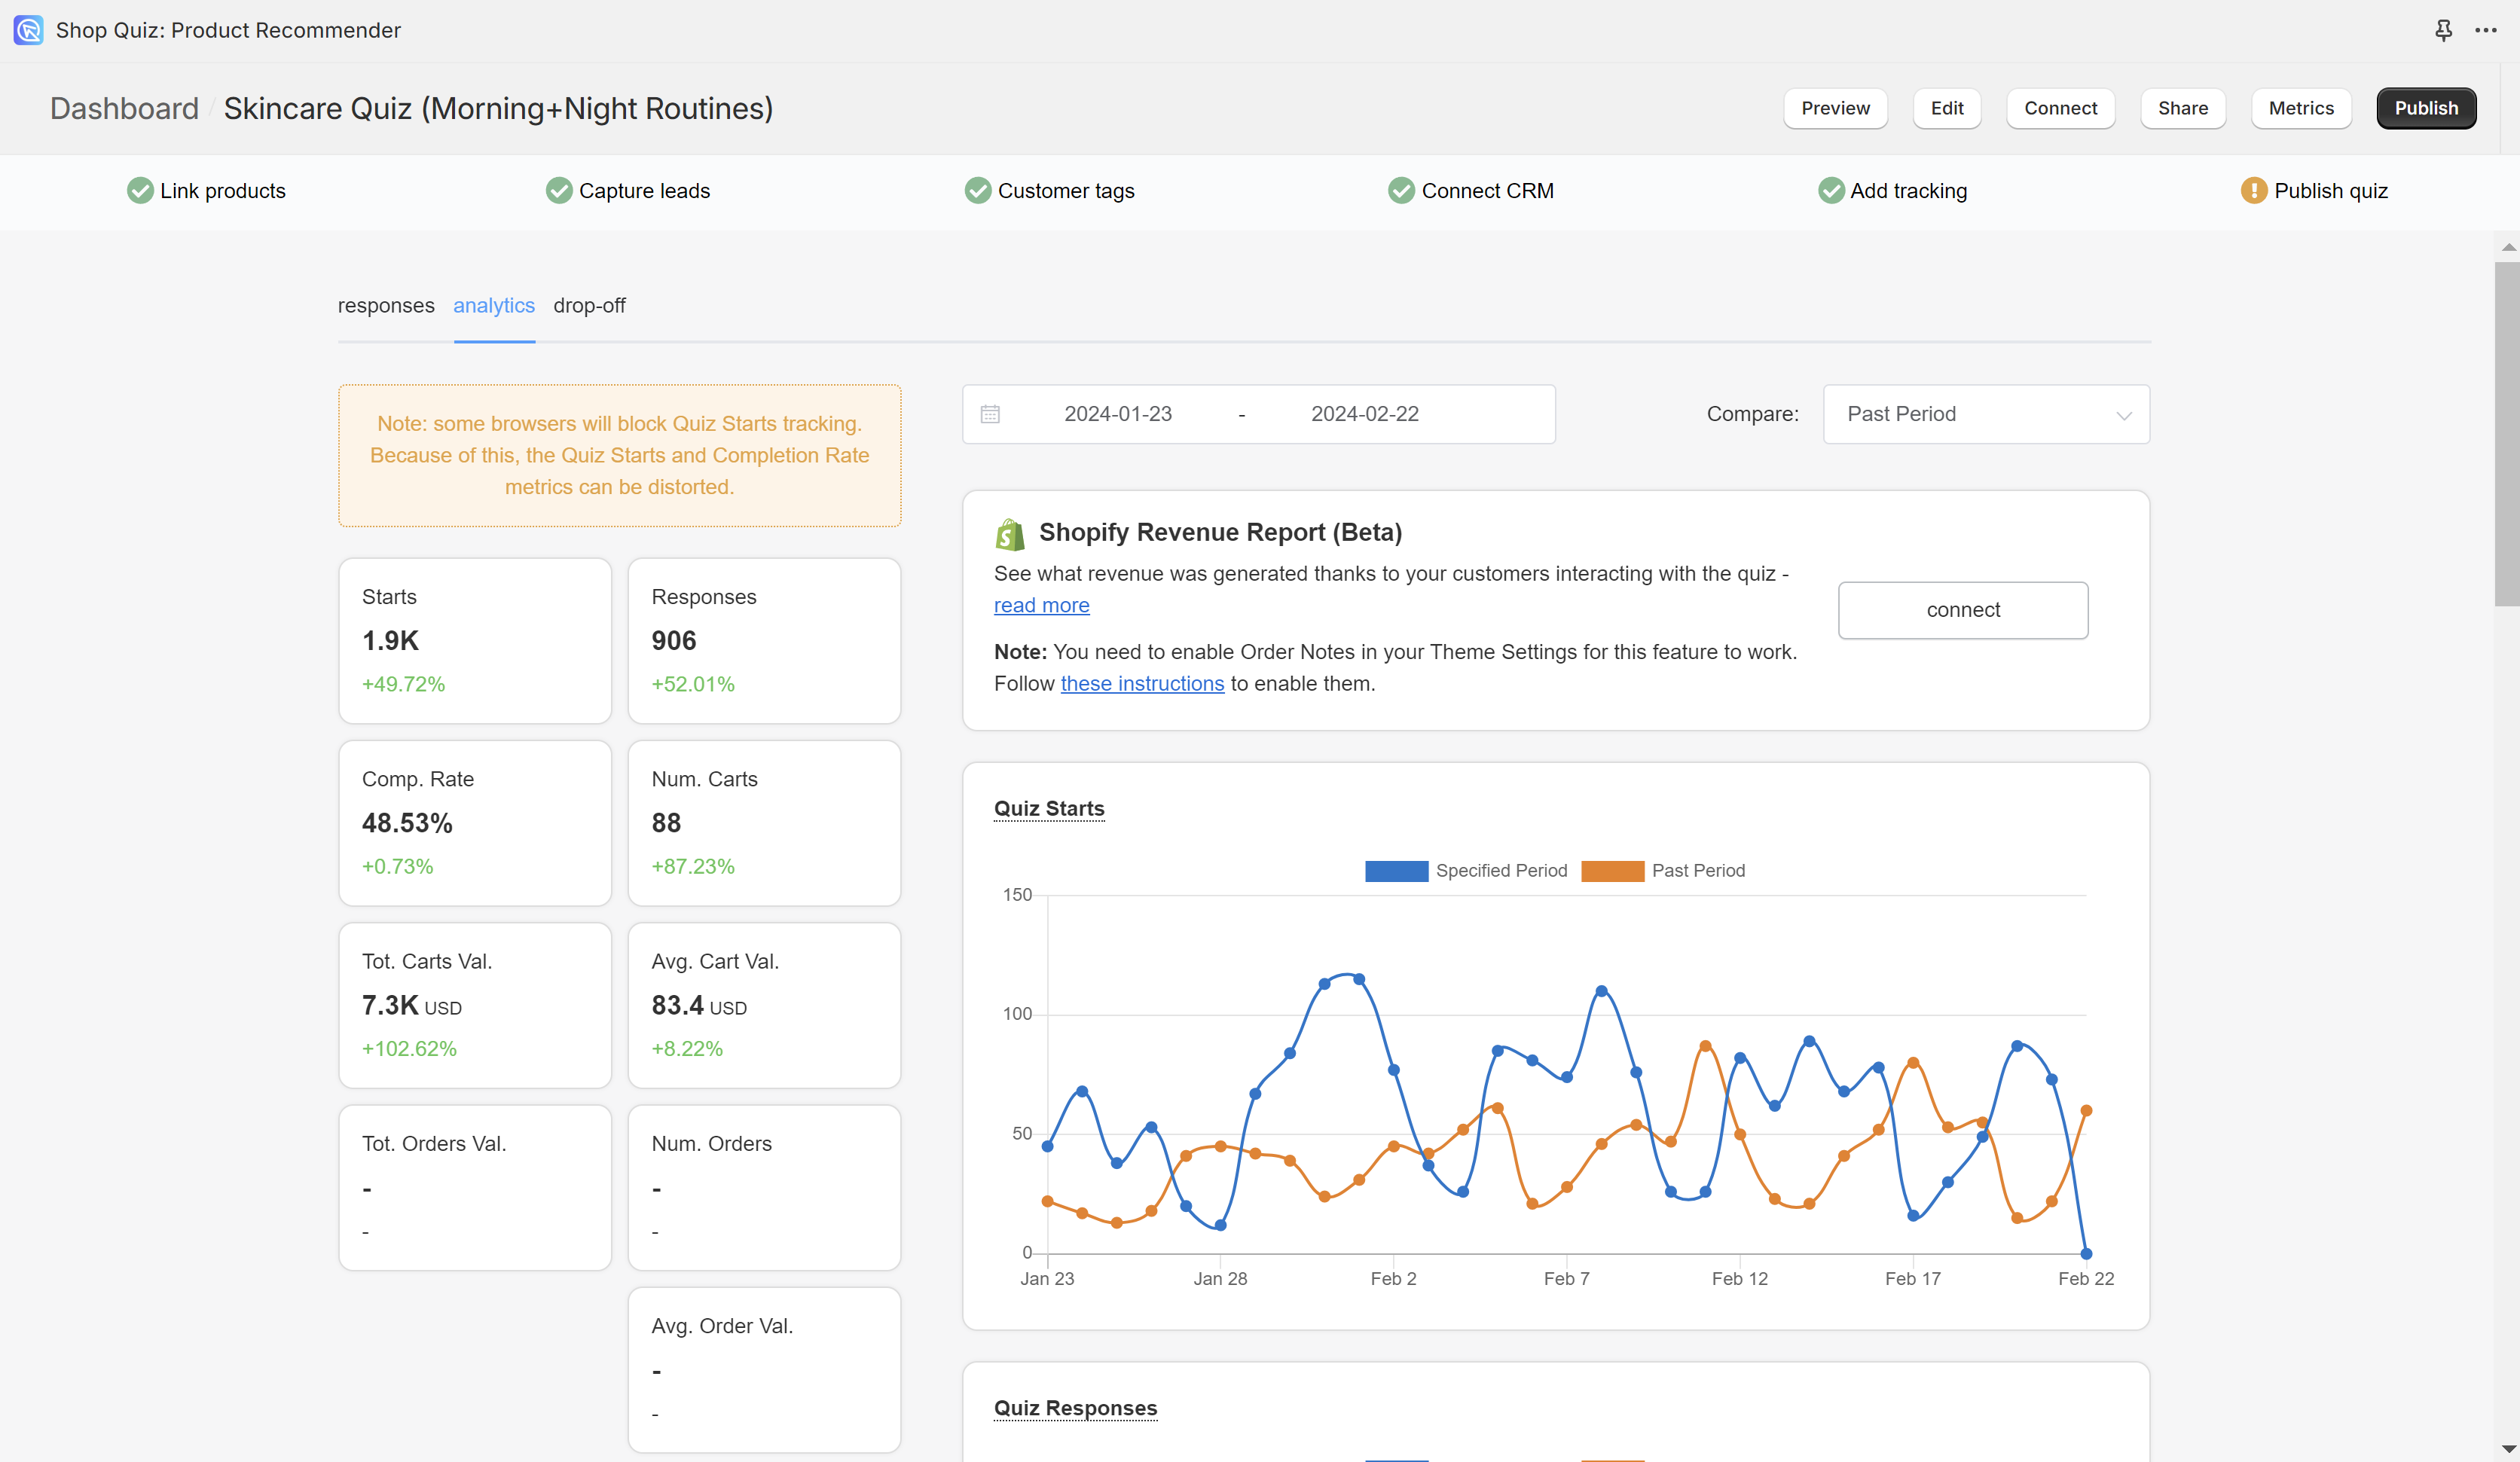
The Metrics panel is where you analyze quiz responses.
- Scroll down in
analyticsto see an overview of your results. It covers how many people viewed the quiz, how many started it, and how many responses you received. - The
responsestab lets you look at individual customers and see how they answered each question. - You can download all responses to a CSV file from how to download quiz responses.
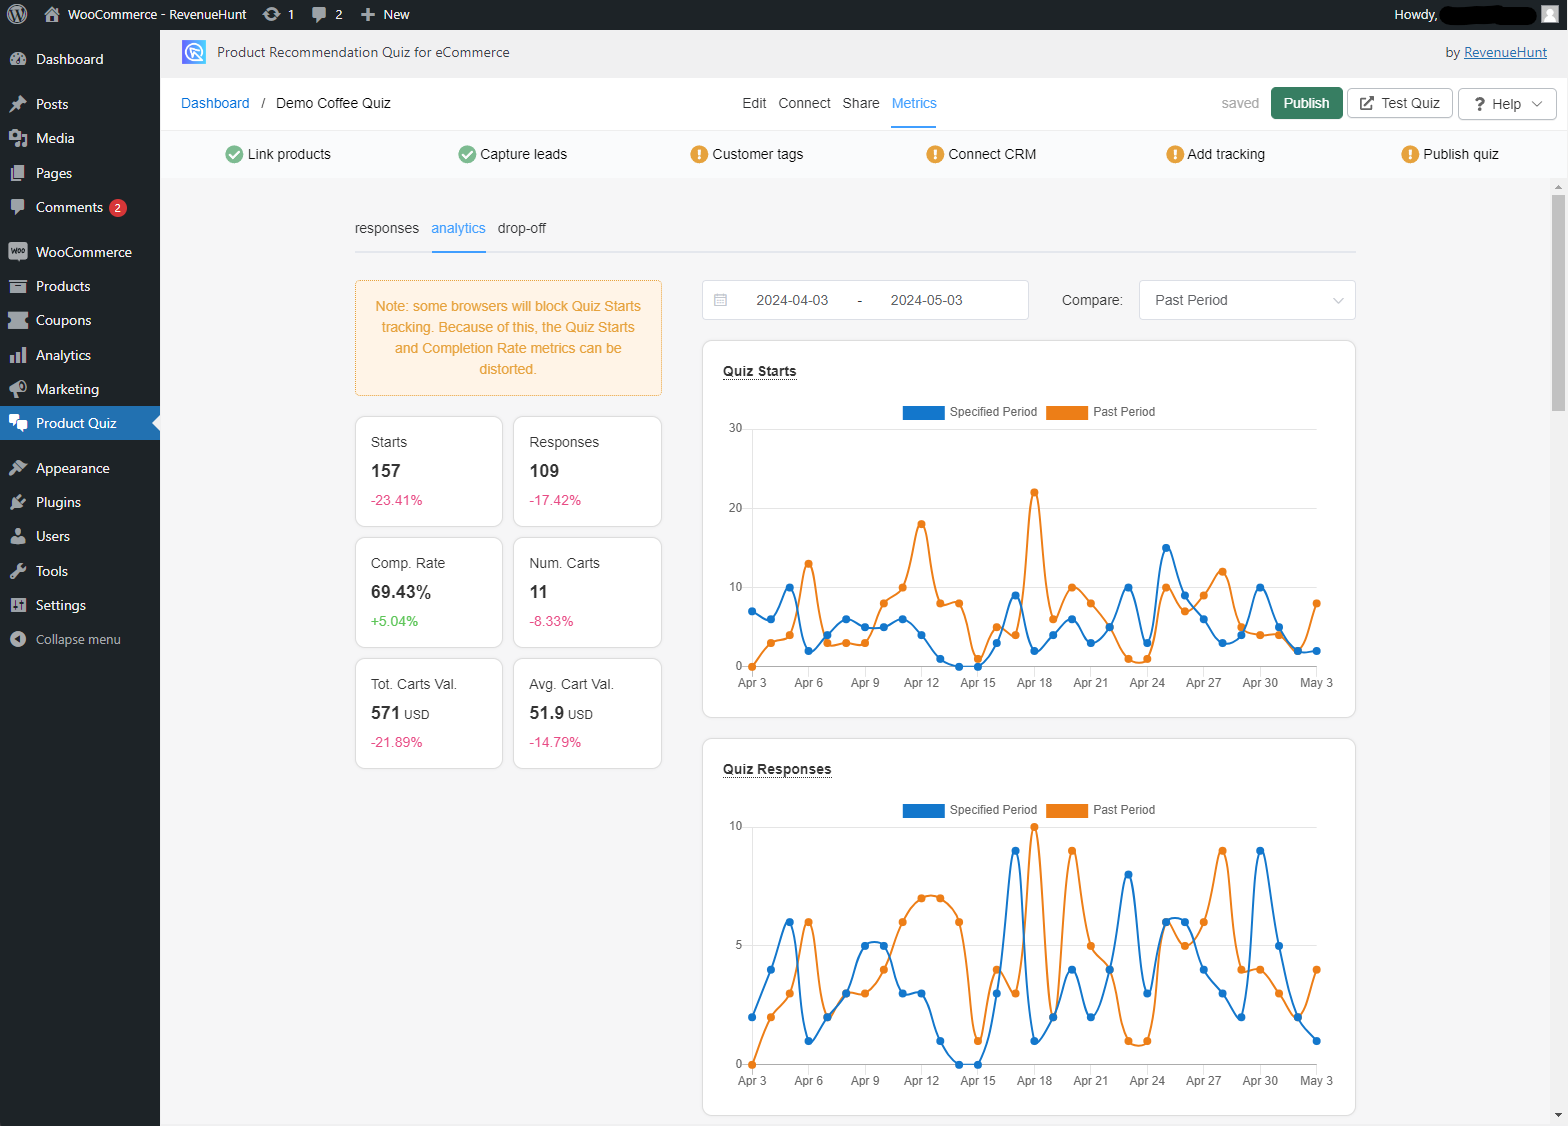
The Metrics panel is where you analyze quiz responses.
- Scroll down in
analyticsto see an overview of your results. It covers how many people viewed the quiz, how many started it, and how many responses you received. - The
responsestab lets you look at individual customers and see how they answered each question. - You can download all responses to a CSV file from how to download quiz responses.
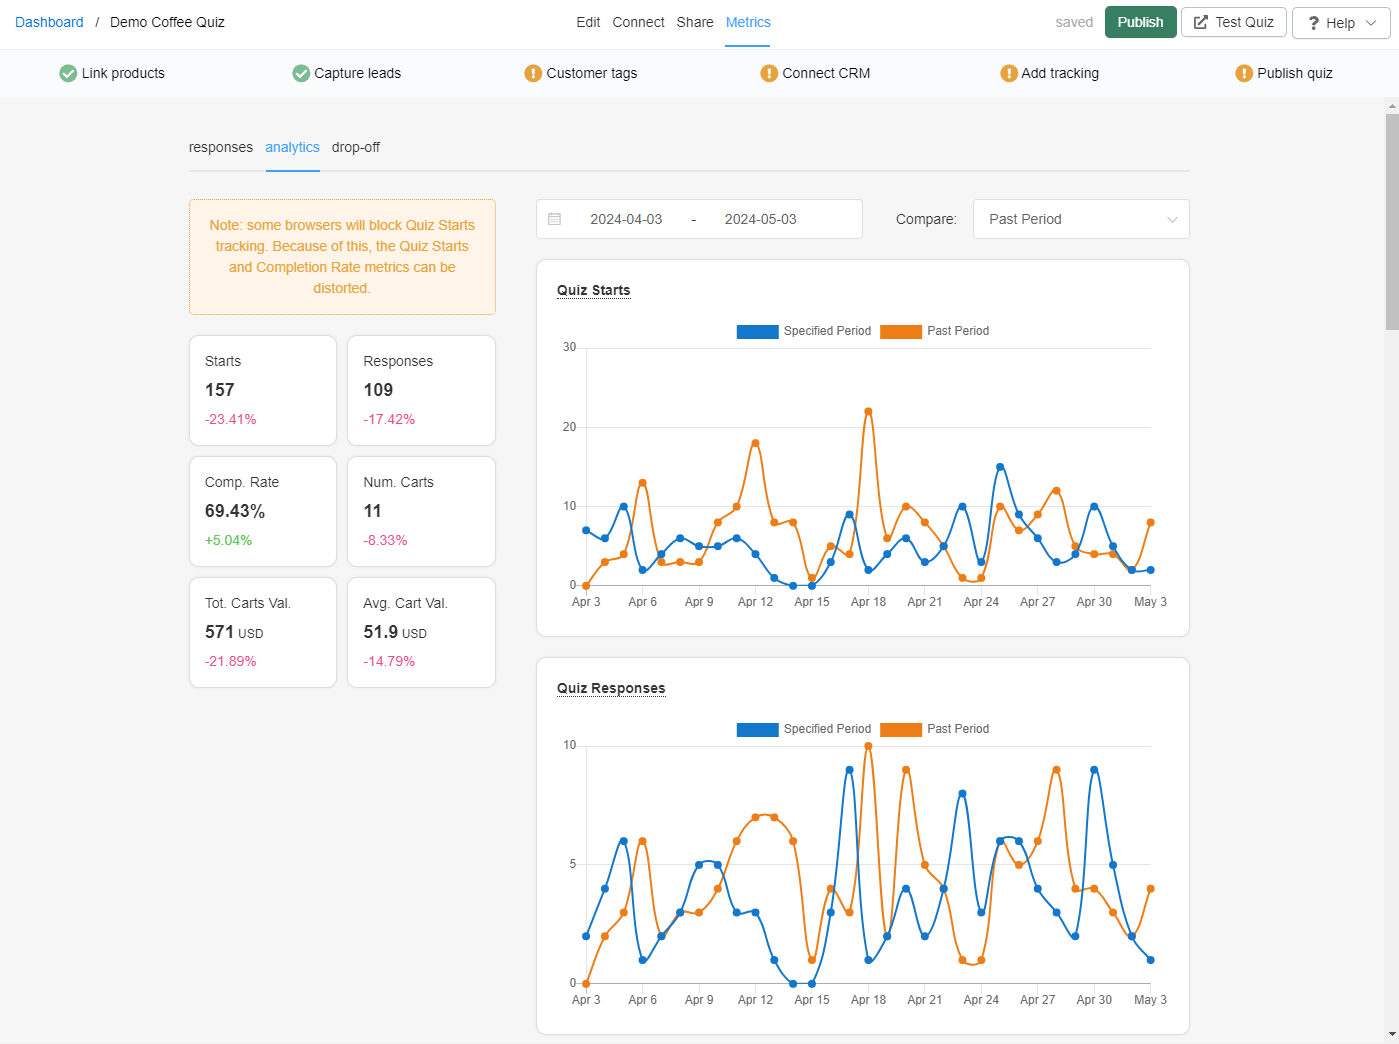
The Metrics panel is where you analyze quiz responses.
- Scroll down in
analyticsto see an overview of your results. It covers how many people viewed the quiz, how many started it, and how many responses you received. - The
responsestab lets you look at individual customers and see how they answered each question. - You can download all responses to a CSV file from how to download quiz responses.
The Metrics panel is where you analyze quiz responses.
- Scroll down in
analyticsto see an overview of your results. It covers how many people viewed the quiz, how many started it, and how many responses you received. - The
responsestab lets you look at individual customers and see how they answered each question. - You can download all responses to a CSV file from how to download quiz responses.
The Metrics panel is where you analyze quiz responses.
- Scroll down in
analyticsto see an overview of your results. It covers how many people viewed the quiz, how many started it, and how many responses you received. - The
responsestab lets you look at individual customers and see how they answered each question. - You can download all responses to a CSV file from how to download quiz responses.
That is the RevenueHunt app.
This article provides a step by step video tutorial on how to get started with the RevenueHunt app.