How to Send Quiz Leads to Shopify Customers
You can add new customers automatically to your Shopify Customers list every time someone completes the quiz. Once someone leaves their email in the quiz, their Shopify Customer profile will be updated with their name, email, phone number and customer tags.
This article explains how to connect your quiz to Shopify Customers and build a Shopify Flow targeted at quiz takers.
Link Quiz to Shopify Customers
- Navigate to App Settings from the side menu.
- Click on the
Shopify Customerstab. -
Toggle the
Enable pushing quiz leads to Shopify Customersswitch to enable the integration.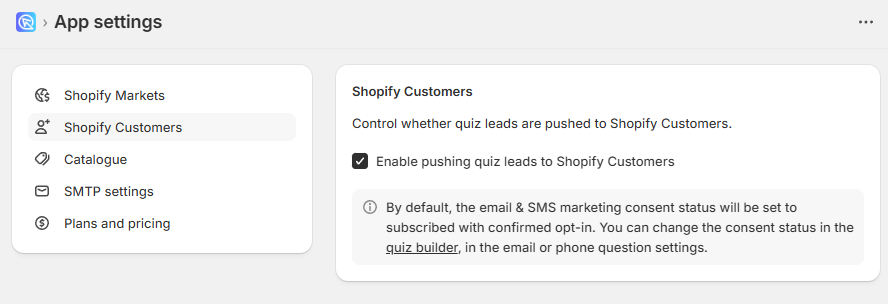
-
Click the
Savebutton to save the changes.
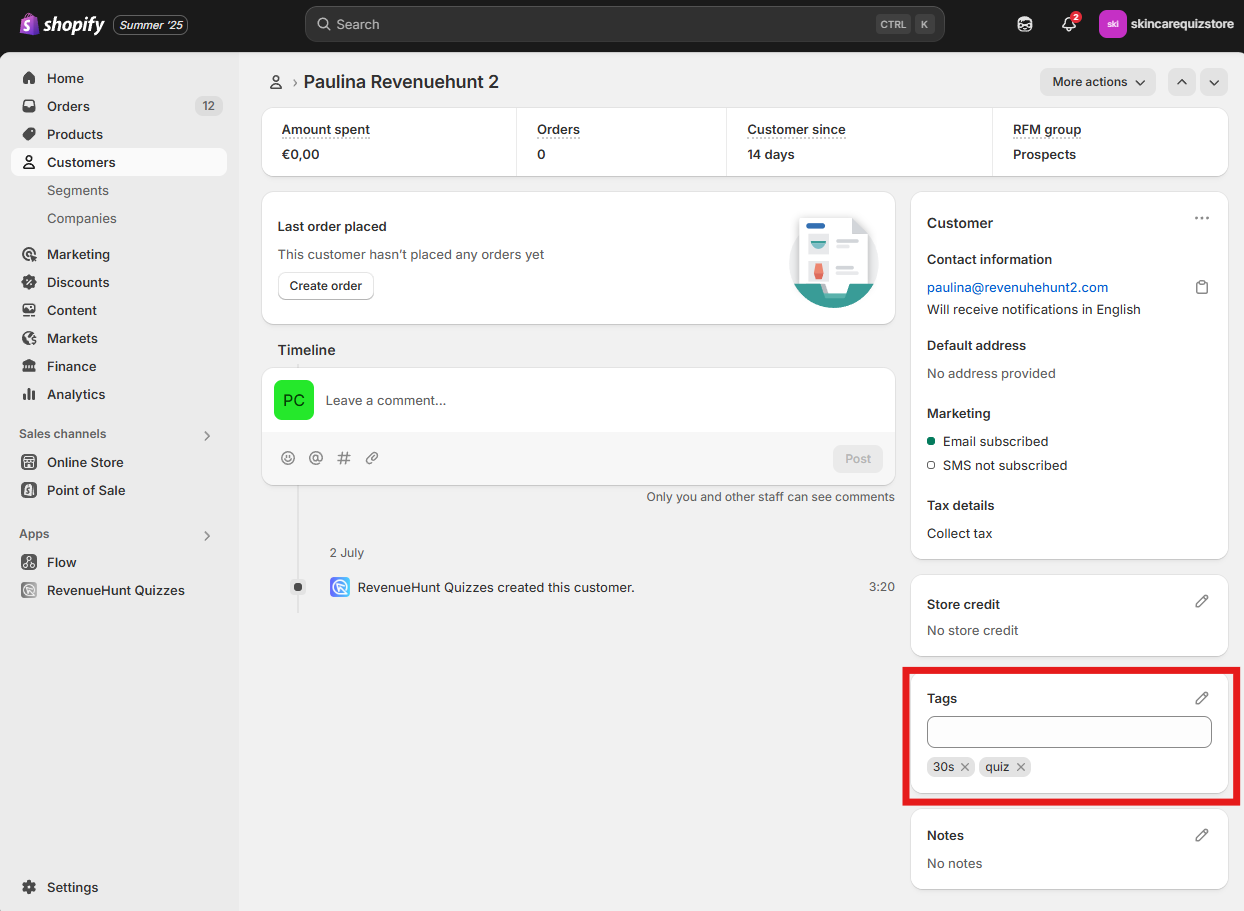
Newly captured leads will appear in your Shopify Customers List with their Customer Tags added to their profile.
Note
This is a global setting that applies to all quizzes in your shop.
Note
If a profile with the same email already exists, it will simply be updated with the customer tags from the quiz.
Customer tags are updated every time a customer takes the quiz.
- Go to your quiz and click on the Connect tab on the top of the screen. This will open a tab where you can connect your quiz with multiple third-party services.
- Then click on the
Connectbutton in theShopify Customerssection. This will authorize our app to connect with your Shopify Customers List. - Click the
Publishbutton to save the changes and update the preview/live quiz with new settings.
Newly captured leads will appear in your Shopify Customers List with their Customer Tags added to their profile.
Note
If a profile with the same email already exists, it will simply be updated with the customer tags from the quiz.
Customer tags are updated every time a customer takes the quiz.
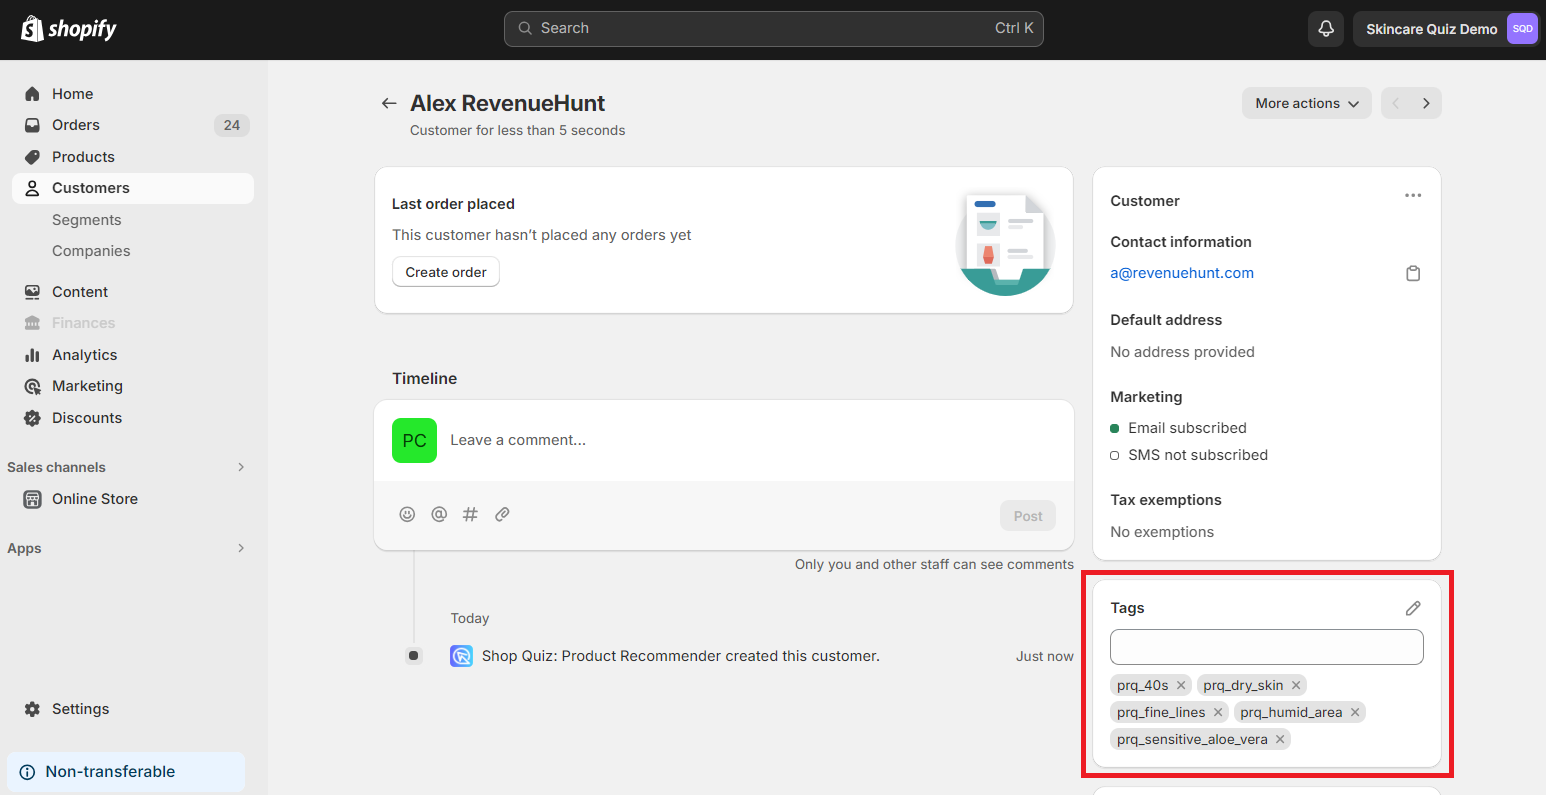
Note
Tags coming from the quiz will have a prq_ prefix added. So if you created a tag called teen in Shopify profile, it will be available as prq_teen.
Not applicable.
Not applicable.
Not applicable.
Not applicable.
Change subscribed/consent status for email and phone questions
By default, all the contacts added to the Shopify Customers list via the quiz will be marked as subscribed and their consent to receiving marketing information was given. It is not possible to change the default consent state.
However, there are many ways you can ask the customer for marketing consent directly in the quiz.
Tip
Check this article to learn how to ask for marketing consent directly in the quiz.
By default, all the contacts added to the list via the quiz will be marked as subscribed and their consent to receiving marketing information was given. You can change that in the email and phone questions settings.
- To change the default Consent state and Opt-in level, go to the email or phone question in the Quiz Builder.
-
Open the question settings.
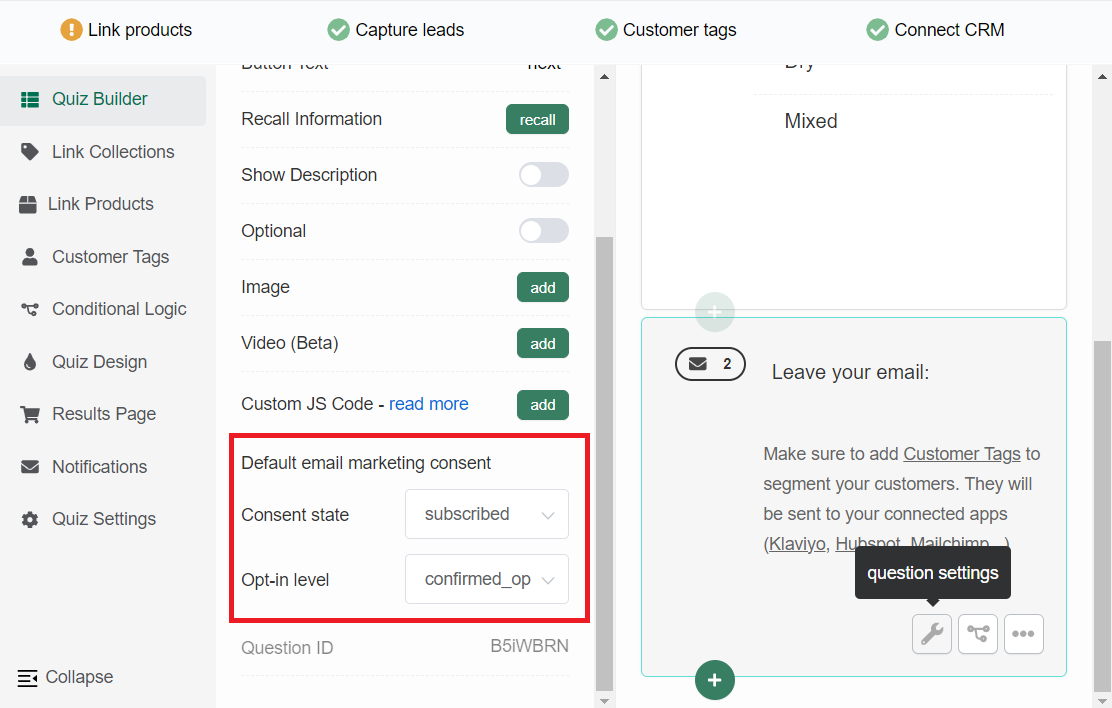
-
Under
Consent state, you can select eithersubscribedornon-subscribed. -
Under
Opt-in level, you can select eitherconfirmed_opt_inorsingle_opt_in(pick this option if you only want to send the one results email to the customer).
-
-
Click the
Publishbutton to update the preview/live quiz with new settings.
Not applicable.
Not applicable.
Not applicable.
Not applicable.
Tag Quiz Choices to Segment Shopify Customers
You can use Customer Tags to send quiz answers that the customer provided in the quiz to their Shopify Customer's profile.
Follow these steps to add tags to your quiz choices and test the setup:
-
Adding Tags to Quiz Choices: To add tags to your quiz choices, follow these steps:
- Open the Revenue Hunt Quizzes app and select your quiz.
- Navigate to the choice settings section.
- Under Customer Tags, create new tags for each choice. For example, create a tag called
teenand assign it to the relevant choice. - Repeat this process for other choices, adding appropriate tags as needed (e.g.,
30s). - Additionally, add a common tag (e.g.,
quiz) to all choices in one of the questions to identify participants from the product recommendation quiz. Anyone who takes the quiz will be tagged with this common tag.
-
Saving Changes: After adding the desired tags, click
Saveto save your changes. - Test the quiz:
Previewthe quiz using the same or a new email to test the tagging functionality. - Refresh the Shopify Customers list: Once participants complete the quiz, refresh the Shopify Customers list to see the leads being added.
- View the customer tags: Open the profile of a participant to view their name, email, and the associated customer tags from the quiz.
You can then use these tags to create a Shopify email Flow.
You can use Customer Tags to send quiz answers that the customer provided in the quiz to their Shopify Customer's profile.
Follow these steps to add tags to your quiz choices and test the setup:
-
Adding Tags to Quiz Choices: To add tags to your quiz choices, follow these steps:
- Open the Revenue Hunt Quizzes app and select your quiz.
- Navigate to the Customer Tags section.
- Create new tags for each choice. For example, create a tag called
teenand assign it to the relevant choice. - Repeat this process for other choices, adding appropriate tags as needed (e.g.,
30s,40s,50s,60s,dry skin,oily skin, etc.). - Additionally, add a common tag (e.g.,
quiz) to all choices in one of the questions to identify participants from the product recommendation quiz. Anyone who takes the quiz will be tagged with this common tag.
-
Saving Changes: After adding the desired tags, click
Publishto save your changes. - Test the quiz:
Previewthe quiz using the same or a new email to test the tagging functionality. - Refresh the Shopify Customers list: Once participants complete the quiz, refresh the Shopify Customers list to see the leads being added.
- View the customer tags: Open the profile of a participant to view their name, email, and the associated customer tags from the quiz.
Note
Tags coming from the quiz will have a prq_ prefix added. So if you created a tag called teen in Shopify profile, it will be available as prq_teen.
You can then use these tags to create a Shopify email Flow.
Not applicable.
Not applicable.
Not applicable.
Not applicable.
Set up Shopify Automation Flow
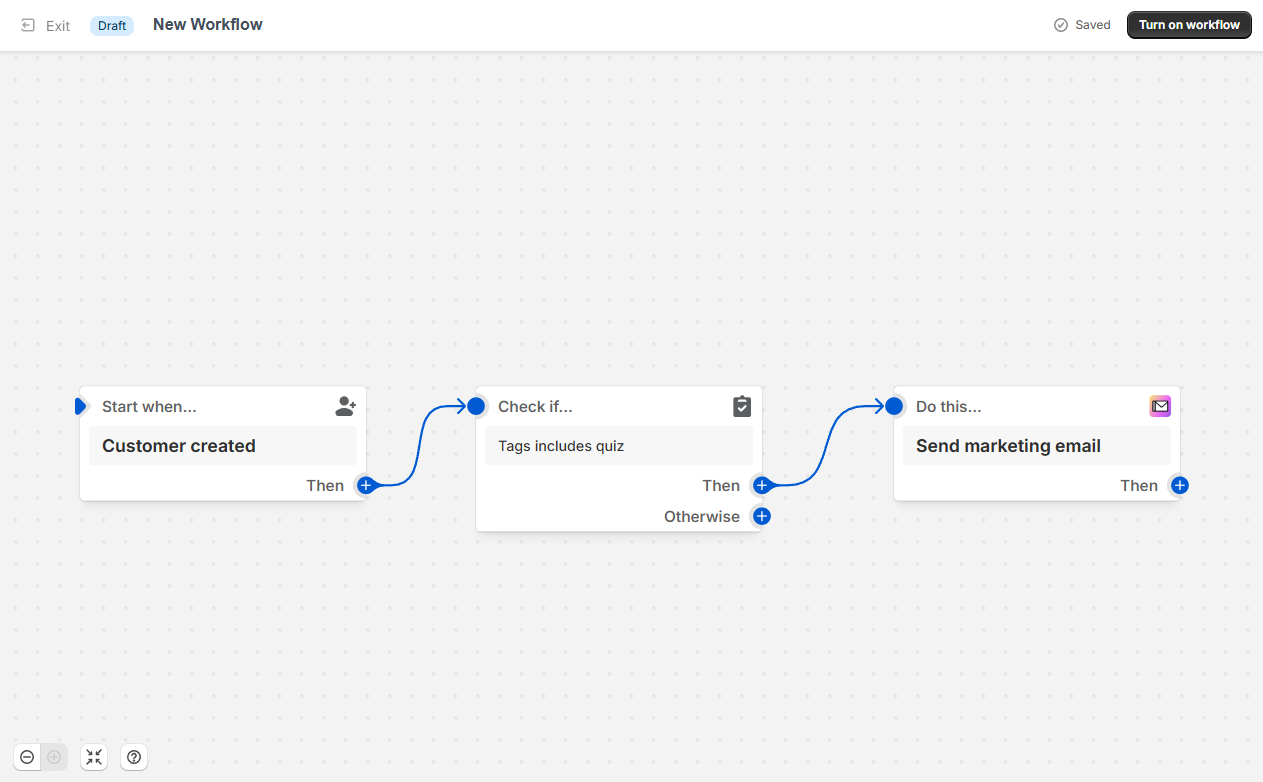
- To set up a post-quiz automation head to your
Shopify dashboard > Marketing > Automations, clickView templates. - Select a
Create custom automationautomation: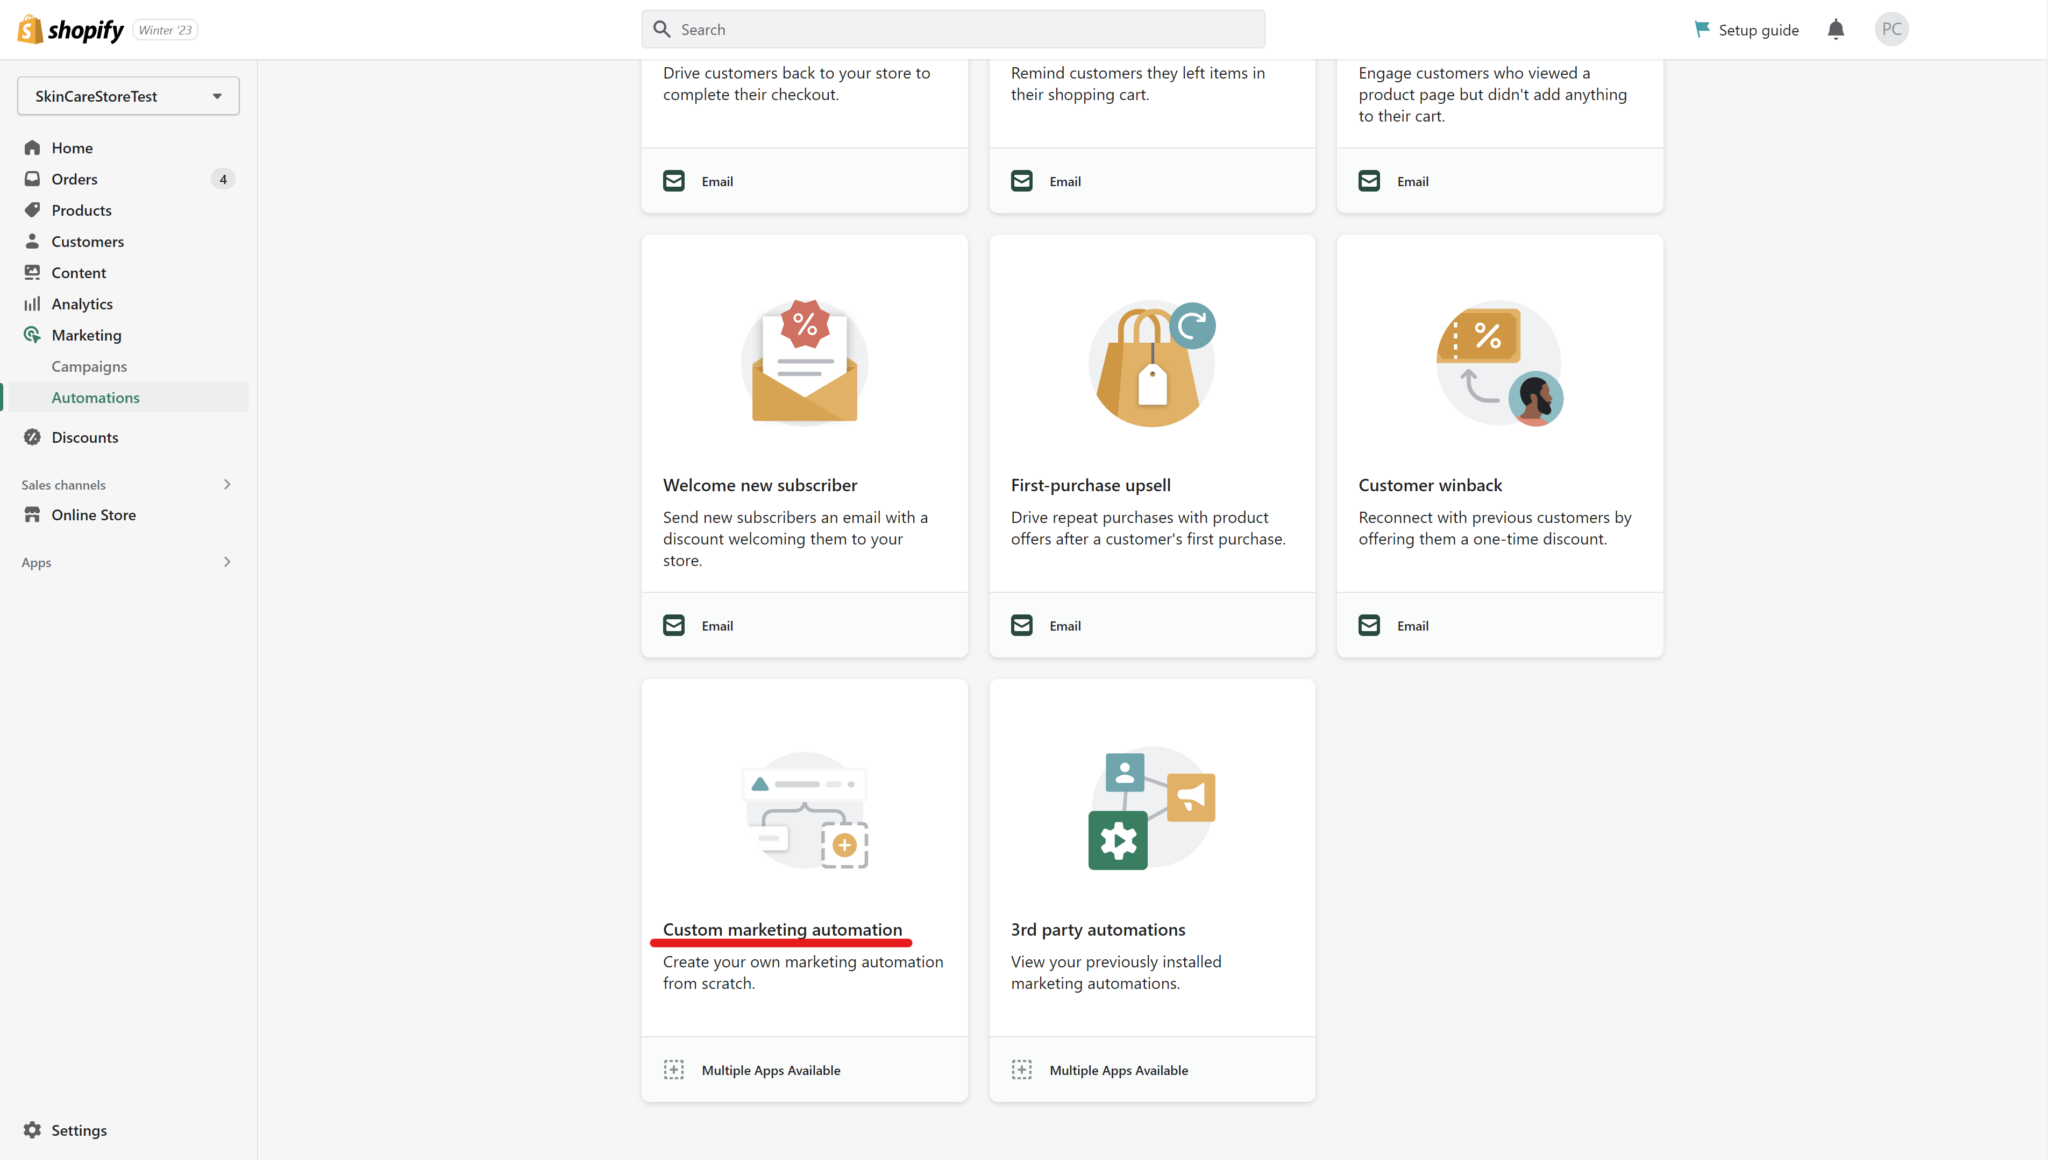
- Add a trigger: Click anywhere and select the first trigger to be
Customer created.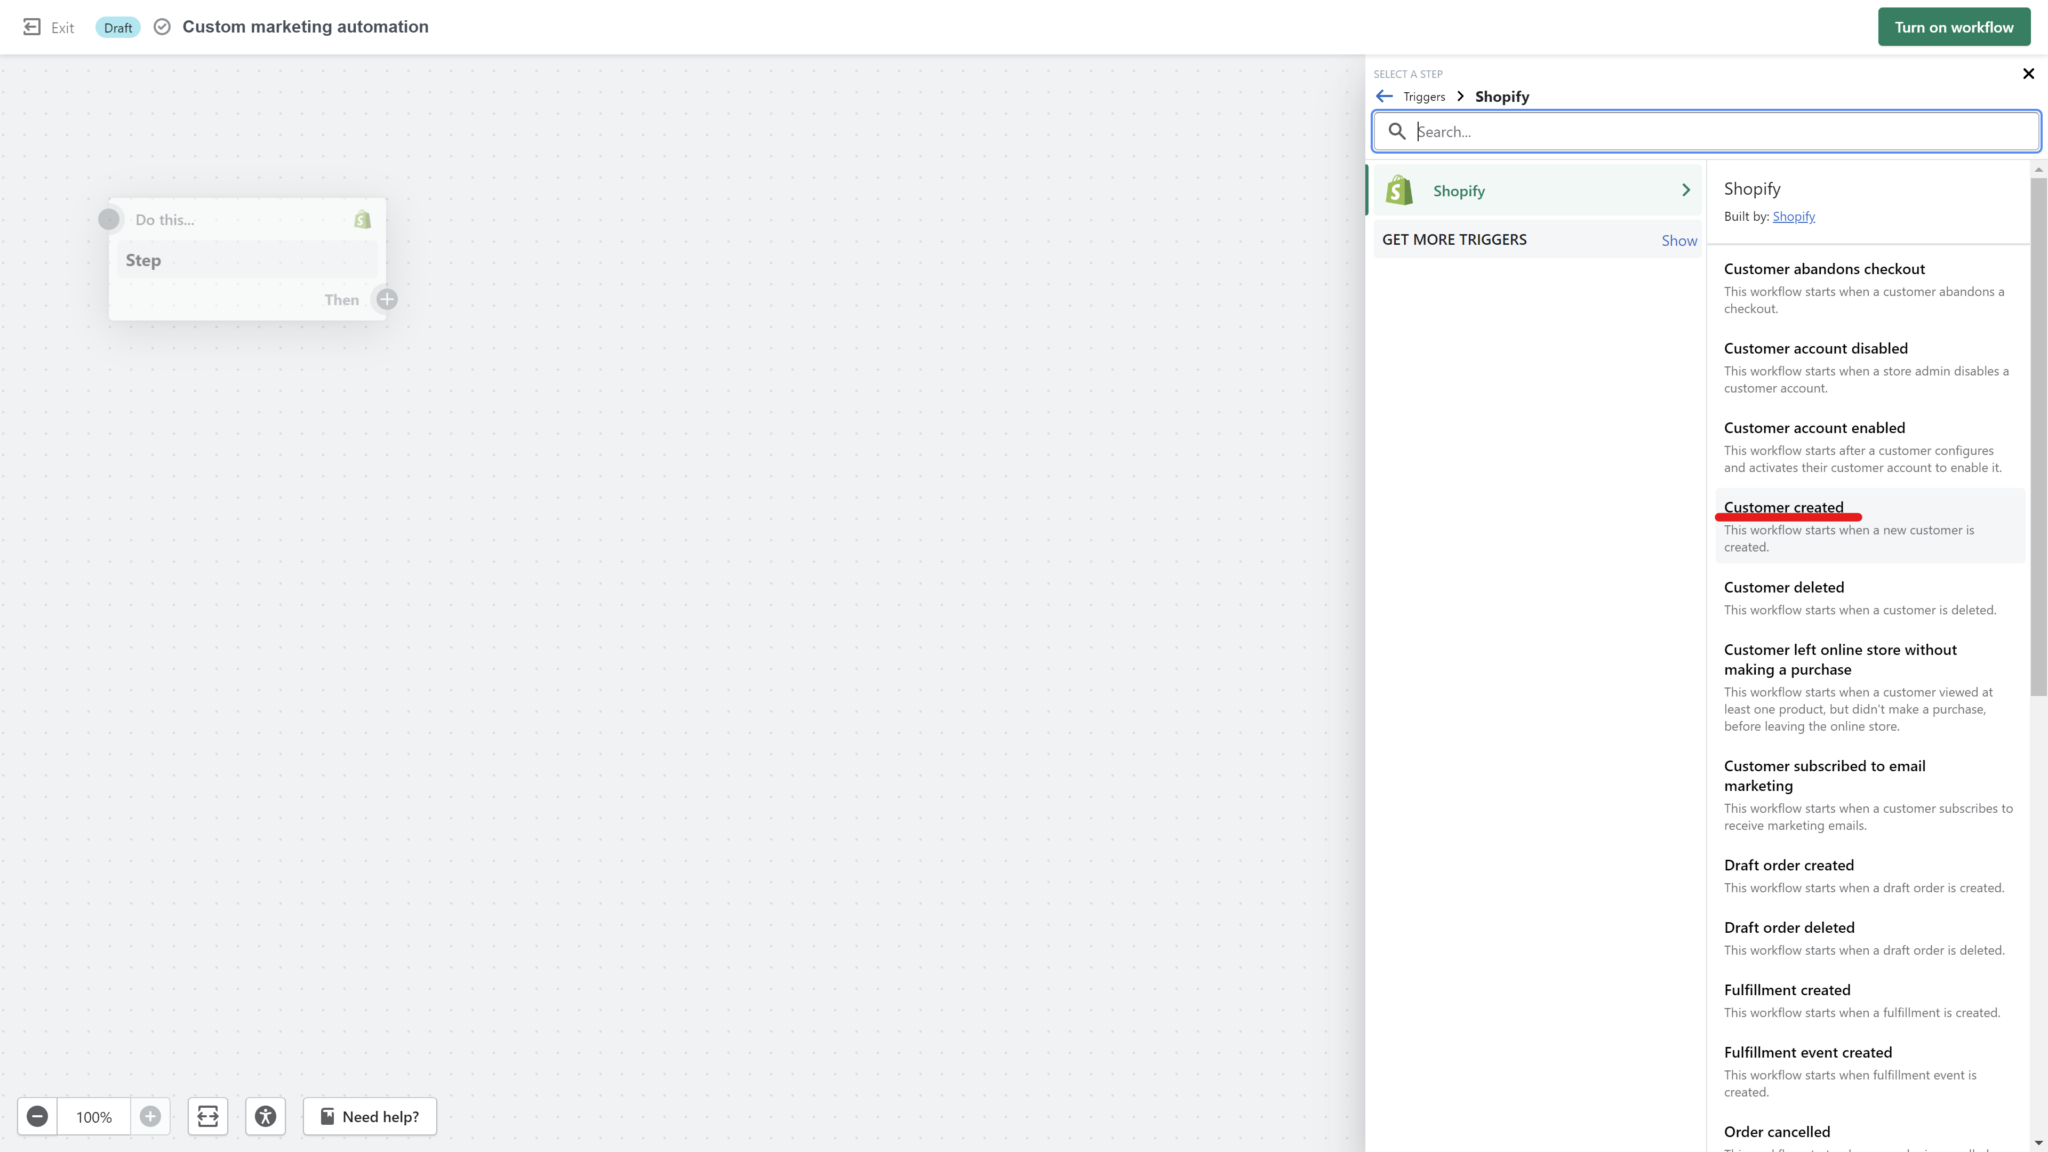
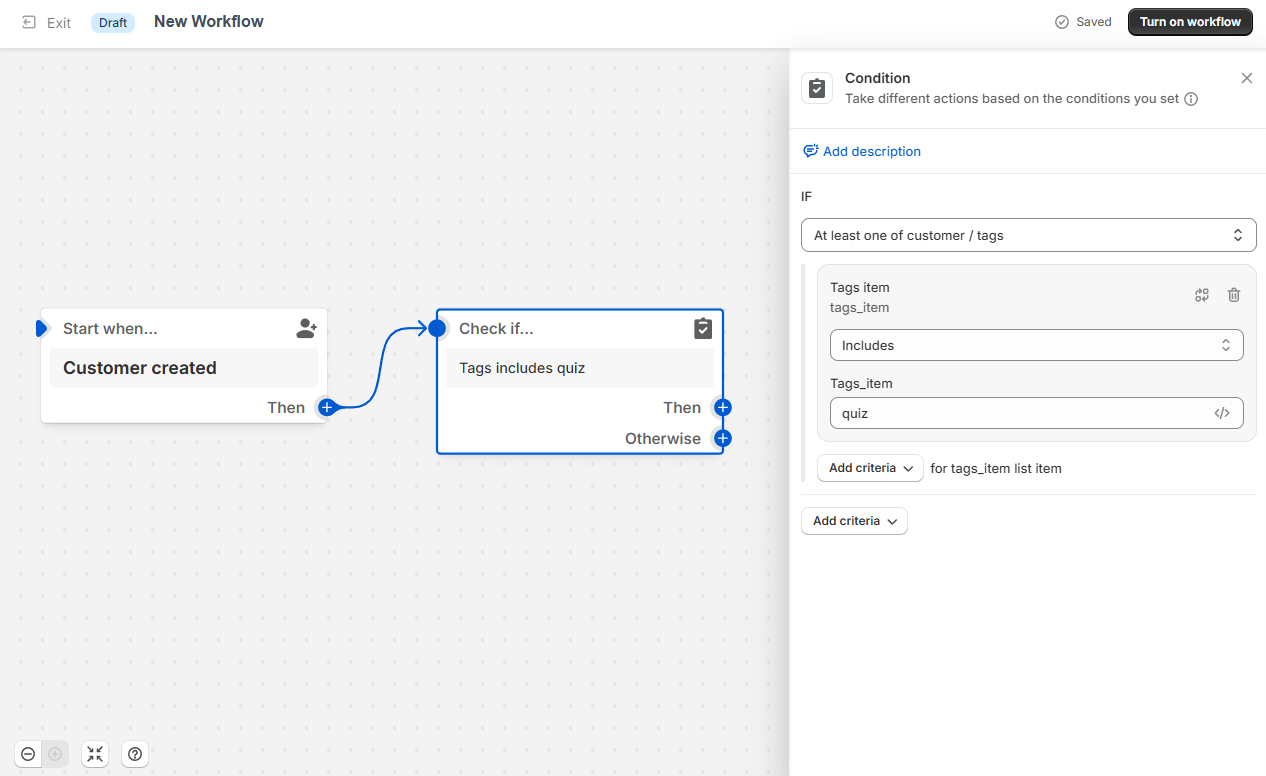
-
Select a condition: Add a
Conditionaction after the trigger. ClickAdd variableand from the list look forcustomerand thentags. Then, set up the condition as follows:At least one customer / tags
includestags_itemquiz.
-
Set up an email: To send a follow-up email to all the quiz contacts that contain the
prq_ tag(right after the tag is added to their profile), clickThen > Actionand from the list selectSend marketing email. Next, select the email template you want to use.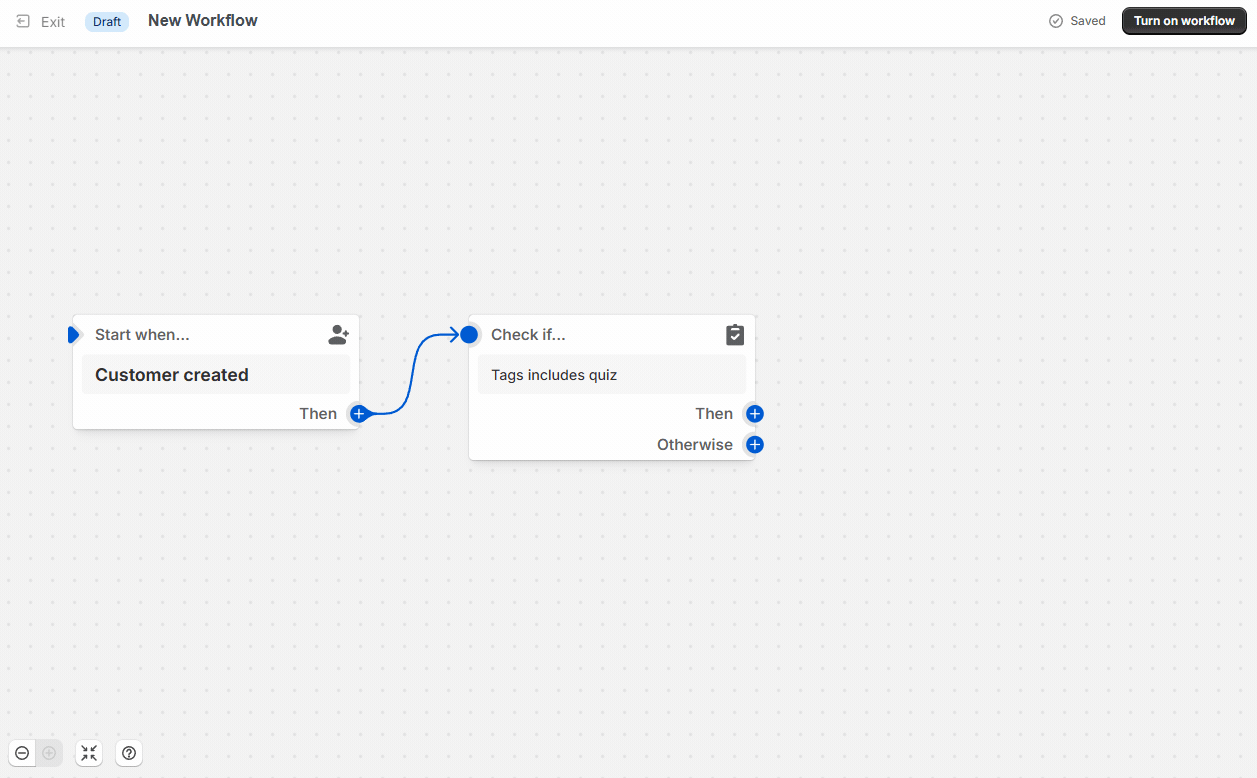
- Save: Remember to
Turn on workflowonce you're done with making the changes.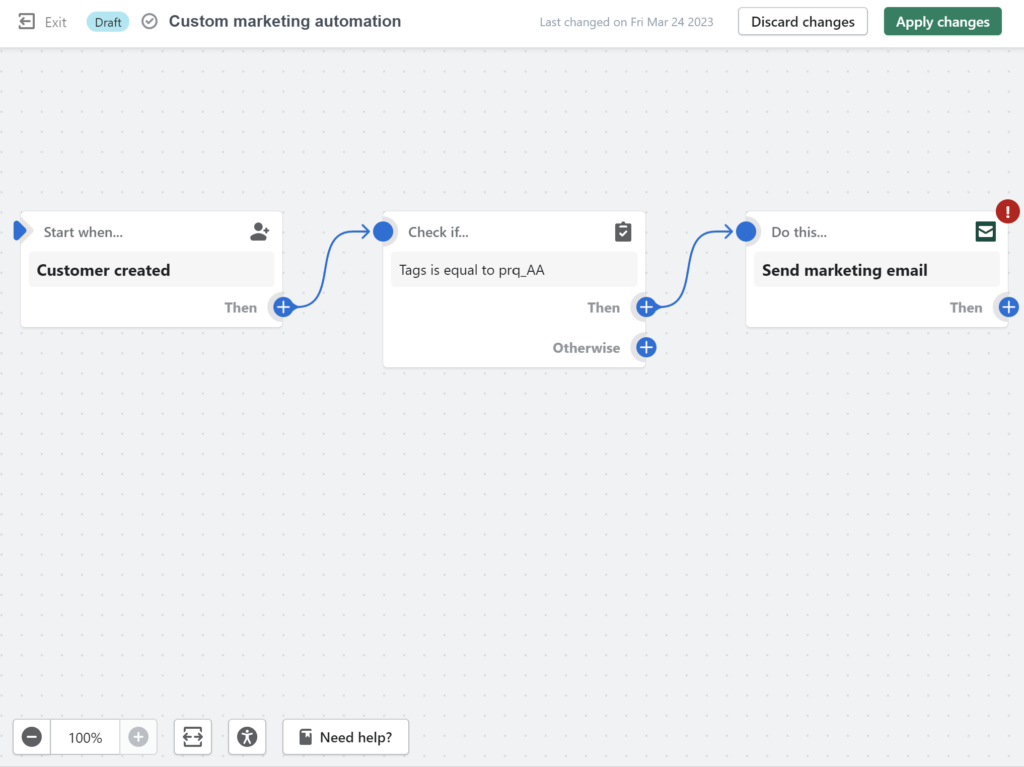
Now, all the quiz takers with a specific tag like quiz will be sent the marketing email.
To learn more about Shopify Automations, check their FAQ page.
- To set up a post-quiz automation head to your
Shopify dashboard > Marketing > Automations, clickView templates. - Select a
Create custom automationautomation: - Add a trigger: Click anywhere and select the first trigger to be
Customer created. -
Select a condition: Add a
Conditionaction after the trigger. ClickAdd variableand from the list look forcustomerand thentags. Then, set up the condition as follows:At least one customer / tags
includestags_itemprq_quiz.Note
You need to add the full name of the tag. For example,
prq_oilyskinorprq_Oily Skin.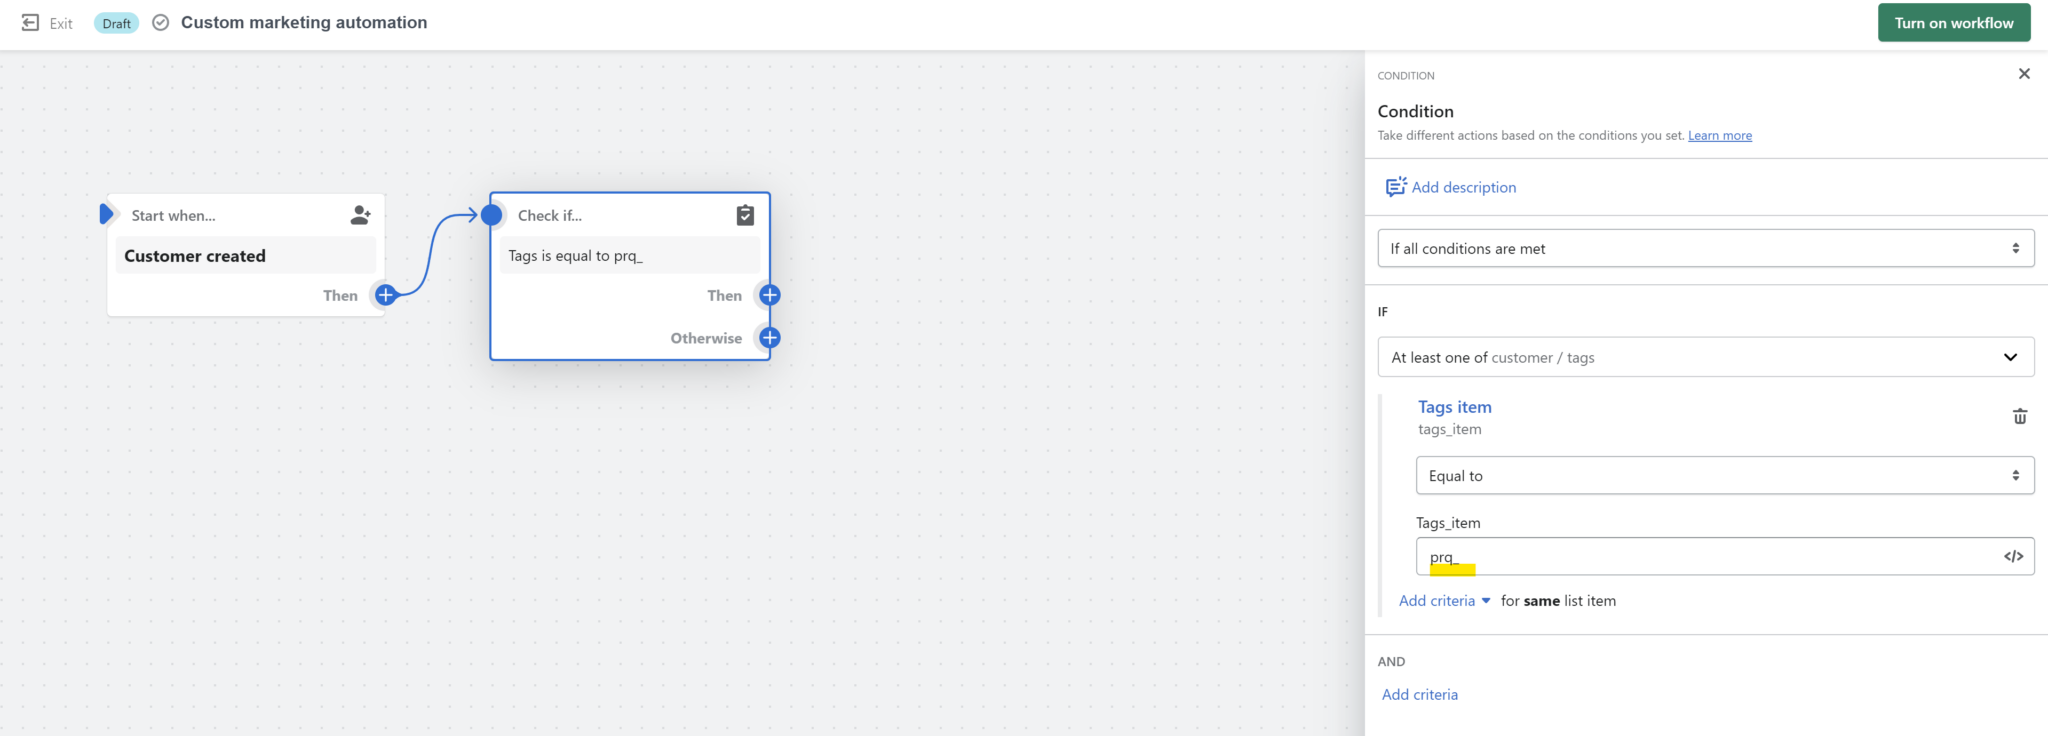
-
Set up an email: To send a follow-up email to all the quiz contacts that contain the
prq_ tag(right after the tag is added to their profile), clickThen > Actionand from the list selectSend marketing email. Next, select the email template you want to use. - Save: Remember to
Turn on workflowonce you're done with making the changes.
Now, all the quiz takers with a specific prq_ tag will be sent the marketing email.
To learn more about Shopify Automations, check their FAQ page.
Not applicable.
Not applicable.
Not applicable.
Not applicable.
By following this article, you can learn how to connect your quiz to Shopify Customers and set up your post-quiz email flow with Shopify Flows.