Sending Emails with the RevenueHunt App
In this tutorial you will learn how to send emails to customers and to yourself. It also covers connecting your own email server over SMTP, which stands for Simple Mail Transfer Protocol.
What you will learn
- how to send quiz result emails to customers automatically,
- how to receive a notification email when someone completes a quiz,
- how to connect your own email server using SMTP,
- how to style emails with the help of AI tools.
In this tutorial you will learn how to send emails to customers and to yourself. It also covers connecting your own email server over SMTP, which stands for Simple Mail Transfer Protocol.
What you will learn
- how to send quiz result emails to customers automatically,
- how to receive a notification email when someone completes a quiz,
- how to connect your own email server using SMTP.
In this tutorial you will learn how to send emails to customers and to yourself. It also covers connecting your own email server over SMTP, which stands for Simple Mail Transfer Protocol.
What you will learn
- how to send quiz result emails to customers automatically,
- how to receive a notification email when someone completes a quiz,
- how to connect your own email server using SMTP.
In this tutorial you will learn how to send emails to customers and to yourself. It also covers connecting your own email server over SMTP, which stands for Simple Mail Transfer Protocol.
What you will learn
- how to send quiz result emails to customers automatically,
- how to receive a notification email when someone completes a quiz,
- how to connect your own email server using SMTP.
In this tutorial you will learn how to send emails to customers and to yourself. It also covers connecting your own email server over SMTP, which stands for Simple Mail Transfer Protocol.
What you will learn
- how to send quiz result emails to customers automatically,
- how to receive a notification email when someone completes a quiz,
- how to connect your own email server using SMTP.
In this tutorial you will learn how to send emails to customers and to yourself. It also covers connecting your own email server over SMTP, which stands for Simple Mail Transfer Protocol.
What you will learn
- how to send quiz result emails to customers automatically,
- how to receive a notification email when someone completes a quiz,
- how to connect your own email server using SMTP.
Sending emails to customers
- Add an email question. Your quiz needs an email question before you set up result emails. Go to Quiz builder > Questions and click
+ Add questionor+ Add block. - Activate the email to customers. Go to
Quiz settings > Emails to respondentsand checkSend email when someone completes the quiz.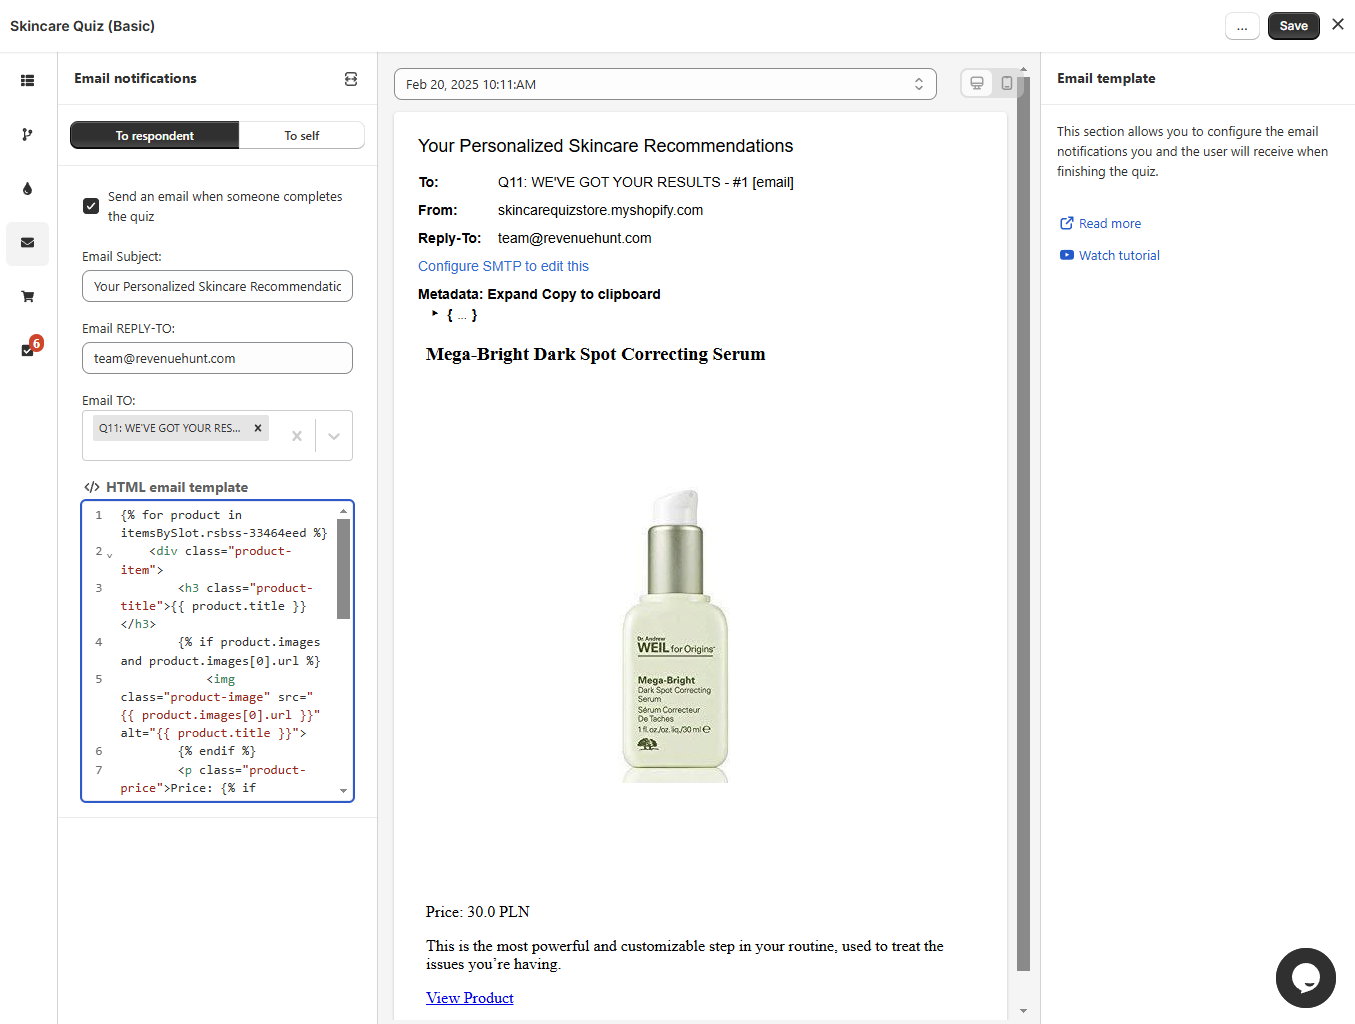
- Set
Email TO. Choose which email question supplies the address that the result email is sent to. - Set
REPLY-TO. Choose the address that the customer replies to. - Set the
Email Subject. Edit the title of the email that customers will receive. -
Build the
Email Liquid Template. Configure the email template of the email that your customers will receive.Warning
Email template requires the knowledge of HTML and Liquid to be edited.
-
Incorporate quiz response metadata like
{{first_name}}to personalize emails. You can use Liquid code to loop through and display recommended products or customize content based on quiz outcomes. -
The email Liquid template recalls quiz information through metadata. That covers the response ID, the quiz name, the customer's name and email, the answers, tags, recommended products and results page content.
Tip
To learn more about the metadata, see Editing email templates.
-
The
Email Liquid Templatefield has useful code snippets below it. Use them to insert quiz data, such as theResponses by Blocksnippet that lists the answers.Tip
You can copy the useful code snippets and paste them into a large language model like ChatGPT or Gemini to style the Liquid email template.
Note
HTML emails do not render the same way in every email client, so add styles inline rather than as classes. Email clients do not run JavaScript, so JavaScript code has no effect. Read more in Editing email templates.
-
-
Check the email preview. Use the Email preview section to see how the email looks for different customers.
- Add your SMTP credentials (recommended). Check Sending Emails from Your Servers (SMTP) to learn how to connect your own email server using SMTP.
- Save the changes. Remember to save the changes with the top-right
Savebutton to update the preview/live quiz. - Preview the quiz: Return to the dashboard and preview the quiz. Complete the quiz all the way to the results page to trigger the email notification.
-
Add Your SMTP Credentials: Go to
App Settings > SMTPand enter your SMTP credentials. See how to send result emails from your own server for the setup.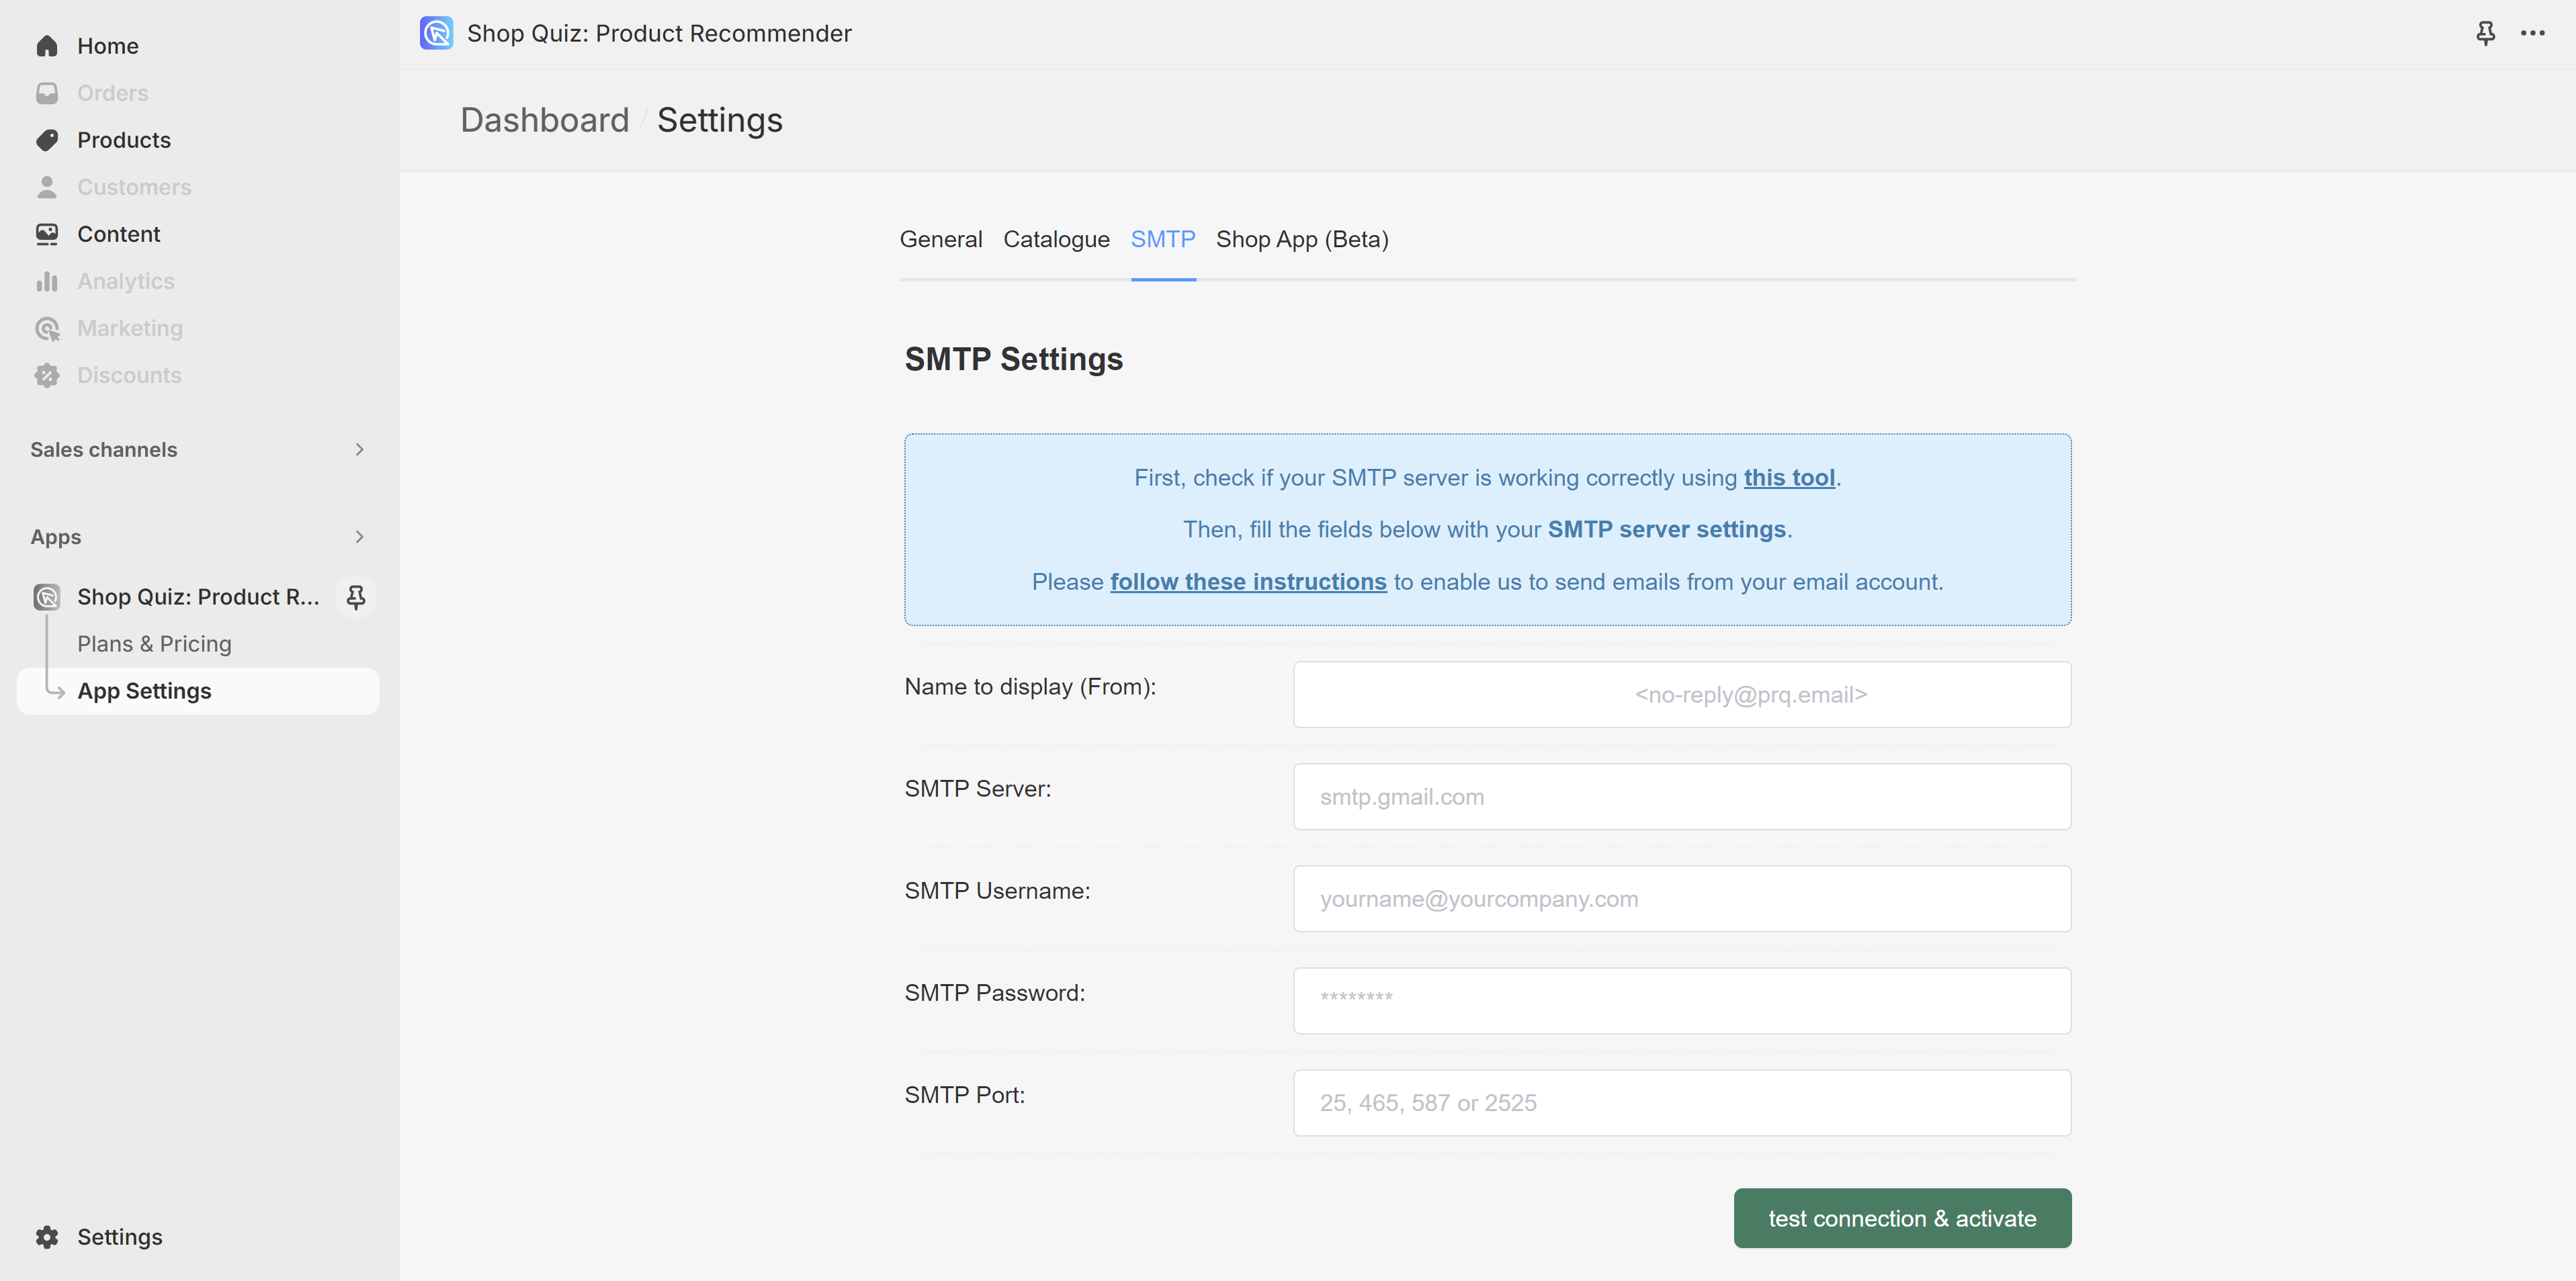
Note
SMTP stands for Simple Mail Transfer Protocol. SMTP is a connection protocol that enables third-party apps (e.g. RevenueHunt) to send emails through your email server.
Once the RevenueHunt app is connected to your SMTP server, the follow-up emails with quiz results are sent from your own email account.
If you are not sure which credentials to use, check your email provider's documentation for "SMTP", or contact their support.
-
Add Email Question: Your quiz needs an email question before you set up result emails. Add one in the Quiz Builder.
- Activate the email to customers. Go to
Notifications > TO RESPONDENTand toggleSend email when someone completes the quiz.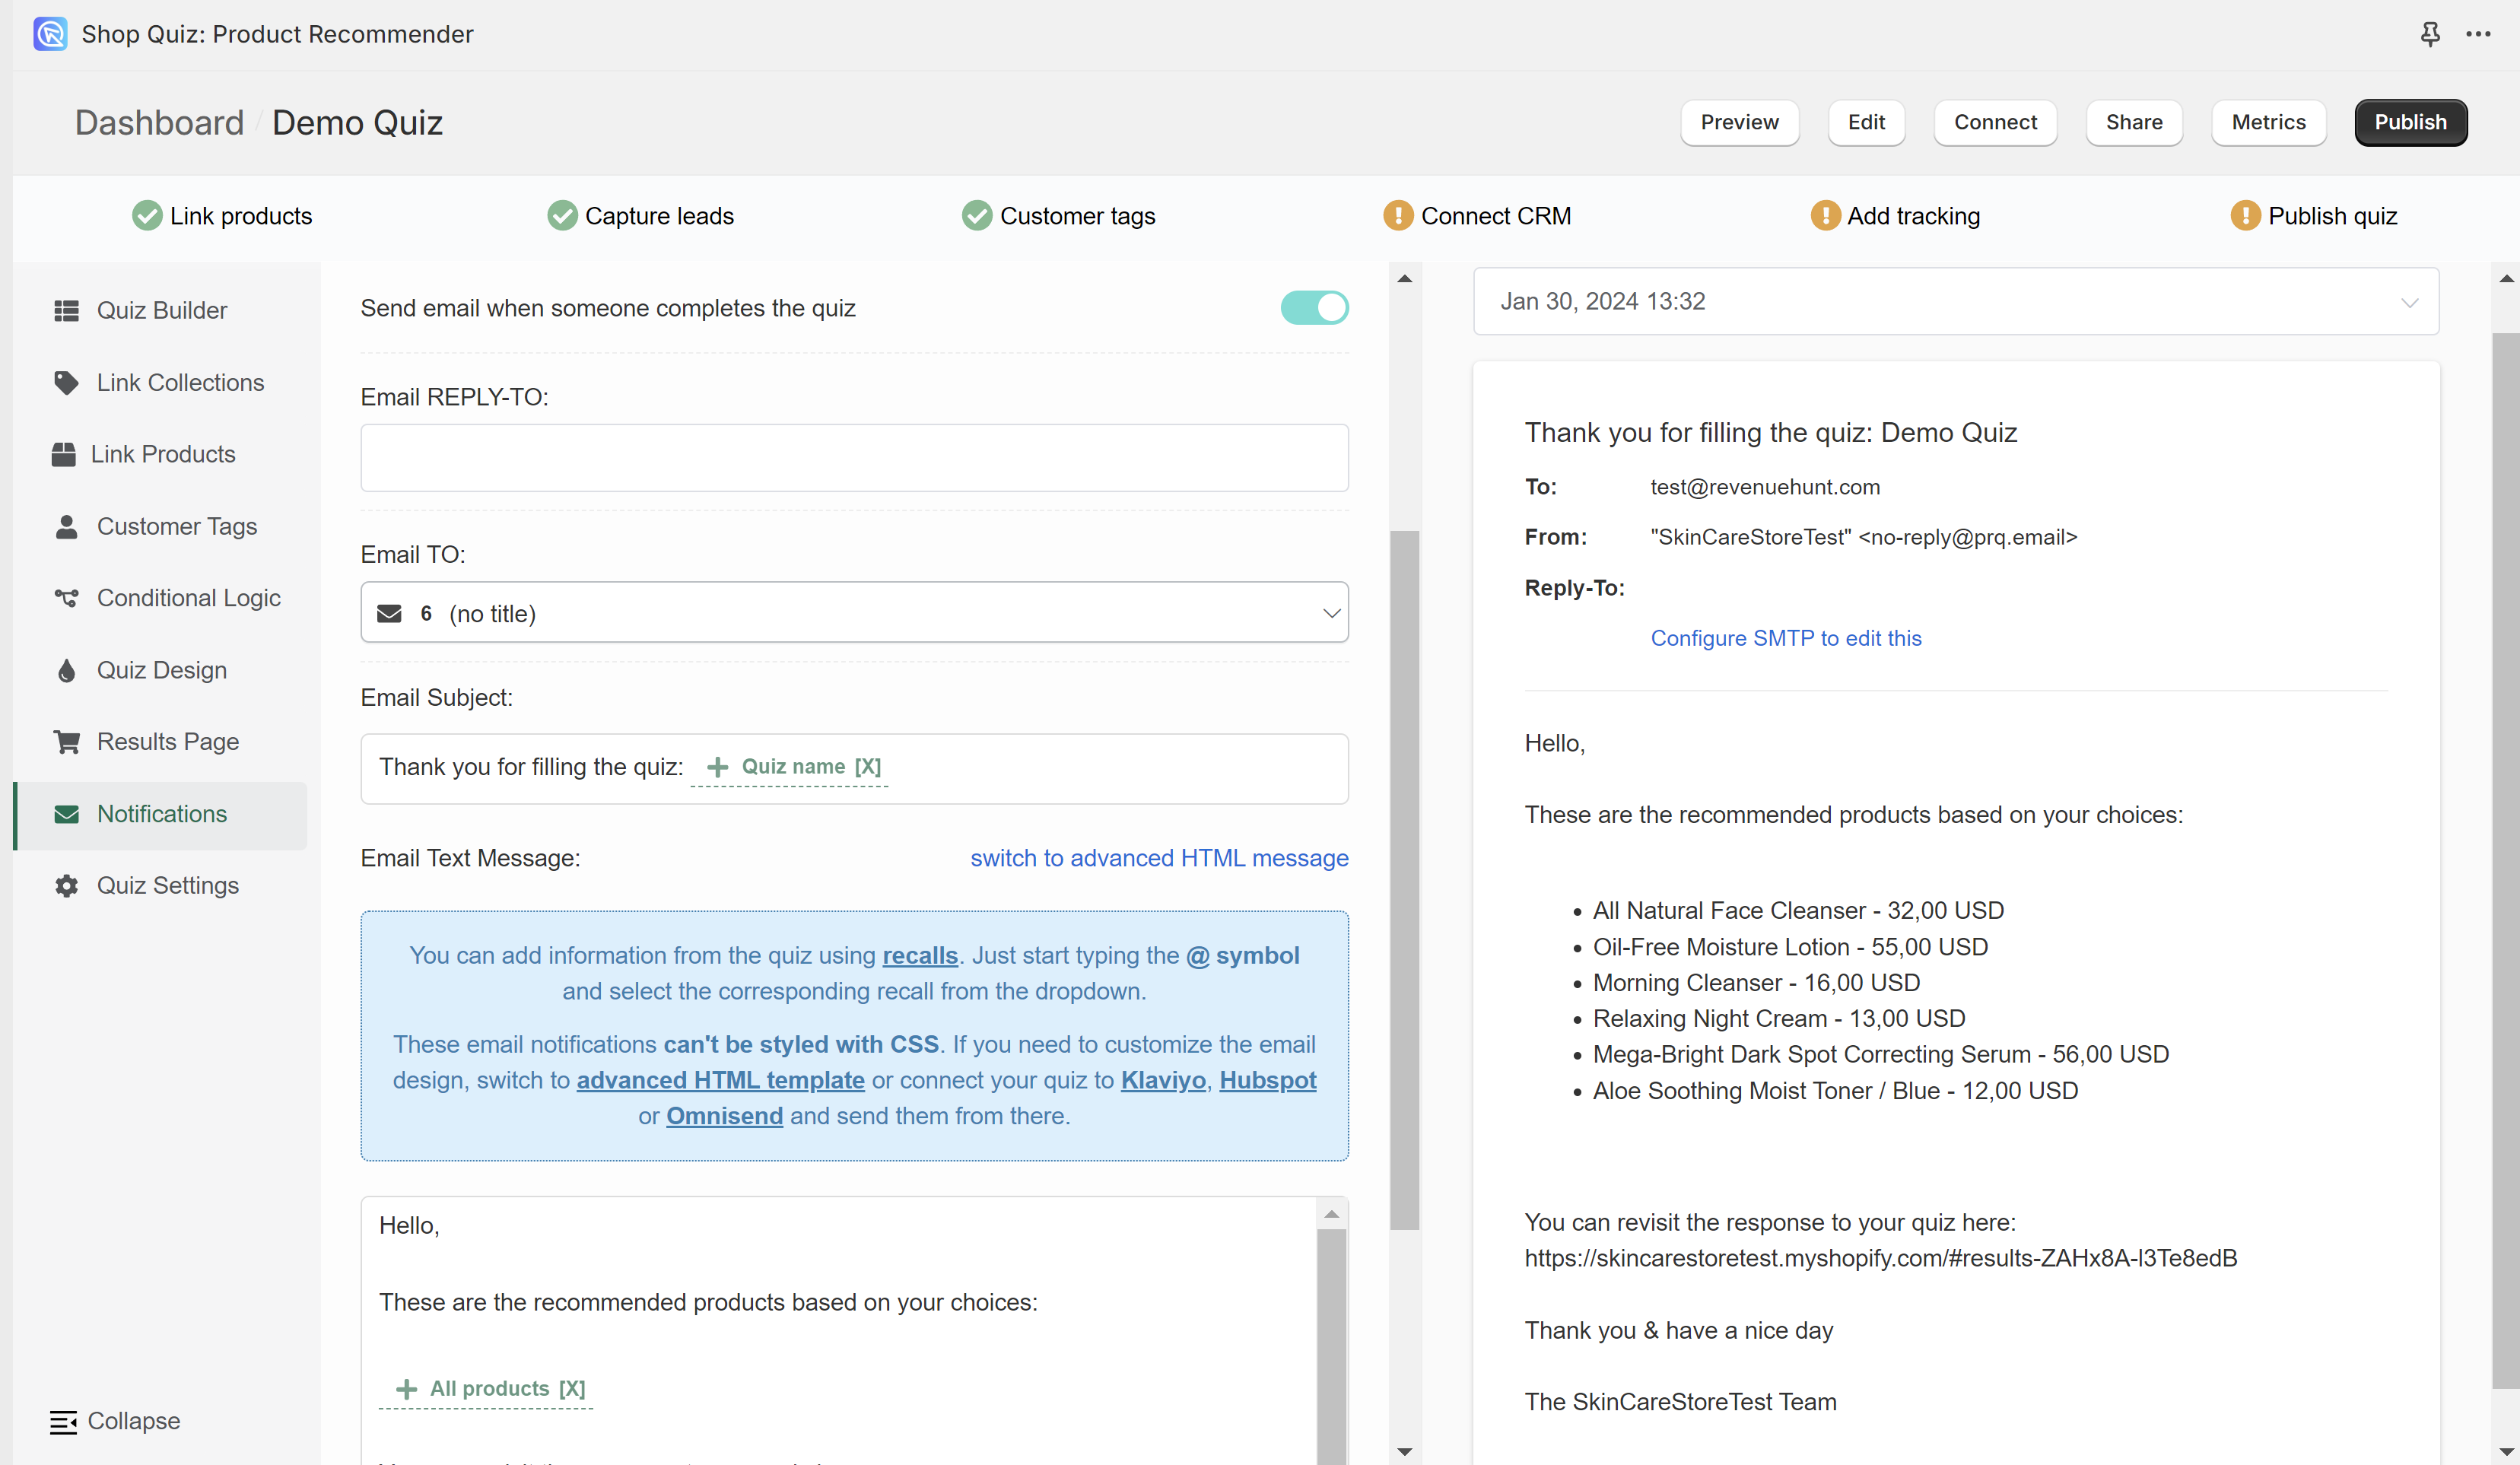
- Edit REPLY-TO: Choose what email the customers will be able to reply to once they receive the results.
- Email TO: Choose which email question supplies the address. With only one email question in the quiz, it is selected for you.
- Email Subject: Edit the title of the email that customers will receive. You can use
@to recall information such as the customer name or the quiz name in the title field. - Edit Email Content: Configure the email your customers will receive. You can choose between a Basic (text) email format or Advanced (HTML) email format. You can switch between the two by clicking
switch to advanced HTML messageorswitch to basic text messagein theEmail Text Messagefield.- Basic text email template. Type the text you want the customer to see in the
Email Text Messagefield. Add dynamic elements with@, or with an Information Recall, to pull in the customer name, email, phone number, quiz name, answers and recommended products. The basic template shows no images and no color, and has the best deliverability.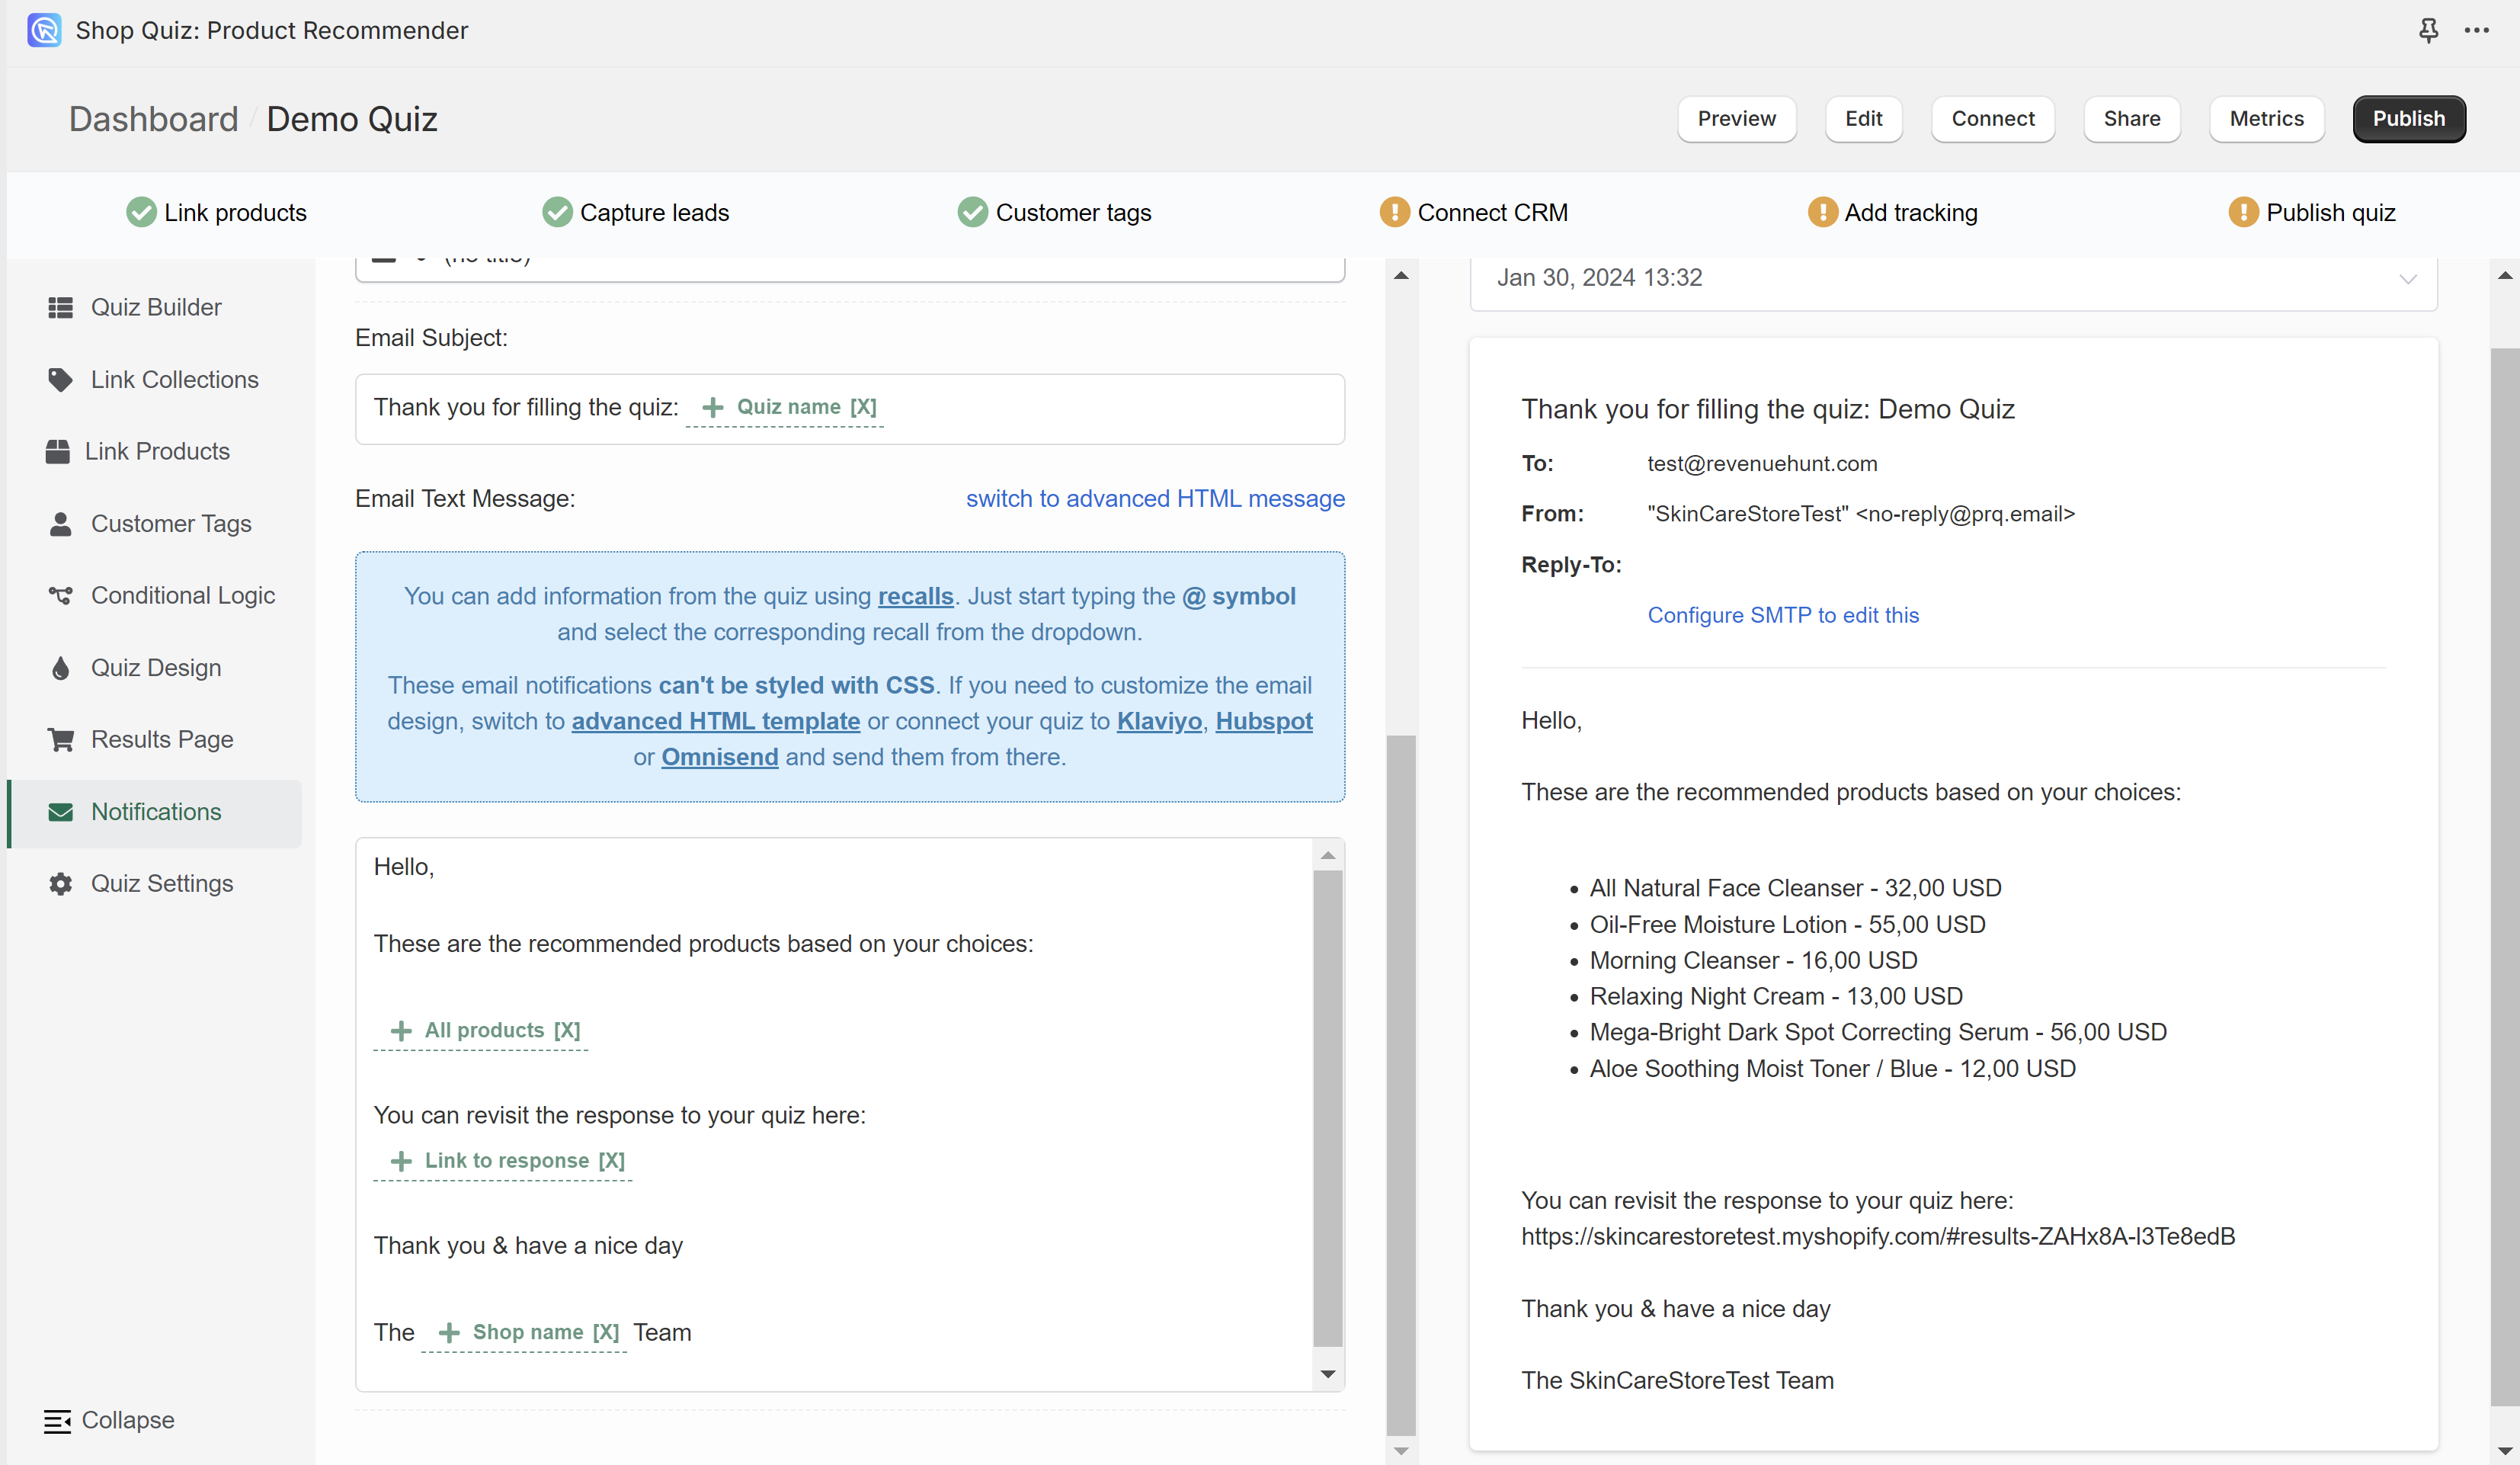
- Advanced HTML email template. Editing it needs HTML and Handlebars helpers. Use quiz response metadata such as
{{first_name}}to personalize an email, and use Handlebars to loop over recommended products. HTML emails do not render the same way in every email client, so add styles inline rather than as classes. Email clients do not run JavaScript. Read more in Editing Email Templates.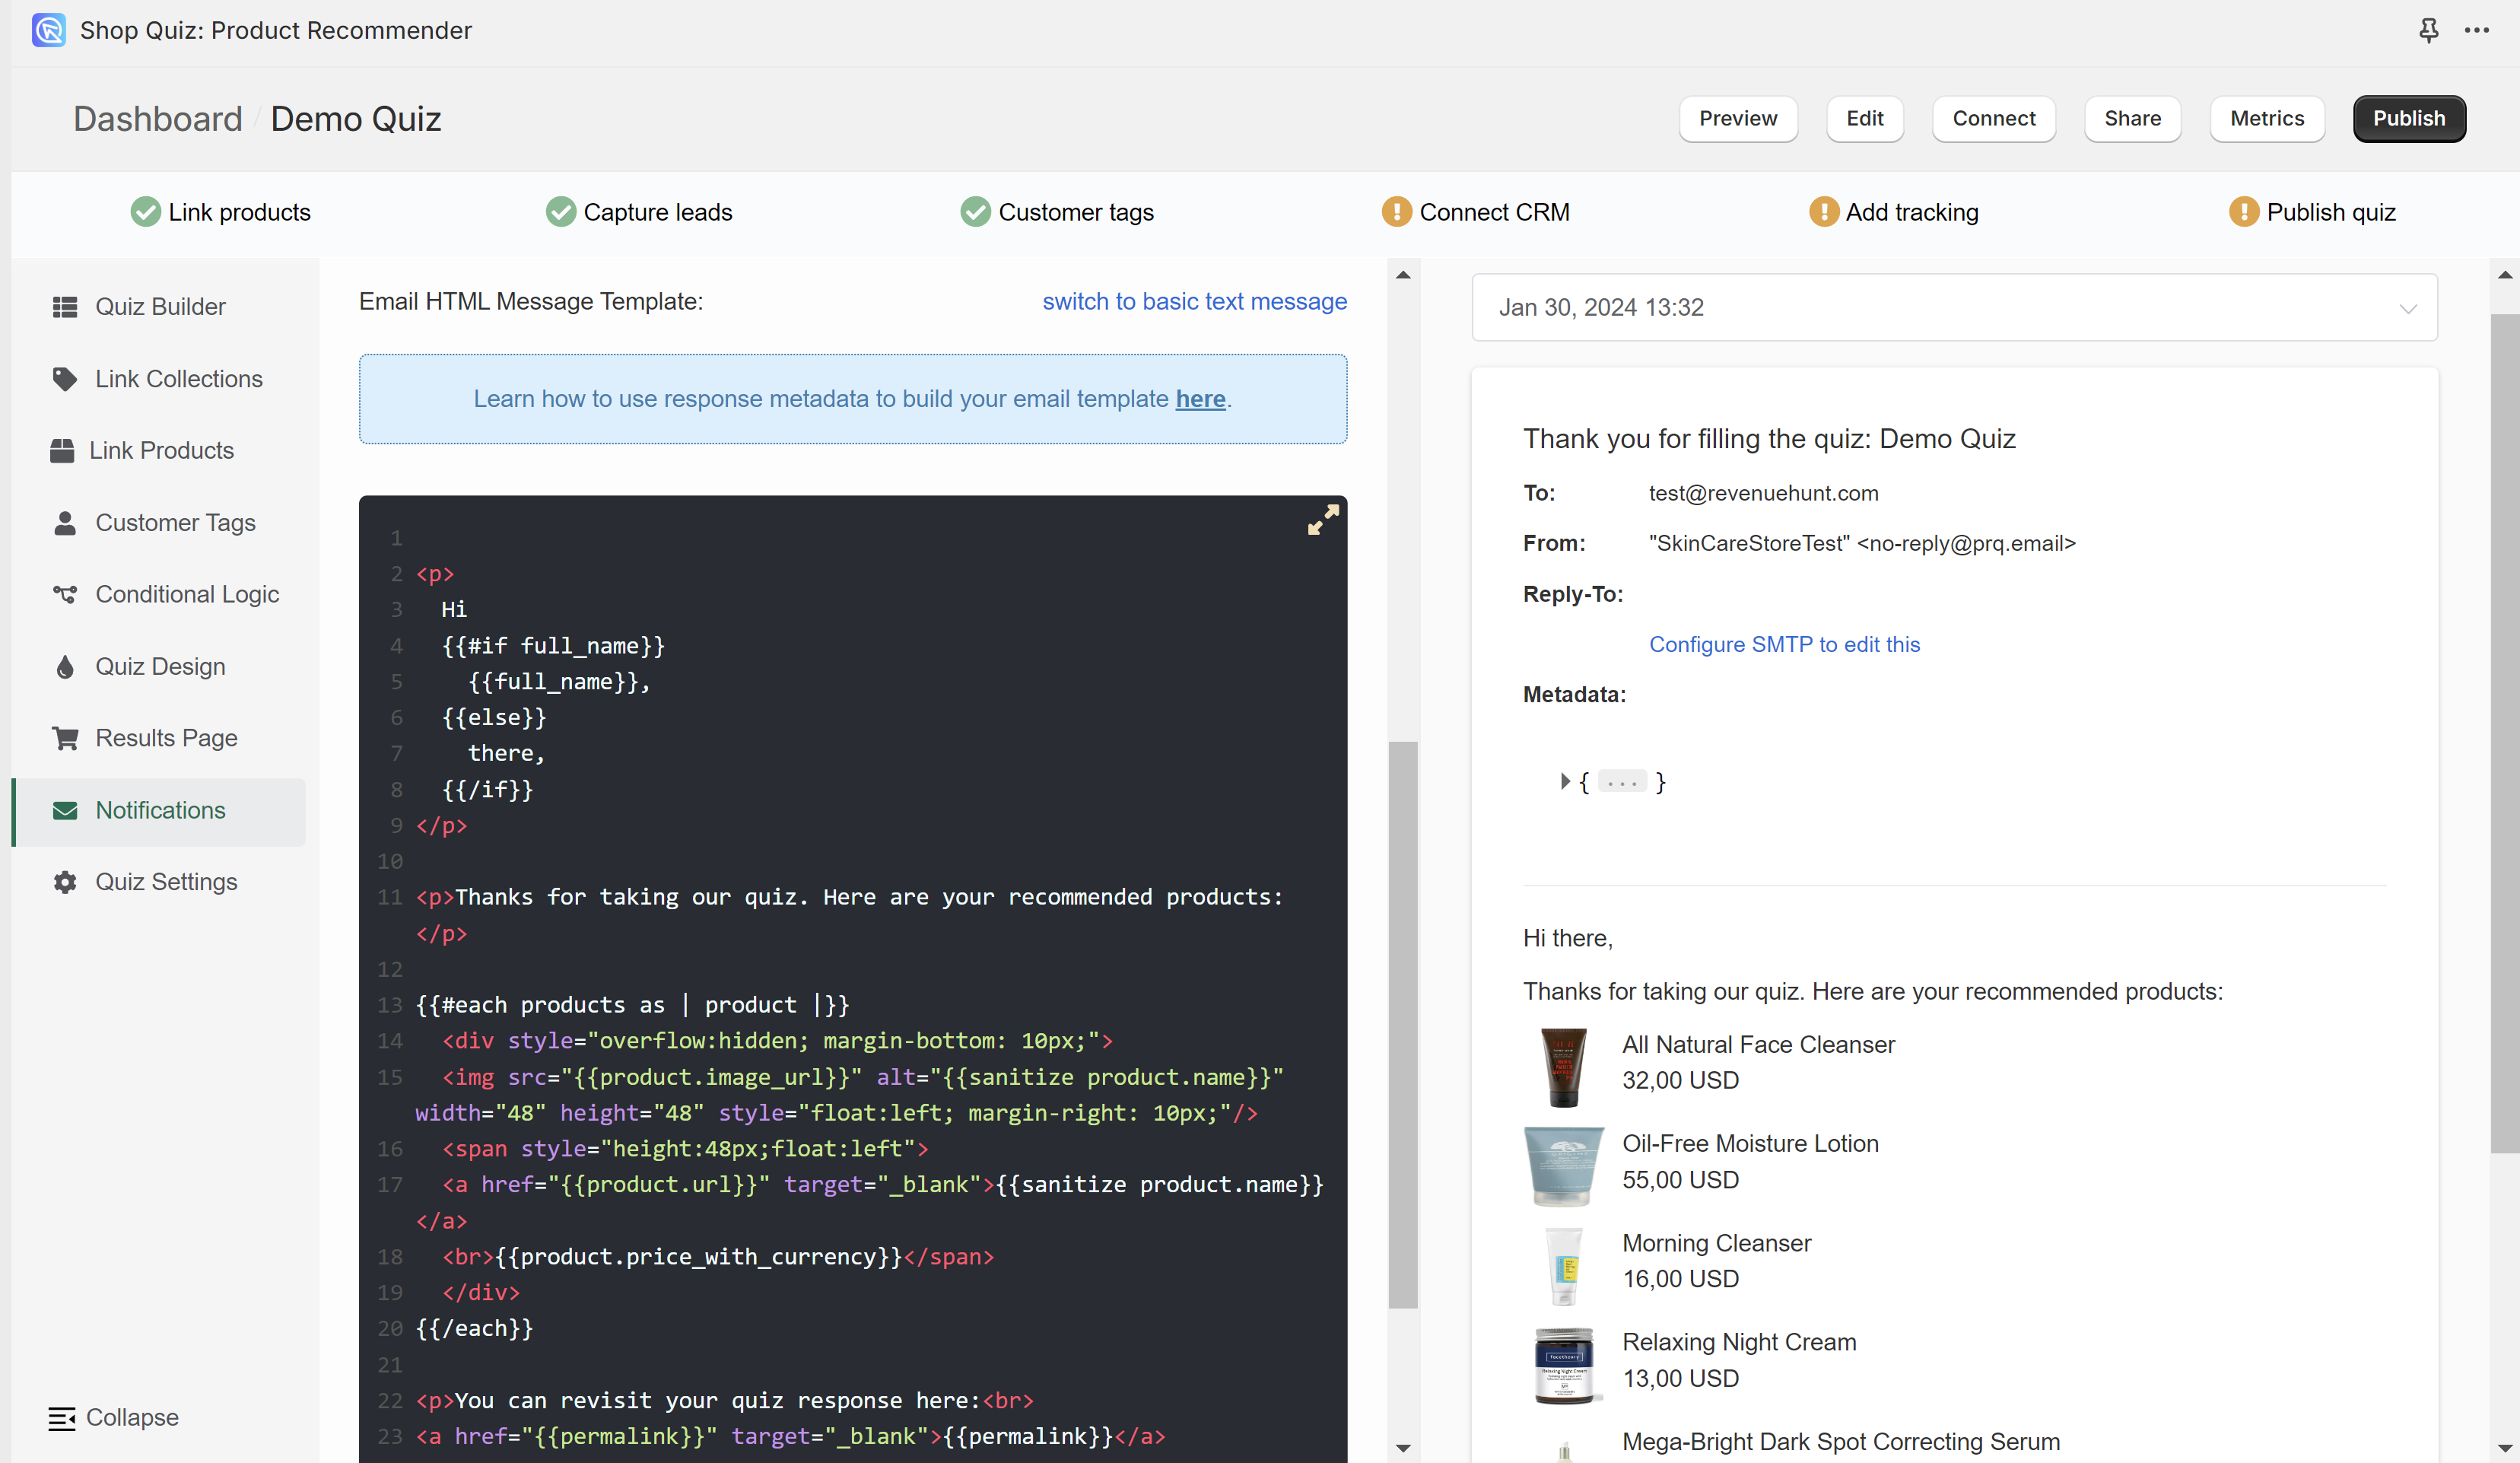
- Basic text email template. Type the text you want the customer to see in the
- Publish the changes: Publish the changes with the top-right
Publishbutton to update the preview and the live quiz.
-
Add Your SMTP Credentials: Go to
App Settings > SMTPand enter your SMTP credentials. See how to send result emails from your own server for the setup.Note
SMTP stands for Simple Mail Transfer Protocol. SMTP is a connection protocol that enables third-party apps (e.g. RevenueHunt) to send emails through your email server.
Once the RevenueHunt app is connected to your SMTP server, the follow-up emails with quiz results are sent from your own email account.
If you are not sure which credentials to use, check your email provider's documentation for "SMTP", or contact their support.
-
Add Email Question: Your quiz needs an email question before you set up result emails. Add one in the Quiz Builder.
- Activate the email to customers. Go to
Notifications > TO RESPONDENTand toggleSend email when someone completes the quiz. - Edit REPLY-TO: Choose what email the customers will be able to reply to once they receive the results.
- Email TO: Choose which email question supplies the address. With only one email question in the quiz, it is selected for you.
- Email Subject: Edit the title of the email that customers will receive. You can use
@to recall information such as the customer name or the quiz name in the title field. - Edit Email Content: Configure the email your customers will receive. You can choose between a Basic (text) email format or Advanced (HTML) email format. You can switch between the two by clicking
switch to advanced HTML messageorswitch to basic text messagein theEmail Text Messagefield.- Basic text email template. Type the text you want the customer to see in the
Email Text Messagefield. Add dynamic elements with@, or with an Information Recall, to pull in the customer name, email, phone number, quiz name, answers and recommended products. The basic template shows no images and no color, and has the best deliverability. - Advanced HTML email template. Editing it needs HTML and Handlebars helpers. Use quiz response metadata such as
{{first_name}}to personalize an email, and use Handlebars to loop over recommended products. HTML emails do not render the same way in every email client, so add styles inline rather than as classes. Email clients do not run JavaScript. Read more in Editing Email Templates.
- Basic text email template. Type the text you want the customer to see in the
- Publish the changes: Publish the changes with the top-right
Publishbutton to update the preview and the live quiz.
-
Add Your SMTP Credentials: Go to
App Settings > SMTPand enter your SMTP credentials. See how to send result emails from your own server for the setup.Note
SMTP stands for Simple Mail Transfer Protocol. SMTP is a connection protocol that enables third-party apps (e.g. RevenueHunt) to send emails through your email server.
Once the RevenueHunt app is connected to your SMTP server, the follow-up emails with quiz results are sent from your own email account.
If you are not sure which credentials to use, check your email provider's documentation for "SMTP", or contact their support.
-
Add Email Question: Your quiz needs an email question before you set up result emails. Add one in the Quiz Builder.
- Activate the email to customers. Go to
Notifications > TO RESPONDENTand toggleSend email when someone completes the quiz. - Edit REPLY-TO: Choose what email the customers will be able to reply to once they receive the results.
- Email TO: Choose which email question supplies the address. With only one email question in the quiz, it is selected for you.
- Email Subject: Edit the title of the email that customers will receive. You can use
@to recall information such as the customer name or the quiz name in the title field. - Edit Email Content: Configure the email your customers will receive. You can choose between a Basic (text) email format or Advanced (HTML) email format. You can switch between the two by clicking
switch to advanced HTML messageorswitch to basic text messagein theEmail Text Messagefield.- Basic text email template. Type the text you want the customer to see in the
Email Text Messagefield. Add dynamic elements with@, or with an Information Recall, to pull in the customer name, email, phone number, quiz name, answers and recommended products. The basic template shows no images and no color, and has the best deliverability. - Advanced HTML email template. Editing it needs HTML and Handlebars helpers. Use quiz response metadata such as
{{first_name}}to personalize an email, and use Handlebars to loop over recommended products. HTML emails do not render the same way in every email client, so add styles inline rather than as classes. Email clients do not run JavaScript. Read more in Editing Email Templates.
- Basic text email template. Type the text you want the customer to see in the
- Publish the changes: Publish the changes with the top-right
Publishbutton to update the preview and the live quiz.
-
Add Your SMTP Credentials: Go to
App Settings > SMTPand enter your SMTP credentials. See how to send result emails from your own server for the setup.Note
SMTP stands for Simple Mail Transfer Protocol. SMTP is a connection protocol that enables third-party apps (e.g. RevenueHunt) to send emails through your email server.
Once the RevenueHunt app is connected to your SMTP server, the follow-up emails with quiz results are sent from your own email account.
If you are not sure which credentials to use, check your email provider's documentation for "SMTP", or contact their support.
-
Add Email Question: Your quiz needs an email question before you set up result emails. Add one in the Quiz Builder.
- Activate the email to customers. Go to
Notifications > TO RESPONDENTand toggleSend email when someone completes the quiz. - Edit REPLY-TO: Choose what email the customers will be able to reply to once they receive the results.
- Email TO: Choose which email question supplies the address. With only one email question in the quiz, it is selected for you.
- Email Subject: Edit the title of the email that customers will receive. You can use
@to recall information such as the customer name or the quiz name in the title field. - Edit Email Content: Configure the email your customers will receive. You can choose between a Basic (text) email format or Advanced (HTML) email format. You can switch between the two by clicking
switch to advanced HTML messageorswitch to basic text messagein theEmail Text Messagefield.- Basic text email template. Type the text you want the customer to see in the
Email Text Messagefield. Add dynamic elements with@, or with an Information Recall, to pull in the customer name, email, phone number, quiz name, answers and recommended products. The basic template shows no images and no color, and has the best deliverability. - Advanced HTML email template. Editing it needs HTML and Handlebars helpers. Use quiz response metadata such as
{{first_name}}to personalize an email, and use Handlebars to loop over recommended products. HTML emails do not render the same way in every email client, so add styles inline rather than as classes. Email clients do not run JavaScript. Read more in Editing Email Templates.
- Basic text email template. Type the text you want the customer to see in the
- Publish the changes: Publish the changes with the top-right
Publishbutton to update the preview and the live quiz.
-
Add Your SMTP Credentials: Go to
App Settings > SMTPand enter your SMTP credentials. See how to send result emails from your own server for the setup.Note
SMTP stands for Simple Mail Transfer Protocol. SMTP is a connection protocol that enables third-party apps (e.g. RevenueHunt) to send emails through your email server.
Once the RevenueHunt app is connected to your SMTP server, the follow-up emails with quiz results are sent from your own email account.
If you are not sure which credentials to use, check your email provider's documentation for "SMTP", or contact their support.
-
Add Email Question: Your quiz needs an email question before you set up result emails. Add one in the Quiz Builder.
- Activate the email to customers. Go to
Notifications > TO RESPONDENTand toggleSend email when someone completes the quiz. - Edit REPLY-TO: Choose what email the customers will be able to reply to once they receive the results.
- Email TO: Choose which email question supplies the address. With only one email question in the quiz, it is selected for you.
- Email Subject: Edit the title of the email that customers will receive. You can use
@to recall information such as the customer name or the quiz name in the title field. - Edit Email Content: Configure the email your customers will receive. You can choose between a Basic (text) email format or Advanced (HTML) email format. You can switch between the two by clicking
switch to advanced HTML messageorswitch to basic text messagein theEmail Text Messagefield.- Basic text email template. Type the text you want the customer to see in the
Email Text Messagefield. Add dynamic elements with@, or with an Information Recall, to pull in the customer name, email, phone number, quiz name, answers and recommended products. The basic template shows no images and no color, and has the best deliverability. - Advanced HTML email template. Editing it needs HTML and Handlebars helpers. Use quiz response metadata such as
{{first_name}}to personalize an email, and use Handlebars to loop over recommended products. HTML emails do not render the same way in every email client, so add styles inline rather than as classes. Email clients do not run JavaScript. Read more in Editing Email Templates.
- Basic text email template. Type the text you want the customer to see in the
- Publish the changes: Publish the changes with the top-right
Publishbutton to update the preview and the live quiz.
Sending emails to yourself
- Activate the email to yourself. Go to
Quiz settings > Emails to selfand checkReceive an email when someone completes the quiz.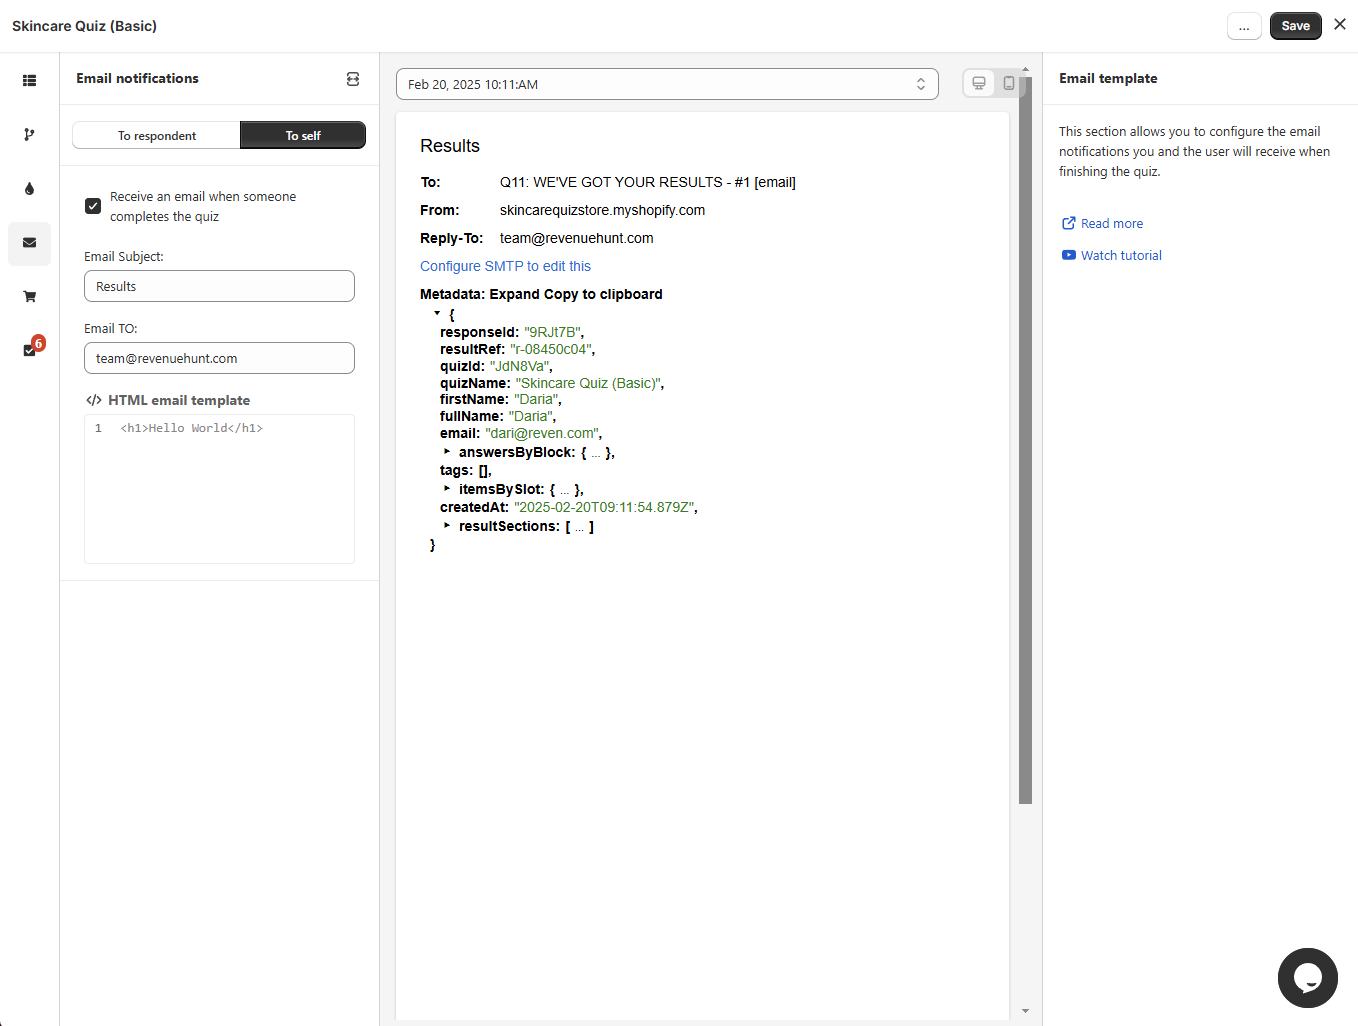
- Set the address that receives it. Choose the address that receives the notification, such as a company or personal email.
- Set the
Email Subject. Edit the subject line of the notification email. -
Build the
Email Liquid Template. Configure the email you receive. Edit the Liquid email template.- The default Liquid template includes all customer answers from the quiz. You can edit this template to include additional information.
-
Use the
useful code snippetsto add customer information. Click a snippet to copy it, then paste it at the top of your email Liquid template.Tip
You can copy the useful code snippets and paste them into a large language model like ChatGPT or Gemini to style the Liquid email template.
-
You can always reset the email template to default settings.
-
Email Preview: Use the Email preview section to see how the email looks for different customers.
RecommendedAdd Your SMTP Credentials: To connect your own email server, see Sending Emails from Your Servers (SMTP).- Save the changes: Save the changes with the top
Savebutton. - Preview the quiz: Return to the dashboard and preview the quiz. Complete it all the way to the results page to trigger the email notification.
-
Add Your SMTP Credentials: Go to
App Settings > SMTPand enter your SMTP credentials. See how to send result emails from your own server for the setup.Note
SMTP stands for Simple Mail Transfer Protocol. SMTP is a connection protocol that enables third-party apps (e.g. RevenueHunt) to send emails through your email server.
When you connect the RevenueHunt app to your SMTP Server, the notification emails to admin will be sent from your email account.
If you are not sure which credentials to use, check your email provider's documentation for "SMTP", or contact their support.
-
Open Notifications: Navigate to
Notifications > TO SELFin your quiz dashboard. - Activate Notifications: Toggle the button to activate the emails. You can get an email for each quiz completion, and for each cart or checkout.
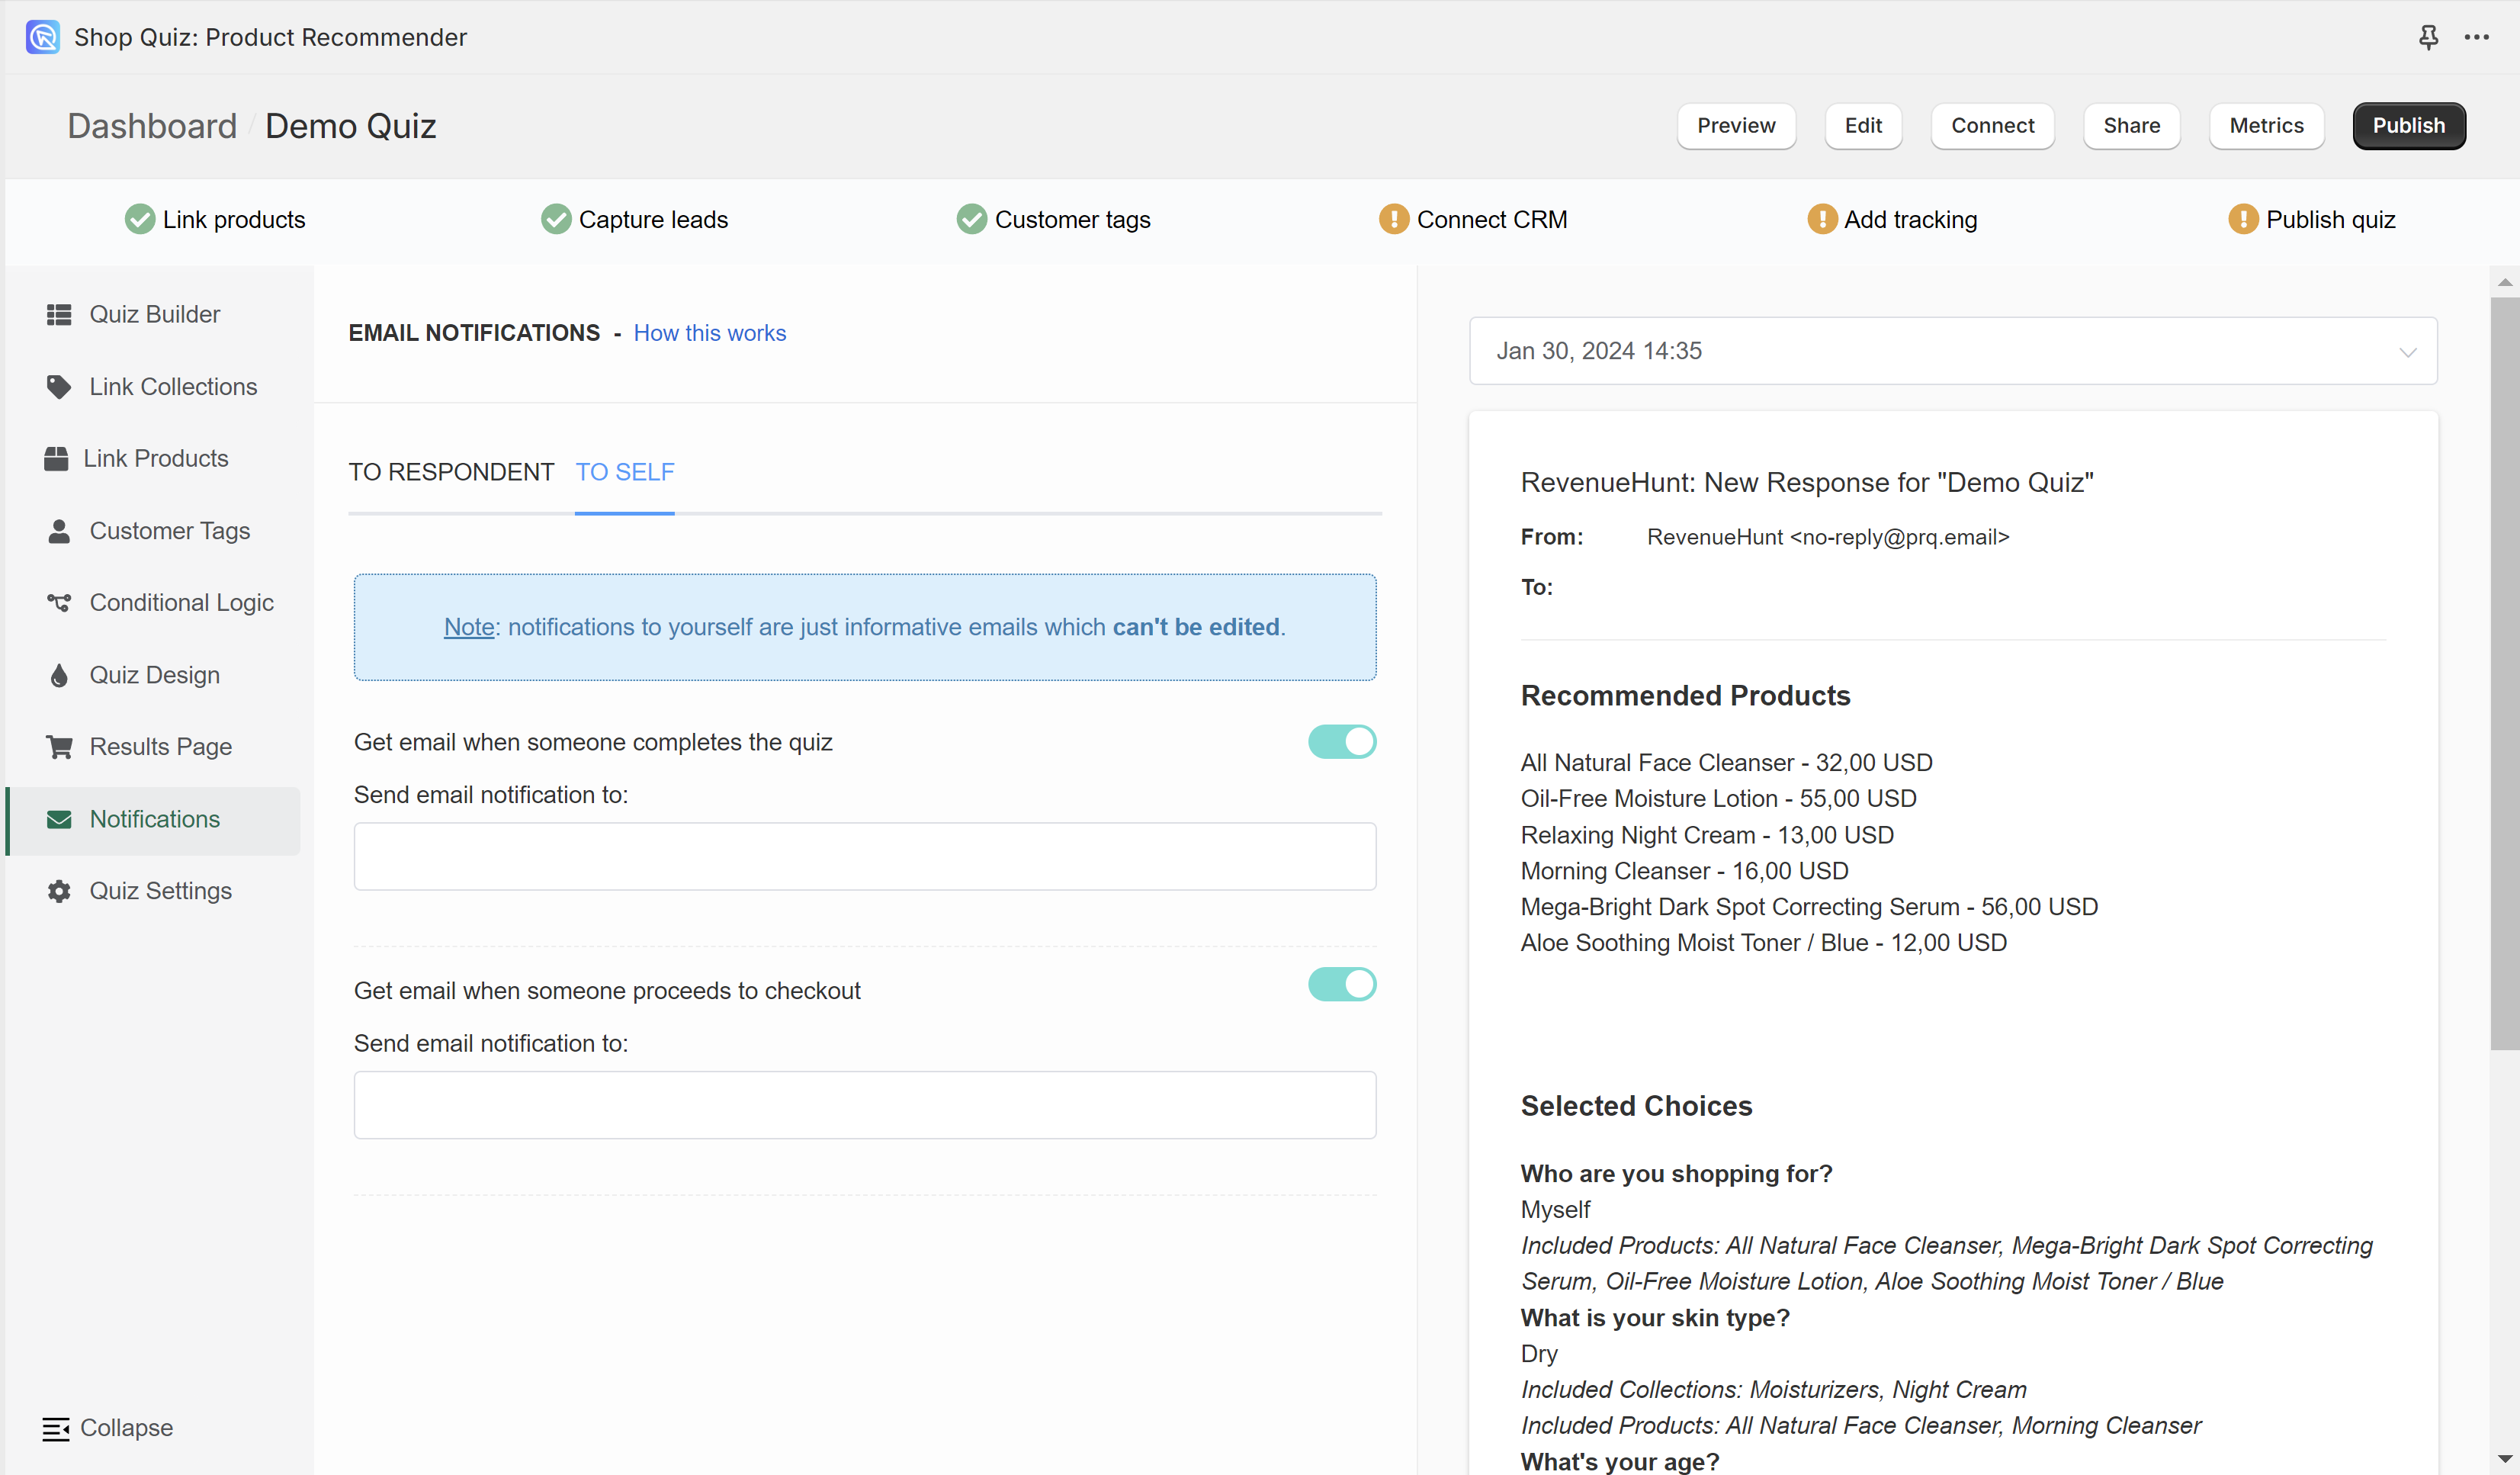
- Add your email address in the
Send email notification tofield. - Publish the changes: Remember to publish the changes with the top-right
Publishbutton.
-
Add Your SMTP Credentials: Go to
App Settings > SMTPand enter your SMTP credentials. See how to send result emails from your own server for the setup.Note
SMTP stands for Simple Mail Transfer Protocol. SMTP is a connection protocol that enables third-party apps (e.g. RevenueHunt) to send emails through your email server.
When you connect the RevenueHunt app to your SMTP Server, the notification emails to admin will be sent from your email account.
If you are not sure which credentials to use, check your email provider's documentation for "SMTP", or contact their support.
-
Open Notifications: Navigate to
Notifications > TO SELFin your quiz dashboard. - Activate Notifications: Toggle the button to activate the emails. You can get an email for each quiz completion, and for each cart or checkout.
- Add your email address in the
Send email notification tofield. - Publish the changes: Remember to publish the changes with the top-right
Publishbutton.
-
Add Your SMTP Credentials: Go to
App Settings > SMTPand enter your SMTP credentials. See how to send result emails from your own server for the setup.Note
SMTP stands for Simple Mail Transfer Protocol. SMTP is a connection protocol that enables third-party apps (e.g. RevenueHunt) to send emails through your email server.
When you connect the RevenueHunt app to your SMTP Server, the notification emails to admin will be sent from your email account.
If you are not sure which credentials to use, check your email provider's documentation for "SMTP", or contact their support.
-
Open Notifications: Navigate to
Notifications > TO SELFin your quiz dashboard. - Activate Notifications: Toggle the button to activate the emails. You can get an email for each quiz completion, and for each cart or checkout.
- Add your email address in the
Send email notification tofield. - Publish the changes: Remember to publish the changes with the top-right
Publishbutton.
-
Add Your SMTP Credentials: Go to
App Settings > SMTPand enter your SMTP credentials. See how to send result emails from your own server for the setup.Note
SMTP stands for Simple Mail Transfer Protocol. SMTP is a connection protocol that enables third-party apps (e.g. RevenueHunt) to send emails through your email server.
When you connect the RevenueHunt app to your SMTP Server, the notification emails to admin will be sent from your email account.
If you are not sure which credentials to use, check your email provider's documentation for "SMTP", or contact their support.
-
Open Notifications: Navigate to
Notifications > TO SELFin your quiz dashboard. - Activate Notifications: Toggle the button to activate the emails. You can get an email for each quiz completion, and for each cart or checkout.
- Add your email address in the
Send email notification tofield. - Publish the changes: Remember to publish the changes with the top-right
Publishbutton.
-
Add Your SMTP Credentials: Go to
App Settings > SMTPand enter your SMTP credentials. See how to send result emails from your own server for the setup.Note
SMTP stands for Simple Mail Transfer Protocol. SMTP is a connection protocol that enables third-party apps (e.g. RevenueHunt) to send emails through your email server.
When you connect the RevenueHunt app to your SMTP Server, the notification emails to admin will be sent from your email account.
If you are not sure which credentials to use, check your email provider's documentation for "SMTP", or contact their support.
-
Open Notifications: Navigate to
Notifications > TO SELFin your quiz dashboard. - Activate Notifications: Toggle the button to activate the emails. You can get an email for each quiz completion, and for each cart or checkout.
- Add your email address in the
Send email notification tofield. - Publish the changes: Remember to publish the changes with the top-right
Publishbutton.
Sending emails from your servers (SMTP)
- Open App settings from the side menu.
- Open
SMTP settings. -
Fill in your SMTP server details.
SMTP credentials vary by email provider. To find yours:
- Check your email provider's documentation by searching for
SMTP. - See Specific SMTP configurations for common email providers.
- Contact your email provider's support team for assistance.
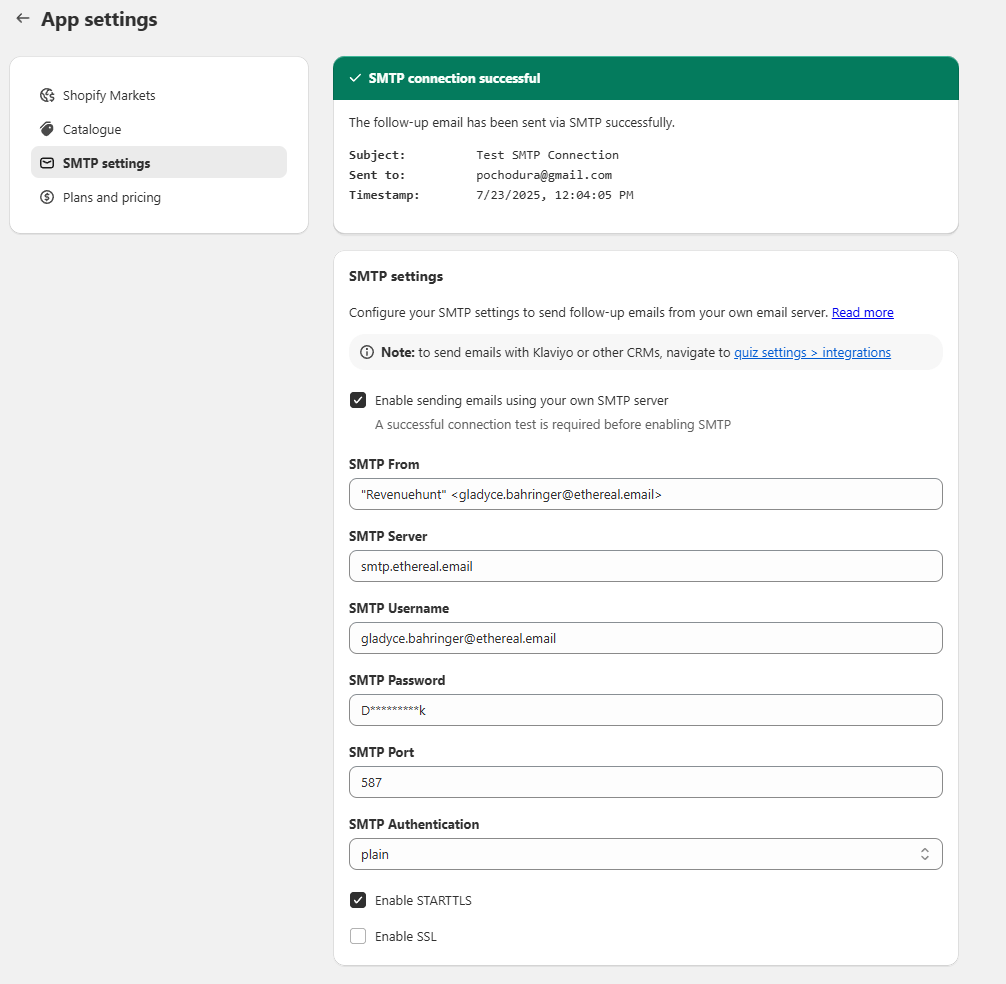
Fill in the following fields:
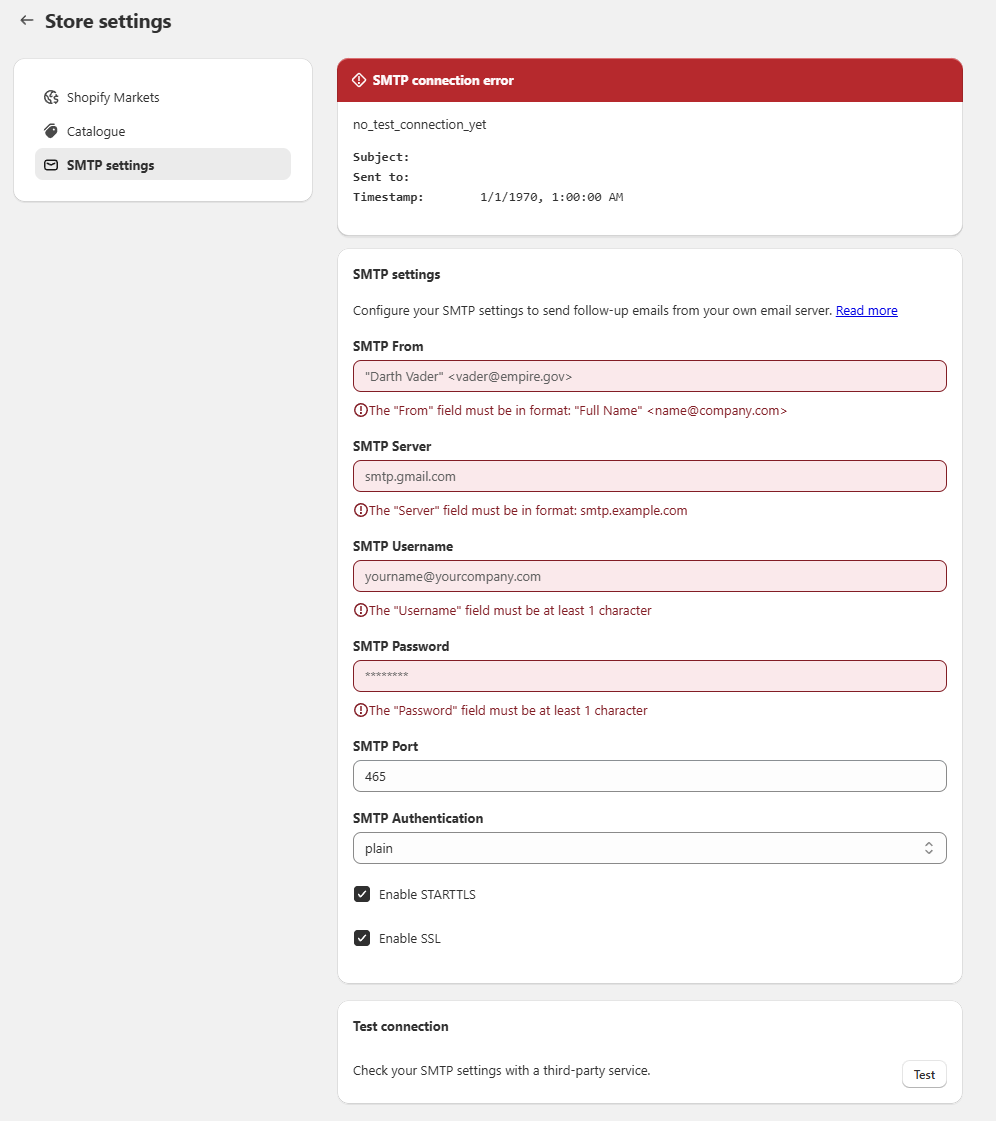
SMTP From: the name and address the customer sees. Use the format"Full Name" <name@company.com>.SMTP Server: the server address from your provider, such assmtp.example.com.SMTP Username: usually the email address your provider gave you.SMTP Password: the password for that username. Some providers issue a separate password for SMTP.SMTP Port: the port your provider specifies, usually25,465,587or2525.SMTP Authentication: pick your provider's method from the dropdown, usuallyplain.Encryption: chooseSTARTTLSorSSL/TLS, whichever your provider asks for. STARTTLS usually runs on port 587, and SSL/TLS on port 465.
Note
If you are not sure what to enter, contact your email service provider or search their documentation for
SMTP. - Check your email provider's documentation by searching for
-
Click
Test connection. The app sends a test email and reportsSMTP connection successful, with the subject, the recipient and the timestamp.If the test fails, check every credential again, the port first. See the troubleshooting guidelines.
-
Tick
Enable sending emails using your own SMTP server. The checkbox stays greyed out until a test passes. From then on, both quiz emails leave your own server rather than the RevenueHunt one.
- Open App Settings from your quiz dashboard.
-
Open the
SMTPtab. -
Fill in your SMTP server details.
Fill in the following fields:
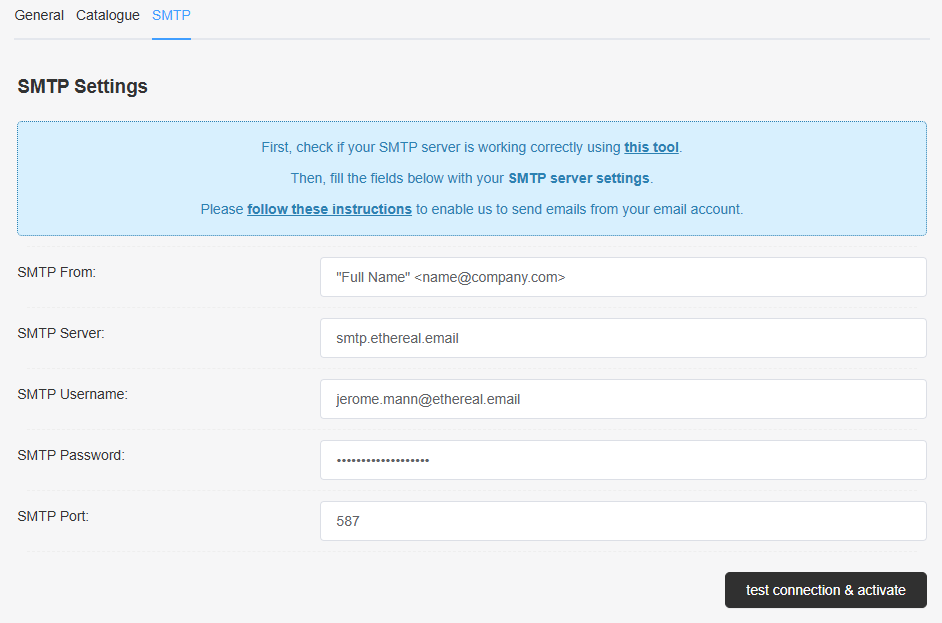
SMTP From: the name and address the customer sees. Use the format"Full Name" <name@company.com>.SMTP Server: the server address from your provider, such assmtp.example.com.SMTP Username: usually the email address your provider gave you.SMTP Password: the password for that username. Some providers issue a separate password for SMTP.SMTP Port: the port your provider specifies, usually25,465,587or2525.
SMTP settings vary by email provider. To find your settings:
- Search your email provider's documentation for 'SMTP'.
- Visit Specific SMTP configurations for common email provider instructions.
- Contact your email provider's support team for assistance.
Note
If you are not sure what to enter, contact your email service provider or search their documentation for
SMTP. -
Test and Activate: Click
test connection & activate. Once the test passes, all emails are sent from your server.If there are errors, please check the troubleshooting guidelines.
- Open App Settings from your quiz dashboard.
-
Open the
SMTPtab. -
Fill in your SMTP server details.
Fill in the following fields:
SMTP From: the name and address the customer sees. Use the format"Full Name" <name@company.com>.SMTP Server: the server address from your provider, such assmtp.example.com.SMTP Username: usually the email address your provider gave you.SMTP Password: the password for that username. Some providers issue a separate password for SMTP.SMTP Port: the port your provider specifies, usually25,465,587or2525.
SMTP settings vary by email provider. To find your settings:
- Search your email provider's documentation for 'SMTP'.
- Visit Specific SMTP configurations for common email provider instructions.
- Contact your email provider's support team for assistance.
Note
If you are not sure what to enter, contact your email service provider or search their documentation for
SMTP. -
Test and Activate: Click
test connection & activate. Once the test passes, all emails are sent from your server.If there are errors, please check the troubleshooting guidelines.
- Open App Settings from your quiz dashboard.
-
Open the
SMTPtab. -
Fill in your SMTP server details.
Fill in the following fields:
SMTP From: the name and address the customer sees. Use the format"Full Name" <name@company.com>.SMTP Server: the server address from your provider, such assmtp.example.com.SMTP Username: usually the email address your provider gave you.SMTP Password: the password for that username. Some providers issue a separate password for SMTP.SMTP Port: the port your provider specifies, usually25,465,587or2525.
SMTP settings vary by email provider. To find your settings:
- Search your email provider's documentation for 'SMTP'.
- Visit Specific SMTP configurations for common email provider instructions.
- Contact your email provider's support team for assistance.
Note
If you are not sure what to enter, contact your email service provider or search their documentation for
SMTP. -
Test and Activate: Click
test connection & activate. Once the test passes, all emails are sent from your server.If there are errors, please check the troubleshooting guidelines.
- Open App Settings from your quiz dashboard.
-
Open the
SMTPtab. -
Fill in your SMTP server details.
Fill in the following fields:
SMTP From: the name and address the customer sees. Use the format"Full Name" <name@company.com>.SMTP Server: the server address from your provider, such assmtp.example.com.SMTP Username: usually the email address your provider gave you.SMTP Password: the password for that username. Some providers issue a separate password for SMTP.SMTP Port: the port your provider specifies, usually25,465,587or2525.
SMTP settings vary by email provider. To find your settings:
- Search your email provider's documentation for 'SMTP'.
- Visit Specific SMTP configurations for common email provider instructions.
- Contact your email provider's support team for assistance.
Note
If you are not sure what to enter, contact your email service provider or search their documentation for
SMTP. -
Test and Activate: Click
test connection & activate. Once the test passes, all emails are sent from your server.If there are errors, see the troubleshooting guidelines.
- Open App Settings from your quiz dashboard.
-
Open the
SMTPtab. -
Fill in your SMTP server details.
Fill in the following fields:
SMTP From: the name and address the customer sees. Use the format"Full Name" <name@company.com>.SMTP Server: the server address from your provider, such assmtp.example.com.SMTP Username: usually the email address your provider gave you.SMTP Password: the password for that username. Some providers issue a separate password for SMTP.SMTP Port: the port your provider specifies, usually25,465,587or2525.
SMTP settings vary by email provider. To find your settings:
- Search your email provider's documentation for 'SMTP'.
- Visit Specific SMTP configurations for common email provider instructions.
- Contact your email provider's support team for assistance.
Note
If you are not sure what to enter, contact your email service provider or search their documentation for
SMTP. -
Test and Activate: Click
test connection & activate. Once the test passes, all emails are sent from your server.If there are errors, please check the troubleshooting guidelines.
You have set up emails with the RevenueHunt app.
This tutorial and video explain how to send emails to customers and to yourself, and how to connect your own email server over SMTP.