How to Send Quiz Leads to Klaviyo
Apart from giving your customers personalized product recommendations, you can connect your quiz to Klaviyo. This way all the contacts coming from the quiz will be added to your Klaviyo account and you can create targeted email campaigns to upsell them.
This article walks you through the process of connecting your quiz to Klaviyo and setting up post-quiz email flow. You can also follow our step-by-step tutorial.
Tutorial
You can also follow our step-by-step tutorial to learn how to connect your quiz to Klaviyo and send leads to Klaviyo: Sending Follow-up Emails with Klaviyo
Tutorial
You can also follow our step-by-step tutorial to learn how to connect your quiz to Klaviyo and send leads to Klaviyo: Sending Follow-up Emails with Klaviyo
Tutorial
You can also follow our step-by-step tutorial to learn how to connect your quiz to Klaviyo and send leads to Klaviyo: Sending Follow-up Emails with Klaviyo
Tutorial
You can also follow our step-by-step tutorial to learn how to connect your quiz to Klaviyo and send leads to Klaviyo: Sending Follow-up Emails with Klaviyo
Tutorial
You can also follow our step-by-step tutorial to learn how to connect your quiz to Klaviyo and send leads to Klaviyo: Sending Follow-up Emails with Klaviyo
Tutorial
You can also follow our step-by-step tutorial to learn how to connect your quiz to Klaviyo and send leads to Klaviyo: Sending Follow-up Emails with Klaviyo
Link Your Quiz to Klaviyo
The Klaviyo integration uses OAuth to securely connect your store to Klaviyo. This connection is made at the store level, meaning once connected, you can enable Klaviyo for any of your quizzes.
- Open the RevenueHunt app and navigate to any quiz.
- Go to
Quiz Settings > Integrationstab. - Scroll to the
Mailing & CRMssection and find the Klaviyo card. - Click the
Connectbutton. - You will be redirected to Klaviyo's authorization page. Log in to your Klaviyo account if prompted.
- Select the Klaviyo account you want to connect and review the permissions requested, then click
Allowto authorize the connection. - You will be redirected back to the RevenueHunt app. The Klaviyo card will now show as
Connected, with your account name and Site ID displayed. -
Klaviyo is automatically enabled for the quiz you initiated the connection from. You can enable it for other quizzes individually by opening
Quiz Settings > Integrationsand togglingSend quiz leads to Klaviyo. -
Publish the changes with the top
Savebutton. - Test the quiz all the way to the results. Make sure to provide a sample email that doesn’t already exist in your Klaviyo account.
- To verify the test, open
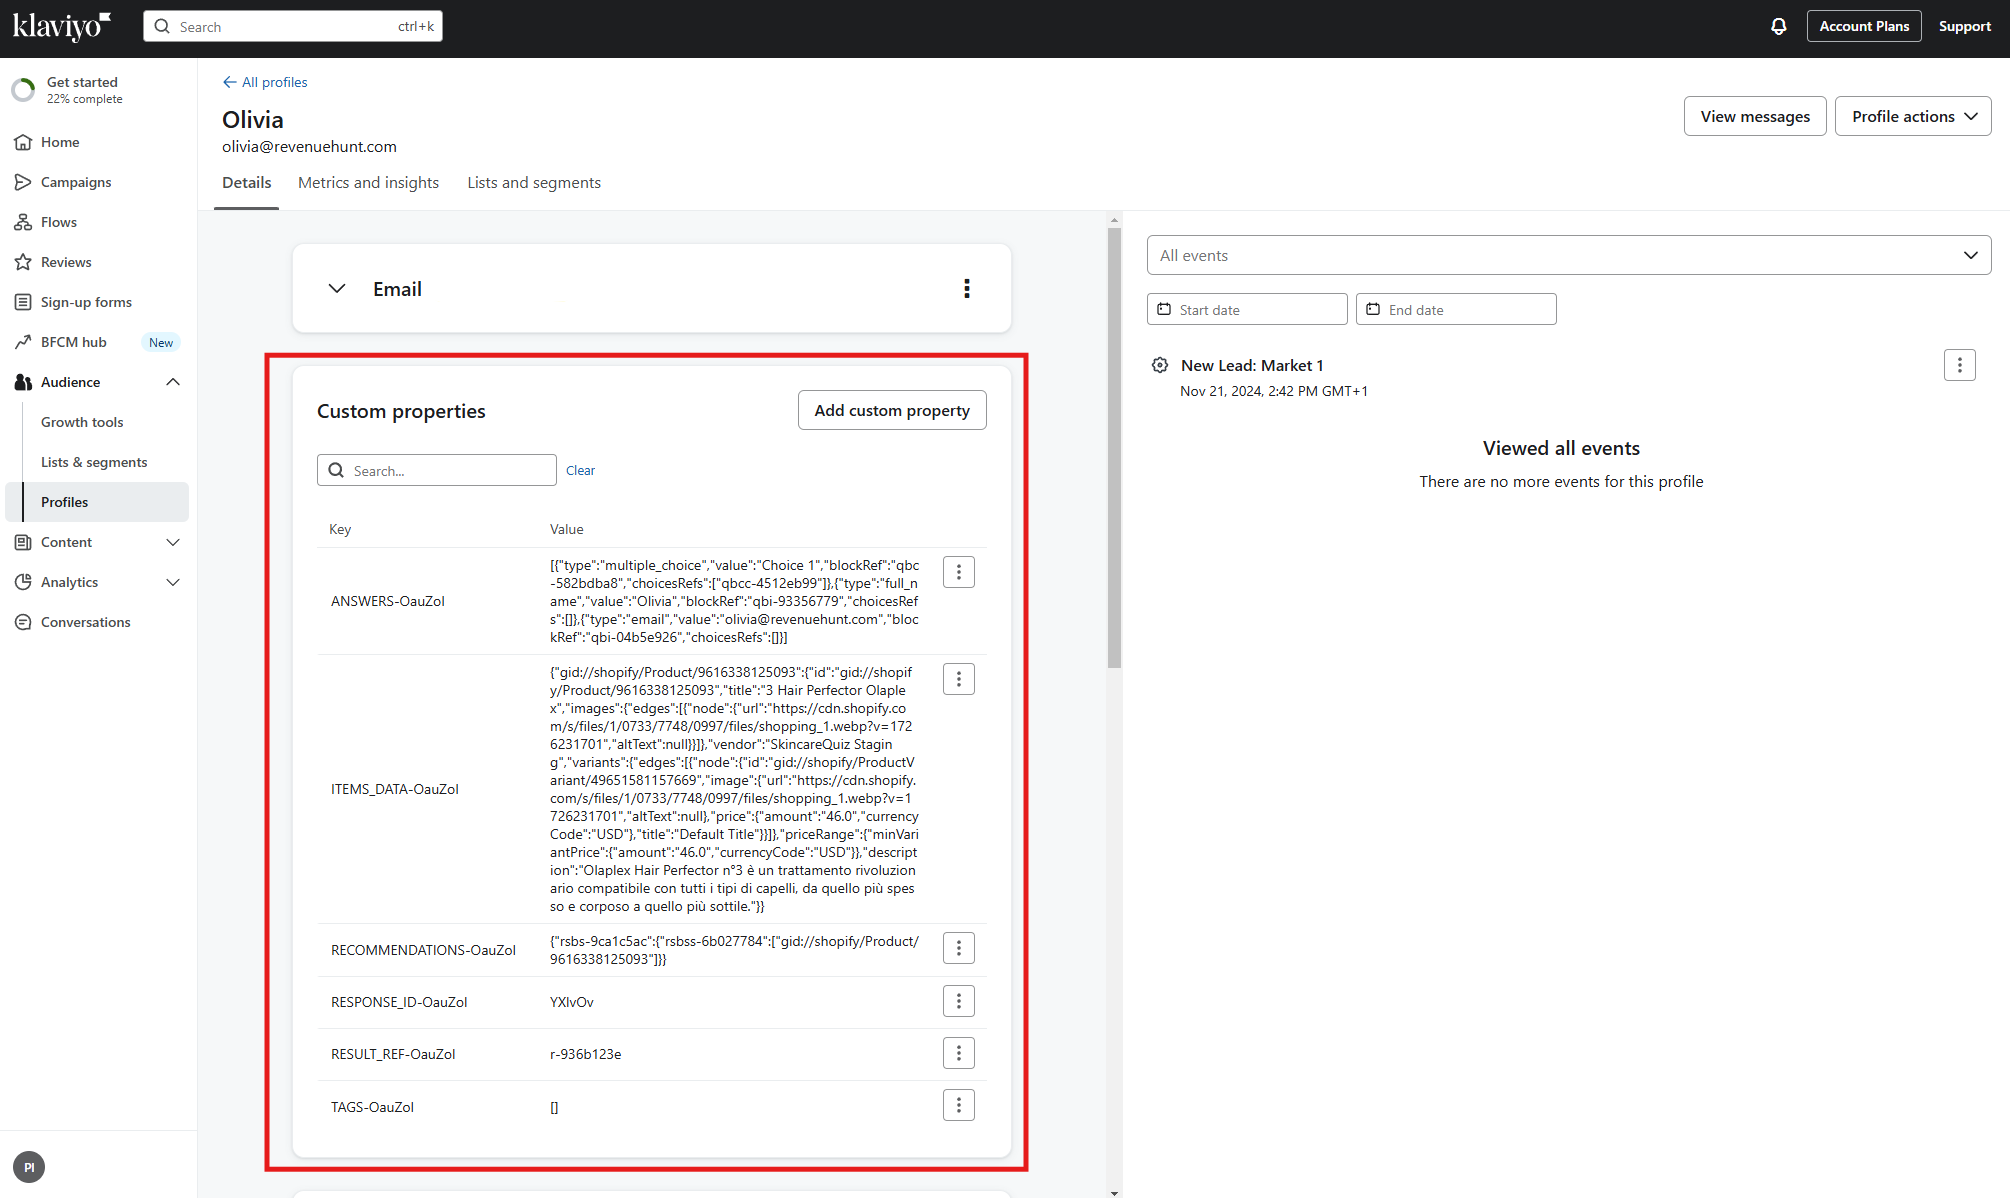
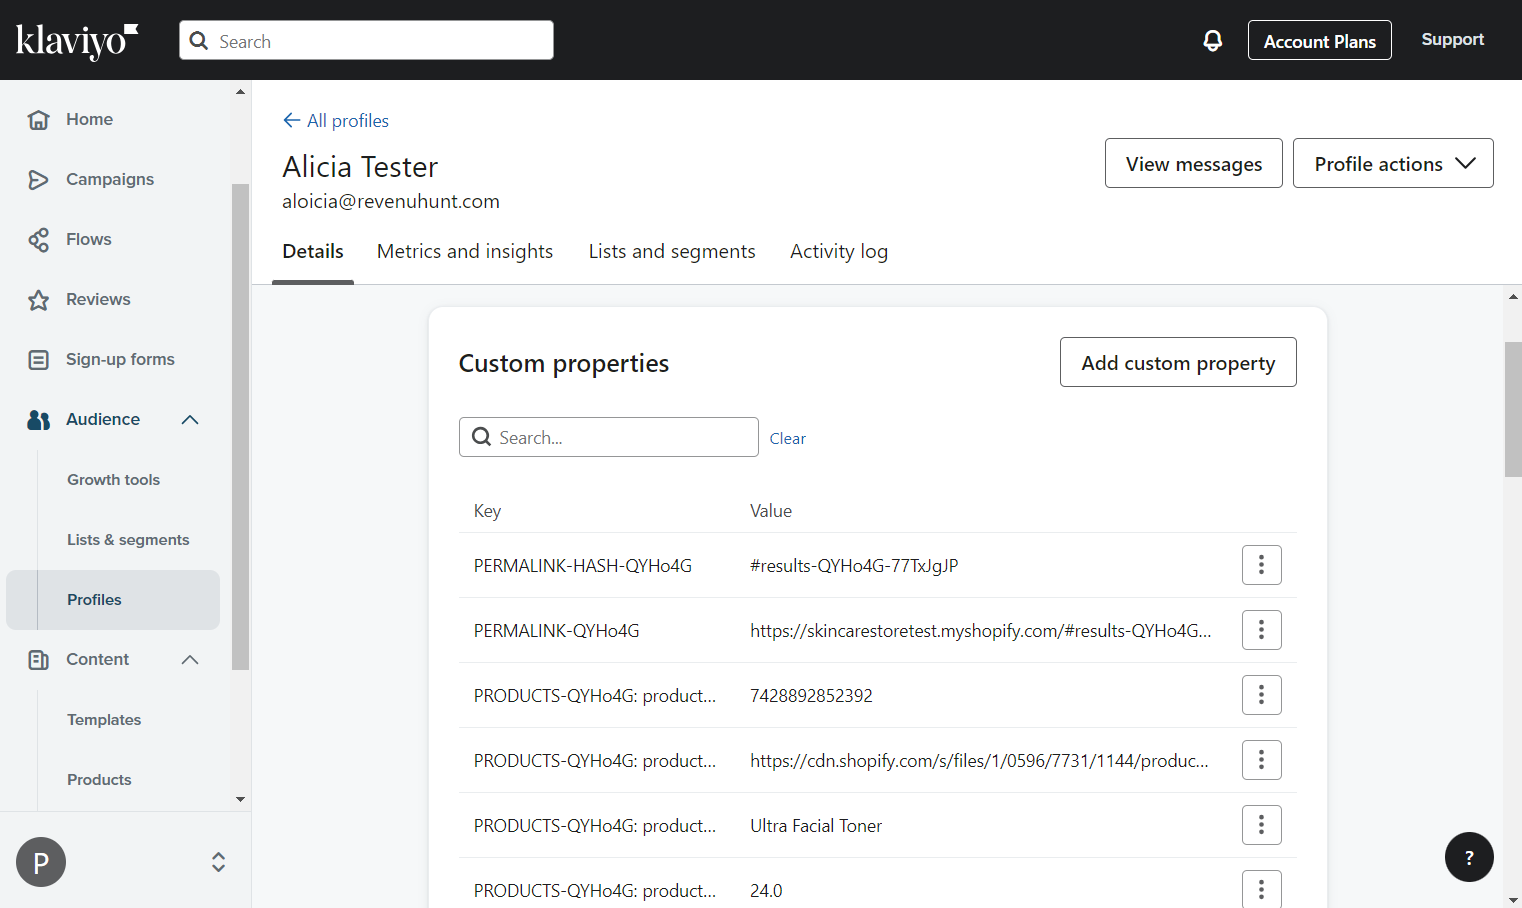
Klaviyo > Audience > Profiles. If a new profile was added the integration was successful.
From now on all the contacts coming from the quiz will be added to your Klaviyo account.
Reconnecting
If you previously connected Klaviyo and need to refresh permissions or switch accounts, click Reconnect on the Klaviyo card. Use Disconnect to revoke the connection entirely.
Legacy API key setup
Stores that configured Klaviyo before the OAuth integration still work using their saved Public and Private API keys. We recommend reconnecting via OAuth for the cleaner setup and automatic token management.
Custom Properties
Following these steps ensures that every quiz participant's contact information, alongside their responses and product recommendations, are forwarded to your Klaviyo account, registering as custom properties within Klaviyo customer Profiles. These properties are instrumental in personalizing Klaviyo email templates.
To connect the quiz to Klaviyo you’ll have to provide your Klaviyo Public API Key. Public API Key is essential because it allows us to send information to Klaviyo Profiles.
- To find your Public Key login to your Klaviyo account. In account
Settingsopen theAPI Keystab and copy the public API Key. You can get your Klaviyo Public API Key here.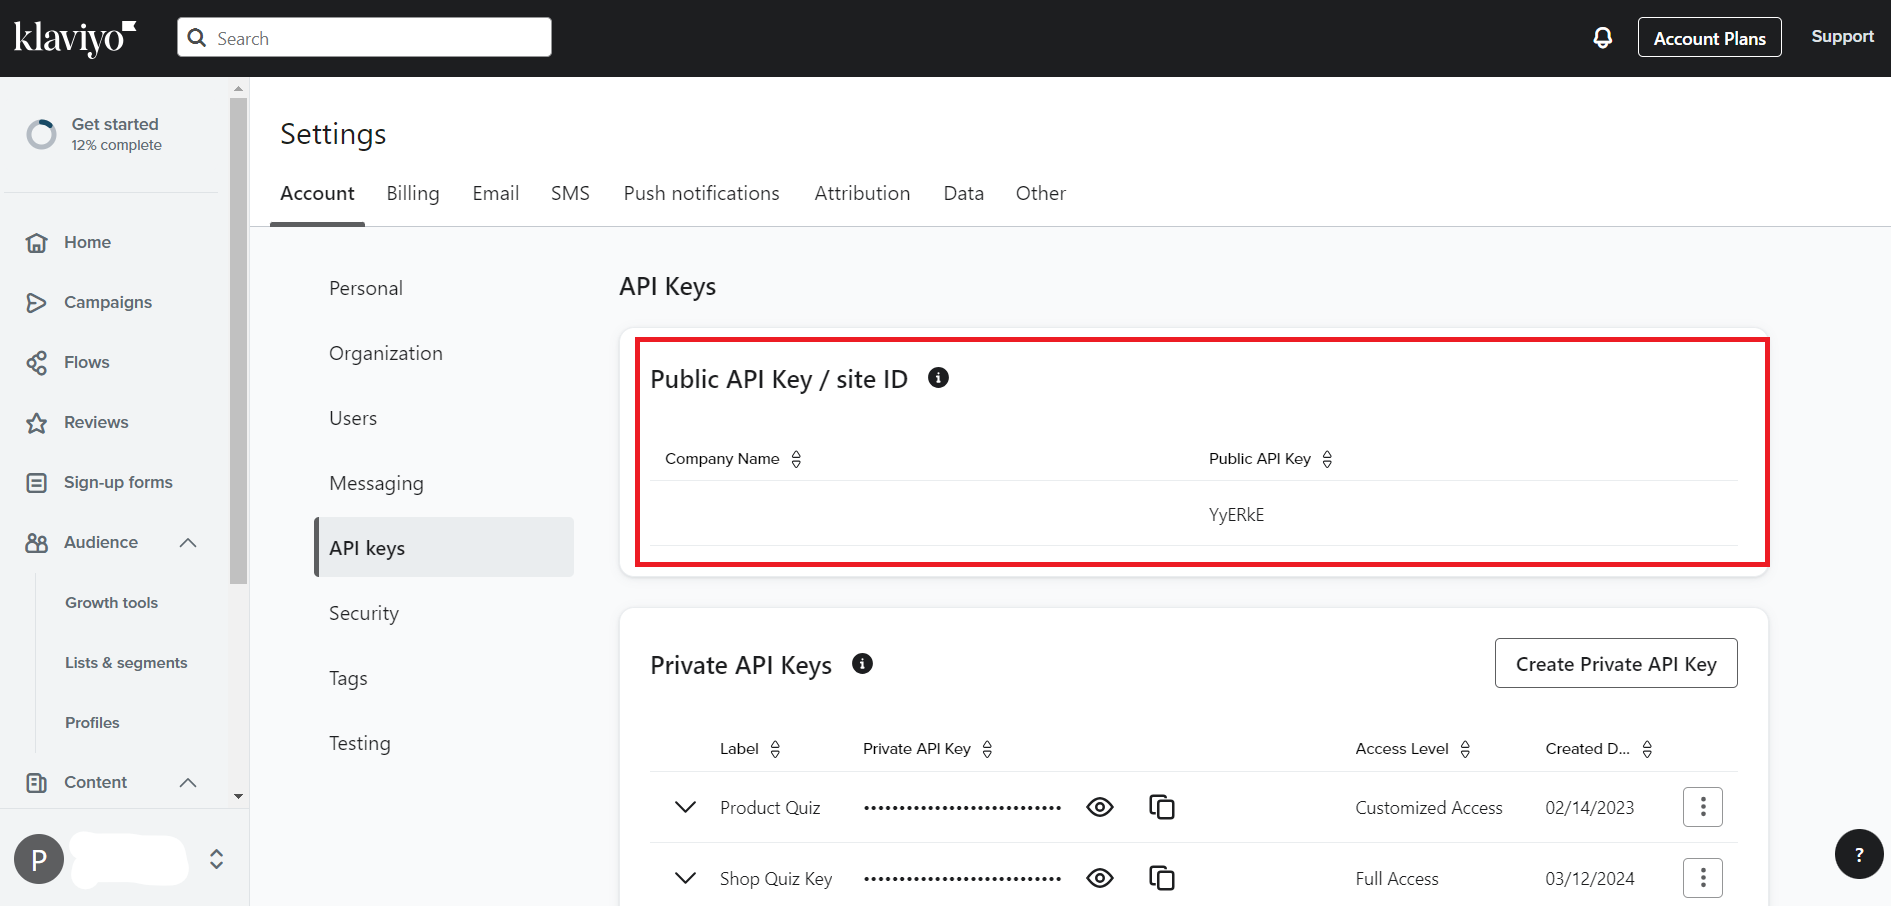
- Navigate back to the RevenueHunt app.
-
In the
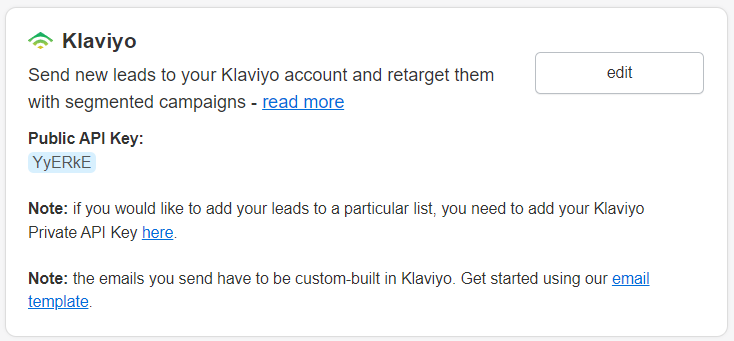
Quiz > Connecttab, scroll to Klaviyo and edit the connection. Paste your Public API Key and save.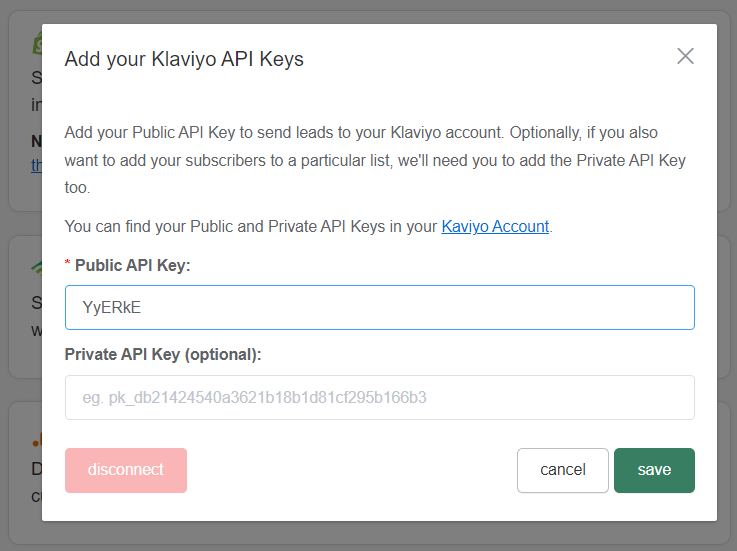
-
Publish the changes with the top-right
Publishbutton. - Test quiz all the way to the results. Make sure to provide a sample email that doesn’t already exist in your Kalviyo account.
- To verify the test, open
Kalviyo > Audeince > Profilessection. If a new profile was added the integration was successful.
From now on all the contacts coming from the quiz will be added to your Klaviyo account.
Custom Properties
Following these steps ensures that every quiz participant's contact information, alongside their responses and product recommendations, are forwarded to your Klaviyo account, registering as custom properties within Klaviyo customer Profiles. These properties are instrumental in personalizing Klaviyo email templates.
To connect the quiz to Klaviyo you’ll have to provide your Klaviyo Public API Key. Public API Key is essential because it allows us to send information to Klaviyo Profiles.
- To find your Public Key login to your Klaviyo account. In account
Settingsopen theAPI Keystab and copy the public API Key. You can get your Klaviyo Public API Key here. - Navigate back to the RevenueHunt app.
-
In the
Quiz > Connecttab, scroll to Klaviyo and edit the connection. Paste your Public API Key and save.
-
Publish the changes with the top-right
Publishbutton. - Test quiz all the way to the results. Make sure to provide a sample email that doesn’t already exist in your Kalviyo account.
- To verify the test, open
Kalviyo > Audeince > Profilessection. If a new profile was added the integration was successful.
From now on all the contacts coming from the quiz will be added to your Klaviyo account.
Custom Properties
Following these steps ensures that every quiz participant's contact information, alongside their responses and product recommendations, are forwarded to your Klaviyo account, registering as custom properties within Klaviyo customer Profiles. These properties are instrumental in personalizing Klaviyo email templates.
To connect the quiz to Klaviyo you’ll have to provide your Klaviyo Public API Key. Public API Key is essential because it allows us to send information to Klaviyo Profiles.
- To find your Public Key login to your Klaviyo account. In account
Settingsopen theAPI Keystab and copy the public API Key. You can get your Klaviyo Public API Key here. - Navigate back to the RevenueHunt app.
-
In the
Quiz > Connecttab, scroll to Klaviyo and edit the connection. Paste your Public API Key and save.
-
Publish the changes with the top-right
Publishbutton. - Test quiz all the way to the results. Make sure to provide a sample email that doesn’t already exist in your Kalviyo account.
- To verify the test, open
Kalviyo > Audeince > Profilessection. If a new profile was added the integration was successful.
From now on all the contacts coming from the quiz will be added to your Klaviyo account.
Custom Properties
Following these steps ensures that every quiz participant's contact information, alongside their responses and product recommendations, are forwarded to your Klaviyo account, registering as custom properties within Klaviyo customer Profiles. These properties are instrumental in personalizing Klaviyo email templates.
Klaviyo Limitations
Processing Time: Klaviyo may have some delay in displaying new leads.
Character Limitations: Special characters (e.g., è, é, ê) may impede data transmission.
Sending Follow-up Emails via Klaviyo
It’s possible to send the product recommendation follow-up emails via Klaviyo, although this is not something that’s a one-click install. It should be built by someone with technical knowledge and experience in Klaviyo.
Below you’ll find some basic instructions that can be forwarded to a developer.
RevenueHunt Support Scope
Once the quiz is connected to Klaviyo (and the data is sent there), it’s out of our app’s scope, and any particular questions on how to set up the flows and how to build the email templates should be directed to Klaviyo.
-
Add Email Question: To send contacts to Klaviyo your quiz needs to have an email question. You can add it to the quiz from the Quiz Builder tab by clicking
+and selectingemailfrom the dropdown list.Tip
You can ask for marketing consent directly in the quiz.
-
Connect Quiz to Klaviyo: Follow the instructions in this section to learn how to connect your quiz to Klaviyo correctly.
-
Create a Segment: All quiz contacts can be grouped into a segment in Klaviyo.
- To create a new segment in Klaviyo go to
Audience > List & Segementsand clickCreate New > New Segment. - Name the segment and set up the definition.
-
Segment definition: Select
Properties about someoneand add a property that will be unique for profiles coming from the quiz. This can be any of the custom properties that RevenueHunt sends to Klaviyo Profiles.Example
-
ANSWERS_BY_BLOCK-QuizIDproperty is unique for profiles coming from the quiz. -
If you don't see the
ANSWERS_BY_BLOCK-QuizIDproperty in the dropdown menu, you may need to take a test quiz and try again.
-
-
Segment definition: As segment definition set up a rule that follows this format:
Custom property from the Quizis setType:text.Example
ANSWERS_BY_BLOCK-QuizIDis setType:text.
-
Click
Create a segmentand wait for Klaviyo to load all the contacts that match the segment definition. This may take a few minutes. - Once the agent finishes loading, all the profiles that already match the segment definition will be added to the segment. New contacts coming from the quiz will be added to the segment automatically.
- To create a new segment in Klaviyo go to
-
Create an Email Flow: You’ll have to create a flow that is triggered when someone gets added to the segment we created in the previous step. This is the trickiest part, the emails you send have to be custom-built in Klaviyo.
Trigger the Flow
- To create an email flow that includes only quiz takers open the
Flowstab in Klaviyo. - Click
Create flowand thenBuild from scratch. - Name the flow and click
Create flow. - Next, you'll be asked to set up a flow trigger.
-
Choose the trigger to be
Added to a segmentand select the segment created in the previous step. Set theReentry criteriatoAllow reentryso quiz takers receive an email every time they complete the quiz. ClickConfirmandConfirm and save.Alternative: trigger from a Klaviyo list
Instead of triggering from a segment, you can trigger the flow when a contact is added to a specific Klaviyo list. This is useful if you're using the
Klaviyo listselector in your quiz's email question block to send contacts directly to a list (see Adding Quiz Contacts to Klaviyo List).
Optional: Update Marketing Consent
If you've asked for marketing consent in the quiz, you can update it in the Klaviyo email flow. Just follw these steps:
- Right below the flow trigger, add a
Profile property updateaction. - Click
+ Step. - A menu will appear letting up set up the profile property update.
- Select to
Update existing property, from the Select property dropdown menu selectAccepts marketingand set the value totrue. - Turn this action
LIVE.
- To create an email flow that includes only quiz takers open the
-
Edit the Email: In the next steps, you should edit the email template.
Add Email Action
- Grab the
EMAILaction and drop it below the flow trigger.
Edit the Email Template
- In
Email detailssection edit the Subject. - Then, click
Select template. You'll be taken to the Templates section in Klaviyo. - To create a new email template, click
Create. You'll be redirected to the Klaviyo email builder. - In the Klaviyo email builder you can use pre-designed blocs to add images or text to your template.
- To add the quiz content and quiz recommended products you'll need to add an
HTMLblock. Drag and drop theHTMLblock to the email builder. -
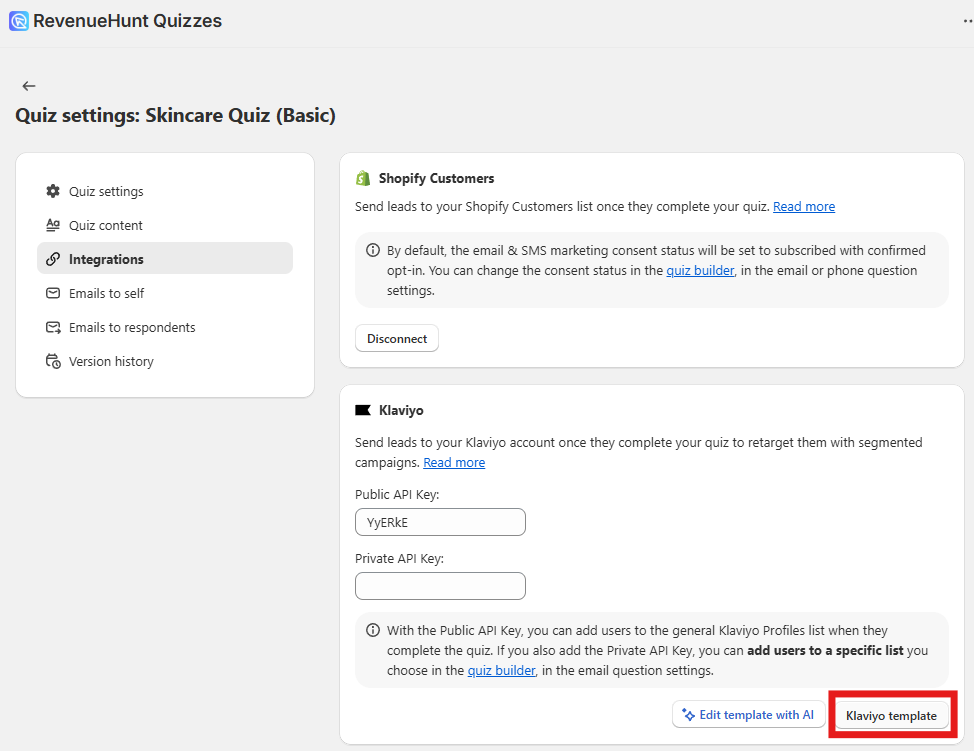
In the
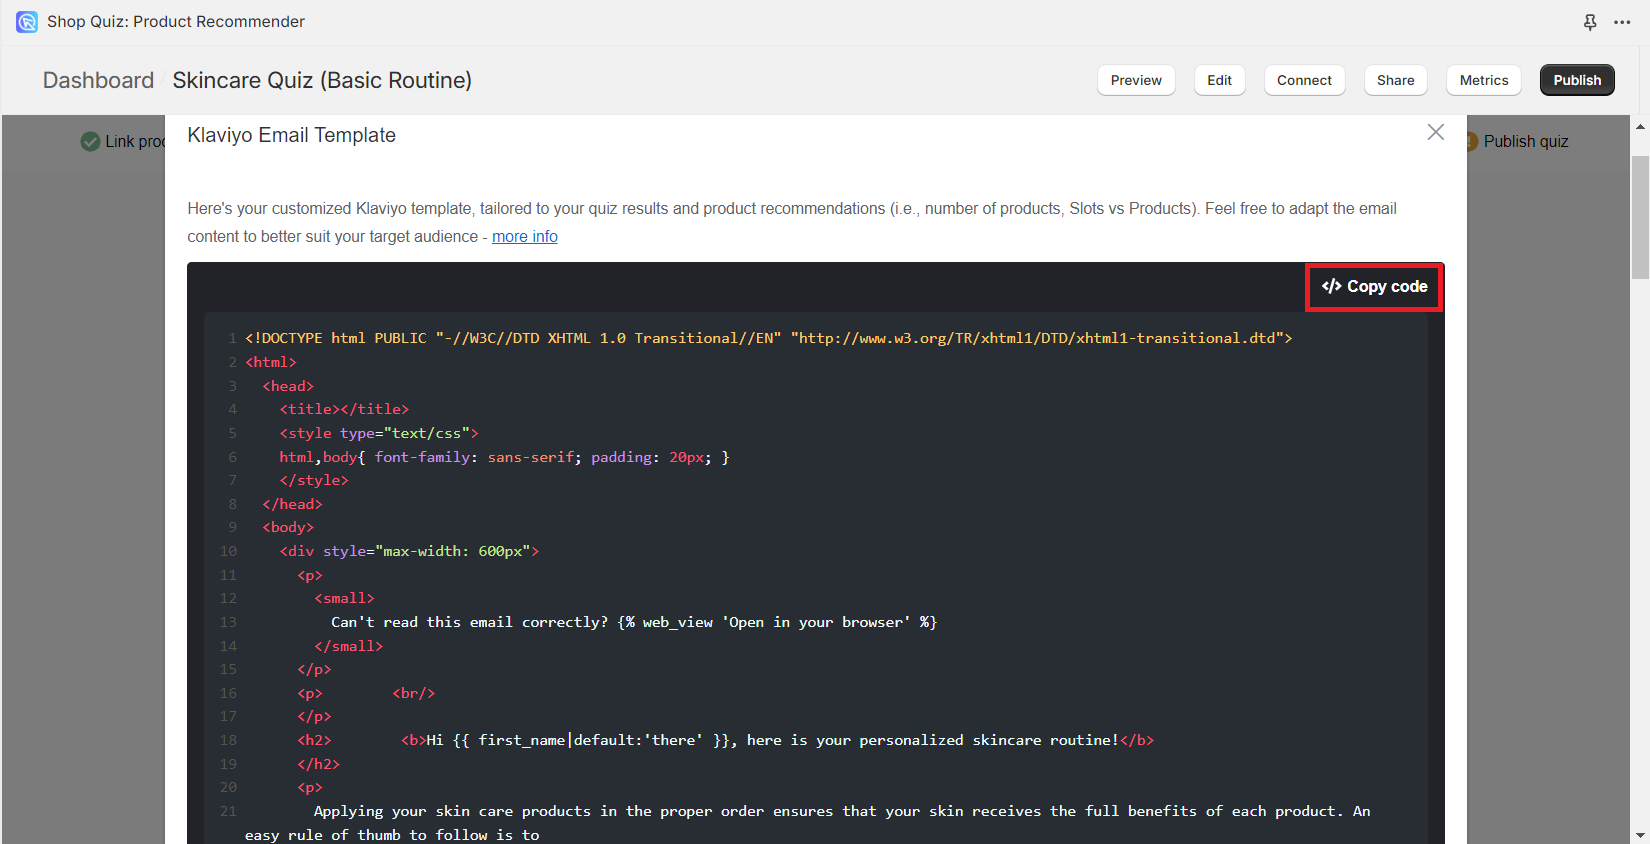
Quiz Settings > Integrationssection, you'll find a button to download aKlaviyo Template. Click theKlaviyo Templatebutton and a new window will open. There, clickCopy codeto copy the existing template.Klaviyo Template
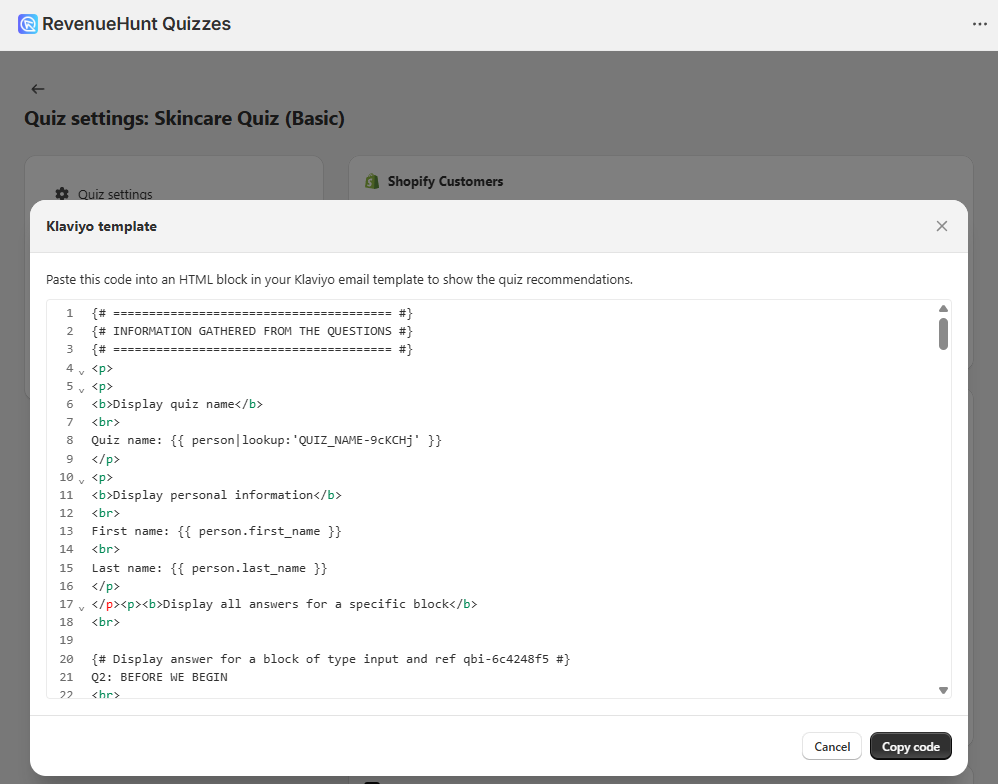
The code contains several ready-to-use code snippets that allow you to display:
- Dynamic Results Page: Display dynamic result page content that loops through sections and blocks. A Dynamic Results Page content that contains all the elements of your results page and replaces content upon each quiz retake. This is the recommended approach for production templates as it adapts to quiz structure changes.
- Static Results Page: Display the complete result page content using static lookups. Static Results Page content that contains all the elements of your results page and adds content upon each quiz retake. Use this approach for understanding the data structure and for simple implementations.
- Individual recommendations: Display individual product recommendations by slot. Use this to show specific recommended items with their details like title, description, price, and images.
- Question answers: Display quiz information and individual question answers. Use this to show personal data and specific responses from quiz questions.
-
Paste the code in the
HTMLblock in Klaviyo email. -
Next,
Previewthe email as one of your segment subscribers to check what information is displayed. -
You can freely edit the email template to your liking. For example, you can remove sections of the code that you don't need and restyle the rest to match your branding.
Let Quiz Copilot edit and style your Klaviyo template
You don't need a developer to customize the Klaviyo HTML template. Just paste the template code into Quiz Copilot and ask it to:
- remove sections you don't need (e.g. keep only recommended products or only question answers),
- restyle the template to match your brand colors, fonts, and spacing,
- rearrange blocks or change the layout,
- explain what each part of the template does.
Once Quiz Copilot returns the updated code, paste it back into the
HTMLblock in your Klaviyo template.Create your own email template
Check the Use quiz data in Klaviyo email templates article to learn how to customize your Klaviyo email template with quiz properties.
-
Once you're happy with the email template, click
ExitthenDoneand return to your flow. - Turn your email
LIVE.
From that moment on, all the quiz takers, who leave their email, will be automatically added to your Kalviyo Segment and will be sent a follow-up email.
- Grab the
-
Re-trigger the flow: The easiest way to send an email with each quiz retake is to set the reentry criteria when you configure the flow trigger:
- Open the flow trigger (
Added to a segment). - Set the
Reentry criteriatoAllow reentry. - Save the trigger.
This way, quiz takers will receive an email every time they complete the quiz.
Alternative method
You can also achieve this by adding a
Profile property updateaction at the end of the flow that deletes the segment property (for example,ANSWERS_BY_BLOCK-QuizID). Each time a quiz taker completes the quiz, the property is re-added and they re-enter the segment, triggering the flow again.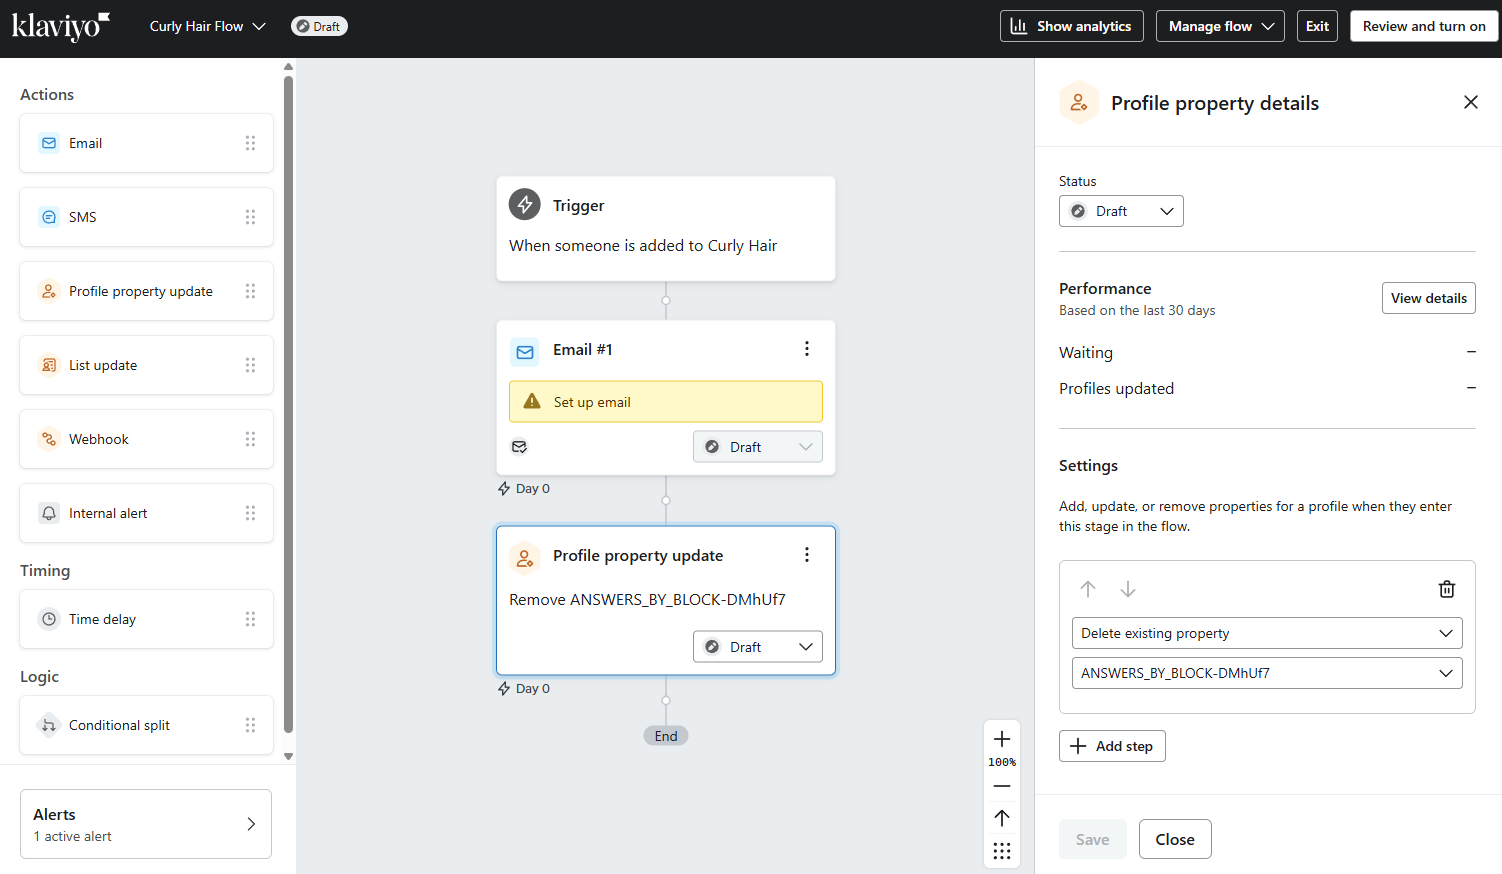
- Open the flow trigger (
- Add Email Question: To send contacts to Klaviyo your quiz needs to have an email question. You can add it to the quiz from the Quiz Builder tab by clicking
+and selectingemailfrom the dropdown list. You can also ask for marketing consent directly in the quiz. - Connect Quiz to Klaviyo: Follow the instructions in this section to learn how to connect your quiz to Klaviyo correctly.
-
Create a Segment: All quiz contacts can be grouped into a segment in Klaviyo.
- To create a new segment in Klaviyo go to
Audience > List & Segementsand clickCreate New > New Segment. - Name the segment and set up the definition.
- The
Permalink-QuizIDproperty is unique for profiles coming from the quiz. - If you don't see the permalink property in the dropdown menu, you may need to take a test quiz and try again.
- Click
Create a segment.
- To create a new segment in Klaviyo go to
-
Create an Email Flow: You’ll have to create a flow that is triggered when someone gets added to the segment we created in the previous step. This is the trickiest part, the emails you send have to be custom-built in Klaviyo.
Trigger Flow
- To create an email flow that includes only quiz takers open the
Flowstab in Klaviyo. - Click
Create flowand thenBuild from scratch. - Name the flow and click
Create flow. - Next, you'll be asked to set up a flow trigger.
- Choose the trigger to be
Added to a segmentand select the segment created in the previous step. ClickConfirmandConfirm and save. This way whenever someone enters the segment they will trigger the email flow.
Optional: Update Marketing Consent
If you've asked for marketing consent in the quiz, you can update it in the Klaviyo email flow. Just follw these steps:
- Right below the flow trigger, add a
Profile property updateaction. - Click
+ Step. - A menu will appear letting up set up the profile property update.
- Select to
Update existing property, from the Select property dropdown menu selectAccepts marketingand set the value totrue. - Turn this action
LIVE.
- To create an email flow that includes only quiz takers open the
-
Edit the Email: In the next steps, you should edit the email template.
Add Email Action
- Click on the
three dotsand edit the email. - Edit the name/subject/email to your liking and select the
HTML email template. -
From the
Connect > Klaviyotab you can download a ready-to-use email template.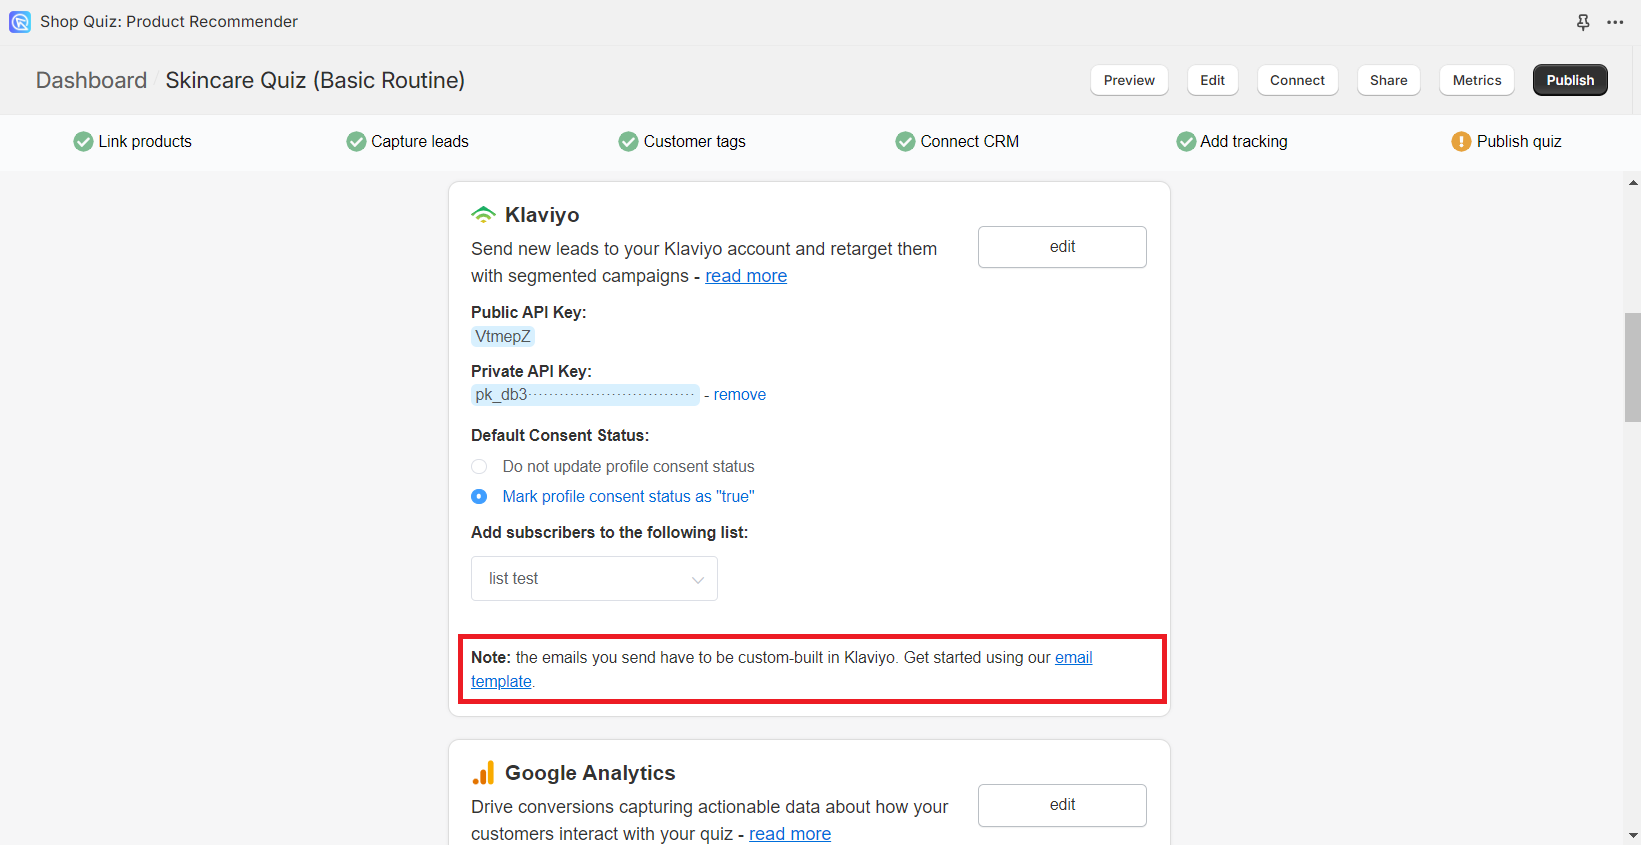
Tip
If you would rather create your own email template, check this section for more details.
-
Copy the code and go back to Klaviyo.
- Open the
HTML email templateand remove the existing code. - Paste the new template code.
- You can then
previewthe email as one of your segment subscribers. - Make sure to
Savethe changes and clickDone. - Return to your flow and turn your email
LIVE.
From that moment on, all the quiz takers, who leave their email, will be automatically added to your Kalviyo Segment and will be sent a follow-up email.
- Click on the
-
Re-trigger the flow: If you want to send an email with each quiz retake, you can do that by adding a
Profile property updateaction at the end of the flow. Follow these steps:- Add a
Profile property updateaction at the end of the flow. - Click
+ Step. - Select
Delete existing property. -
From the
Select propertydropdown menu select the property that was used to create a segment in earlier steps.Example
Select
Delete existing property>PERMALINK-QuizID.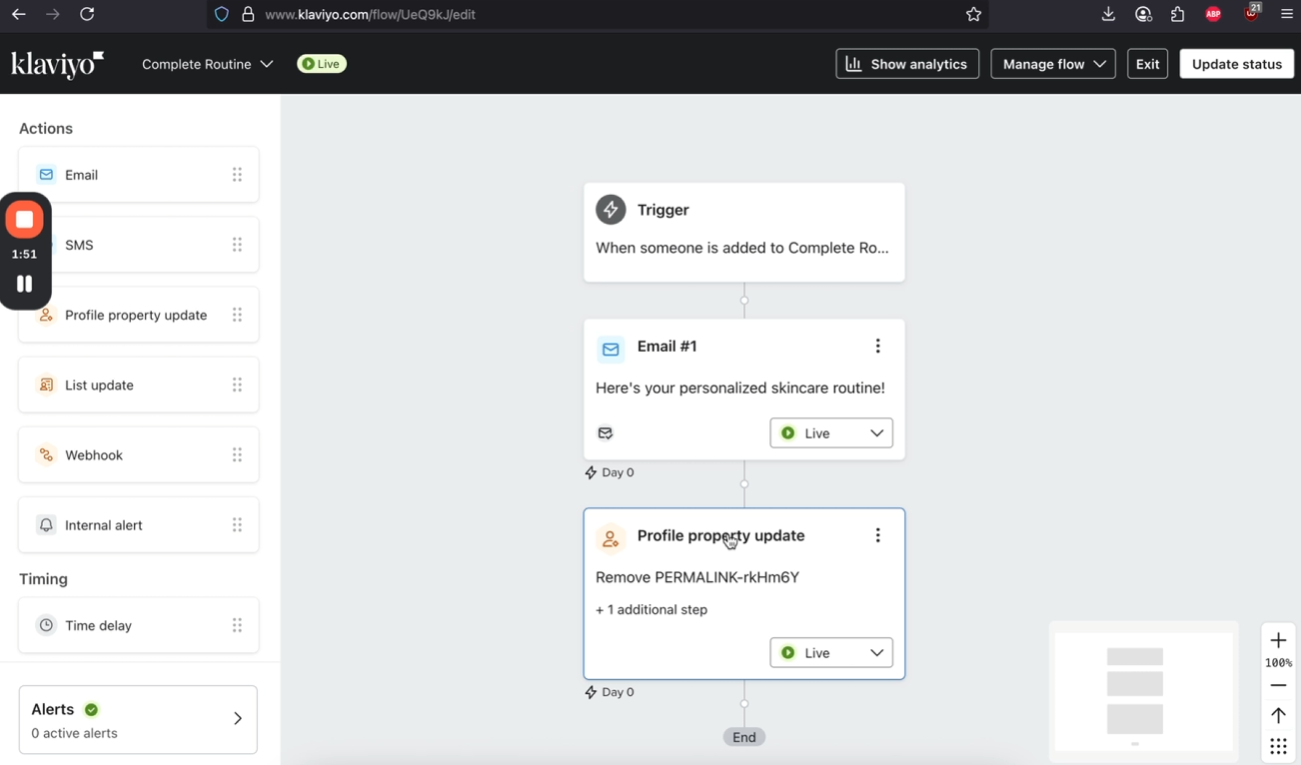
How to send an email every time someone completes the quiz?
First, you need to set up a segment based on the
PERMALINK-{{quiz_id}}property to filter quiz takers. Once the segment is created, you can build a flow that triggers when users are added to this segment, sends them their quiz results via email, and then removes thePERMALINK-{{quiz_id}}property from their profile to allow for re-entry if they retake the quiz.For example:
-
Save the changes and turn the action
LIVE.
This way, each time a quiz taker takes the quiz again, they will be re-added to the segment and will trigger the email flow again.
- Add a
Deactive App Emails
Remember to deactivate the email Notifications from the Quiz Builder once the Klaviyo flow is set up.
- Add Email Question: To send contacts to Klaviyo your quiz needs to have an email question. You can add it to the quiz from the Quiz Builder tab by clicking
+and selectingemailfrom the dropdown list. You can also ask for marketing consent directly in the quiz. - Connect Quiz to Klaviyo: Follow the instructions in this section to learn how to connect your quiz to Klaviyo correctly.
-
Create a Segment: All quiz contacts can be grouped into a segment in Klaviyo.
- To create a new segment in Klaviyo go to
Audience > List & Segementsand clickCreate New > New Segment. - Name the segment and set up the definition.
- The
Permalink-QuizIDproperty is unique for profiles coming from the quiz. - If you don't see the permalink property in the dropdown menu, you may need to take a test quiz and try again.
- Click
Create a segment.
- To create a new segment in Klaviyo go to
-
Create an Email Flow: You’ll have to create a flow that is triggered when someone gets added to the segment we created in the previous step. This is the trickiest part, the emails you send have to be custom-built in Klaviyo.
Trigger Flow
- To create an email flow that includes only quiz takers open the
Flowstab in Klaviyo. - Click
Create flowand thenBuild from scratch. - Name the flow and click
Create flow. - Next, you'll be asked to set up a flow trigger.
- Choose the trigger to be
Added to a segmentand select the segment created in the previous step. ClickConfirmandConfirm and save. This way whenever someone enters the segment they will trigger the email flow.
Optional: Update Marketing Consent
If you've asked for marketing consent in the quiz, you can update it in the Klaviyo email flow. Just follw these steps:
- Right below the flow trigger, add a
Profile property updateaction. - Click
+ Step. - A menu will appear letting up set up the profile property update.
- Select to
Update existing property, from the Select property dropdown menu selectAccepts marketingand set the value totrue. - Turn this action
LIVE.
- To create an email flow that includes only quiz takers open the
-
Edit the Email: In the next steps, you should edit the email template.
Add Email Action
- Click on the
three dotsand edit the email. - Edit the name/subject/email to your liking and select the
HTML email template. -
From the
Connect > Klaviyotab you can download a ready-to-use email template.
Tip
If you would rather create your own email template, check this section for more details.
-
Copy the code and go back to Klaviyo.
- Open the
HTML email templateand remove the existing code. - Paste the new template code.
- You can then
previewthe email as one of your segment subscribers. - Make sure to
Savethe changes and clickDone. - Return to your flow and turn your email
LIVE.
From that moment on, all the quiz takers, who leave their email, will be automatically added to your Kalviyo Segment and will be sent a follow-up email.
- Click on the
-
Re-trigger the flow: If you want to send an email with each quiz retake, you can do that by adding a
Profile property updateaction at the end of the flow. Follow these steps:- Add a
Profile property updateaction at the end of the flow. - Click
+ Step. - Select
Delete existing property. -
From the
Select propertydropdown menu select the property that was used to create a segment in earlier steps.Example
Select
Delete existing property>PERMALINK-QuizID.How to send an email every time someone completes the quiz?
First, you need to set up a segment based on the
PERMALINK-{{quiz_id}}property to filter quiz takers. Once the segment is created, you can build a flow that triggers when users are added to this segment, sends them their quiz results via email, and then removes thePERMALINK-{{quiz_id}}property from their profile to allow for re-entry if they retake the quiz.For example:
-
Save the changes and turn the action
LIVE.
This way, each time a quiz taker takes the quiz again, they will be re-added to the segment and will trigger the email flow again.
- Add a
Deactive App Emails
Remember to deactivate the email Notifications from the Quiz Builder once the Klaviyo flow is set up.
Adding Quiz Contacts to Klaviyo List
With the OAuth connection in place, you can add contacts from the quiz directly to a list in Klaviyo. No additional API keys are needed — the list selector lives inside the email question block.
-
First, make sure that you have a Klaviyo list ready to add contacts to. If you don't have one, you can create a new one in
Klaviyo > Audience > Lists & Segments. In the list settings, make sure to set it toSingle Opt-in.Warning
Quiz contacts can be added only to a Single Opt-in list in Klaviyo.
-
Make sure your RevenueHunt account is connected to Klaviyo via OAuth and that the
Send Quiz Leads to Klaviyo Profilescheckbox is enabled in the quiz'sQuiz Settings > Integrationssection. - In the RevenueHunt app, open the Quiz Builder and click on the email question block to open its settings.
- Under the
Klaviyo listdropdown, select the list you want quiz takers added to. -
Set the
subscription status(for example,Subscribed).
-
Save your quiz changes with the top-right
Savebutton.Per-quiz lists
If you have multiple quizzes and want each to feed a different Klaviyo list, configure the email question block of each quiz individually and select the appropriate list there.
-
Previewthe quiz and complete it with a sample email to verify the connection. - In Klaviyo, go to
Audience > Lists & Segmentsand open the list to confirm the test contact was added asSubscribed.
RevenueHunt app allows you to add contacts from the quiz directly to a list in Klaviyo.
- To do that you’ll need to provide a Private API Key.
- To create a new Private Key for the RevenueHunt app login to your Klaviyo account.
-
In account
Settingsopen theAPI Keystab and create a new Private API Key. For list-specific contact additions, you can get your Klaviyo Private API Key here.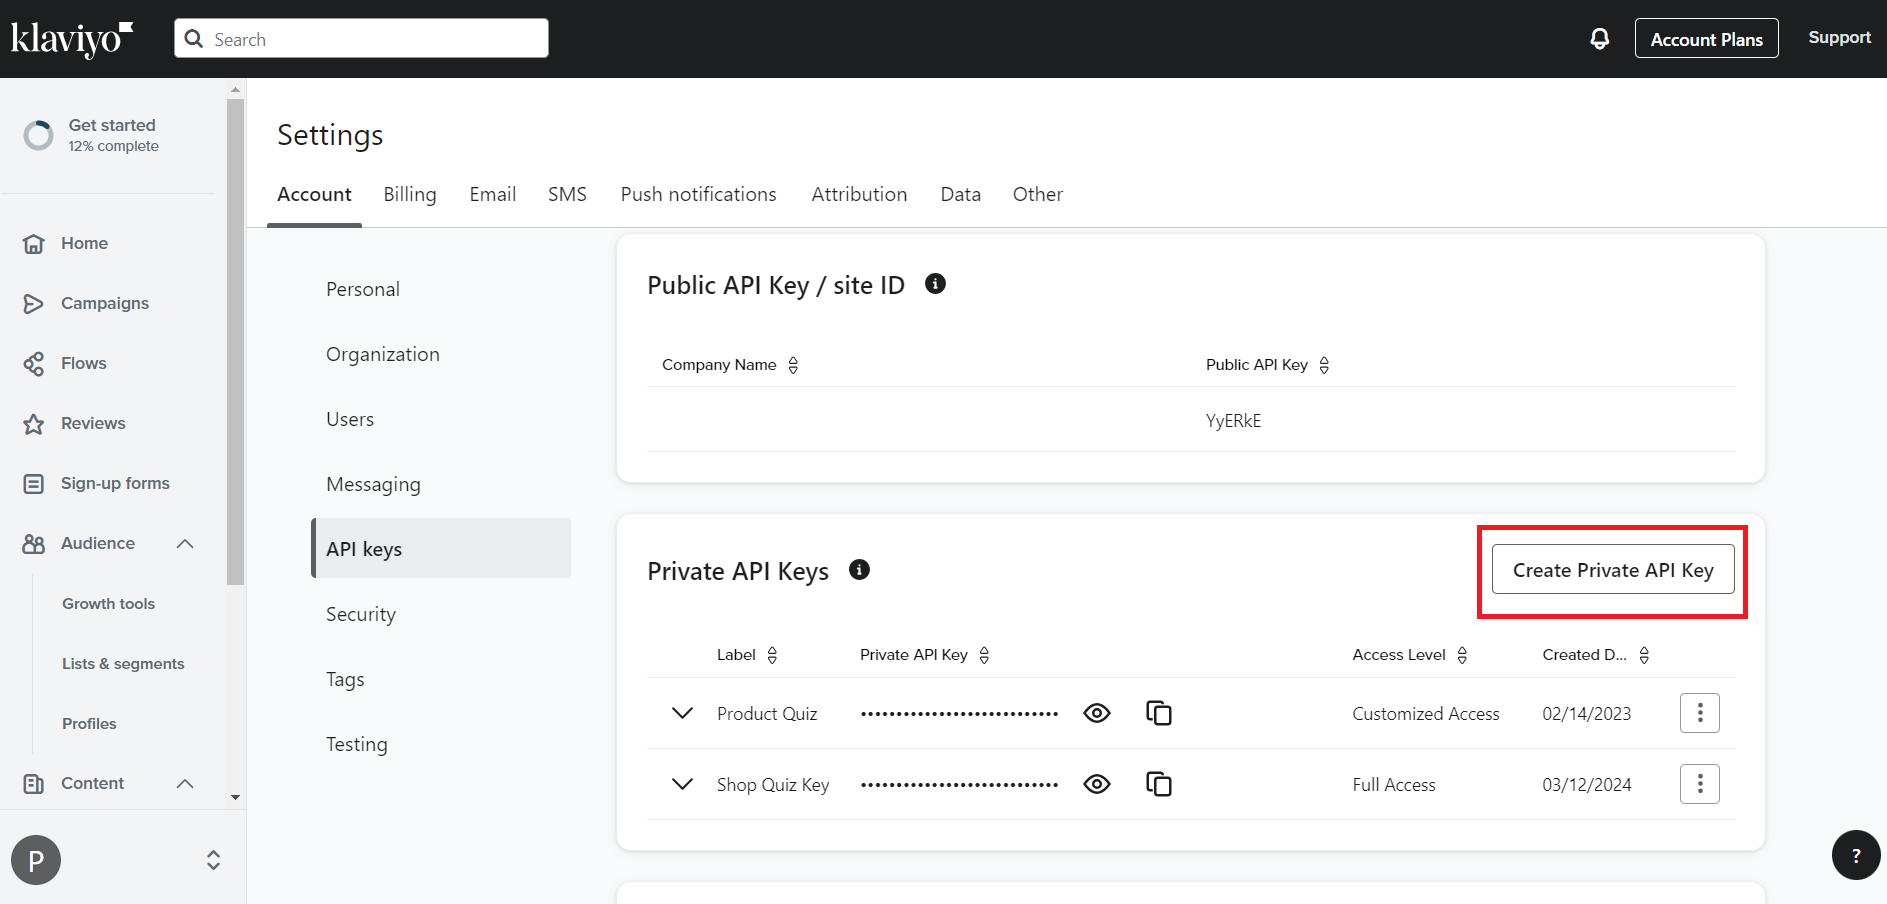
-
Allow
Full access. - Copy the private key.
- In the Quiz Connect tab scroll to Klaviyo and edit the connection.
- Paste your Private API Key.
-
Choose to
mark all profiles as trueand select a list that contacts should be added to.Warning
Keep in mind that contacts from the quiz can be added only to a Single Opt-in List in Klaviyo.
-
Save the changes and publish them with the top-right
Publishbutton. - Remember to test the connection with a sample email.
RevenueHunt app allows you to add contacts from the quiz directly to a list in Klaviyo.
- To do that you’ll need to provide a Private API Key.
- To create a new Private Key for the RevenueHunt app login to your Klaviyo account.
-
In account
Settingsopen theAPI Keystab and create a new Private API Key. For list-specific contact additions, you can get your Klaviyo Private API Key here. -
Allow
Full access. - Copy the private key.
- In the Quiz Connect tab scroll to Klaviyo and edit the connection.
- Paste your Private API Key.
-
Choose to
mark all profiles as trueand select a list that contacts should be added to.Warning
Keep in mind that contacts from the quiz can be added only to a Single Opt-in List in Klaviyo.
-
Save the changes and publish them with the top-right
Publishbutton. - Remember to test the connection with a sample email.
Tip: Segmented Campaigns Work Better
It is possible to add contacts to Klaviyo List but there may be a better way: instead of adding them to a general list you can create dynamic segments based on your customers’ responses to send them hyper-targeted campaigns. Highly segmented campaigns return more than 3X the revenue per recipient as unsegmented campaigns.
With Klaviyo you can create segments to filter your leads and assign email flows to each segment. Read more about how to create and use segments on Klaviyo.
Use Quiz Data In Klaviyo Email Templates
If you need to modify our Klaviyo email template to match your brand’s style guide, you’ll need a developer because email templates in Klaviyo are built using HTML, CSS and the Django templating system.
Custom Properties in Klaviyo
We send all the responses to the quiz and the recommended products along with the contact information to the customer’s Klaviyo profile. This information will appear in the customer’s profile as custom properties.
If you need to add any additional information to the email template, your developer can do so by pulling the appropriate custom properties from the user profile.
Learn the person|lookup function
To build your own email template based on the custom properties we send to Klaviyo, you should familiarize yourself with the message personalization reference in Klaviyo, aka the {{ person|lookup:"..." }} function.
Overwriting or Appending Custom Properties
Some custom properties sent to Klaviyo from the quiz such as ANSWER_BY_BLOCK, CHOICE, RESPONSE_ID, RESULT_REF, RESULT_SECTIONS or TAGS are sent as an array, meaning that their values get overwritten with new data upon each quiz completion.
However, properties such as RECOMMENDATIONS_BY_SLOT or RESULT_CONTENT_BY_BLOCK are sent as a JSON object, meaning that their values get appended to the existing data upon each quiz completion.
If you want to make sure that in your Klaviyo template, the values get overwritten with new data upon each quiz completion and you want to use our pre-defined Klaviyo email tempalte which you can download from Integrations tab, make sure to only use the code snippet that starts with the following comment:
{# ================================================================= #}
{# DYNAMIC RESULT PAGE CONTENT (LOOPS THROUGH RESULT_SECTIONS-lBJ9bk) #}
{# This template loops through the result sections and blocks          #}
{# It will adapt if you change the results page structure in the quiz editor #}
{# ================================================================= #}
If you need to modify our Klaviyo email template to match your brand’s style guide, you’ll need a developer because email templates in Klaviyo are built using HTML, CSS and the Django templating system.
We send all the responses to the quiz and the recommended products along with the contact information to the customer’s Klaviyo profile. This information will appear in the customer’s profile as custom properties.
If you need to add any additional information to the email template, your developer can do so by pulling the appropriate custom properties from the user profile.
Example Email Templates
Use Copilot to generate Klaviyo Email Template
QuizCopilot can assist in creating Klaviyo email templates for your quiz email flow.
- Open the Quiz Copilot or start a new conversation by clicking the
New conversationbutton in the top-right corner of the pop-up window, or head over to the Quiz Settings > Integrations page, find theKlaviyointegration and click on theEdit template with AIbutton. -
Paste your desired layout message, and Quiz Copilot will generate the template code.
-
The generated code for the Klaviyo email template can be copied by clicking the
Copyicon. - Paste the generated code directly into an HTML block in your Klaviyo email template.
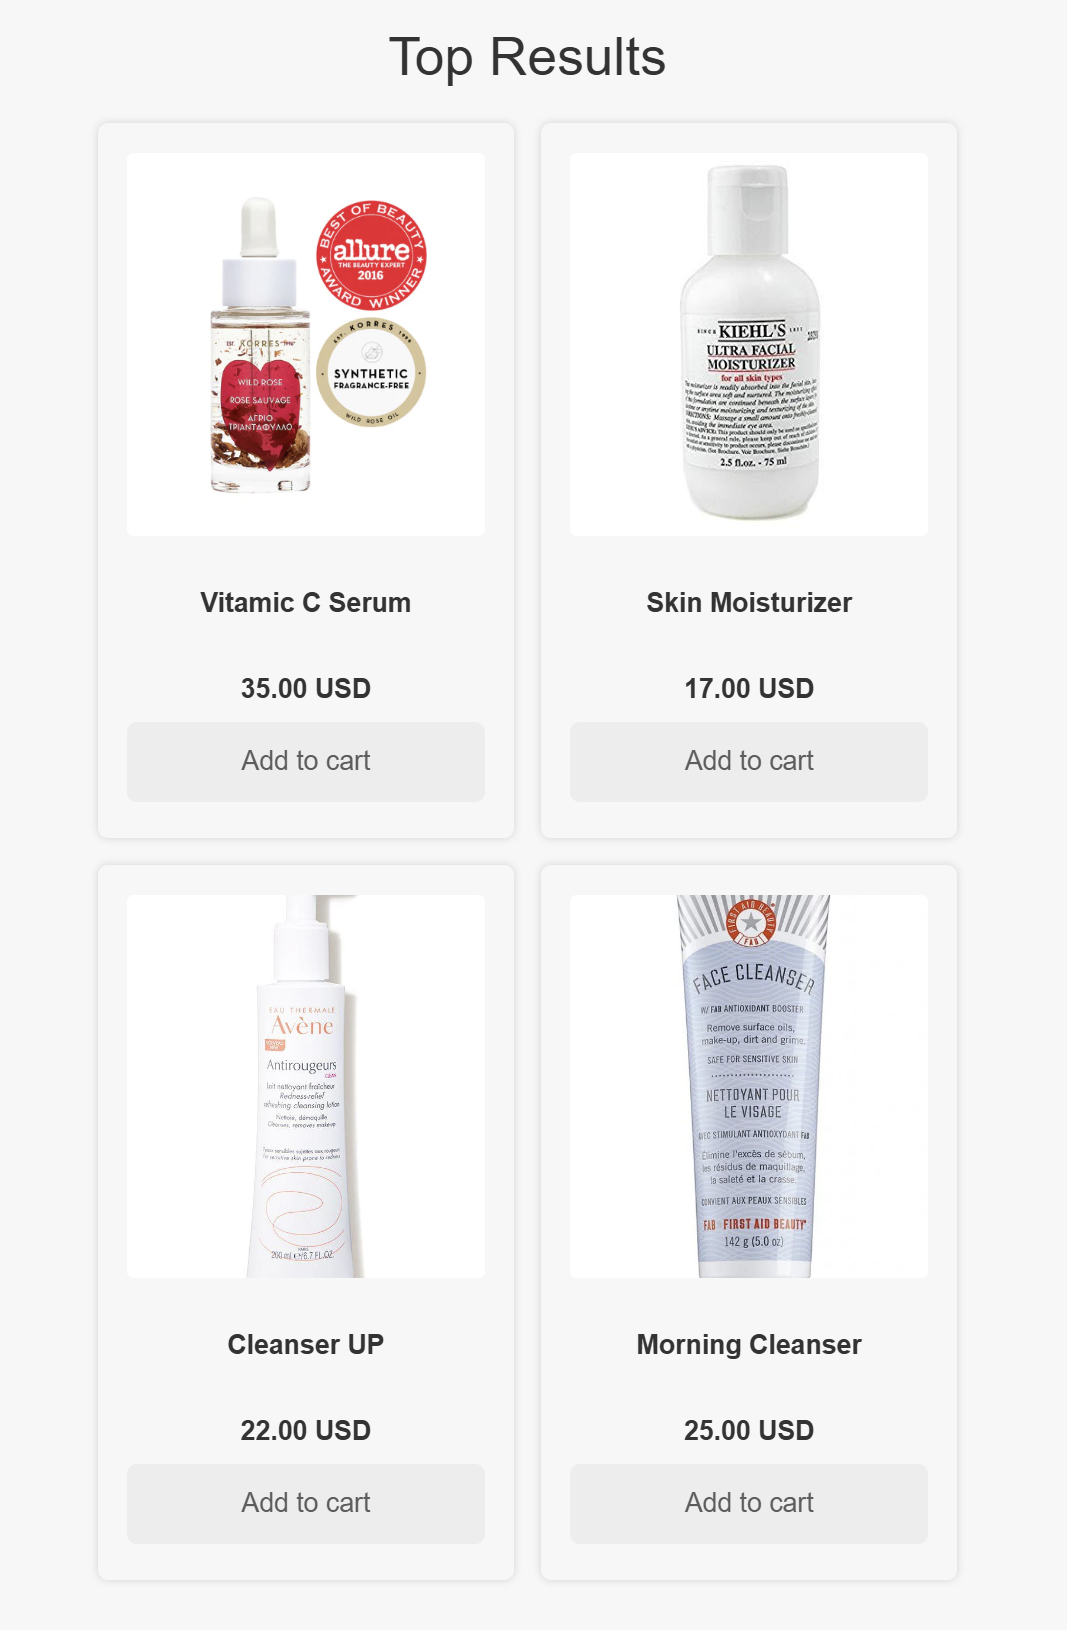
Example 1 - Display Recommended Products
In this example, a quiz with ID YN5L9G recommends a simple list of products.
Example: List of Recommended Products in Klaviyo Template
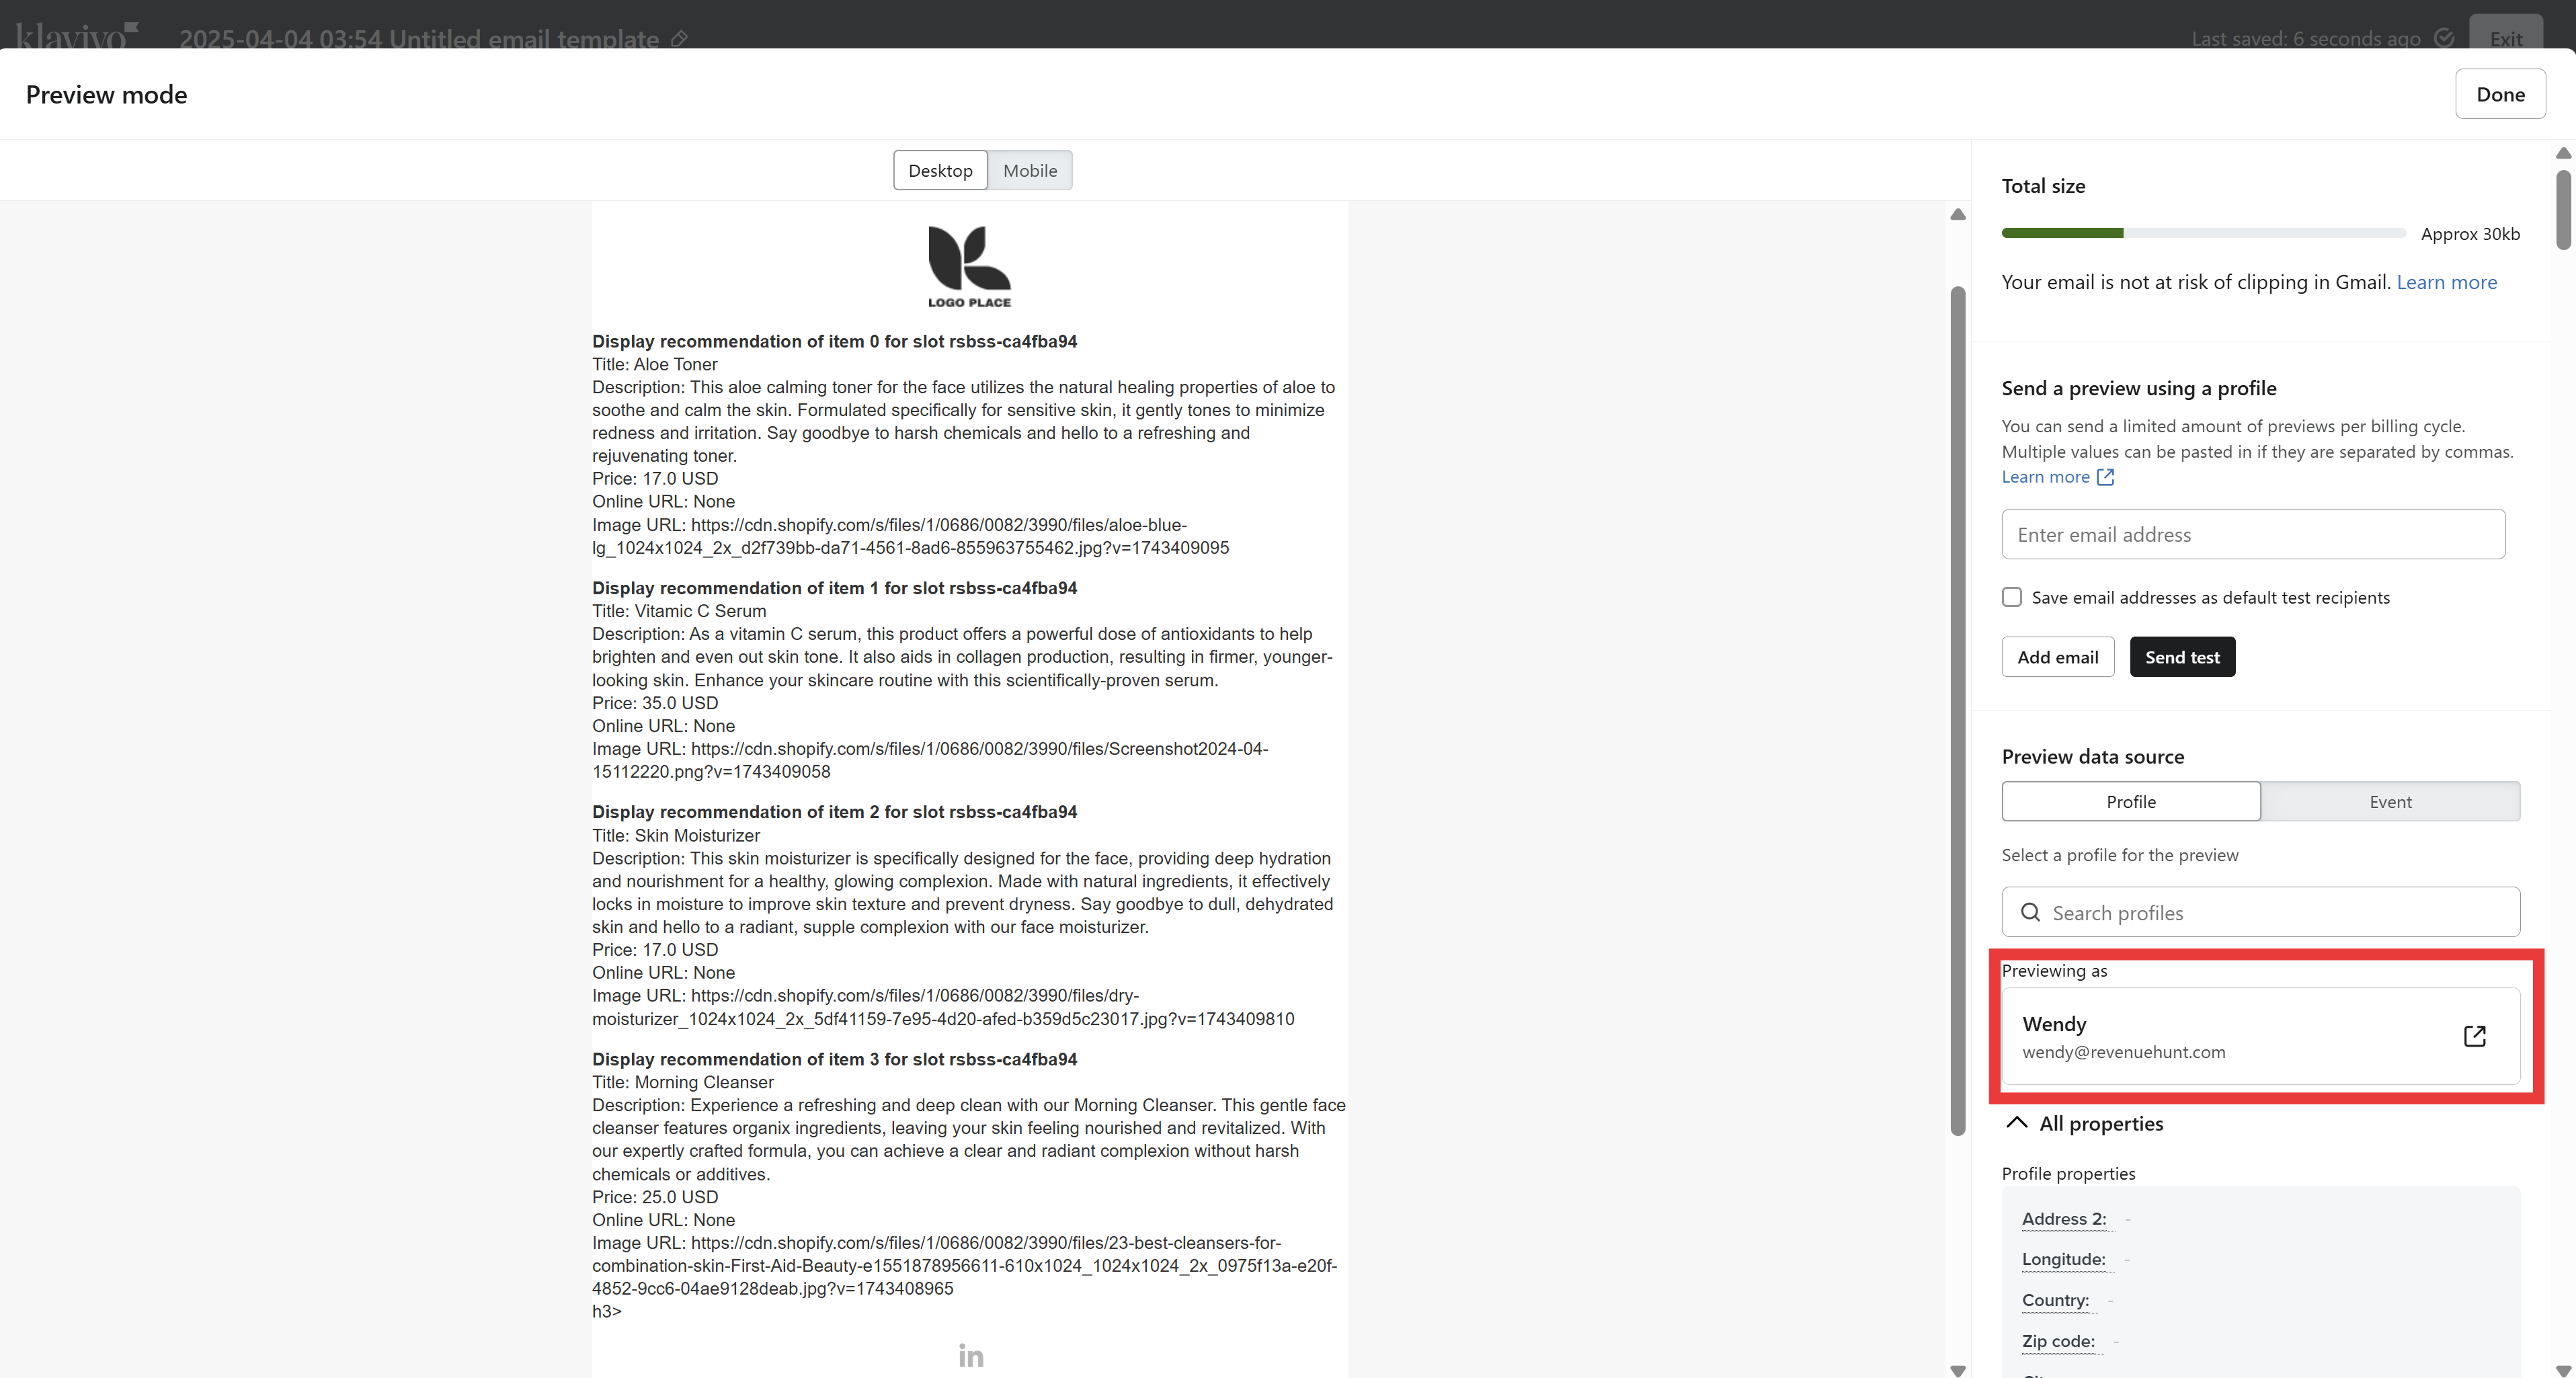
-
To show the recommended products in the email, you can use the following code copied from the Klaviyo template in the
Integrationstab:Example: Code from QuizIntegrations tab
{# ======================================== #} {# INDIVIDUAL ITEM RECOMMENDATIONS BY SLOT #} {# ======================================== #} <p> <b>Display recommendation of item 0 for slot rsbss-ca4fba94 </b> <br> Title: {{ person|lookup:'RECOMMENDATIONS_BY_SLOT-YN5L9G'|lookup:'rsbss-ca4fba94'|lookup:'0'|lookup:'title' }} <br> Description: {{ person|lookup:'RECOMMENDATIONS_BY_SLOT-YN5L9G'|lookup:'rsbss-ca4fba94'|lookup:'0'|lookup:'description' }} <br> Price: {{ person|lookup:'RECOMMENDATIONS_BY_SLOT-YN5L9G'|lookup:'rsbss-ca4fba94'|lookup:'0'|lookup:'price'|lookup:'amount' }} {{ person|lookup:'RECOMMENDATIONS_BY_SLOT-YN5L9G'|lookup:'rsbss-ca4fba94'|lookup:'0'|lookup:'price'|lookup:'currencyCode' }} <br> Online URL: {{ person|lookup:'RECOMMENDATIONS_BY_SLOT-YN5L9G'|lookup:'rsbss-ca4fba94'|lookup:'0'|lookup:'onlineUrl' }} <br> Image URL: {{ person|lookup:'RECOMMENDATIONS_BY_SLOT-YN5L9G'|lookup:'rsbss-ca4fba94'|lookup:'0'|lookup:'image'|lookup:'url' }} </p> <p> <b>Display recommendation of item 1 for slot rsbss-ca4fba94 </b> <br> Title: {{ person|lookup:'RECOMMENDATIONS_BY_SLOT-YN5L9G'|lookup:'rsbss-ca4fba94'|lookup:'1'|lookup:'title' }} <br> Description: {{ person|lookup:'RECOMMENDATIONS_BY_SLOT-YN5L9G'|lookup:'rsbss-ca4fba94'|lookup:'1'|lookup:'description' }} <br> Price: {{ person|lookup:'RECOMMENDATIONS_BY_SLOT-YN5L9G'|lookup:'rsbss-ca4fba94'|lookup:'1'|lookup:'price'|lookup:'amount' }} {{ person|lookup:'RECOMMENDATIONS_BY_SLOT-YN5L9G'|lookup:'rsbss-ca4fba94'|lookup:'1'|lookup:'price'|lookup:'currencyCode' }} <br> Online URL: {{ person|lookup:'RECOMMENDATIONS_BY_SLOT-YN5L9G'|lookup:'rsbss-ca4fba94'|lookup:'1'|lookup:'onlineUrl' }} <br> Image URL: {{ person|lookup:'RECOMMENDATIONS_BY_SLOT-YN5L9G'|lookup:'rsbss-ca4fba94'|lookup:'1'|lookup:'image'|lookup:'url' }} </p> <p> <b>Display recommendation of item 2 for slot rsbss-ca4fba94 </b> <br> Title: {{ person|lookup:'RECOMMENDATIONS_BY_SLOT-YN5L9G'|lookup:'rsbss-ca4fba94'|lookup:'2'|lookup:'title' }} <br> Description: {{ person|lookup:'RECOMMENDATIONS_BY_SLOT-YN5L9G'|lookup:'rsbss-ca4fba94'|lookup:'2'|lookup:'description' }} <br> Price: {{ person|lookup:'RECOMMENDATIONS_BY_SLOT-YN5L9G'|lookup:'rsbss-ca4fba94'|lookup:'2'|lookup:'price'|lookup:'amount' }} {{ person|lookup:'RECOMMENDATIONS_BY_SLOT-YN5L9G'|lookup:'rsbss-ca4fba94'|lookup:'2'|lookup:'price'|lookup:'currencyCode' }} <br> Online URL: {{ person|lookup:'RECOMMENDATIONS_BY_SLOT-YN5L9G'|lookup:'rsbss-ca4fba94'|lookup:'2'|lookup:'onlineUrl' }} <br> Image URL: {{ person|lookup:'RECOMMENDATIONS_BY_SLOT-YN5L9G'|lookup:'rsbss-ca4fba94'|lookup:'2'|lookup:'image'|lookup:'url' }} </p> <p> <b>Display recommendation of item 3 for slot rsbss-ca4fba94 </b> <br> Title: {{ person|lookup:'RECOMMENDATIONS_BY_SLOT-YN5L9G'|lookup:'rsbss-ca4fba94'|lookup:'3'|lookup:'title' }} <br> Description: {{ person|lookup:'RECOMMENDATIONS_BY_SLOT-YN5L9G'|lookup:'rsbss-ca4fba94'|lookup:'3'|lookup:'description' }} <br> Price: {{ person|lookup:'RECOMMENDATIONS_BY_SLOT-YN5L9G'|lookup:'rsbss-ca4fba94'|lookup:'3'|lookup:'price'|lookup:'amount' }} {{ person|lookup:'RECOMMENDATIONS_BY_SLOT-YN5L9G'|lookup:'rsbss-ca4fba94'|lookup:'3'|lookup:'price'|lookup:'currencyCode' }} <br> Online URL: {{ person|lookup:'RECOMMENDATIONS_BY_SLOT-YN5L9G'|lookup:'rsbss-ca4fba94'|lookup:'3'|lookup:'onlineUrl' }} <br> Image URL: {{ person|lookup:'RECOMMENDATIONS_BY_SLOT-YN5L9G'|lookup:'rsbss-ca4fba94'|lookup:'3'|lookup:'image'|lookup:'url' }} </p>h3> -
If you paste this code into an HTML block in a Klaviyo template and preview the email as one of the quiz subscribers, you will see the recommended products.
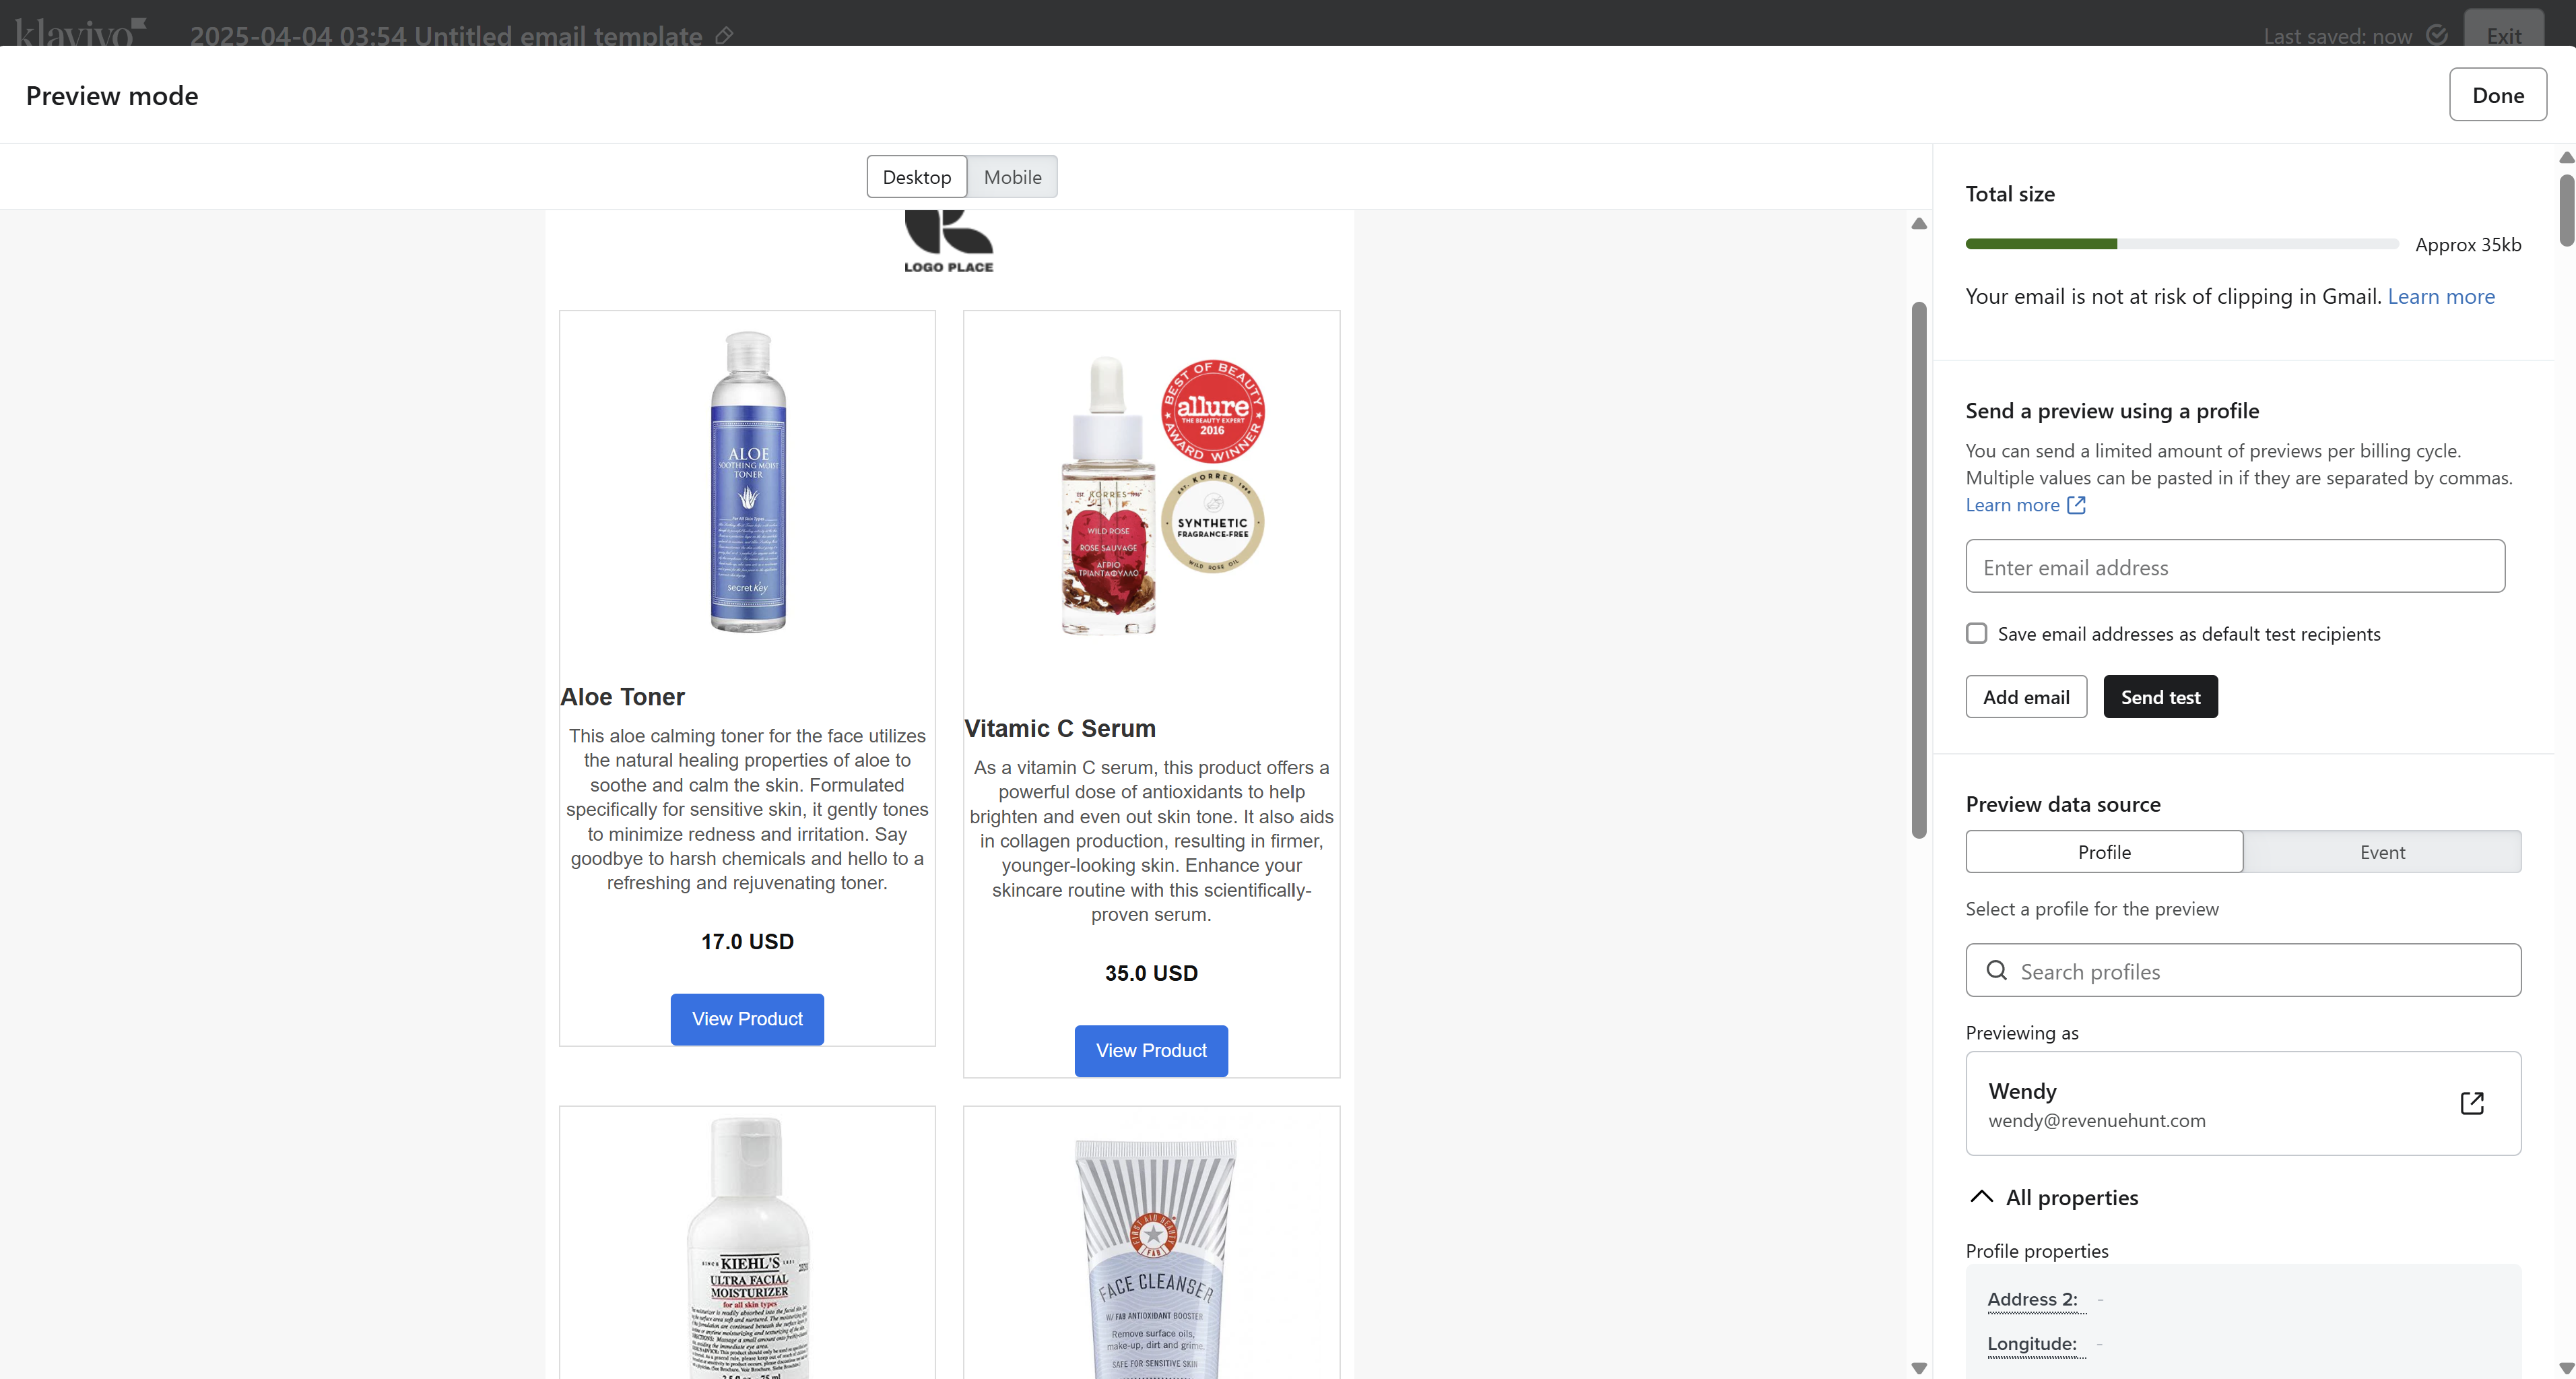
-
To style the recommended products, your developer will need to add CSS classes to the HTML code and style it the way you want.
For example, this is a styled version of the code above:
Example: Styled version of the code above
In Klaviyo, it will look like this:
<!-- Two-Column Product Grid for Klaviyo Email -->

<table role="presentation" cellspacing="0" cellpadding="0" border="0" width="100%" align="center" style="font-family: sans-serif;">
<tr>
    <!-- Product 0 -->
    <td style="width: 50%; padding: 10px; vertical-align: top;">
    <table role="presentation" cellspacing="0" cellpadding="0" border="0" width="100%" style="border: 1px solid #ddd; border-radius: 8px; padding: 16px;">
        <tr>
        <td style="text-align: center;">
            <img src="{{ person|lookup:'RECOMMENDATIONS_BY_SLOT-YN5L9G'|lookup:'rsbss-ca4fba94'|lookup:'0'|lookup:'image'|lookup:'url' }}" alt="Product 0" style="width: 100%; max-width: 250px; border-radius: 6px; margin-bottom: 12px;">
            <h3 style="font-size: 18px; color: #333; margin: 10px 0;">
            {{ person|lookup:'RECOMMENDATIONS_BY_SLOT-YN5L9G'|lookup:'rsbss-ca4fba94'|lookup:'0'|lookup:'title' }}
            </h3>
            <p style="font-size: 14px; color: #555; margin-bottom: 10px;">
            {{ person|lookup:'RECOMMENDATIONS_BY_SLOT-YN5L9G'|lookup:'rsbss-ca4fba94'|lookup:'0'|lookup:'description' }}
            </p>
            <p style="font-size: 16px; color: #111; font-weight: bold; margin-bottom: 12px;">
            {{ person|lookup:'RECOMMENDATIONS_BY_SLOT-YN5L9G'|lookup:'rsbss-ca4fba94'|lookup:'0'|lookup:'price'|lookup:'amount' }} {{ person|lookup:'RECOMMENDATIONS_BY_SLOT-YN5L9G'|lookup:'rsbss-ca4fba94'|lookup:'0'|lookup:'price'|lookup:'currencyCode' }}
            </p>
            <a href="{{ person|lookup:'RECOMMENDATIONS_BY_SLOT-YN5L9G'|lookup:'rsbss-ca4fba94'|lookup:'0'|lookup:'onlineUrl' }}" style="background-color: #1a73e8; color: #fff; padding: 10px 16px; text-decoration: none; border-radius: 4px; display: inline-block;">
            View Product
            </a>
        </td>
        </tr>
    </table>
    </td>

    <!-- Product 1 -->
    <td style="width: 50%; padding: 10px; vertical-align: top;">
    <table role="presentation" cellspacing="0" cellpadding="0" border="0" width="100%" style="border: 1px solid #ddd; border-radius: 8px; padding: 16px;">
        <tr>
        <td style="text-align: center;">
            <img src="{{ person|lookup:'RECOMMENDATIONS_BY_SLOT-YN5L9G'|lookup:'rsbss-ca4fba94'|lookup:'1'|lookup:'image'|lookup:'url' }}" alt="Product 1" style="width: 100%; max-width: 250px; border-radius: 6px; margin-bottom: 12px;">
            <h3 style="font-size: 18px; color: #333; margin: 10px 0;">
            {{ person|lookup:'RECOMMENDATIONS_BY_SLOT-YN5L9G'|lookup:'rsbss-ca4fba94'|lookup:'1'|lookup:'title' }}
            </h3>
            <p style="font-size: 14px; color: #555; margin-bottom: 10px;">
            {{ person|lookup:'RECOMMENDATIONS_BY_SLOT-YN5L9G'|lookup:'rsbss-ca4fba94'|lookup:'1'|lookup:'description' }}
            </p>
            <p style="font-size: 16px; color: #111; font-weight: bold; margin-bottom: 12px;">
            {{ person|lookup:'RECOMMENDATIONS_BY_SLOT-YN5L9G'|lookup:'rsbss-ca4fba94'|lookup:'1'|lookup:'price'|lookup:'amount' }} {{ person|lookup:'RECOMMENDATIONS_BY_SLOT-YN5L9G'|lookup:'rsbss-ca4fba94'|lookup:'1'|lookup:'price'|lookup:'currencyCode' }}
            </p>
            <a href="{{ person|lookup:'RECOMMENDATIONS_BY_SLOT-YN5L9G'|lookup:'rsbss-ca4fba94'|lookup:'1'|lookup:'onlineUrl' }}" style="background-color: #1a73e8; color: #fff; padding: 10px 16px; text-decoration: none; border-radius: 4px; display: inline-block;">
            View Product
            </a>
        </td>
        </tr>
    </table>
    </td>
</tr>

<tr>
    <!-- Product 2 -->
    <td style="width: 50%; padding: 10px; vertical-align: top;">
    <table role="presentation" cellspacing="0" cellpadding="0" border="0" width="100%" style="border: 1px solid #ddd; border-radius: 8px; padding: 16px;">
        <tr>
        <td style="text-align: center;">
            <img src="{{ person|lookup:'RECOMMENDATIONS_BY_SLOT-YN5L9G'|lookup:'rsbss-ca4fba94'|lookup:'2'|lookup:'image'|lookup:'url' }}" alt="Product 2" style="width: 100%; max-width: 250px; border-radius: 6px; margin-bottom: 12px;">
            <h3 style="font-size: 18px; color: #333; margin: 10px 0;">
            {{ person|lookup:'RECOMMENDATIONS_BY_SLOT-YN5L9G'|lookup:'rsbss-ca4fba94'|lookup:'2'|lookup:'title' }}
            </h3>
            <p style="font-size: 14px; color: #555; margin-bottom: 10px;">
            {{ person|lookup:'RECOMMENDATIONS_BY_SLOT-YN5L9G'|lookup:'rsbss-ca4fba94'|lookup:'2'|lookup:'description' }}
            </p>
            <p style="font-size: 16px; color: #111; font-weight: bold; margin-bottom: 12px;">
            {{ person|lookup:'RECOMMENDATIONS_BY_SLOT-YN5L9G'|lookup:'rsbss-ca4fba94'|lookup:'2'|lookup:'price'|lookup:'amount' }} {{ person|lookup:'RECOMMENDATIONS_BY_SLOT-YN5L9G'|lookup:'rsbss-ca4fba94'|lookup:'2'|lookup:'price'|lookup:'currencyCode' }}
            </p>
            <a href="{{ person|lookup:'RECOMMENDATIONS_BY_SLOT-YN5L9G'|lookup:'rsbss-ca4fba94'|lookup:'2'|lookup:'onlineUrl' }}" style="background-color: #1a73e8; color: #fff; padding: 10px 16px; text-decoration: none; border-radius: 4px; display: inline-block;">
            View Product
            </a>
        </td>
        </tr>
    </table>
    </td>

    <!-- Product 3 -->
    <td style="width: 50%; padding: 10px; vertical-align: top;">
    <table role="presentation" cellspacing="0" cellpadding="0" border="0" width="100%" style="border: 1px solid #ddd; border-radius: 8px; padding: 16px;">
        <tr>
        <td style="text-align: center;">
            <img src="{{ person|lookup:'RECOMMENDATIONS_BY_SLOT-YN5L9G'|lookup:'rsbss-ca4fba94'|lookup:'3'|lookup:'image'|lookup:'url' }}" alt="Product 3" style="width: 100%; max-width: 250px; border-radius: 6px; margin-bottom: 12px;">
            <h3 style="font-size: 18px; color: #333; margin: 10px 0;">
            {{ person|lookup:'RECOMMENDATIONS_BY_SLOT-YN5L9G'|lookup:'rsbss-ca4fba94'|lookup:'3'|lookup:'title' }}
            </h3>
            <p style="font-size: 14px; color: #555; margin-bottom: 10px;">
            {{ person|lookup:'RECOMMENDATIONS_BY_SLOT-YN5L9G'|lookup:'rsbss-ca4fba94'|lookup:'3'|lookup:'description' }}
            </p>
            <p style="font-size: 16px; color: #111; font-weight: bold; margin-bottom: 12px;">
            {{ person|lookup:'RECOMMENDATIONS_BY_SLOT-YN5L9G'|lookup:'rsbss-ca4fba94'|lookup:'3'|lookup:'price'|lookup:'amount' }} {{ person|lookup:'RECOMMENDATIONS_BY_SLOT-YN5L9G'|lookup:'rsbss-ca4fba94'|lookup:'3'|lookup:'price'|lookup:'currencyCode' }}
            </p>
            <a href="{{ person|lookup:'RECOMMENDATIONS_BY_SLOT-YN5L9G'|lookup:'rsbss-ca4fba94'|lookup:'3'|lookup:'onlineUrl' }}" style="background-color: #1a73e8; color: #fff; padding: 10px 16px; text-decoration: none; border-radius: 4px; display: inline-block;">
            View Product
            </a>
        </td>
        </tr>
    </table>
    </td>
</tr>
</table>
Tip: Use Copilot or AI to style the code
You can use Quiz Copilot or another AI agent like ChatGPT or Gemini to generate a styled version of the code.
-
You can use elements of the code in your Klaviyo template elements.
Example: Display Product Title in Text Block
For example, you can use the
{{ person|lookup:'RECOMMENDATIONS_BY_SLOT-YN5L9G'|lookup:'rsbss-ca4fba94'|lookup:'0'|lookup:'title' }}to display the title of the first product in a text block.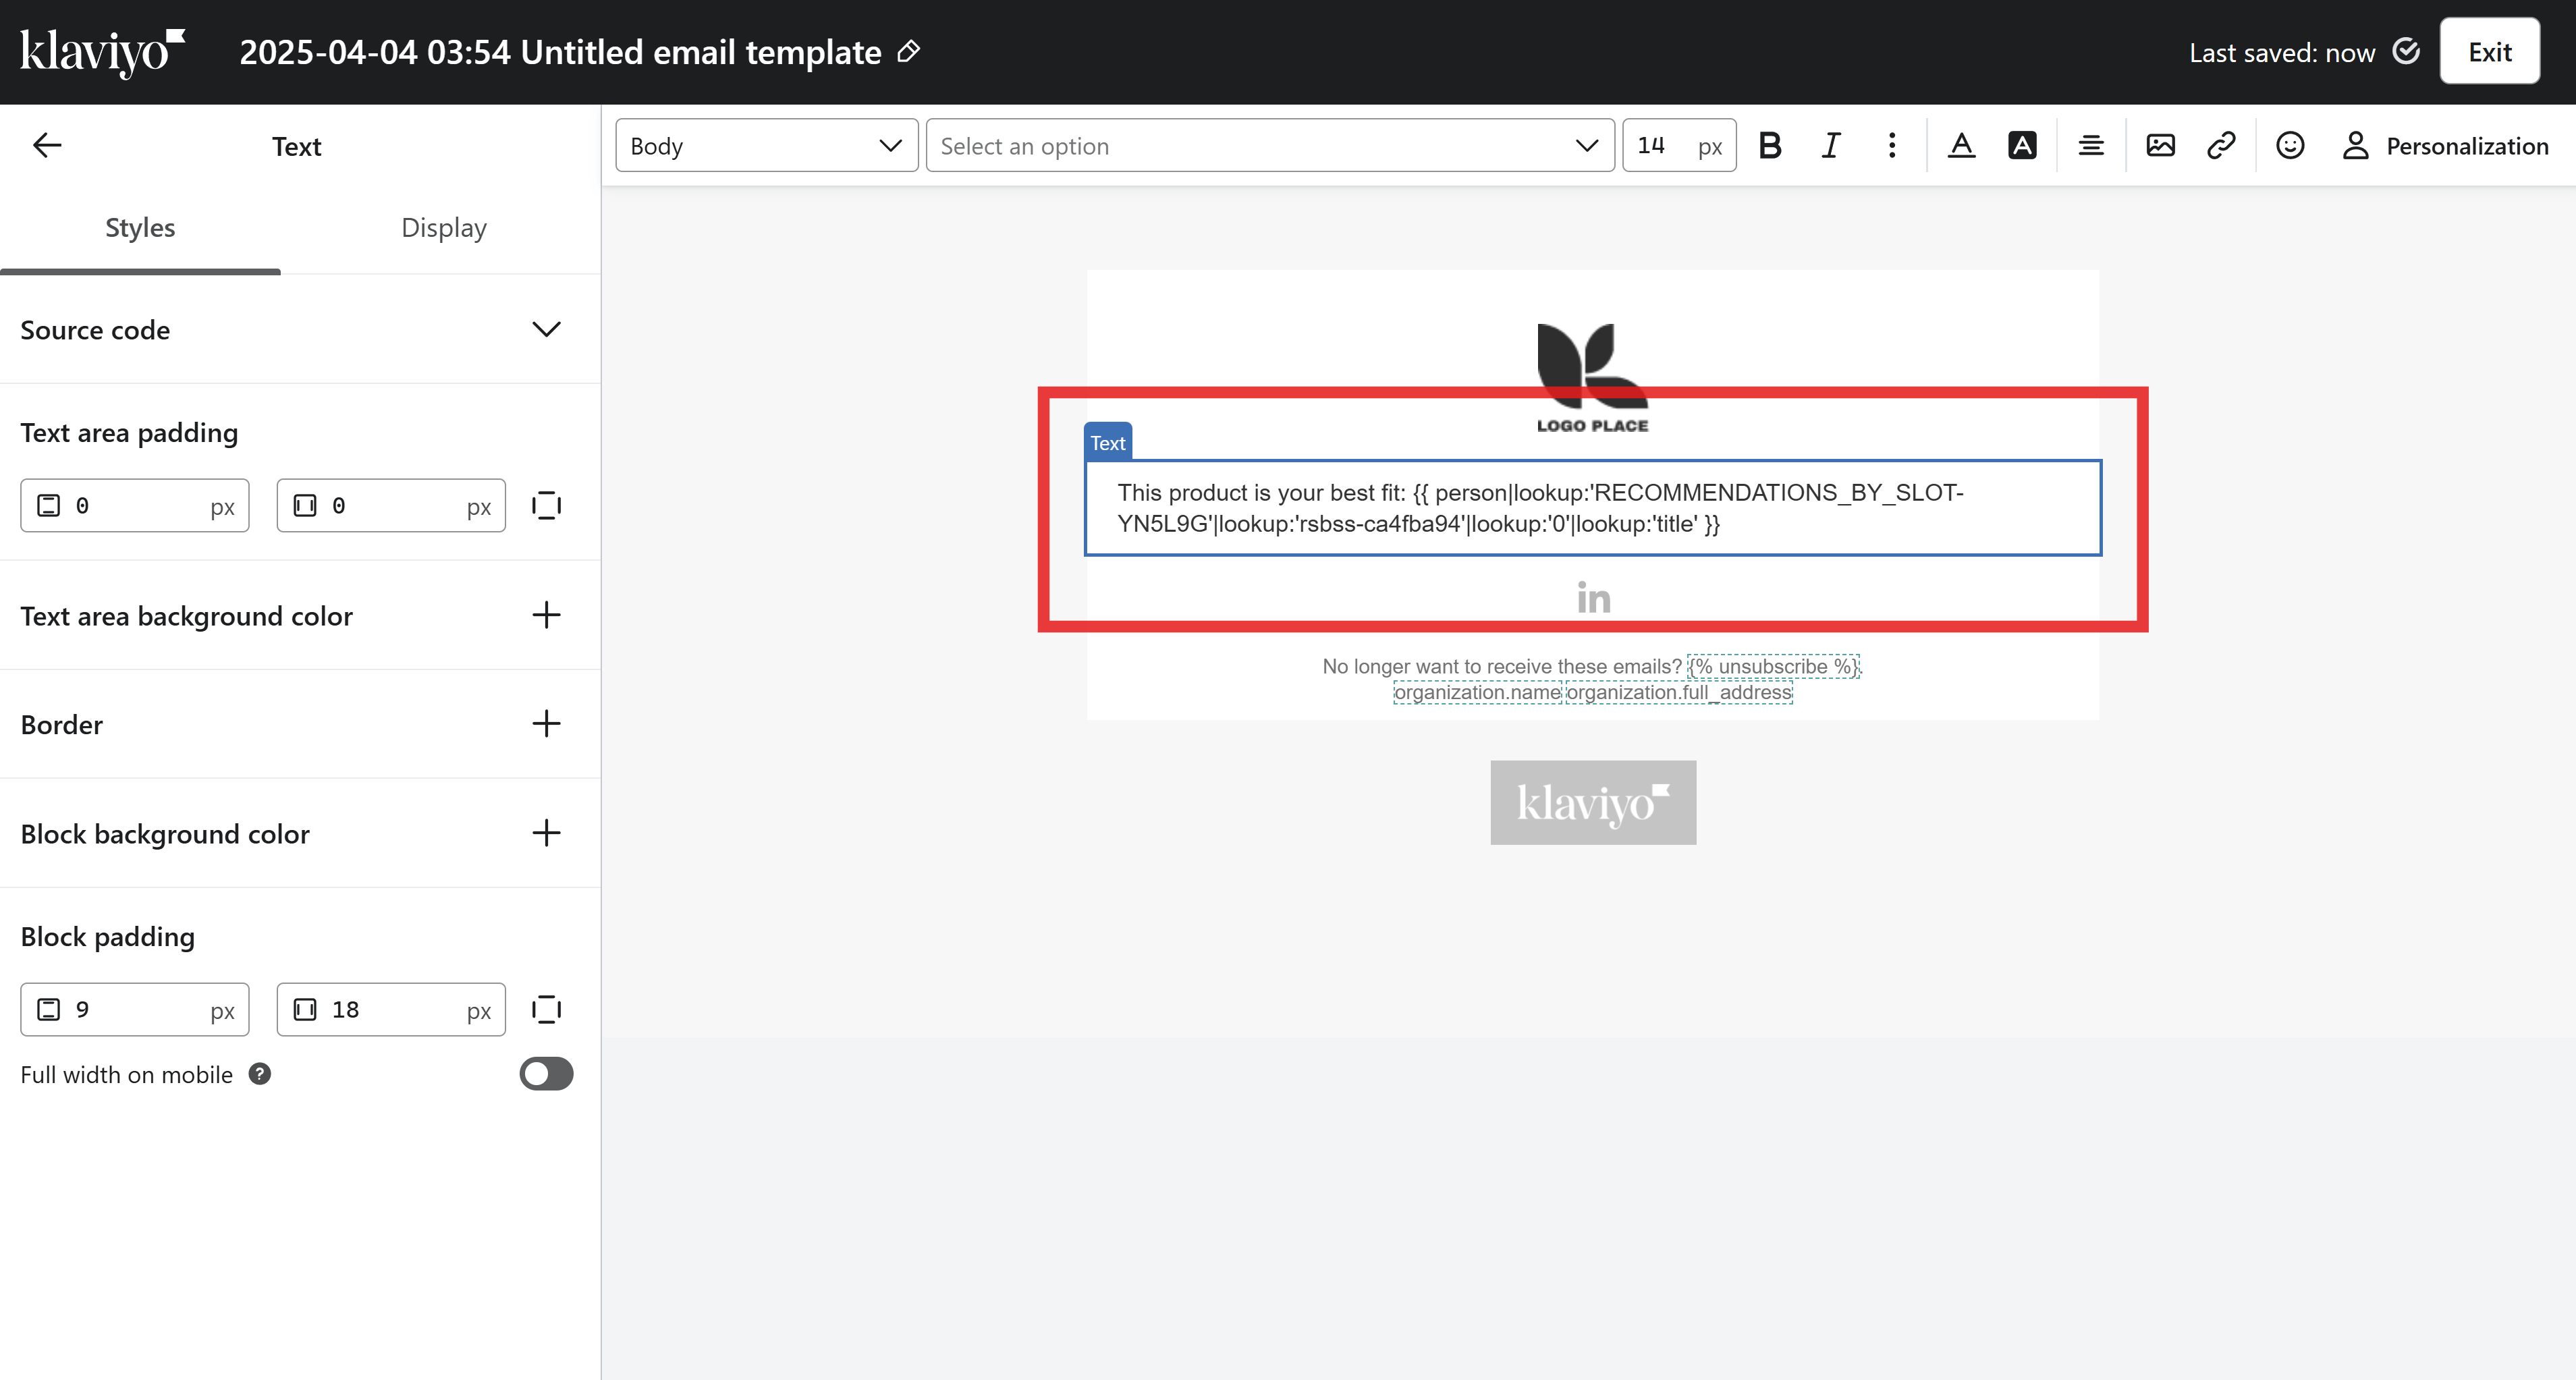
Sample Product Object Structure
In this example, here's a product object structure that was sent to Klaviyo:
- Display recommendation of item 0 for slot rsbss-ca4fba94
- Title:
{{ person|lookup:'RECOMMENDATIONS_BY_SLOT-YN5L9G'|lookup:'rsbss-ca4fba94'|lookup:'0'|lookup:'title' }} - Description:
{{ person|lookup:'RECOMMENDATIONS_BY_SLOT-YN5L9G'|lookup:'rsbss-ca4fba94'|lookup:'0'|lookup:'description' }} - Price:
{{ person|lookup:'RECOMMENDATIONS_BY_SLOT-YN5L9G'|lookup:'rsbss-ca4fba94'|lookup:'0'|lookup:'price'|lookup:'amount' }} {{ person|lookup:'RECOMMENDATIONS_BY_SLOT-YN5L9G'|lookup:'rsbss-ca4fba94'|lookup:'0'|lookup:'price'|lookup:'currencyCode' }} - Online URL:
{{ person|lookup:'RECOMMENDATIONS_BY_SLOT-YN5L9G'|lookup:'rsbss-ca4fba94'|lookup:'0'|lookup:'onlineUrl' }} - Image URL:
{{ person|lookup:'RECOMMENDATIONS_BY_SLOT-YN5L9G'|lookup:'rsbss-ca4fba94'|lookup:'0'|lookup:'image'|lookup:'url' }}
Example 2 - Display Quiz Answers
A Skincare Quiz with ID YN5L9G wants to display all customer answers in the email.
-
To do this, you can use the following code copied from the Klaviyo template in the
Integrationstab:Example: Code from Quiz Integrations tab
{# ======================================= #} {# INFORMATION GATHERED FROM THE QUESTIONS #} {# ======================================= #} <p> <p> <b>Display quiz name</b> <br> Quiz name: {{ person|lookup:'QUIZ_NAME-YN5L9G' }} </p> <p> <b>Display personal information</b> <br> First name: {{ person.first_name }} <br> Last name: {{ person.last_name }} </p> </p><p><b>Display all answers for a specific block</b> <br> {# Display answer for a block of type input and ref qbi-6c4248f5 #} Q2: BEFORE WE BEGIN <br> {{ person|lookup:'ANSWER_BY_BLOCK-qbi-6c4248f5-YN5L9G' }} <br> {# Display answer for a block of type choice and ref qbc-dd744cf3 #} Q3: AGE GROUP <br> {{ person|lookup:'ANSWER_BY_BLOCK-qbc-dd744cf3-YN5L9G' }} <br> {# Display answer for a block of type choice and ref qbc-485600ce #} Q4: SKIN TYPE <br> {{ person|lookup:'ANSWER_BY_BLOCK-qbc-485600ce-YN5L9G' }} <br> {# Display answer for a block of type choice and ref qbc-e8cf3180 #} Q9: SKIN CONCERNS <br> {{ person|lookup:'ANSWER_BY_BLOCK-qbc-e8cf3180-YN5L9G' }} <br> {# Display answer for a block of type choice and ref qbc-329aaeff #} Q10: ALERGIES <br> {{ person|lookup:'ANSWER_BY_BLOCK-qbc-329aaeff-YN5L9G' }} <br> {# Display answer for a block of type input and ref qbi-29f016cf #} Q11: WE'VE GOT YOUR RESULTS - #1 [email] <br> {{ person|lookup:'ANSWER_BY_BLOCK-qbi-29f016cf-YN5L9G' }} <br> {# Display answer for a block of type choice and ref qbc-cb601cf6 #} Q11: WE'VE GOT YOUR RESULTS - #2 [multiple_choice] <br> {{ person|lookup:'ANSWER_BY_BLOCK-qbc-cb601cf6-YN5L9G' }} <br> </p> -
When this code is copied into an HTML block in a Klaviyo template and previewd as one of the quiz subscribes is will display a full list of all the answers.
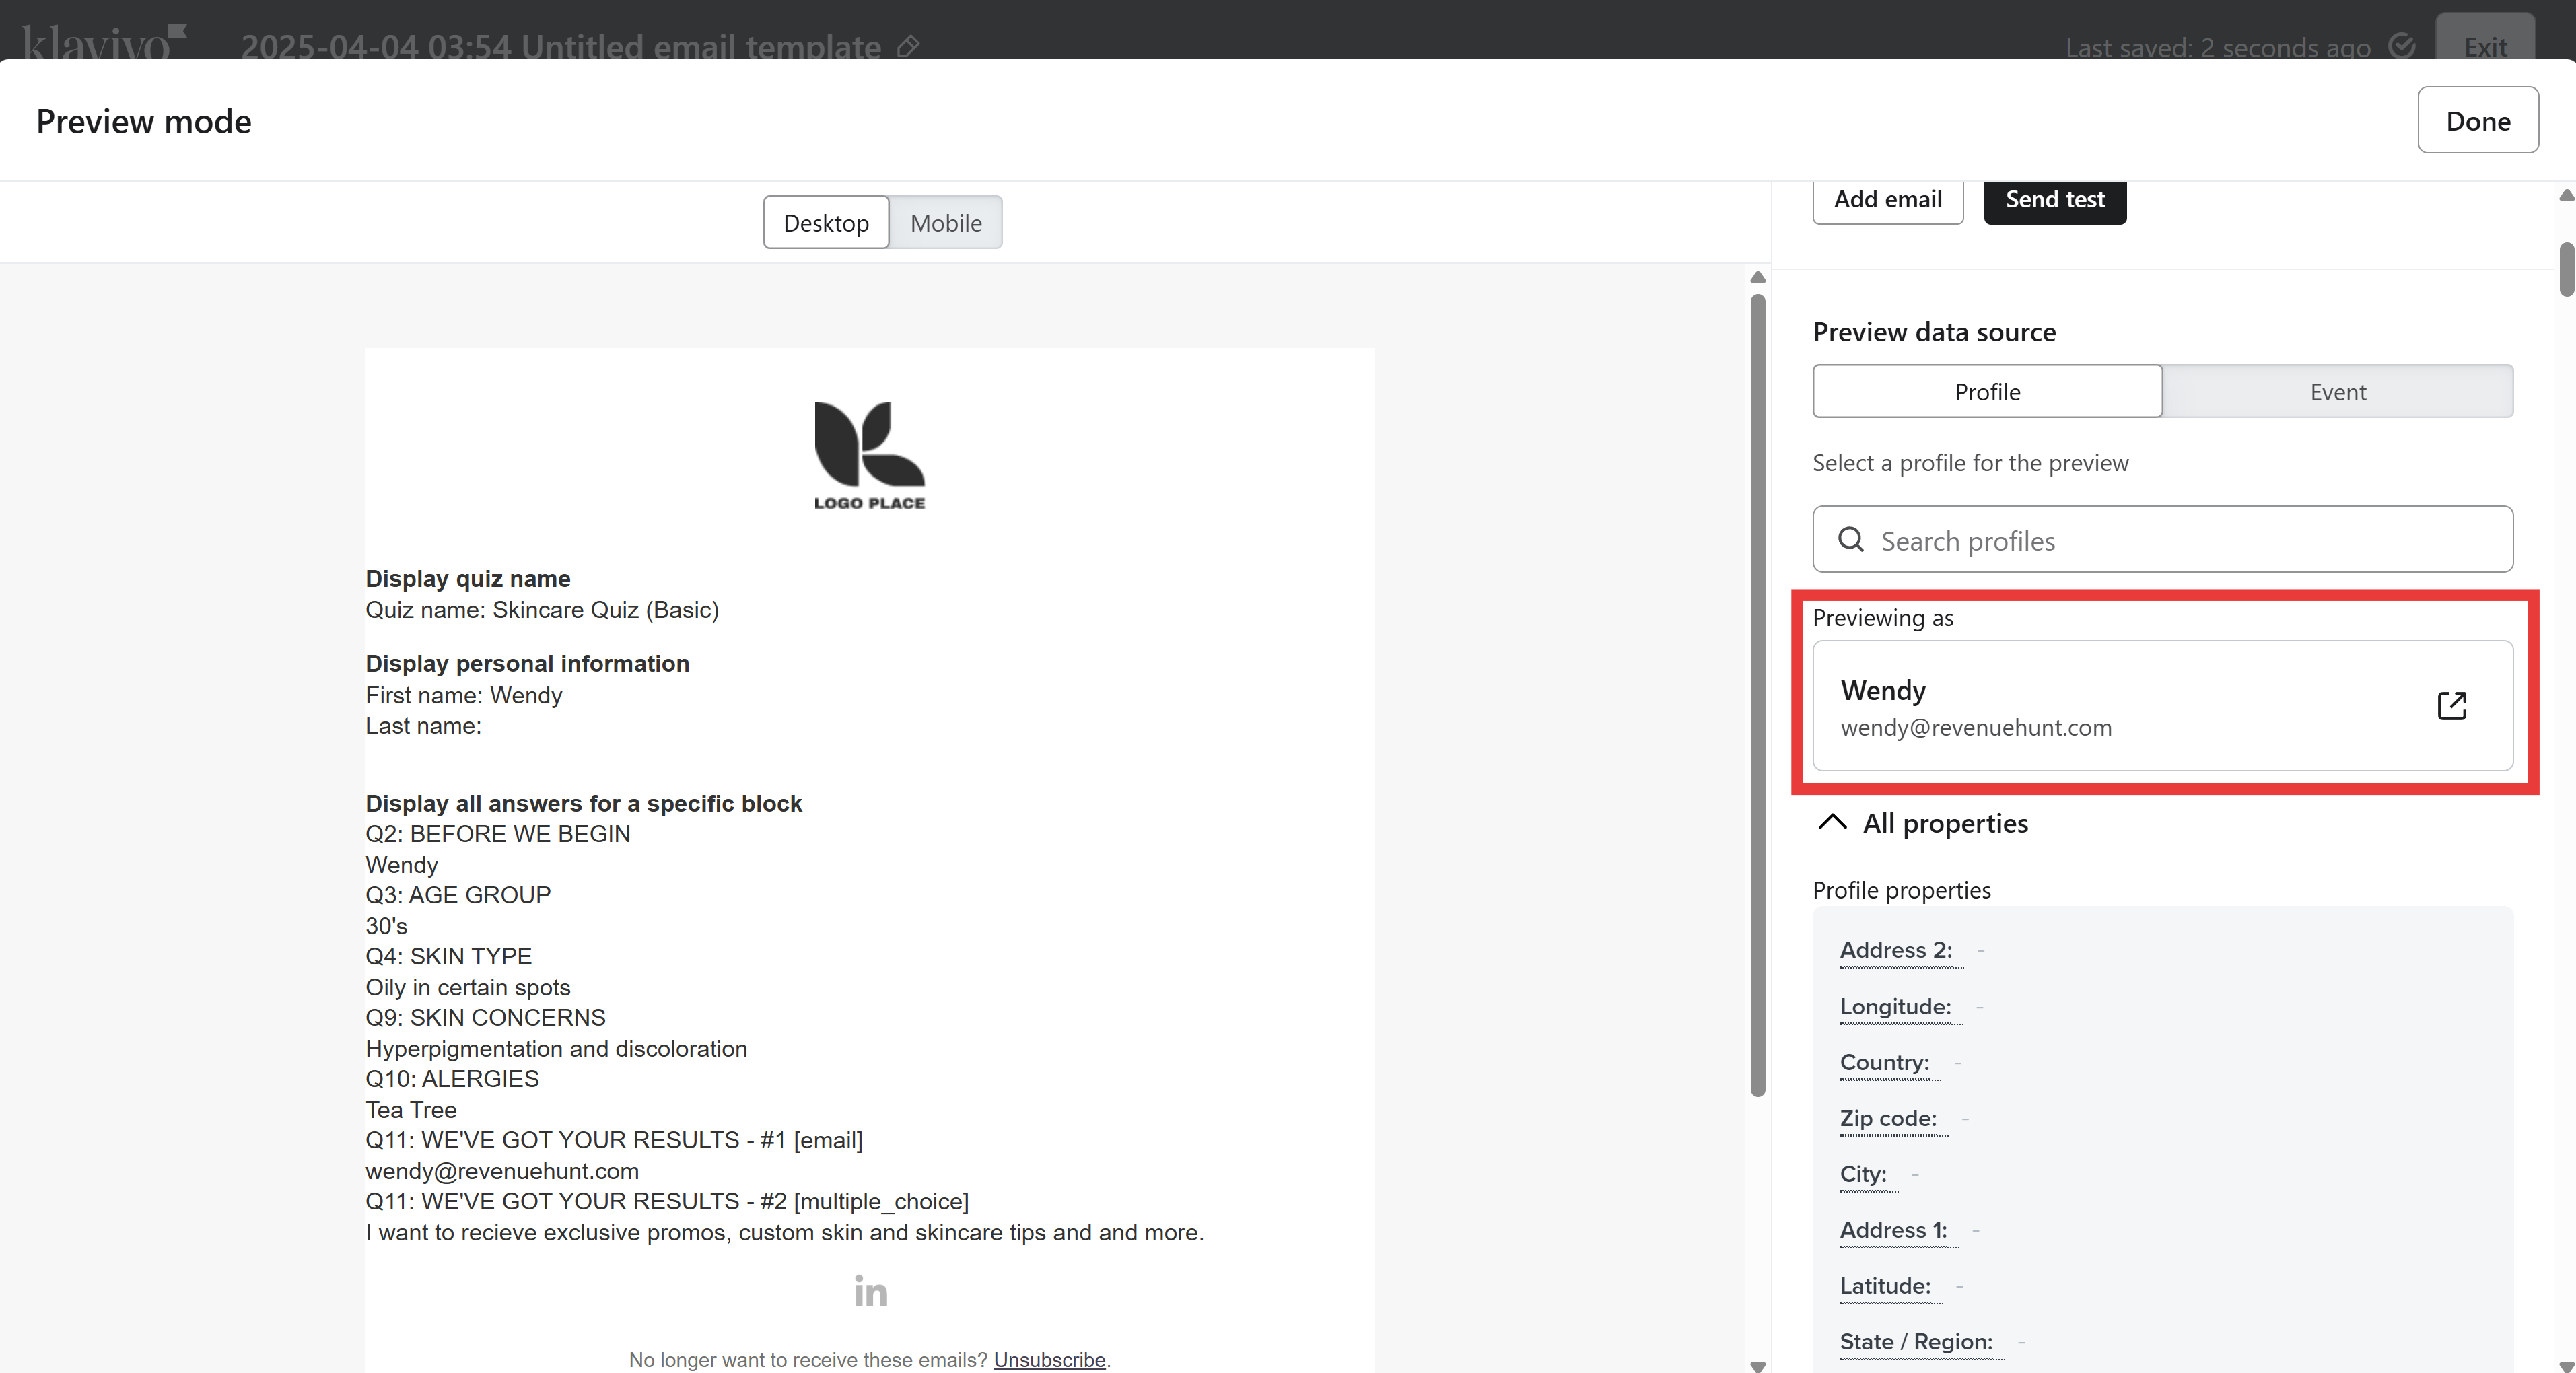
-
If you want to show specific answers in your email template, you can copy parts of the code.
Example: Display Answer for Q3: AGE GROUP
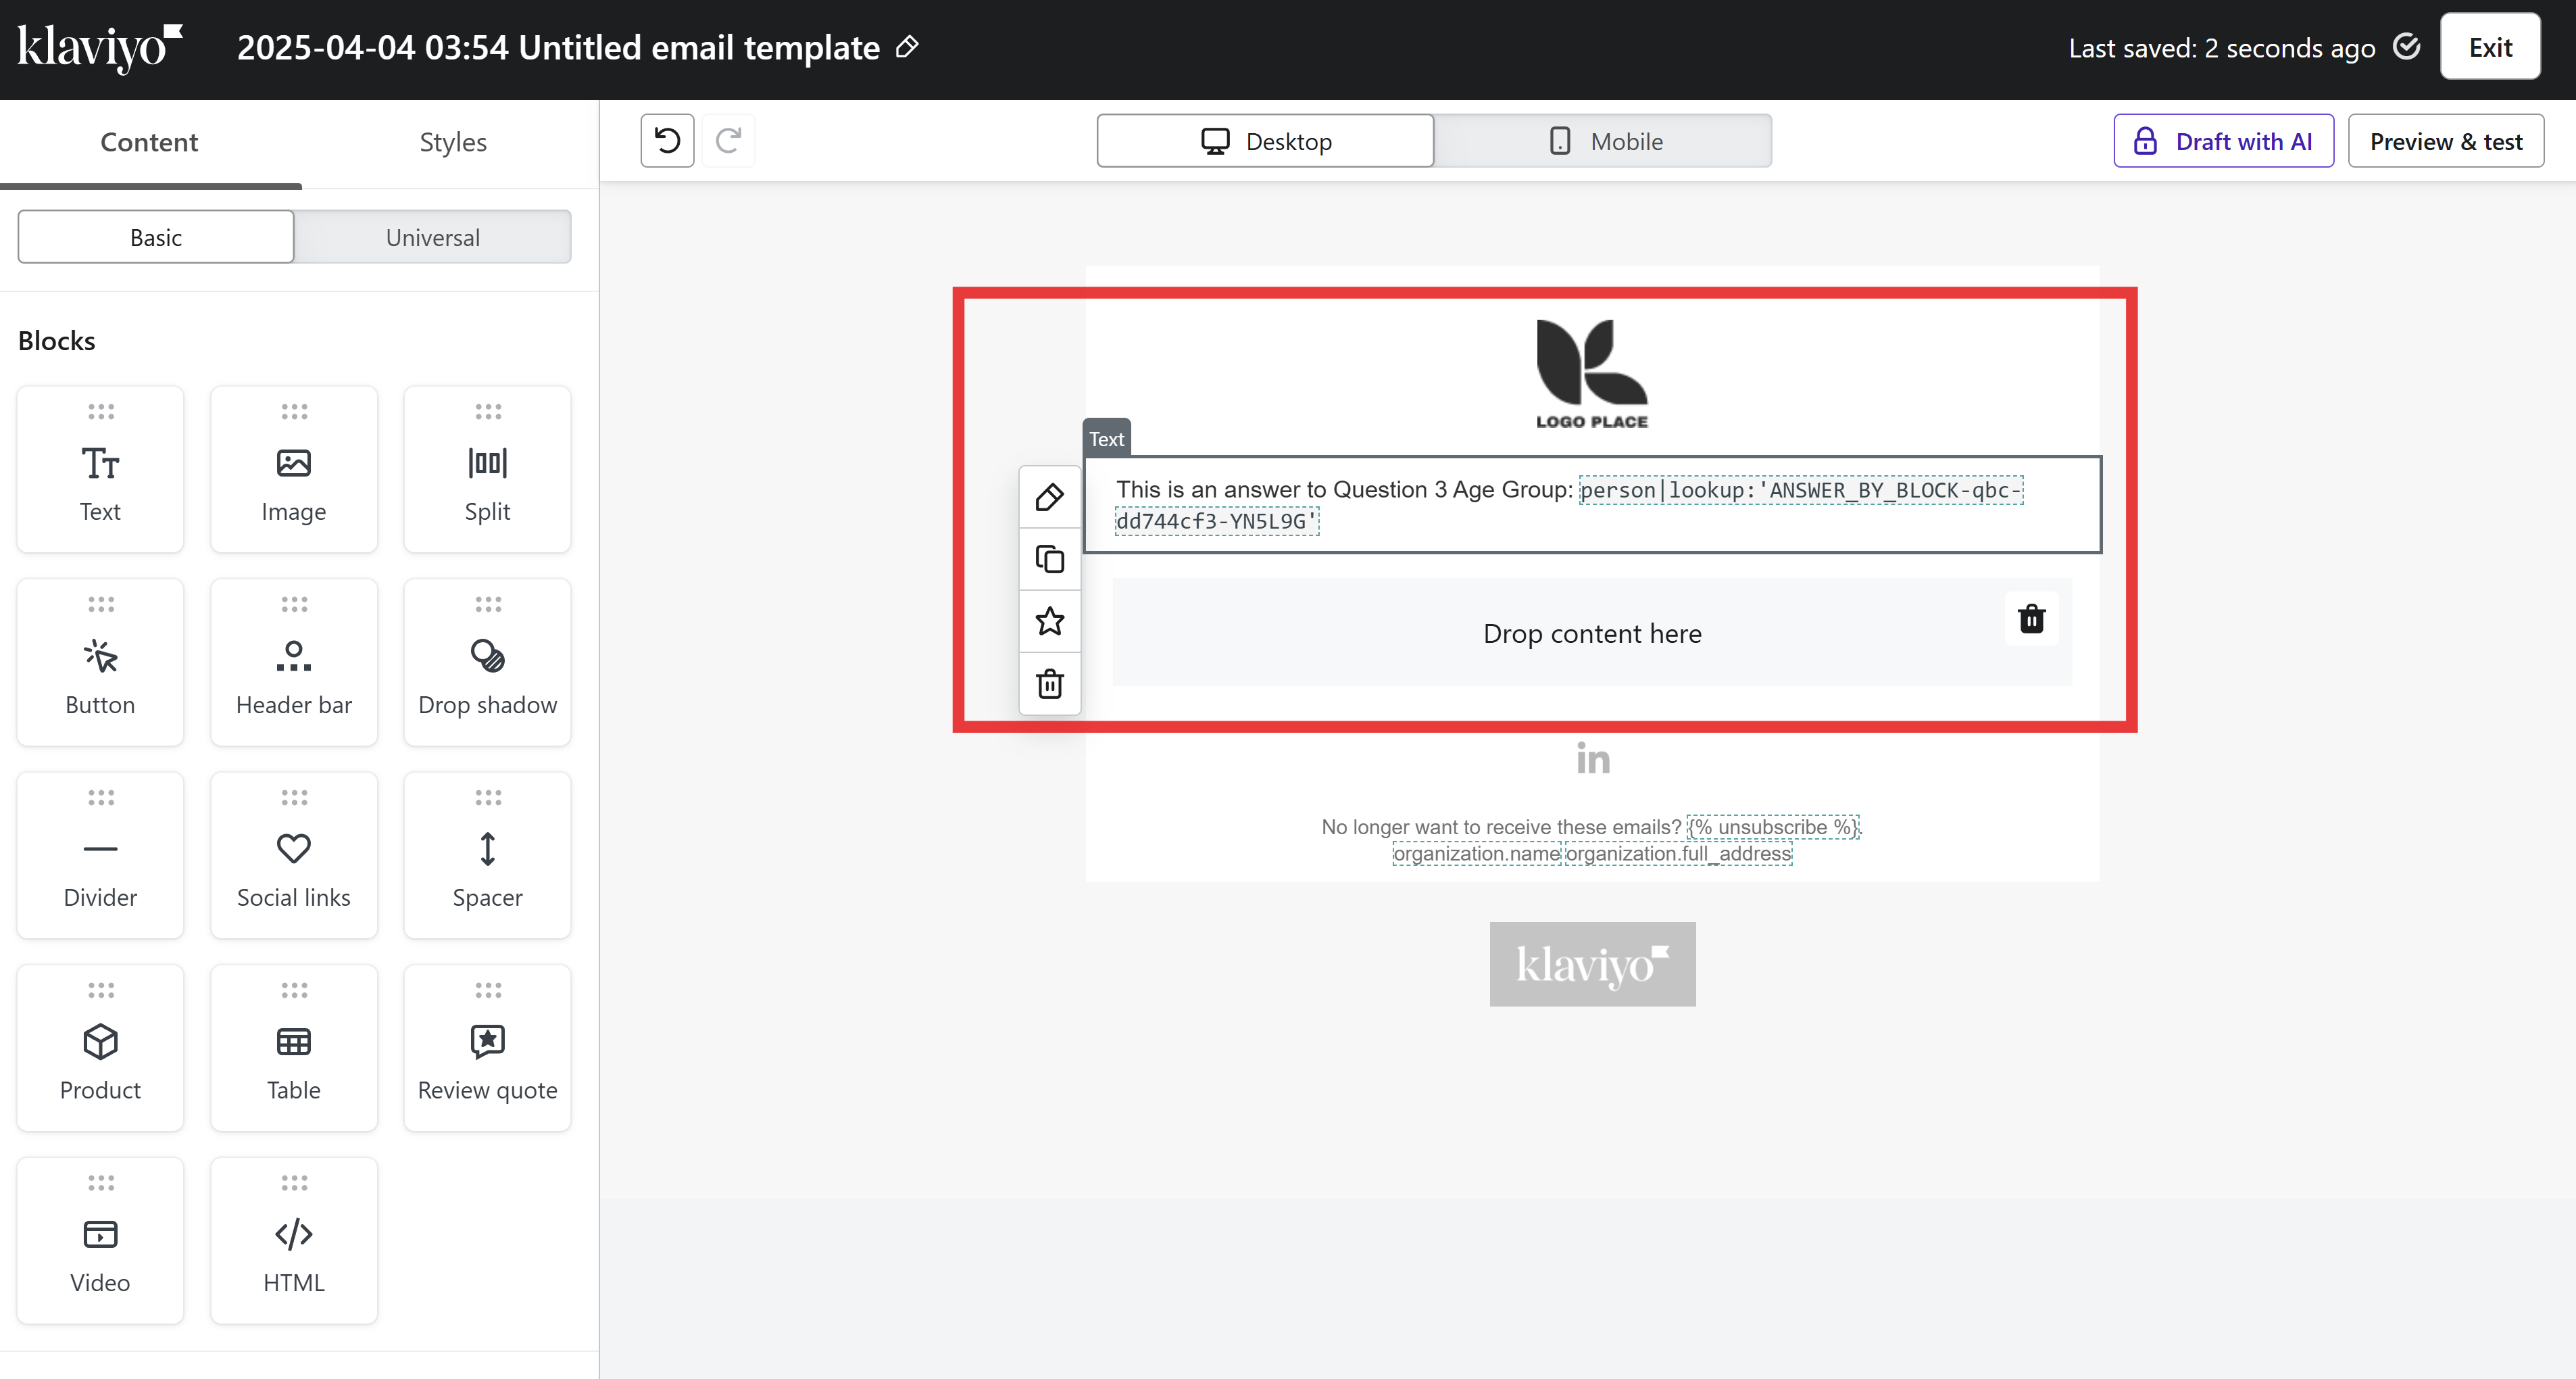
For example, you can use
{{ person|lookup:'ANSWER_BY_BLOCK-qbc-dd744cf3-YN5L9G' }}to display answer for Q3: AGE GROUP (ref qbc-dd744cf3).Here's how to use it in a Klaviyo template text block:
Sample Answer Object Structure
In this example, here's how to get answers for a specific question:
Quiz name:
{{ person|lookup:'QUIZ_NAME-YN5L9G' }}First name:
{{ person.first_name }}Last name:
{{ person.last_name }}Q2: BEFORE WE BEGIN:
{{ person|lookup:'ANSWER_BY_BLOCK-qbi-6c4248f5-YN5L9G' }}Q3: AGE GROUP:
{{ person|lookup:'ANSWER_BY_BLOCK-qbc-dd744cf3-YN5L9G' }}Q4: SKIN TYPE:
{{ person|lookup:'ANSWER_BY_BLOCK-qbc-485600ce-YN5L9G' }}Q9: SKIN CONCERNS:
{{ person|lookup:'ANSWER_BY_BLOCK-qbc-e8cf3180-YN5L9G' }}Q10: ALERGIES:
{{ person|lookup:'ANSWER_BY_BLOCK-qbc-329aaeff-YN5L9G' }}Q11: WE'VE GOT YOUR RESULTS - #1 [email]:
{{ person|lookup:'ANSWER_BY_BLOCK-qbi-29f016cf-YN5L9G' }}Q11: WE'VE GOT YOUR RESULTS - #2 [multiple_choice]:
{{ person|lookup:'ANSWER_BY_BLOCK-qbc-cb601cf6-YN5L9G' }}
Example 3 - Display Link to Quiz Results
Use the RESPONSE_ID-QuizID to create a link to the quiz results page.
-
Just add
#response-{{ person|lookup:'RESPONSE_ID-QuizID' }}to the end of your results page href attribute in any link or URL.Example: Link to Quiz Results
<a href="https://yourwebsite.com/#response-{{ person|lookup:'RESPONSE_ID-Gli0KD' }}">View your quiz results</a>where
Gli0KDis the quiz ID and{{ person|lookup:'RESPONSE_ID-Gli0KD' }}fetches the dynamic response ID (e.g., eVgV0Y).
In this example, we’re using our quiz ID dbqHqN, which you’ll need to replace for your quiz ID. Here is the code for reference:
Example: Basic Slots Template
<h3>Hello {{ person|lookup:'Q-dbqHqN ZMiXjj: .Before we get started... what\'s your name?'|default:'' }}!</h3>
<p>Here we are making sure the product exists:</p>
{% if person|lookup:'SLOT-dbqHqN: Step 1: Cleanser - product_0_image_url' %}
<p>Cleanser</p>
<p><img alt="This is the cleanser image" src="{{ person|lookup:'SLOT-dbqHqN: Step 1: Cleanser - product_0_image_url'|default:'' }}" /></p>
<p>{{ person|lookup:'SLOT-dbqHqN: Step 1: Cleanser - product_0_name'|default:'' }}</p>
<p>{{ person|lookup:'SLOT-dbqHqN: Step 1: Cleanser - product_0_price'|default:'' }}</p>
<p>{{ person|lookup:'SLOT-dbqHqN: Step 1: Cleanser - product_0_sku'|default:'' }}</p>
<p><a href="{{ person|lookup:'SLOT-dbqHqN: Step 1: Cleanser - product_0_url'|default:'' }}">Buy now</a></p>
{% endif %}
{% if person|lookup:'T-dbqHqN: 40s' %}
<p>You are in your forties</p>
{% endif %}
This example demonstrated that you can not only include custom properties that are passed from the quiz to your Klaviyo account, but you can also use IF-ELSE conditional statements to show/hide content based on the customer’s responses to the quiz.
Note: Counting Products
Note that when looping through the products, the count starts in 0 (zero), so for example, if you were to display the name of 3 products in a slot you’d have to do it like this:
```html
<p>{{ person|lookup:'SLOT-dbqHqN - product_0_name'|default:'' }}</p>
<p>{{ person|lookup:'SLOT-dbqHqN - product_1_name'|default:'' }}</p>
<p>{{ person|lookup:'SLOT-dbqHqN - product_2_name'|default:'' }}</p>
```
Here are some other email templates that you can use as a reference:
- Basic Slots Template (4-Step Skincare Routine) – take this quiz & enter your email to see a demo.
- Advanced Slots Template (Morning & Night Routine) – take this quiz & enter your email to see a demo.
- Products List Template (Coffee Recommendations) – take this quiz & enter your email to see a demo.
Note: These templates won’t work as is
Bear in mind that these templates (unlike the one generated from the Connect > Klaviyo tab) won’t work as is. They were created for a sample quiz. Your developer will have to modify the custom properties to match the ones that are passed from the quiz to your Klaviyo account. The quiz ID is different, so are other property names.
Pull Product Information Directly from Shopify
There’s a feature in Klaviyo that allows you to pull the product information directly from Shopify by providing the id. This way you don’t need to use the description or image_url that is provided by revenuehunt, but can pull it directly from Shopify by providing the origin_id of the product. More information about this function can be found here.
Disconnect Klaviyo
There are two ways to stop sending quiz data to Klaviyo, depending on whether you want to stop a single quiz or disconnect Klaviyo from your entire RevenueHunt account.
Option 1: Disconnect a single quiz
If you only want one specific quiz to stop sending data to Klaviyo (while other quizzes in your account keep working):
- Open the Quiz Settings of the quiz you want to disconnect.
- Go to the
Integrationstab, find the Klaviyo section, and uncheck theSend Quiz Leads to Klaviyo Profilescheckbox. - Save your changes.
No more quiz data will flow from that specific quiz to Klaviyo. Other quizzes in your account will continue to send data normally.
Option 2: Disconnect Klaviyo from your entire RevenueHunt account
If you want to completely revoke the Klaviyo connection across your whole RevenueHunt account:
- Open Quiz Settings and go to the
Integrationstab. - Scroll to Klaviyo and click
Disconnect. - Confirm the action.
The changes will save automatically. No more quiz data will flow to Klaviyo from any quiz in your account. To reconnect later, simply click Connect again and complete the OAuth flow.
By following this article, you can set up your post-quiz email flow with Klaviyo.