Sending Follow-up Emails with Klaviyo
In this tutorial you will learn how to send quiz leads to Klaviyo, and how to build a post-quiz email flow there.
What you will learn
- how to add an email question to your quiz,
- how to ask for marketing consent in your quiz,
- how to connect your RevenueHunt account to Klaviyo via OAuth,
- how to enable Klaviyo on a specific quiz,
- how to send quiz leads to Klaviyo Profiles,
- how to send quiz leads to Klaviyo Lists,
- how to segment customers coming from the quiz in Klaviyo,
- how to create a result email flow in Klaviyo,
- how to find a Klaviyo email template,
- how to edit a Klaviyo email template for the quiz,
- how to disconnect Klaviyo from a single quiz,
- how to disconnect Klaviyo from your entire RevenueHunt account.
In this tutorial you will learn how to send quiz leads to Klaviyo, and how to build a post-quiz email flow there.
What you will learn
- how to add an email question to your quiz
- how to ask for marketing consent in your quiz
- how to connect your quiz to Klaviyo
- how to send quiz leads to Klaviyo Profiles
- how to send quiz leads to Klaviyo Lists
- how to segment customers coming from the quiz in Klaviyo
- how to create a result email flow in Klaviyo
- how to use the built-in Klaviyo email templates
In this tutorial you will learn how to send quiz leads to Klaviyo, and how to build a post-quiz email flow there.
What you will learn
- how to add an email question to your quiz
- how to ask for marketing consent in your quiz
- how to connect your quiz to Klaviyo
- how to send quiz leads to Klaviyo Profiles
- how to send quiz leads to Klaviyo Lists
- how to segment customers coming from the quiz in Klaviyo
- how to create a result email flow in Klaviyo
- how to use the built-in Klaviyo email templates
In this tutorial you will learn how to send quiz leads to Klaviyo, and how to build a post-quiz email flow there.
What you will learn
- how to add an email question to your quiz
- how to ask for marketing consent in your quiz
- how to connect your quiz to Klaviyo
- how to send quiz leads to Klaviyo Profiles
- how to send quiz leads to Klaviyo Lists
- how to segment customers coming from the quiz in Klaviyo
- how to create a result email flow in Klaviyo
- how to use the built-in Klaviyo email templates
In this tutorial you will learn how to send quiz leads to Klaviyo, and how to build a post-quiz email flow there.
What you will learn
- how to add an email question to your quiz
- how to ask for marketing consent in your quiz
- how to connect your quiz to Klaviyo
- how to send quiz leads to Klaviyo Profiles
- how to send quiz leads to Klaviyo Lists
- how to segment customers coming from the quiz in Klaviyo
- how to create a result email flow in Klaviyo
- how to use the built-in Klaviyo email templates
In this tutorial you will learn how to send quiz leads to Klaviyo, and how to build a post-quiz email flow there.
What you will learn
- how to add an email question to your quiz
- how to ask for marketing consent in your quiz
- how to connect your quiz to Klaviyo
- how to send quiz leads to Klaviyo Profiles
- how to send quiz leads to Klaviyo Lists
- how to segment customers coming from the quiz in Klaviyo
- how to create a result email flow in Klaviyo
- how to use the built-in Klaviyo email templates
Intro
In this tutorial you will learn how to connect your RevenueHunt account to Klaviyo over OAuth, and how to set up a post-quiz email flow.
Connecting the quiz to Klaviyo can significantly increase your sales.
The RevenueHunt app sends all quiz information straight to Klaviyo. That covers the customer's email and name, and every question, answer and recommended product.
The OAuth connection removes the need for Public or Private API Keys. Authenticate once and your whole account is connected.
In this tutorial you will learn how to connect your quiz to Klaviyo and set up a post-quiz email flow.
Connecting the quiz to Klaviyo can significantly increase your sales.
The RevenueHunt app sends all quiz information straight to Klaviyo. That covers the customer's email and name, and every question, answer and recommended product.
The steps below set up a follow-up email in Klaviyo.
In this tutorial you will learn how to connect your quiz to Klaviyo and set up a post-quiz email flow.
Connecting the quiz to Klaviyo can significantly increase your sales.
The RevenueHunt app sends all quiz information straight to Klaviyo. That covers the customer's email and name, and every question, answer and recommended product.
The steps below set up a follow-up email in Klaviyo.
In this tutorial you will learn how to connect your quiz to Klaviyo and set up a post-quiz email flow.
Connecting the quiz to Klaviyo can significantly increase your sales.
The RevenueHunt app sends all quiz information straight to Klaviyo. That covers the customer's email and name, and every question, answer and recommended product.
The steps below set up a follow-up email in Klaviyo.
In this tutorial you will learn how to connect your quiz to Klaviyo and set up a post-quiz email flow.
Connecting the quiz to Klaviyo can significantly increase your sales.
The RevenueHunt app sends all quiz information straight to Klaviyo. That covers the customer's email and name, and every question, answer and recommended product.
The steps below set up a follow-up email in Klaviyo.
In this tutorial you will learn how to connect your quiz to Klaviyo and set up a post-quiz email flow.
Connecting the quiz to Klaviyo can significantly increase your sales.
The RevenueHunt app sends all quiz information straight to Klaviyo. That covers the customer's email and name, and every question, answer and recommended product.
The steps below set up a follow-up email in Klaviyo.
Add email question
To send contacts to Klaviyo your quiz needs to have an email question.
-
In the Quiz builder tab, click
+ Add Questionand select the email question type. You can also click+ Add Blockto add an email block to an existing slide. You can also ask for marketing consent on the same slide.Example
- You can add a marketing consent checkbox in the email question settings (as a single choice multiple-choice question).
To send contacts to Klaviyo your quiz needs to have an email question.
-
You can add it to the quiz from the Quiz Builder tab. You can also ask for marketing consent on the same slide.
Example
-
You can inform the customer in the question description that by providing the email address they agree to receive marketing information.
-
Or you can add a marketing checkmark by joining two slides together.
-
To send contacts to Klaviyo your quiz needs to have an email question.
-
You can add it to the quiz from the Quiz Builder tab. You can also ask for marketing consent on the same slide.
Example
-
You can inform the customer in the question description that by providing the email address they agree to receive marketing information.
-
Or you can add a marketing checkmark by joining two slides together.
-
To send contacts to Klaviyo your quiz needs to have an email question.
-
You can add it to the quiz from the Quiz Builder tab. You can also ask for marketing consent on the same slide.
Example
-
You can inform the customer in the question description that by providing the email address they agree to receive marketing information.
-
Or you can add a marketing checkmark by joining two slides together.
-
To send contacts to Klaviyo your quiz needs to have an email question.
-
You can add it to the quiz from the Quiz Builder tab. You can also ask for marketing consent on the same slide.
Example
-
You can inform the customer in the question description that by providing the email address they agree to receive marketing information.
-
Or you can add a marketing checkmark by joining two slides together.
-
To send contacts to Klaviyo your quiz needs to have an email question.
-
You can add it to the quiz from the Quiz Builder tab. You can also ask for marketing consent on the same slide.
Example
-
You can inform the customer in the question description that by providing the email address they agree to receive marketing information.
-
Or you can add a marketing checkmark by joining two slides together.
-
Connect quiz to Klaviyo
To connect Klaviyo, authenticate your Klaviyo account over OAuth. No API keys are needed.
- Open Quiz settings.
- Go to the
Integrationstab and scroll down to Klaviyo. - Click
Connect. Klaviyo opens an authentication page. - Log in to Klaviyo, or select your account if you are already logged in, and click
Allowto grant access. -
You return to Quiz settings, where Klaviyo now shows a
Connectedbadge.Account-level connection
Connecting Klaviyo over OAuth links your whole RevenueHunt account, so every quiz in it gains the option to send leads to Klaviyo Profiles. This does not happen on its own. Enable it for each quiz, as the next steps show.
-
For each quiz you want to send data from, open that quiz's Quiz settings. Find the Klaviyo section and check
Send Quiz Leads to Klaviyo Profiles. -
Save your changes with the top-right
Savebutton.Tip
To stop one quiz sending data to Klaviyo, uncheck that box and save. You do not need to disconnect Klaviyo.
-
To test the connection, click
Previewand complete the quiz with a test name and email. Use an email address that is not already in your Klaviyo account. - To verify the test, open
Klaviyo > Audience > Profilesand search for the email address you used. It may take a moment to appear, so refresh the page if needed. -
You should see the new profile with custom quiz properties attached, such as quiz answers and recommended products. If the profile was added, the integration is working.
Tip
If no new profile appears in Klaviyo Profiles, check that
Send Quiz Leads to Klaviyo Profilesis enabled in that quiz's settings, and that Klaviyo still shows theConnectedbadge in Integrations.
From now on, all the contacts coming from this quiz will be added to your Klaviyo account.
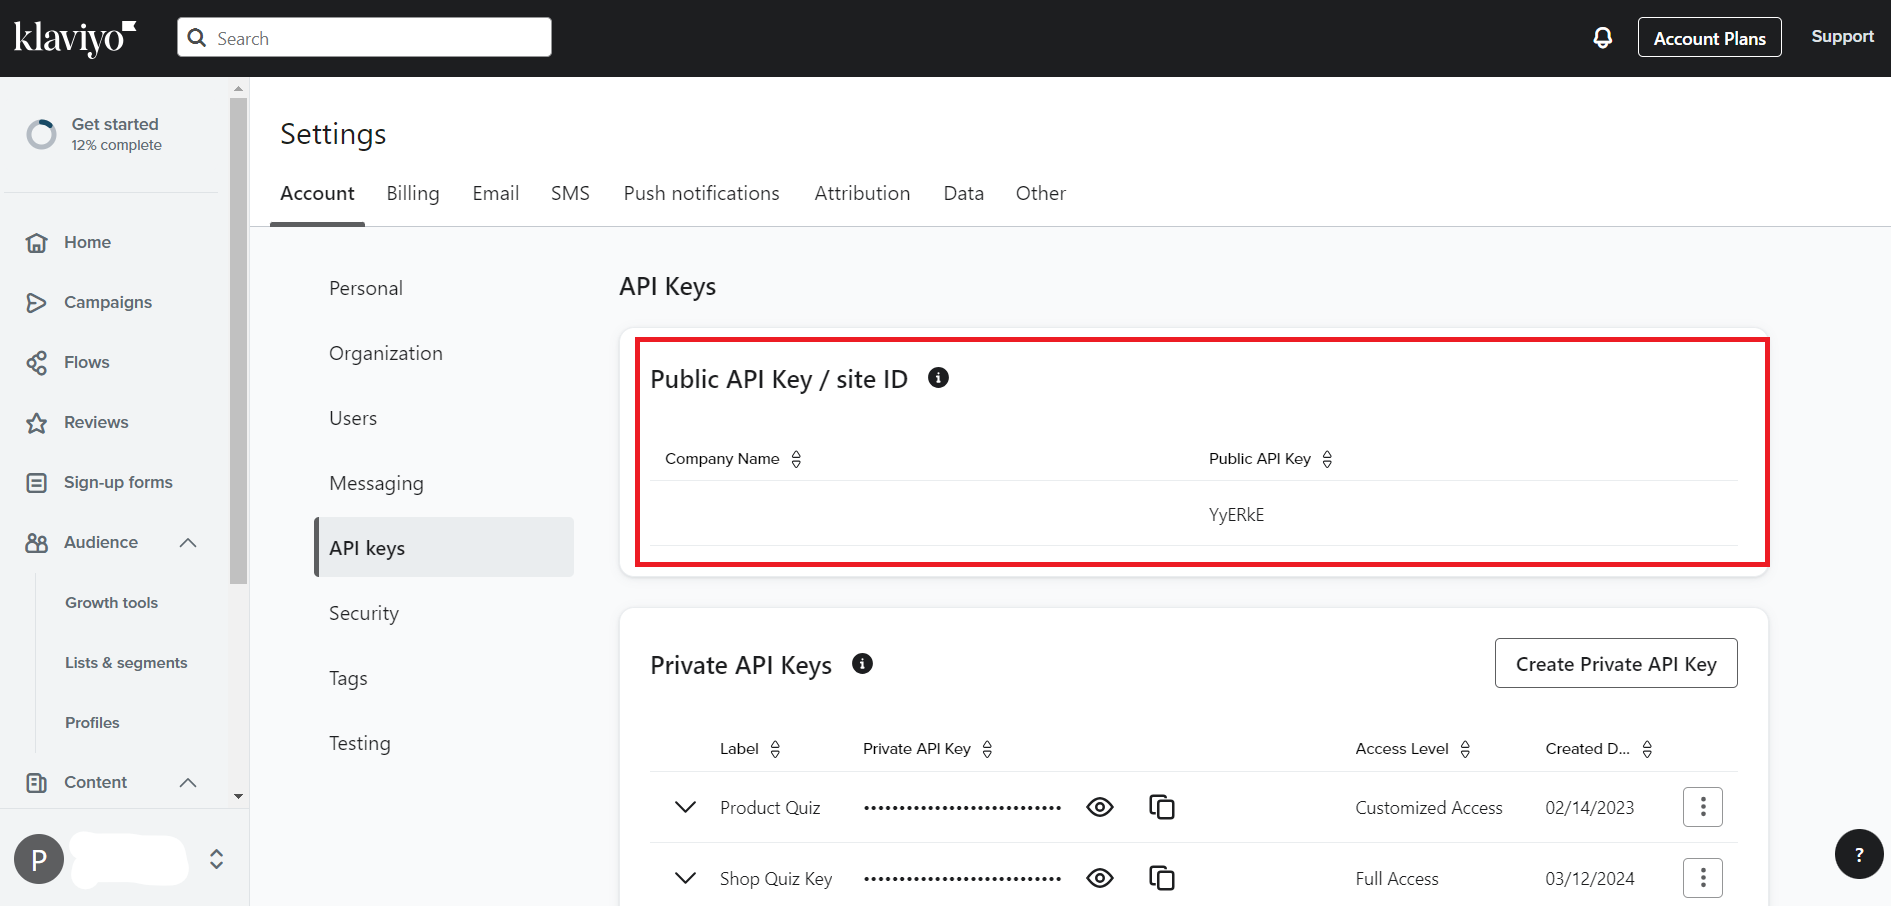
To connect the quiz to Klaviyo, provide your Klaviyo Public API Key.
The Public API Key is what lets the app send information to Klaviyo Profiles.
- To find your Public Key login to your Klaviyo account.
- In account
Settingsopen theAPI Keystab and copy the public API Key. - Navigate back to the RevenueHunt app.
- In the
Quiz > Connecttab, scroll to Klaviyo andeditthe connection. - Paste your Public API Key and
save. - Publish the changes with the top-right
Publishbutton. - Take the quiz all the way to the results page. Use an email address that is not already in your Klaviyo account.
- To verify the test, open
Klaviyo > Profilessection. -
If a new profile was added the integration was successful.
Tip
If no new profile appears in Klaviyo Profiles, check your Public API Key and repeat the process.
From now on all the contacts coming from the quiz will be added to your Klaviyo account.
To connect the quiz to Klaviyo, provide your Klaviyo Public API Key.
The Public API Key is what lets the app send information to Klaviyo Profiles.
- To find your Public Key login to your Klaviyo account.
- In account
Settingsopen theAPI Keystab and copy the public API Key. - Navigate back to the RevenueHunt app.
- In the
Quiz > Connecttab, scroll to Klaviyo andeditthe connection. - Paste your Public API Key and
save. - Publish the changes with the top-right
Publishbutton. - Take the quiz all the way to the results page. Use an email address that is not already in your Klaviyo account.
- To verify the test, open
Klaviyo > Profilessection. -
If a new profile was added the integration was successful.
Tip
If no new profile appears in Klaviyo Profiles, check your Public API Key and repeat the process.
From now on all the contacts coming from the quiz will be added to your Klaviyo account.
To connect the quiz to Klaviyo, provide your Klaviyo Public API Key.
The Public API Key is what lets the app send information to Klaviyo Profiles.
- To find your Public Key login to your Klaviyo account.
- In account
Settingsopen theAPI Keystab and copy the public API Key. - Navigate back to the RevenueHunt app.
- In the
Quiz > Connecttab, scroll to Klaviyo andeditthe connection. - Paste your Public API Key and
save. - Publish the changes with the top-right
Publishbutton. - Take the quiz all the way to the results page. Use an email address that is not already in your Klaviyo account.
- To verify the test, open
Klaviyo > Profilessection. -
If a new profile was added the integration was successful.
Tip
If no new profile appears in Klaviyo Profiles, check your Public API Key and repeat the process.
From now on all the contacts coming from the quiz will be added to your Klaviyo account.
To connect the quiz to Klaviyo, provide your Klaviyo Public API Key.
The Public API Key is what lets the app send information to Klaviyo Profiles.
- To find your Public Key login to your Klaviyo account.
- In account
Settingsopen theAPI Keystab and copy the public API Key. - Navigate back to the RevenueHunt app.
- In the
Quiz > Connecttab, scroll to Klaviyo andeditthe connection. - Paste your Public API Key and
save. - Publish the changes with the top-right
Publishbutton. - Take the quiz all the way to the results page. Use an email address that is not already in your Klaviyo account.
- To verify the test, open
Klaviyo > Profilessection. -
If a new profile was added the integration was successful.
Tip
If no new profile appears in Klaviyo Profiles, check your Public API Key and repeat the process.
From now on all the contacts coming from the quiz will be added to your Klaviyo account.
To connect the quiz to Klaviyo, provide your Klaviyo Public API Key.
The Public API Key is what lets the app send information to Klaviyo Profiles.
- To find your Public Key login to your Klaviyo account.
- In account
Settingsopen theAPI Keystab and copy the public API Key. - Navigate back to the RevenueHunt app.
- In the
Quiz > Connecttab, scroll to Klaviyo andeditthe connection. - Paste your Public API Key and
save. - Publish the changes with the top-right
Publishbutton. - Take the quiz all the way to the results page. Use an email address that is not already in your Klaviyo account.
- To verify the test, open
Klaviyo > Profilessection. -
If a new profile was added the integration was successful.
Tip
If no new profile appears in Klaviyo Profiles, check your Public API Key and repeat the process.
From now on all the contacts coming from the quiz will be added to your Klaviyo account.
Create segment for quiz customers
All quiz contacts can be grouped into a Klaviyo segment.
- To create a new segment in Klaviyo go to
Audience > Lists & Segmentsand clickCreate New > New Segment. - Name the segment, then set up its definition.
-
Set the definition to
Properties about someone, then add a property that only quiz profiles carry. Any of the custom properties the quiz sends to Klaviyo will do.Example
-
ANSWERS_BY_BLOCK-QuizIDproperty is unique for profiles coming from the quiz. -
If the
ANSWERS_BY_BLOCK-QuizIDproperty is not in the dropdown, take a test quiz and try again.
-
-
Build the rule as
Custom property from the Quizis set, Typetext.Example
ANSWERS_BY_BLOCK-QuizIDis setType:text.
-
Click
Create a segment. Klaviyo then loads every contact that matches the definition, which can take a few minutes. - Check the segment once it finishes loading. Every profile that already matches is in it. New contacts from the quiz join it on their own from then on.
All quiz contacts can be grouped into a Klaviyo segment.
- To create a new segment in Klaviyo go to
Audience > Lists & Segmentsand clickCreate New > New Segment. - Name the segment, then set up its definition.
- Pick
PERMALINK-QuizID. Only profiles that came from the quiz carry it. - Take a test quiz and try again if the permalink property is not in the dropdown.
- Click
Create a segment.
Now all the contacts coming from the quiz will also be added to this specific segment.
All quiz contacts can be grouped into a Klaviyo segment.
- To create a new segment in Klaviyo go to
Audience > Lists & Segmentsand clickCreate New > New Segment. - Name the segment, then set up its definition.
- Pick
PERMALINK-QuizID. Only profiles that came from the quiz carry it. - Take a test quiz and try again if the permalink property is not in the dropdown.
- Click
Create a segment.
Now all the contacts coming from the quiz will also be added to this specific segment.
All quiz contacts can be grouped into a Klaviyo segment.
- To create a new segment in Klaviyo go to
Audience > Lists & Segmentsand clickCreate New > New Segment. - Name the segment, then set up its definition.
- Pick
PERMALINK-QuizID. Only profiles that came from the quiz carry it. - Take a test quiz and try again if the permalink property is not in the dropdown.
- Click
Create a segment.
Now all the contacts coming from the quiz will also be added to this specific segment.
All quiz contacts can be grouped into a Klaviyo segment.
- To create a new segment in Klaviyo go to
Audience > Lists & Segmentsand clickCreate New > New Segment. - Name the segment, then set up its definition.
- Pick
PERMALINK-QuizID. Only profiles that came from the quiz carry it. - Take a test quiz and try again if the permalink property is not in the dropdown.
- Click
Create a segment.
Now all the contacts coming from the quiz will also be added to this specific segment.
All quiz contacts can be grouped into a Klaviyo segment.
- To create a new segment in Klaviyo go to
Audience > Lists & Segmentsand clickCreate New > New Segment. - Name the segment, then set up its definition.
- Pick
PERMALINK-QuizID. Only profiles that came from the quiz carry it. - Take a test quiz and try again if the permalink property is not in the dropdown.
- Click
Create a segment.
Now all the contacts coming from the quiz will also be added to this specific segment.
Set up email flow
Add a trigger
- To create an email flow for quiz customers only, open the
Flowstab in Klaviyo. - Click
Create flowand thenBuild from scratch. - Name the flow and click
Create flow. -
Set the trigger Klaviyo asks for to
Added to a segmentand select the segment you made in Create segment for quiz customers. SetReentry criteriatoAllow reentry, so a customer receives an email every time they complete the quiz. ClickConfirm, thenConfirm and save.Alternative: trigger from a Klaviyo list
You can trigger the flow when a contact is added to a Klaviyo list instead of a segment. That suits a quiz whose email question block uses the
Klaviyo listselector to send contacts straight to a list. See Add Contacts to List.
- To create an email flow for quiz customers only, open the
Flowstab in Klaviyo. - Click
Create flowand thenBuild from scratch. - Name the flow and click
Create flow. - Set the trigger Klaviyo asks for to
Added to a segmentand select the segment you made in Create segment for quiz customers. ClickConfirm, thenConfirm and save. Anyone who enters the segment now triggers the email flow.
- To create an email flow for quiz customers only, open the
Flowstab in Klaviyo. - Click
Create flowand thenBuild from scratch. - Name the flow and click
Create flow. - Set the trigger Klaviyo asks for to
Added to a segmentand select the segment you made in Create segment for quiz customers. ClickConfirm, thenConfirm and save. Anyone who enters the segment now triggers the email flow.
- To create an email flow for quiz customers only, open the
Flowstab in Klaviyo. - Click
Create flowand thenBuild from scratch. - Name the flow and click
Create flow. - Set the trigger Klaviyo asks for to
Added to a segmentand select the segment you made in Create segment for quiz customers. ClickConfirm, thenConfirm and save. Anyone who enters the segment now triggers the email flow.
- To create an email flow for quiz customers only, open the
Flowstab in Klaviyo. - Click
Create flowand thenBuild from scratch. - Name the flow and click
Create flow. - Set the trigger Klaviyo asks for to
Added to a segmentand select the segment you made in Create segment for quiz customers. ClickConfirm, thenConfirm and save. Anyone who enters the segment now triggers the email flow.
- To create an email flow for quiz customers only, open the
Flowstab in Klaviyo. - Click
Create flowand thenBuild from scratch. - Name the flow and click
Create flow. - Set the trigger Klaviyo asks for to
Added to a segmentand select the segment you made in Create segment for quiz customers. ClickConfirm, thenConfirm and save. Anyone who enters the segment now triggers the email flow.
(Optional) update marketing consent
If you asked for marketing consent in the quiz, update it in the Klaviyo email flow:
- Right below the flow trigger, add a
Profile property updateaction. - Click
+ Step. A menu opens for the profile property update. - Select
Update existing property. In theSelect propertydropdown chooseAccepts marketing, then set the value totrue. - Turn this action
LIVE.
If you asked for marketing consent in the quiz, update it in the Klaviyo email flow:
- Right below the flow trigger, add a
Profile property updateaction. - Click
+ Step. A menu opens for the profile property update. - Select
Update existing property. In theSelect propertydropdown chooseAccepts marketing, then set the value totrue. - Turn this action
LIVE.
If you asked for marketing consent in the quiz, update it in the Klaviyo email flow:
- Right below the flow trigger, add a
Profile property updateaction. - Click
+ Step. A menu opens for the profile property update. - Select
Update existing property. In theSelect propertydropdown chooseAccepts marketing, then set the value totrue. - Turn this action
LIVE.
If you asked for marketing consent in the quiz, update it in the Klaviyo email flow:
- Right below the flow trigger, add a
Profile property updateaction. - Click
+ Step. A menu opens for the profile property update. - Select
Update existing property. In theSelect propertydropdown chooseAccepts marketing, then set the value totrue. - Turn this action
LIVE.
If you asked for marketing consent in the quiz, update it in the Klaviyo email flow:
- Right below the flow trigger, add a
Profile property updateaction. - Click
+ Step. A menu opens for the profile property update. - Select
Update existing property. In theSelect propertydropdown chooseAccepts marketing, then set the value totrue. - Turn this action
LIVE.
If you asked for marketing consent in the quiz, update it in the Klaviyo email flow:
- Right below the flow trigger, add a
Profile property updateaction. - Click
+ Step. A menu opens for the profile property update. - Select
Update existing property. In theSelect propertydropdown chooseAccepts marketing, then set the value totrue. - Turn this action
LIVE.
Edit the email
- Grab the
Emailaction and drop it below the last step. - In
Email detailssection edit the Subject. - Click
Select template. Klaviyo opens the Templates section. - Click
Createto make a new email template. Klaviyo opens its email builder. - In the Klaviyo email builder, use the pre-designed blocks to add images or text to your template.
- To add the quiz content and the recommended products, drag an
HTMLblock into the email builder. -
Back in the RevenueHunt app, go to
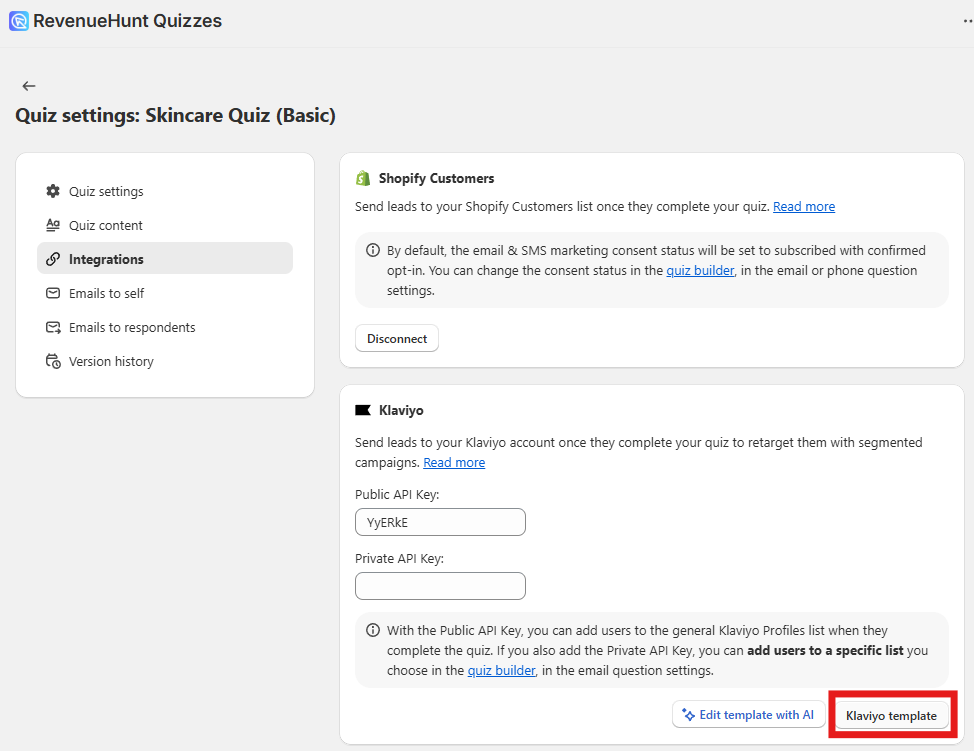
Quiz settings > Integrationsand clickKlaviyo Template. A new window opens. ClickCopy codethere, then return to Klaviyo.Klaviyo Template
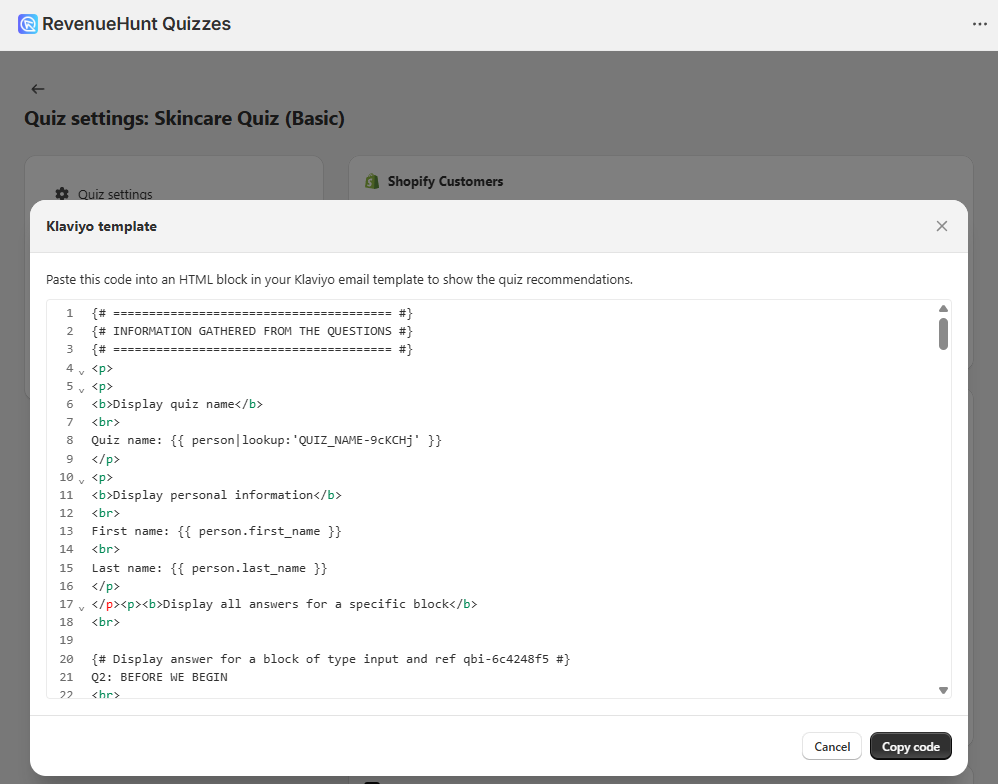
The code holds ready-to-use snippets that display:
- Dynamic Results page: Display dynamic results page content that loops through sections and blocks. A Dynamic Results page content that contains all the elements of your results page and replaces content upon each quiz retake. This is the recommended approach for production templates as it adapts to quiz structure changes.
- Static Results page: Display the complete results page content using static lookups. Static Results page content that contains all the elements of your results page and adds content upon each quiz retake. Use this approach for understanding the data structure and for simple implementations.
- Individual recommendations: Display individual product recommendations by slot. Use this to show specific recommended items with their details like title, description, price, and images.
- Question answers: Display quiz information and individual question answers. Use this to show personal data and specific responses from quiz questions.
-
Paste the code in the
HTMLblock in Klaviyo email. - Next,
Previewthe email as one of your segment subscribers to check what information is displayed. -
Edit the email template as you like. For example, remove the sections you do not need and restyle the rest to match your branding.
Let Quiz Copilot edit and style your Klaviyo template
You do not need a developer to customize the Klaviyo HTML template. Paste the template code into Quiz Copilot and ask it to:
- remove the sections you do not need, for example to keep only the recommended products or only the question answers,
- restyle the template to match your brand colors, fonts, and spacing,
- rearrange blocks or change the layout,
- explain what each part of the template does.
Once Quiz Copilot returns the updated code, paste it back into the
HTMLblock in your Klaviyo template.Tip
To customize your Klaviyo email template with quiz properties, see Use quiz data in Klaviyo email templates.
-
Once you are happy with the email template, click
Exit, thenDone, and return to your flow. - Turn your email
LIVE.
From then on, every customer who leaves an email address is added to your Klaviyo segment and is sent a follow-up email.
- Grab the
EMAILaction and drop it below the flow trigger. - Click on the
...three dots andedit the email. - Edit the
name/subject/emailto your liking and select theHTML email template. - From the
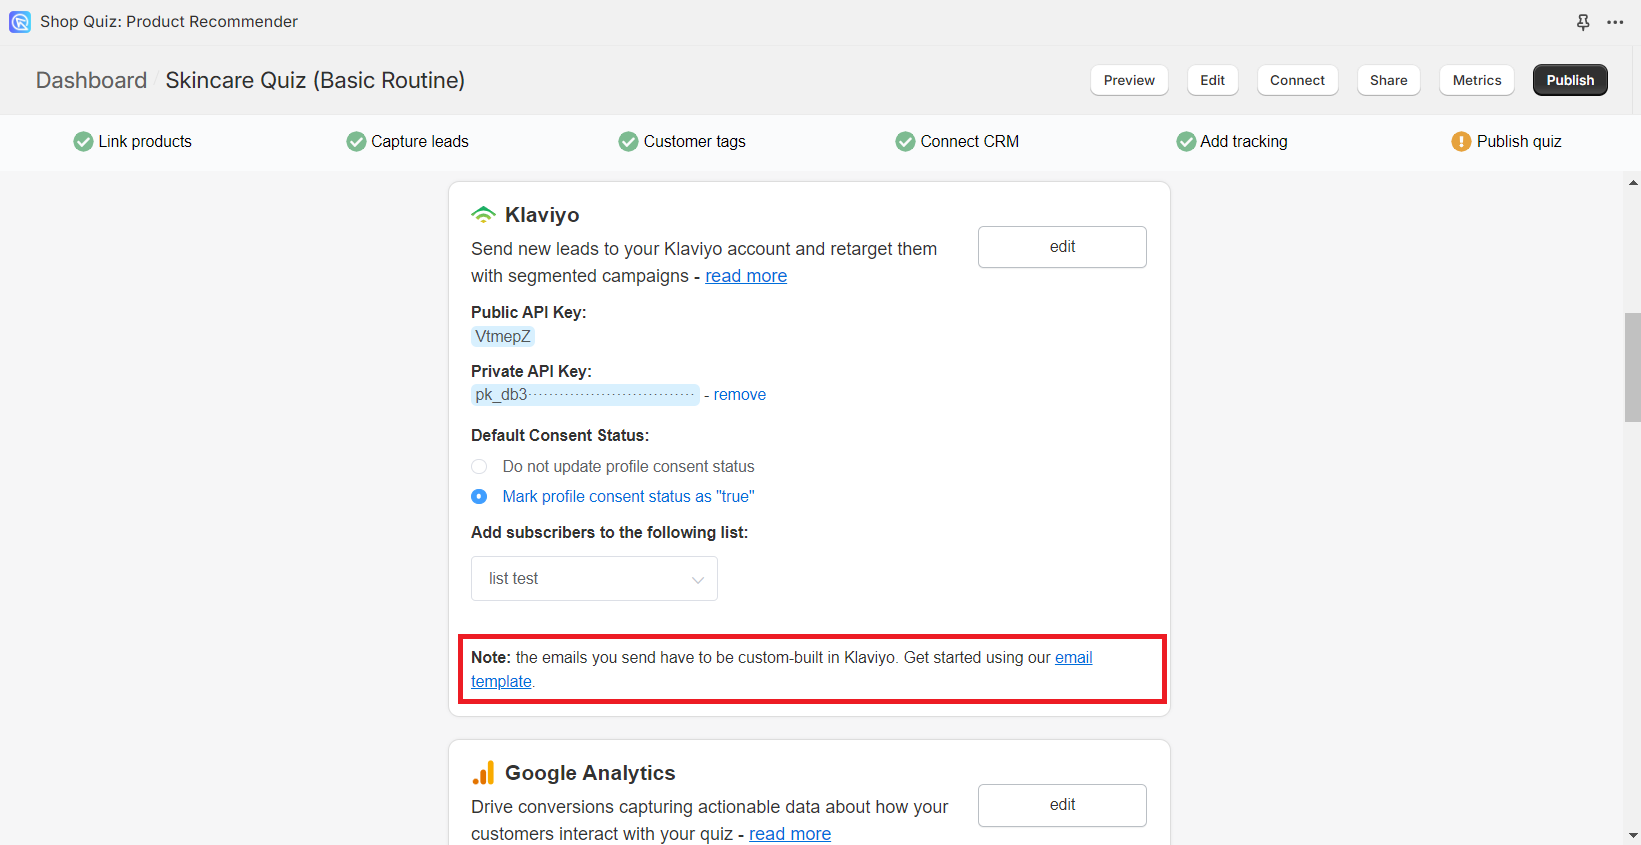
Connect > Klaviyotab you can download a ready-to-use email template. - Copy the code and go back to Klaviyo.
- Open the
HTML email templateand remove the existing code. - Paste the new template code.
- You can then
previewthe email as one of your segment subscribers. - Make sure to
Savethe changes and clickDone. - Return to your flow and turn your email
LIVE.
From then on, every customer who leaves an email address is added to your Klaviyo segment and is sent a follow-up email.
Remember to deactivate the email Notifications from the Quiz Builder once the Klaviyo flow is set up.
- Grab the
EMAILaction and drop it below the flow trigger. - Click on the
...three dots andedit the email. - Edit the
name/subject/emailto your liking and select theHTML email template. - From the
Connect > Klaviyotab you can download a ready-to-use email template. - Copy the code and go back to Klaviyo.
- Open the
HTML email templateand remove the existing code. - Paste the new template code.
- You can then
previewthe email as one of your segment subscribers. - Make sure to
Savethe changes and clickDone. - Return to your flow and turn your email
LIVE.
From then on, every customer who leaves an email address is added to your Klaviyo segment and is sent a follow-up email.
Remember to deactivate the email Notifications from the Quiz Builder once the Klaviyo flow is set up.
- Grab the
EMAILaction and drop it below the flow trigger. - Click on the
...three dots andedit the email. - Edit the
name/subject/emailto your liking and select theHTML email template. - From the
Connect > Klaviyotab you can download a ready-to-use email template. - Copy the code and go back to Klaviyo.
- Open the
HTML email templateand remove the existing code. - Paste the new template code.
- You can then
previewthe email as one of your segment subscribers. - Make sure to
Savethe changes and clickDone. - Return to your flow and turn your email
LIVE.
From then on, every customer who leaves an email address is added to your Klaviyo segment and is sent a follow-up email.
Remember to deactivate the email Notifications from the Quiz Builder once the Klaviyo flow is set up.
- Grab the
EMAILaction and drop it below the flow trigger. - Click on the
...three dots andedit the email. - Edit the
name/subject/emailto your liking and select theHTML email template. - From the
Connect > Klaviyotab you can download a ready-to-use email template. - Copy the code and go back to Klaviyo.
- Open the
HTML email templateand remove the existing code. - Paste the new template code.
- You can then
previewthe email as one of your segment subscribers. - Make sure to
Savethe changes and clickDone. - Return to your flow and turn your email
LIVE.
From then on, every customer who leaves an email address is added to your Klaviyo segment and is sent a follow-up email.
Remember to deactivate the email Notifications from the Quiz Builder once the Klaviyo flow is set up.
- Grab the
EMAILaction and drop it below the flow trigger. - Click on the
...three dots andedit the email. - Edit the
name/subject/emailto your liking and select theHTML email template. - From the
Connect > Klaviyotab you can download a ready-to-use email template. - Copy the code and go back to Klaviyo.
- Open the
HTML email templateand remove the existing code. - Paste the new template code.
- You can then
previewthe email as one of your segment subscribers. - Make sure to
Savethe changes and clickDone. - Return to your flow and turn your email
LIVE.
From then on, every customer who leaves an email address is added to your Klaviyo segment and is sent a follow-up email.
Remember to deactivate the email Notifications from the Quiz Builder once the Klaviyo flow is set up.
Send email with each quiz retake
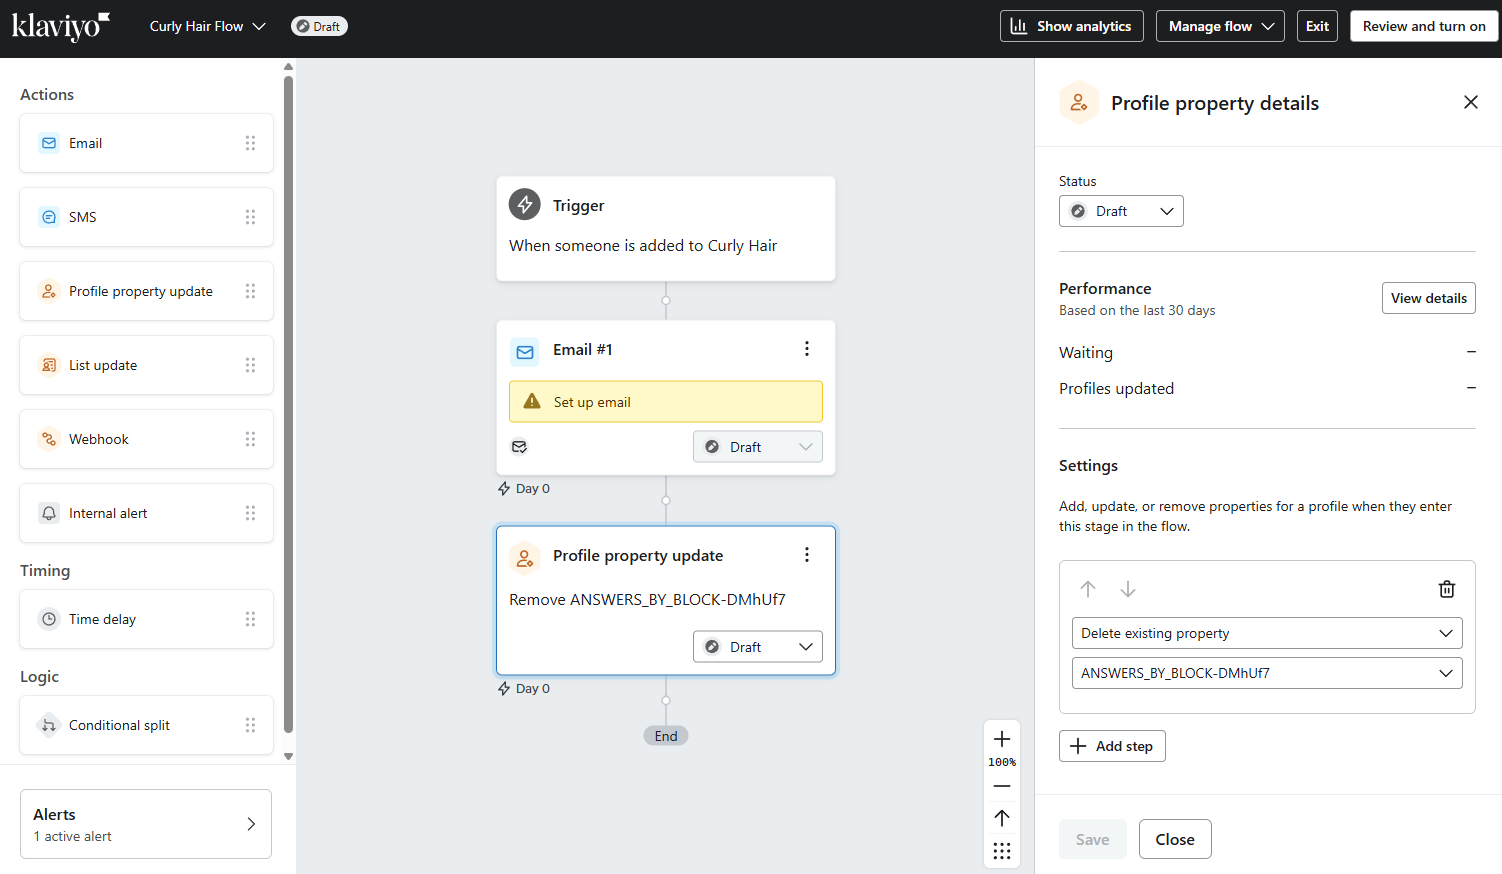
The easiest way to send an email with each quiz retake is to set the reentry criteria when you configure the flow trigger:
- Open the flow trigger (
Added to a segment). - Set the
Reentry criteriatoAllow reentry. - Save the trigger.
A customer then receives an email every time they complete the quiz.
Alternative method
You can also add a Profile property update action at the end of the flow that deletes the segment property, for example ANSWERS_BY_BLOCK-QuizID. Each time a customer completes the quiz the property is added again. They re-enter the segment and trigger the flow again.
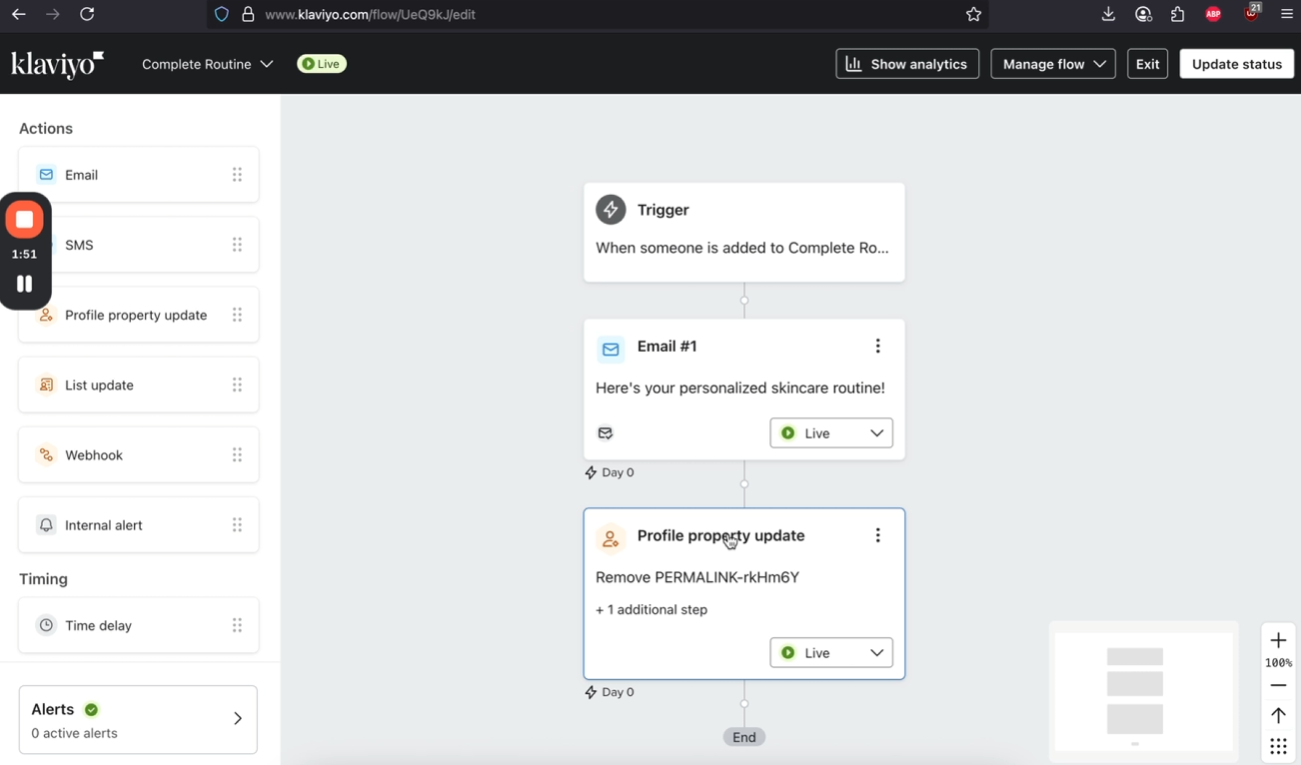
If you want to send an email with each quiz retake, you can do that by adding a Profile property update action at the end of the flow. Follow these steps:
- Add a
Profile property updateaction at the end of the flow. - Click
+ Step. - Select
Delete existing property. -
From the
Select propertydropdown menu select the property that was used to create a segment in earlier steps.Example
Select
Delete existing property>PERMALINK-QuizID. -
Save the changes and turn the action
LIVE.
Each time a customer takes the quiz again, they are added back to the segment and trigger the email flow again.
If you want to send an email with each quiz retake, you can do that by adding a Profile property update action at the end of the flow. Follow these steps:
- Add a
Profile property updateaction at the end of the flow. - Click
+ Step. - Select
Delete existing property. -
From the
Select propertydropdown menu select the property that was used to create a segment in earlier steps.Example
Select
Delete existing property>PERMALINK-QuizID. -
Save the changes and turn the action
LIVE.
Each time a customer takes the quiz again, they are added back to the segment and trigger the email flow again.
If you want to send an email with each quiz retake, you can do that by adding a Profile property update action at the end of the flow. Follow these steps:
- Add a
Profile property updateaction at the end of the flow. - Click
+ Step. - Select
Delete existing property. -
From the
Select propertydropdown menu select the property that was used to create a segment in earlier steps.Example
Select
Delete existing property>PERMALINK-QuizID. -
Save the changes and turn the action
LIVE.
Each time a customer takes the quiz again, they are added back to the segment and trigger the email flow again.
If you want to send an email with each quiz retake, you can do that by adding a Profile property update action at the end of the flow. Follow these steps:
- Add a
Profile property updateaction at the end of the flow. - Click
+ Step. - Select
Delete existing property. -
From the
Select propertydropdown menu select the property that was used to create a segment in earlier steps.Example
Select
Delete existing property>PERMALINK-QuizID. -
Save the changes and turn the action
LIVE.
Each time a customer takes the quiz again, they are added back to the segment and trigger the email flow again.
If you want to send an email with each quiz retake, you can do that by adding a Profile property update action at the end of the flow. Follow these steps:
- Add a
Profile property updateaction at the end of the flow. - Click
+ Step. - Select
Delete existing property. -
From the
Select propertydropdown menu select the property that was used to create a segment in earlier steps.Example
Select
Delete existing property>PERMALINK-QuizID. -
Save the changes and turn the action
LIVE.
Each time a customer takes the quiz again, they are added back to the segment and trigger the email flow again.
Add contacts to list
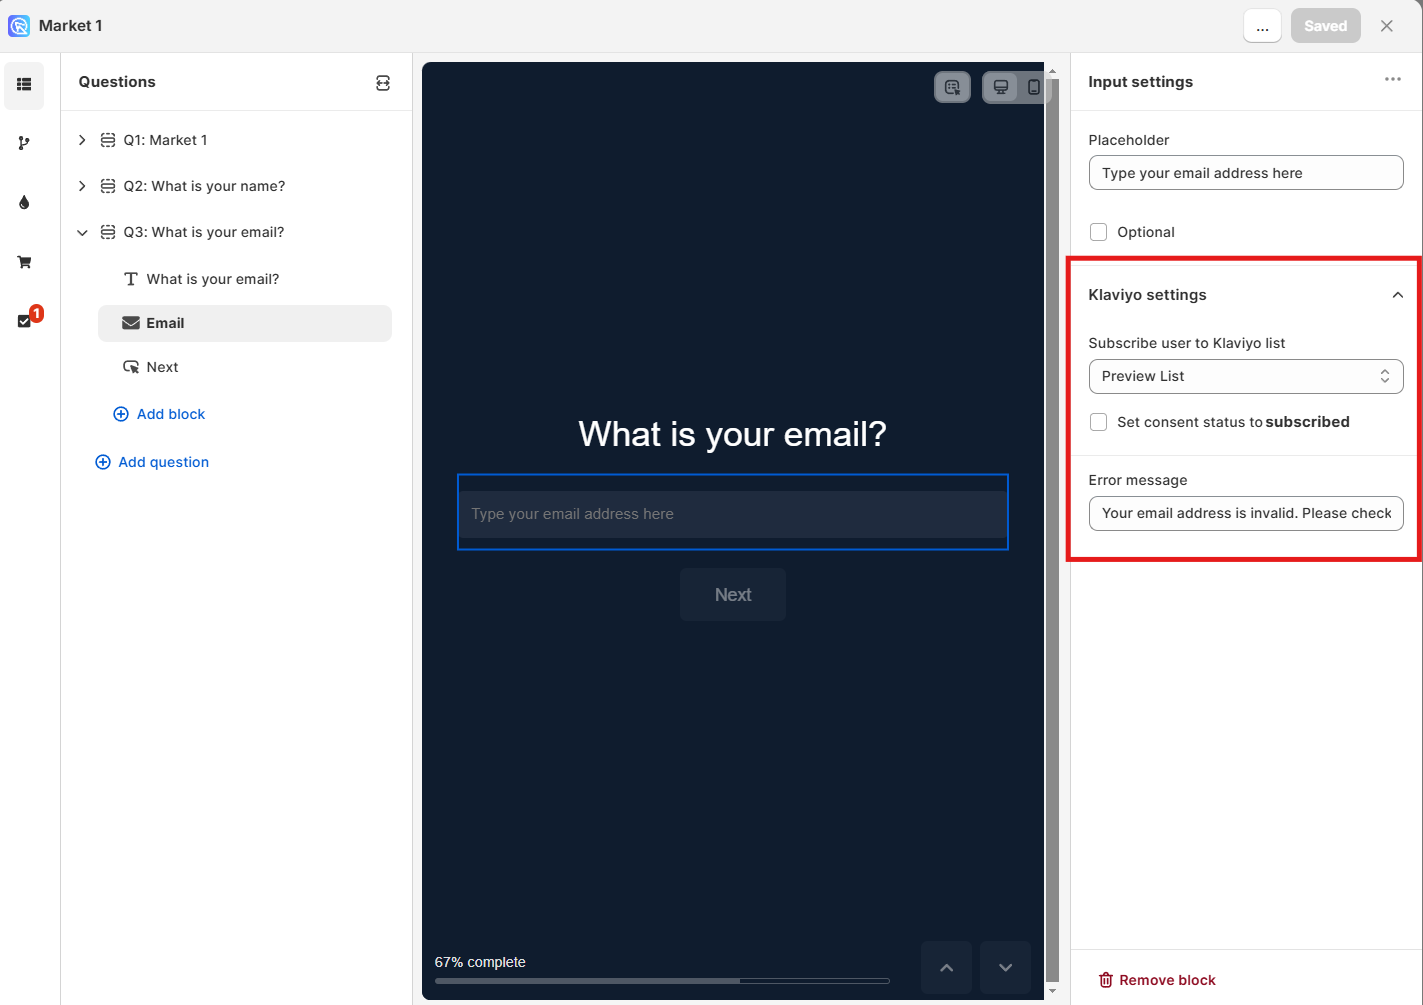
With the OAuth connection in place, you can add quiz contacts straight to a Klaviyo list. No extra API keys are needed, and the list selector sits inside the email question block.
- Have a Klaviyo list ready. To create one, go to
Klaviyo > Audience > Lists & Segmentsand set it toSingle Opt-inin the list settings. - In the RevenueHunt app, open the Quiz builder and select the
Emailblock. TheEmail input settingspanel opens. - Scroll to
Klaviyo listand pick your list fromSelect a Klaviyo list. - Tick
Subscribedbelow the list. It stays greyed out until you pick a list. -
Save your quiz changes with the top-right
Savebutton.Per-quiz lists
To feed a different Klaviyo list from each quiz, set the email question block of every quiz separately and pick its list there.
-
Previewthe quiz and complete it with a sample email to verify the connection. -
In Klaviyo, go to
Audience > Lists & Segmentsand open the list to confirm the test contact was added asSubscribed.Warning
Quiz contacts can be added only to a Single Opt-in list in Klaviyo.
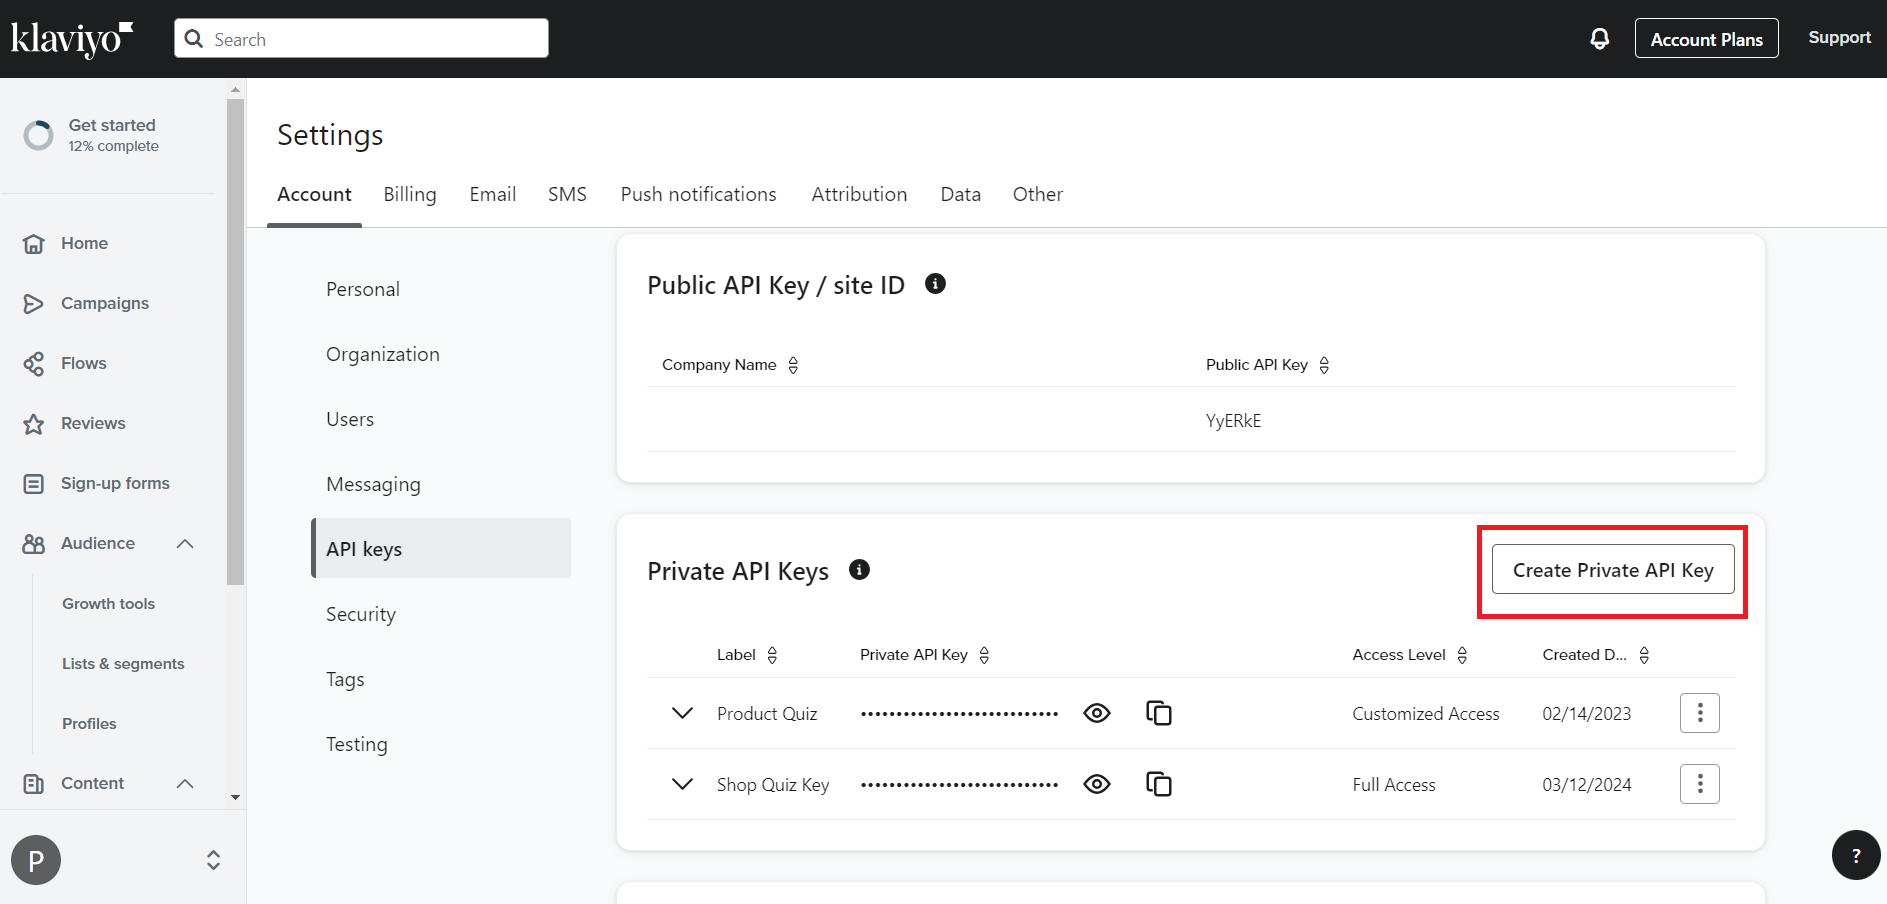
The RevenueHunt app can add quiz contacts straight to a Klaviyo list. This needs a Private API Key.
- Create a
Private API Keyin Klaviyo. The app needs it to write to a list. - In account
Settingsopen theAPI Keystab and create anew Private API Key. - Allow
Full access. - Copy the private key.
- In the Quiz Connect tab scroll to Klaviyo and edit the connection.
- Paste your Private API Key.
-
Choose to
mark all profiles as trueand select a list that contacts should be added to.Warning
Keep in mind that contacts from the quiz can be added only to a Single Opt-in List in Klaviyo.
-
Save the changes and publish them with the top-right
Publishbutton. - Take the quiz with a sample email from
Preview, then check the list in Klaviyo.
The RevenueHunt app can add quiz contacts straight to a Klaviyo list. This needs a Private API Key.
- Create a
Private API Keyin Klaviyo. The app needs it to write to a list. - In account
Settingsopen theAPI Keystab and create anew Private API Key. - Allow
Full access. - Copy the private key.
- In the Quiz Connect tab scroll to Klaviyo and edit the connection.
- Paste your Private API Key.
-
Choose to
mark all profiles as trueand select a list that contacts should be added to.Warning
Keep in mind that contacts from the quiz can be added only to a Single Opt-in List in Klaviyo.
-
Save the changes and publish them with the top-right
Publishbutton. - Take the quiz with a sample email from
Preview, then check the list in Klaviyo.
The RevenueHunt app can add quiz contacts straight to a Klaviyo list. This needs a Private API Key.
- Create a
Private API Keyin Klaviyo. The app needs it to write to a list. - In account
Settingsopen theAPI Keystab and create anew Private API Key. - Allow
Full access. - Copy the private key.
- In the Quiz Connect tab scroll to Klaviyo and edit the connection.
- Paste your Private API Key.
-
Choose to
mark all profiles as trueand select a list that contacts should be added to.Warning
Keep in mind that contacts from the quiz can be added only to a Single Opt-in List in Klaviyo.
-
Save the changes and publish them with the top-right
Publishbutton. - Take the quiz with a sample email from
Preview, then check the list in Klaviyo.
The RevenueHunt app can add quiz contacts straight to a Klaviyo list. This needs a Private API Key.
- Create a
Private API Keyin Klaviyo. The app needs it to write to a list. - In account
Settingsopen theAPI Keystab and create anew Private API Key. - Allow
Full access. - Copy the private key.
- In the Quiz Connect tab scroll to Klaviyo and edit the connection.
- Paste your Private API Key.
-
Choose to
mark all profiles as trueand select a list that contacts should be added to.Warning
Keep in mind that contacts from the quiz can be added only to a Single Opt-in List in Klaviyo.
-
Save the changes and publish them with the top-right
Publishbutton. - Take the quiz with a sample email from
Preview, then check the list in Klaviyo.
The RevenueHunt app can add quiz contacts straight to a Klaviyo list. This needs a Private API Key.
- Create a
Private API Keyin Klaviyo. The app needs it to write to a list. - In account
Settingsopen theAPI Keystab and create anew Private API Key. - Allow
Full access. - Copy the private key.
- In the Quiz Connect tab scroll to Klaviyo and edit the connection.
- Paste your Private API Key.
-
Choose to
mark all profiles as trueand select a list that contacts should be added to.Warning
Keep in mind that contacts from the quiz can be added only to a Single Opt-in List in Klaviyo.
-
Save the changes and publish them with the top-right
Publishbutton. - Take the quiz with a sample email from
Preview, then check the list in Klaviyo.
Disconnect Klaviyo
There are two ways to stop sending quiz data to Klaviyo. You can stop one quiz, or disconnect Klaviyo from your whole RevenueHunt account.
Option 1: Disconnect a single quiz
If you only want one specific quiz to stop sending data to Klaviyo (while other quizzes in your account keep working):
- Open the Quiz settings of the quiz you want to disconnect.
- Find the Klaviyo section and uncheck the
Send Quiz Leads to Klaviyo Profilescheckbox. - Save your changes.
No more quiz data will flow from that specific quiz to Klaviyo. Other quizzes in your account will continue to send data normally.
Option 2: Disconnect Klaviyo from your entire RevenueHunt account
If you want to completely revoke the Klaviyo connection across your whole RevenueHunt account:
- Open Quiz settings and go to the
Integrationstab. - Scroll to Klaviyo and click
Disconnect. - Confirm the action.
The change saves on its own, and no quiz in your account sends data to Klaviyo any more. To reconnect later, click Connect again and complete the OAuth flow.
In this version the Klaviyo connection is set on each quiz, so disconnecting one quiz leaves the others working.
- Open the Quiz Builder and go to the
Connecttab. - Scroll to Klaviyo and click
Disconnect. - Publish the changes with the top-right
Publishbutton.
That quiz stops sending contacts to Klaviyo. Contacts already in your Klaviyo account are not affected.
In this version the Klaviyo connection is set on each quiz, so disconnecting one quiz leaves the others working.
- Open the Quiz Builder and go to the
Connecttab. - Scroll to Klaviyo and click
Disconnect. - Publish the changes with the top-right
Publishbutton.
That quiz stops sending contacts to Klaviyo. Contacts already in your Klaviyo account are not affected.
In this version the Klaviyo connection is set on each quiz, so disconnecting one quiz leaves the others working.
- Open the Quiz Builder and go to the
Connecttab. - Scroll to Klaviyo and click
Disconnect. - Publish the changes with the top-right
Publishbutton.
That quiz stops sending contacts to Klaviyo. Contacts already in your Klaviyo account are not affected.
In this version the Klaviyo connection is set on each quiz, so disconnecting one quiz leaves the others working.
- Open the Quiz Builder and go to the
Connecttab. - Scroll to Klaviyo and click
Disconnect. - Publish the changes with the top-right
Publishbutton.
That quiz stops sending contacts to Klaviyo. Contacts already in your Klaviyo account are not affected.
In this version the Klaviyo connection is set on each quiz, so disconnecting one quiz leaves the others working.
- Open the Quiz Builder and go to the
Connecttab. - Scroll to Klaviyo and click
Disconnect. - Publish the changes with the top-right
Publishbutton.
That quiz stops sending contacts to Klaviyo. Contacts already in your Klaviyo account are not affected.
Congratulations!
You have learned how to create a quiz email flow in Klaviyo, and how to add contacts to a Klaviyo list.
This article explains how to create a post-quiz email flow in Klaviyo and add contacts to a list in Klaviyo.