Setting Up Result Emails with Product Recommendation Quiz
Sending result emails to quiz takers can significantly improve your quiz sales by reducing cart abandonmemnt and improving the customer experince. With RevenueHunt app it is possible to set up quiz result emails directly without the need to connect the app to an external CRM service, though this option is also avialble.
This guide covers setting up email results for both quiz respondents and administartors and well as sending results emails via an external CRM service.
With RevenueHunt app you can:
- Send emails to quiz respondents with their quiz answers and results directly from the app.
- Send emails to a specific email address with notifications about each new quiz completion.
Warning
We recently encountered issues with our previous email provider and switched to a new service. Unfortunately, some emails were affected by this change, and not all messages have been going through as expected.
Starting on November 29th, 2024, we kindly ask you to configure your SMTP settings to continue sending result emails through the app. Notification emails will now be sent from your email address ensuring deliverabilty and consistent branding.
Email Quiz Results via RevenueHunt app
Result emails can be sent directly from the RevenueHunt app to the email provided by the customer.
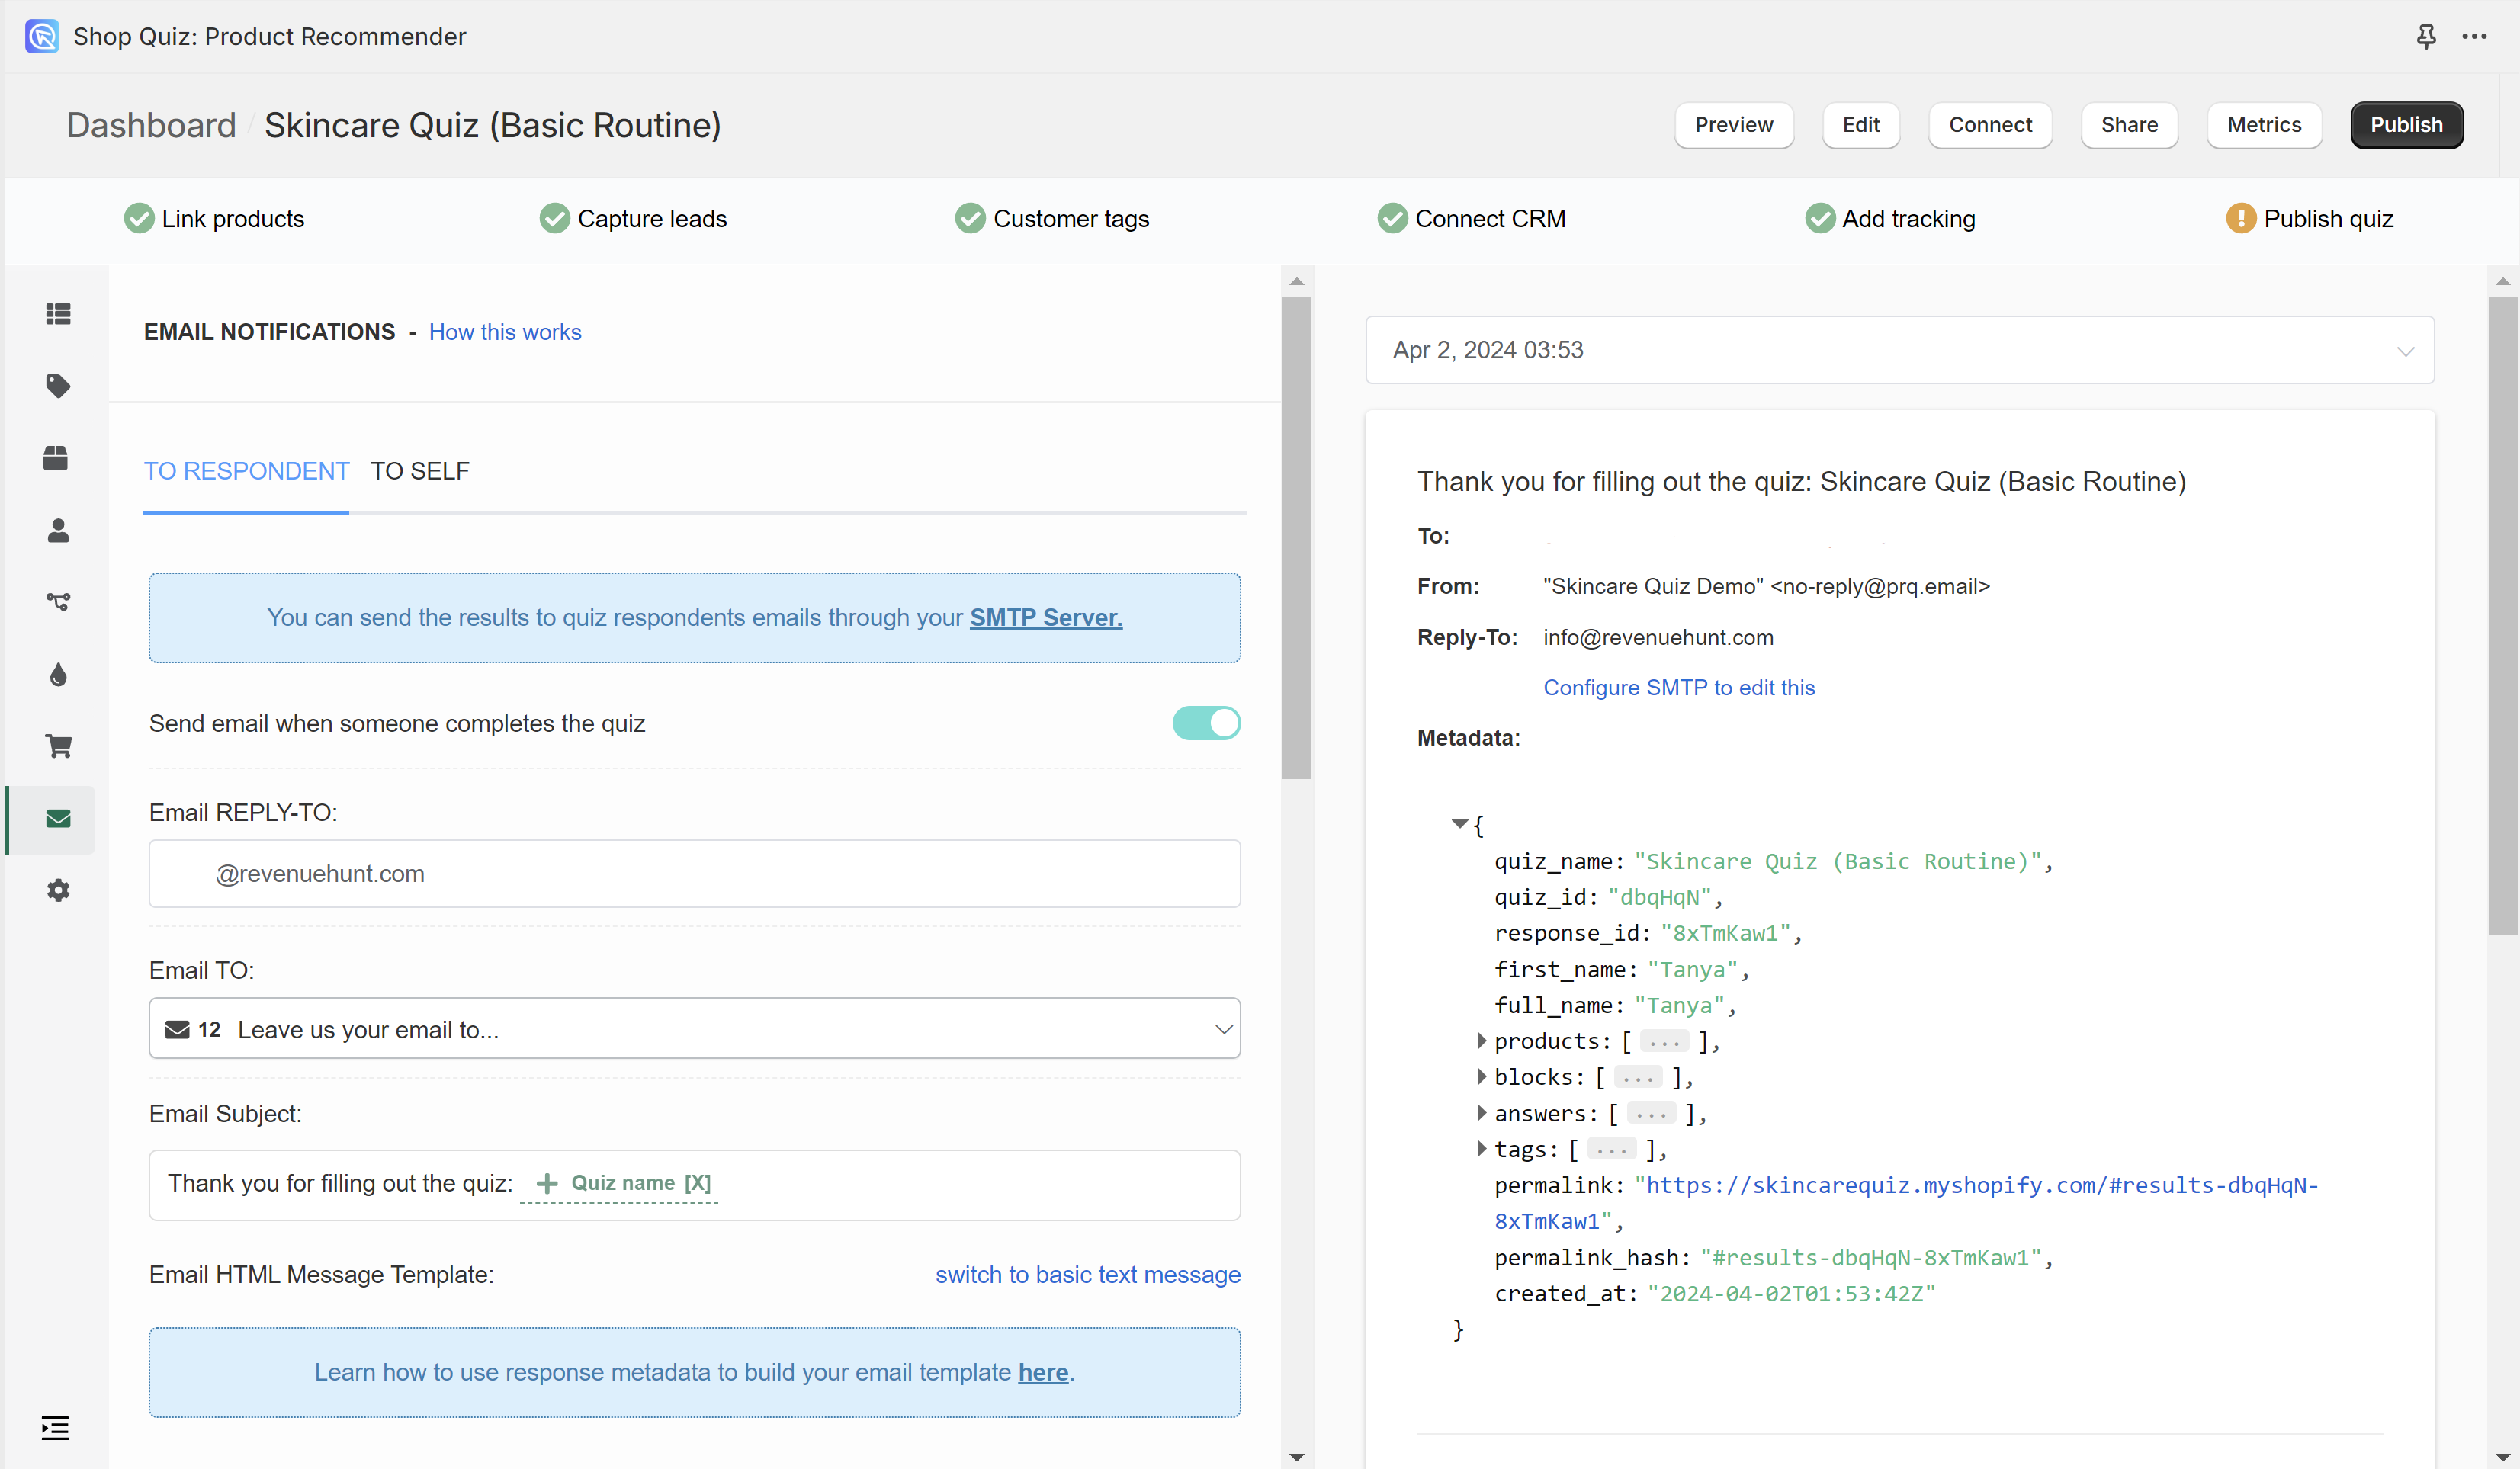
Follow the step by step instructions below to active and edit the result emails sent with the app:
- Add Email Question: Before you set up your result emails, you need to make sure that the quiz has an email question. To add an email question go to the Quiz Builder.
- Activate Respondent Emails: Go to
Quiz Settings > Emails to respondentsand check theSend email when someone completes the quizbutton to activate the emails.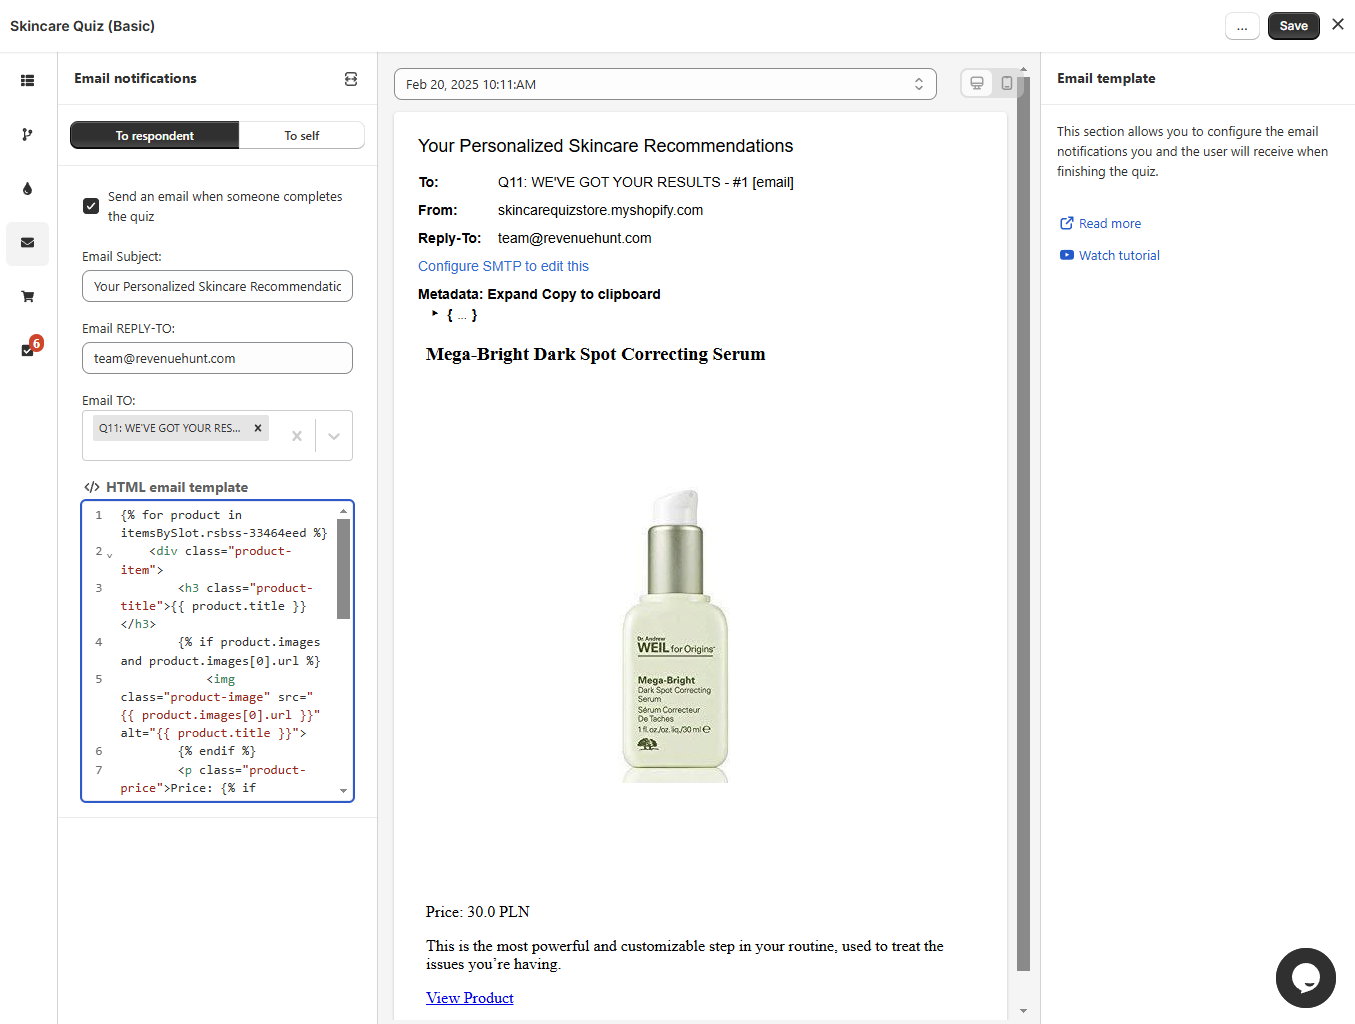
- Email TO: Choose an answer to which email question should be used to send the result emails to.
- Edit REPLY-TO: Choose what email the customers will be able to reply to once they recieve the results.
- Email Subject: Edit the title of the email that customers will receive.
-
Edit Email Content: Configure the email temaplate of the email that your customers will receive.
Warning
Email template requires the knowledge of HTML and liquid to be edited.
-
Incorporate quiz response metadata like
{{first_name}}to personalize emails. You can use liquid code to loop through and display recommended products or customize content based on quiz outcomes. -
The email liquid template uses metadata (such as response ID, quiz name, user's name and email, answers to quiz questions, tags and recommended products, content from the results page) to recall information from the quiz.
Tip
To learn more about the metadata, check out the Quiz Response Metadata Structure.
-
You can find useful code snippets under the
Email Liquid Templatefield and use them to insert specific data into the email template (e.g., 'Responses by Block' snippet to list user answers).Tip
You can copy the useful code snippets and paste them into a large languge model like ChatGPT or Gemini to style the liquid email template.
Note
Note that HTML emails are not rendered the same in different email clients and that you should add styles inline, not as classes. You also can’t add JavaScript code since it won’t be executed by email clients. Read more about styling and editing theEmail templates here.
-
-
👉 Recommended - Add Your SMTP Credentials: By default, the result emails are sent from Revenuehunt email servers. For full deliverabilty and brand experince, it's recommended to connect your email servers to the app instead. To do that, go to
App Settings > SMTPand provide your email SMTP credentials. Follow these instruction to learn how to set this up.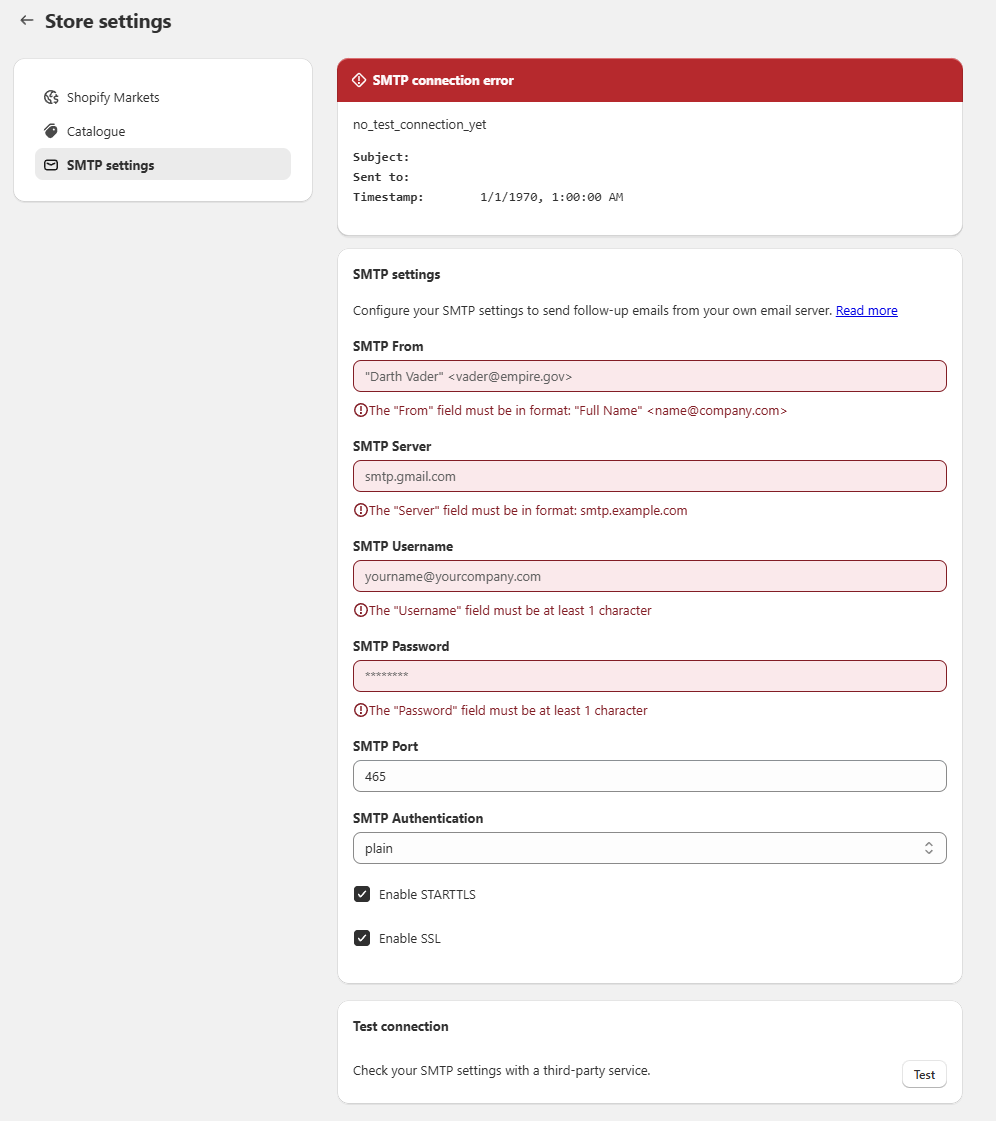
Note
SMTP stands for Simple Mail Transfer Protocol. SMTP is a connection protocol that enables third-party apps (e.g. RevenueHunt) to send emails through your email server.
When you connect the RevenueHunt app to your SMTP Server, the follow-up emails with the quiz results that are sent to your customers will be sent from your email account.
If you're unsure what credentials to use, check your email provider's documentation (look for "SMTP") or contact their customer support.
-
Save the changes: Remember to save the changes with the top-right
Savebutton to update the preview/live quiz. - Preview the quiz: Return to the dashboard and preview the quiz. Complete the quiz all the way to the results page to trigger the email notification.
-
Add Your SMTP Credentials: Go to
App Settings > SMTPand provide your email SMTP credentials. Follow these instruction to learn how to set this up.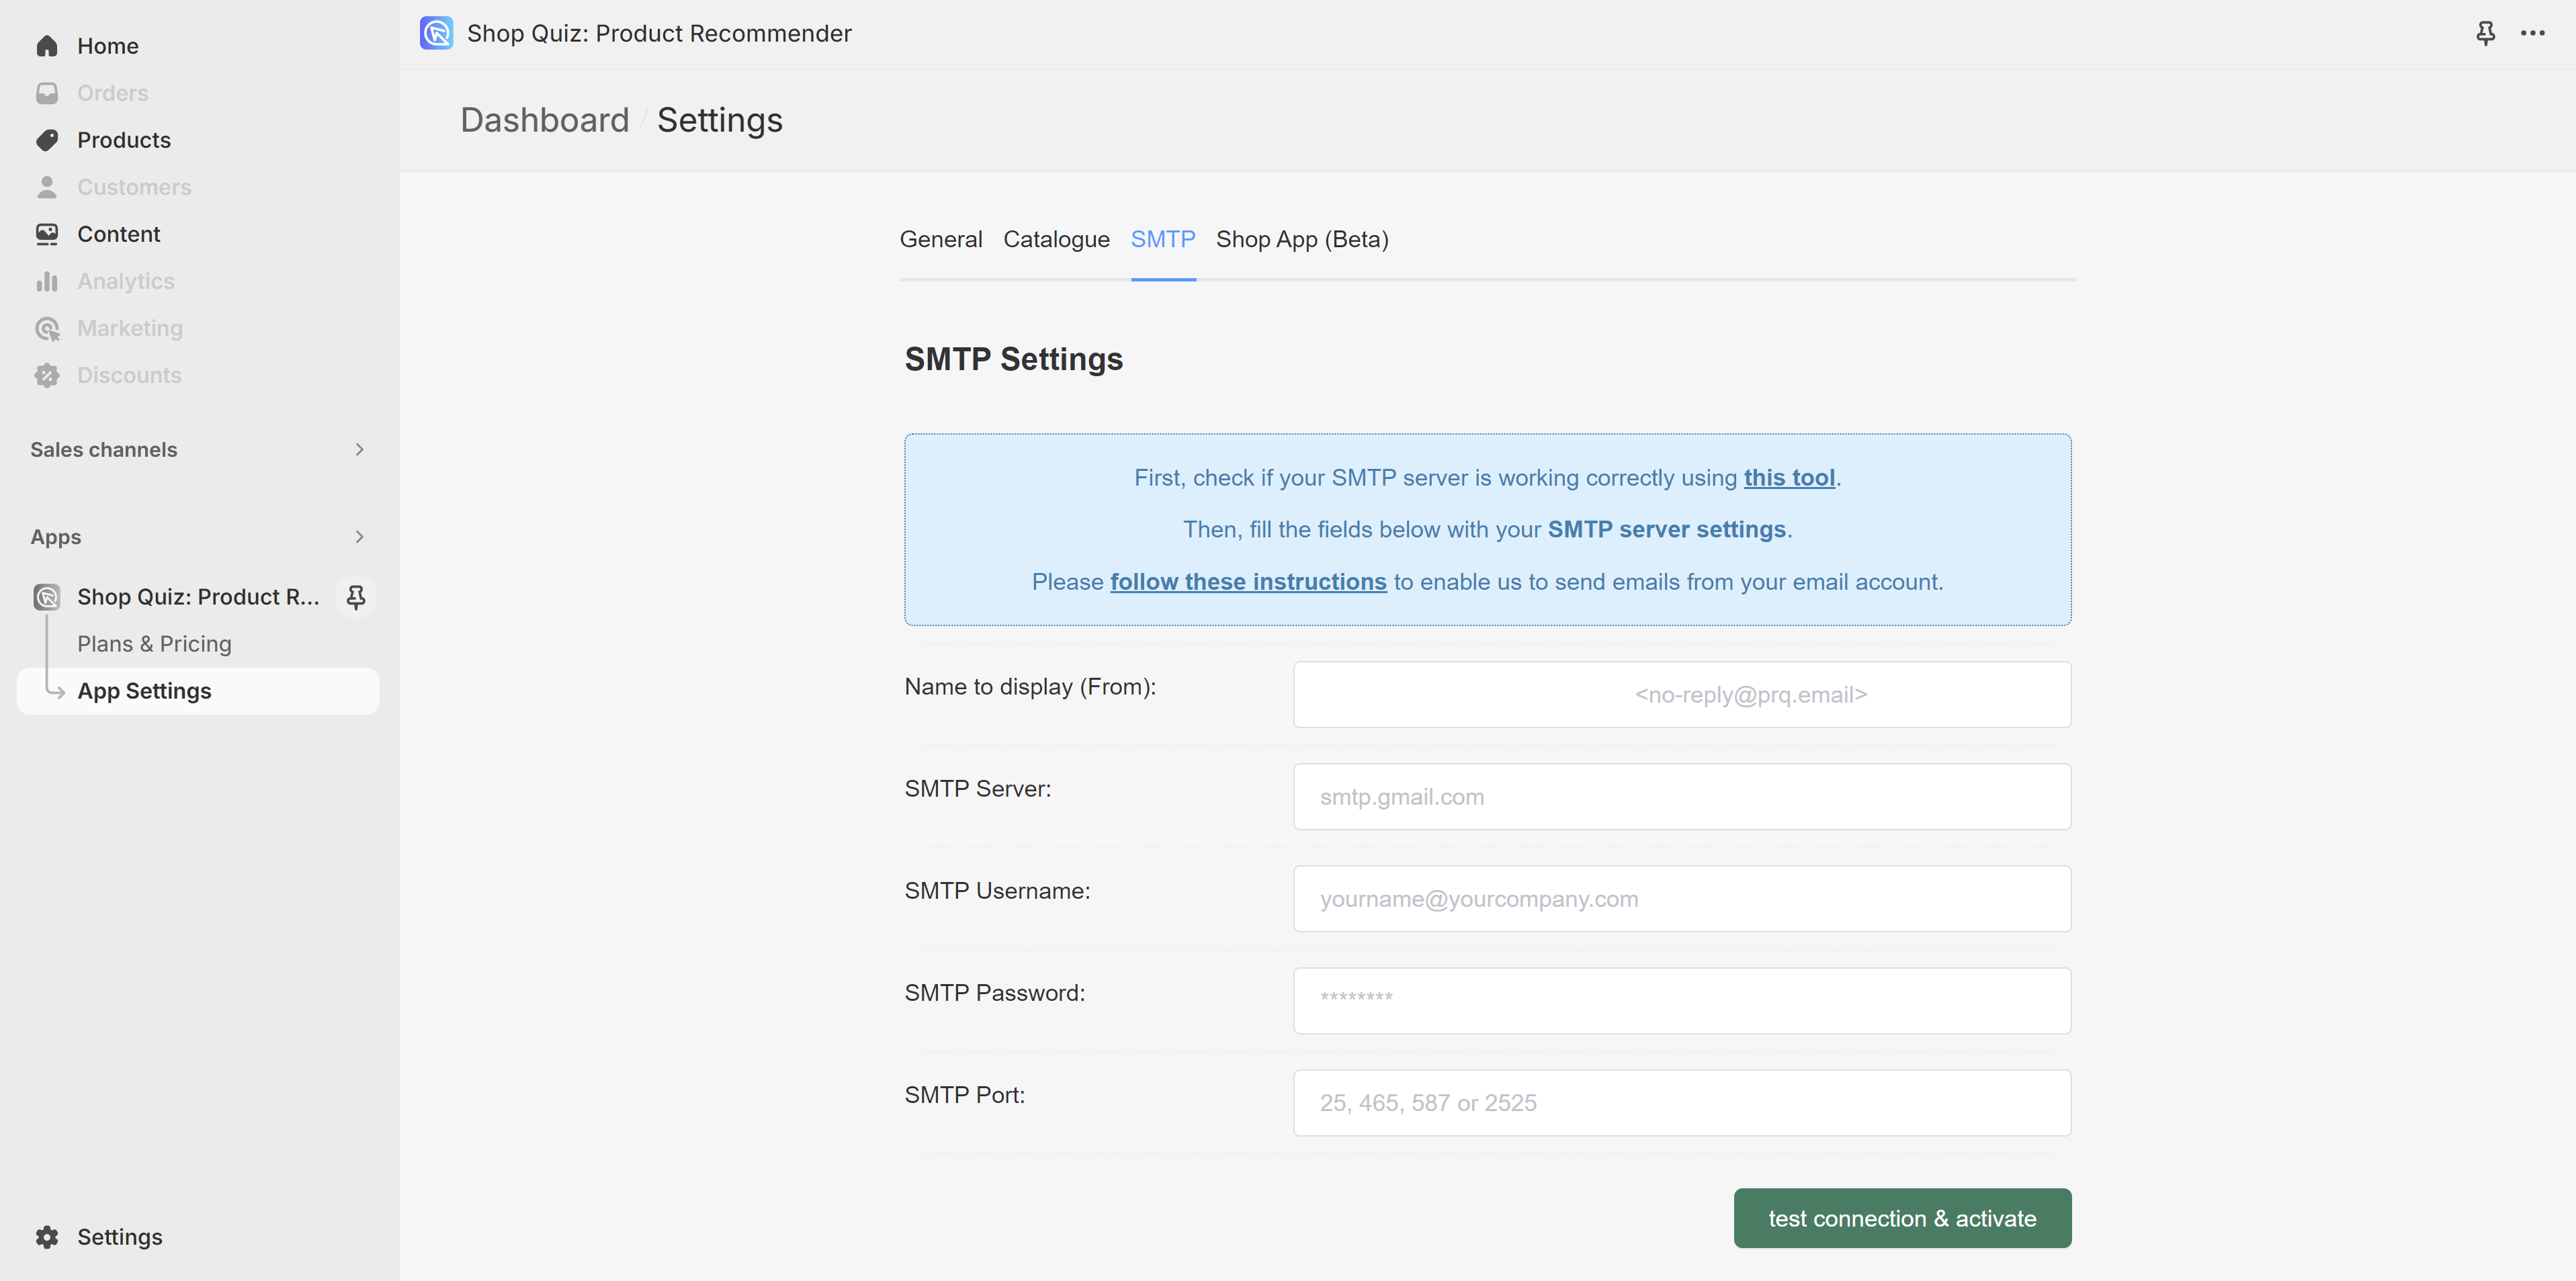
Note
SMTP stands for Simple Mail Transfer Protocol. SMTP is a connection protocol that enables third-party apps (e.g. RevenueHunt) to send emails through your email server.
When you connect the RevenueHunt app to your SMTP Server, the follow-up emails with the quiz results that are sent to your customers will be sent from your email account.
If you're unsure what credentials to use, check your email provider's documentation (look for "SMTP") or contact their customer support.
-
Add Email Question: Before you set up your result emails, you need to make sure that the quiz has an email question. To add an email question go to the Quiz Builder.
- Activate Respondent Emails: Go to
Notifications > TO RESPONDENTand toggle theSend email when someone completes the quizbutton to activate the emails.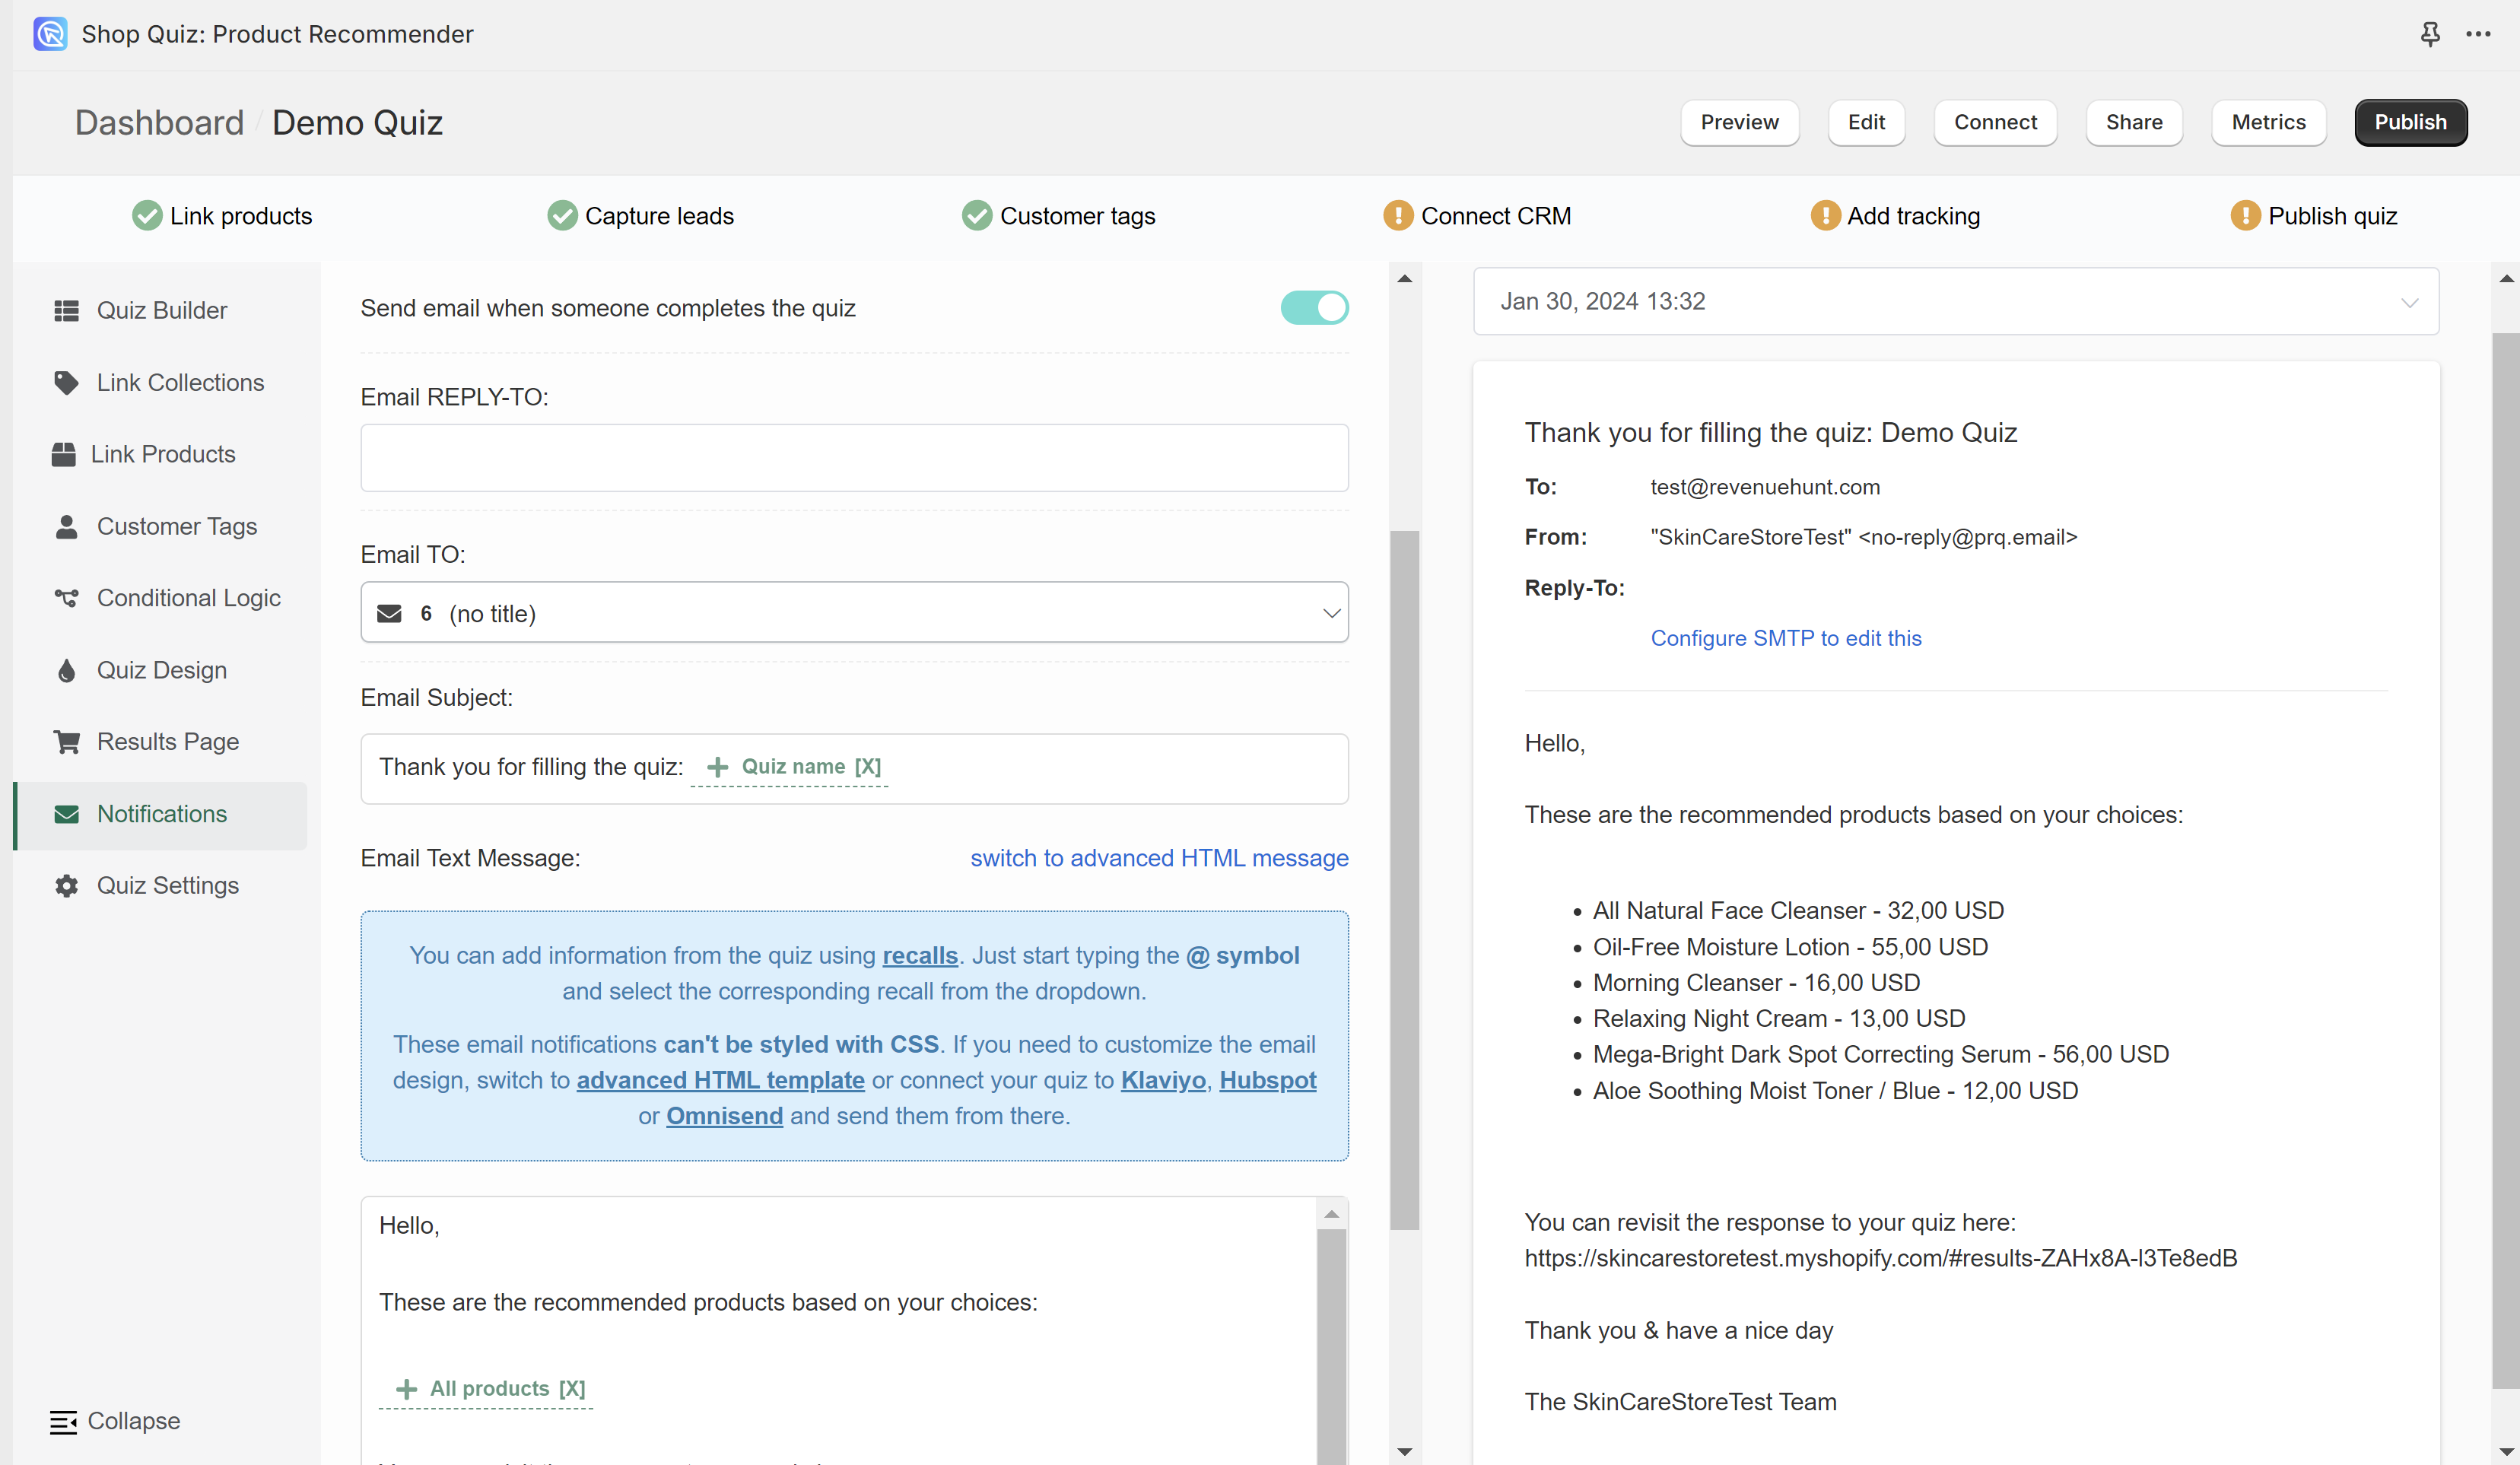
- Edit REPLY-TO: Choose what email the customers will be able to reply to once they recieve the results.
- Email TO: If you have more than one email question in your quiz, choose an answer to which email question should be used to send the result emails. If you have only one email question, it will be selected by default.
- Email Subject: Edit the title of the email that customers will receive. You can use
@to recall information such as the customer name or the quiz name in the title field. - Edit Email Content: Configure the email your customers will receive. You can choose between a Basic (text) email format or Advanced (HTML) email format. You can switch between the two by clicking
switch to advanced HTML messageorswitch to basic text messagein theEmail Text Messagefield.- Basic text email template is easy to use. Type the text that you want the customer to see in the
Email Text Messagefield. You can personalize the email subject and content. You can add dynamic elements with@. Use@/ Information Recalls to recall quiz information in the email body. You can recall data such as customer name, email, phone number, quiz name, question responses, recommended products and more. Basic email template does not allow the display of images or color customization but offers maximum deliverability.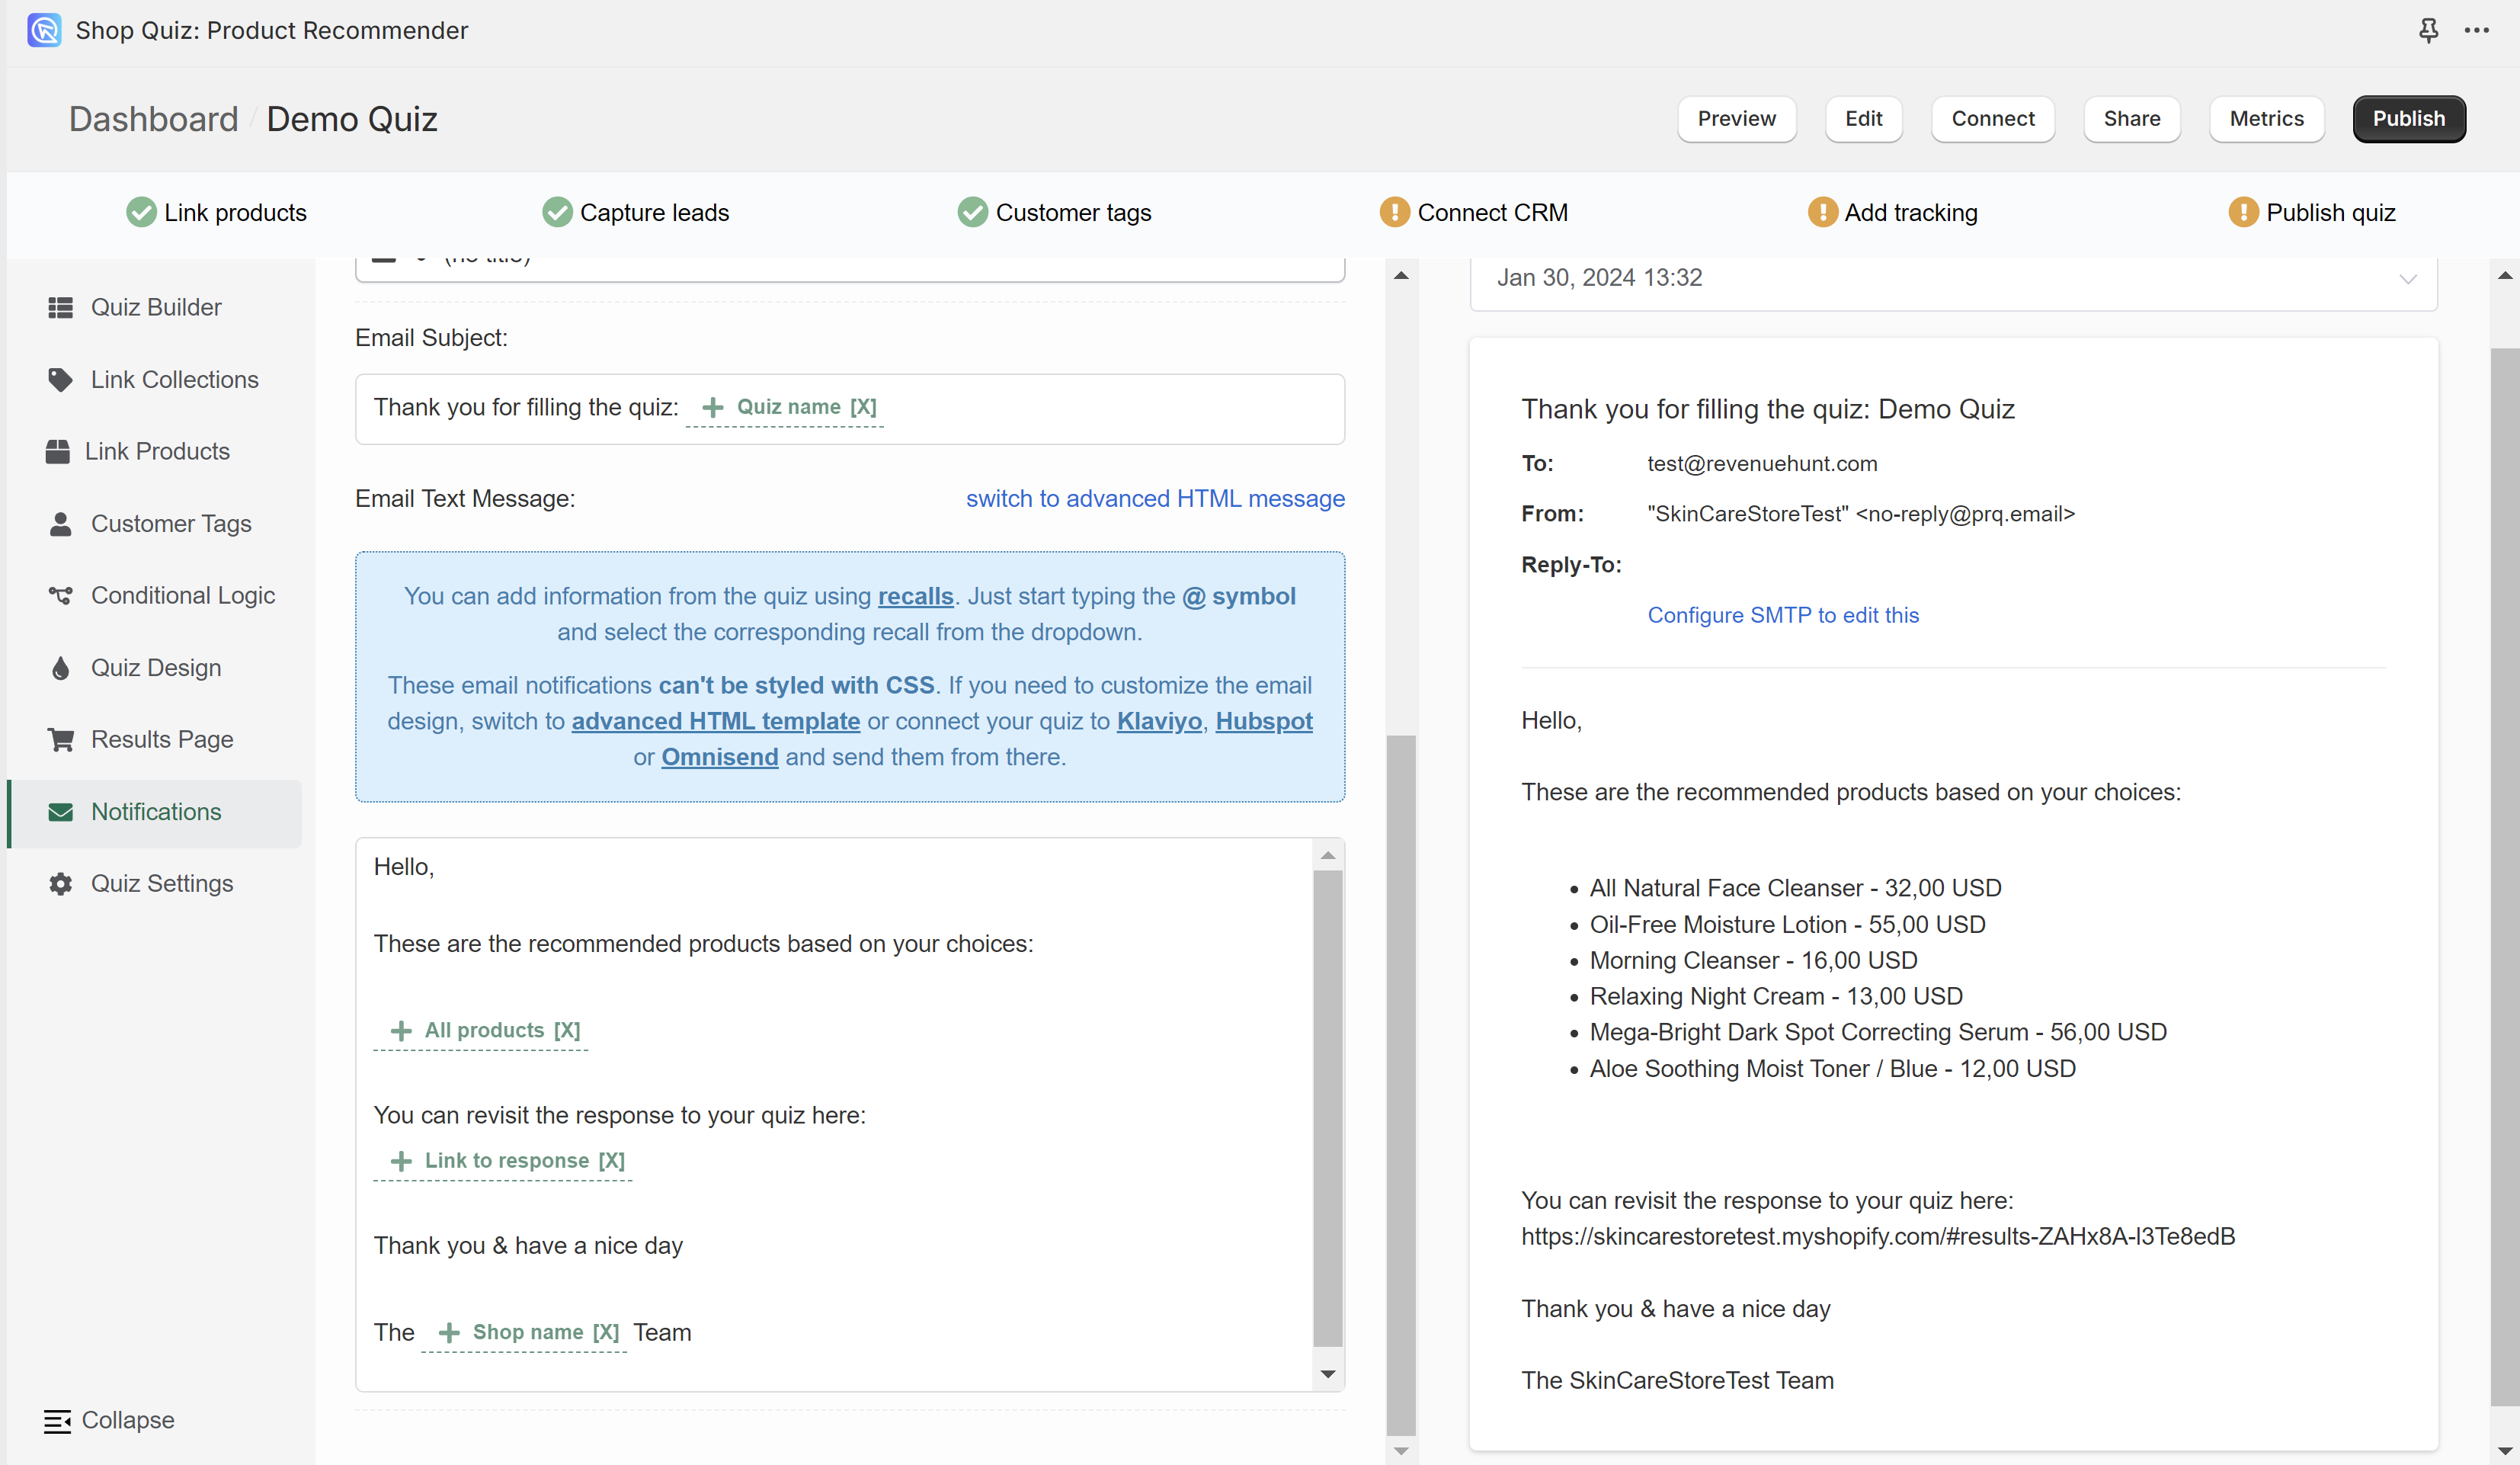
- Advanced HTML email template requires the knowledge of HTML and Handlebars helpers to be edited. Incorporate quiz response metadata like
{{first_name}}to personalize emails. You can use Handlebars to loop through and display recommended products or customize content based on quiz outcomes. Note that HTML emails are not rendered the same in different email clients and that you should add styles inline, not as classes. You also can’t add JavaScript code since it won’t be executed by email clients. Read more about styling Advanced HTML Email temapltes here.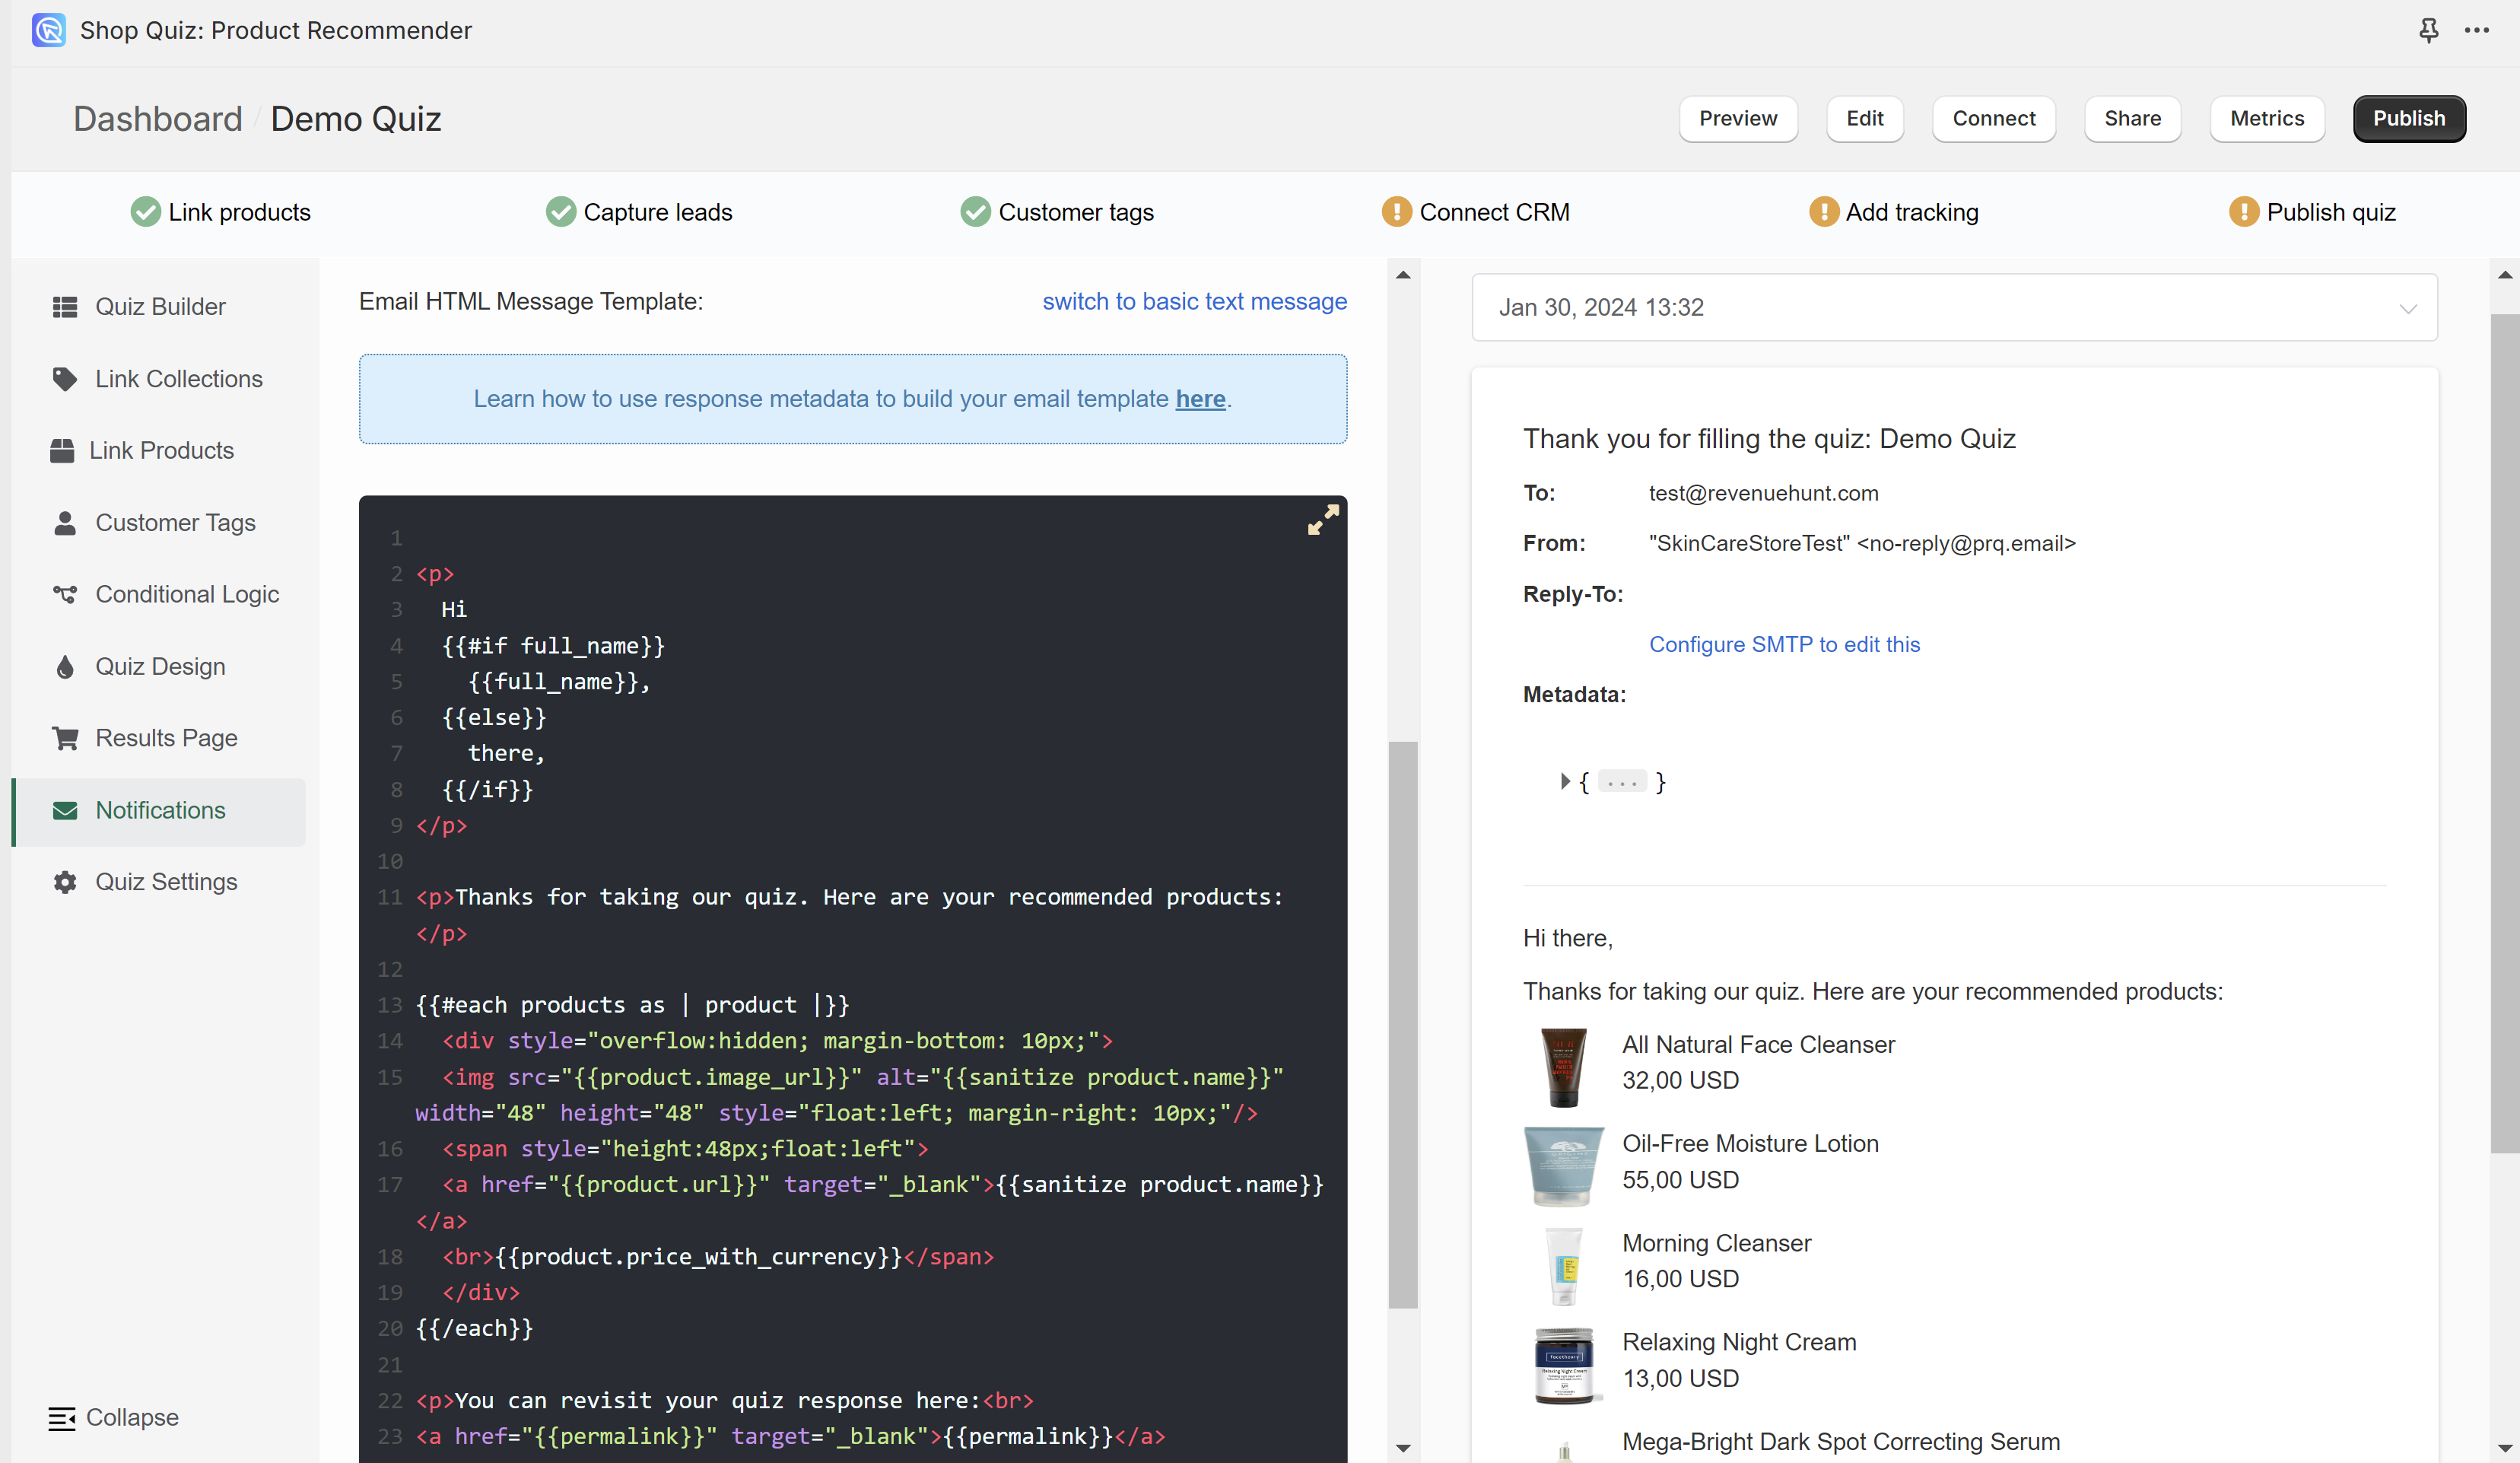
- Basic text email template is easy to use. Type the text that you want the customer to see in the
- Publish the changes: Remember to publish the changes with the top-right
Publishbutton to update the preview/live quiz.
-
Add Your SMTP Credentials: Go to
App Settings > SMTPand provide your email SMTP credentials. Follow these instruction to learn how to set this up.Note
SMTP stands for Simple Mail Transfer Protocol. SMTP is a connection protocol that enables third-party apps (e.g. RevenueHunt) to send emails through your email server.
When you connect the RevenueHunt app to your SMTP Server, the follow-up emails with the quiz results that are sent to your customers will be sent from your email account.
If you're unsure what credentials to use, check your email provider's documentation (look for "SMTP") or contact their customer support.
-
Add Email Question: Before you set up your result emails, you need to make sure that the quiz has an email question. To add an email question go to the Quiz Builder.
- Activate Respondent Emails: Go to
Notifications > TO RESPONDENTand toggle theSend email when someone completes the quizbutton to activate the emails. - Edit REPLY-TO: Choose what email the customers will be able to reply to once they recieve the results.
- Email TO: If you have more than one email question in your quiz, choose an answer to which email question should be used to send the result emails. If you have only one email question, it will be selected by default.
- Email Subject: Edit the title of the email that customers will receive. You can use
@to recall information such as the customer name or the quiz name in the title field. - Edit Email Content: Configure the email your customers will receive. You can choose between a Basic (text) email format or Advanced (HTML) email format. You can switch between the two by clicking
switch to advanced HTML messageorswitch to basic text messagein theEmail Text Messagefield.- Basic text email template is easy to use. Type the text that you want the customer to see in the
Email Text Messagefield. You can personalize the email subject and content. You can add dynamic elements with@. Use@/ Information Recalls to recall quiz information in the email body. You can recall data such as customer name, email, phone number, quiz name, question responses, recommended products and more. Basic email template does not allow the display of images or color customization but offers maximum deliverability. - Advanced HTML email template requires the knowledge of HTML and Handlebars helpers to be edited. Incorporate quiz response metadata like
{{first_name}}to personalize emails. You can use Handlebars to loop through and display recommended products or customize content based on quiz outcomes. Note that HTML emails are not rendered the same in different email clients and that you should add styles inline, not as classes. You also can’t add JavaScript code since it won’t be executed by email clients. Read more about styling Advanced HTML Email temapltes here.
- Basic text email template is easy to use. Type the text that you want the customer to see in the
- Publish the changes: Remember to publish the changes with the top-right
Publishbutton to update the preview/live quiz.
Sending Result Emails with Your CRM
You can automate the process of sending quiz result emails using your own CRM platform. Connect your quiz to one of our available integrations, and the quiz data will be transmitted to your CRM as soon as the customer completes the quiz and reaches the results page. This allows you to set up your own email sequences directly within your CRM. For guidance on connecting the quiz to our integrations, refer to the documentation provided for each integration.
Activate Email Notifications To Admin
You can receive an email notification every time someone completes the quiz or proceeds to checkout to your specified email address. This allows the quiz admin/responsible to stay up to date with quiz engagments.
Warning
We recently encountered issues with our previous email provider and switched to a new service. Unfortunately, some emails were affected by this change, and not all TO-SELF notifications have been going through as expected.
Starting on November 29th, 2024, we kindly ask you to configure your SMTP settings to continue receiving notification emails through the app. Notification emails will now be sent from your email address ensuring deliverabilty.
- Activate Emails to Self: Go to
Quiz Settings > Emails to selfand check theReceive an email when someone completes the quizbutton to activate the emails.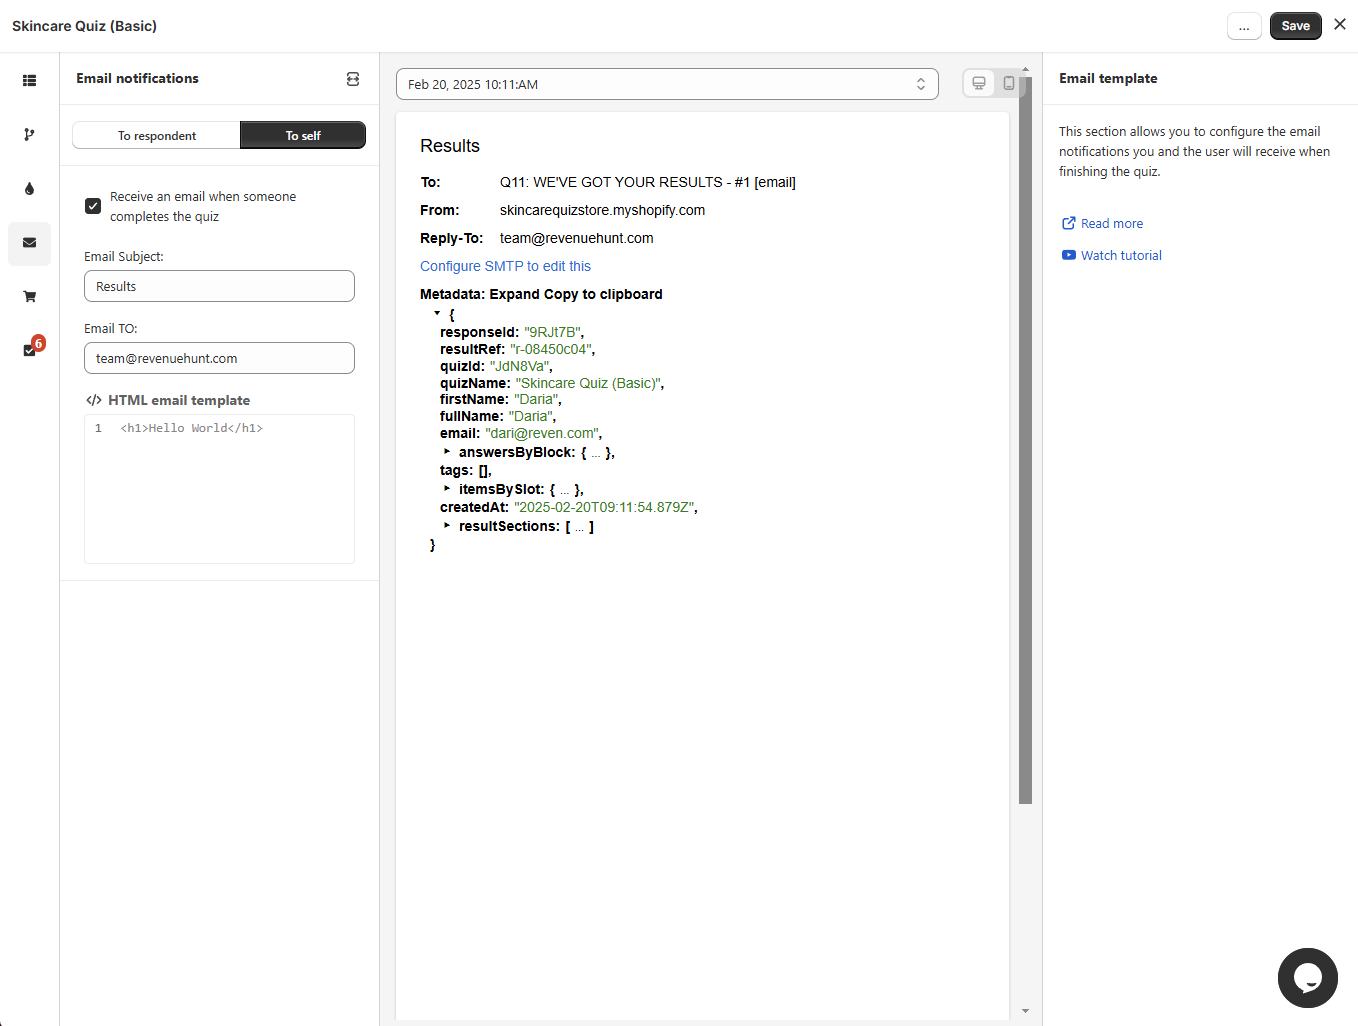
- Edit Email to: Choose what email adress should recieve the notification (e.g., company or personal email).
- Edit Email Subject: Edit the title of the email notifications will receive.
-
Edit Email Content: Configure the email your customers will receive. Edit the liquid email template.
- The default liquid template includes all customer answers from the quiz. You can edit this template to include additional information.
-
Use provided
useful code snippetsto add personal information from users. To add personal information, click to copy the template snippet and paste it at the top of your email liquid template. -
You can always reset the email template to default settings.
-
👉 Recommended - Add Your SMTP Credentials: By default, the result emails are sent from Revenuehunt email servers. For full deliverabilty and brand experince, it's recommended to connect your email servers to the app instead. To do that, go to
App Settings > SMTPand provide your email SMTP credentials. Follow these instruction to learn how to set this up.Note
SMTP stands for Simple Mail Transfer Protocol. SMTP is a connection protocol that enables third-party apps (e.g. RevenueHunt) to send emails through your email server.
When you connect the RevenueHunt app to your SMTP Server, the notification emails to admin will be sent from your email account.
If you're unsure what credentials to use, check your email provider's documentation (look for "SMTP") or contact their customer support.
-
Save the changes: Remember to save the changes with the top
Savebutton. - Preview the quiz: Return to the dashboard and preview the quiz. Complete the quiz all the way to the results page to trigger the email notification.
-
Add Your SMTP Credentials: Go to
App Settings > SMTPand provide your email SMTP credentials. Follow these instruction to learn how to set this up.Note
SMTP stands for Simple Mail Transfer Protocol. SMTP is a connection protocol that enables third-party apps (e.g. RevenueHunt) to send emails through your email server.
When you connect the RevenueHunt app to your SMTP Server, the notification emails to admin will be sent from your email account.
If you're unsure what credentials to use, check your email provider's documentation (look for "SMTP") or contact their customer support.
-
Open Notifications: Navigate to
Notifications > TO SELFin your quiz dashboard. - Activate Notifications: Toggle the button to activate the emails. Here, you can opt to receive an email for each quiz completion and/or when someone proceeds to the cart or checkout.
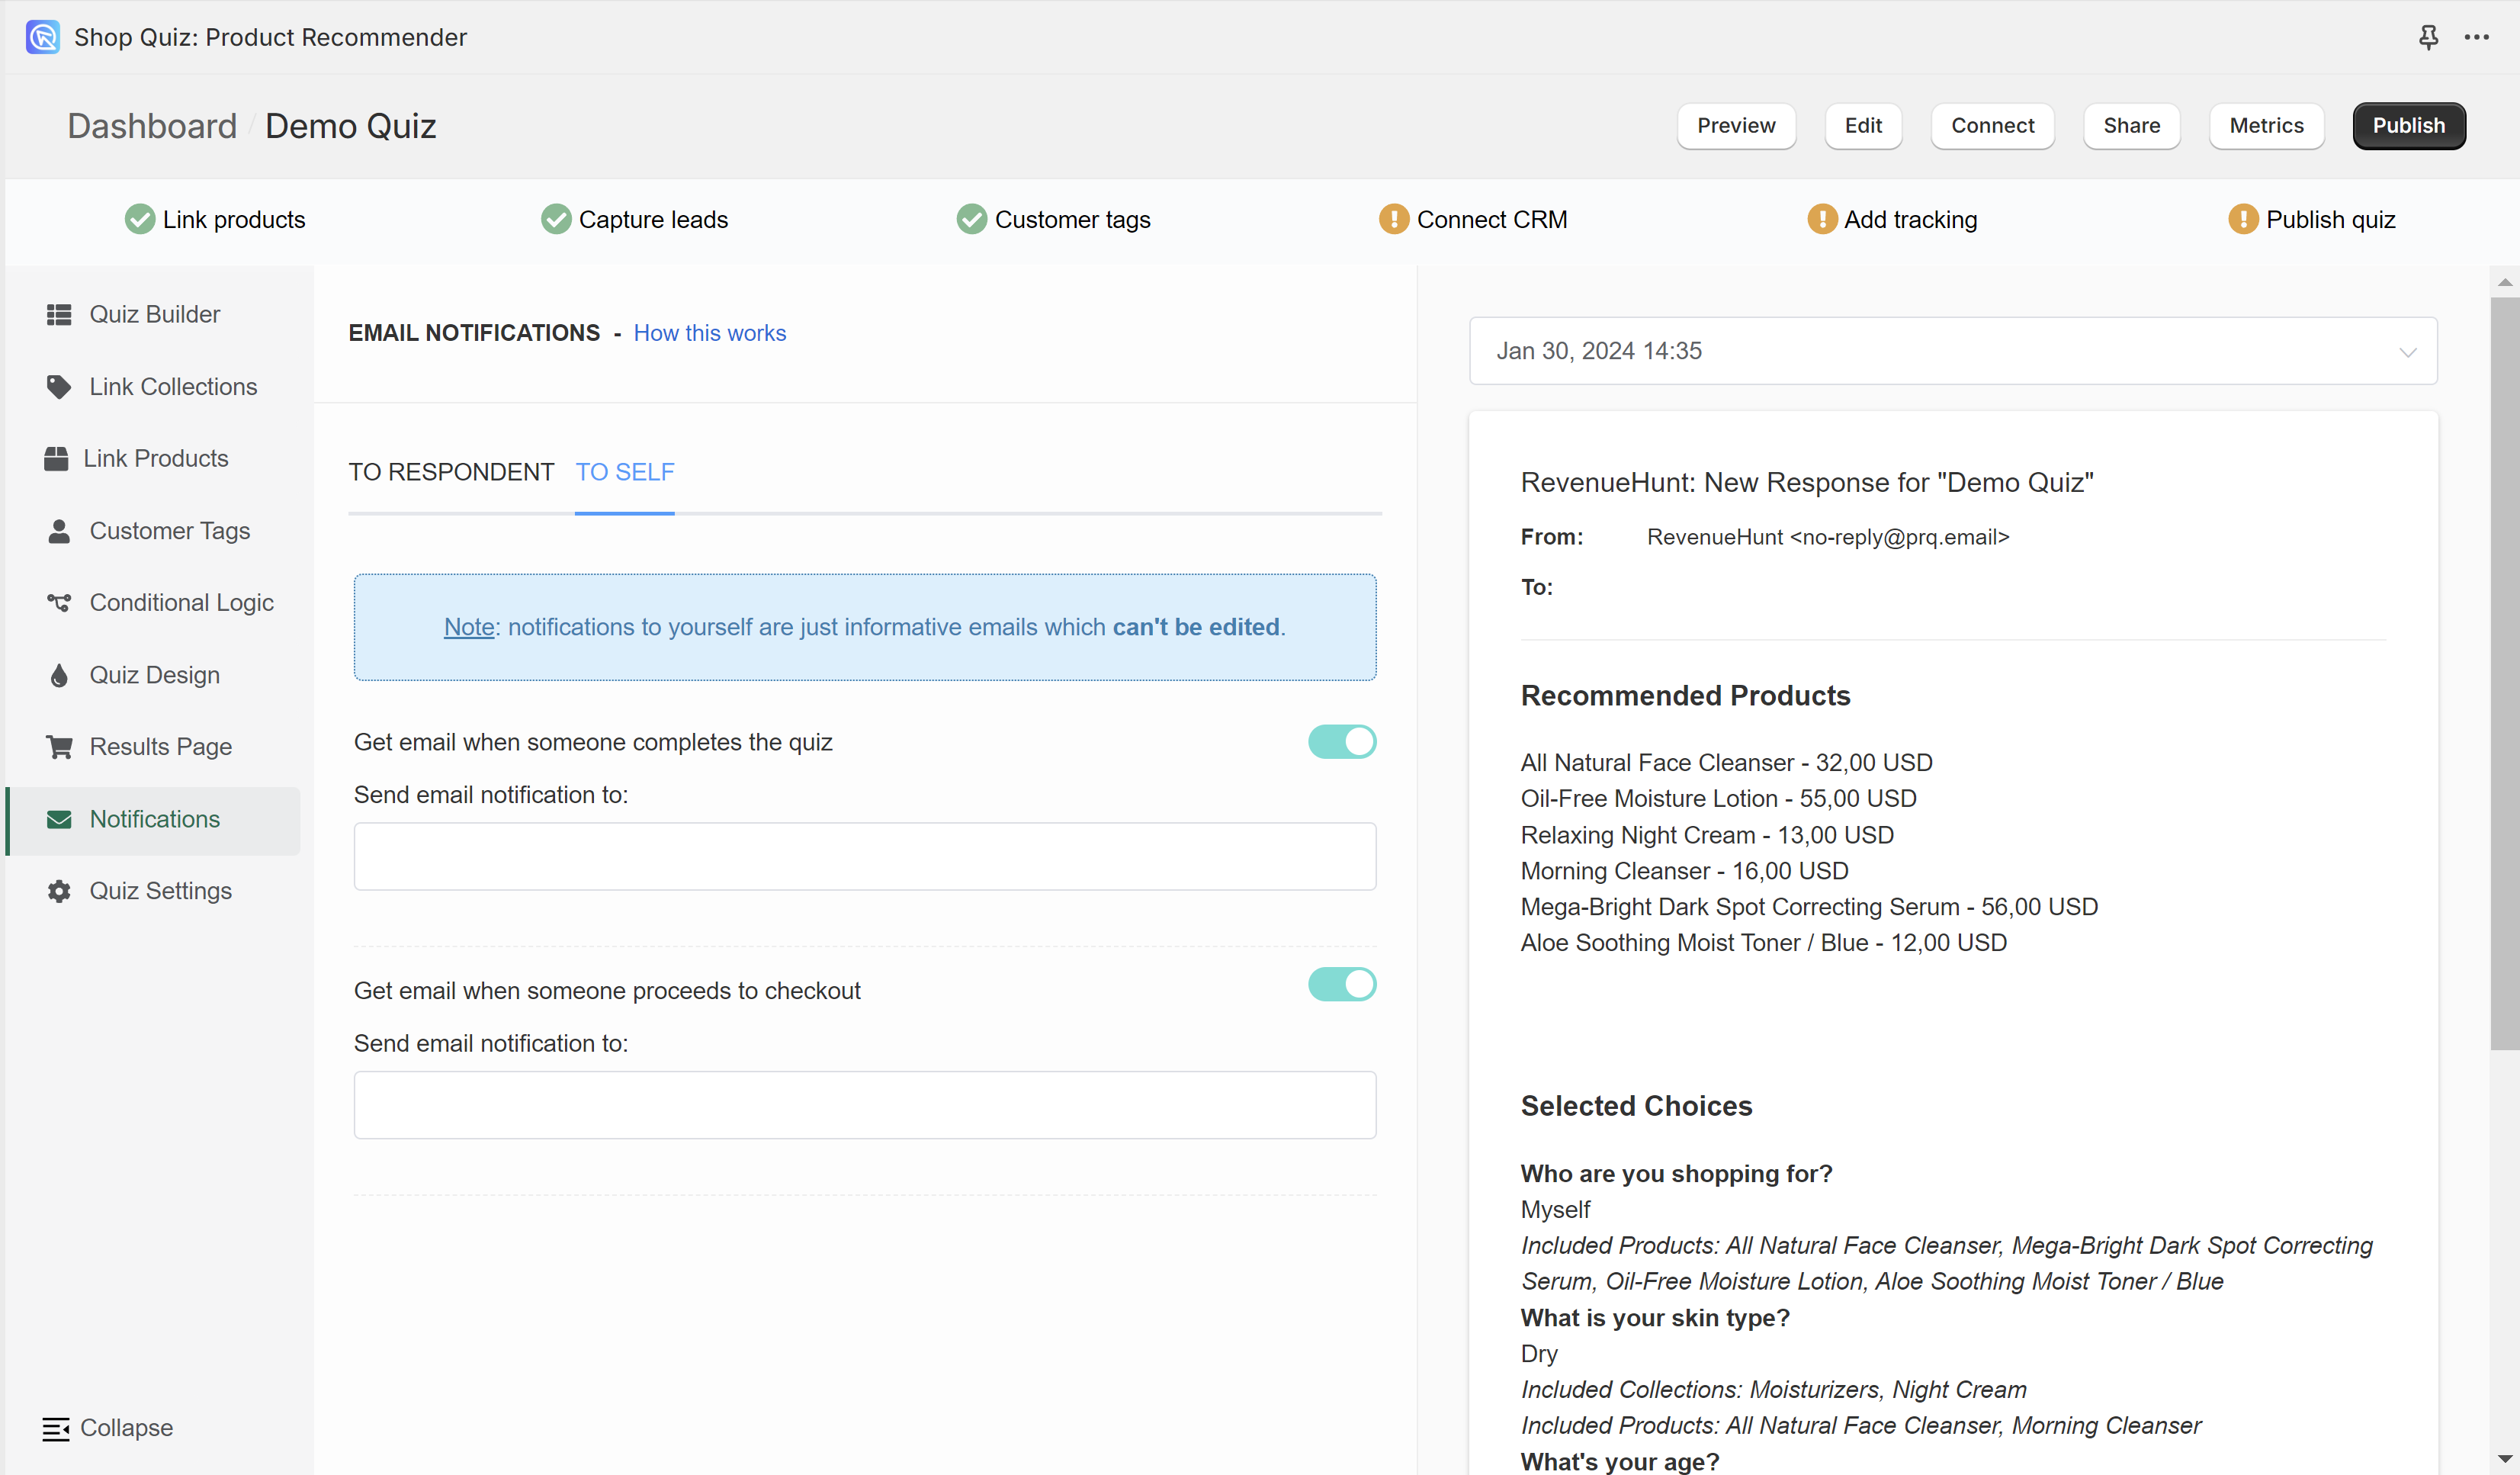
- Add your email address in the
Send email notification tofield. - Publish the changes: Remember to publish the changes with the top-right
Publishbutton.
-
Add Your SMTP Credentials: Go to
App Settings > SMTPand provide your email SMTP credentials. Follow these instruction to learn how to set this up.Note
SMTP stands for Simple Mail Transfer Protocol. SMTP is a connection protocol that enables third-party apps (e.g. RevenueHunt) to send emails through your email server.
When you connect the RevenueHunt app to your SMTP Server, the notification emails to admin will be sent from your email account.
If you're unsure what credentials to use, check your email provider's documentation (look for "SMTP") or contact their customer support.
-
Open Notifications: Navigate to
Notifications > TO SELFin your quiz dashboard. - Activate Notifications: Toggle the button to activate the emails. Here, you can opt to receive an email for each quiz completion and/or when someone proceeds to the cart or checkout.
- Add your email address in the
Send email notification tofield. - Publish the changes: Remember to publish the changes with the top-right
Publishbutton.
Editing Email Templates
Using Metadata
Note
This guide explains how to use quiz metadata like answersByBlock, recommendationsBySlot, and resultContentByBlock in a Liquid-compatible email template.
Each quiz response has metadata which can be used in your emails to personalize them. You can see the metadata from the quiz response on the right hand side of each notification:
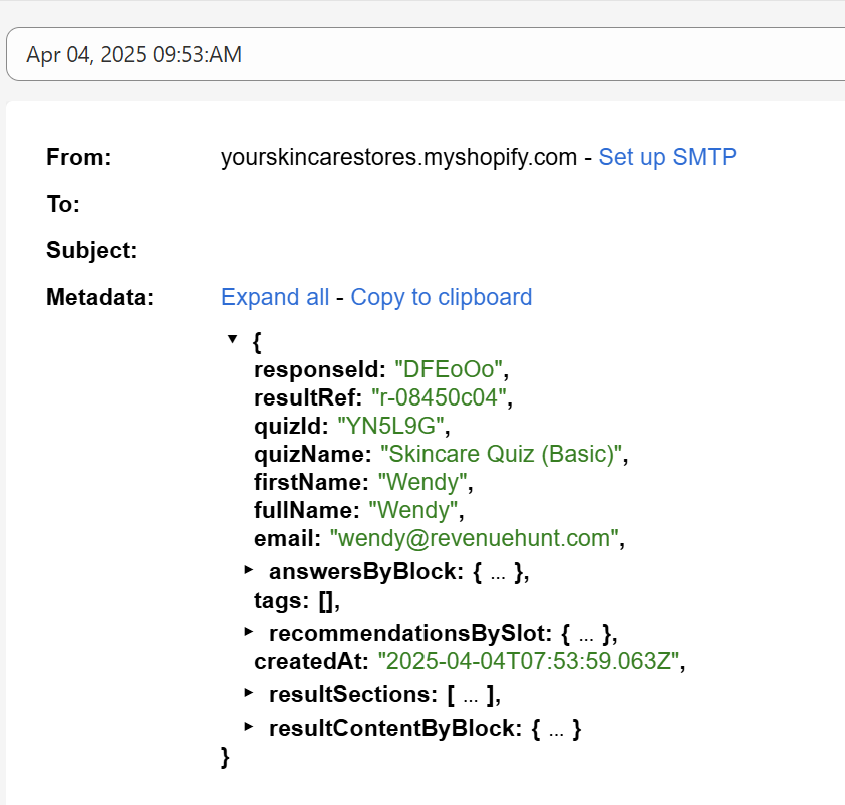
The metadata from a quiz response can include various details that are useful for personalizing email communications.
Understanding the Data Structure
When a customer finishes a quiz, you receive structured metadata with:
firstName,fullName,email: basic user infoanswersByBlock: customer’s answers to quiz questionsrecommendationsBySlot: products recommended by the quizresultContentByBlock: dynamic text, tips, and headings from the result page
Quiz Response Metadata Structure
This object contains all the data generated when a user completes a quiz — including responses, product recommendations, and result content. It is used to power dynamic result pages, follow-up emails, and custom workflows.
Basic Information
responseId - Unique ID for this specific quiz response
resultRef - Internal reference to the results layout
quizId - ID of the quiz that was completed
quizName - Name of the quiz
firstName / fullName - Name entered by the user
email - Email address submitted
createdAt - Timestamp of quiz completion (ISO format)
User Answers (answersByBlock)
"answersByBlock": {
"qbc-485600ce": {
"type": "picture_choice",
"value": "Dry and tight all over",
"choicesRefs": ["qbcc-30928613"]
}
}
Each quiz question block is mapped to the user's response.
Fields inside each entry:
type - The kind of question (e.g. multiple_choice, picture_choice, email)
value - The answer selected or typed by the user
choicesRefs - List of selected choice references (used internally)
Example: qbc-485600ce → type: picture_choice, value: "Dry and tight all over", choicesRefs: ["qbcc-30928613"]
Tags
tags - A list of tags to assign to the respondent. Often used for segmentation. Empty if unused.
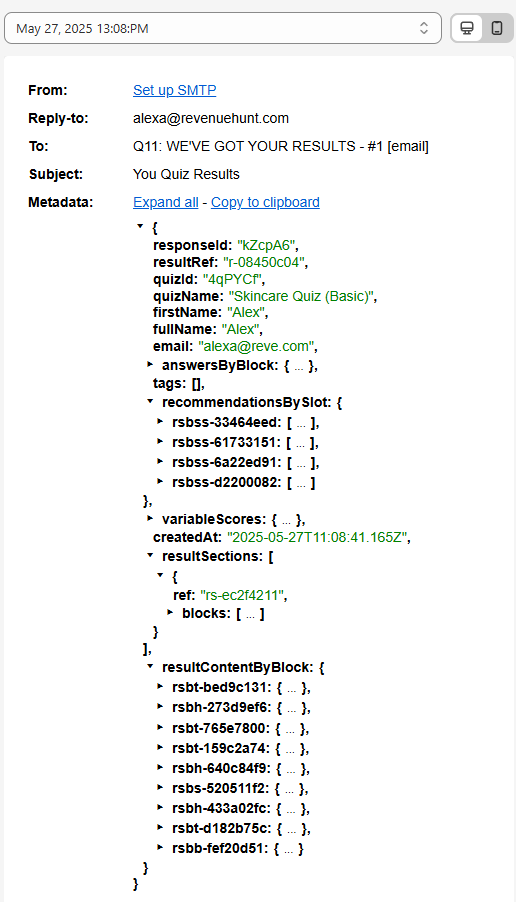
Product Recommendations (recommendationsBySlot)
"recommendationsBySlot": {
"rsbss-33464eed": {
"type": "product",
"value": "Ordinary Serum",
"variants": [
Each result "slot" contains one or more product recommendations.
Each product object includes: id, title, vendor, handle: Shopify product metadata
variants - Variant ID, price, and image per product
slotHeading / slotDescription - Rich text HTML displayed on result pages
image - URL for the main product image
price - Object with amount and currencyCode
Example: rsbss-33464eed → contains "Ordinary Serum", $45 USD
Variable Scores (variableScores)
Used only if the quiz has a scoring logic. Contains numerical results or score breakdowns.
Result Sections (resultSections)
"resultSections": [
"rsbh-273d9ef6": {
"type": "heading",
"content": "<p>Here's what your skin wants!</p>"
}
]
An ordered array of blocks that make up the results page. Each block can be:
heading
text
products
button
Products blocks have a slots array that contains product lists grouped by slot reference.
Rendered Result Content (resultContentByBlock)
A lookup table of rendered content for each block (used in external templates like email).
Each entry is keyed by the block reference and contains:
type - Type of block (text, heading, products, etc.)
content or slots - The rendered HTML or product data
How to Use Metadata in Liquid Templates
Display Their First Name: Hi {{ person.firstName | default: 'there' }}, or Hi {{ person.answersByBlock.qbi-6c4248f5.value | default: 'there' }},
Display Their Answers: You mentioned your skin is mostly: <strong>{{ person.answersByBlock['qbc-485600ce'].value }}</strong>
Tip
You can loop through all answers dynamically too:
Show an link to the quiz results page: Use the responseId to create a link to the quiz results page. Just add #response-{{ responseId }} to the end of your results page URL in any link.
Show Recommended Products: If your quiz sends recommended products under recommendationsBySlot, you can display them like this:
{% assign products = person.recommendationsBySlot['rsbss-ca4fba94'] %}
{% for product in products %}
<div style="margin-bottom: 30px;">
    <img src="{{ product.image.url }}" alt="{{ product.title }}" width="200" />
    <h3>{{ product.vendor }} - {{ product.title }}</h3>
    <p>{{ product.description }}</p>
    <p><strong>{{ product.price.amount }} {{ product.price.currencyCode }}</strong></p>
    <a href="https://yourstore.com/products/{{ product.handle }}">Shop now</a>
</div>
{% endfor %}
Show Custom Headings from Results Page: You can also pull headings or tips from resultContentByBlock by using a code like {{ person.resultContentByBlock['rsbt-159c2a74'].content }} or loop through result content blocks:
Using Metadata
Each quiz response has metadata which can be used in your emails to personalize them. You can see the metadata from the quiz response on the right hand side of each notification:
The metadata from a quiz response can include various details that are useful for personalizing email communications.
For example:
-
Show Customer Name: If you wish to display the respondent’s name, you can use the
{{first_name}}handlebar in your code.It should render as:
-
Recommended Products in Metadata: The most recommended products are listed within the metadata JSON under the
productsproperty.
Usign Handlebars
You can use Handlebars to add more functionality to your HTML email template.
For more detailed guidance on using handlebars in your HTML email templates, refer to the following resources:
- Handlebars Builtin Helpers: Handlebars Built-in Helpers
- GitHub Handlebars Helpers: Handlebars Helpers on GitHub
The format for helpers in Notifications might slightly differ from those on GitHub. For instance, to truncate a product name to 7 characters, you should write:
If you want to present specific metadata you should use a special property {{#eq}} ... {{/eq}}
- To target all slot blocks:
- To target a specific block, for example, a block with the ID
A4TeY9:
Specific use cases:
-
List the Recommended Products: If you want to loop through the most recommended products, you can do so like this:
{{#each products as | product |}} <div style="overflow:hidden; margin-bottom: 10px;"> <img src="{{product.image_url}}" alt="{{product.name}}" width="48" height="48" style="float:left; margin-right: 10px;"/> <span style="height:48px;float:left"> <a href="{{product.url}}" target="_blank">{{product.name}}</a> <br>{{product.price}} USD</span> </div> {{/each}} -
List recommended products with Slot Titles: If you want to list the most recommended product with Slot titles, you can do so like this:
{{#each blocks as |block|}} {{#eq block.type "SlotsBlock"}} {{#each block.slots as |slot|}} <b>{{slot.title}}</b><br> {{#each products as |product|}} <div style="overflow:hidden; margin-bottom: 10px;"> <img src="{{product.image_url}}" alt="{{product.name}}" width="48" height="48" style="float:left; margin-right: 10px;"/> <span style="height:48px;float:left"> <a href="{{product.url}}" target="_blank">{{product.name}}</a> <br>{{product.price}} USD</span> </div> {{/each}} {{/each}} {{/eq}} {{#eq block.type "ProductsBlock"}} {{#each block.products as |product|}} <div style="overflow:hidden; margin-bottom: 10px;"> <img src="{{product.image_url}}" alt="{{product.name}}" width="48" height="48" style="float:left; margin-right: 10px;"/> <span style="height:48px;float:left"> <a href="{{product.url}}" target="_blank">{{product.name}}</a> <br>{{product.price}} USD</span> </div> {{/each}} {{/eq}} {{/each}} -
List recommended products separated by Slot Blocks: If you want to recommend a Morning and Night slot routine separately you can use the following code. Make sure to change the block IDs (“A4TeY9” and “PPT2PG”) to the ones in your quiz.
<h3>Let’s start with your morning routine</h3>
{{#each blocks as |block|}}
{{#eq block.id "A4TeY9"}}
{{#each block.slots as |slot|}}
<b>{{slot.title}}</b><br>
{{#each products as |product|}}
<div style="overflow:hidden; margin-bottom: 10px;">
<img src="{{product.image_url}}" alt="{{product.name}}" width="48" height="48" style="float:left; margin-right: 10px;"/>
<span style="height:48px;float:left">
<a href="{{product.url}}" target="_blank">{{product.name}}</a>
<br>{{product.price}} USD</span>
</div>
{{/each}}
{{/each}}
{{/eq}}
{{/each}}
<br>
<h3>Finish the day with your night routine</h3>
{{#each blocks as |block|}}
{{#eq block.id "PPT2PG"}}
{{#each block.slots as |slot|}}
<b>{{slot.title}}</b><br>
{{#each products as |product|}}
<div style="overflow:hidden; margin-bottom: 10px;">
<img src="{{product.image_url}}" alt="{{product.name}}" width="48" height="48" style="float:left; margin-right: 10px;"/>
<span style="height:48px;float:left">
<a href="{{product.url}}" target="_blank">{{product.name}}</a>
<br>{{product.price}} USD</span>
</div>
{{/each}}
{{/each}}
{{/eq}}
{{/each}}
This article explains how to send result emails to quiz respondents and to a specific email address with RevenueHunt app.