How to Send Leads to Mailchimp
While the new Built for Shopiify version of the RevenueHunt app does not yet integrate directly with Mailchimp, it is still possible to send quiz leads to Mailchimp.
One option includes using our Webhooks integration to send quiz leads to Mailchimp. Another, includes manually adding the quiz leads to Mailchimp by uploading a CSV file generated from the quiz.
This guide explain how you can send quiz data to Mailchimp with a workaround.
This article explains how to send leads to Mailchimp from your quiz.
Automating the transfer of quiz leads to your Mailchimp account can help you improve your email marketing campaigns by segmenting your audience and sending them personalized follow-up emails.
Important Considerations
- Limited Data Transfer: Mailchimp integration only supports email, name, and customer tags to be send from the quiz. For more complex emailing/data needs, including direct product recommendations, consider using a different service.
- Alternative Services: For functionality beyond basic data transfer, platforms like Klaviyo, HubSpot or Omnisend are recommended. These services offer more robust integration options for personalized follow-ups.
Before you begin, ensure you have:
- An active Mailchimp account.
- A RevenueHunt Product Recommendation Quiz that you wish to connect with Mailchimp.
Link Quiz to Mailchimp
It is not yet possible to link your Product Recommendation Quiz created in the new Built for Shopify version of the RevenueHunt app to Mailchimp.
Check Alternative Ways to Send Quiz Leads to Mailchimp to learn how you can send quiz leads to Mailchimp anyway.
Connecting your quiz to Mailchimp allows for the seamless transfer of leads:
- Locate your quiz and click on the Connect tab at the top of the interface.
-
Find the Mailchimp section and click on the
Connectbutton. This action will redirect you to a Mailchimp login page in a new tab.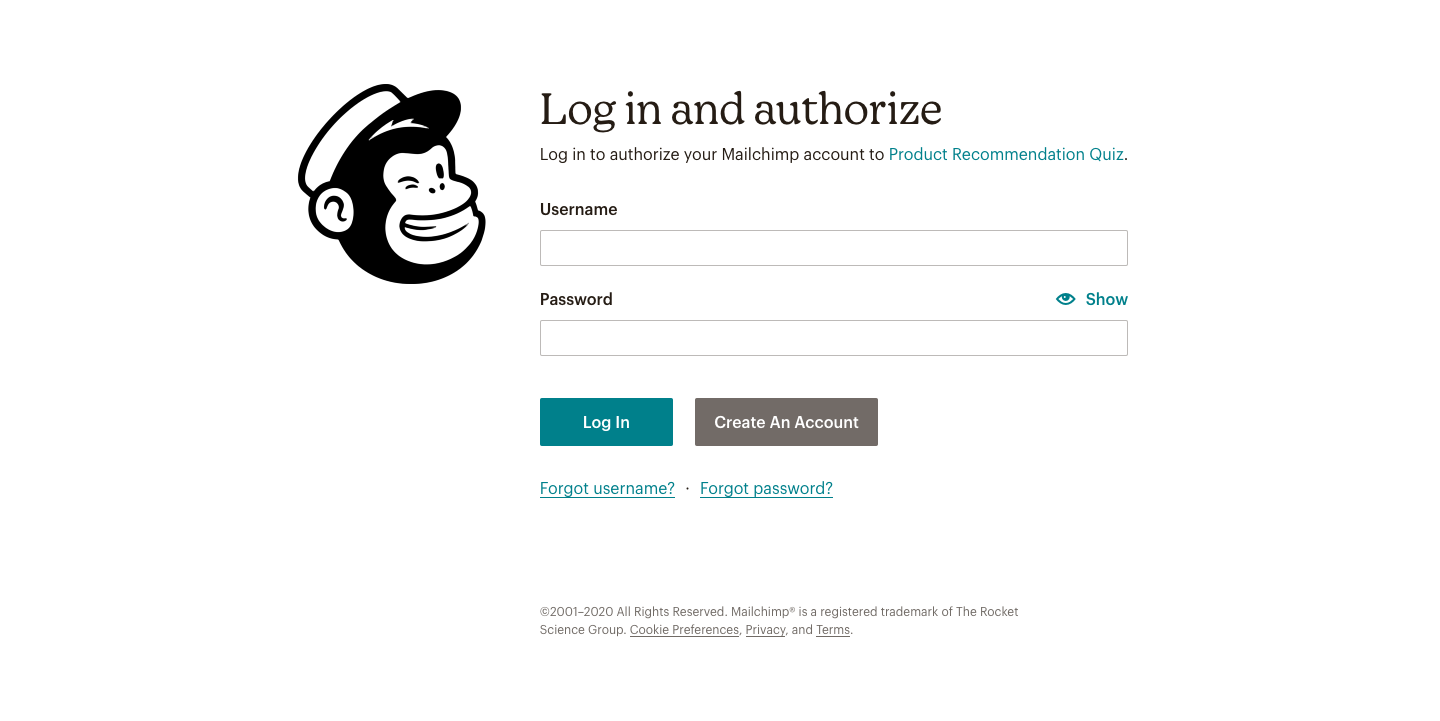
-
Log into your Mailchimp account and authorize the app by clicking on
Allow.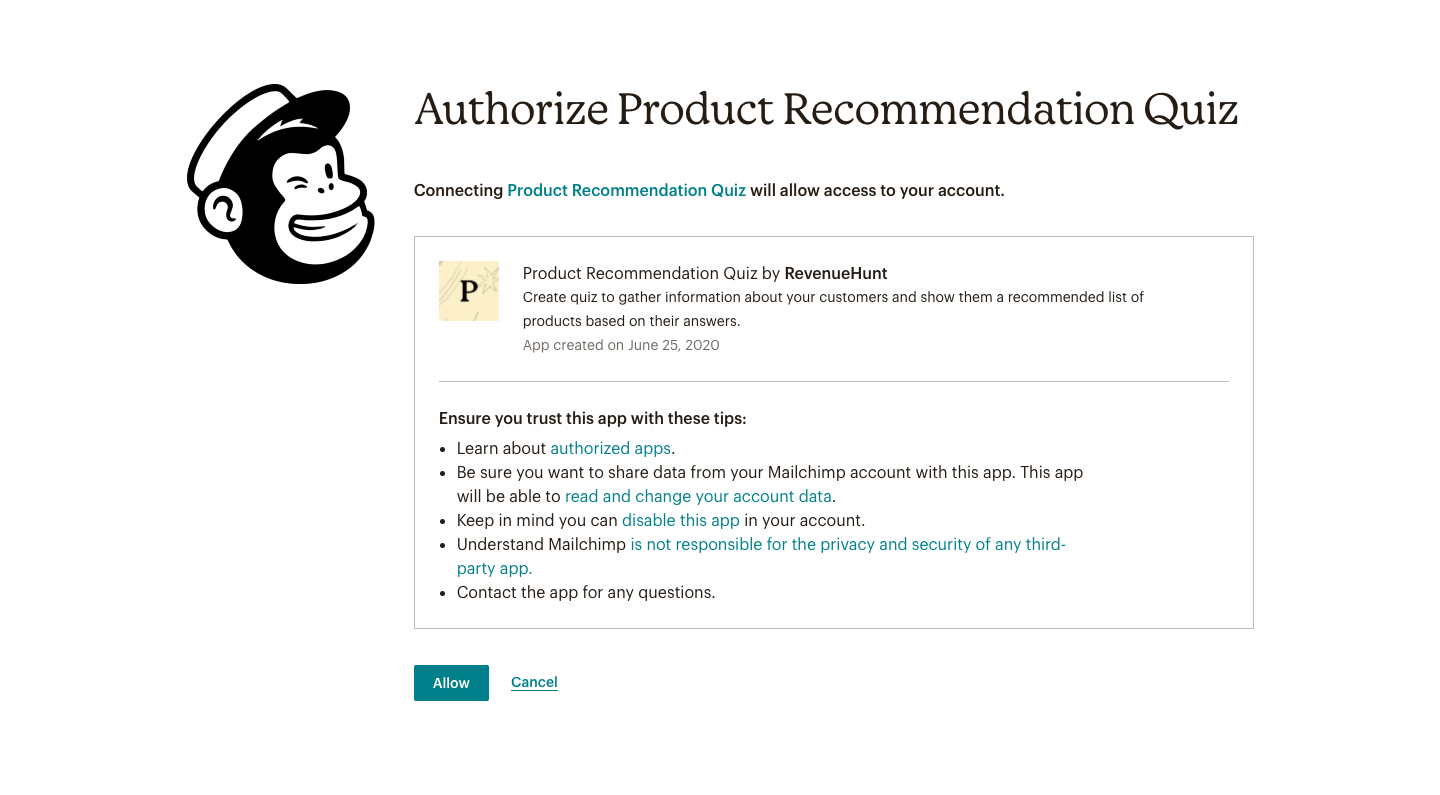
-
If the connection was successful, you'll see a
Mailchimp got connected, please close this windows to go back to the dashboard.message. -
After authorization, your quiz is connected to Mailchimp, and you can proceed to link it to a specific mailing list.
-
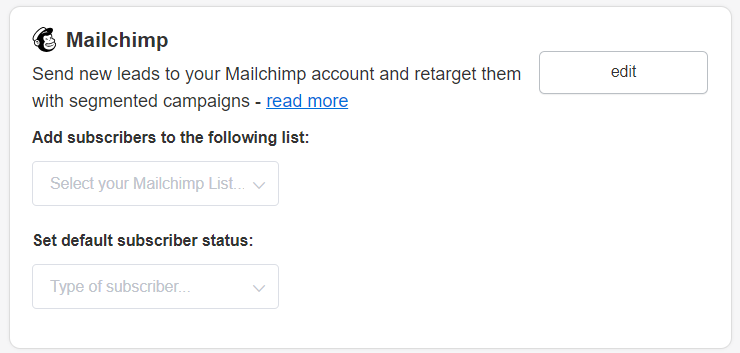
Return to the Connect tab in your quiz platform. You may need to refresh the page to update the connection status.
- Follow the prompts to select the Mailchimp list you wish to send your quiz results to from the dropdown.
Connecting your quiz to Mailchimp allows for the seamless transfer of leads:
- Locate your quiz and click on the Connect tab at the top of the interface.
-
Find the Mailchimp section and click on the
Connectbutton. This action will redirect you to a Mailchimp login page in a new tab. -
Log into your Mailchimp account and authorize the app by clicking on
Allow. -
If the connection was successful, you'll see a
Mailchimp got connected, please close this windows to go back to the dashboard.message. -
After authorization, your quiz is connected to Mailchimp, and you can proceed to link it to a specific mailing list.
-
Return to the Connect tab in your quiz platform. You may need to refresh the page to update the connection status.
- Follow the prompts to select the Mailchimp list you wish to send your quiz results to from the dropdown.
Alternative Ways to Send Quiz Leads to Mailchimp
Sometimes, you would like a bit more control over the data that is sent to Mailchimp. In that case there are a few alternatives you can use to send quiz leads to Mailchimp.
- Using Webhooks: You can use our Webhooks integration to send quiz leads to Mailchimp. Just connect your quiz to Webhooks following this guide. Then, in Webhooks set up a redirection of selected data to Mailchimp.
- Manually adding the quiz leads to Mailchimp: You can manually add the quiz leads to Mailchimp by uploading a CSV file generated from the quiz responses section.
Sometimes, you would like a bit more control over the data that is sent to Mailchimp. In that case there are a few alternatives you can use to send quiz leads to Mailchimp.
- Using Shopify Customers: You can use Shopify Customers to send quiz leads to Mailchimp. Just connect your quiz to Shopify Customers following this guide. Then, use a native Shopify - Mailchimp integration to send the quiz leads to Mailchimp.
- Using Zapier: You can use out native Zapier integration to send quiz leads to Mailchimp. Just connect your quiz to Zapier following this guide. Then, in Zapier set up a redirection of selected data to Mailchimp.
- Using Webhooks: You can use our Webhooks integration to send quiz leads to Mailchimp. Just connect your quiz to Webhooks following this guide. Then, in Webhooks set up a redirection of selected data to Mailchimp.
- Manually adding the quiz leads to Mailchimp: You can manually add the quiz leads to Mailchimp by uploading a CSV file generated from the quiz metrics > responses section.
Sometimes, you would like a bit more control over the data that is sent to Mailchimp. In that case there are a few alternatives you can use to send quiz leads to Mailchimp.
- Using Zapier: You can use out native Zapier integration to send quiz leads to Mailchimp. Just connect your quiz to Zapier following this guide. Then, in Zapier set up a redirection of selected data to Mailchimp.
- Using Webhooks: You can use our Webhooks integration to send quiz leads to Mailchimp. Just connect your quiz to Webhooks following this guide. Then, in Webhooks set up a redirection of selected data to Mailchimp.
- Manually adding the quiz leads to Mailchimp: You can manually add the quiz leads to Mailchimp by uploading a CSV file generated from the quiz metrics > responses section.
Use Customer Tags for Segmentation in Mailchimp
With customer tags, you can segment your audience within Mailchimp based on their quiz responses:
- Make sure the quiz is connected to Mailchimp.
-
Create customer tags in the RevenueHunt app and link them to choices.
-
Once done, click the
Publishbutton to update the preview/live quiz with new changes. - Navigate to the
Audiencesection in your Mailchimp account. - Use the customer tags to create segmented lists or groups, allowing for targeted campaign efforts based on the quiz outcomes.
With customer tags, you can segment your audience within Mailchimp based on their quiz responses:
- Make sure the quiz is connected to Mailchimp.
-
Create customer tags in the RevenueHunt app and link them to choices.

-
Once done, click the
Publishbutton to update the preview/live quiz with new changes. - Navigate to the
Audiencesection in your Mailchimp account. - Use the customer tags to create segmented lists or groups, allowing for targeted campaign efforts based on the quiz outcomes.
With customer tags, you can segment your audience within Mailchimp based on their quiz responses:
- Make sure the quiz is connected to Mailchimp.
-
Create customer tags in the RevenueHunt app and link them to choices.
-
Once done, click the
Publishbutton to update the preview/live quiz with new changes. - Navigate to the
Audiencesection in your Mailchimp account. - Use the customer tags to create segmented lists or groups, allowing for targeted campaign efforts based on the quiz outcomes.
Hack: Send Quiz Answers to MailChimp
To override Mailchimp's limitation on pushing detailed custom quiz data, you can use customer tags to represent customer responses.
-
For each possible quiz answer, create a corresponding customer tag within your quiz setup. This requires planning to ensure each tag accurately represents the quiz responses.
-
Upon completion of the quiz by a participant, Mailchimp will receive all the tags that the customer picked based on their choices.
To override Mailchimp's limitation on pushing detailed quiz data, you can use customer tags to represent customer responses.
-
For each possible quiz answer, create a corresponding customer tag within your quiz setup. This requires planning to ensure each tag accurately represents the quiz responses.
-
Upon completion of the quiz by a participant, Mailchimp will receive all the tags that the customer picked based on their choices.
Set up Post-Quiz Email Flow with Mailchimp
If you want to set up a post-quiz email flow with Mailchimp, you can follow the steps below:
-
Connect Your Quiz to MailChimp. Follow the instructions in the Alternative Ways to Send Quiz Leads to Mailchimp section to send your quiz leads to Mailchimp.
Tip
Remember to take a test quiz/preview the quiz leaving a sample email address in order to send first data to MailChimp and test the connection. You can use your real email with a +test1, +test2 to test different answering routes. For example, youremail+test1@email.com or youremail+test2@email.com.
-
Use Customer Tags for Segmentation. Once your quiz data is redirected to Mailchimp, you should consider what data you want to send to MailChimp from the quiz. You can, for example:
- Create customer tags in your quiz to represent different quiz responses.
- Link these tags to specific answers in your quiz.
-
Upon completion of the quiz by a participant, Mailchimp should receive all the tags that the customer picked based on their choices.
Warning
Make sure you have configured the redirection of these tags to Mailchimp via your workaround.
-
In MailChimp, you can use these tags to segment your audience and tailor your email campaigns.
Warning
Mailchimp API only supports email, name, and customer tags to be send from the quiz. To override Mailchimp’s limitation on pushing detailed quiz data, you can use customer tags to represent customer responses.
-
Design Email Campaigns. Once the quiz answers are covered with customer tags, all the information you need about your customer will start flowing into MailChimp. That’s when you can set up your email campaigns.
- You can start by setting up Automations (automated email flows) to trigger based on specific tags or quiz completions.
- Then, create different email templates in MailChimp that correspond to different quiz outcomes or automation flows.
Example
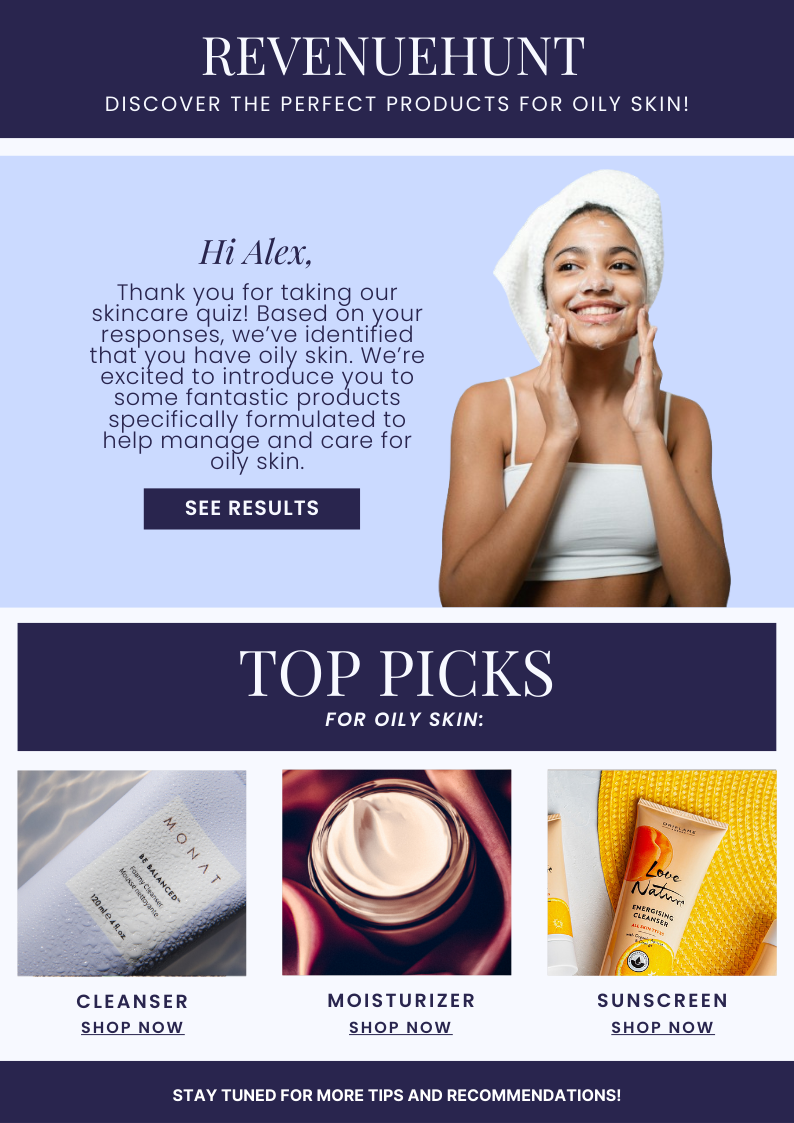
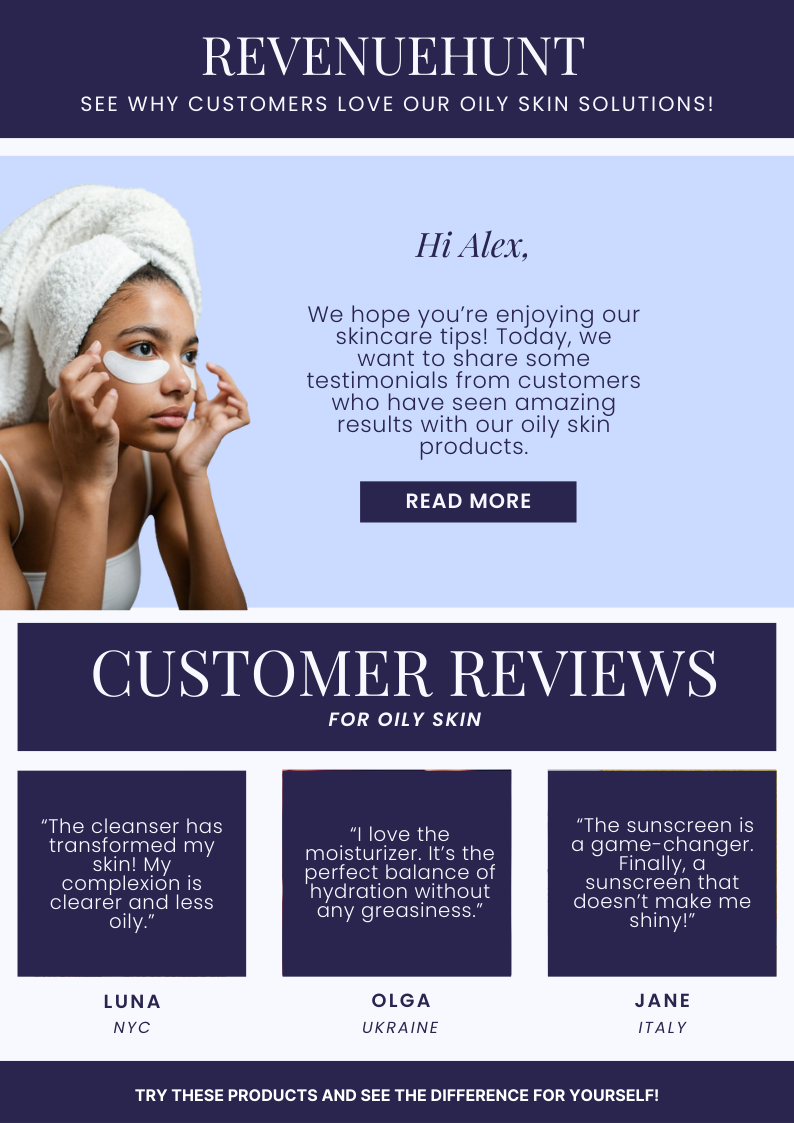
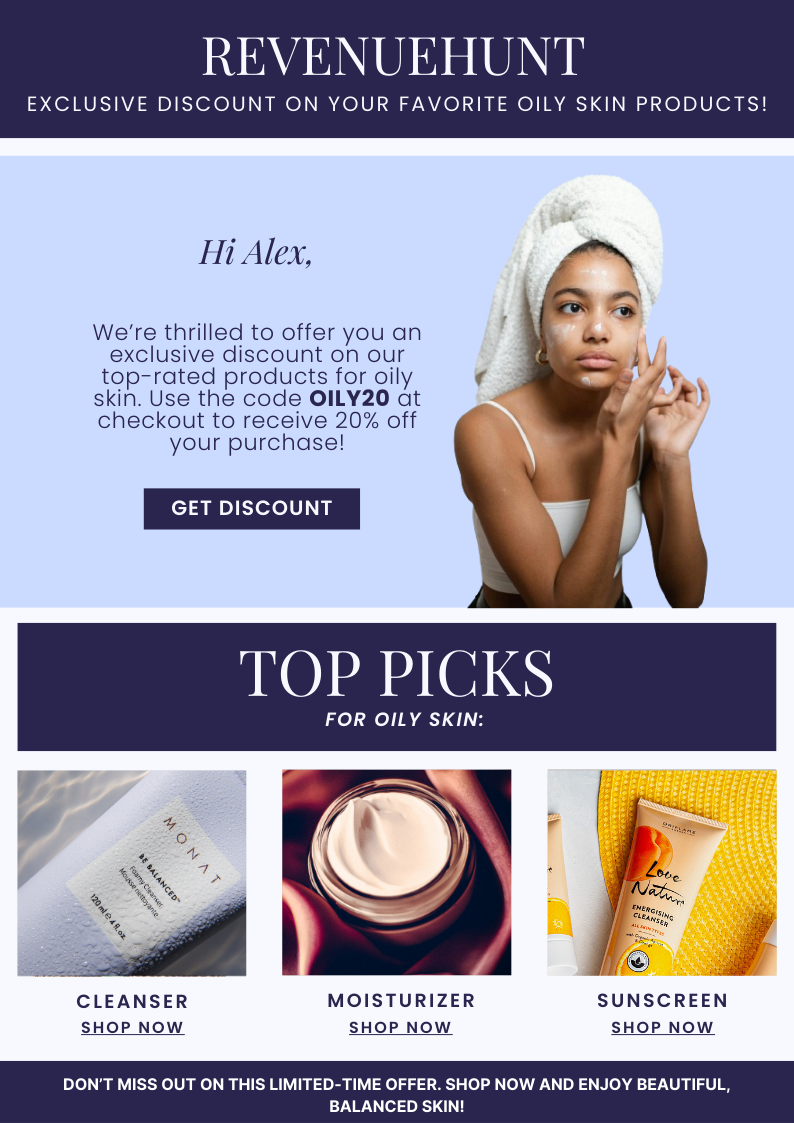
Imagine you run a skincare eCommerce store. Your quiz asks customers about their skin type and concerns. Based on their answers, you tag them as “Oily Skin,” “Dry Skin,” etc.
In MailChimp, you create an email series targeting these tags. For instance:
- Day 1: Introduction to products suitable for oily skin. Check example here.
- Day 3: Customer testimonials and reviews for oily skin products. Check example here.
- Day 7: Special discount on recommended products for oily skin. Check example here.

-
Test and Optimize. After setting up your email campaigns, test them with a test email and optimize them based on the results.
If you want to set up a post-quiz email flow with Mailchimp, you can follow the steps below:
-
Connect Your Quiz to MailChimp. Follow the instructions in the Send Quiz Leads to Mailchimp section.
Tip
Remember to take a test quiz/preview the quiz leaving a sample email address in order to send first data to MailChimp and test the connection. You can use your real email with a +test1, +test2 to test different answering routes. For example, youremail+test1@email.com or youremail+test2@email.com.
-
Use Customer Tags for Segmentation. Once your quiz is connected you should consider what data you want to send to MailChimp from the quiz. You can, for example:
- Create customer tags in your quiz to represent different quiz responses.
- Link these tags to specific answers in your quiz.
- Upon completion of the quiz by a participant, Mailchimp will receive all the tags that the customer picked based on their choices.
- In MailChimp, you can use these tags to segment your audience and tailor your email campaigns.
Warning
Mailchimp API only supports email, name, and customer tags to be send from the quiz. To override Mailchimp’s limitation on pushing detailed quiz data, you can use customer tags to represent customer responses.
-
Design Email Campaigns. Once the quiz answers are covered with customer tags, all the information you need about your customer will start flowing into MailChimp. That’s when you can set up your email campaigns.
- You can start by setting up Automations (automated email flows) to trigger based on specific tags or quiz completions.
- Then, create different email templates in MailChimp that correspond to different quiz outcomes or automation flows.
Example
Imagine you run a skincare eCommerce store. Your quiz asks customers about their skin type and concerns. Based on their answers, you tag them as “Oily Skin,” “Dry Skin,” etc.
In MailChimp, you create an email series targeting these tags. For instance:
- Day 1: Introduction to products suitable for oily skin. Check example here.
- Day 3: Customer testimonials and reviews for oily skin products. Check example here.
- Day 7: Special discount on recommended products for oily skin. Check example here.
-
Test and Optimize. After setting up your email campaigns, test them with a test email and optimize them based on the results.
This article explains how to send leads to Mailchimp from your quiz created in the RevenueHunt app.