How to Send Leads to HubSpot
Connect your quiz to HubSpot and every quiz result is sent to your HubSpot account. You can then segment your contacts on their answers, and write a campaign for each group.
This article explains how to connect your store to HubSpot. It also covers turning the integration on for a quiz, and adding contacts to a HubSpot list.
Before starting, make sure you have:
- Access to your quiz in the RevenueHunt app.
- An active HubSpot account.
Connect your quiz to HubSpot and every quiz result is sent to your HubSpot account. You can then segment your contacts on their answers, and write a campaign for each group.
This article explains how to link your quiz to HubSpot, so you can follow up on every response.
Before starting, make sure you have:
- Access to your quiz in the RevenueHunt app.
- An active HubSpot account.
Connect your quiz to HubSpot and every quiz result is sent to your HubSpot account. You can then segment your contacts on their answers, and write a campaign for each group.
This article explains how to link your quiz to HubSpot, so you can follow up on every response.
Before starting, make sure you have:
- Access to your quiz in the RevenueHunt app.
- An active HubSpot account.
Connect your quiz to HubSpot and every quiz result is sent to your HubSpot account. You can then segment your contacts on their answers, and write a campaign for each group.
This article explains how to link your quiz to HubSpot, so you can follow up on every response.
Before starting, make sure you have:
- Access to your quiz in the RevenueHunt app.
- An active HubSpot account.
Connect your quiz to HubSpot and every quiz result is sent to your HubSpot account. You can then segment your contacts on their answers, and write a campaign for each group.
This article explains how to link your quiz to HubSpot, so you can follow up on every response.
Before starting, make sure you have:
- Access to your quiz in the RevenueHunt app.
- An active HubSpot account.
Connect your quiz to HubSpot and every quiz result is sent to your HubSpot account. You can then segment your contacts on their answers, and write a campaign for each group.
This article explains how to link your quiz to HubSpot, so you can follow up on every response.
Before starting, make sure you have:
- Access to your quiz in the RevenueHunt app.
- An active HubSpot account.
Connect your store to HubSpot
The HubSpot integration uses OAuth to securely connect your store to HubSpot. The connection is made once for the whole store. You then switch it on for each quiz separately.
- Open the RevenueHunt app and open any quiz.
- Go to
Quiz settings > Integrations. - Scroll to
Mailing & CRMsand find the HubSpot card. - Click
Connect.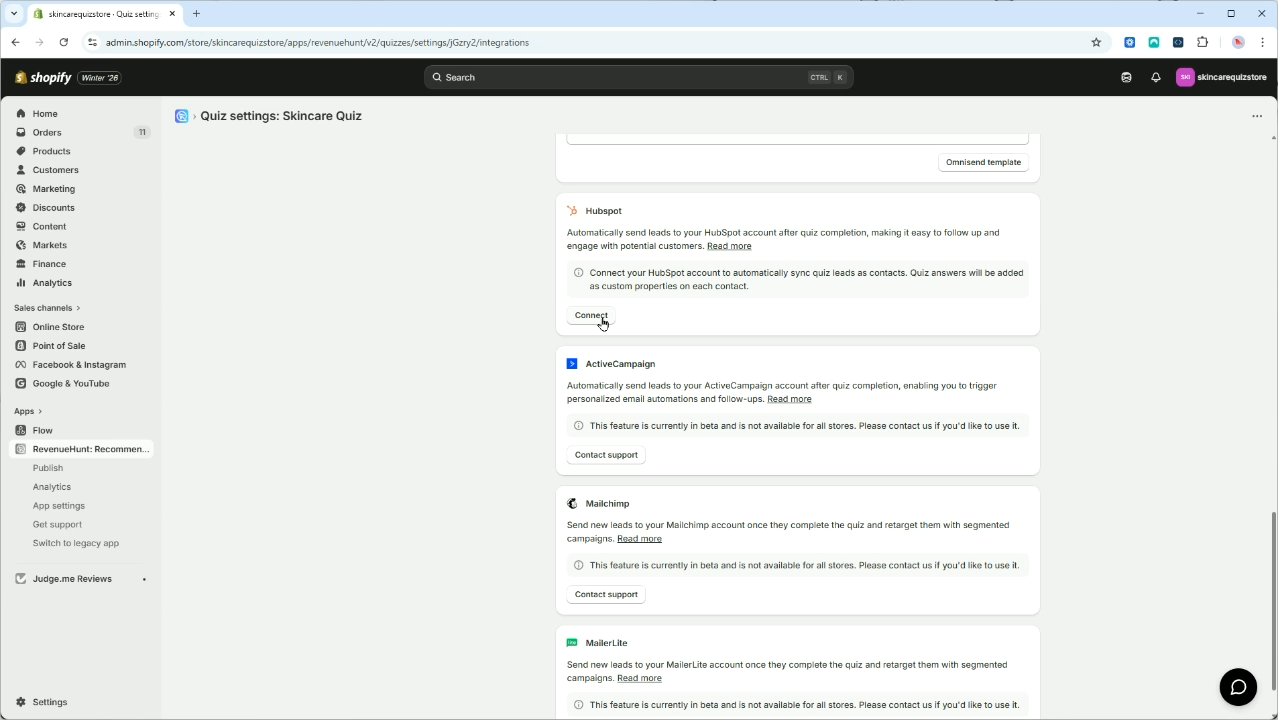
- Log in to HubSpot if prompted. The app sends you to HubSpot's authorization page.
- Select the HubSpot account you want, then click
Choose Account. - Review the permissions, then click
Connect app.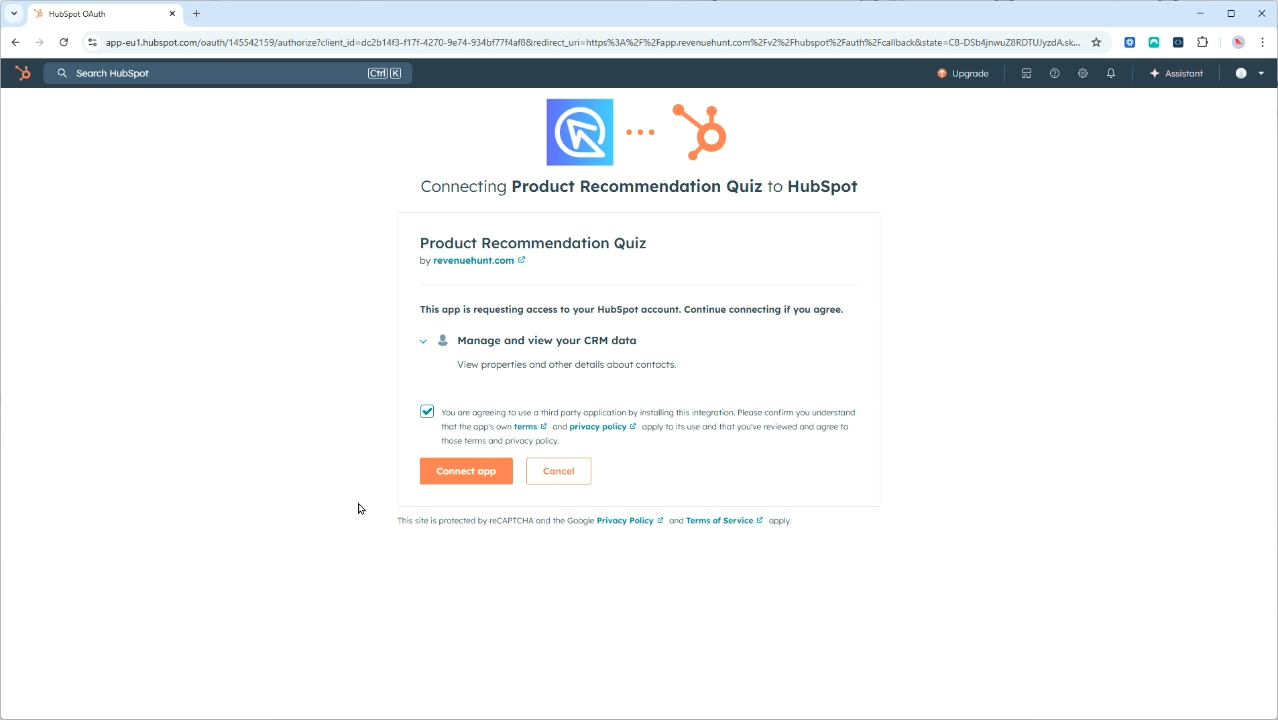
- Check the HubSpot card back in the app. It shows a
Connectedbadge and yourPortal ID.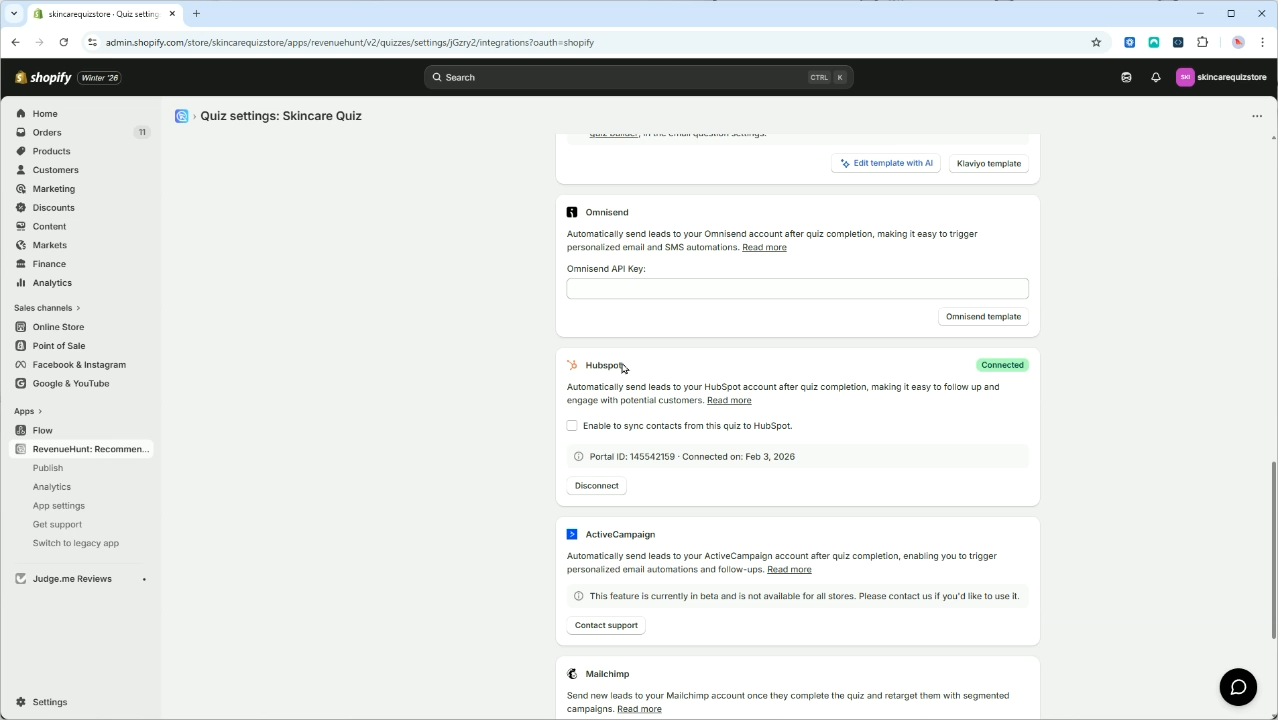
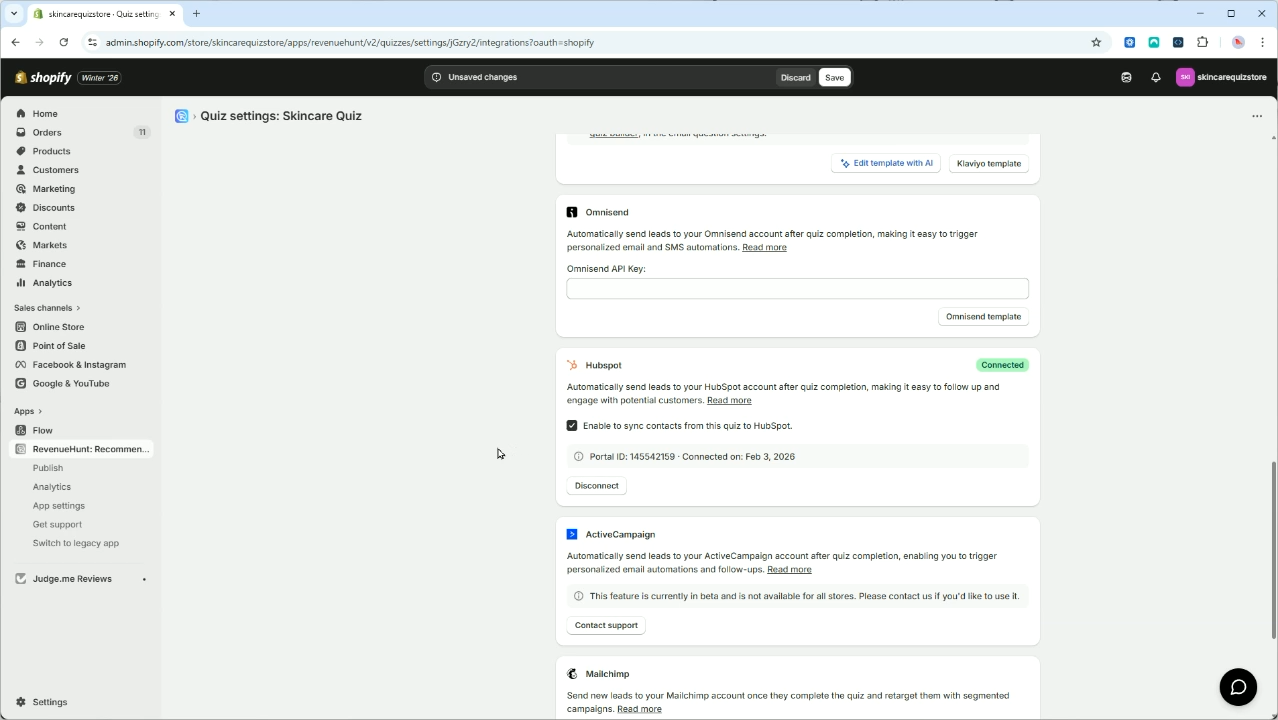
- Turn syncing on for the quizzes you want. It starts switched off everywhere, and the next section covers the checkbox.
Reconnecting
If you connected HubSpot earlier and cannot see the option to select HubSpot lists, reconnect the account. Click Reconnect to grant the additional permissions required for list management.
Another way to connect
You can also connect your quiz to HubSpot from the HubSpot app marketplace. Click Sign in to install and follow the instructions.
- Open the Quiz Builder and go to the
Connecttab at the top of the screen. - Find HubSpot in the integration list and click
Connect. - Authorize the connection in the new browser tab.
-
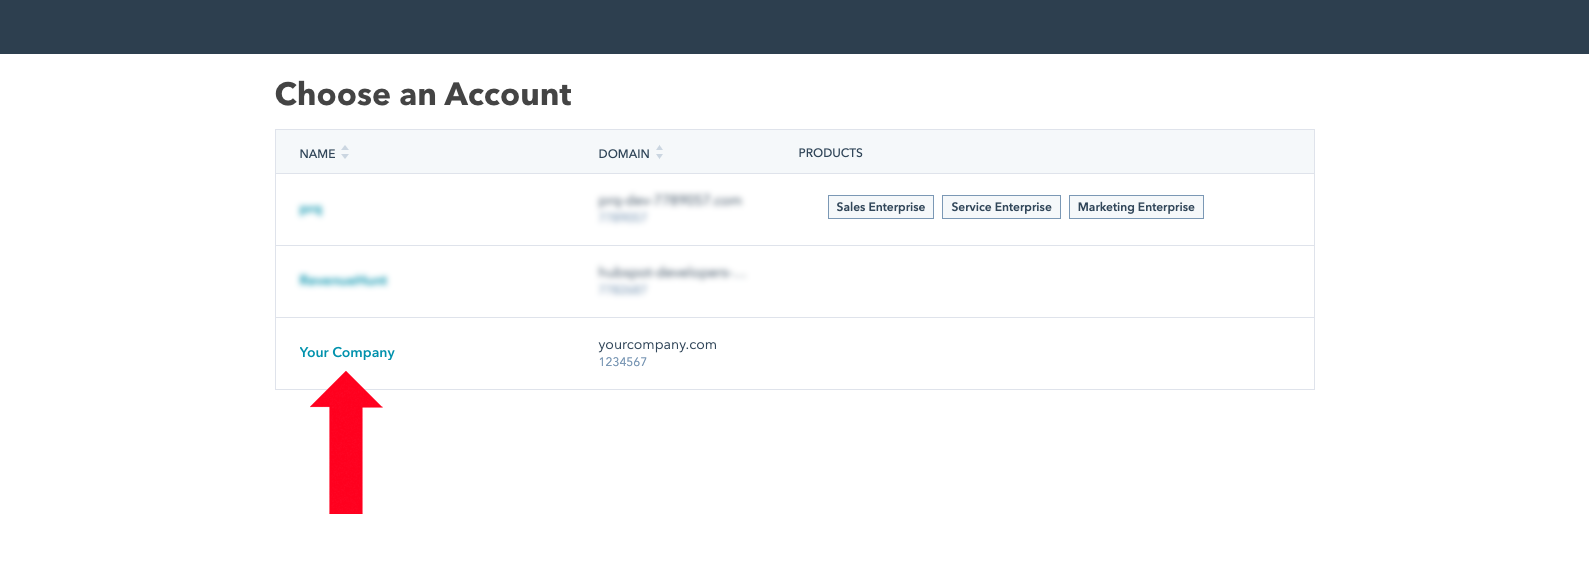
Select your HubSpot account from the list.
-
Check the confirmation page. It shows that the connection was made.
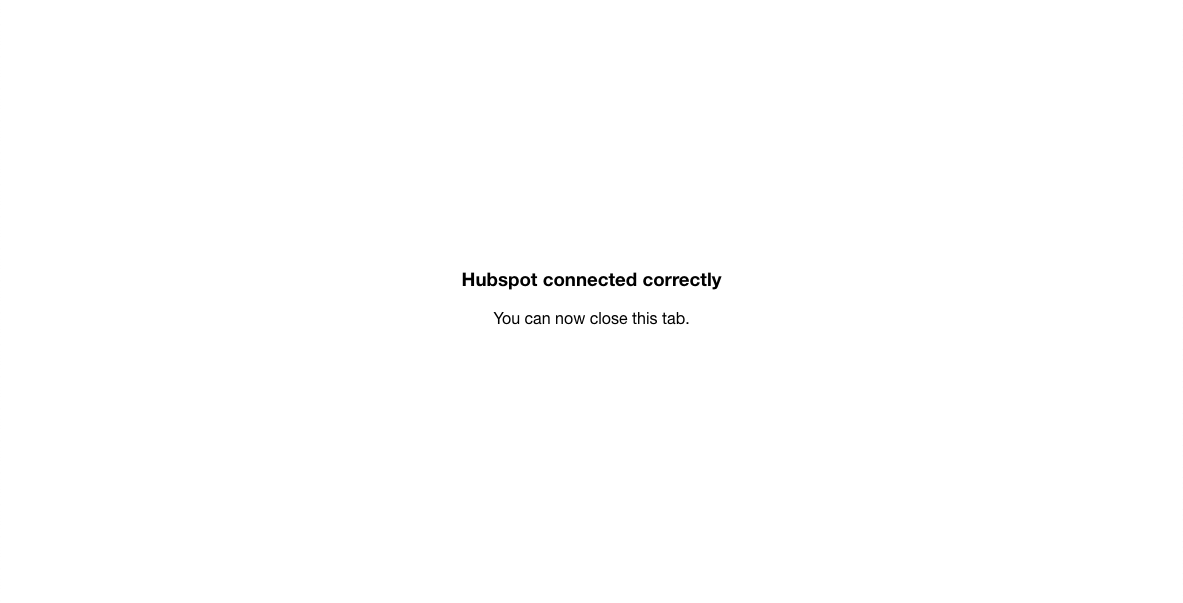
Once connected, the quiz results will automatically flow into your HubSpot account.
- Open the Quiz Builder and go to the
Connecttab at the top of the screen. - Find HubSpot in the integration list and click
Connect. - Authorize the connection in the new browser tab.
-
Select your HubSpot account from the list.
-
Check the confirmation page. It shows that the connection was made.
Once connected, the quiz results will automatically flow into your HubSpot account.
- Open the Quiz Builder and go to the
Connecttab at the top of the screen. - Find HubSpot in the integration list and click
Connect. - Authorize the connection in the new browser tab.
-
Select your HubSpot account from the list.
-
Check the confirmation page. It shows that the connection was made.
Once connected, the quiz results will automatically flow into your HubSpot account.
- Open the Quiz Builder and go to the
Connecttab at the top of the screen. - Find HubSpot in the integration list and click
Connect. - Authorize the connection in the new browser tab.
-
Select your HubSpot account from the list.
-
Check the confirmation page. It shows that the connection was made.
Once connected, the quiz results will automatically flow into your HubSpot account.
- Open the Quiz Builder and go to the
Connecttab at the top of the screen. - Find HubSpot in the integration list and click
Connect. - Authorize the connection in the new browser tab.
-
Select your HubSpot account from the list.
-
Check the confirmation page. It shows that the connection was made.
Once connected, the quiz results will automatically flow into your HubSpot account.
Enable HubSpot for a quiz
After connecting your store to HubSpot, you can enable or disable the integration for each quiz individually.
- Open the quiz you want to configure.
- Go to
Quiz settings > Integrations. - Scroll to the HubSpot card.
- Tick
Enable to sync contacts from this quiz to HubSpot. - Click
Save.
From then on, whenever a customer finishes this quiz and leaves an email address, their contact details and answers are sent to your HubSpot account.
An email question is required
The HubSpot integration requires an email address to create or update a contact. Make sure your quiz includes an email question if you want quiz responses to be sent to HubSpot.
The integration is enabled automatically when you connect your quiz to HubSpot. All quiz responses with an email address will be sent to your HubSpot account.
The integration is enabled automatically when you connect your quiz to HubSpot. All quiz responses with an email address will be sent to your HubSpot account.
The integration is enabled automatically when you connect your quiz to HubSpot. All quiz responses with an email address will be sent to your HubSpot account.
The integration is enabled automatically when you connect your quiz to HubSpot. All quiz responses with an email address will be sent to your HubSpot account.
The integration is enabled automatically when you connect your quiz to HubSpot. All quiz responses with an email address will be sent to your HubSpot account.
Add contacts to a HubSpot list
You can add each customer to a HubSpot list automatically. You set this on the email block in your quiz.
- Open your quiz in the quiz builder.
- Select the
Emailblock in your quiz. - In the
Email input settingspanel, scroll toHubSpot List.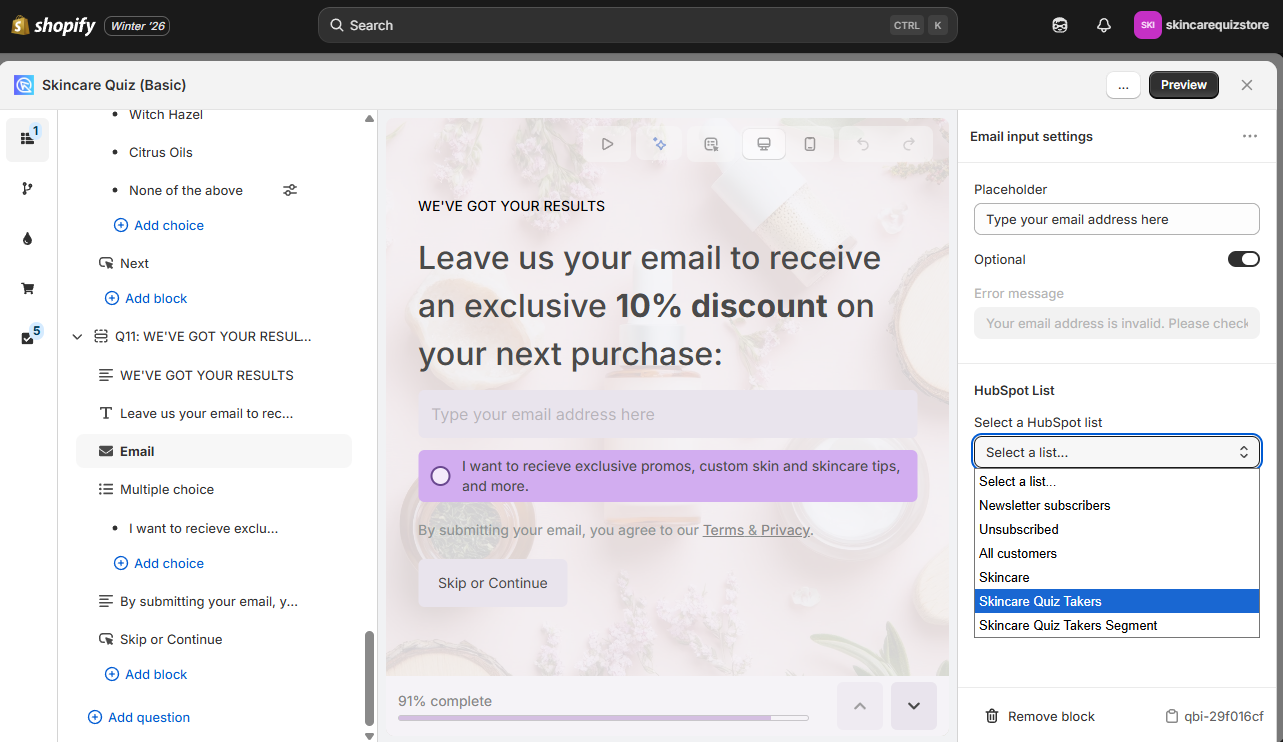
- Open
Select a HubSpot listand pick the list to add the customer to. - Click
Save.
List permissions are separate
If the HubSpot list dropdown is missing, or it shows Reconnect to HubSpot to enable list management, reconnect your HubSpot account. Go to Quiz settings > Integrations and click Reconnect in the HubSpot card to grant the list permissions.
Create the lists in HubSpot first
The dropdown shows only lists that already exist in your HubSpot account. Create your lists in HubSpot before configuring this setting. Check this HubSpot article to learn how to create lists.
Adding contacts to a specific list is not available in this version. You can create segments in HubSpot based on the custom properties sent with quiz responses.
Adding contacts to a specific list is not available in this version. You can create segments in HubSpot based on the custom properties sent with quiz responses.
Adding contacts to a specific list is not available in this version. You can create segments in HubSpot based on the custom properties sent with quiz responses.
Adding contacts to a specific list is not available in this version. You can create segments in HubSpot based on the custom properties sent with quiz responses.
Adding contacts to a specific list is not available in this version. You can create segments in HubSpot based on the custom properties sent with quiz responses.
Alternative ways to send quiz leads to HubSpot
To control exactly which data reaches HubSpot, use one of these methods instead.
- Using Zapier: connect your quiz to Zapier, as described in how to send leads to Zapier. Then, in Zapier, map the fields you want and forward them to HubSpot.
- Uploading a CSV file: export your quiz responses as a CSV file and upload it to HubSpot.
To control exactly which data reaches HubSpot, use one of these methods instead.
- Using Zapier: connect your quiz to Zapier, as described in how to send leads to Zapier. Then, in Zapier, forward the data you want to HubSpot.
- Uploading a CSV file: export your quiz responses as a CSV file and upload it to HubSpot.
To control exactly which data reaches HubSpot, use one of these methods instead.
- Using Zapier: connect your quiz to Zapier, as described in how to send leads to Zapier. Then, in Zapier, forward the data you want to HubSpot.
- Uploading a CSV file: export your quiz responses as a CSV file and upload it to HubSpot.
To control exactly which data reaches HubSpot, use one of these methods instead.
- Using Zapier: connect your quiz to Zapier, as described in how to send leads to Zapier. Then, in Zapier, forward the data you want to HubSpot.
- Uploading a CSV file: export your quiz responses as a CSV file and upload it to HubSpot.
To control exactly which data reaches HubSpot, use one of these methods instead.
- Using Zapier: connect your quiz to Zapier, as described in how to send leads to Zapier. Then, in Zapier, forward the data you want to HubSpot.
- Uploading a CSV file: export your quiz responses as a CSV file and upload it to HubSpot.
To control exactly which data reaches HubSpot, use one of these methods instead.
- Using Zapier: connect your quiz to Zapier, as described in how to send leads to Zapier. Then, in Zapier, forward the data you want to HubSpot.
- Uploading a CSV file: export your quiz responses as a CSV file and upload it to HubSpot.
Quiz data in HubSpot
A customer finishes your quiz and leaves an email address. Their contact details, their answers and their product recommendations are then sent to your HubSpot account.
Viewing contact data
- In HubSpot, go to
Contacts. - Open a contact who finished the quiz, then click
View all properties.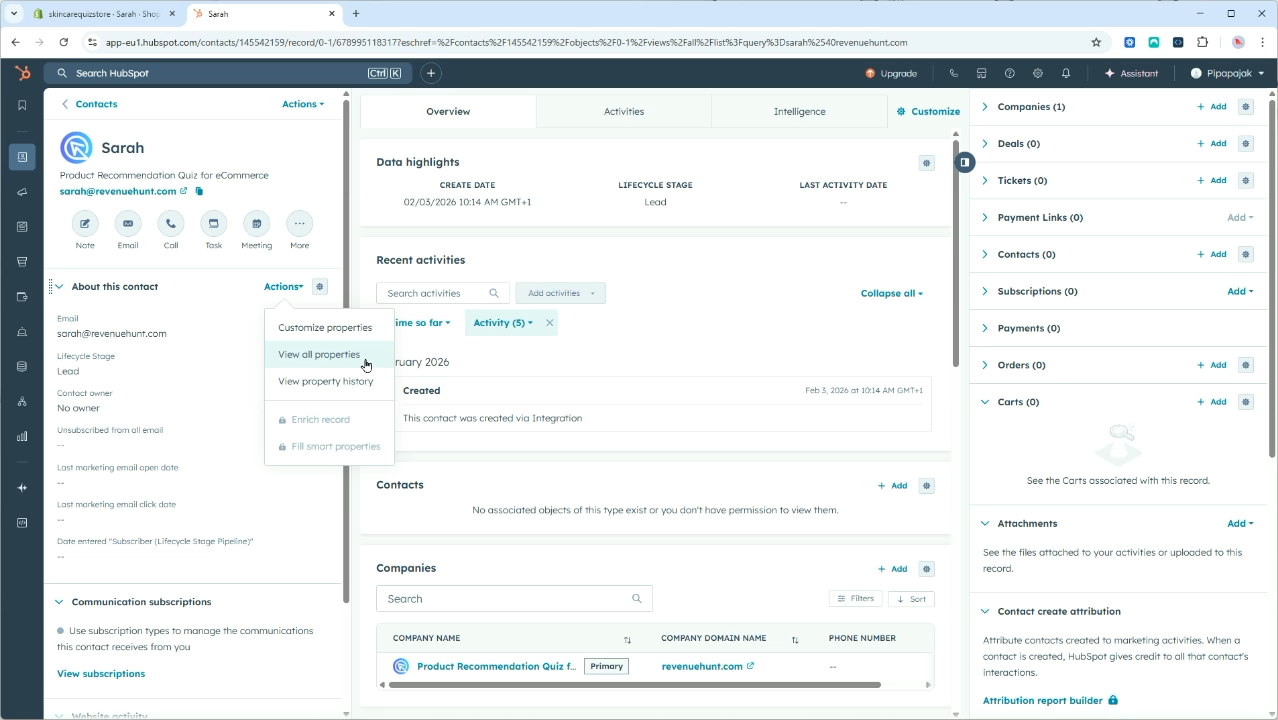
- Find the
Product Recommendation Quizgroup. It holds every field from the quiz, including the answers and the product recommendations.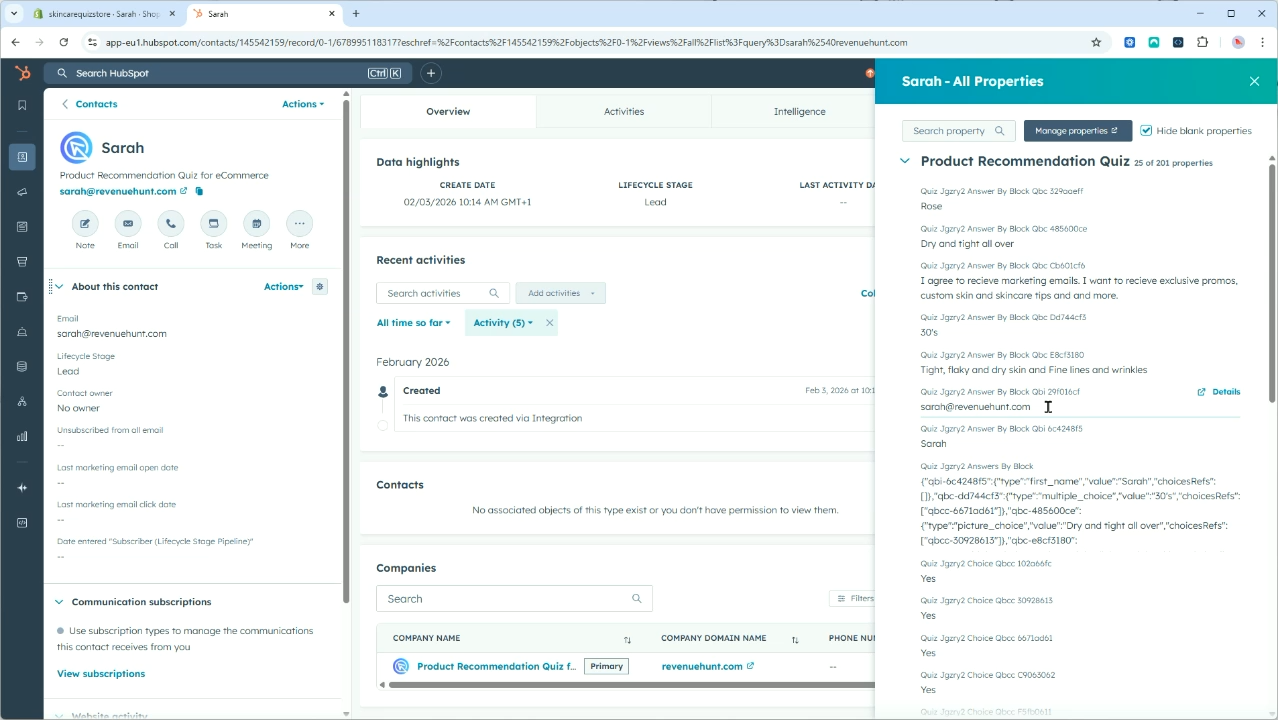
Custom properties
The integration automatically creates custom properties in HubSpot to store quiz data. Each property is named quiz_{quiz_id}_{field_name}. These are the fields the app sends:
| Property | Description |
|---|---|
email |
Contact's email address |
firstname |
Contact's first name (if provided) |
lastname |
Contact's last name (if provided) |
phone |
Contact's phone number (if provided) |
quiz_{id}_response_id |
Unique identifier for this quiz response |
quiz_{id}_quiz_name |
Name of the quiz |
quiz_{id}_result_ref |
Reference to the results page shown |
quiz_{id}_result_page_name |
Name of the results page |
quiz_{id}_created_at |
Timestamp when the quiz was completed |
quiz_{id}_tags |
Tags assigned based on quiz answers |
quiz_{id}_variable_scores |
Variable scores calculated from answers |
quiz_{id}_answer_by_block_{block_ref} |
Answer for each question block |
quiz_{id}_choice_{choice_ref} |
Boolean indicating if a choice was selected |
quiz_{id}_tag_{tag_name} |
Boolean indicating if a tag was assigned |
quiz_{id}_products |
List of recommended product names |
quiz_{id}_products_count |
Number of products recommended |
The properties create themselves
The app creates these properties in HubSpot the first time a response is sent, so you do not have to create them yourself. They will appear under the Product Recommendation Quiz property group.
Whenever a customer finishes your quiz, their contact details, their answers and their product recommendations are sent to your HubSpot account.
- In HubSpot, go to
Contacts. - Open a contact who finished the quiz, then click
View all properties.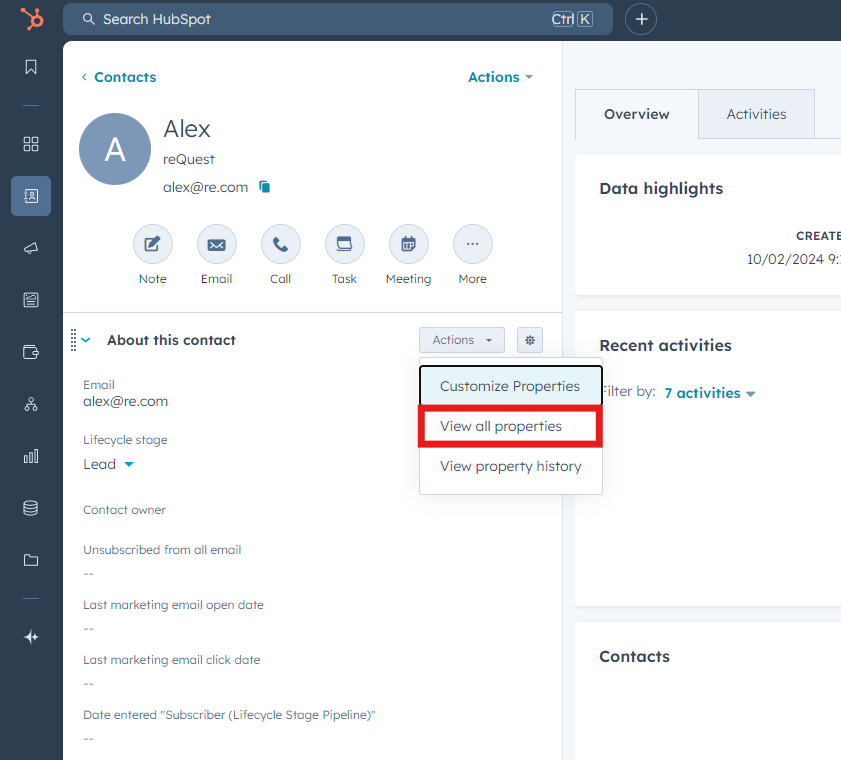
- Find the
Product Recommendation Quizgroup, or a similar name depending on your setup. It holds every field from the quiz, including the answers and the product recommendations.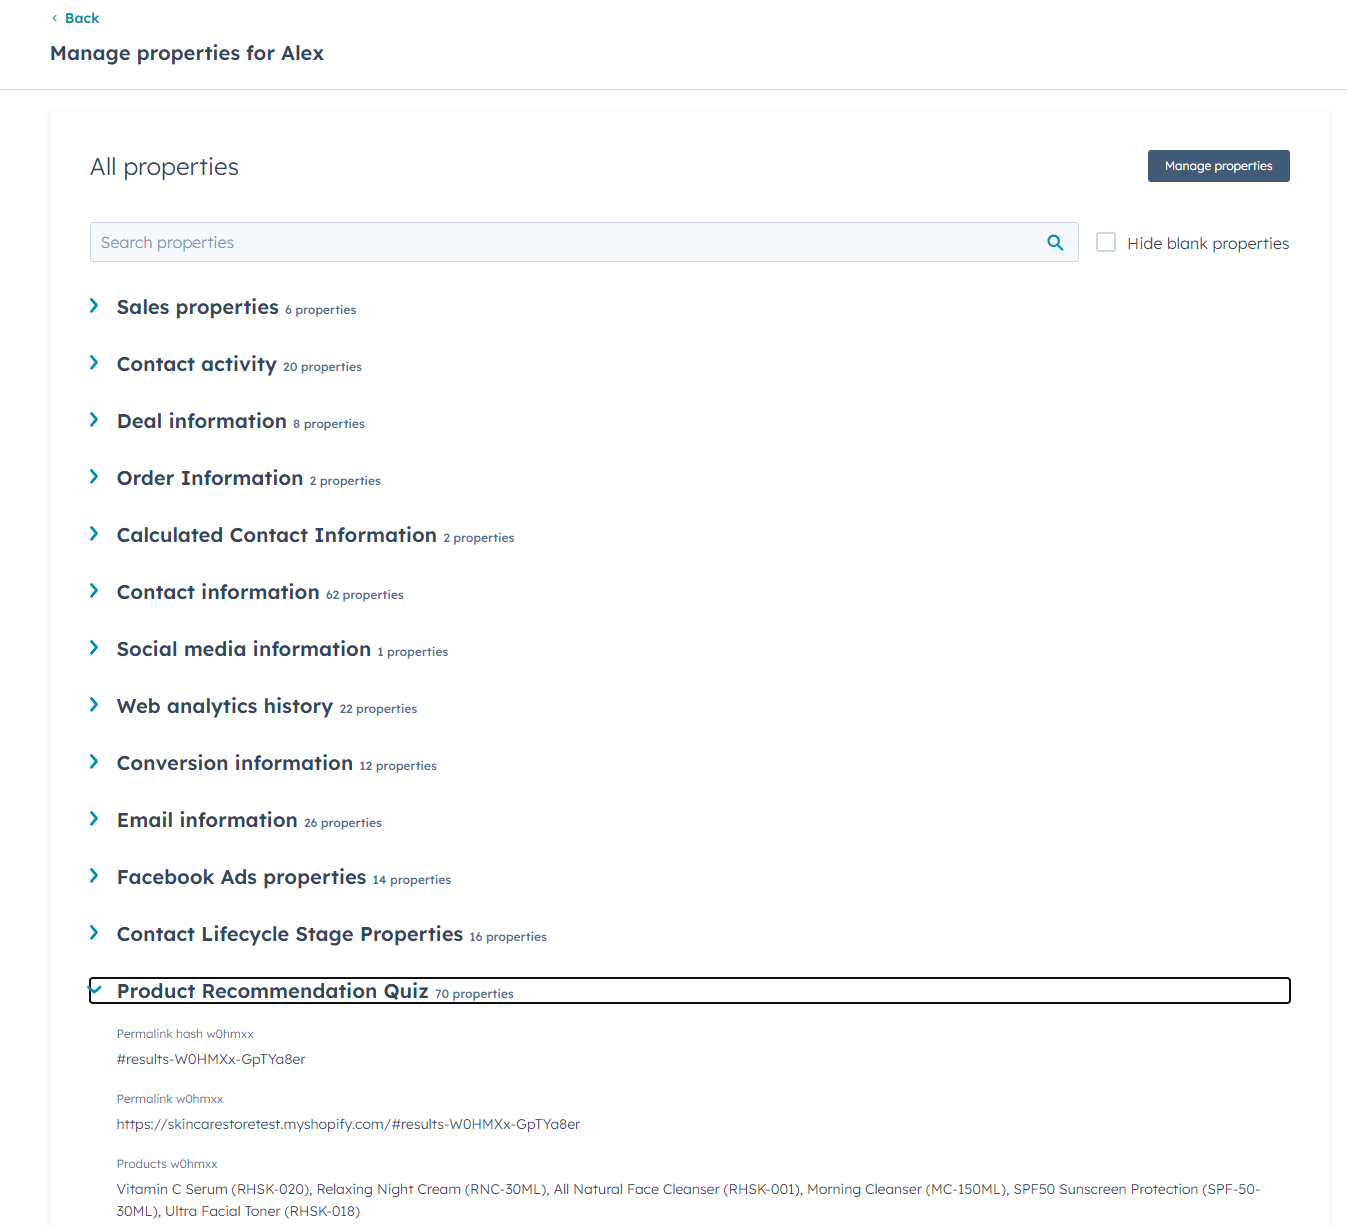
Custom properties
Property names use the quiz Hash ID ([ID]) in lowercase, so a quiz with the ID LVPS1n produces properties like permalink_lvps1n.
Create the properties in HubSpot first
Unlike the Built for Shopify version, the legacy app does not create properties automatically. You need to create each one manually in HubSpot, using the exact internal name listed below, before the data can sync.
| Property (internal name) | Value |
|---|---|
email |
The customer's email address, used as the primary identifier to find or create the contact. |
firstname |
The customer's first name. |
lastname |
The customer's last name. |
phone |
The customer's phone number. |
permalink_[ID] |
URL of the customer's results page. |
permalink_hash_[ID] |
Unique hash of those results. |
tags_[ID] |
Comma-separated string of all tags assigned. |
result_page_name_[ID] |
Name of the results page, for quizzes with multiple results. |
products_[ID] |
Comma-separated list of all recommended product titles. |
q_[ID]_[QUESTION_TITLE] |
The text of the selected answer. |
t_[ID]_[TAG_NAME] |
true for every individual tag assigned. |
slot_[ID]_[SLOT_NAME]_product_[INDEX]_[FIELD] |
The recommended products, one property per field. |
Product [FIELD] values
name, url, price and image_url. [INDEX] starts at 0.
Property names are sanitized
HubSpot has strict property naming rules, so question titles, tag names and slot names are lowercased and underscored when they are turned into internal names.
- A question titled "What is your skin type?" becomes
q_lvps1n_what_is_your_skin_type - A tag named "Skin type: oily" becomes
t_lvps1n_skin_type_oily
Answers to date questions are sent as Unix timestamps in milliseconds, which is the format HubSpot requires for date properties.
Quiz data is not showing up in HubSpot?
If one property in the payload does not exist in your portal, HubSpot rejects the entire sync. When some or all of the quiz data is missing, check that you created every property in the table. Check too that you used the internal name, such as q_lvps1n_what_is_your_skin_type, rather than the label.
Create each property with the matching type:
| Data | HubSpot property type |
|---|---|
Answers (q_...) |
Text, or Date for date questions |
Tags and choices (t_...) |
Single checkbox, or Text |
| Permalinks and product lists | Text |
Whenever a customer finishes your quiz, their contact details, their answers and their product recommendations are sent to your HubSpot account.
- In HubSpot, go to
Contacts. - Open a contact who finished the quiz, then click
View all properties. - Find the
Product Recommendation Quizgroup, or a similar name depending on your setup. It holds every field from the quiz, including the answers and the product recommendations.
Custom properties
Property names use the quiz Hash ID ([ID]) in lowercase, so a quiz with the ID LVPS1n produces properties like permalink_lvps1n.
Create the properties in HubSpot first
Unlike the Built for Shopify version, the legacy app does not create properties automatically. You need to create each one manually in HubSpot, using the exact internal name listed below, before the data can sync.
| Property (internal name) | Value |
|---|---|
email |
The customer's email address, used as the primary identifier to find or create the contact. |
firstname |
The customer's first name. |
lastname |
The customer's last name. |
phone |
The customer's phone number. |
permalink_[ID] |
URL of the customer's results page. |
permalink_hash_[ID] |
Unique hash of those results. |
tags_[ID] |
Comma-separated string of all tags assigned. |
result_page_name_[ID] |
Name of the results page, for quizzes with multiple results. |
products_[ID] |
Comma-separated list of all recommended product titles. |
q_[ID]_[QUESTION_TITLE] |
The text of the selected answer. |
t_[ID]_[TAG_NAME] |
true for every individual tag assigned. |
slot_[ID]_[SLOT_NAME]_product_[INDEX]_[FIELD] |
The recommended products, one property per field. |
Product [FIELD] values
name, url, price and image_url. [INDEX] starts at 0.
Property names are sanitized
HubSpot has strict property naming rules, so question titles, tag names and slot names are lowercased and underscored when they are turned into internal names.
- A question titled "What is your skin type?" becomes
q_lvps1n_what_is_your_skin_type - A tag named "Skin type: oily" becomes
t_lvps1n_skin_type_oily
Answers to date questions are sent as Unix timestamps in milliseconds, which is the format HubSpot requires for date properties.
Quiz data is not showing up in HubSpot?
If one property in the payload does not exist in your portal, HubSpot rejects the entire sync. When some or all of the quiz data is missing, check that you created every property in the table. Check too that you used the internal name, such as q_lvps1n_what_is_your_skin_type, rather than the label.
Create each property with the matching type:
| Data | HubSpot property type |
|---|---|
Answers (q_...) |
Text, or Date for date questions |
Tags and choices (t_...) |
Single checkbox, or Text |
| Permalinks and product lists | Text |
Whenever a customer finishes your quiz, their contact details, their answers and their product recommendations are sent to your HubSpot account.
- In HubSpot, go to
Contacts. - Open a contact who finished the quiz, then click
View all properties. - Find the
Product Recommendation Quizgroup, or a similar name depending on your setup. It holds every field from the quiz, including the answers and the product recommendations.
Custom properties
Property names use the quiz Hash ID ([ID]) in lowercase, so a quiz with the ID LVPS1n produces properties like permalink_lvps1n.
Create the properties in HubSpot first
Unlike the Built for Shopify version, the legacy app does not create properties automatically. You need to create each one manually in HubSpot, using the exact internal name listed below, before the data can sync.
| Property (internal name) | Value |
|---|---|
email |
The customer's email address, used as the primary identifier to find or create the contact. |
firstname |
The customer's first name. |
lastname |
The customer's last name. |
phone |
The customer's phone number. |
permalink_[ID] |
URL of the customer's results page. |
permalink_hash_[ID] |
Unique hash of those results. |
tags_[ID] |
Comma-separated string of all tags assigned. |
result_page_name_[ID] |
Name of the results page, for quizzes with multiple results. |
products_[ID] |
Comma-separated list of all recommended product titles. |
q_[ID]_[QUESTION_TITLE] |
The text of the selected answer. |
t_[ID]_[TAG_NAME] |
true for every individual tag assigned. |
slot_[ID]_[SLOT_NAME]_product_[INDEX]_[FIELD] |
The recommended products, one property per field. |
Product [FIELD] values
name, url, price and image_url. [INDEX] starts at 0.
Property names are sanitized
HubSpot has strict property naming rules, so question titles, tag names and slot names are lowercased and underscored when they are turned into internal names.
- A question titled "What is your skin type?" becomes
q_lvps1n_what_is_your_skin_type - A tag named "Skin type: oily" becomes
t_lvps1n_skin_type_oily
Answers to date questions are sent as Unix timestamps in milliseconds, which is the format HubSpot requires for date properties.
Quiz data is not showing up in HubSpot?
If one property in the payload does not exist in your portal, HubSpot rejects the entire sync. When some or all of the quiz data is missing, check that you created every property in the table. Check too that you used the internal name, such as q_lvps1n_what_is_your_skin_type, rather than the label.
Create each property with the matching type:
| Data | HubSpot property type |
|---|---|
Answers (q_...) |
Text, or Date for date questions |
Tags and choices (t_...) |
Single checkbox, or Text |
| Permalinks and product lists | Text |
Whenever a customer finishes your quiz, their contact details, their answers and their product recommendations are sent to your HubSpot account.
- In HubSpot, go to
Contacts. - Open a contact who finished the quiz, then click
View all properties. - Find the
Product Recommendation Quizgroup, or a similar name depending on your setup. It holds every field from the quiz, including the answers and the product recommendations.
Custom properties
Property names use the quiz Hash ID ([ID]) in lowercase, so a quiz with the ID LVPS1n produces properties like permalink_lvps1n.
Create the properties in HubSpot first
Unlike the Built for Shopify version, the legacy app does not create properties automatically. You need to create each one manually in HubSpot, using the exact internal name listed below, before the data can sync.
| Property (internal name) | Value |
|---|---|
email |
The customer's email address, used as the primary identifier to find or create the contact. |
firstname |
The customer's first name. |
lastname |
The customer's last name. |
phone |
The customer's phone number. |
permalink_[ID] |
URL of the customer's results page. |
permalink_hash_[ID] |
Unique hash of those results. |
tags_[ID] |
Comma-separated string of all tags assigned. |
result_page_name_[ID] |
Name of the results page, for quizzes with multiple results. |
products_[ID] |
Comma-separated list of all recommended product titles. |
q_[ID]_[QUESTION_TITLE] |
The text of the selected answer. |
t_[ID]_[TAG_NAME] |
true for every individual tag assigned. |
slot_[ID]_[SLOT_NAME]_product_[INDEX]_[FIELD] |
The recommended products, one property per field. |
Product [FIELD] values
name, url, price and image_url. [INDEX] starts at 0.
Property names are sanitized
HubSpot has strict property naming rules, so question titles, tag names and slot names are lowercased and underscored when they are turned into internal names.
- A question titled "What is your skin type?" becomes
q_lvps1n_what_is_your_skin_type - A tag named "Skin type: oily" becomes
t_lvps1n_skin_type_oily
Answers to date questions are sent as Unix timestamps in milliseconds, which is the format HubSpot requires for date properties.
Quiz data is not showing up in HubSpot?
If one property in the payload does not exist in your portal, HubSpot rejects the entire sync. When some or all of the quiz data is missing, check that you created every property in the table. Check too that you used the internal name, such as q_lvps1n_what_is_your_skin_type, rather than the label.
Create each property with the matching type:
| Data | HubSpot property type |
|---|---|
Answers (q_...) |
Text, or Date for date questions |
Tags and choices (t_...) |
Single checkbox, or Text |
| Permalinks and product lists | Text |
Whenever a customer finishes your quiz, their contact details, their answers and their product recommendations are sent to your HubSpot account.
- In HubSpot, go to
Contacts. - Open a contact who finished the quiz, then click
View all properties. - Find the
Product Recommendation Quizgroup, or a similar name depending on your setup. It holds every field from the quiz, including the answers and the product recommendations.
Custom properties
Property names use the quiz Hash ID ([ID]) in lowercase, so a quiz with the ID LVPS1n produces properties like permalink_lvps1n.
Create the properties in HubSpot first
Unlike the Built for Shopify version, the legacy app does not create properties automatically. You need to create each one manually in HubSpot, using the exact internal name listed below, before the data can sync.
| Property (internal name) | Value |
|---|---|
email |
The customer's email address, used as the primary identifier to find or create the contact. |
firstname |
The customer's first name. |
lastname |
The customer's last name. |
phone |
The customer's phone number. |
permalink_[ID] |
URL of the customer's results page. |
permalink_hash_[ID] |
Unique hash of those results. |
tags_[ID] |
Comma-separated string of all tags assigned. |
result_page_name_[ID] |
Name of the results page, for quizzes with multiple results. |
products_[ID] |
Comma-separated list of all recommended product titles. |
q_[ID]_[QUESTION_TITLE] |
The text of the selected answer. |
t_[ID]_[TAG_NAME] |
true for every individual tag assigned. |
slot_[ID]_[SLOT_NAME]_product_[INDEX]_[FIELD] |
The recommended products, one property per field. |
Product [FIELD] values
name, url, price and image_url. [INDEX] starts at 0.
Property names are sanitized
HubSpot has strict property naming rules, so question titles, tag names and slot names are lowercased and underscored when they are turned into internal names.
- A question titled "What is your skin type?" becomes
q_lvps1n_what_is_your_skin_type - A tag named "Skin type: oily" becomes
t_lvps1n_skin_type_oily
Answers to date questions are sent as Unix timestamps in milliseconds, which is the format HubSpot requires for date properties.
Quiz data is not showing up in HubSpot?
If one property in the payload does not exist in your portal, HubSpot rejects the entire sync. When some or all of the quiz data is missing, check that you created every property in the table. Check too that you used the internal name, such as q_lvps1n_what_is_your_skin_type, rather than the label.
Create each property with the matching type:
| Data | HubSpot property type |
|---|---|
Answers (q_...) |
Text, or Date for date questions |
Tags and choices (t_...) |
Single checkbox, or Text |
| Permalinks and product lists | Text |
Sending follow-up emails with HubSpot
Info
The app sends the quiz data to HubSpot. You build the flows and the email templates in HubSpot, so ask HubSpot support about that part of the setup.
- Set up an email campaign in HubSpot. Your quiz has to be sending data there first.
-
Create a list holding only the customers who finished the quiz. Build it from the custom properties the quiz sends. You can then write a separate campaign for each set of answers.
Tip
Check this HubSpot article to learn how to create lists.
A list that holds every quiz finisher
Create a list where
quiz_{your_quiz_id}_response_idisknown. It holds every contact who finished your quiz. -
Use that list as the trigger for your campaign. Only those customers then get the email.
- Set up your campaign and email flow.
- Personalize the email with the
Personalization Tokenfeature. Using custom quiz properties in email templates covers how. - Turn the campaign on. HubSpot then sends the email to everyone in the list.
Info
The app sends the quiz data to HubSpot. You build the flows and the email templates in HubSpot, so ask HubSpot support about that part of the setup.
- Set up an email campaign in HubSpot. Your quiz has to be connected first.
-
Create a list holding only the customers who finished the quiz. Build it from the custom properties the quiz sends. You can then write a separate campaign for each set of answers.
Tip
Check this HubSpot article to learn how to create lists.
-
Use that list as the trigger for your campaign. Only those customers then get the email.
- Set up your campaign and email flow.
- Personalize the email with the
Personalization Tokenfeature. Using custom quiz properties in email templates covers how. - Turn the campaign on. HubSpot then sends the email to everyone in the list.
Info
The app sends the quiz data to HubSpot. You build the flows and the email templates in HubSpot, so ask HubSpot support about that part of the setup.
- Set up an email campaign in HubSpot. Your quiz has to be connected first.
-
Create a list holding only the customers who finished the quiz. Build it from the custom properties the quiz sends. You can then write a separate campaign for each set of answers.
Tip
Check this HubSpot article to learn how to create lists.
-
Use that list as the trigger for your campaign. Only those customers then get the email.
- Set up your campaign and email flow.
- Personalize the email with the
Personalization Tokenfeature. Using custom quiz properties in email templates covers how. - Turn the campaign on. HubSpot then sends the email to everyone in the list.
Info
The app sends the quiz data to HubSpot. You build the flows and the email templates in HubSpot, so ask HubSpot support about that part of the setup.
- Set up an email campaign in HubSpot. Your quiz has to be connected first.
-
Create a list holding only the customers who finished the quiz. Build it from the custom properties the quiz sends. You can then write a separate campaign for each set of answers.
Tip
Check this HubSpot article to learn how to create lists.
-
Use that list as the trigger for your campaign. Only those customers then get the email.
- Set up your campaign and email flow.
- Personalize the email with the
Personalization Tokenfeature. Using custom quiz properties in email templates covers how. - Turn the campaign on. HubSpot then sends the email to everyone in the list.
Info
The app sends the quiz data to HubSpot. You build the flows and the email templates in HubSpot, so ask HubSpot support about that part of the setup.
- Set up an email campaign in HubSpot. Your quiz has to be connected first.
-
Create a list holding only the customers who finished the quiz. Build it from the custom properties the quiz sends. You can then write a separate campaign for each set of answers.
Tip
Check this HubSpot article to learn how to create lists.
-
Use that list as the trigger for your campaign. Only those customers then get the email.
- Set up your campaign and email flow.
- Personalize the email with the
Personalization Tokenfeature. Using custom quiz properties in email templates covers how. - Turn the campaign on. HubSpot then sends the email to everyone in the list.
Info
The app sends the quiz data to HubSpot. You build the flows and the email templates in HubSpot, so ask HubSpot support about that part of the setup.
- Set up an email campaign in HubSpot. Your quiz has to be connected first.
-
Create a list holding only the customers who finished the quiz. Build it from the custom properties the quiz sends. You can then write a separate campaign for each set of answers.
Tip
Check this HubSpot article to learn how to create lists.
-
Use that list as the trigger for your campaign. Only those customers then get the email.
- Set up your campaign and email flow.
- Personalize the email with the
Personalization Tokenfeature. Using custom quiz properties in email templates covers how. - Turn the campaign on. HubSpot then sends the email to everyone in the list.
Using custom quiz properties in email templates
To personalize a follow-up email with quiz data, pull the custom properties into the email template.
- In HubSpot, go to
Marketing > Email > Create email.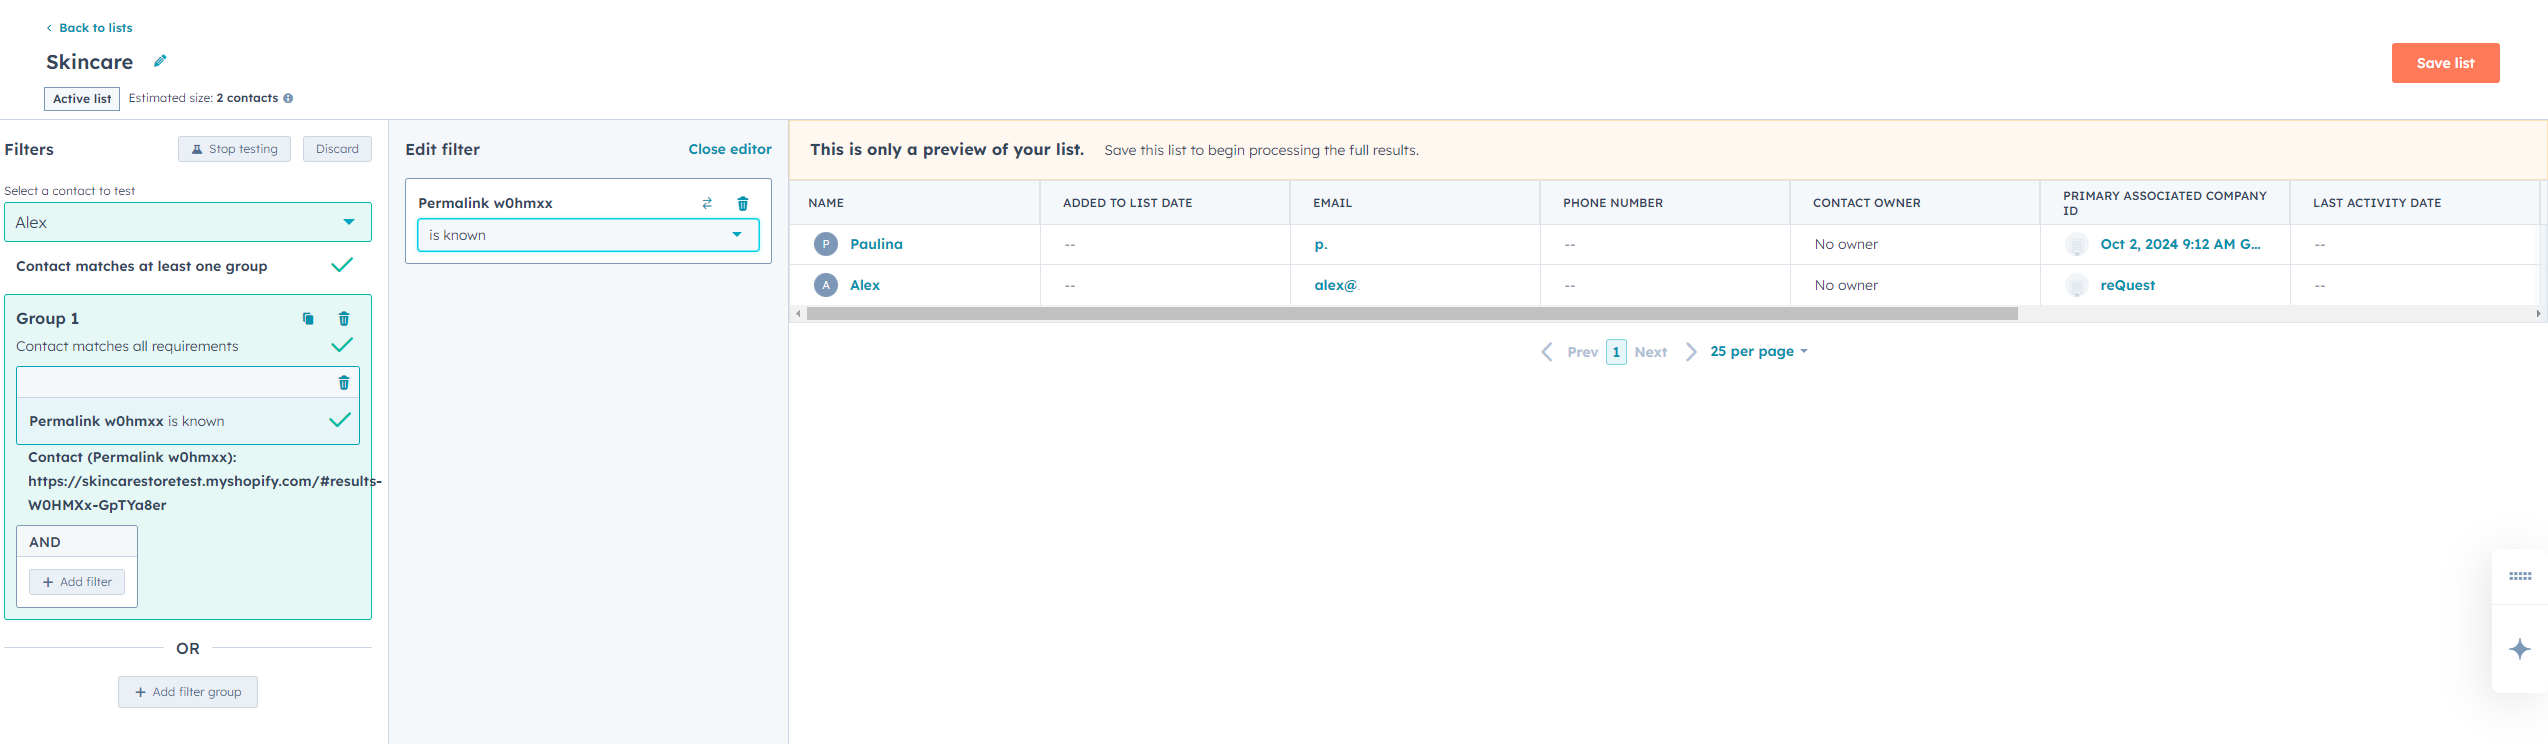
- In the email editor, open the
Personalization Tokenfeature. - Click
Insert, then selectPersonalization Token.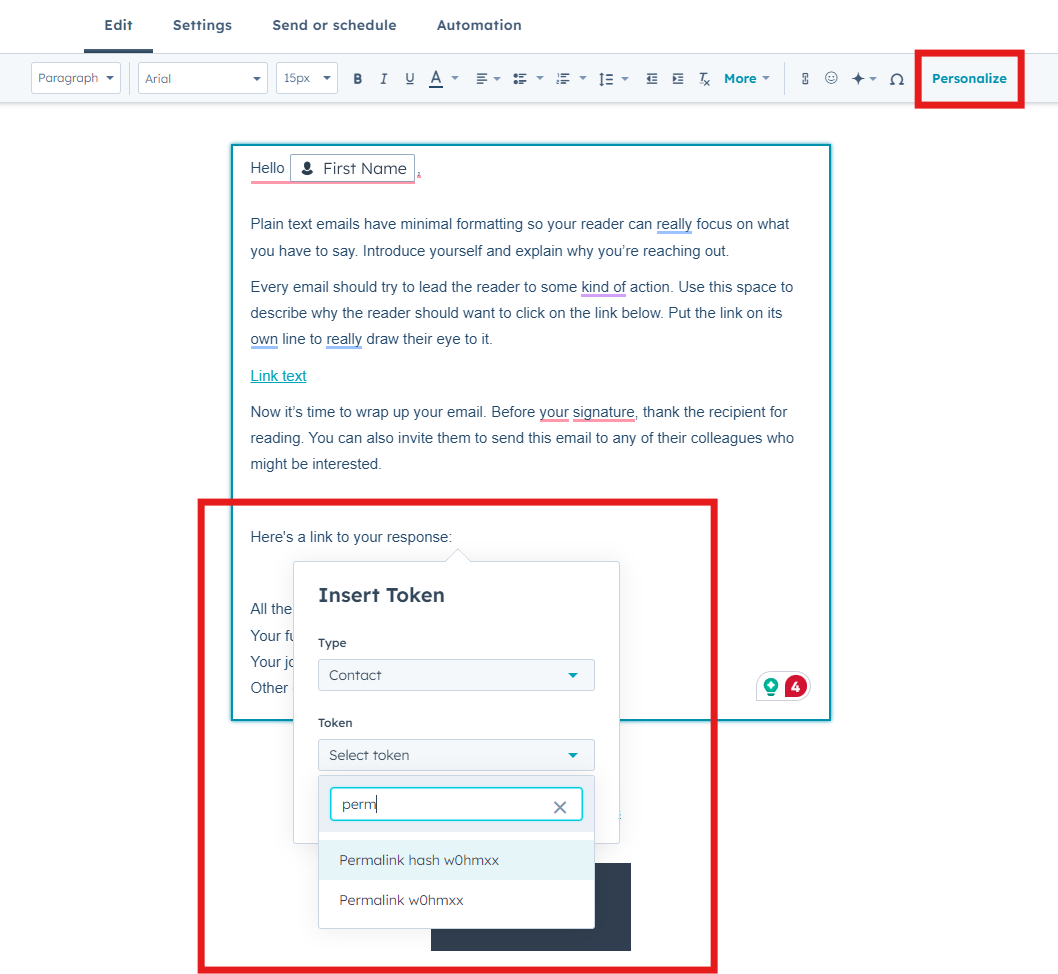
-
Choose the custom quiz properties your quiz captured. HubSpot replaces each token with that contact's own data when the email is sent.
Properties worth using
quiz_{id}_quiz_name- Display the quiz namequiz_{id}_products- Show recommended productsquiz_{id}_result_page_name- Show which result they gotquiz_{id}_tags- Display assigned tagsquiz_{id}_answer_by_block_{ref}- Show specific question answers
-
Click
Previewand check that the properties appear correctly.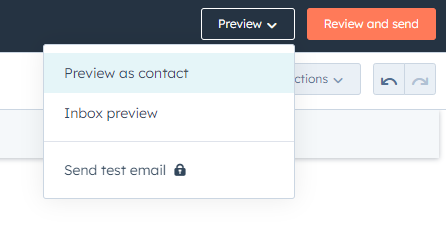
Info
HubSpot handles text from the quiz. It cannot embed images in an email template as a custom property, so plan your quiz content around that limit.
To personalize a follow-up email with quiz data, pull the custom properties into the email template.
- In HubSpot, go to
Marketing > Email > Create email. - In the email editor, open the
Personalization Tokenfeature. - Click
Insert, then selectPersonalization Token. - Choose the custom quiz properties your quiz captured. HubSpot replaces each token with that contact's own data when the email is sent.
-
Click
Previewand check that the properties appear correctly.
Info
HubSpot handles text from the quiz. It cannot embed images in an email template as a custom property, so plan your quiz content around that limit.
To personalize a follow-up email with quiz data, pull the custom properties into the email template.
- In HubSpot, go to
Marketing > Email > Create email. - In the email editor, open the
Personalization Tokenfeature. - Click
Insert, then selectPersonalization Token. - Choose the custom quiz properties your quiz captured. HubSpot replaces each token with that contact's own data when the email is sent.
-
Click
Previewand check that the properties appear correctly.
Info
HubSpot handles text from the quiz. It cannot embed images in an email template as a custom property, so plan your quiz content around that limit.
To personalize a follow-up email with quiz data, pull the custom properties into the email template.
- In HubSpot, go to
Marketing > Email > Create email. - In the email editor, open the
Personalization Tokenfeature. - Click
Insert, then selectPersonalization Token. - Choose the custom quiz properties your quiz captured. HubSpot replaces each token with that contact's own data when the email is sent.
-
Click
Previewand check that the properties appear correctly.
Info
HubSpot handles text from the quiz. It cannot embed images in an email template as a custom property, so plan your quiz content around that limit.
To personalize a follow-up email with quiz data, pull the custom properties into the email template.
- In HubSpot, go to
Marketing > Email > Create email. - In the email editor, open the
Personalization Tokenfeature. - Click
Insert, then selectPersonalization Token. - Choose the custom quiz properties your quiz captured. HubSpot replaces each token with that contact's own data when the email is sent.
-
Click
Previewand check that the properties appear correctly.
Info
HubSpot handles text from the quiz. It cannot embed images in an email template as a custom property, so plan your quiz content around that limit.
To personalize a follow-up email with quiz data, pull the custom properties into the email template.
- In HubSpot, go to
Marketing > Email > Create email. - In the email editor, open the
Personalization Tokenfeature. - Click
Insert, then selectPersonalization Token. - Choose the custom quiz properties your quiz captured. HubSpot replaces each token with that contact's own data when the email is sent.
-
Click
Previewand check that the properties appear correctly.
Info
HubSpot handles text from the quiz. It cannot embed images in an email template as a custom property, so plan your quiz content around that limit.
Disconnect HubSpot
If you need to disconnect your store from HubSpot:
- Open the RevenueHunt app and open any quiz.
- Go to
Quiz settings > Integrations. - Scroll to the HubSpot card.
- Click
Disconnect. - Confirm when prompted.
Warning
Disconnecting HubSpot will stop sending quiz responses to your HubSpot account for all quizzes. Existing contacts and data in HubSpot will not be affected.
To disconnect HubSpot, open the Quiz Builder and go to the Connect tab. Click Disconnect next to the HubSpot integration.
To disconnect HubSpot, open the Quiz Builder and go to the Connect tab. Click Disconnect next to the HubSpot integration.
To disconnect HubSpot, open the Quiz Builder and go to the Connect tab. Click Disconnect next to the HubSpot integration.
To disconnect HubSpot, open the Quiz Builder and go to the Connect tab. Click Disconnect next to the HubSpot integration.
To disconnect HubSpot, open the Quiz Builder and go to the Connect tab. Click Disconnect next to the HubSpot integration.
This article explains how to send quiz leads to HubSpot, and how to set up a follow-up email there.