How to Send Leads to Omnisend
Connect your quiz to Omnisend and every quiz result is sent to your mailing list. You can then segment those contacts on their answers, and follow up with a campaign for each group.
This article explains how to connect your quiz to Omnisend, build a segment from the customers who finished it, and send them their quiz results.
Connect your quiz to Omnisend and every quiz result is sent to your mailing list. You can then segment those contacts on their answers, and follow up with a campaign for each group.
This article explains how to connect your quiz to Omnisend, build a segment from the customers who finished it, and email them their quiz results.
Connect your quiz to Omnisend and every quiz result is sent to your mailing list. You can then segment those contacts on their answers, and follow up with a campaign for each group.
This article explains how to connect your quiz to Omnisend, build a segment from the customers who finished it, and send them their quiz results.
Connect your quiz to Omnisend and every quiz result is sent to your mailing list. You can then segment those contacts on their answers, and follow up with a campaign for each group.
This article explains how to connect your quiz to Omnisend, build a segment from the customers who finished it, and send them their quiz results.
Connect your quiz to Omnisend and every quiz result is sent to your mailing list. You can then segment those contacts on their answers, and follow up with a campaign for each group.
This article explains how to connect your quiz to Omnisend, build a segment from the customers who finished it, and send them their quiz results.
Connect your quiz to Omnisend and every quiz result is sent to your mailing list. You can then segment those contacts on their answers, and follow up with a campaign for each group.
This article explains how to connect your quiz to Omnisend, build a segment from the customers who finished it, and send them their quiz results.
Link quiz to Omnisend
- Add an email question: your quiz needs an email question before it can send anything to Omnisend. Add one from the
+ Add Questionmenu, or insert an email block into an existing question. -
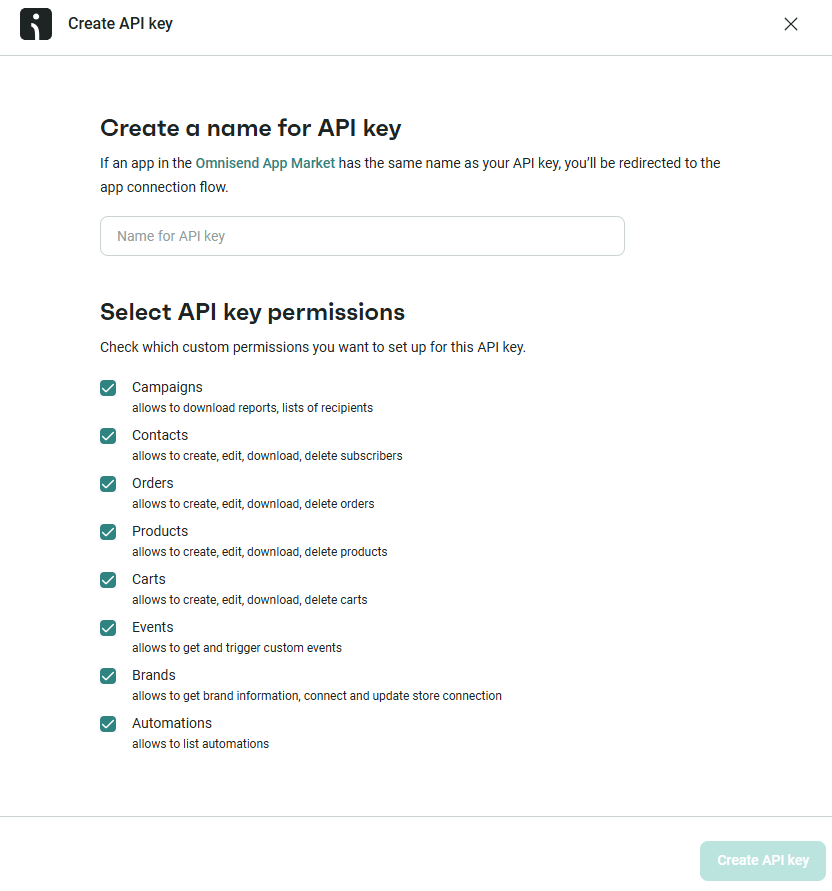
Generate an Omnisend API Key: generate a new API key in Omnisend.
- Log in to your Omnisend account.
- Go to
Store Settings > APIand create a new API key. - Name the key for example
RevenueHunt API Keyand grant all permissions. - Copy the generated API key.
-
Connect to Omnisend: open the Quiz builder, go to
Quiz settings > Integrationsand find the Omnisend card. Paste yourOmnisend API Keyinto the field, then clickSave. -
Preview your quiz: preview it all the way to the results page, to send the first contact. Use a sample email such as
alexa@example.com, and give sample answers so the properties arrive in Omnisend. -
Check your profile: Go back to the Omnisend platform and navigate to the
Dashboard > Audience > Contacts. Check if the sample profile (for exampleAlexa RevenueHunt / alexa@example.com) has been added. Click on the profile to view all custom properties from the quiz, including:- Quiz answers
- Recommended products
- Quiz name
- Product links, names, and images.
From now on, whenever a customer finishes your quiz, their contact details, answers and product recommendations are sent to your Omnisend account.
The app sends every answer, every recommended product and the contact details to the customer's Omnisend profile, where they appear as custom properties.
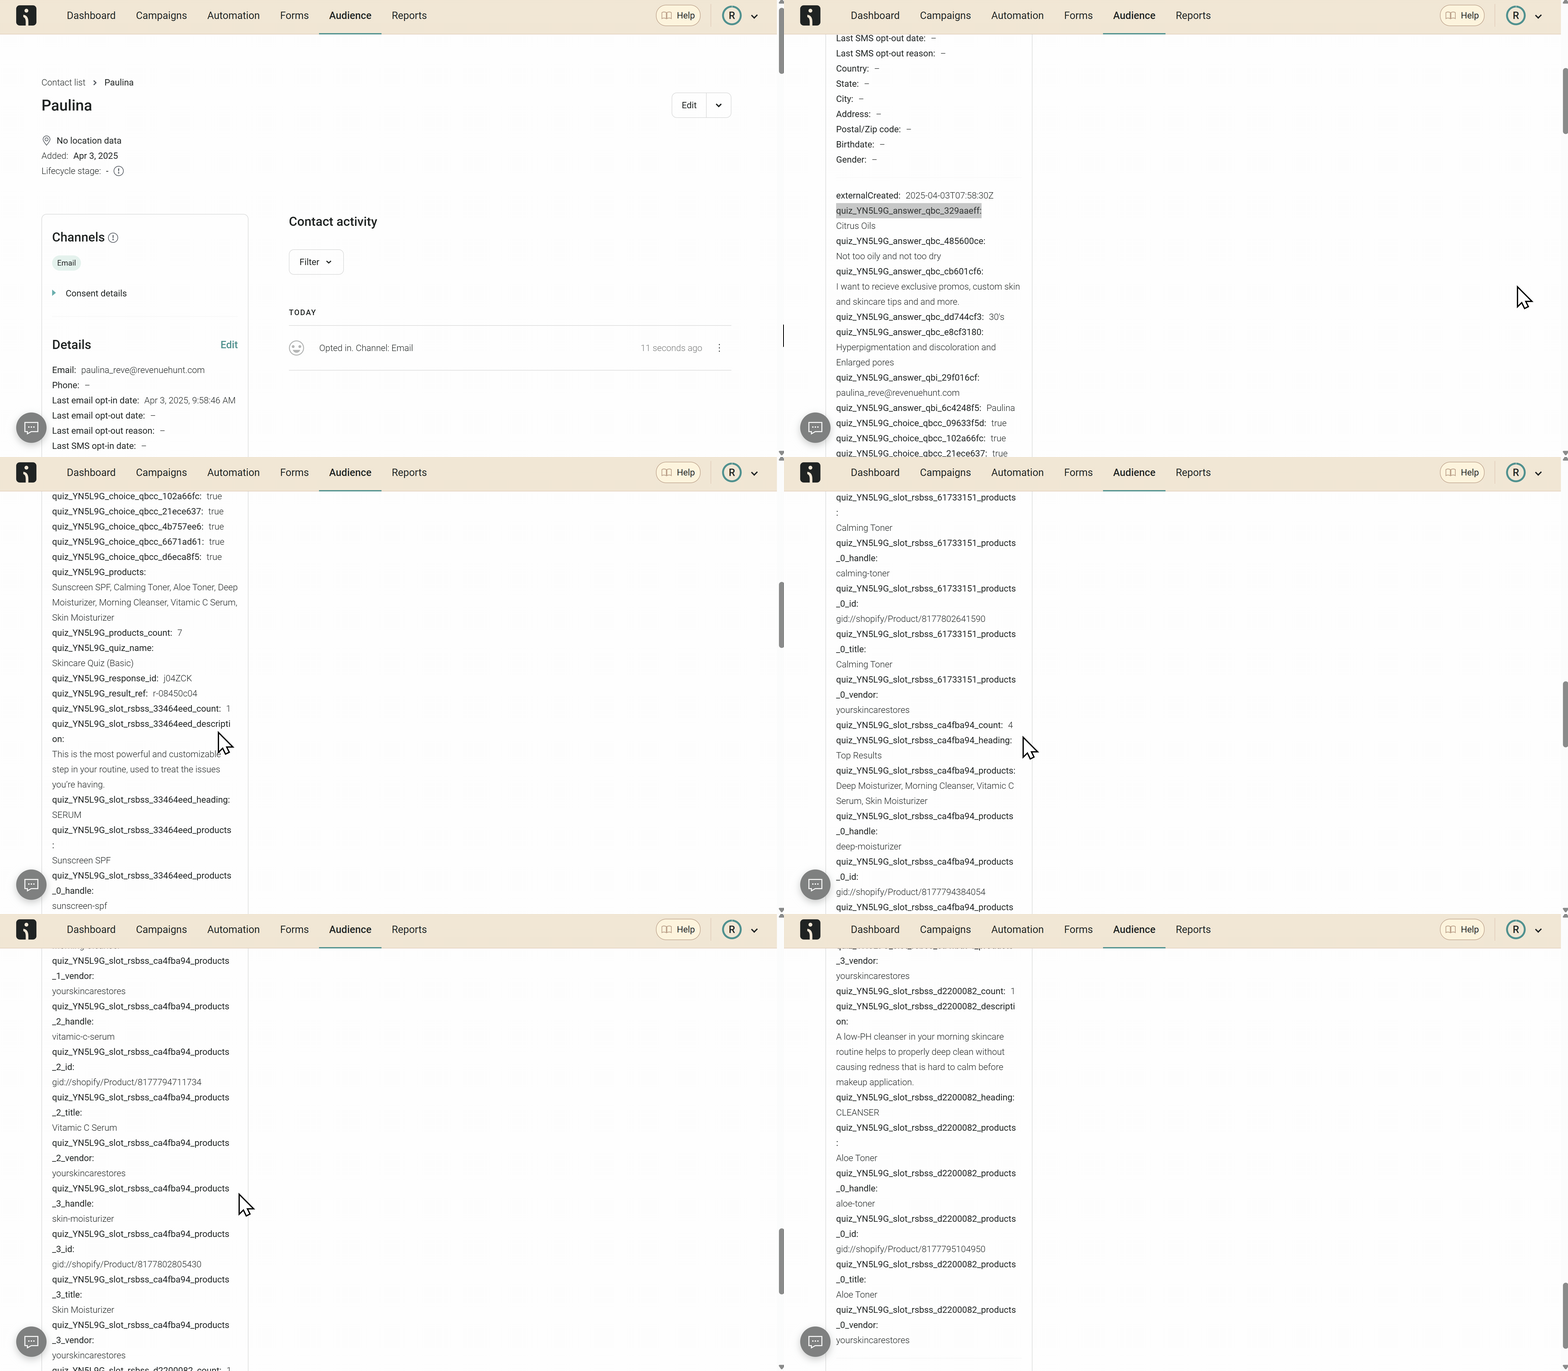
To add anything else to the email template, your developer pulls the matching custom properties off the profile.
- Add an email question: your quiz needs an email question before it can send anything to Omnisend. Add one from the
+ Add Questionmenu, or insert an email block into an existing question. -
Generate an Omnisend API Key: generate a new API key in Omnisend.
- Log in to your Omnisend account.
- Go to
Store Settings > APIand create a new API key. - Name the key for example
RevenueHunt API Keyand grant all permissions. - Copy the generated API key.
-
Connect to Omnisend: Access the Quiz Builder and go to the
Connecttab. Scroll to the Omnisend section and click on theConnectbutton to initiate the connection process. - Paste your
Omnisend API Keyinto the field that appears, then clickSave. - Click the top-right
Publishbutton to send the connection to the preview and the live quiz. - Preview your quiz: preview it all the way to the results page, to send the first contact. Use a sample email such as
alexa@example.com, and give sample answers so the properties arrive in Omnisend. -
Check your profile: Go back to the Omnisend platform and navigate to the
Dashboard > Audience > Contacts. Check if the sample profile (for exampleAlexa RevenueHunt / alexa@example.com) has been added. Click on the profile to view all custom properties from the quiz, including:- Quiz answers
- Recommended products
- Quiz name
- Product links, names, and images.
From now on, whenever a customer finishes your quiz, their contact details, answers and product recommendations are sent to your Omnisend account.
The app sends every answer, every recommended product and the contact details to the customer's Omnisend profile, where they appear as custom properties.
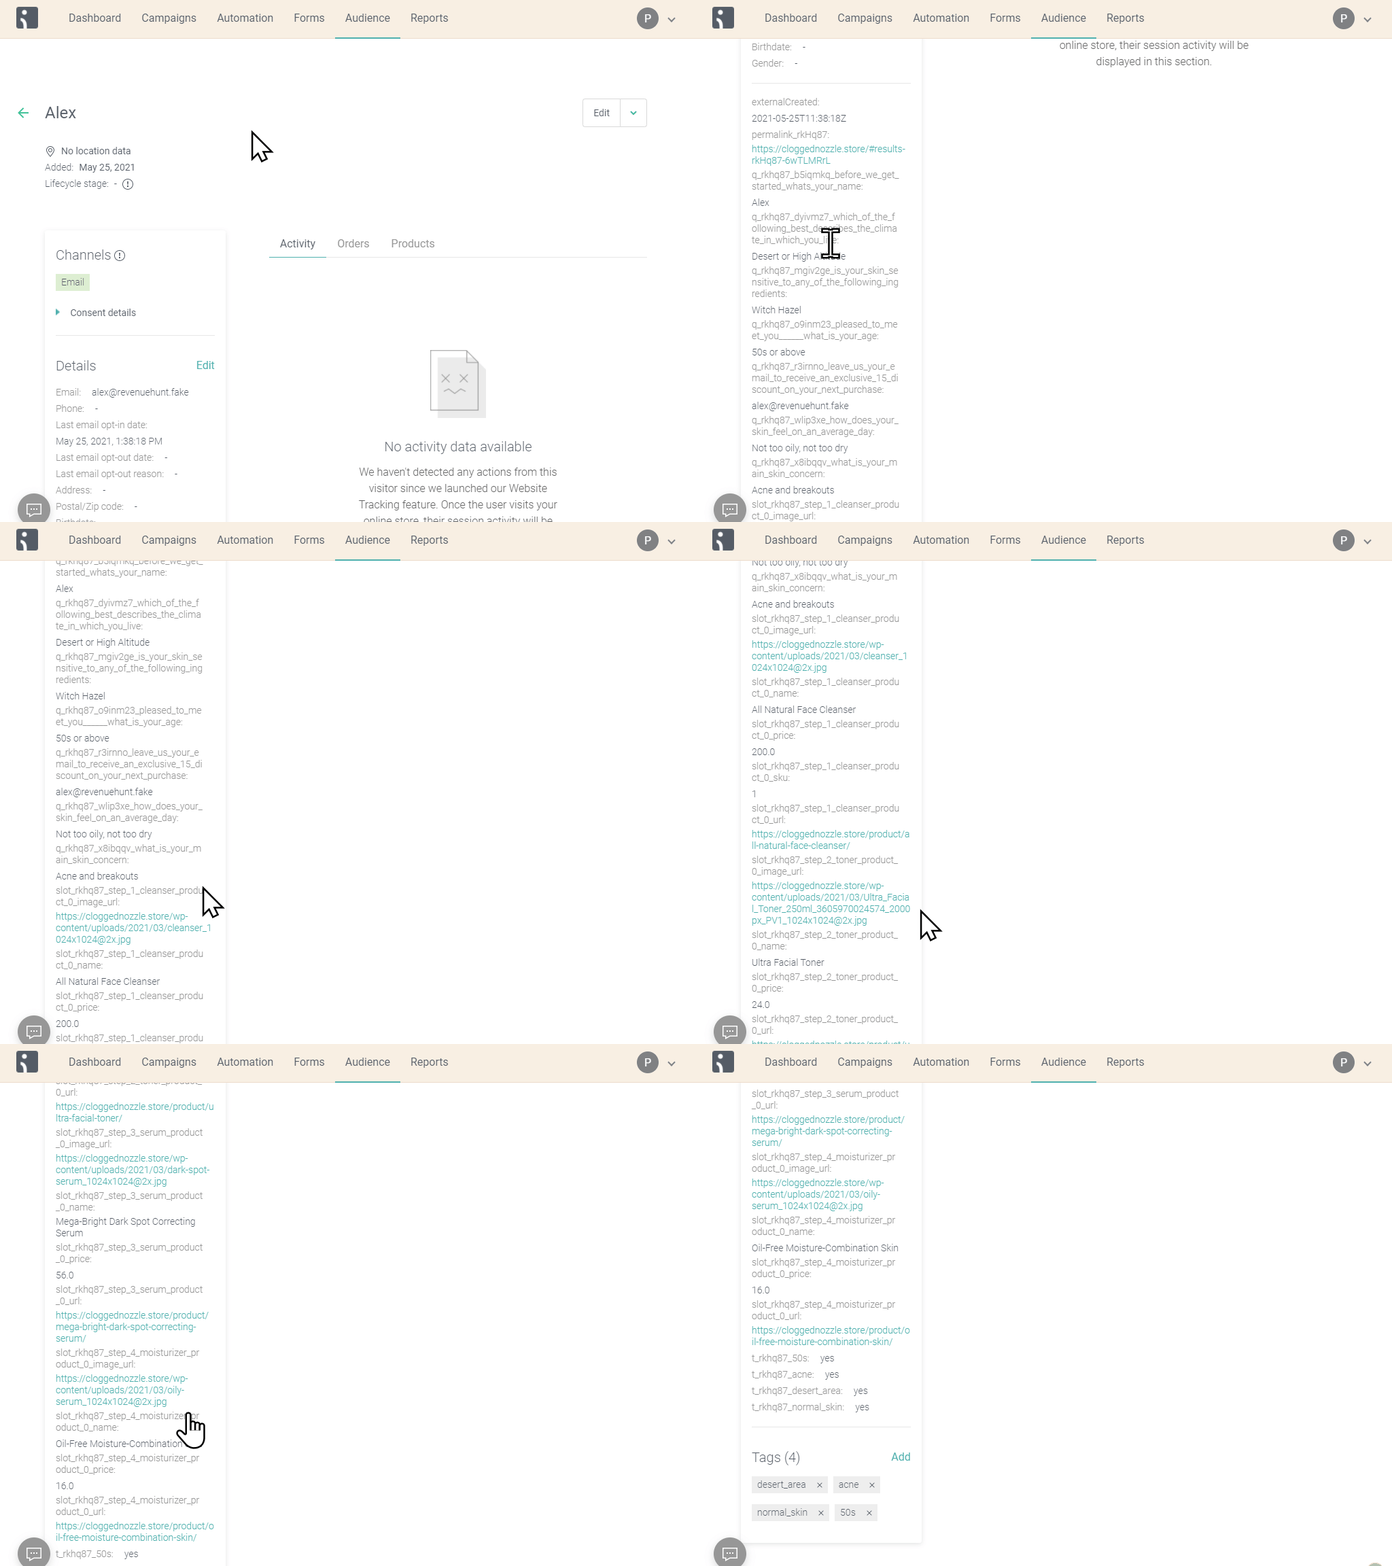
To add anything else to the email template, your developer pulls the matching custom properties off the profile.
- Add an email question: your quiz needs an email question before it can send anything to Omnisend. Add one from the
+ Add Questionmenu, or insert an email block into an existing question. -
Generate an Omnisend API Key: generate a new API key in Omnisend.
- Log in to your Omnisend account.
- Go to
Store Settings > APIand create a new API key. - Name the key for example
RevenueHunt API Keyand grant all permissions. - Copy the generated API key.
-
Connect to Omnisend: Access the Quiz Builder and go to the
Connecttab. Scroll to the Omnisend section and click on theConnectbutton to initiate the connection process. - Paste your
Omnisend API Keyinto the field that appears, then clickSave. - Click the top-right
Publishbutton to send the connection to the preview and the live quiz. - Preview your quiz: preview it all the way to the results page, to send the first contact. Use a sample email such as
alexa@example.com, and give sample answers so the properties arrive in Omnisend. -
Check your profile: Go back to the Omnisend platform and navigate to the
Dashboard > Audience > Contacts. Check if the sample profile (for exampleAlexa RevenueHunt / alexa@example.com) has been added. Click on the profile to view all custom properties from the quiz, including:- Quiz answers
- Recommended products
- Quiz name
- Product links, names, and images.
From now on, whenever a customer finishes your quiz, their contact details, answers and product recommendations are sent to your Omnisend account.
The app sends every answer, every recommended product and the contact details to the customer's Omnisend profile, where they appear as custom properties.
To add anything else to the email template, your developer pulls the matching custom properties off the profile.
- Add an email question: your quiz needs an email question before it can send anything to Omnisend. Add one from the
+ Add Questionmenu, or insert an email block into an existing question. -
Generate an Omnisend API Key: generate a new API key in Omnisend.
- Log in to your Omnisend account.
- Go to
Store Settings > APIand create a new API key. - Name the key for example
RevenueHunt API Keyand grant all permissions. - Copy the generated API key.
-
Connect to Omnisend: Access the Quiz Builder and go to the
Connecttab. Scroll to the Omnisend section and click on theConnectbutton to initiate the connection process. - Paste your
Omnisend API Keyinto the field that appears, then clickSave. - Click the top-right
Publishbutton to send the connection to the preview and the live quiz. - Preview your quiz: preview it all the way to the results page, to send the first contact. Use a sample email such as
alexa@example.com, and give sample answers so the properties arrive in Omnisend. -
Check your profile: Go back to the Omnisend platform and navigate to the
Dashboard > Audience > Contacts. Check if the sample profile (for exampleAlexa RevenueHunt / alexa@example.com) has been added. Click on the profile to view all custom properties from the quiz, including:- Quiz answers
- Recommended products
- Quiz name
- Product links, names, and images.
From now on, whenever a customer finishes your quiz, their contact details, answers and product recommendations are sent to your Omnisend account.
The app sends every answer, every recommended product and the contact details to the customer's Omnisend profile, where they appear as custom properties.
To add anything else to the email template, your developer pulls the matching custom properties off the profile.
- Add an email question: your quiz needs an email question before it can send anything to Omnisend. Add one from the
+ Add Questionmenu, or insert an email block into an existing question. -
Generate an Omnisend API Key: generate a new API key in Omnisend.
- Log in to your Omnisend account.
- Go to
Store Settings > APIand create a new API key. - Name the key for example
RevenueHunt API Keyand grant all permissions. - Copy the generated API key.
-
Connect to Omnisend: Access the Quiz Builder and go to the
Connecttab. Scroll to the Omnisend section and click on theConnectbutton to initiate the connection process. - Paste your
Omnisend API Keyinto the field that appears, then clickSave. - Click the top-right
Publishbutton to send the connection to the preview and the live quiz. - Preview your quiz: preview it all the way to the results page, to send the first contact. Use a sample email such as
alexa@example.com, and give sample answers so the properties arrive in Omnisend. -
Check your profile: Go back to the Omnisend platform and navigate to the
Dashboard > Audience > Contacts. Check if the sample profile (for exampleAlexa RevenueHunt / alexa@example.com) has been added. Click on the profile to view all custom properties from the quiz, including:- Quiz answers
- Recommended products
- Quiz name
- Product links, names, and images.
From now on, whenever a customer finishes your quiz, their contact details, answers and product recommendations are sent to your Omnisend account.
The app sends every answer, every recommended product and the contact details to the customer's Omnisend profile, where they appear as custom properties.
To add anything else to the email template, your developer pulls the matching custom properties off the profile.
- Add an email question: your quiz needs an email question before it can send anything to Omnisend. Add one from the
+ Add Questionmenu, or insert an email block into an existing question. -
Generate an Omnisend API Key: generate a new API key in Omnisend.
- Log in to your Omnisend account.
- Go to
Store Settings > APIand create a new API key. - Name the key for example
RevenueHunt API Keyand grant all permissions. - Copy the generated API key.
-
Connect to Omnisend: Access the Quiz Builder and go to the
Connecttab. Scroll to the Omnisend section and click on theConnectbutton to initiate the connection process. - Paste your
Omnisend API Keyinto the field that appears, then clickSave. - Click the top-right
Publishbutton to send the connection to the preview and the live quiz. - Preview your quiz: preview it all the way to the results page, to send the first contact. Use a sample email such as
alexa@example.com, and give sample answers so the properties arrive in Omnisend. -
Check your profile: Go back to the Omnisend platform and navigate to the
Dashboard > Audience > Contacts. Check if the sample profile (for exampleAlexa RevenueHunt / alexa@example.com) has been added. Click on the profile to view all custom properties from the quiz, including:- Quiz answers
- Recommended products
- Quiz name
- Product links, names, and images.
From now on, whenever a customer finishes your quiz, their contact details, answers and product recommendations are sent to your Omnisend account.
The app sends every answer, every recommended product and the contact details to the customer's Omnisend profile, where they appear as custom properties.
To add anything else to the email template, your developer pulls the matching custom properties off the profile.
Custom properties sent to Omnisend
Every completed response is sent to Omnisend as custom properties on the contact profile. Property names include your quiz ID, so two quizzes never overwrite each other's data on the same contact.
Property names use the quiz Short ID ([SQID]) and the internal references ([REF]) of your questions, choices, tags and slots.
Hyphens become underscores
Omnisend does not accept a hyphen in a property name, so every ID is converted. A block reference of qbc-485600ce appears in Omnisend as qbc_485600ce.
| Property | Value |
|---|---|
quiz_[SQID]_response_id |
Unique ID of that quiz session. |
quiz_[SQID]_quiz_name |
The name of the quiz. |
quiz_[SQID]_result_ref |
Reference or URL of the results page shown. |
quiz_[SQID]_market_id |
The market or locale ID, if you use multiple markets. |
quiz_[SQID]_answer_[BLOCK_REF] |
The text of the answer given to that question. |
quiz_[SQID]_choice_[CHOICE_REF] |
true for every choice selected. Best option for segmenting. |
quiz_[SQID]_tag_[TAG_NAME] |
true for every tag assigned. |
quiz_[SQID]_variable_[VARIABLE_NAME] |
The numerical score of that variable. |
quiz_[SQID]_highest_variable_ref |
Reference of the top-scoring variable. |
quiz_[SQID]_products |
Comma-separated list of all recommended product titles. |
quiz_[SQID]_products_count |
Total number of recommended products. |
quiz_[SQID]_currency |
The store currency code, for example USD. |
quiz_[SQID]_slot_[SLOT_REF]_heading |
Title of that slot. |
quiz_[SQID]_slot_[SLOT_REF]_description |
Description text of that slot. |
quiz_[SQID]_slot_[SLOT_REF]_products |
Comma-separated product titles in that slot. |
quiz_[SQID]_slot_[SLOT_REF]_count |
Number of products in that slot. |
quiz_[SQID]_slot_[SLOT_REF]_[TYPE]_[INDEX]_[FIELD] |
The details of each recommended item, one property per field. |
Item [FIELD] values
title, handle, id, price, url, image, vendor and currency. [TYPE] is products, products_variants or collections. [INDEX] starts at 0.
Identifiers and consent
The email address is sent as an Omnisend identifier with source: quiz-[SQID] and a status of subscribed or nonSubscribed. A phone number, when provided, is sent as an identifier for SMS marketing. If the quiz block has Omnisend consent enabled, the status is set to subscribed along with a statusDate. See how to ask for marketing consent.
The app asks Omnisend not to send its welcome message when it adds or updates the email address or the phone number. This does not stop an automation you built in Omnisend. Check your welcome automations to decide which ones quiz contacts trigger.
Property names use the quiz Hash ID ([ID]), for example LVPS1n.
| Property | Value |
|---|---|
firstName |
First name captured in the quiz. |
lastName |
Last name captured in the quiz, when available. |
tags |
Omnisend's standard tags field, populated with the quiz tags. |
permalink_[ID] |
Link to the customer's results page. |
permalink_hash_[ID] |
Unique hash of those results. |
tags_[ID] |
Comma-separated string of all tags assigned. |
result_page_name_[ID] |
Name of the results page, for quizzes with multiple results. |
products_[ID] |
Comma-separated string of recommended product titles. Set to NO RECOMMENDED PRODUCTS when the quiz recommends nothing. |
q_[ID]_[QUESTION_TITLE] |
The text of the selected answer. |
t_[ID]_[TAG_NAME] |
true for every individual tag assigned. |
slot_[ID]_[SLOT_NAME]_product_[INDEX]_[FIELD] |
The recommended products, one property per field. |
Product [FIELD] values
name, url, price and image_url. [INDEX] starts at 0.
Property names are sanitized
Omnisend has strict naming rules. A question title, tag name or slot name is lowercased, underscored and sometimes truncated to become a property name.
- A question titled "What is your skin type?" becomes
q_lvps1n_what_is_your_skin_type: Oily - A tag named "Skin type: oily" becomes
t_lvps1n_skin_type_oily: true
Identifiers and consent
The email address, and the phone number when provided, are sent as Omnisend identifiers with a status of subscribed on submission.
Property names use the quiz Hash ID ([ID]), for example LVPS1n.
| Property | Value |
|---|---|
firstName |
First name captured in the quiz. |
lastName |
Last name captured in the quiz, when available. |
tags |
Omnisend's standard tags field, populated with the quiz tags. |
permalink_[ID] |
Link to the customer's results page. |
permalink_hash_[ID] |
Unique hash of those results. |
tags_[ID] |
Comma-separated string of all tags assigned. |
result_page_name_[ID] |
Name of the results page, for quizzes with multiple results. |
products_[ID] |
Comma-separated string of recommended product titles. Set to NO RECOMMENDED PRODUCTS when the quiz recommends nothing. |
q_[ID]_[QUESTION_TITLE] |
The text of the selected answer. |
t_[ID]_[TAG_NAME] |
true for every individual tag assigned. |
slot_[ID]_[SLOT_NAME]_product_[INDEX]_[FIELD] |
The recommended products, one property per field. |
Product [FIELD] values
name, url, price and image_url. [INDEX] starts at 0.
Property names are sanitized
Omnisend has strict naming rules. A question title, tag name or slot name is lowercased, underscored and sometimes truncated to become a property name.
- A question titled "What is your skin type?" becomes
q_lvps1n_what_is_your_skin_type: Oily - A tag named "Skin type: oily" becomes
t_lvps1n_skin_type_oily: true
Identifiers and consent
The email address, and the phone number when provided, are sent as Omnisend identifiers with a status of subscribed on submission.
Property names use the quiz Hash ID ([ID]), for example LVPS1n.
| Property | Value |
|---|---|
firstName |
First name captured in the quiz. |
lastName |
Last name captured in the quiz, when available. |
tags |
Omnisend's standard tags field, populated with the quiz tags. |
permalink_[ID] |
Link to the customer's results page. |
permalink_hash_[ID] |
Unique hash of those results. |
tags_[ID] |
Comma-separated string of all tags assigned. |
result_page_name_[ID] |
Name of the results page, for quizzes with multiple results. |
products_[ID] |
Comma-separated string of recommended product titles. Set to NO RECOMMENDED PRODUCTS when the quiz recommends nothing. |
q_[ID]_[QUESTION_TITLE] |
The text of the selected answer. |
t_[ID]_[TAG_NAME] |
true for every individual tag assigned. |
slot_[ID]_[SLOT_NAME]_product_[INDEX]_[FIELD] |
The recommended products, one property per field. |
Product [FIELD] values
name, url, price and image_url. [INDEX] starts at 0.
Property names are sanitized
Omnisend has strict naming rules. A question title, tag name or slot name is lowercased, underscored and sometimes truncated to become a property name.
- A question titled "What is your skin type?" becomes
q_lvps1n_what_is_your_skin_type: Oily - A tag named "Skin type: oily" becomes
t_lvps1n_skin_type_oily: true
Identifiers and consent
The email address, and the phone number when provided, are sent as Omnisend identifiers with a status of subscribed on submission.
Property names use the quiz Hash ID ([ID]), for example LVPS1n.
| Property | Value |
|---|---|
firstName |
First name captured in the quiz. |
lastName |
Last name captured in the quiz, when available. |
tags |
Omnisend's standard tags field, populated with the quiz tags. |
permalink_[ID] |
Link to the customer's results page. |
permalink_hash_[ID] |
Unique hash of those results. |
tags_[ID] |
Comma-separated string of all tags assigned. |
result_page_name_[ID] |
Name of the results page, for quizzes with multiple results. |
products_[ID] |
Comma-separated string of recommended product titles. Set to NO RECOMMENDED PRODUCTS when the quiz recommends nothing. |
q_[ID]_[QUESTION_TITLE] |
The text of the selected answer. |
t_[ID]_[TAG_NAME] |
true for every individual tag assigned. |
slot_[ID]_[SLOT_NAME]_product_[INDEX]_[FIELD] |
The recommended products, one property per field. |
Product [FIELD] values
name, url, price and image_url. [INDEX] starts at 0.
Property names are sanitized
Omnisend has strict naming rules. A question title, tag name or slot name is lowercased, underscored and sometimes truncated to become a property name.
- A question titled "What is your skin type?" becomes
q_lvps1n_what_is_your_skin_type: Oily - A tag named "Skin type: oily" becomes
t_lvps1n_skin_type_oily: true
Identifiers and consent
The email address, and the phone number when provided, are sent as Omnisend identifiers with a status of subscribed on submission.
Property names use the quiz Hash ID ([ID]), for example LVPS1n.
| Property | Value |
|---|---|
firstName |
First name captured in the quiz. |
lastName |
Last name captured in the quiz, when available. |
tags |
Omnisend's standard tags field, populated with the quiz tags. |
permalink_[ID] |
Link to the customer's results page. |
permalink_hash_[ID] |
Unique hash of those results. |
tags_[ID] |
Comma-separated string of all tags assigned. |
result_page_name_[ID] |
Name of the results page, for quizzes with multiple results. |
products_[ID] |
Comma-separated string of recommended product titles. Set to NO RECOMMENDED PRODUCTS when the quiz recommends nothing. |
q_[ID]_[QUESTION_TITLE] |
The text of the selected answer. |
t_[ID]_[TAG_NAME] |
true for every individual tag assigned. |
slot_[ID]_[SLOT_NAME]_product_[INDEX]_[FIELD] |
The recommended products, one property per field. |
Product [FIELD] values
name, url, price and image_url. [INDEX] starts at 0.
Property names are sanitized
Omnisend has strict naming rules. A question title, tag name or slot name is lowercased, underscored and sometimes truncated to become a property name.
- A question titled "What is your skin type?" becomes
q_lvps1n_what_is_your_skin_type: Oily - A tag named "Skin type: oily" becomes
t_lvps1n_skin_type_oily: true
Identifiers and consent
The email address, and the phone number when provided, are sent as Omnisend identifiers with a status of subscribed on submission.
Cannot find a property in Omnisend?
Omnisend only lists properties it has already received, so take a test quiz first and try again.
In the Built for Shopify version, a property name holds the reference of the block, choice or tag, not its title. Find that reference in the Quiz Builder, under the Advanced tab of the block or choice. Renaming a question therefore does not break your Omnisend setup. The legacy versions work the other way round: a property name is built from the question title, so renaming a question creates a new property.
Legacy vs Built for Shopify: property naming
If you migrated from the legacy app, your Omnisend segments and email templates need updating because the property names changed.
| Data | Legacy | Built for Shopify |
|---|---|---|
| Key format | [PROPERTY]_[ID] |
quiz_[SQID]_[PROPERTY] |
| Answers | q_[ID]_[QUESTION_TITLE], built from the sanitized question title |
quiz_[SQID]_answer_[BLOCK_REF], built from the block reference |
| Variables | Not sent | quiz_[SQID]_variable_[NAME] and quiz_[SQID]_highest_variable_ref |
| Products | Title, URL, price and image only | Adds slot headings and descriptions, currency, vendor, handle and item IDs |
| Consent | Defaults to subscribed on submission |
Follows the Omnisend consent setting on the quiz block |
Send follow-up emails with Omnisend
You can set up a post-quiz email campaign in Omnisend. It sends the product recommendations, or any other offer, to everyone who finished the quiz.
The instructions below cover building the segment, setting up an automation workflow, and putting the quiz results into the email.
Warning
Email templates and flows are not a one-click setup. Someone who knows Omnisend has to build them.
The app sends the quiz data to Omnisend. You build the flows and the email templates in Omnisend, so ask Omnisend support about that part of the setup.
- Connect your quiz to Omnisend. Follow Link quiz to Omnisend.
-
Create a segment: in Omnisend, create a segment holding everyone who finished the quiz. Filter on a
custom propertythat only those contacts carry, such asquiz_QUIZID_quiz_name.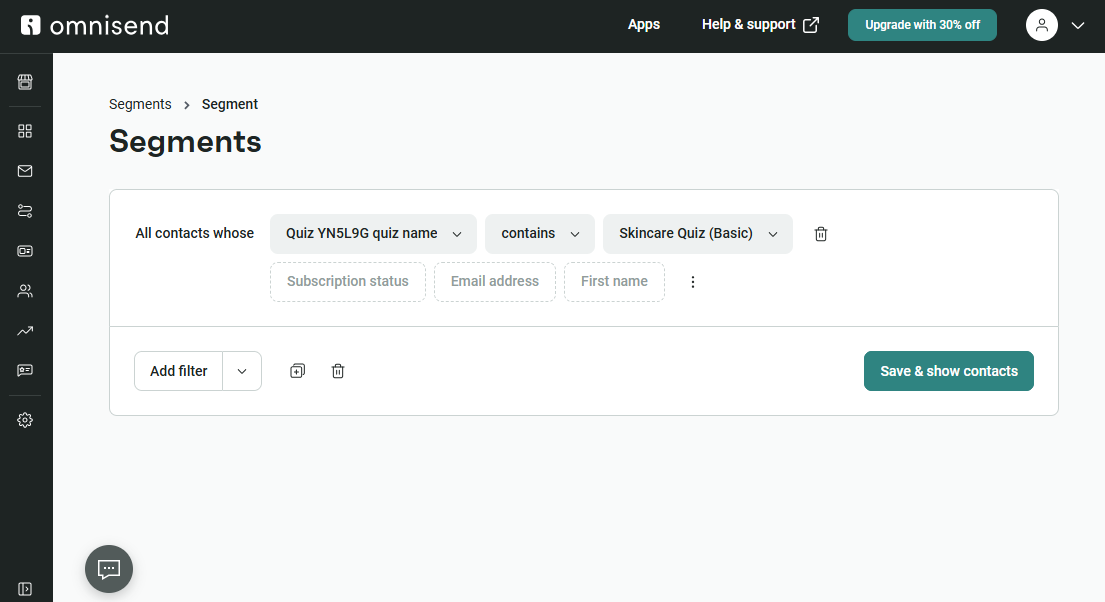
- Pick a property that only these contacts carry, such as
quiz_QUIZID_quiz_name, and copy its name. - Go to
Audience>Segmentsand create a new segment from scratch. - Add a filter using the copied property.
- Name the segment something recognizable, for example
Skincare Quiz Basic Segment, and save it. - Omnisend will automatically add profiles with this property to the segment.
- Pick a property that only these contacts carry, such as
-
Set up an automated workflow: build an automation workflow that starts when someone joins that segment. Omnisend then runs the email sequence for everyone in it.
- Go to the
Automationsection in Omnisend. - Explore existing workflows or create a new workflow from scratch.
- Set a trigger for the workflow: select
When someone enters the segmentand choose the segment you created, for exampleSkincare Quiz Basic Segment. - Save the changes to initiate the workflow when users enter the segment.
- Go to the
-
Customize the email template: putting the quiz results and product recommendations into an email takes HTML, CSS and Omnisend personalization tags. Start from one of Omnisend's templates, add the quiz data as custom properties, and restyle it to match your brand.
- Drag and drop an email action below the trigger in the workflow.
- Set the email subject, for example
Your Quiz Results, and add a subheading. - Edit the email content as needed, then save changes to access the email editor.
-
Include the quiz results: add a Custom HTML item to the Omnisend email builder.
-
In the quiz builder, go to
Quiz settings > Integrationsand generate an Omnisend email template.
-
Copy the generated code and paste it into the Custom HTML item of your email template in Omnisend.
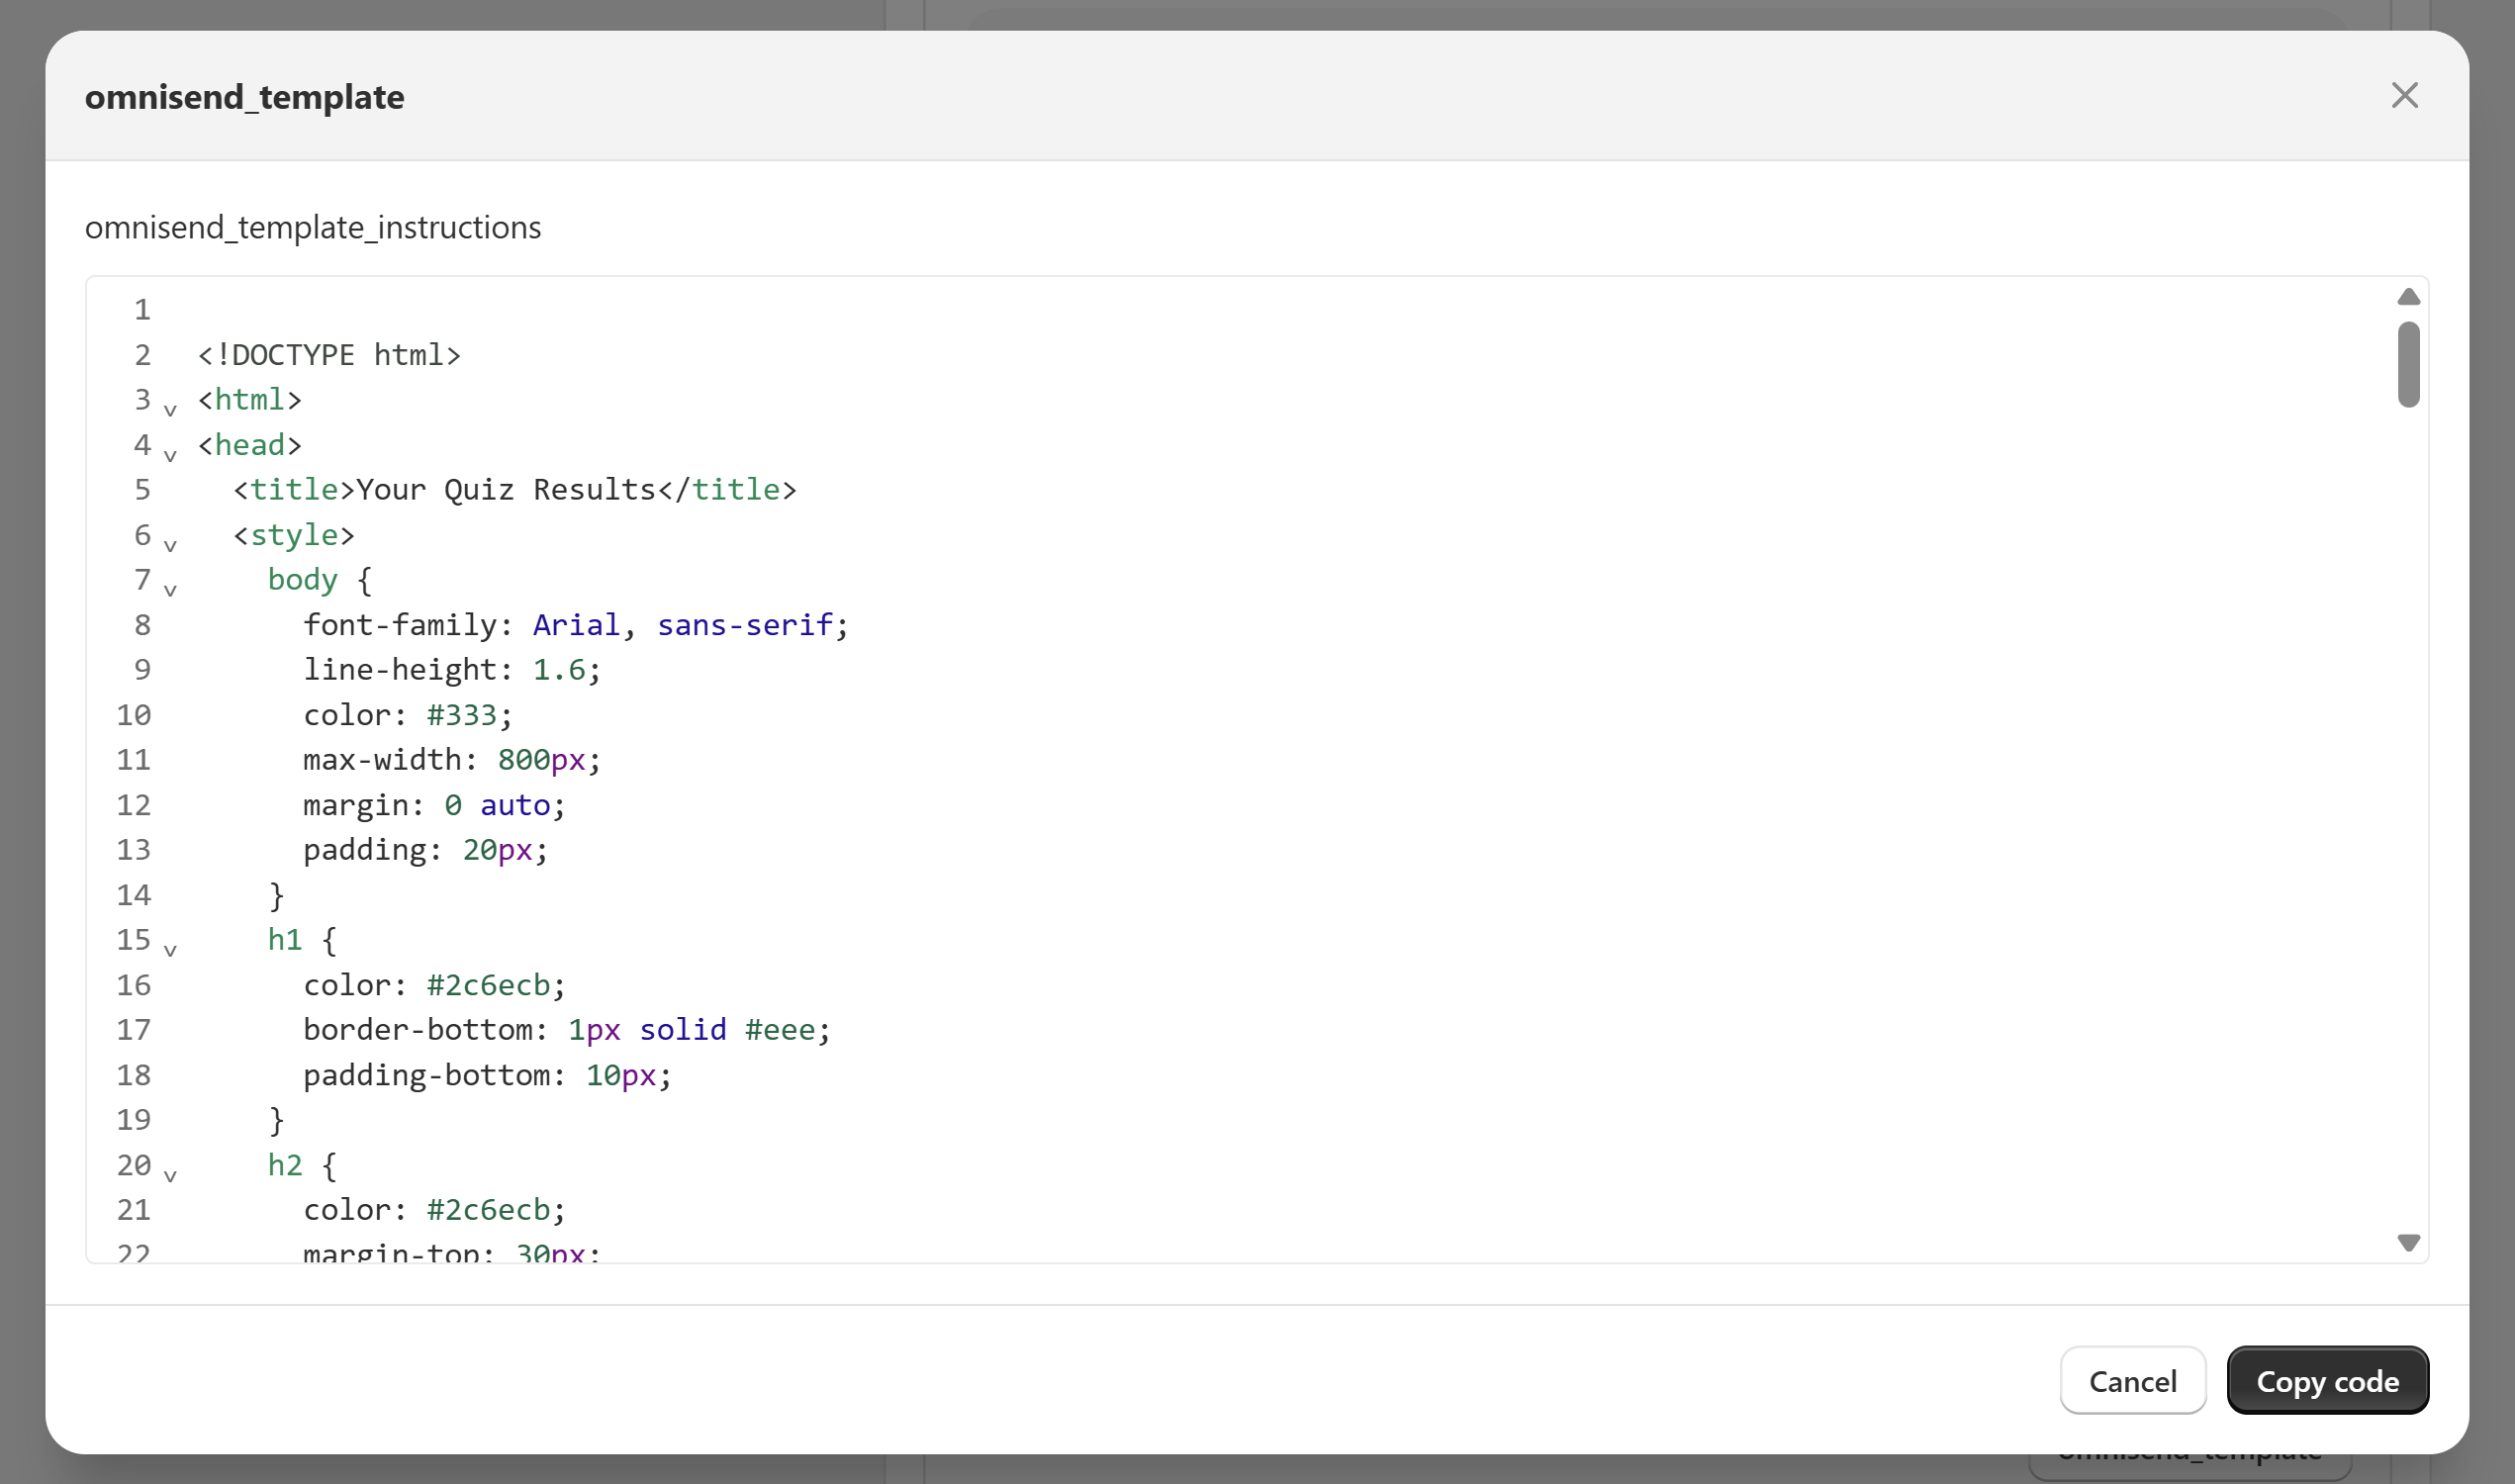
-
The code builds a ready-made email holding the quiz results and the recommended products. Edit it as you like.
Older generated templates
Paste the generated template into a Custom HTML item in the Omnisend email builder. The template uses Omnisend personalization tags such as
[[ contact.custom_properties.quiz_QUIZID_quiz_name | default: '' ]]. Preview it with a contact who completed the quiz. Test emails show the raw tags.An older template can show raw placeholder text or wrong product links. If this happens, generate the template again and replace the old code.
-
-
Preview and test the email: preview it as one of the segment subscribers. Then finish any remaining steps in the workflow.
- Save and start the workflow: save your changes, then start the workflow.
You can set up a post-quiz email campaign in Omnisend. It sends the product recommendations, or any other offer, to everyone who finished the quiz.
The instructions below cover building the segment, setting up an automation workflow, and putting the quiz results into the email.
Warning
Email templates and flows are not a one-click setup. Someone who knows Omnisend has to build them.
The app sends the quiz data to Omnisend. You build the flows and the email templates in Omnisend, so ask Omnisend support about that part of the setup.
- Connect your quiz to Omnisend. Follow Link quiz to Omnisend.
-
Create a segment: in Omnisend, create a segment holding everyone who finished the quiz. Filter on a
custom propertythat only those contacts carry, such aspermalink_quiz_id.- Pick a property that only these contacts carry, such as
permalink_quiz_id, and copy its name. - Go to
Audience>Segmentsand create a new segment from scratch. - Add a filter using the copied property.
- Name the segment something recognizable, for example
Skincare Quiz Basic Segment, and save it. - Omnisend will automatically add profiles with this property to the segment.
- Pick a property that only these contacts carry, such as
-
Set up an automated workflow: build an automation workflow that starts when someone joins that segment. Omnisend then runs the email sequence for everyone in it.
- Go to the
Automationsection in Omnisend. - Explore existing workflows or create a new workflow from scratch.
- Set a trigger for the workflow: select
When someone enters the segmentand choose the segment you created, for exampleSkincare Quiz Basic Segment. - Save the changes to initiate the workflow when users enter the segment.
- Go to the
-
Customize the Email Template: Customizing the email template to include quiz results and product recommendations requires HTML, CSS, and Omnisend personalization tags knowledge. Use Omnisend's existing email templates as a base and modify them to incorporate the quiz data as custom properties. Ensure the template aligns with your brand's style guide.
- Drag and drop an email action below the trigger in the workflow.
- Set the email subject, for example
Your Quiz Results, and add a subheading. - Edit the email content as needed, then save changes to access the email editor.
-
Start from the sample quiz results email templates on this page. To build your own instead, use the custom properties the quiz sends to Omnisend.
- Preview and test the email: preview it as one of the segment subscribers. Then finish any remaining steps in the workflow.
- Save and start the workflow: save your changes, then start the workflow.
You can set up a post-quiz email campaign in Omnisend. It sends the product recommendations, or any other offer, to everyone who finished the quiz.
The instructions below cover building the segment, setting up an automation workflow, and putting the quiz results into the email.
Warning
Email templates and flows are not a one-click setup. Someone who knows Omnisend has to build them.
The app sends the quiz data to Omnisend. You build the flows and the email templates in Omnisend, so ask Omnisend support about that part of the setup.
- Connect your quiz to Omnisend. Follow Link quiz to Omnisend.
-
Create a segment: in Omnisend, create a segment holding everyone who finished the quiz. Filter on a
custom propertythat only those contacts carry, such aspermalink_quiz_id.- Pick a property that only these contacts carry, such as
permalink_quiz_id, and copy its name. - Go to
Audience>Segmentsand create a new segment from scratch. - Add a filter using the copied property.
- Name the segment something recognizable, for example
Skincare Quiz Basic Segment, and save it. - Omnisend will automatically add profiles with this property to the segment.
- Pick a property that only these contacts carry, such as
-
Set up an automated workflow: build an automation workflow that starts when someone joins that segment. Omnisend then runs the email sequence for everyone in it.
- Go to the
Automationsection in Omnisend. - Explore existing workflows or create a new workflow from scratch.
- Set a trigger for the workflow: select
When someone enters the segmentand choose the segment you created, for exampleSkincare Quiz Basic Segment. - Save the changes to initiate the workflow when users enter the segment.
- Go to the
-
Customize the Email Template: Customizing the email template to include quiz results and product recommendations requires HTML, CSS, and Omnisend personalization tags knowledge. Use Omnisend's existing email templates as a base and modify them to incorporate the quiz data as custom properties. Ensure the template aligns with your brand's style guide.
- Drag and drop an email action below the trigger in the workflow.
- Set the email subject, for example
Your Quiz Results, and add a subheading. - Edit the email content as needed, then save changes to access the email editor.
-
Start from the sample quiz results email templates on this page. To build your own instead, use the custom properties the quiz sends to Omnisend.
- Preview and test the email: preview it as one of the segment subscribers. Then finish any remaining steps in the workflow.
- Save and start the workflow: save your changes, then start the workflow.
You can set up a post-quiz email campaign in Omnisend. It sends the product recommendations, or any other offer, to everyone who finished the quiz.
The instructions below cover building the segment, setting up an automation workflow, and putting the quiz results into the email.
Warning
Email templates and flows are not a one-click setup. Someone who knows Omnisend has to build them.
The app sends the quiz data to Omnisend. You build the flows and the email templates in Omnisend, so ask Omnisend support about that part of the setup.
- Connect your quiz to Omnisend. Follow Link quiz to Omnisend.
-
Create a segment: in Omnisend, create a segment holding everyone who finished the quiz. Filter on a
custom propertythat only those contacts carry, such aspermalink_quiz_id.- Pick a property that only these contacts carry, such as
permalink_quiz_id, and copy its name. - Go to
Audience>Segmentsand create a new segment from scratch. - Add a filter using the copied property.
- Name the segment something recognizable, for example
Skincare Quiz Basic Segment, and save it. - Omnisend will automatically add profiles with this property to the segment.
- Pick a property that only these contacts carry, such as
-
Set up an automated workflow: build an automation workflow that starts when someone joins that segment. Omnisend then runs the email sequence for everyone in it.
- Go to the
Automationsection in Omnisend. - Explore existing workflows or create a new workflow from scratch.
- Set a trigger for the workflow: select
When someone enters the segmentand choose the segment you created, for exampleSkincare Quiz Basic Segment. - Save the changes to initiate the workflow when users enter the segment.
- Go to the
-
Customize the Email Template: Customizing the email template to include quiz results and product recommendations requires HTML, CSS, and Omnisend personalization tags knowledge. Use Omnisend's existing email templates as a base and modify them to incorporate the quiz data as custom properties. Ensure the template aligns with your brand's style guide.
- Drag and drop an email action below the trigger in the workflow.
- Set the email subject, for example
Your Quiz Results, and add a subheading. - Edit the email content as needed, then save changes to access the email editor.
-
Start from the sample quiz results email templates on this page. To build your own instead, use the custom properties the quiz sends to Omnisend.
- Preview and test the email: preview it as one of the segment subscribers. Then finish any remaining steps in the workflow.
- Save and start the workflow: save your changes, then start the workflow.
You can set up a post-quiz email campaign in Omnisend. It sends the product recommendations, or any other offer, to everyone who finished the quiz.
The instructions below cover building the segment, setting up an automation workflow, and putting the quiz results into the email.
Warning
Email templates and flows are not a one-click setup. Someone who knows Omnisend has to build them.
The app sends the quiz data to Omnisend. You build the flows and the email templates in Omnisend, so ask Omnisend support about that part of the setup.
- Connect your quiz to Omnisend. Follow Link quiz to Omnisend.
-
Create a segment: in Omnisend, create a segment holding everyone who finished the quiz. Filter on a
custom propertythat only those contacts carry, such aspermalink_quiz_id.- Pick a property that only these contacts carry, such as
permalink_quiz_id, and copy its name. - Go to
Audience>Segmentsand create a new segment from scratch. - Add a filter using the copied property.
- Name the segment something recognizable, for example
Skincare Quiz Basic Segment, and save it. - Omnisend will automatically add profiles with this property to the segment.
- Pick a property that only these contacts carry, such as
-
Set up an automated workflow: build an automation workflow that starts when someone joins that segment. Omnisend then runs the email sequence for everyone in it.
- Go to the
Automationsection in Omnisend. - Explore existing workflows or create a new workflow from scratch.
- Set a trigger for the workflow: select
When someone enters the segmentand choose the segment you created, for exampleSkincare Quiz Basic Segment. - Save the changes to initiate the workflow when users enter the segment.
- Go to the
-
Customize the Email Template: Customizing the email template to include quiz results and product recommendations requires HTML, CSS, and Omnisend personalization tags knowledge. Use Omnisend's existing email templates as a base and modify them to incorporate the quiz data as custom properties. Ensure the template aligns with your brand's style guide.
- Drag and drop an email action below the trigger in the workflow.
- Set the email subject, for example
Your Quiz Results, and add a subheading. - Edit the email content as needed, then save changes to access the email editor.
-
Start from the sample quiz results email templates on this page. To build your own instead, use the custom properties the quiz sends to Omnisend.
- Preview and test the email: preview it as one of the segment subscribers. Then finish any remaining steps in the workflow.
- Save and start the workflow: save your changes, then start the workflow.
You can set up a post-quiz email campaign in Omnisend. It sends the product recommendations, or any other offer, to everyone who finished the quiz.
The instructions below cover building the segment, setting up an automation workflow, and putting the quiz results into the email.
Warning
Email templates and flows are not a one-click setup. Someone who knows Omnisend has to build them.
The app sends the quiz data to Omnisend. You build the flows and the email templates in Omnisend, so ask Omnisend support about that part of the setup.
- Connect your quiz to Omnisend. Follow Link quiz to Omnisend.
-
Create a segment: in Omnisend, create a segment holding everyone who finished the quiz. Filter on a
custom propertythat only those contacts carry, such aspermalink_quiz_id.- Pick a property that only these contacts carry, such as
permalink_quiz_id, and copy its name. - Go to
Audience>Segmentsand create a new segment from scratch. - Add a filter using the copied property.
- Name the segment something recognizable, for example
Skincare Quiz Basic Segment, and save it. - Omnisend will automatically add profiles with this property to the segment.
- Pick a property that only these contacts carry, such as
-
Set up an automated workflow: build an automation workflow that starts when someone joins that segment. Omnisend then runs the email sequence for everyone in it.
- Go to the
Automationsection in Omnisend. - Explore existing workflows or create a new workflow from scratch.
- Set a trigger for the workflow: select
When someone enters the segmentand choose the segment you created, for exampleSkincare Quiz Basic Segment. - Save the changes to initiate the workflow when users enter the segment.
- Go to the
-
Customize the Email Template: Customizing the email template to include quiz results and product recommendations requires HTML, CSS, and Omnisend personalization tags knowledge. Use Omnisend's existing email templates as a base and modify them to incorporate the quiz data as custom properties. Ensure the template aligns with your brand's style guide.
- Drag and drop an email action below the trigger in the workflow.
- Set the email subject, for example
Your Quiz Results, and add a subheading. - Edit the email content as needed, then save changes to access the email editor.
-
Start from the sample quiz results email templates on this page. To build your own instead, use the custom properties the quiz sends to Omnisend.
- Preview and test the email: preview it as one of the segment subscribers. Then finish any remaining steps in the workflow.
- Save and start the workflow: save your changes, then start the workflow.
Use quiz data in Omnisend email templates
See Custom Properties Sent to Omnisend for the full list of properties you can pull into a template.
Use the custom properties the quiz sends to Omnisend to personalize your email templates.
If you need to add any additional information to the email template, your developer can do so by pulling the appropriate custom properties from the user profile.
Use the custom properties the quiz sends to Omnisend to personalize your email templates.
If you need to add any additional information to the email template, your developer can do so by pulling the appropriate custom properties from the user profile.
Use the custom properties the quiz sends to Omnisend to personalize your email templates.
If you need to add any additional information to the email template, your developer can do so by pulling the appropriate custom properties from the user profile.
Use the custom properties the quiz sends to Omnisend to personalize your email templates.
If you need to add any additional information to the email template, your developer can do so by pulling the appropriate custom properties from the user profile.
Use the custom properties the quiz sends to Omnisend to personalize your email templates.
If you need to add any additional information to the email template, your developer can do so by pulling the appropriate custom properties from the user profile.
Use the custom properties the quiz sends to Omnisend to personalize your email templates.
If you need to add any additional information to the email template, your developer can do so by pulling the appropriate custom properties from the user profile.
Pull customer answers into an email template
Pull a customer answer into an email template with the custom properties the quiz sends to Omnisend. This is done by using the insert personalization tag feature in Omnisend.
- Open your Omnisend automation workflow and select the email you want to edit.
- Add a text element and type a base message, such as "You said that your skin feels...".
- Open the text block settings and click
insert personalization tag. - Browse the custom properties that quiz profiles carry.
-
Search for the property holding the answer you want, such as
quiz_LKKT6j_answer_qbc_485600ce.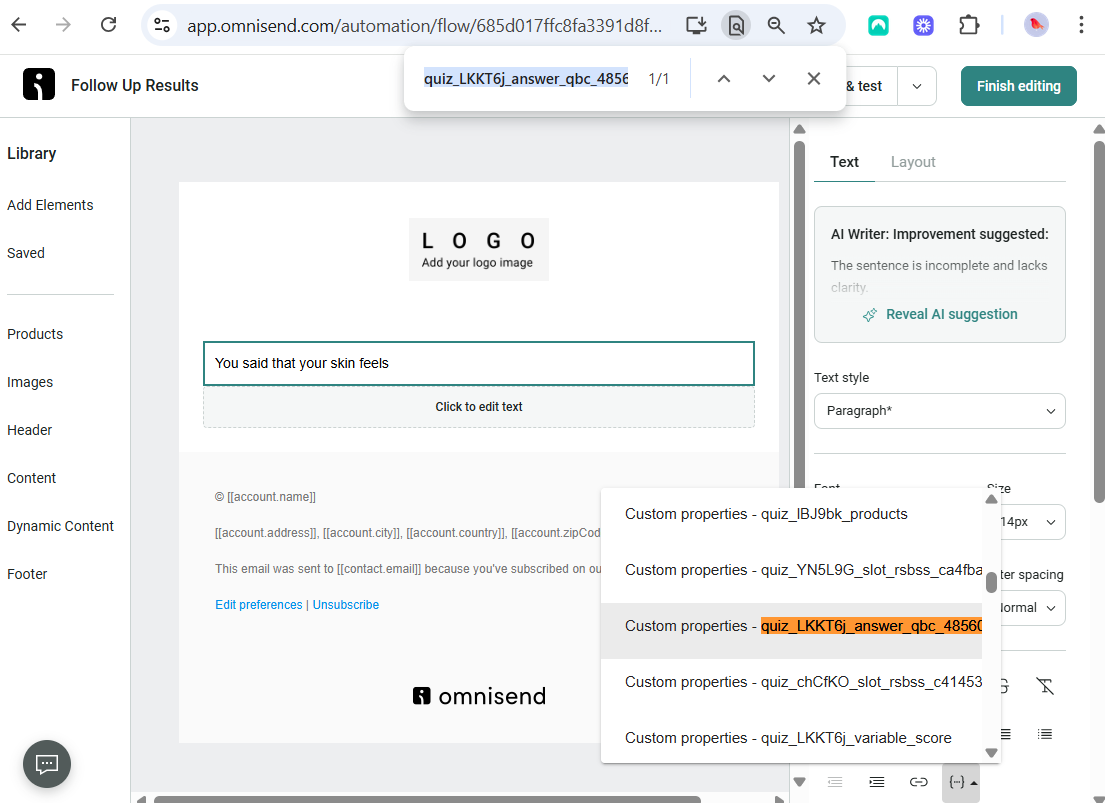
-
Insert the property into the text element. You can add default text for a contact that lacks it.
-
Save the text element.
- Preview the template against one profile, such as
Alexa RevenueHunt. Check that the property shows the answers that customer gave. - Save the email template.
Pull a customer answer into an email template with the custom properties the quiz sends to Omnisend. This is done by using the insert personalization tag feature in Omnisend.
- Open your Omnisend automation workflow and select the email you want to edit.
- Add a text element and type a base message, such as "You said that your skin feels...".
- Open the text block settings and click
insert personalization tag. - Browse the custom properties that quiz profiles carry.
-
Search for the property holding the answer you want, such as
quiz_LKKT6j_answer_qbc_485600ce. -
Insert the property into the text element. You can add default text for a contact that lacks it.
-
Save the text element.
- Preview the template against one profile, such as
Alexa RevenueHunt. Check that the property shows the answers that customer gave. - Save the email template.
Pull a customer answer into an email template with the custom properties the quiz sends to Omnisend. This is done by using the insert personalization tag feature in Omnisend.
- Open your Omnisend automation workflow and select the email you want to edit.
- Add a text element and type a base message, such as "You said that your skin feels...".
- Open the text block settings and click
insert personalization tag. - Browse the custom properties that quiz profiles carry.
-
Search for the property holding the answer you want, such as
quiz_LKKT6j_answer_qbc_485600ce. -
Insert the property into the text element. You can add default text for a contact that lacks it.
-
Save the text element.
- Preview the template against one profile, such as
Alexa RevenueHunt. Check that the property shows the answers that customer gave. - Save the email template.
Pull a customer answer into an email template with the custom properties the quiz sends to Omnisend. This is done by using the insert personalization tag feature in Omnisend.
- Open your Omnisend automation workflow and select the email you want to edit.
- Add a text element and type a base message, such as "You said that your skin feels...".
- Open the text block settings and click
insert personalization tag. - Browse the custom properties that quiz profiles carry.
-
Search for the property holding the answer you want, such as
quiz_LKKT6j_answer_qbc_485600ce. -
Insert the property into the text element. You can add default text for a contact that lacks it.
-
Save the text element.
- Preview the template against one profile, such as
Alexa RevenueHunt. Check that the property shows the answers that customer gave. - Save the email template.
Pull a customer answer into an email template with the custom properties the quiz sends to Omnisend. This is done by using the insert personalization tag feature in Omnisend.
- Open your Omnisend automation workflow and select the email you want to edit.
- Add a text element and type a base message, such as "You said that your skin feels...".
- Open the text block settings and click
insert personalization tag. - Browse the custom properties that quiz profiles carry.
-
Search for the property holding the answer you want, such as
quiz_LKKT6j_answer_qbc_485600ce. -
Insert the property into the text element. You can add default text for a contact that lacks it.
-
Save the text element.
- Preview the template against one profile, such as
Alexa RevenueHunt. Check that the property shows the answers that customer gave. - Save the email template.
Pull a customer answer into an email template with the custom properties the quiz sends to Omnisend. This is done by using the insert personalization tag feature in Omnisend.
- Open your Omnisend automation workflow and select the email you want to edit.
- Add a text element and type a base message, such as "You said that your skin feels...".
- Open the text block settings and click
insert personalization tag. - Browse the custom properties that quiz profiles carry.
-
Search for the property holding the answer you want, such as
quiz_LKKT6j_answer_qbc_485600ce. -
Insert the property into the text element. You can add default text for a contact that lacks it.
-
Save the text element.
- Preview the template against one profile, such as
Alexa RevenueHunt. Check that the property shows the answers that customer gave. - Save the email template.
Display a link to the quiz results in an email
Use quiz_QUIZID_response_id to build a link to the quiz results page. Add #response-[[ contact.custom_properties.quiz_QUIZID_response_id ]] to the end of the href on any link to that page.
Example
<a href="https://yourwebsite.com/#response-[[ contact.custom_properties.quiz_lBJ9bk_response_id ]]">View your quiz results</a>
where lBJ9bk is the quiz ID and
[[ contact.custom_properties.quiz_lBJ9bk_response_id ]]fetches the response ID, for exampleeVgV0Y.
Use the permalink_koHP8VA in your email template. This property already holds the full URL of the quiz results page.
Example
<a href="[[ contact.custom_properties.permalink_koHP8VA ]]">View your quiz results</a>
Use the permalink_koHP8VA in your email template. This property already holds the full URL of the quiz results page.
Example
<a href="[[ contact.custom_properties.permalink_koHP8VA ]]">View your quiz results</a>
Use the permalink_koHP8VA in your email template. This property already holds the full URL of the quiz results page.
Example
<a href="[[ contact.custom_properties.permalink_koHP8VA ]]">View your quiz results</a>
Use the permalink_koHP8VA in your email template. This property already holds the full URL of the quiz results page.
Example
<a href="[[ contact.custom_properties.permalink_koHP8VA ]]">View your quiz results</a>
Use the permalink_koHP8VA in your email template. This property already holds the full URL of the quiz results page.
Example
<a href="[[ contact.custom_properties.permalink_koHP8VA ]]">View your quiz results</a>
Customer tags in Omnisend
A contact profile is updated on every quiz take, with the new answers and product recommendations. Omnisend does not clear the tags from earlier sessions, so its own tags field mixes old and new.
This version sends no single property holding the whole tag list. Segment on quiz_[SQID]_tag_[TAG_NAME], which is true for each tag assigned, or on quiz_[SQID]_choice_[CHOICE_REF], which the property table above calls the best option for segmenting.
A contact profile is updated on every quiz take, with the new answers and product recommendations. Omnisend does not clear the tags from earlier sessions, so its own tags field mixes old and new.
The tags_[ID] property holds the customer tags as a comma-separated string, so build your segments on that one.
A contact profile is updated on every quiz take, with the new answers and product recommendations. Omnisend does not clear the tags from earlier sessions, so its own tags field mixes old and new.
The tags_[ID] property holds the customer tags as a comma-separated string, so build your segments on that one.
A contact profile is updated on every quiz take, with the new answers and product recommendations. Omnisend does not clear the tags from earlier sessions, so its own tags field mixes old and new.
The tags_[ID] property holds the customer tags as a comma-separated string, so build your segments on that one.
A contact profile is updated on every quiz take, with the new answers and product recommendations. Omnisend does not clear the tags from earlier sessions, so its own tags field mixes old and new.
The tags_[ID] property holds the customer tags as a comma-separated string, so build your segments on that one.
A contact profile is updated on every quiz take, with the new answers and product recommendations. Omnisend does not clear the tags from earlier sessions, so its own tags field mixes old and new.
The tags_[ID] property holds the customer tags as a comma-separated string, so build your segments on that one.
Email templates
In the Integrations section, under Omnisend, you can find the omnisend template.
Click on the button to receive and copy an HTML email template specifically tailored for the quiz.
The template uses Omnisend personalization tags for the quiz answers and the recommended products, in a layout built for email. You can use it as is, or as a reference to create your own.
Older generated templates
Paste the generated template into a Custom HTML item in the Omnisend email builder. The template uses Omnisend personalization tags such as [[ contact.custom_properties.quiz_QUIZID_quiz_name | default: '' ]]. Preview it with a contact who completed the quiz. Test emails show the raw tags.
An older template can show raw placeholder text or wrong product links. If this happens, generate the template again and replace the old code.
Here are some email templates that you can use as a reference:
- Basic Slots Template (4-Step Skincare Routine)
- Advanced Slots Template (Morning & Night Routine)
- Products List Template (Coffee Recommendations)
These templates will not work if you paste them in unchanged, because they were written for a demo quiz. Your quiz ID differs, and so do the other property names. Your developer edits the custom properties in the template to match the ones your quiz sends, then inserts the code as a custom HTML block in the Omnisend email template.
Here are some email templates that you can use as a reference:
- Basic Slots Template (4-Step Skincare Routine)
- Advanced Slots Template (Morning & Night Routine)
- Products List Template (Coffee Recommendations)
These templates will not work if you paste them in unchanged, because they were written for a demo quiz. Your quiz ID differs, and so do the other property names. Your developer edits the custom properties in the template to match the ones your quiz sends, then inserts the code as a custom HTML block in the Omnisend email template.
Here are some email templates that you can use as a reference:
- Basic Slots Template (4-Step Skincare Routine)
- Advanced Slots Template (Morning & Night Routine)
- Products List Template (Coffee Recommendations)
These templates will not work if you paste them in unchanged, because they were written for a demo quiz. Your quiz ID differs, and so do the other property names. Your developer edits the custom properties in the template to match the ones your quiz sends, then inserts the code as a custom HTML block in the Omnisend email template.
Here are some email templates that you can use as a reference:
- Basic Slots Template (4-Step Skincare Routine)
- Advanced Slots Template (Morning & Night Routine)
- Products List Template (Coffee Recommendations)
These templates will not work if you paste them in unchanged, because they were written for a demo quiz. Your quiz ID differs, and so do the other property names. Your developer edits the custom properties in the template to match the ones your quiz sends, then inserts the code as a custom HTML block in the Omnisend email template.
Here are some email templates that you can use as a reference:
- Basic Slots Template (4-Step Skincare Routine)
- Advanced Slots Template (Morning & Night Routine)
- Products List Template (Coffee Recommendations)
These templates will not work if you paste them in unchanged, because they were written for a demo quiz. Your quiz ID differs, and so do the other property names. Your developer edits the custom properties in the template to match the ones your quiz sends, then inserts the code as a custom HTML block in the Omnisend email template.
This article explains how to connect your quiz to Omnisend, build a segment from the customers who finished it, and email them their quiz results.