How to Send Quiz Leads to Shopify Customers
You can add new customers automatically to your Shopify Customers list every time someone completes the quiz. Once someone leaves their email in the quiz, their Shopify Customer profile will be updated with their name, email, phone number and customer tags.
This article explains how to connect your quiz to Shopify Customers, tag respondents based on their answers, and build a Shopify Flow targeted at quiz takers.
Link Quiz to Shopify Customers
Before you begin
Ensure your quiz has an email question. Without an email question the app won't be able to send any data to Shopify Customers or Shopify Flow.
(optional) Tag choices with customer tags. Customer tags get trasfered into the Shopify Customer profile and can be used for further retargeting.
- Navigate to App Settings from the side menu.
- Click on the
Shopify Customerstab. -
Toggle the
Enable pushing quiz leads to Shopify Customersswitch to enable the integration.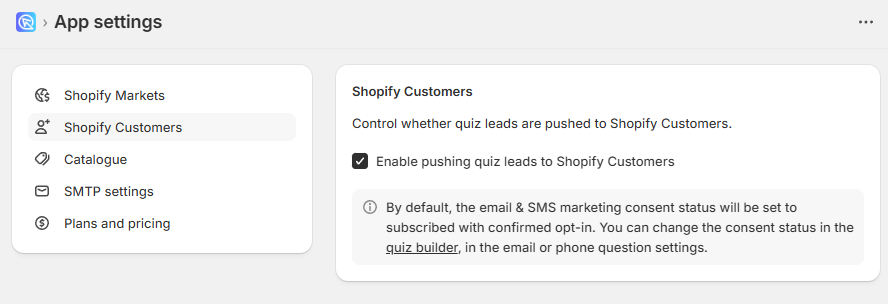
-
Click the
Savebutton to save the changes.
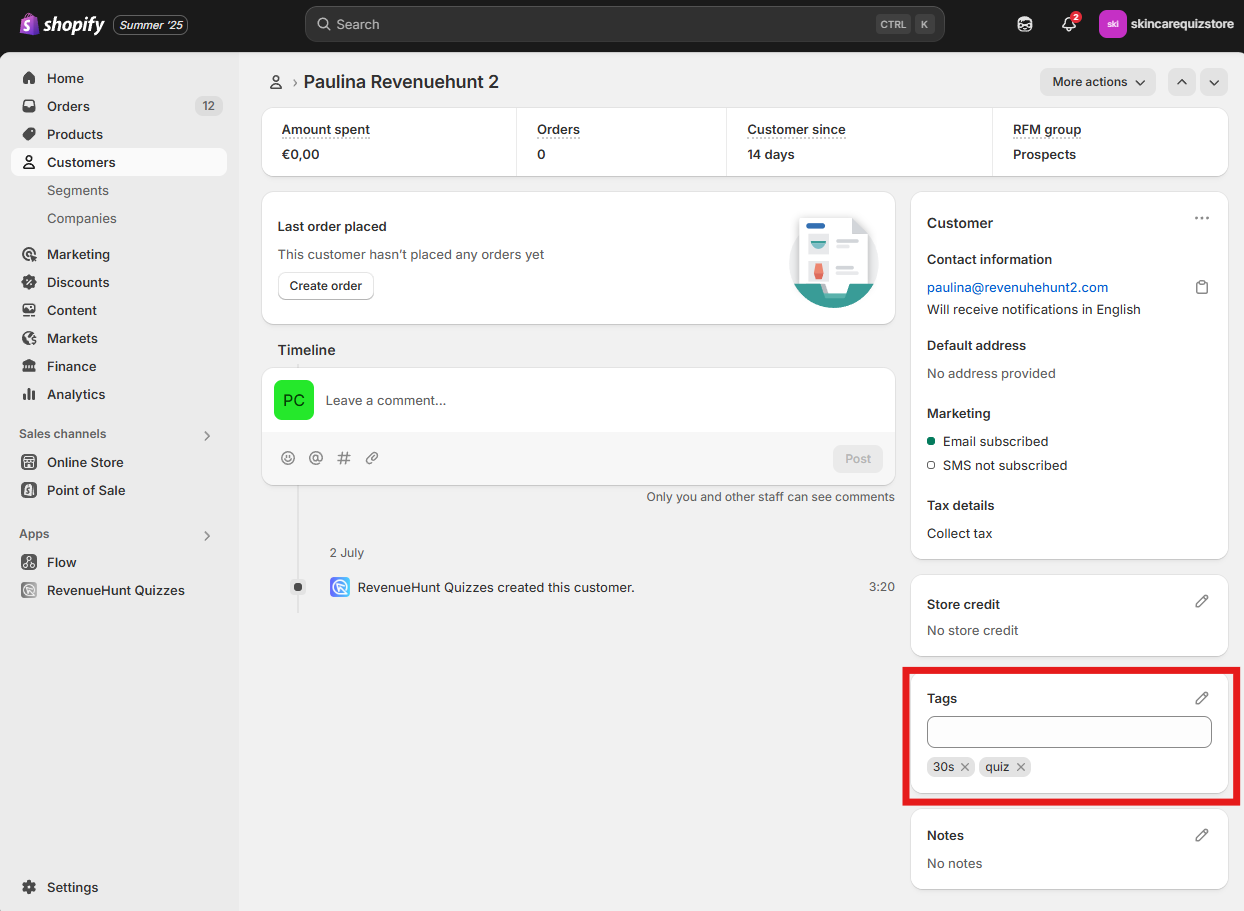
Newly captured leads will appear in your Shopify Customers List with their Customer Tags added to their profile.
Note
This is a global setting that applies to all quizzes in your shop.
Note
If a profile with the same email already exists, it will simply be updated with the customer tags from the quiz.
Customer tags are added every time a customer takes the quiz. Tags from previous attempts are kept, so a customer who retakes the quiz and picks different answers will hold the tags from both attempts.
Note
Customer tags are sent to Shopify exactly as you named them in the quiz builder, with no prefix added. A choice tagged teen appears on the Shopify profile as teen. Use that same name when you reference the tag in a Shopify Flow condition.
- Go to your quiz and click on the Connect tab on the top of the screen. This will open a tab where you can connect your quiz with multiple third-party services.
- Then click on the
Connectbutton in theShopify Customerssection. This will authorize our app to connect with your Shopify Customers List. - Click the
Publishbutton to save the changes and update the preview/live quiz with new settings.
Newly captured leads will appear in your Shopify Customers List with their Customer Tags added to their profile.
Note
If a profile with the same email already exists, it will simply be updated with the customer tags from the quiz.
Customer tags are updated every time a customer takes the quiz.
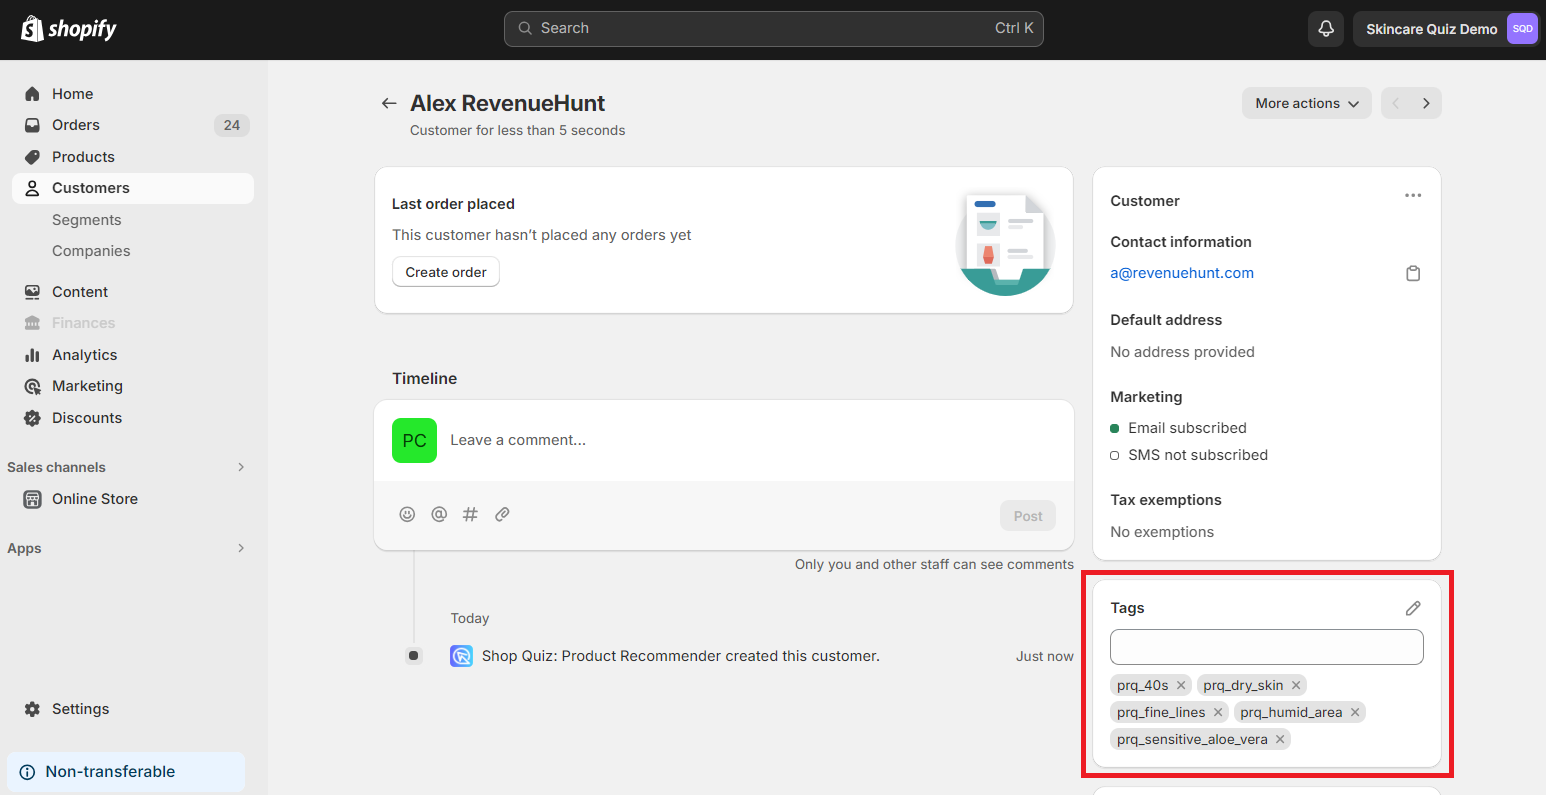
Note
Tags coming from the quiz will have a prq_ prefix added. So if you created a tag called teen in Shopify profile, it will be available as prq_teen.
Not applicable.
Not applicable.
Not applicable.
Not applicable.
Change subscribed/consent status for email and phone questions
By default, all the contacts added to the Shopify Customers list via the quiz will be marked as subscribed and their consent to receiving marketing information was given. It is not possible to change the default consent state.
However, there are many ways you can ask the customer for marketing consent directly in the quiz.
Tip
Check this article to learn how to ask for marketing consent directly in the quiz.
By default, all the contacts added to the list via the quiz will be marked as subscribed and their consent to receiving marketing information was given. You can change that in the email and phone questions settings.
- To change the default Consent state and Opt-in level, go to the email or phone question in the Quiz Builder.
-
Open the question settings.
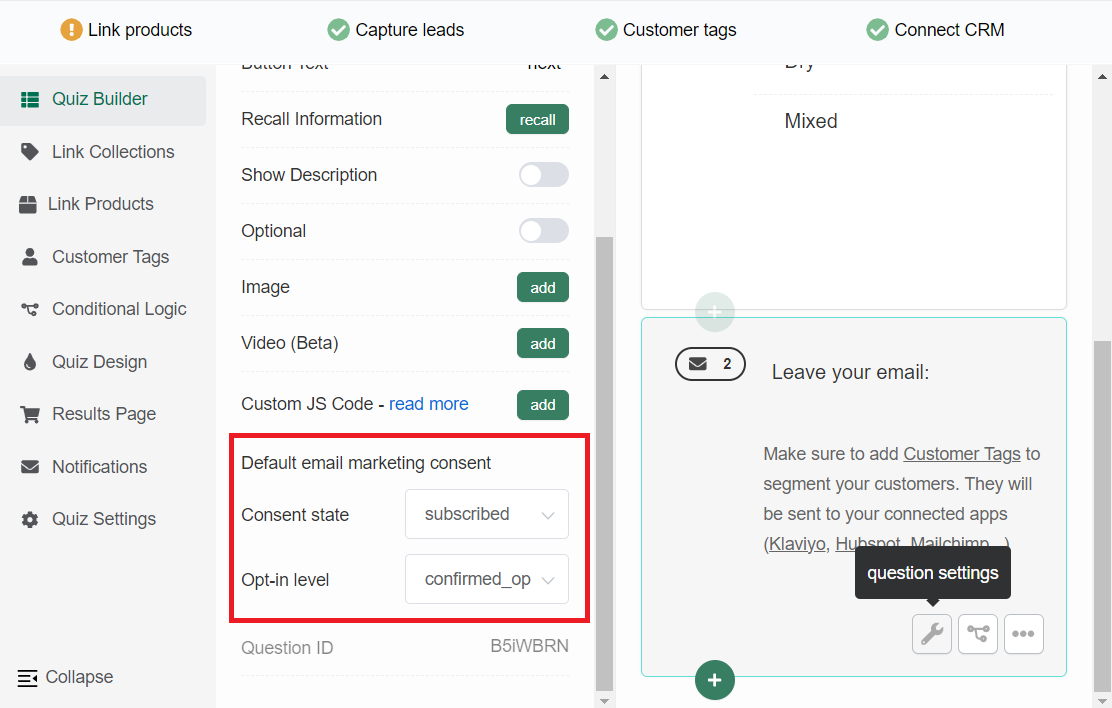
-
Under
Consent state, you can select eithersubscribedornon-subscribed. -
Under
Opt-in level, you can select eitherconfirmed_opt_inorsingle_opt_in(pick this option if you only want to send the one results email to the customer).
-
-
Click the
Publishbutton to update the preview/live quiz with new settings.
Not applicable.
Not applicable.
Not applicable.
Not applicable.
Tag Quiz Choices to Segment Shopify Customers
You can use Customer Tags to send quiz answers that the customer provided in the quiz to their Shopify Customer's profile.
Follow these steps to add tags to your quiz choices and test the setup:
-
Adding Tags to Quiz Choices: To add tags to your quiz choices, follow these steps:
- Open the Revenue Hunt Quizzes app and select your quiz.
- Navigate to the choice settings section.
- Under Customer Tags, create new tags for each choice. For example, create a tag called
teenand assign it to the relevant choice. - Repeat this process for other choices, adding appropriate tags as needed (e.g.,
30s). - Additionally, add a common tag (e.g.,
quiz) to all choices in one of the questions to identify participants from the product recommendation quiz. Anyone who takes the quiz will be tagged with this common tag.
-
Saving Changes: After adding the desired tags, click
Saveto save your changes. - Test the quiz:
Previewthe quiz using the same or a new email to test the tagging functionality. - Refresh the Shopify Customers list: Once participants complete the quiz, refresh the Shopify Customers list to see the leads being added.
- View the customer tags: Open the profile of a participant to view their name, email, and the associated customer tags from the quiz.
You can then use these tags to create a Shopify email Flow.
You can use Customer Tags to send quiz answers that the customer provided in the quiz to their Shopify Customer's profile.
Follow these steps to add tags to your quiz choices and test the setup:
-
Adding Tags to Quiz Choices: To add tags to your quiz choices, follow these steps:
- Open the Revenue Hunt Quizzes app and select your quiz.
- Navigate to the Customer Tags section.
- Create new tags for each choice. For example, create a tag called
teenand assign it to the relevant choice. - Repeat this process for other choices, adding appropriate tags as needed (e.g.,
30s,40s,50s,60s,dry skin,oily skin, etc.). - Additionally, add a common tag (e.g.,
quiz) to all choices in one of the questions to identify participants from the product recommendation quiz. Anyone who takes the quiz will be tagged with this common tag.
-
Saving Changes: After adding the desired tags, click
Publishto save your changes. - Test the quiz:
Previewthe quiz using the same or a new email to test the tagging functionality. - Refresh the Shopify Customers list: Once participants complete the quiz, refresh the Shopify Customers list to see the leads being added.
- View the customer tags: Open the profile of a participant to view their name, email, and the associated customer tags from the quiz.
Note
Tags coming from the quiz will have a prq_ prefix added. So if you created a tag called teen in Shopify profile, it will be available as prq_teen.
You can then use these tags to create a Shopify email Flow.
Not applicable.
Not applicable.
Not applicable.
Not applicable.
Set up Shopify Flow
Shopify Flow runs an automation after someone takes your quiz. There are two ways to start that workflow.
Start from the quiz completion (recommended)
The Quiz Completed trigger from Product Recommendation Quiz starts a workflow every time a respondent finishes the quiz and leaves their email address. It carries the quiz data with it, so your conditions and actions can use the answers, the recommended products, the customer tags and the quiz variable scores.
- Make sure your quiz has an email question and that
Enable pushing quiz leads to Shopify Customersis turned on, as described above. Without both of these, nothing reaches Flow. - Install Shopify Flow if your store does not have it yet. It is free.
- Open Shopify Flow and click
Create workflow. - Click
Select a trigger, chooseProduct Recommendation Quiz, thenQuiz Completed. -
Add the conditions and actions you want to run after a completion. Wherever a field accepts a variable, click
Add variableto pull in the quiz data.Info
For every field the trigger makes available, including the answers, recommendations and variable scores, see What data is sent.
-
Click
Turn on workflow. - Complete your published quiz with an email address, then reopen the workflow and check its recent runs.
RevenueHunt reports whether Shopify has seen an active workflow in App Settings > Shopify Customers > Shopify Flow.
Tip
For worked examples, including how to email your team with the quiz results inside the message and how to branch on a customer tag, see Automate Quiz Completions with Shopify Flow.
Start from a customer tag (alternative)
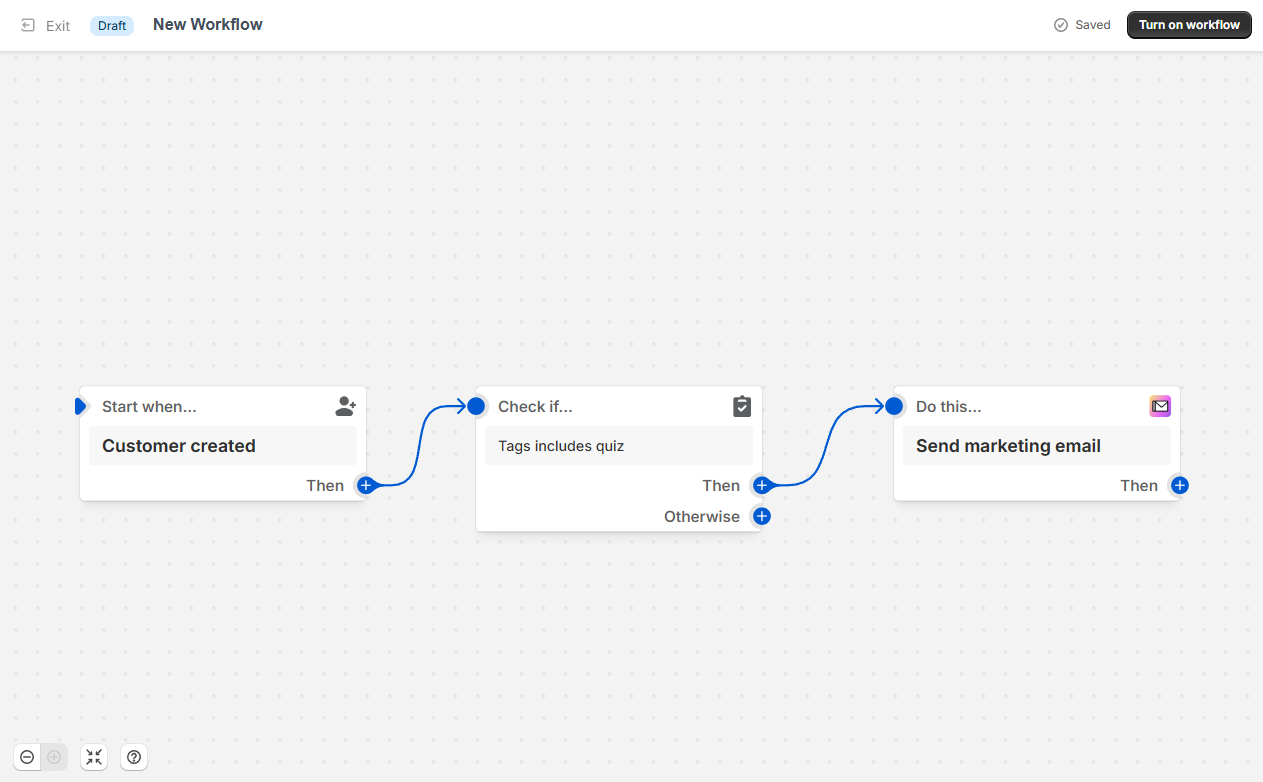
This is the older approach. It uses Shopify's Customer created trigger with a condition on customer tags, so it only runs for brand new customers and it cannot read quiz answers or recommendations. Use it when you deliberately want to act on first time customers only, or if you already have an automation built this way and it still does what you need.
- Open the automations list: go to
Apps > Messaging > Automationsin your Shopify admin and clickCreate automation. Older stores may still reach the same screen fromMarketing > Automations > View templates. - Select a
Create custom automationautomation: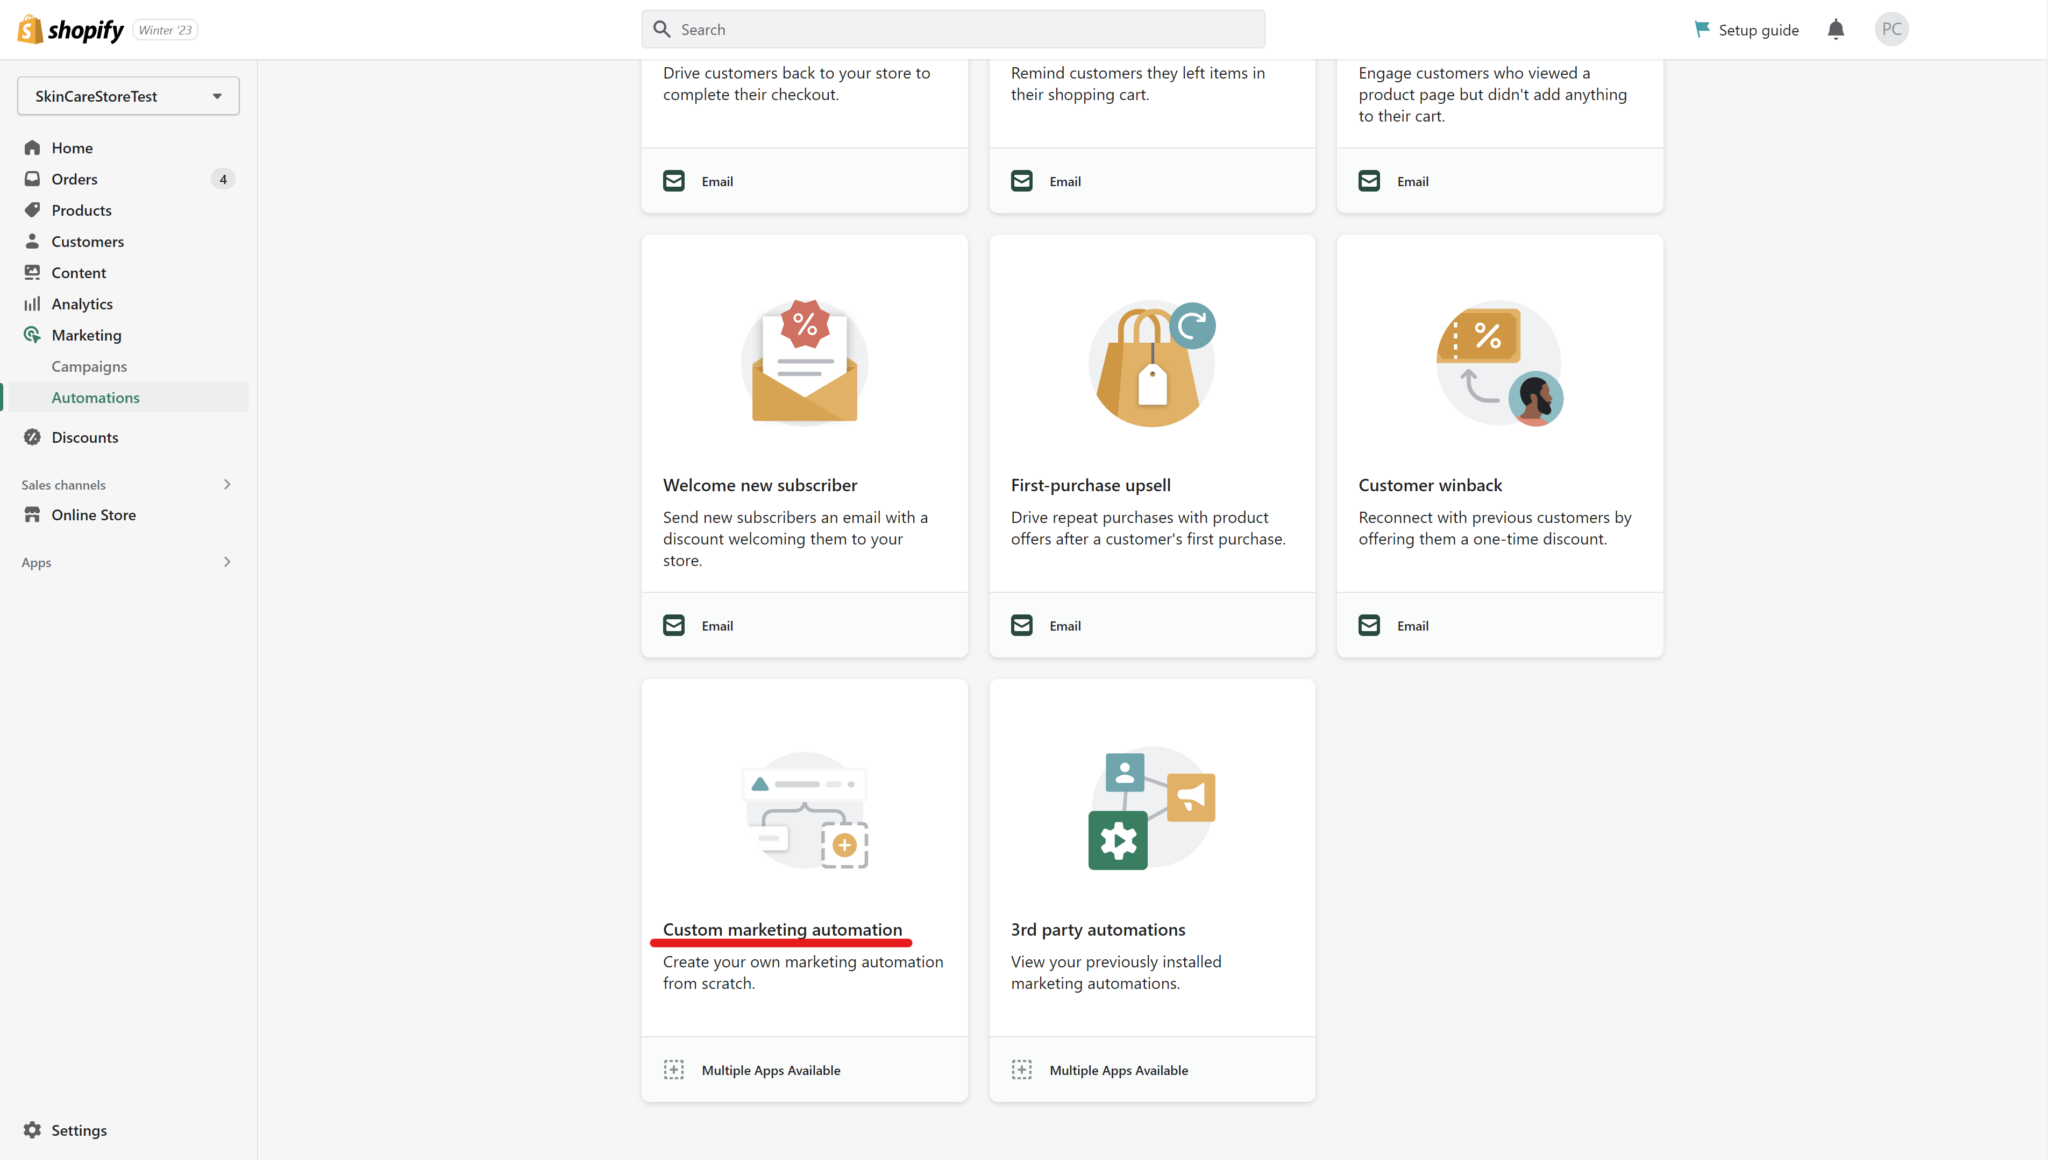
-
Add a trigger: Click anywhere and select the first trigger to be
Customer created.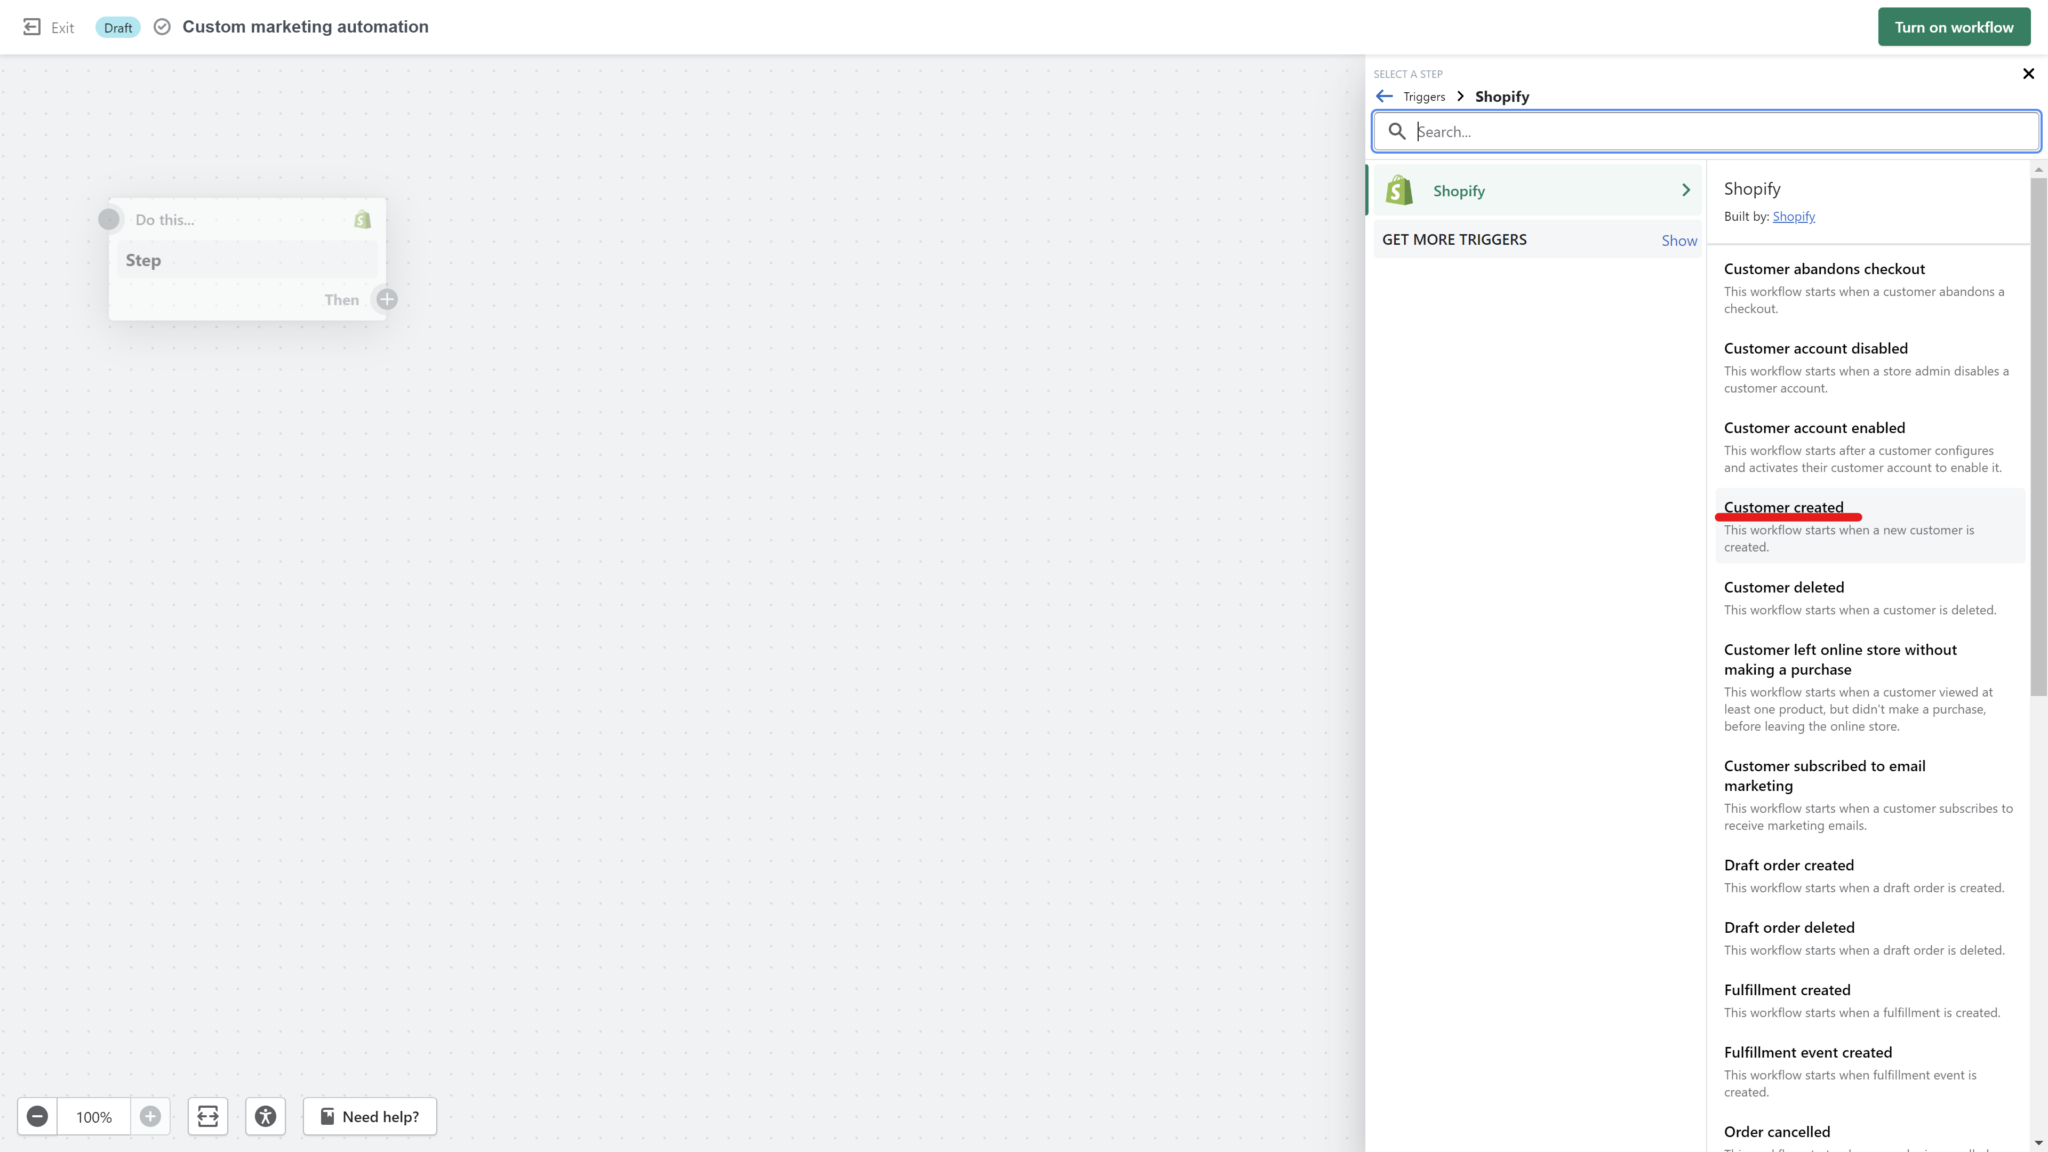
Remember that this fires only for brand new customers. A respondent who already exists in your Shopify Customers list is updated rather than created, so the automation does not run for them.
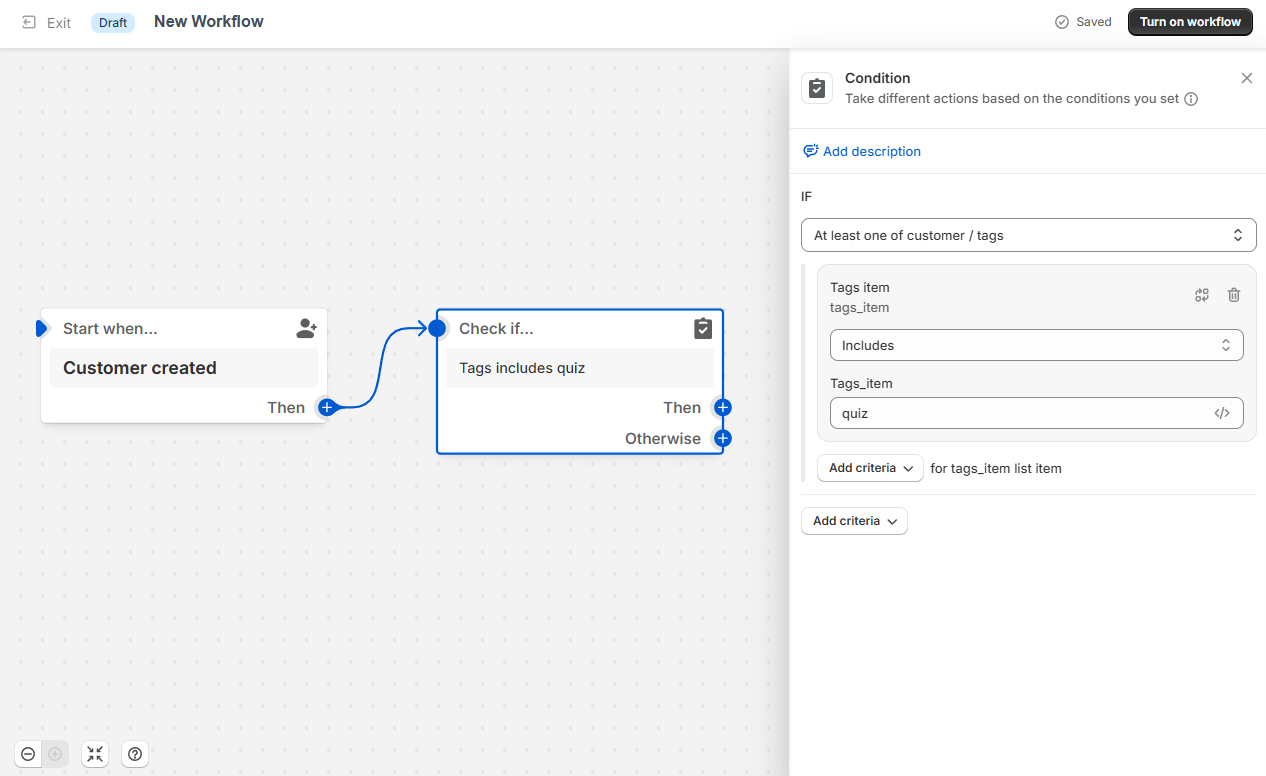
-
Select a condition: Add a
Conditionaction after the trigger. ClickAdd variableand from the list look forcustomerand thentags. Then, set up the condition as follows:At least one customer / tags
includestags_itemquiz.
Type the tag exactly as you named it in the quiz builder.
-
Set up an email: To send a follow-up email to all the quiz contacts that contain the tag (right after the tag is added to their profile), click
Then > Actionand from the list selectSend marketing email. Next, select the email template you want to use.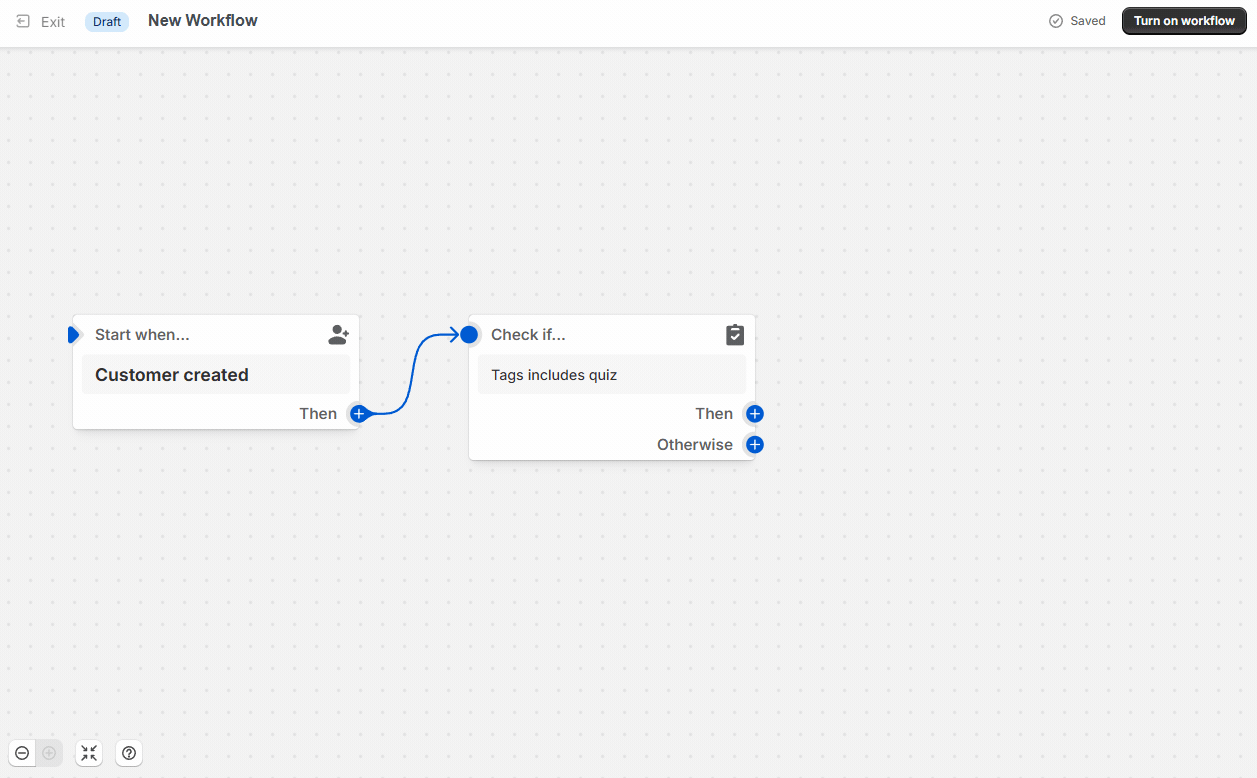
- Save: Remember to
Turn on workflowonce you're done with making the changes.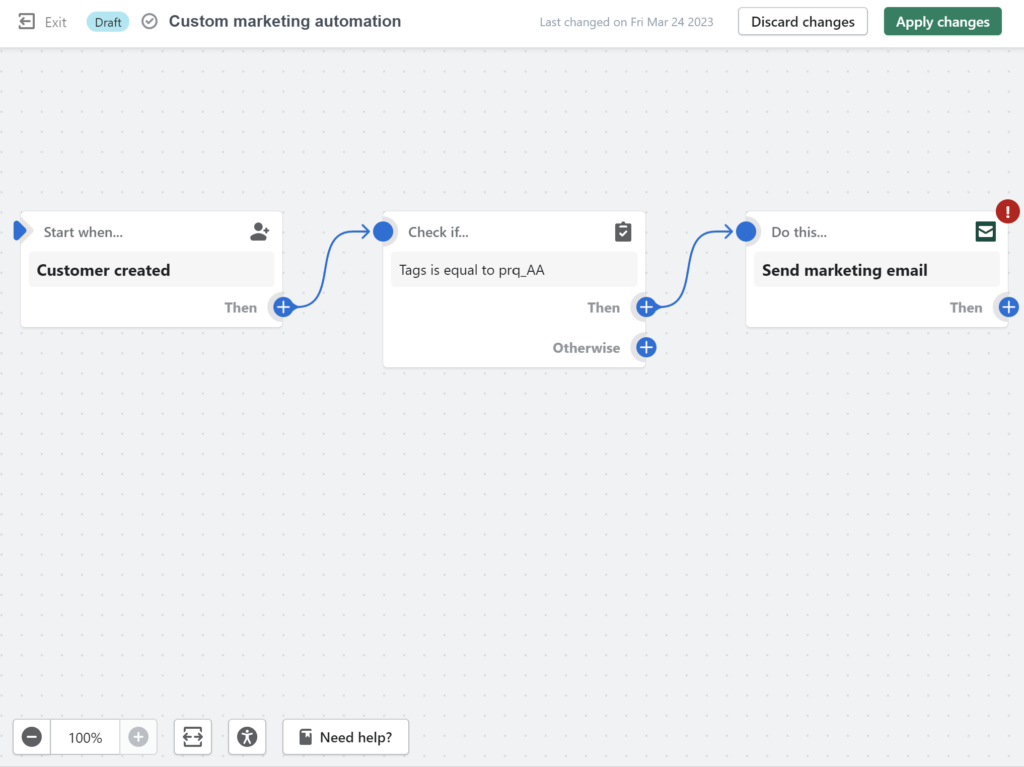
- Test it: complete your published quiz with an email address that does not exist in your Shopify Customers list yet, then open the automation and check its recent runs.
Now, all the quiz takers with a specific tag like quiz will be sent the marketing email.
Note
Since 24 March 2026, marketing automations that use Shopify Messaging emails are managed in the Shopify Messaging app, under Apps > Messaging > Automations. Automations whose marketing action comes from another email app, such as Klaviyo or Seguno, remain in the Shopify Flow app. Existing automations kept working through the move, so you do not need to rebuild anything.
Send marketing email is not a built-in Shopify Flow action. It is provided by the email app you have installed, and it only delivers to customers who are subscribed to marketing. Quiz leads are marked as subscribed by default, as described above.
To learn more about Shopify Automations, check their FAQ page.
- To set up a post-quiz automation head to
Apps > Messaging > Automationsin your Shopify admin and clickCreate automation. Older stores may still reach the same screen fromMarketing > Automations > View templates. - Select a
Create custom automationautomation: - Add a trigger: Click anywhere and select the first trigger to be
Customer created. -
Select a condition: Add a
Conditionaction after the trigger. ClickAdd variableand from the list look forcustomerand thentags. Then, set up the condition as follows:At least one customer / tags
includestags_itemprq_quiz.Note
You need to add the full name of the tag. For example,
prq_oilyskinorprq_Oily Skin.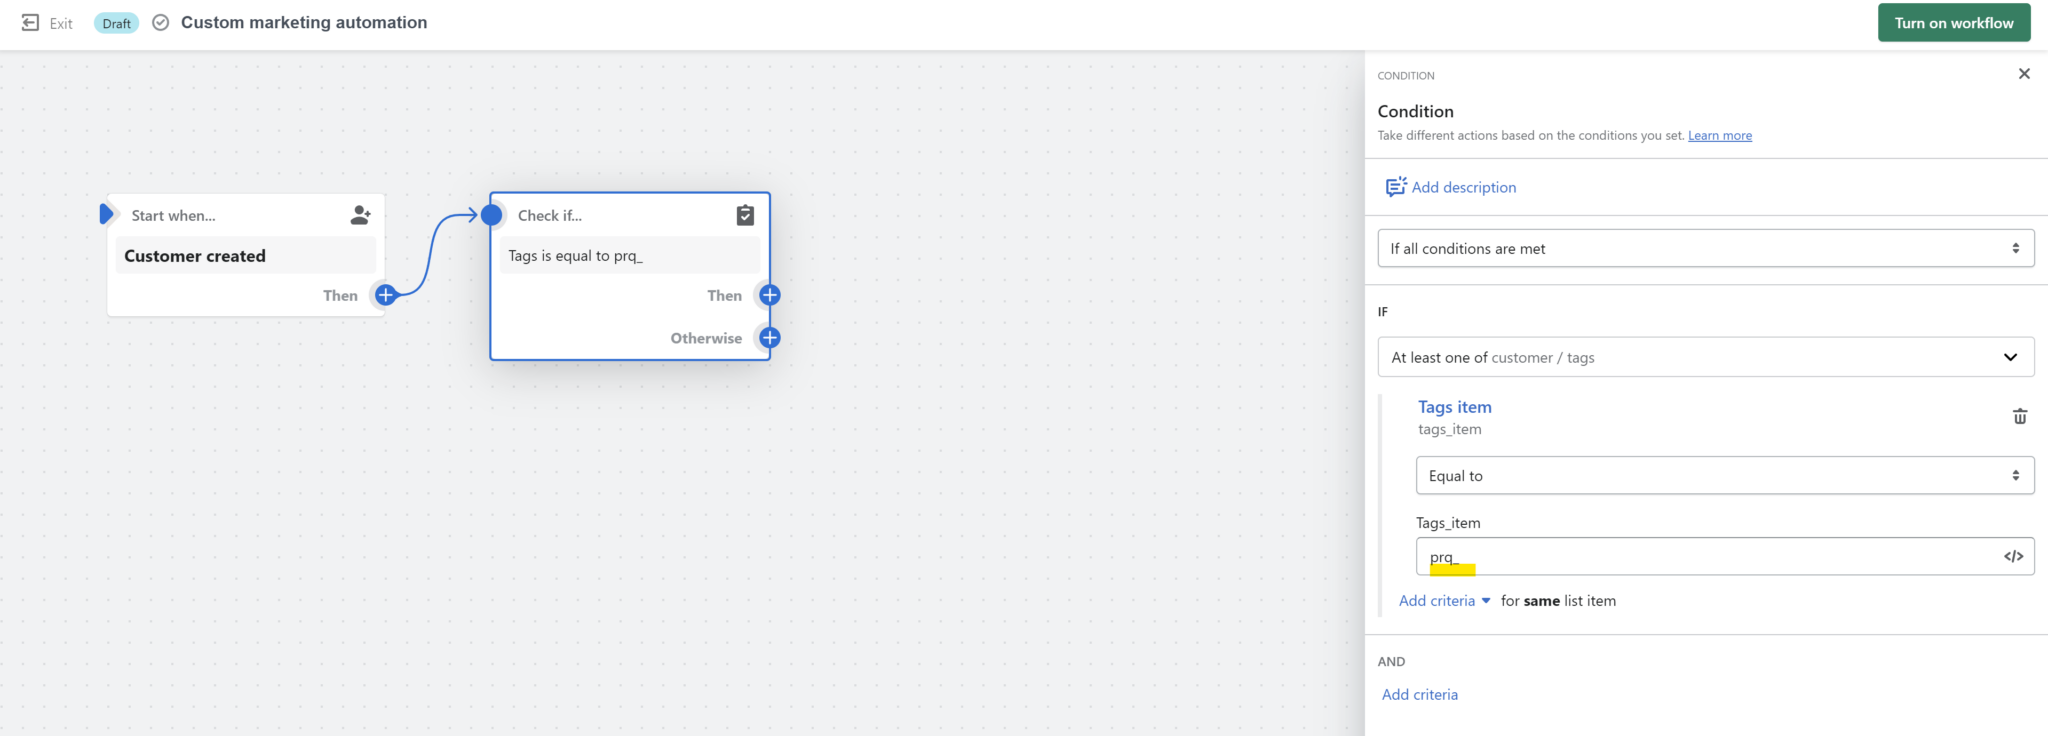
-
Set up an email: To send a follow-up email to all the quiz contacts that contain the
prq_ tag(right after the tag is added to their profile), clickThen > Actionand from the list selectSend marketing email. Next, select the email template you want to use. - Save: Remember to
Turn on workflowonce you're done with making the changes.
Now, all the quiz takers with a specific prq_ tag will be sent the marketing email.
To learn more about Shopify Automations, check their FAQ page.
Not applicable.
Not applicable.
Not applicable.
Not applicable.
By following this article, you can learn how to connect your quiz to Shopify Customers and set up your post-quiz email flow with Shopify Flows.
See also: Automate Quiz Completions with Shopify Flow.