How to Get an External Quiz Link for Emails and Newsletters
This guide walks you through the process of creating an external quiz link that can be embedded in emails and newsletters. This is an effective way to engage your subscribers by incorporating interactive content directly into your email marketing campaigns.
What's an Email Link?
It's a direct link to the quiz for emails.
There are two ways to create an external link to your quiz for emails and newsletters:
-
Link to Dedicated Quiz Page ⬅️ recommended for most marketing campaigns
A quiz is embeded on a specific landing page in your store (for example
https://yourstore.myshopify.com/pages/quiz-page).Embeded quizzes allow better tracking and analytics.
-
A direct link, like
https://yourstore.myshopify.com/#quiz-ABC, that opens a quiz popup.
Quiz on a Dedicated Landing Page
What's an inline quiz on a dedicated landing page?
An inline quiz on a dedicated landing page is a quiz widget embedded directly into a new page in your store. Create a dedicated landing page for the quiz to drive traffic from paid ads or marketing campaigns.
Shopify 1.0 Theme Compatibility
Quizzes created with the 💎Built for Shopify version of the RevenueHunt appcannot be published on Shopify 1.0 themes. Shopify 1.0 themes do not support app embeds, which are required for the V2 integration. App embeds are a feature available in Online Store 2.0 themes, which allow you to add app functionality without touching any code. If you want to use app embeds, you would need to upgrade to an Online Store 2.0 theme.
-
Navigate to Theme Customization: Go to
Online Store > Themesin your Shopify dashboard. Click theCustomizebutton for your active theme. -
Create a New Page Template: click on the
Templatesmenu in the header.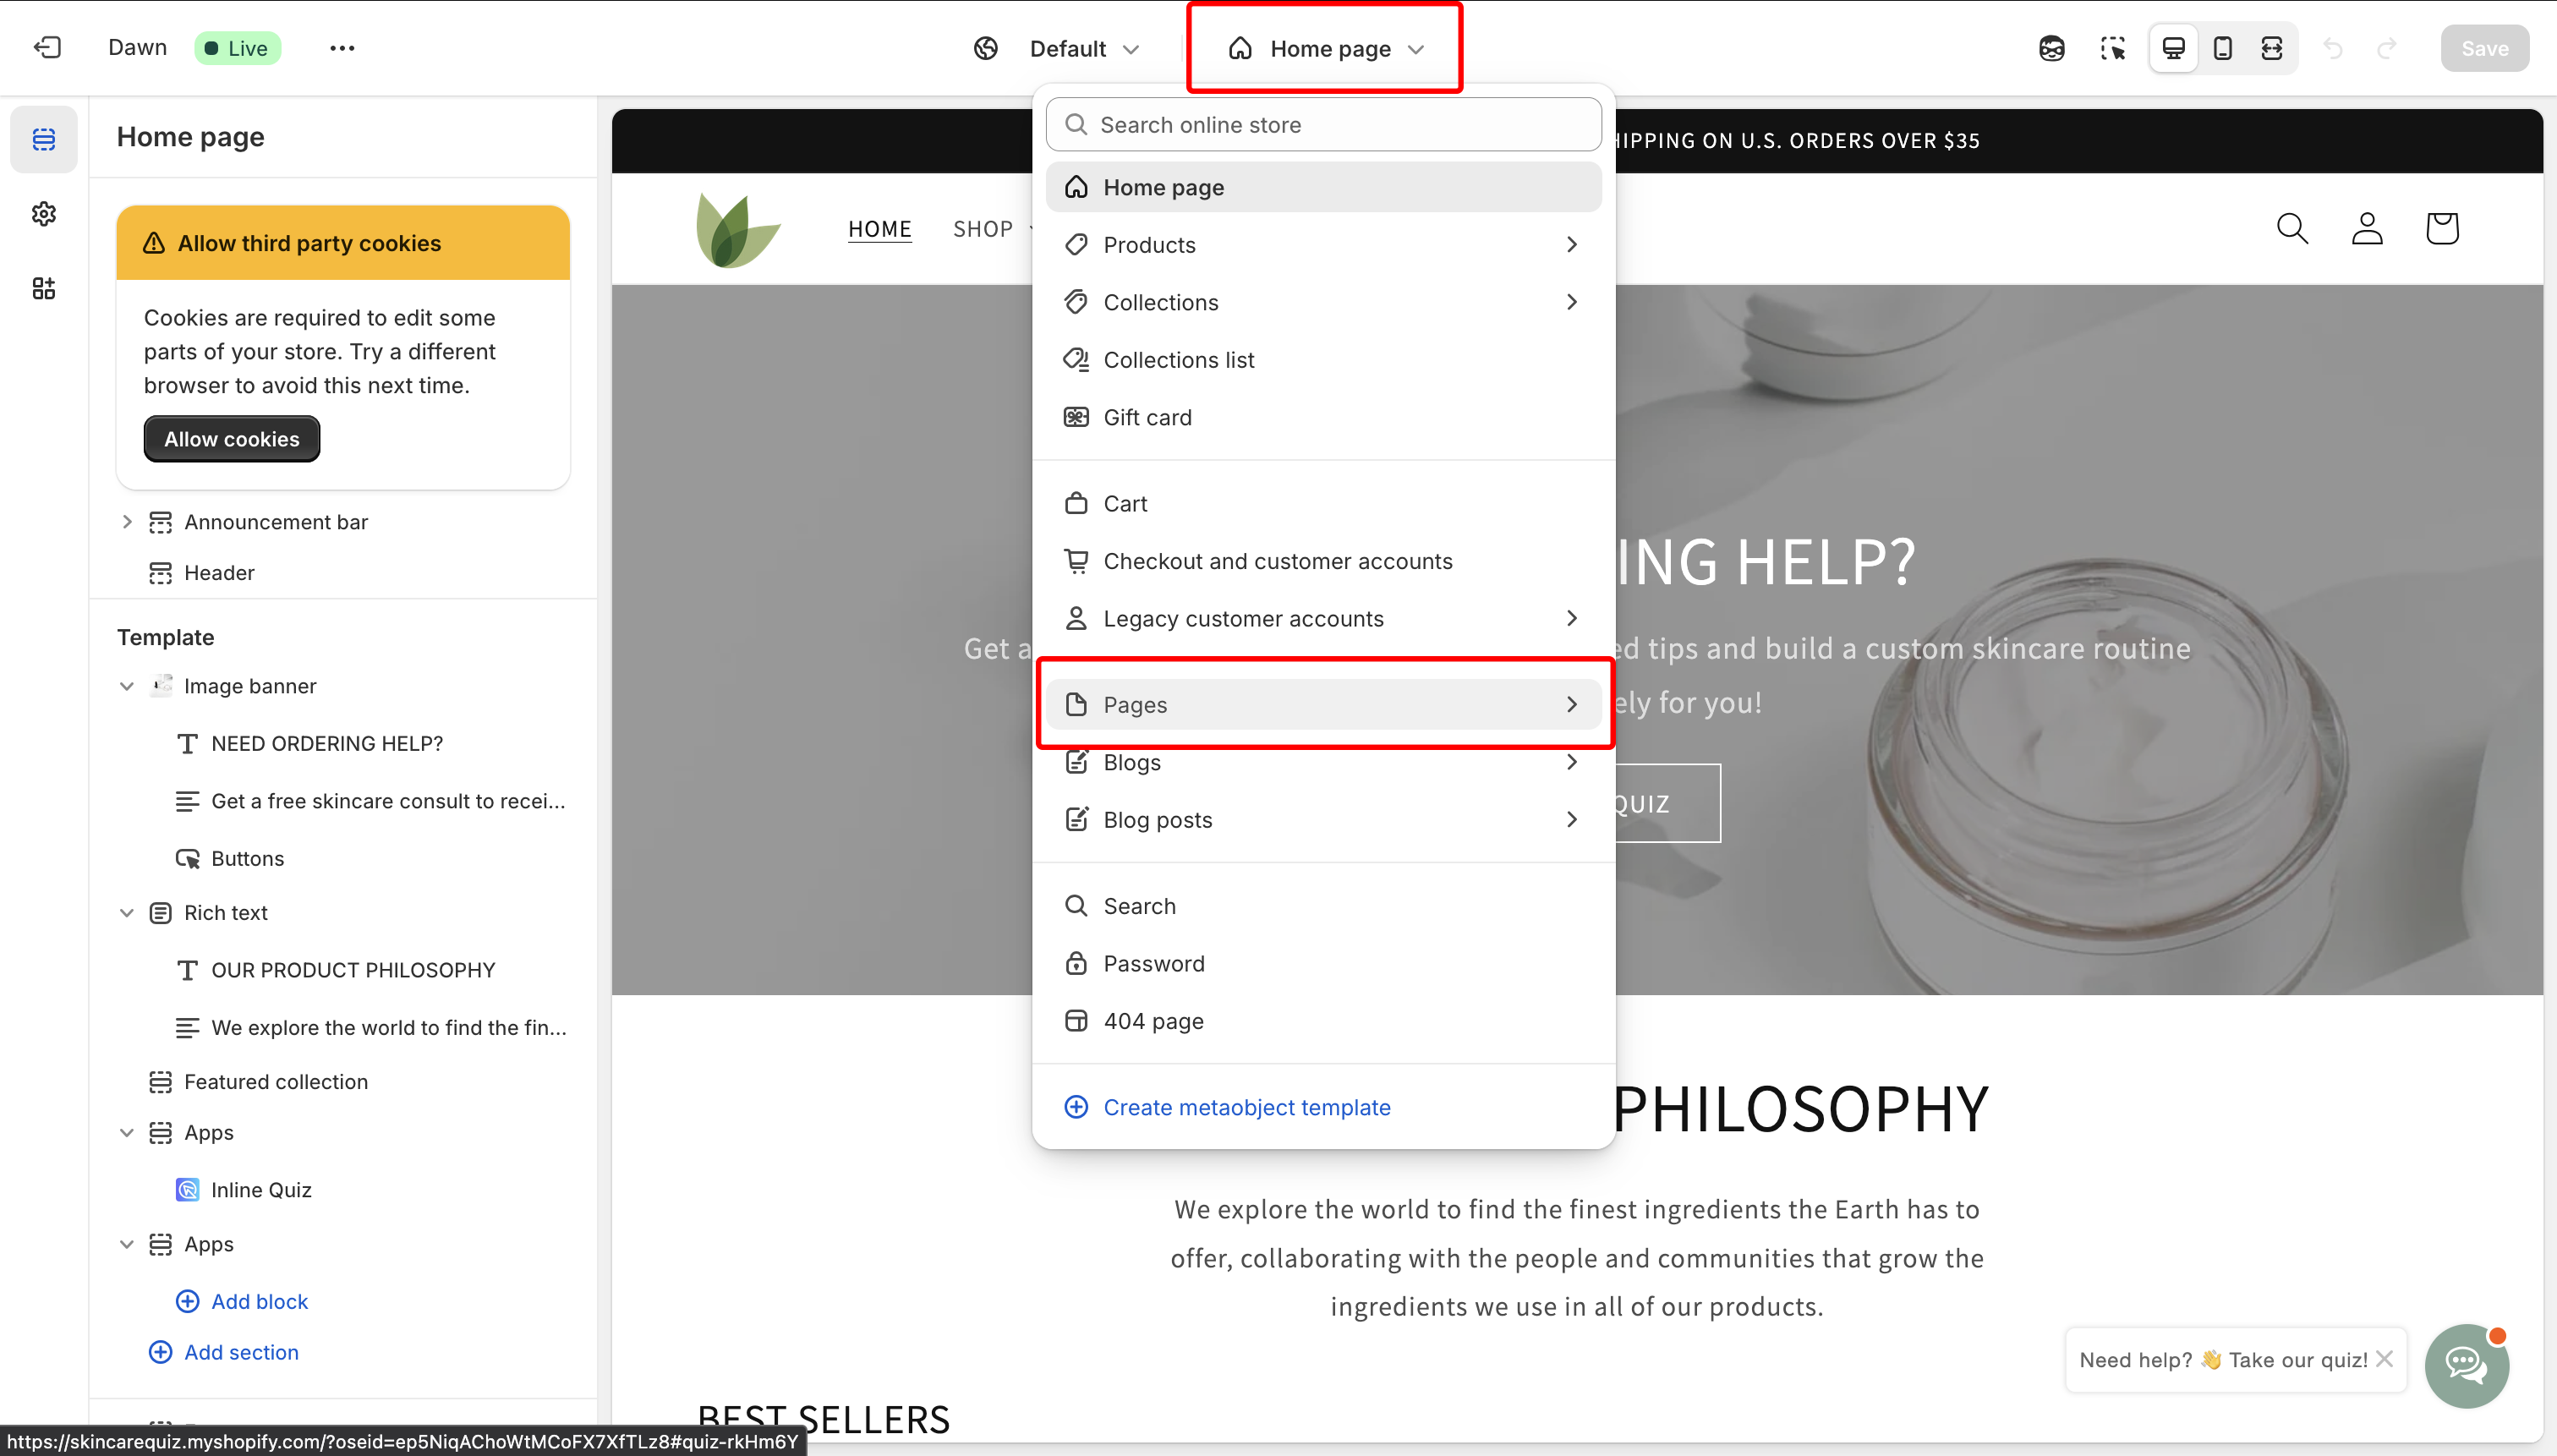 Navigate to
 Pagesand click on theCreate templatelink. Name your template (e.g., quiz-page) and set it as "Based on" your Default page template.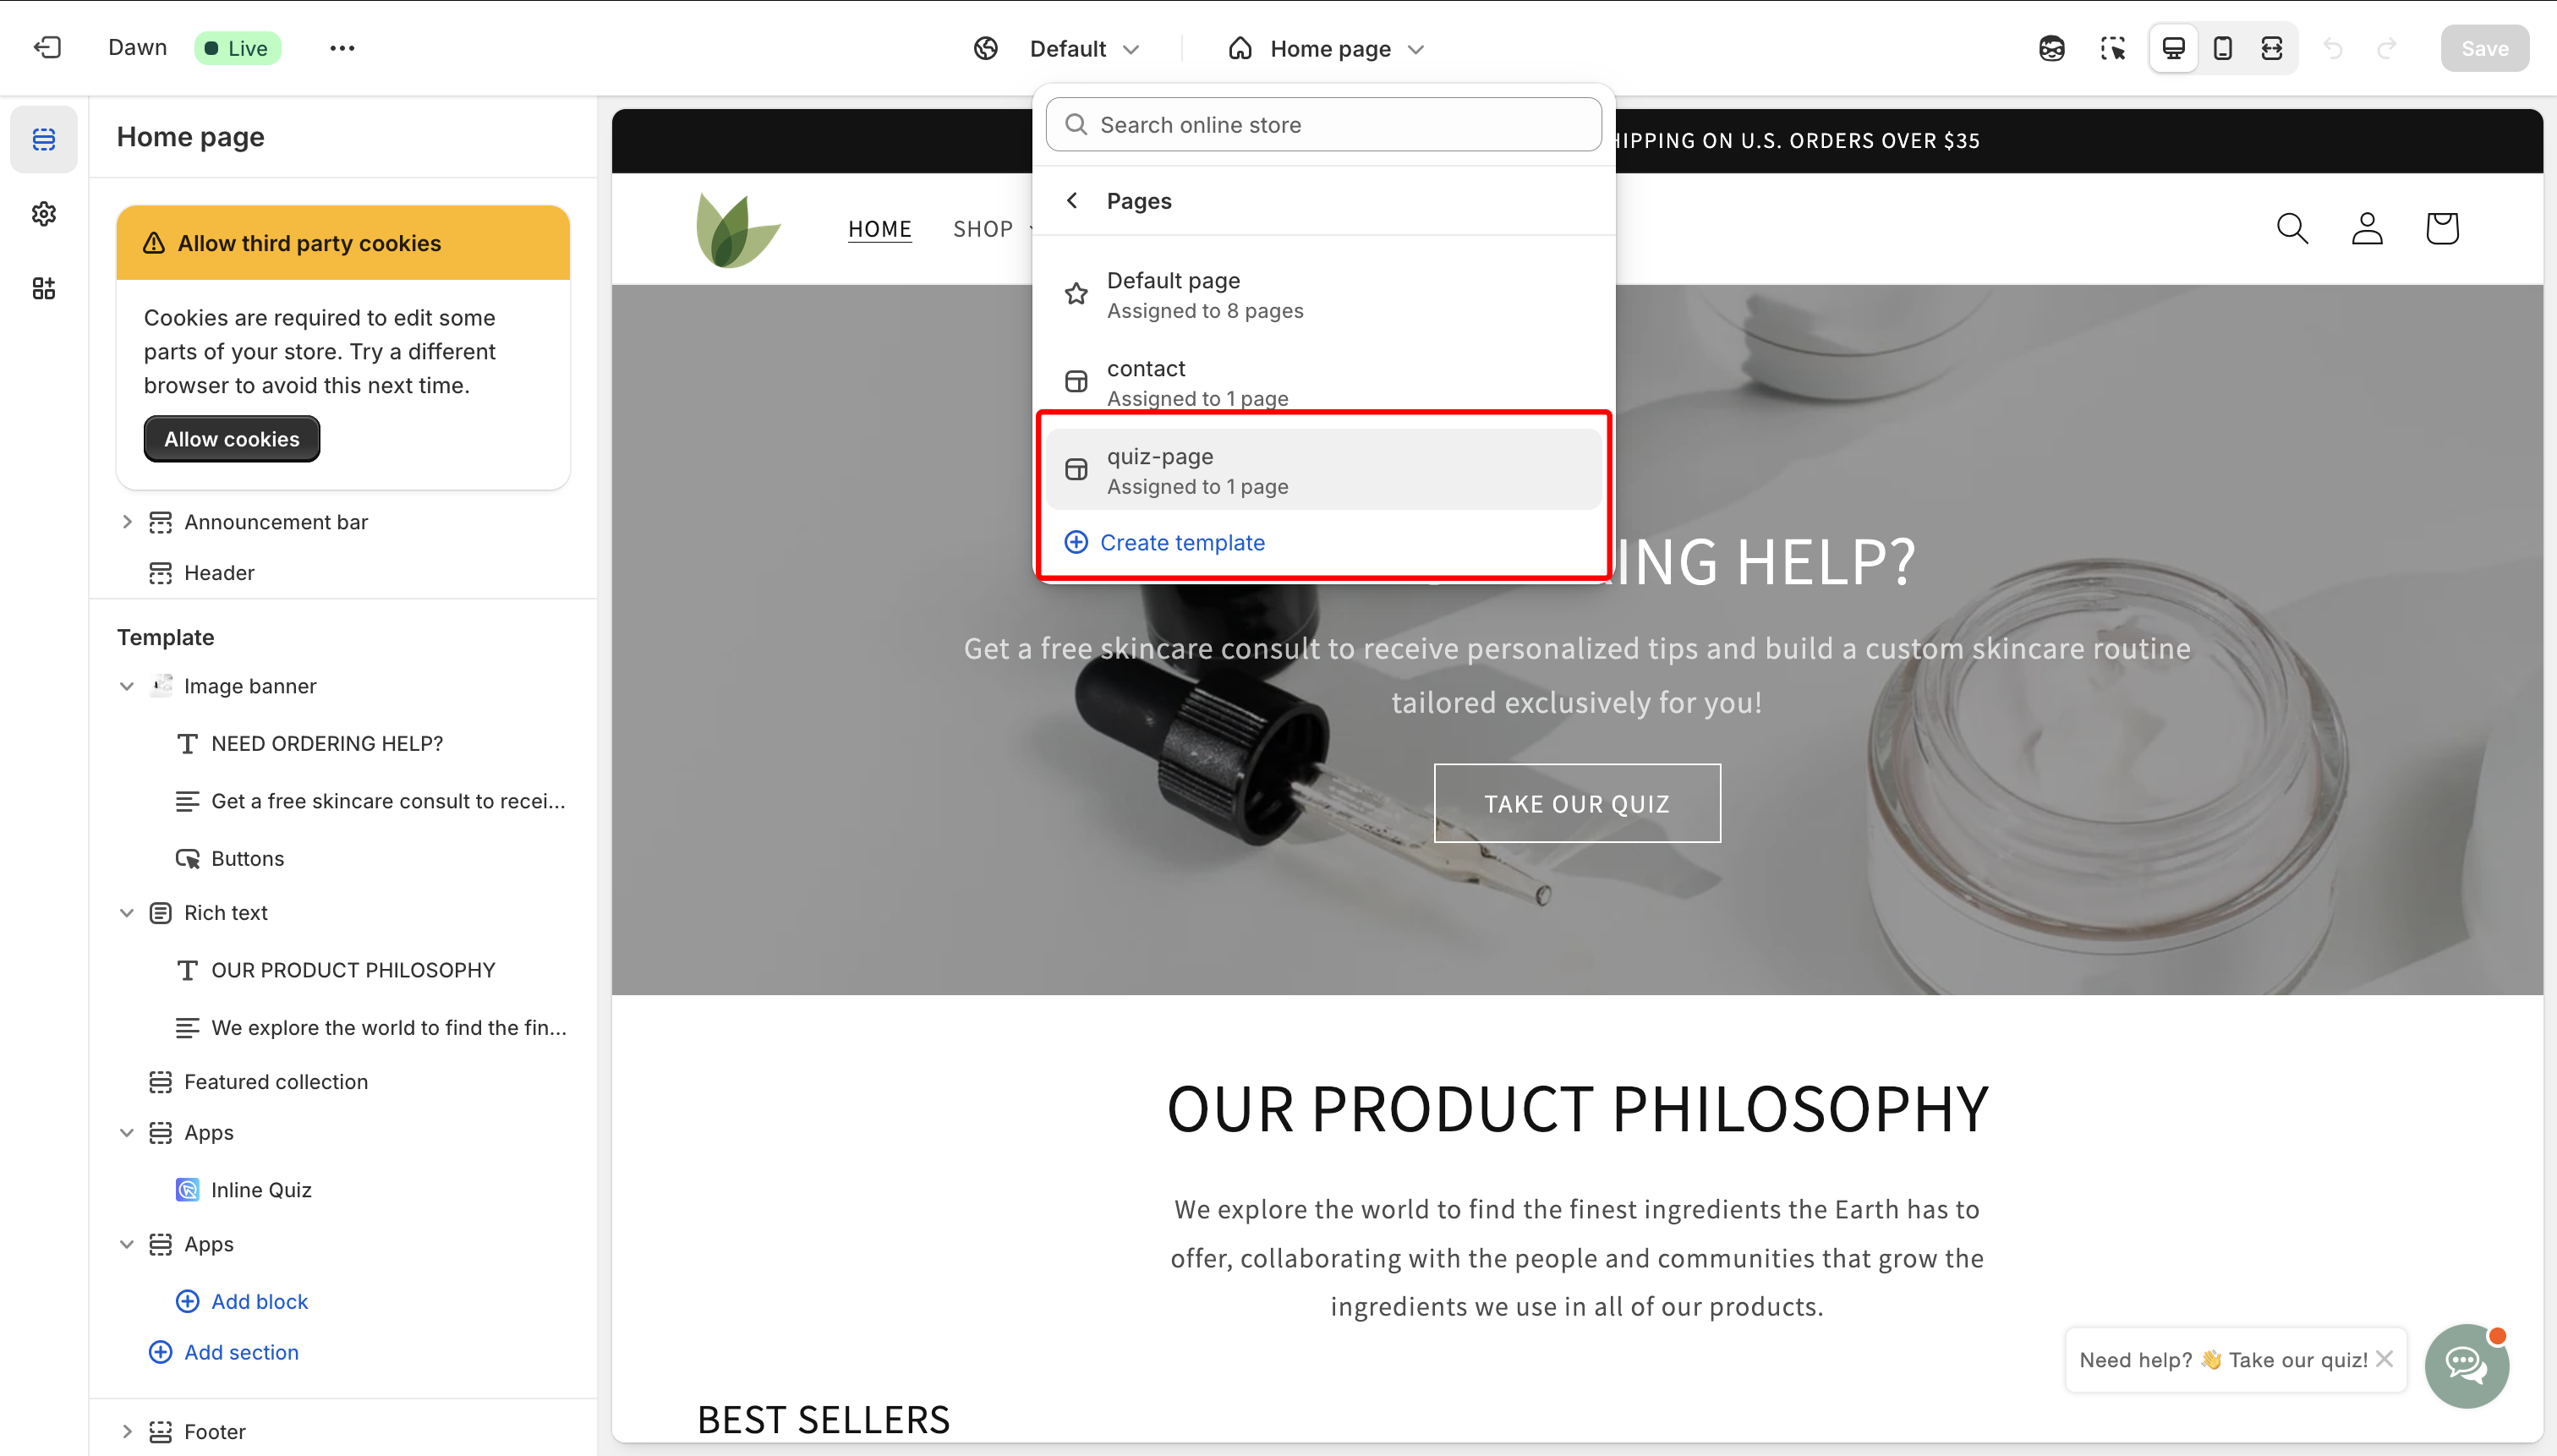
-
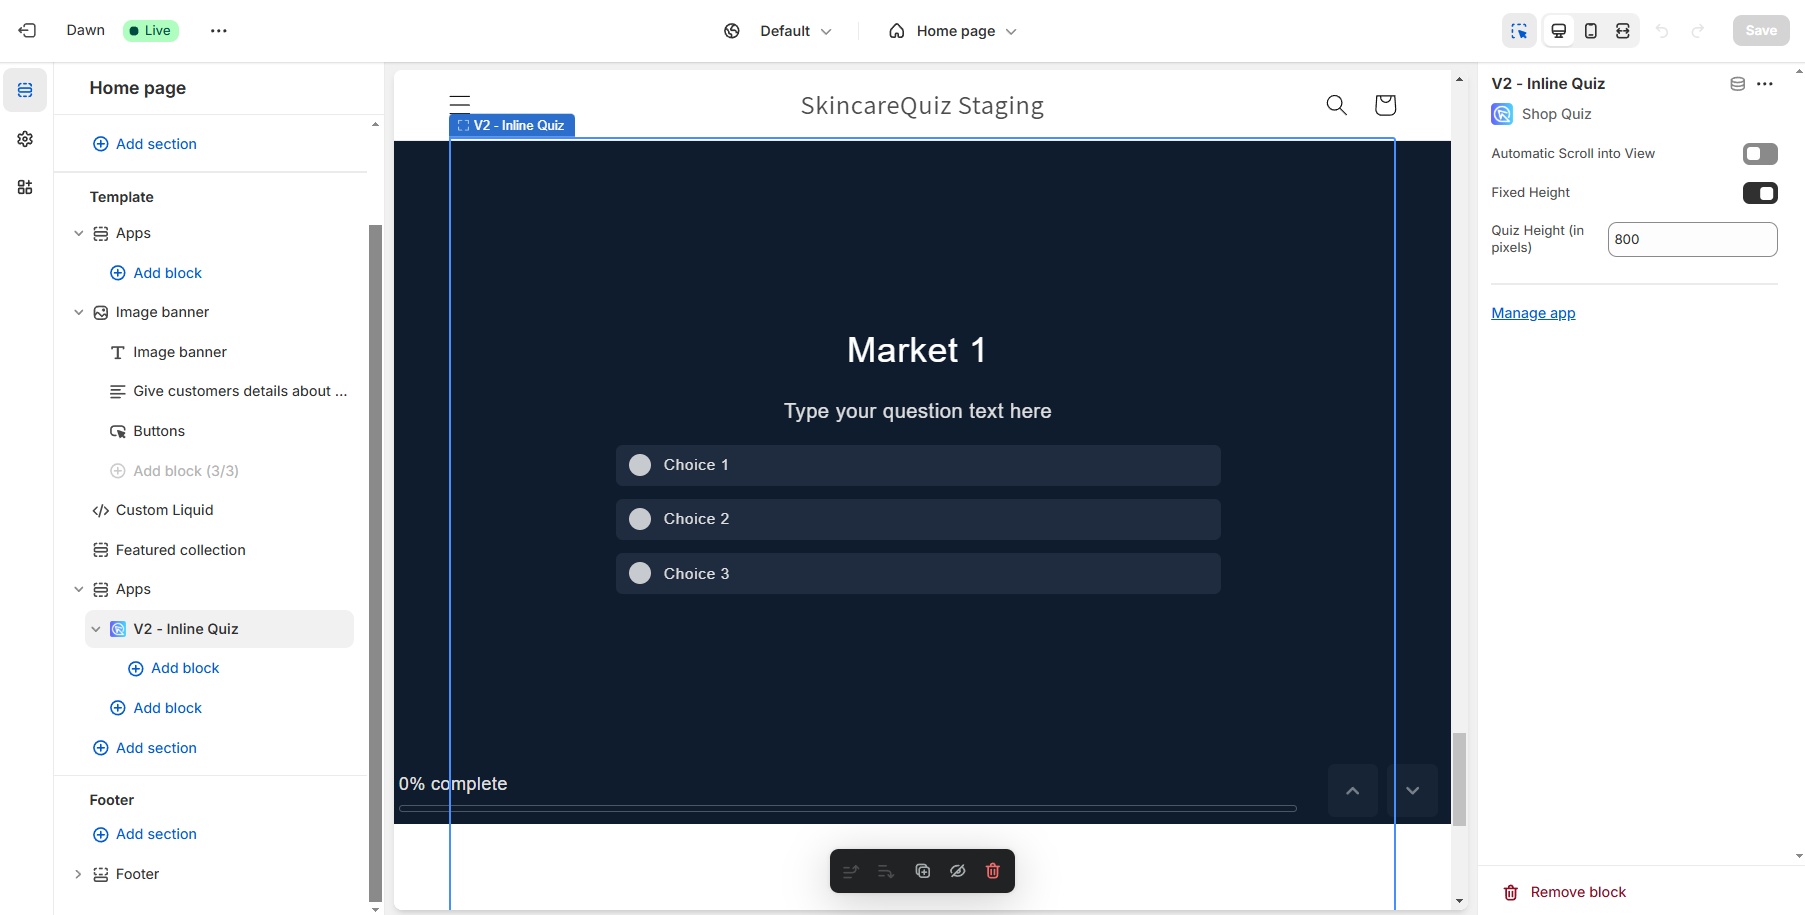
Add Inline Quiz Section: Click on the
Add sectionlink and from theAppssection, findInline Quizfrom RevenueHunt. Select it to add to your quiz page template.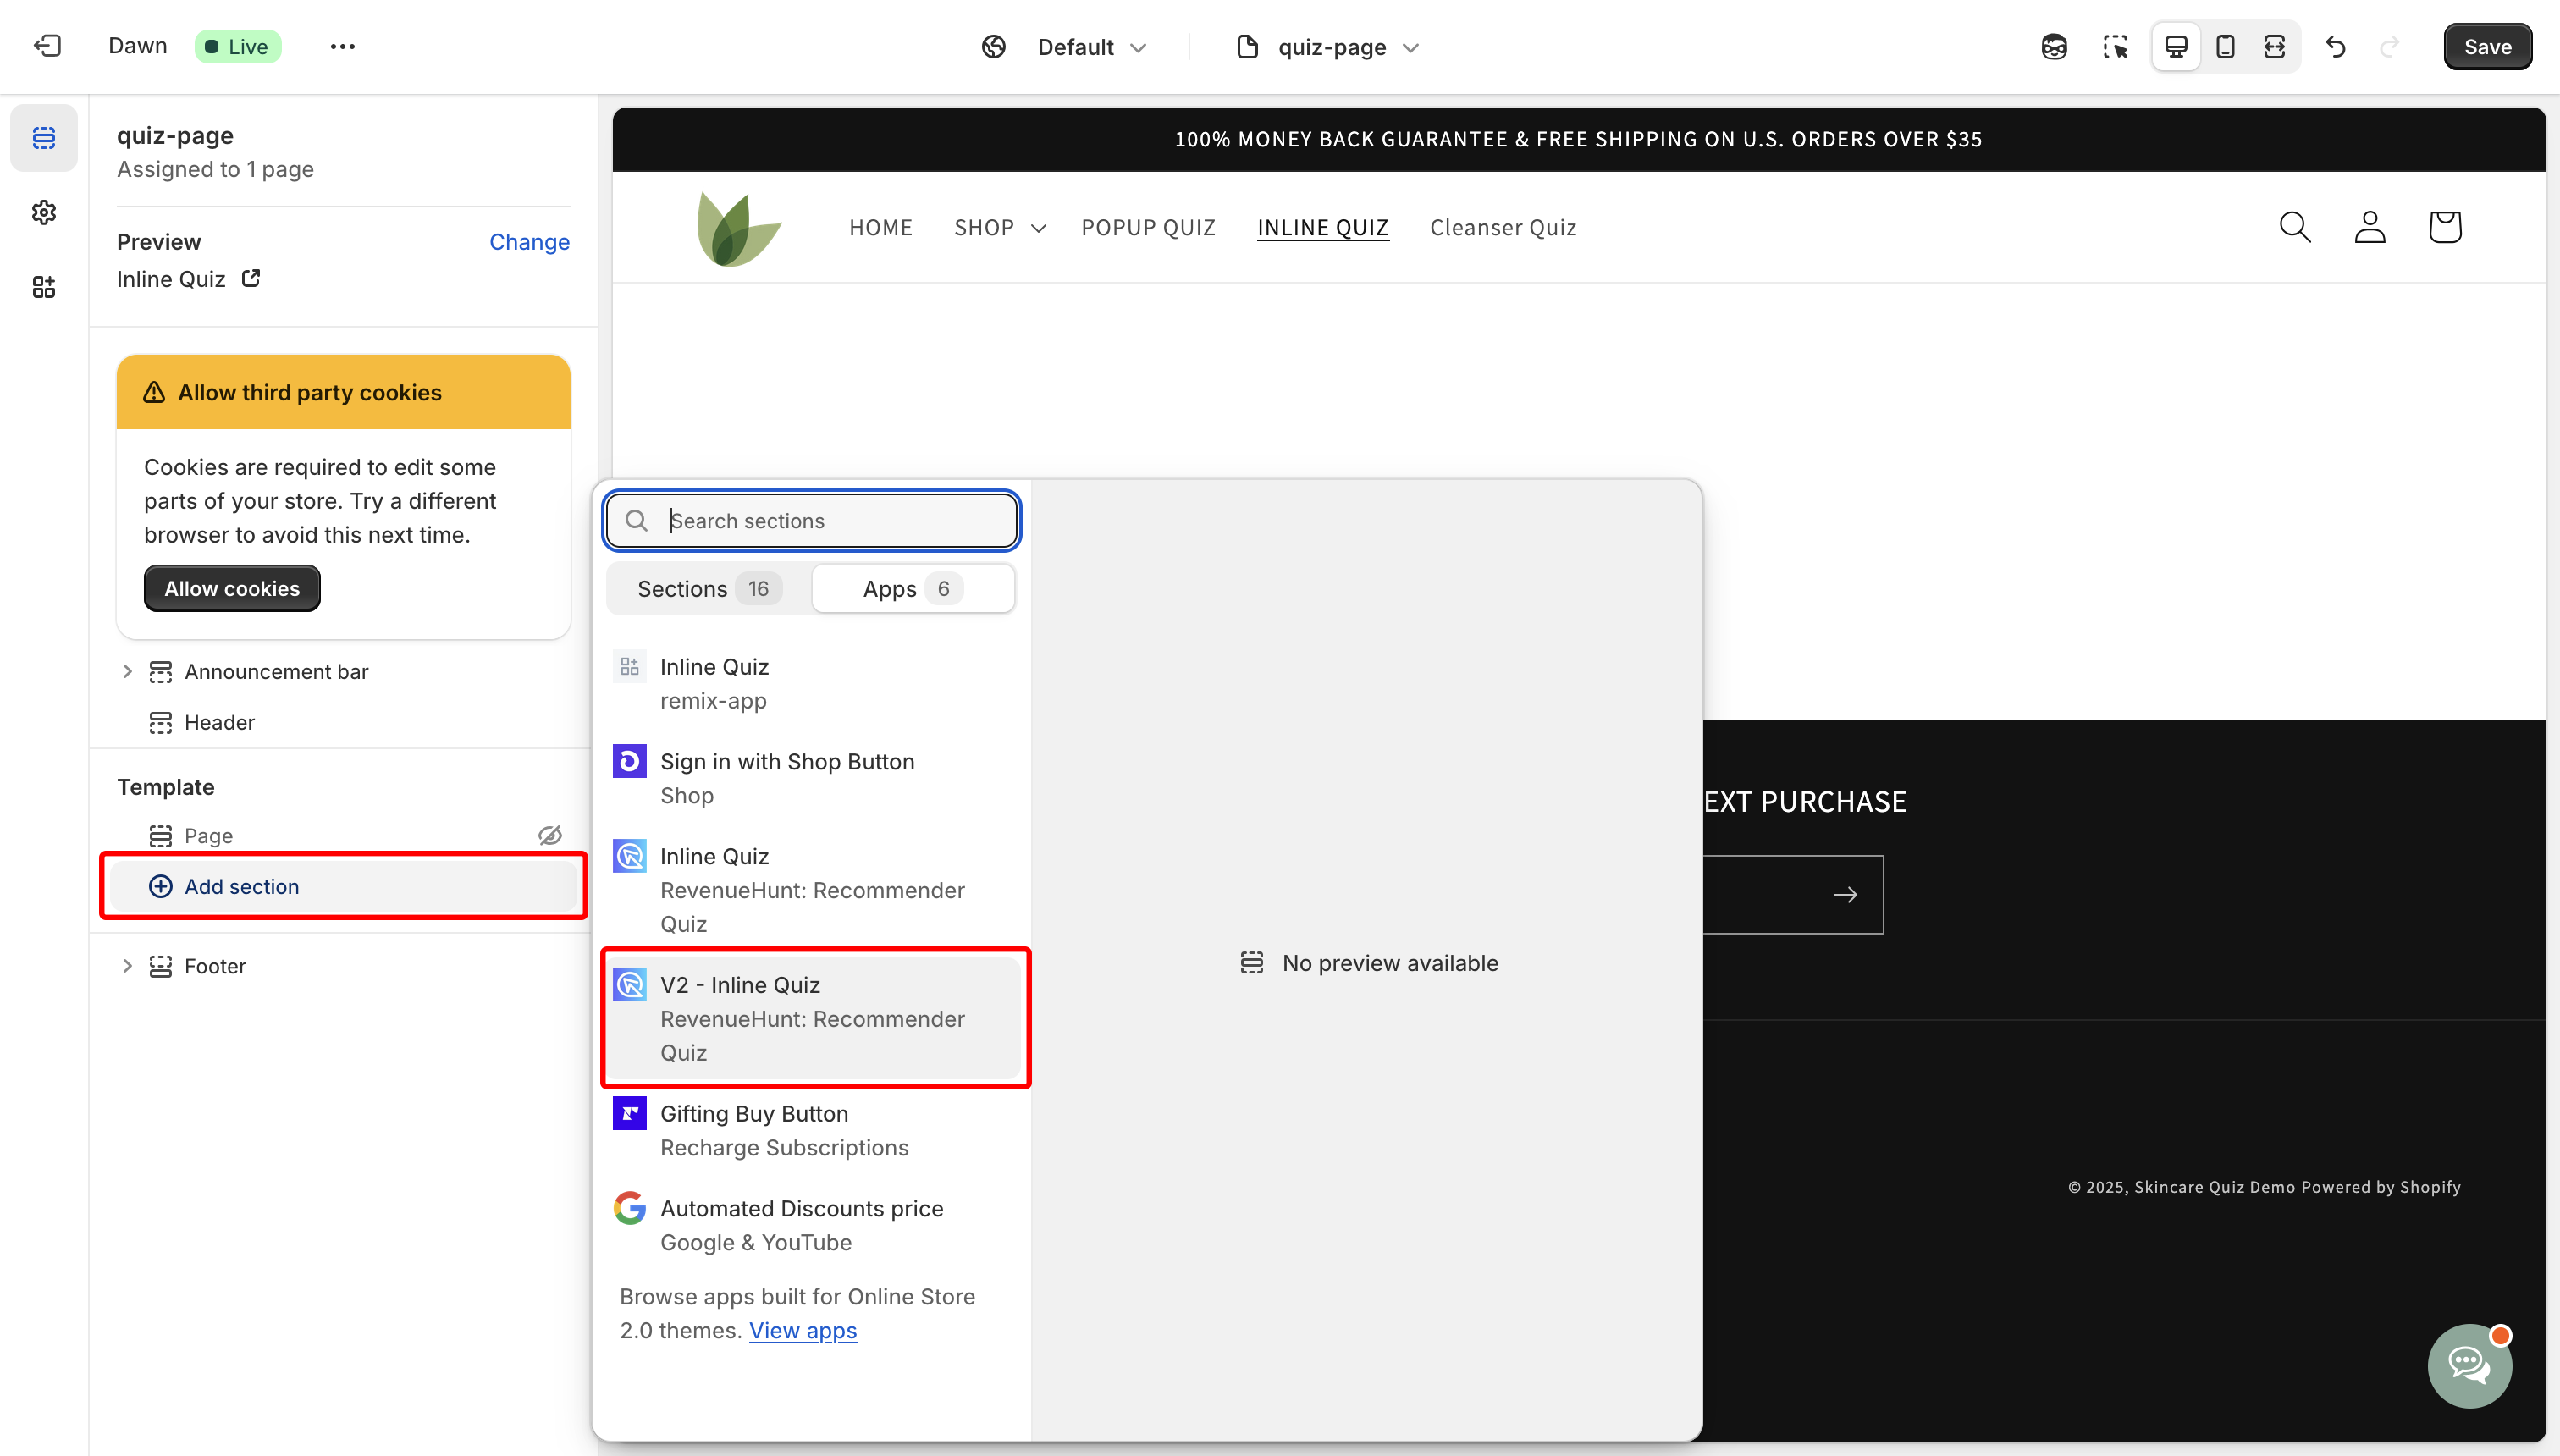
-
The default quiz for your store will be rendered.
Note
If you’ve configured Shopify Markets, the default quiz for that specific market will be shown instead.
If you want to render a specific quiz, you can do so by providing a specific quiz ID in the
Quiz IDfield. Check this section for more information. -
Configure Quiz Settings: Click on the added quiz section to configure. Adjust settings like quiz height, disable auto-scroll, or fix quiz height for consistent results page height.
-
Assign the Template to a Page: Go to
Online Store > Pages. ClickAdd pageor select an existing page to edit. In the Template section on the right, choose your new template from the Theme template dropdown. ClickSaveand thenView Template.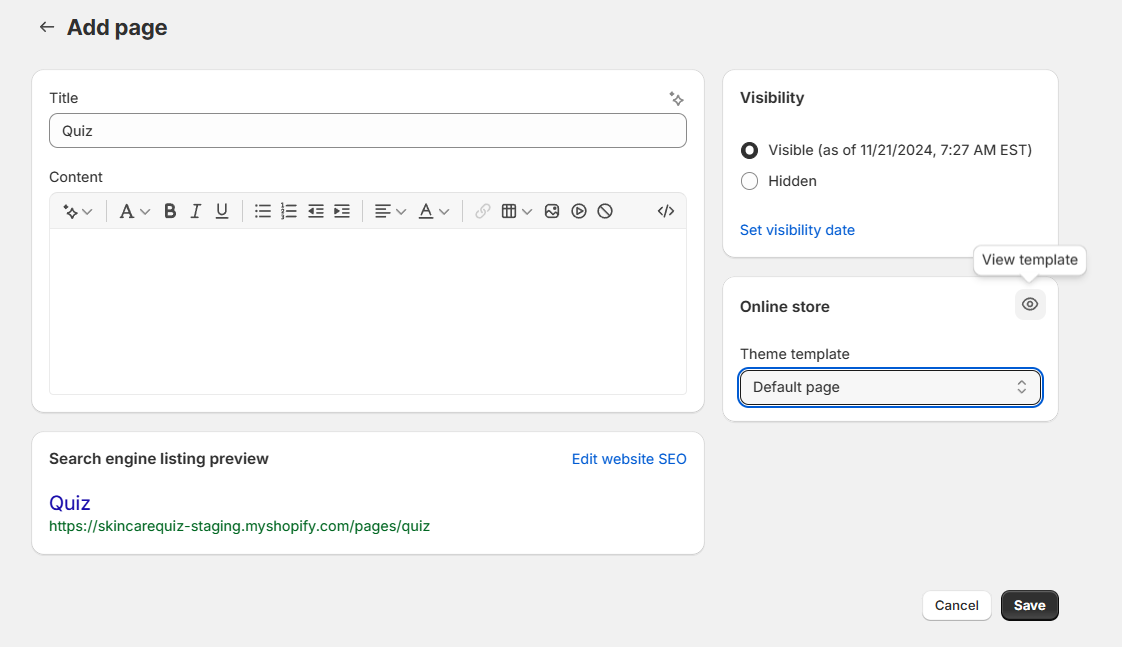
The default quiz for your store will be rendered. If you’ve configured Shopify Markets, the default quiz for that specific market will be shown instead.
-
Save Changes: Ensure all changes are saved before exiting the theme editor.
Now, that page will use the custom template with the quiz you created, allowing for a different layout or style within the same theme.
- Obtain Inline Embed Code: From the quiz builder, click
Share, selectInlinemode, andShow Instructions for Legacy Themesto copy the HTML embed code. - Insert Quiz into Page: Navigate to
Online Store > Pagesand select the page to embed the quiz. ClickShow HTMLand paste the embed code into the code editor. - Single Quiz Per Page: To avoid issues, embed only one quiz per page. If using a non-Shopify version of the quiz, ensure the
embed.jscode is added to your site's header.
- Obtain Inline Embed Code: From the quiz builder, click
Share, selectInlinemode. - Edit the inline quiz settings and click
Get the code. Copy the HTML embed code. - In WordPress, open
Pagesand clickAdd New Page. - In the editor, add a page title. Then, find a
Custom HTMLelement and add it to the page in a place where you want the quiz to show. - In the element, paste the code copied from the app.
- Save the changes and
updatethe page. - From now on, the inline quiz will be visible on that page.
- Add the following embed.js script before the
</head>close tag in the header. Without it, the quiz won't be loaded on your website. - Obtain Inline Embed Code: From the quiz builder, click
Share, selectInlinemode. - Edit the inline quiz settings and click
Get the code. Copy the HTML embed code. - In your Magento dashbaord go to
Content>Pages. ClickAdd New Page. - Edit the Page Title and open the
Contenttab. ClickEdit with Page Builder. - Select
Elements>Rowsand drag a row into the canvas. - Next open
Elementsand pickHTML Code. Drag theHTML Codeonto the Row. - Click the gear icon to open
HTML settings. - Under
Enter HTML, CSS or JavaScript codepaste the HTML code copied from the app. - Remember to save the changes.
- From now on, the inline quiz will be visible on that page.
- Add the following embed.js script before the
</head>close tag in the header. Without it, the quiz won't be loaded on your website. - Obtain Inline Embed Code: From the quiz builder, click
Share, selectInlinemode. - Edit the inline quiz settings and click
Get the code. Copy the HTML embed code. - In BigCommerce, go to
Storefront>Web Pages. ClickCreate a Web Page. - Under
Web Page Details>Page Contentswitch to theHTMLeditor. Paste the HTML code copied from the app. - Save the changes.
- From now on, the inline quiz will be visible on that page.
- Add the following embed.js script before the
</head>close tag in the header. Without it, the quiz won't be loaded on your website. - Obtain Inline Embed Code: From the quiz builder, click
Share, selectInlinemode. - Edit the inline quiz settings and click
Get the code. Copy the HTML embed code. - In your store customization options find the
Pagesmenu and create a new page. - In the page editor find a
Custom HTMLelement. In the element settings paste the code copied from the app. - Save the changes.
- From now on, the inline quiz will be visible on that page.
Tip
You can add a link to this page to your website menu or use the link to this new page in your marketing campaigns.
Link Popup for Emails
What's a Link Popup?
It's a direct link, like https://yourstore.myshopify.com/#quiz-ABC, that opens a quiz popup on your website.
Shopify 1.0 Theme Compatibility
Quizzes created with the 💎Built for Shopify version of the RevenueHunt appcannot be published on Shopify 1.0 themes. Shopify 1.0 themes do not support app embeds, which are required for the V2 integration. App embeds are a feature available in Online Store 2.0 themes, which allow you to add app functionality without touching any code. If you want to use app embeds, you would need to upgrade to an Online Store 2.0 theme.
- Access Theme Customization: Log in to your Shopify admin dashboard. Navigate to
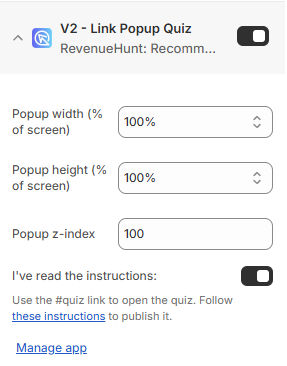
Online Store > Themes. Find your current theme and click on theCustomizebutton. - Activate App Embeds: Within the theme customization area, go to
App Embeds. Look for theLink Popup Quizoption and toggle it on. This action will automatically add the RevenueHunt script to your site, enabling quiz links to load in a popup.
- Save changes: Click on the Save button to ensure all changes are saved before exiting the theme editor.
- Copy the link to the quiz popup: The direct link to your quiz popup is https://yourstore.myshopify.com/#quiz.
- Share the link: Share the link to the quiz popup with your audience. You can add it to your email campaigns, social media posts, or any other communication channel.
Note
When visitors open the link, the default quiz for your store will open based on your settings.
If you've configured Shopify Markets, the default quiz for that specific market will be shown instead.
If you want to show a specific quiz, you can do so by setting the Quiz ID in the popup settings. Check this section for more information.
- Activate App Embeds: Go to
Online Store > Theme > Customize > App Embedsin Shopify. Find theLink Popup Quiz (Legacy)option and toggle it on. - Obtain the Popup Link Code: Go to the
Sharesection of the Quiz Builder, then open theEmailtile andShow Instructions for legacy themes. - Customize Popup Dimensions: Input your desired dimensions for the width and height to optimize the viewer's experience.
- Generate popup link: Click on the
Get the codebutton to create your unique quiz link. This link is now ready to be shared via email. - Embed in Emails or Newsletters: Copy the newly generated link. Paste it into the body of your emails or newsletters wherever you wish the quiz to appear.
- Obtain the Popup Link Code: Go to the
Sharesection of the app, then open theEmailtile. - Customize Popup Dimensions: Input your desired dimensions for the width and height to optimize the viewer's experience.
- Generate popup link: Click on the
Get the codebutton to create your unique quiz link. This link is now ready to be shared via email. - Embed in Emails or Newsletters: Copy the newly generated link. Paste it into the body of your emails or newsletters wherever you wish the quiz to appear.
- Add the following embed.js script before the
</head>close tag in the header. Without it, the quiz won't be loaded on your website. - Obtain the Popup Link Code: Go to the
Sharesection of the app, then open theEmailtile. - Customize Popup Dimensions: Input your desired dimensions for the width and height to optimize the viewer's experience.
- Generate popup link: Click on the
Get the codebutton to create your unique quiz link. Edit the link URL to add your website URL. It should look like thishttps://yourwebsite.com/#quiz-QUIZID/. This link is now ready to be shared via email. - Embed in Emails or Newsletters: Copy the newly generated link. Paste it into the body of your emails or newsletters wherever you wish the quiz to appear.
FAQs
Open a Specific Quiz
By default when you use #quiz as the link, the default quiz for your store will open.
Note
If you've configured Shopify Markets, the default quiz for that specific market will be shown instead.
If instead you want to open a specific quiz, you need to add a Quiz ID in the Quiz ID (optional) field in the Link Popup Quiz settings in the theme editor.
Quiz ID
To find your Quiz ID, go to the Dashboard, find the quiz you want to open. Then, click on the ... three dots next to the quiz and select "Copy Quiz ID".
Keep in mind that the Quiz ID is case-sensitive.
To open a specific quiz, just add the Quiz ID to the link like this #quiz-QUIZID.
For example, https://yourstore.myshopify.com/#quiz-123 can open one quiz, while https://yourstore.myshopify.com/#quiz-456 can open another.
Quiz ID
To find your Quiz ID, go to the Dashboard, find the quiz you want to open. Then, click on the ... three dots next to the quiz and select "Copy Quiz ID".
Keep in mind that the Quiz ID is case-sensitive.
The quiz you are looking for does not exist

If you see the error message "The quiz you are looking for does not exist" when trying to link to a quiz, follow these steps:
-
Ensure that you have activated the
Link Popup Quizin the Online Store > Theme > Customize >App Embedssection and not the the legacyLink Popup Quiz Legacy.
If a wrong link popup is activated, you will see the error message "The quiz you are looking for does not exist" when trying to link to a V2 quiz.
To solve this simply deactivate the
Link Popup Quiz Legacyand activate theLink Popup Quizone. Then, save the changes. -
Verify that the link is correctly formatted. Ensure that the link you've created is correctly formatted and it follows the format
#quiz.
If you see the error message "The quiz you are looking for does not exist" when trying to link to a quiz, follow these steps:
- Go back to the Quiz Builder and ensure that the quiz has been published with the top right
Publishbutton. - Go to Quiz Settings and copy the Quiz ID. Then in Shopify, go back to Online Store > Themes > Customize and under the
App Embedssection active theLink Popup Quiz. - Check the Quiz Link. Ensure that the link you've created is correctly formatted and it follows the format
#quiz-QUIZID. Where the Quiz ID is the ID you've copied from the Quiz Settings. Note: the Quiz ID is case-sensitive. - Save your changes and refresh the page.
If you see the error message "The quiz you are looking for does not exist" when trying to link to a quiz, follow these steps:
- Ensure that the quiz is published and active. Go to the Quiz Builder and ensure that the quiz has been published with the top right
Publishbutton. - Check that the quiz ID is correct. Go to the Quiz Settings and copy the Quiz ID.
- Verify that the link is correctly formatted. Ensure that the link you've created is correctly formatted and it follows the format
#quiz-QUIZID. Where the Quiz ID is the ID you've copied from the Quiz Settings. Note: the Quiz ID is case-sensitive.
If you see the error message "The quiz you are looking for does not exist" when trying to link to a quiz, follow these steps:
- Ensure you've added the following embed.js script to your website. Without it, the quiz won't be loaded on your website.
- Ensure that the quiz is published and active. Go to the Quiz Builder and ensure that the quiz has been published with the top right
Publishbutton. - Check that the quiz ID is correct. Go to the Quiz Settings and copy the Quiz ID.
- Verify that the link is correctly formatted. Ensure that the link you've created is correctly formatted and it follows the format
#quiz-QUIZID. Where the Quiz ID is the ID you've copied from the Quiz Settings. Note: the Quiz ID is case-sensitive.
This article explains how to share a quiz created with RevenueHunt Quizzes app within your emails and newsletters.