Editing Quiz Design
The RevenueHunt app gives you control over how the quiz looks. Design settings work at several levels, from global styles that affect the whole quiz down to single blocks. This tutorial covers every place where you can change the quiz design.
What you will learn
- how to customize global quiz design: fonts, colors, backgrounds, navigation, and transitions,
- how to add custom CSS or JavaScript for the whole quiz or for one slide,
- how to design questions with text, images, videos and choice layouts,
- how to style blocks and choices, including picture sizes and mobile layouts,
- how to build and customize the Results page with text, media, buttons, and product blocks,
- how to control product card layouts.
With the RevenueHunt Quiz app, you have complete control over how your quiz looks and feels. Design settings are available at multiple levels, from global styles that affect the whole quiz to question/block-level tweaks for individual elements. This guide covers every place where you can customize your quiz design.
What you will learn
- how to use the customization options in the Quiz Design tab or built-in Question, Block or Results Page settings
- where to add your own style with CSS or JavaScript
- how to modify any part of the quiz or results page with custom CSS
- how to include custom images and styles for each question via the question settings
- how to add videos to the quiz or results page via the question settings
With the RevenueHunt Quiz app, you have complete control over how your quiz looks and feels. Design settings are available at multiple levels, from global styles that affect the whole quiz to question/block-level tweaks for individual elements. This guide covers every place where you can customize your quiz design.
What you will learn
- how to use the customization options in the Quiz Design tab or built-in Question, Block or Results Page settings
- where to add your own style with CSS or JavaScript
- how to modify any part of the quiz or results page with custom CSS
- how to include custom images and styles for each question via the question settings
- how to add videos to the quiz or results page via the question settings
With the RevenueHunt Quiz app, you have complete control over how your quiz looks and feels. Design settings are available at multiple levels, from global styles that affect the whole quiz to question/block-level tweaks for individual elements. This guide covers every place where you can customize your quiz design.
What you will learn
- how to use the customization options in the Quiz Design tab or built-in Question, Block or Results Page settings
- where to add your own style with CSS or JavaScript
- how to modify any part of the quiz or results page with custom CSS
- how to include custom images and styles for each question via the question settings
- how to add videos to the quiz or results page via the question settings
With the RevenueHunt Quiz app, you have complete control over how your quiz looks and feels. Design settings are available at multiple levels, from global styles that affect the whole quiz to question/block-level tweaks for individual elements. This guide covers every place where you can customize your quiz design.
What you will learn
- how to use the customization options in the Quiz Design tab or built-in Question, Block or Results Page settings
- where to add your own style with CSS or JavaScript
- how to modify any part of the quiz or results page with custom CSS
- how to include custom images and styles for each question via the question settings
- how to add videos to the quiz or results page via the question settings
With the RevenueHunt Quiz app, you have complete control over how your quiz looks and feels. Design settings are available at multiple levels, from global styles that affect the whole quiz to question/block-level tweaks for individual elements. This guide covers every place where you can customize your quiz design.
What you will learn
- how to use the customization options in the Quiz Design tab or built-in Question, Block or Results Page settings
- where to add your own style with CSS or JavaScript
- how to modify any part of the quiz or results page with custom CSS
- how to include custom images and styles for each question via the question settings
- how to add videos to the quiz or results page via the question settings
Intro
Design customization in RevenueHunt works at several levels:
-
The Quiz design tab gives you global control over fonts, colors, and navigation.
-
The Questions tab lets you style each slide individually.
-
The Results page tab ensures your final recommendations screen matches your brand.
-
Every block and choice has its own options for fine-tuning.
-
And when you need full control, custom CSS and JavaScript are available at every step.
Design customization in RevenueHunt works at several levels:
-
The Quiz Design tab gives you global control over fonts, colors, and navigation.
-
The Quiz Builder tab lets you style each slide and its blocks individually.
-
The Results Page tab ensures your final recommendations match your brand.
-
Every slide and block has its own options for fine-tuning.
-
And when you need full control, custom CSS and JavaScript are available at every step.
Design customization in RevenueHunt works at several levels:
-
The Quiz Design tab gives you global control over fonts, colors, and navigation.
-
The Quiz Builder tab lets you style each slide and its blocks individually.
-
The Results Page tab ensures your final recommendations match your brand.
-
Every slide and block has its own options for fine-tuning.
-
And when you need full control, custom CSS and JavaScript are available at every step.
Design customization in RevenueHunt works at several levels:
-
The Quiz Design tab gives you global control over fonts, colors, and navigation.
-
The Quiz Builder tab lets you style each slide and its blocks individually.
-
The Results Page tab ensures your final recommendations match your brand.
-
Every slide and block has its own options for fine-tuning.
-
And when you need full control, custom CSS and JavaScript are available at every step.
Design customization in RevenueHunt works at several levels:
-
The Quiz Design tab gives you global control over fonts, colors, and navigation.
-
The Quiz Builder tab lets you style each slide and its blocks individually.
-
The Results Page tab ensures your final recommendations match your brand.
-
Every slide and block has its own options for fine-tuning.
-
And when you need full control, custom CSS and JavaScript are available at every step.
Design customization in RevenueHunt works at several levels:
-
The Quiz Design tab gives you global control over fonts, colors, and navigation.
-
The Quiz Builder tab lets you style each slide and its blocks individually.
-
The Results Page tab ensures your final recommendations match your brand.
-
Every slide and block has its own options for fine-tuning.
-
And when you need full control, custom CSS and JavaScript are available at every step.
Quiz design tab
The Quiz design tab is your main hub for styling the quiz. Here you can change fonts, colors, backgrounds, navigation, and slide transitions.
- Access the Quiz design tab by clicking
Customizeon your quiz. -
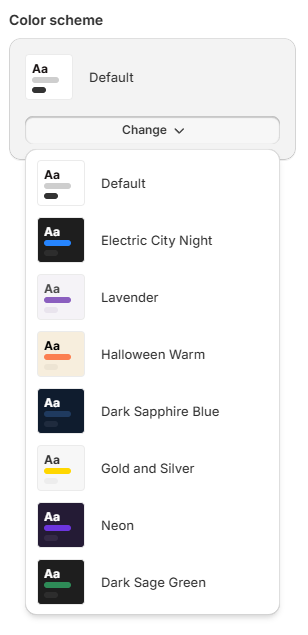
Choose from pre-designed color schemes or customize your own.
-
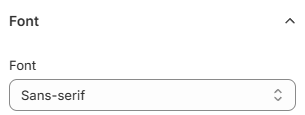
Change fonts for headings and body text, or inherit from your store theme.
-
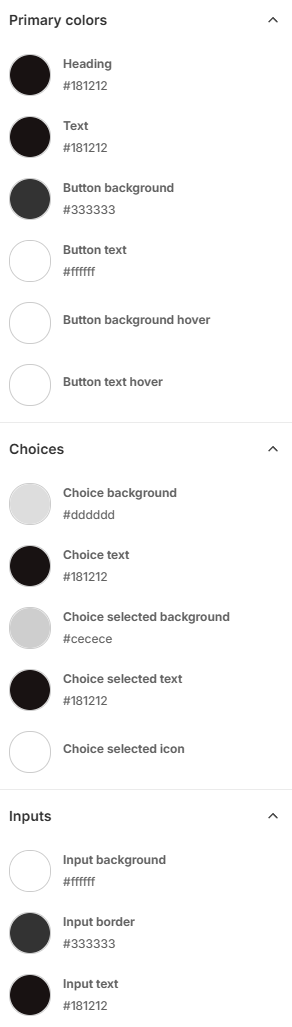
Customize accent colors for texts, buttons and inputs using a color palette or hex codes.
-
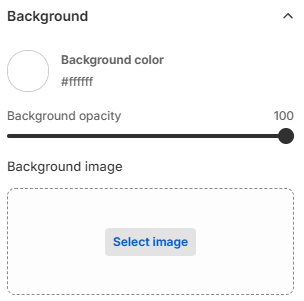
Set a global background with a solid color or upload an image, adjusting opacity for readability.
-
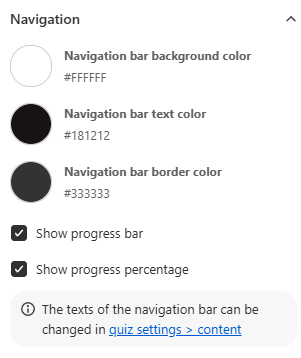
Modify navigation bar color, progress bar display.
-
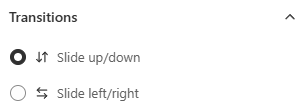
Modify slide transitions (up/down or left/right).
-
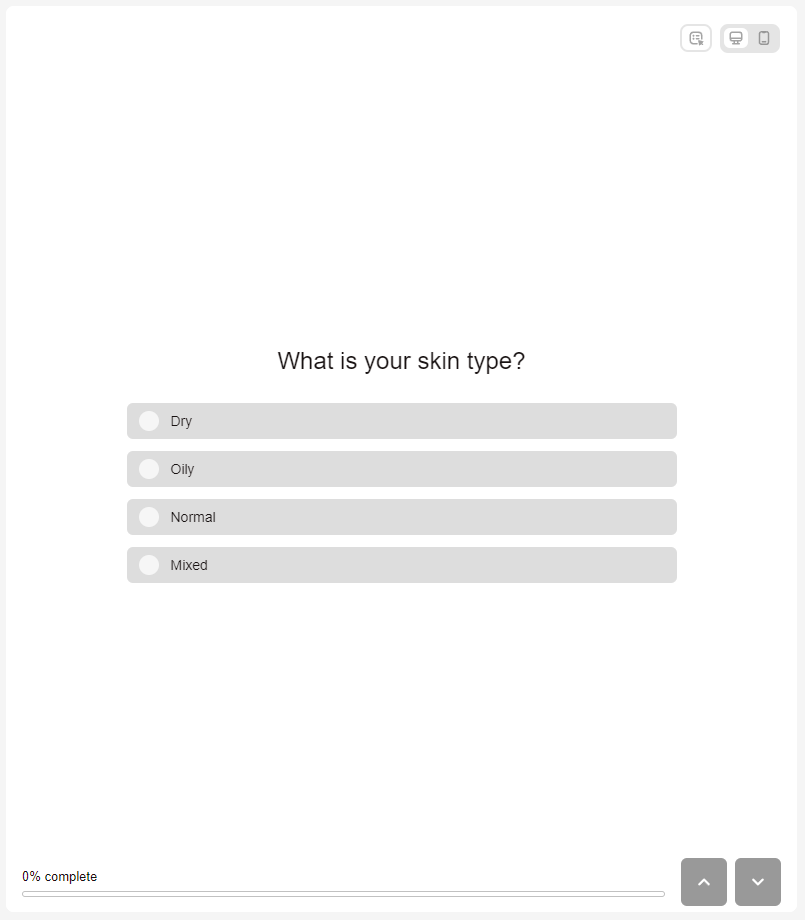
Preview & Inspector: Switch between questions and results, desktop and mobile layouts, and activate the inspector to test interactions.
-
Remember to click
Saveto save your changes.
The Quiz Design tab is your main hub for styling the quiz. Use it to set fonts, colors, backgrounds, and global CSS.
Basic customizations
- Open the Quiz Builder and navigate to the Quiz Design tab.
-
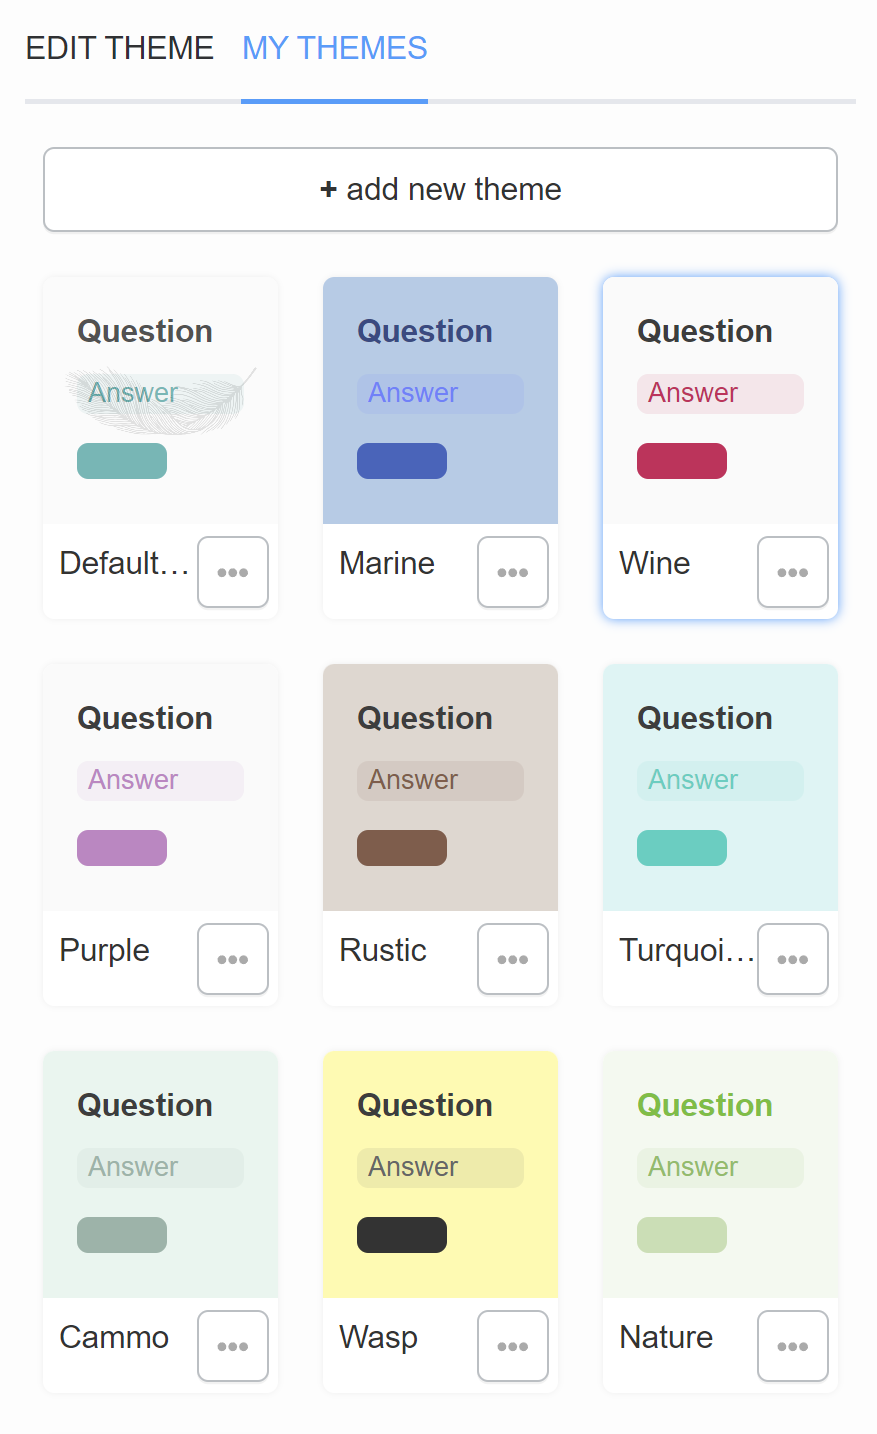
Customize the look. Start from a pre-designed theme in My Themes or make your own.
-
Edit Theme. Pick a color palette, choose fonts, and add a default background image.
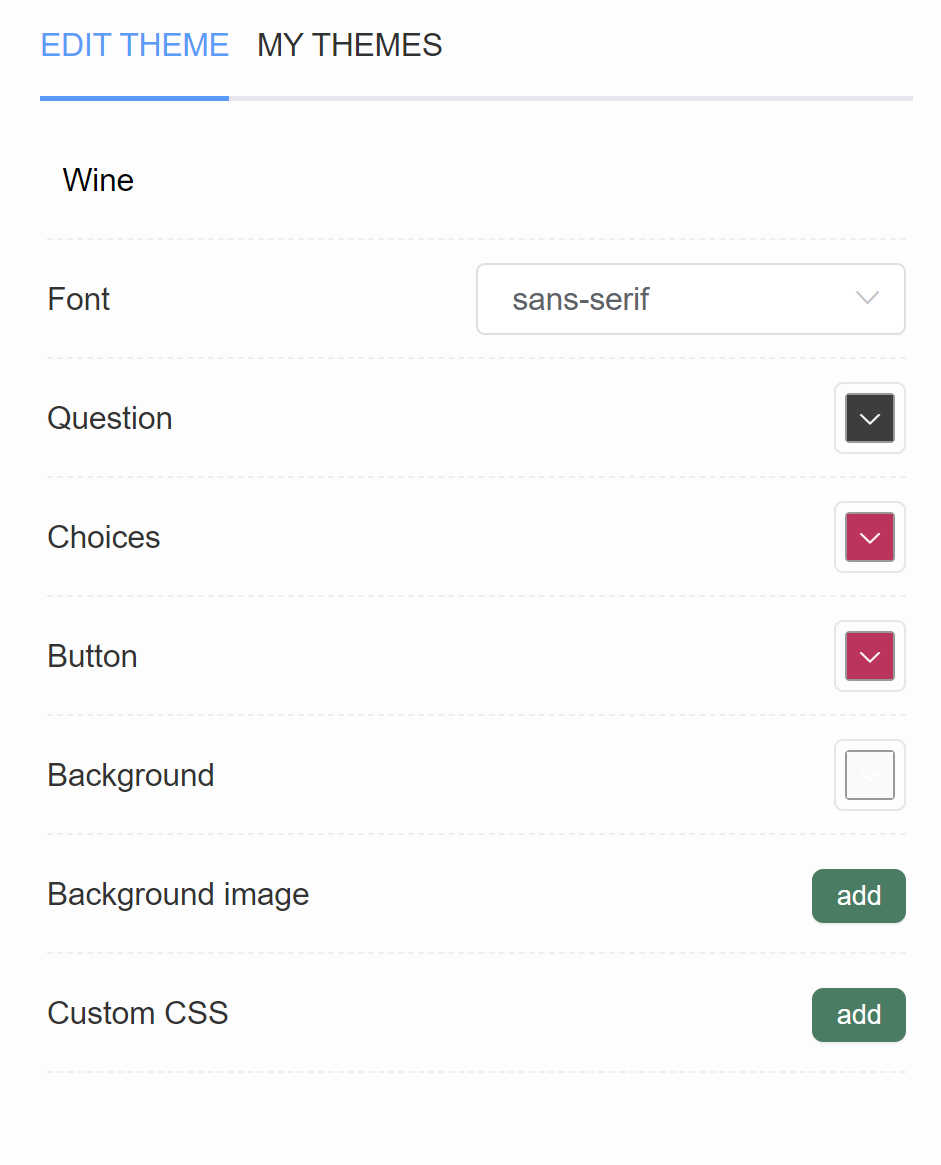
Theme editor fields
-
The Quiz Design tab shows the name of your current theme at the top.
-
Use the Font dropdown to change fonts for headings and body text, or select Inherit to automatically match your store theme.
-
Adjust the question text color with a color picker, or type in a HEX code for precision.
-
Change the look of choices with the built-in color picker. Like other fields, you can paste in a HEX code for an exact match.
-
Style your quiz buttons (Start, Next, Add to Cart, etc.) by selecting a background color.
-
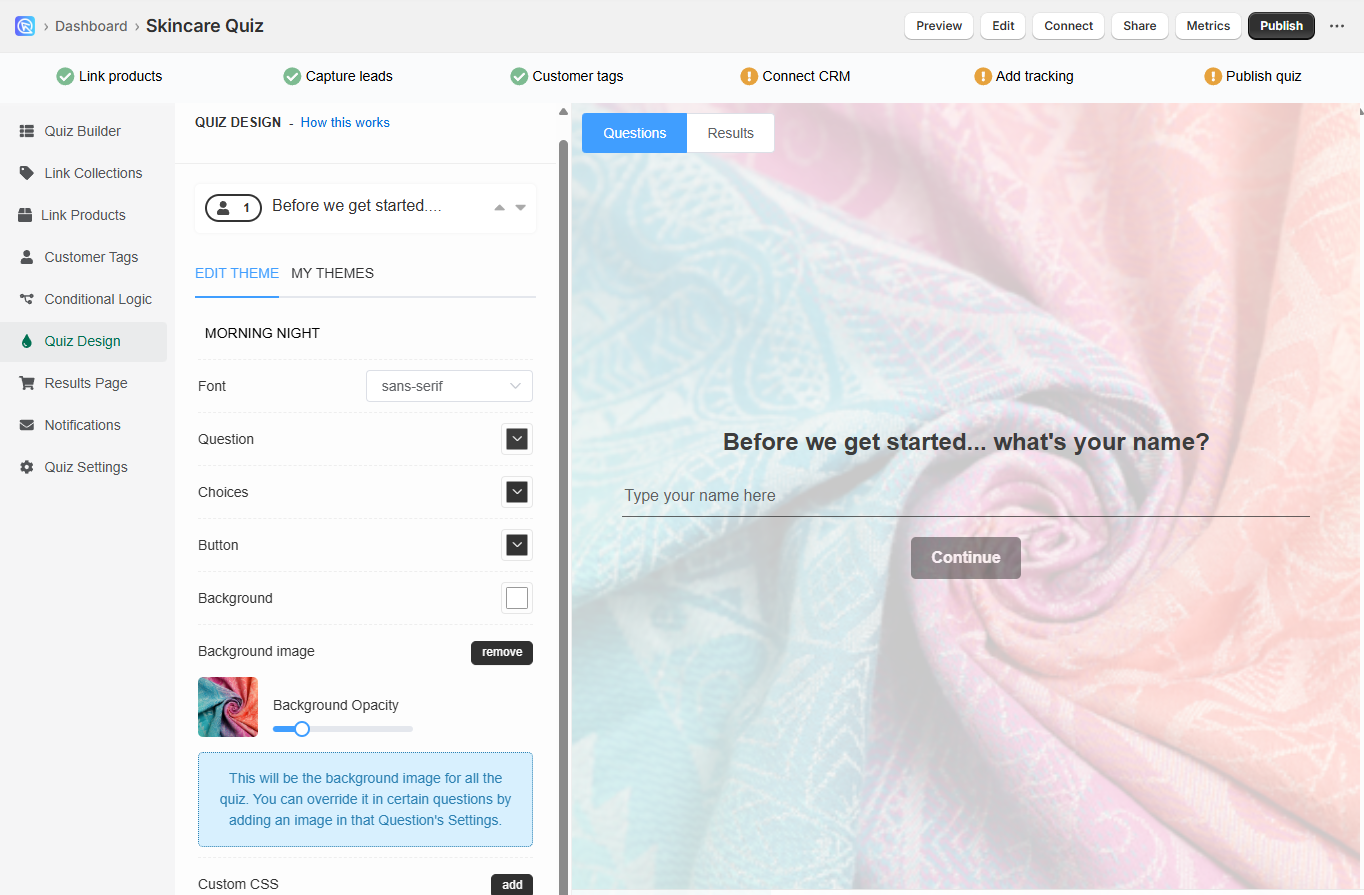
Set a global background color or upload a background image (recommended max size 1000×1000px, ≤2 MB). Once added, extra options for positioning and alignment will appear.
-
Use the Background Opacity slider to fade the image slightly and keep text readable.
Publish changes
- Click the
Publish(top-right) button to apply changes to the live/preview quiz.
The Quiz Design tab is your main hub for styling the quiz. Use it to set fonts, colors, backgrounds, and global CSS.
Basic customizations
- Open the Quiz Builder and navigate to the Quiz Design tab.
-
Customize the look. Start from a pre-designed theme in My Themes or make your own.
-
Edit Theme. Pick a color palette, choose fonts, and add a default background image.
Theme editor fields
-
The Quiz Design tab shows the name of your current theme at the top.
-
Use the Font dropdown to change fonts for headings and body text, or select Inherit to automatically match your store theme.
-
Adjust the question text color with a color picker, or type in a HEX code for precision.
-
Change the look of choices with the built-in color picker. Like other fields, you can paste in a HEX code for an exact match.
-
Style your quiz buttons (Start, Next, Add to Cart, etc.) by selecting a background color.
-
Set a global background color or upload a background image (recommended max size 1000×1000px, ≤2 MB). Once added, extra options for positioning and alignment will appear.
-
Use the Background Opacity slider to fade the image slightly and keep text readable.
Publish changes
- Click the
Publish(top-right) button to apply changes to the live/preview quiz.
The Quiz Design tab is your main hub for styling the quiz. Use it to set fonts, colors, backgrounds, and global CSS.
Basic customizations
- Open the Quiz Builder and navigate to the Quiz Design tab.
-
Customize the look. Start from a pre-designed theme in My Themes or make your own.
-
Edit Theme. Pick a color palette, choose fonts, and add a default background image.
Theme editor fields
-
The Quiz Design tab shows the name of your current theme at the top.
-
Use the Font dropdown to change fonts for headings and body text, or select Inherit to automatically match your store theme.
-
Adjust the question text color with a color picker, or type in a HEX code for precision.
-
Change the look of choices with the built-in color picker. Like other fields, you can paste in a HEX code for an exact match.
-
Style your quiz buttons (Start, Next, Add to Cart, etc.) by selecting a background color.
-
Set a global background color or upload a background image (recommended max size 1000×1000px, ≤2 MB). Once added, extra options for positioning and alignment will appear.
-
Use the Background Opacity slider to fade the image slightly and keep text readable.
Publish changes
- Click the
Publish(top-right) button to apply changes to the live/preview quiz.
The Quiz Design tab is your main hub for styling the quiz. Use it to set fonts, colors, backgrounds, and global CSS.
Basic customizations
- Open the Quiz Builder and navigate to the Quiz Design tab.
-
Customize the look. Start from a pre-designed theme in My Themes or make your own.
-
Edit Theme. Pick a color palette, choose fonts, and add a default background image.
Theme editor fields
-
The Quiz Design tab shows the name of your current theme at the top.
-
Use the Font dropdown to change fonts for headings and body text, or select Inherit to automatically match your store theme.
-
Adjust the question text color with a color picker, or type in a HEX code for precision.
-
Change the look of choices with the built-in color picker. Like other fields, you can paste in a HEX code for an exact match.
-
Style your quiz buttons (Start, Next, Add to Cart, etc.) by selecting a background color.
-
Set a global background color or upload a background image (recommended max size 1000×1000px, ≤2 MB). Once added, extra options for positioning and alignment will appear.
-
Use the Background Opacity slider to fade the image slightly and keep text readable.
Publish changes
- Click the
Publish(top-right) button to apply changes to the live/preview quiz.
The Quiz Design tab is your main hub for styling the quiz. Use it to set fonts, colors, backgrounds, and global CSS.
Basic customizations
- Open the Quiz Builder and navigate to the Quiz Design tab.
-
Customize the look. Start from a pre-designed theme in My Themes or make your own.
-
Edit Theme. Pick a color palette, choose fonts, and add a default background image.
Theme editor fields
-
The Quiz Design tab shows the name of your current theme at the top.
-
Use the Font dropdown to change fonts for headings and body text, or select Inherit to automatically match your store theme.
-
Adjust the question text color with a color picker, or type in a HEX code for precision.
-
Change the look of choices with the built-in color picker. Like other fields, you can paste in a HEX code for an exact match.
-
Style your quiz buttons (Start, Next, Add to Cart, etc.) by selecting a background color.
-
Set a global background color or upload a background image (recommended max size 1000×1000px, ≤2 MB). Once added, extra options for positioning and alignment will appear.
-
Use the Background Opacity slider to fade the image slightly and keep text readable.
Publish changes
- Click the
Publish(top-right) button to apply changes to the live/preview quiz.
Advanced (CSS)
-
Use the
Advancedtab for adding custom CSS that applies to the entire quiz.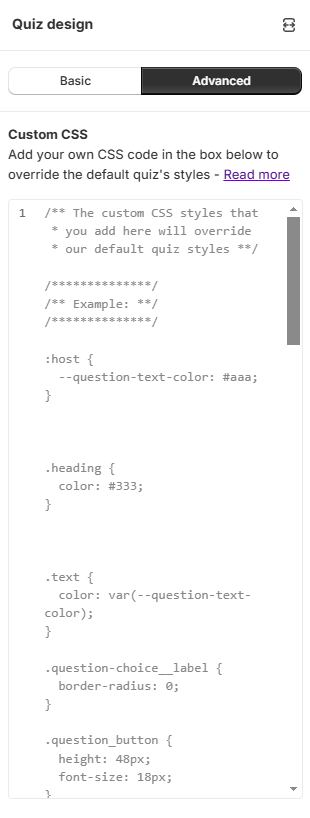
Tips for using CSS in the quiz:
- For examples, see the App CSS Structure reference.
- For specific elements, use the browser's inspect tool to identify selectors for CSS rules.
- Click
✨Get help with custom CSSto open a chat window with the Quiz Copilot AI. It can directly make design changes with CSS code! - Custom CSS and JavaScript are available at every level: the whole quiz, a question, and the results page. This gives you detailed control over how the quiz looks and behaves.
You can style any element of your quiz or results page using the built-in CSS console in the Quiz Design tab.
-
Open your quiz and go to the Quiz Design tab.
-
In the Custom CSS section, click
Addto open the CSS console. This will create an input area where you or your developer can add rules that override the default quiz styles. -
To find the correct selector, right-click on the element in your browser and choose
Inspect. Copy the selector from the developer tools.
Add specificity to your CSS rules
Add specificity to your CSS rules to target the whole quiz, or only one question.
#quiz p {color: red;} - Changes the color of all paragraphs in the quiz.
#question-AbC7Zde p {color: red;} - Changes the color of a paragraph only in question AbC7Zde.
You can find the question ID in Quiz Builder > Question settings.
You can style any element of your quiz or results page using the built-in CSS console in the Quiz Design tab.
-
Open your quiz and go to the Quiz Design tab.
-
In the Custom CSS section, click
Addto open the CSS console. This will create an input area where you or your developer can add rules that override the default quiz styles. -
To find the correct selector, right-click on the element in your browser and choose
Inspect. Copy the selector from the developer tools.
Add specificity to your CSS rules
Add specificity to your CSS rules to target the whole quiz, or only one question.
#quiz p {color: red;} - Changes the color of all paragraphs in the quiz.
#question-AbC7Zde p {color: red;} - Changes the color of a paragraph only in question AbC7Zde.
You can find the question ID in Quiz Builder > Question settings.
You can style any element of your quiz or results page using the built-in CSS console in the Quiz Design tab.
-
Open your quiz and go to the Quiz Design tab.
-
In the Custom CSS section, click
Addto open the CSS console. This will create an input area where you or your developer can add rules that override the default quiz styles. -
To find the correct selector, right-click on the element in your browser and choose
Inspect. Copy the selector from the developer tools.
Add specificity to your CSS rules
Add specificity to your CSS rules to target the whole quiz, or only one question.
#quiz p {color: red;} - Changes the color of all paragraphs in the quiz.
#question-AbC7Zde p {color: red;} - Changes the color of a paragraph only in question AbC7Zde.
You can find the question ID in Quiz Builder > Question settings.
You can style any element of your quiz or results page using the built-in CSS console in the Quiz Design tab.
-
Open your quiz and go to the Quiz Design tab.
-
In the Custom CSS section, click
Addto open the CSS console. This will create an input area where you or your developer can add rules that override the default quiz styles. -
To find the correct selector, right-click on the element in your browser and choose
Inspect. Copy the selector from the developer tools.
Add specificity to your CSS rules
Add specificity to your CSS rules to target the whole quiz, or only one question.
#quiz p {color: red;} - Changes the color of all paragraphs in the quiz.
#question-AbC7Zde p {color: red;} - Changes the color of a paragraph only in question AbC7Zde.
You can find the question ID in Quiz Builder > Question settings.
You can style any element of your quiz or results page using the built-in CSS console in the Quiz Design tab.
-
Open your quiz and go to the Quiz Design tab.
-
In the Custom CSS section, click
Addto open the CSS console. This will create an input area where you or your developer can add rules that override the default quiz styles. -
To find the correct selector, right-click on the element in your browser and choose
Inspect. Copy the selector from the developer tools.
Add specificity to your CSS rules
Add specificity to your CSS rules to target the whole quiz, or only one question.
#quiz p {color: red;} - Changes the color of all paragraphs in the quiz.
#question-AbC7Zde p {color: red;} - Changes the color of a paragraph only in question AbC7Zde.
You can find the question ID in Quiz Builder > Question settings.
Questions tab
The Questions tab lets you design each slide. You can add blocks such as text, images, videos, or choice elements, then rearrange them for a unique layout.
-
Design individual slides in the Questions tab by adding blocks (text, images, videos, answer choices).
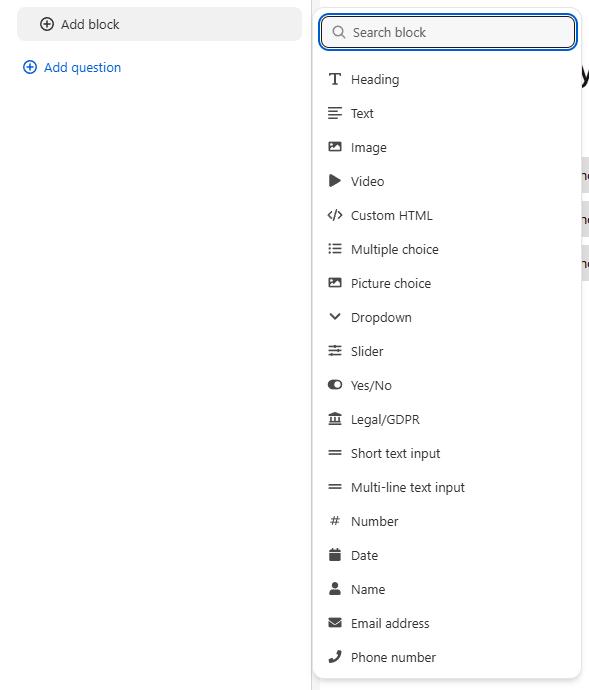
Question settings
- Open question settings by clicking on the question.
-
Upload a featured image for each question and chose a
backgroundor asplit layoutas well as alignment options for mobile.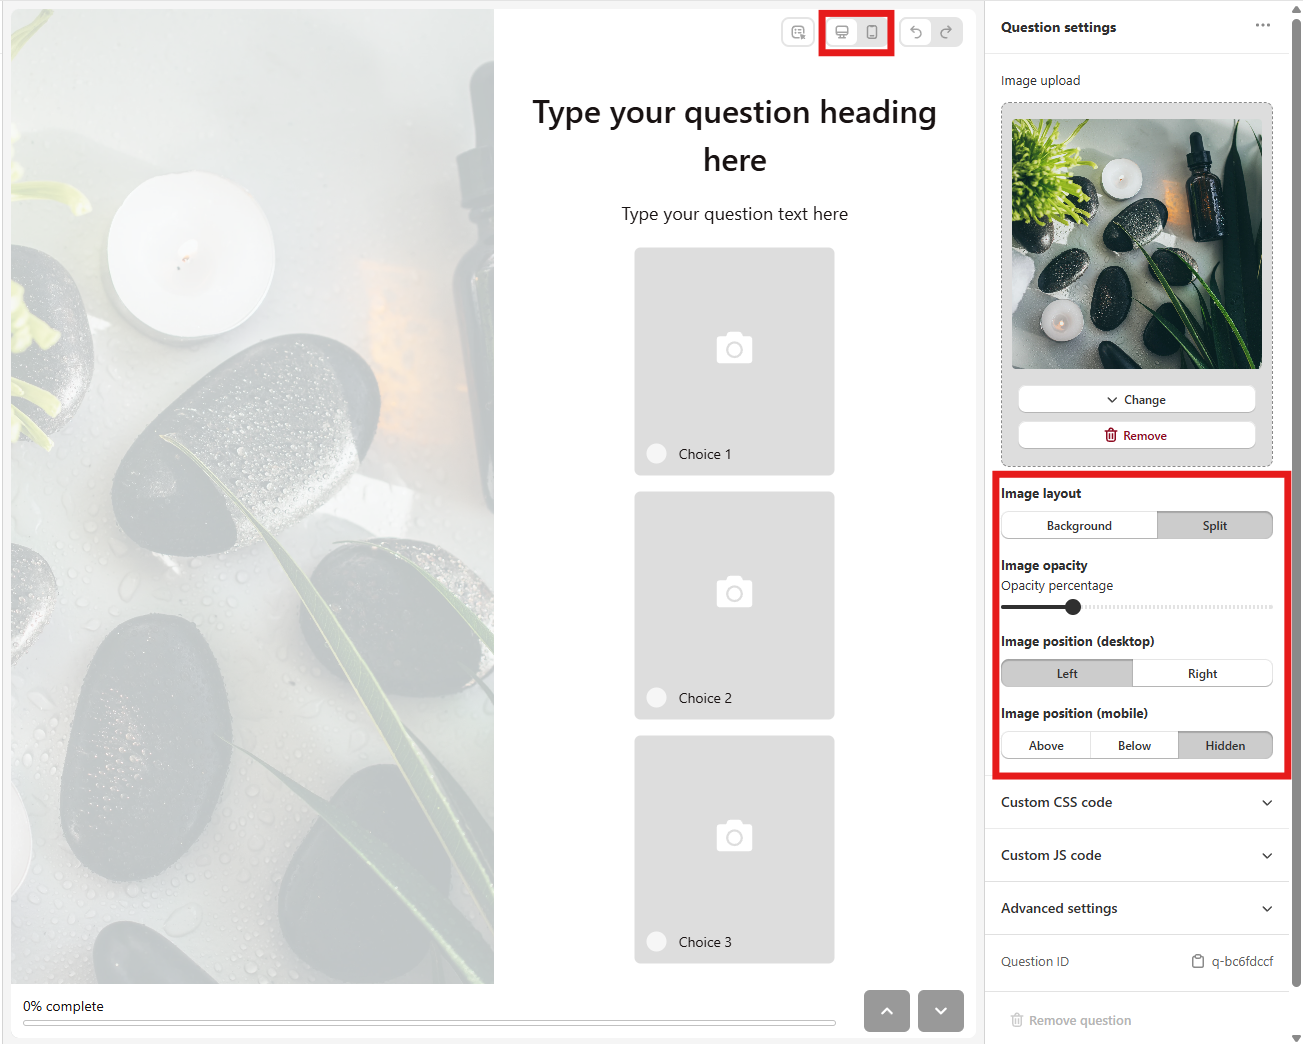
-
Each question supports custom CSS or JavaScript for independent styling.
-
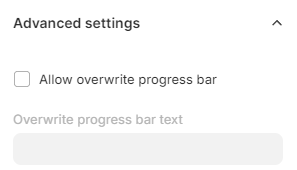
Advanced settings allow for features like auto-advancing questions.
Block settings
-
Open block settings by clicking on the block.
-
Customize each block within a question:
-
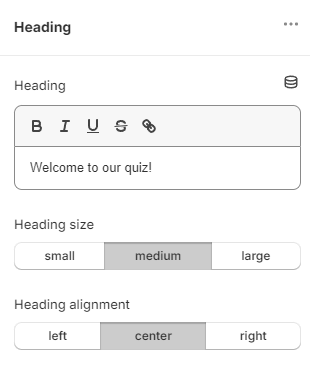
Text blocks: format text, add links, recall previous answers.
-
Image blocks: resize and align graphics.
- Picture-choice blocks: select image ratios and mobile layout options (1-2 per row or carousel).
Choice settings
Choice settings give you control over individual answers, letting you tweak each option separately.
In the Quiz Builder tab, you can design each question/slide.
Question Settings
Click on the wrench icon in the bottom-right corner to open the question settings.
The question settings hold many options to customize a question.
-
Show description - Activates an extra text field on the slide, below the main question field. It lets you add more text to a slide. Toggle to activate.
Show description
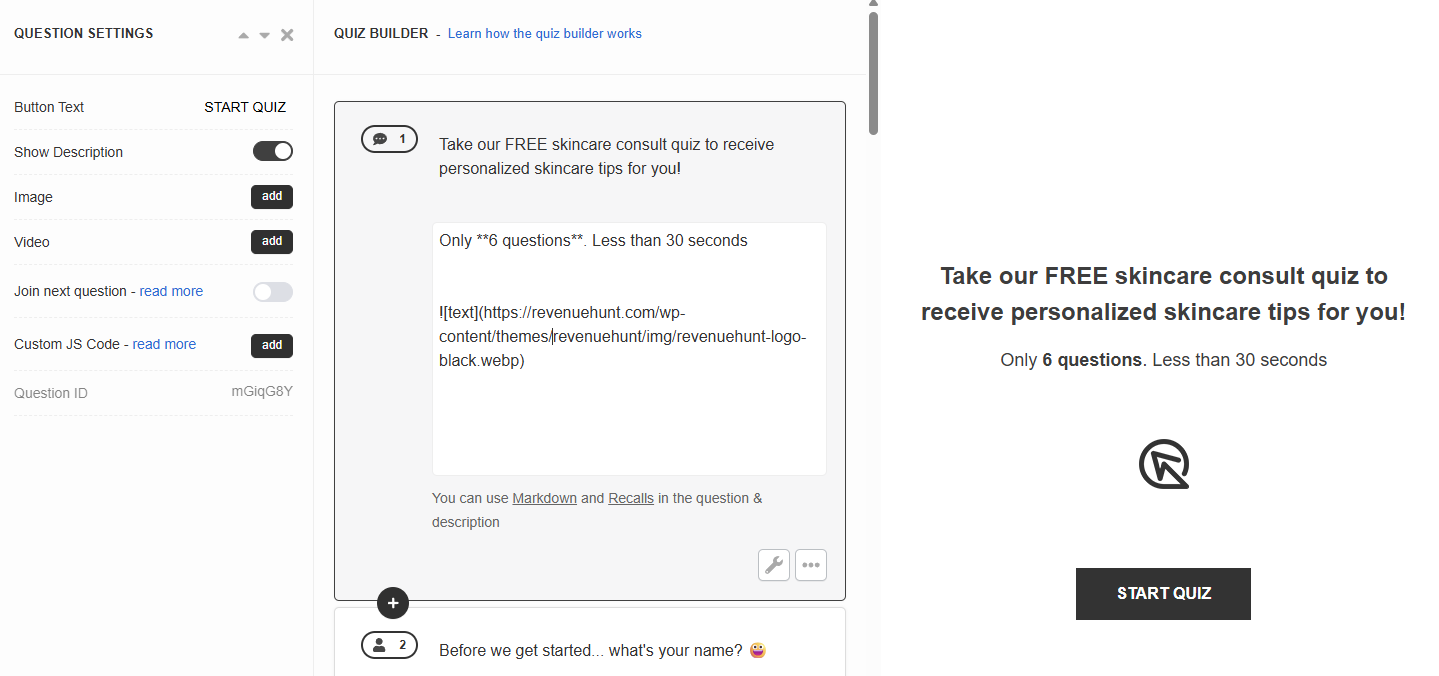
A description field lets you add extra text to the slide. You can style it with Markdown, embed images and videos, or use an information recall to show the customer's earlier answers.
-
Image - Click
Addto upload a featured image to the question. Image should be max 1000px x 1000px. An extra menu appears once activated. You can choose the image position and adjust the opacity.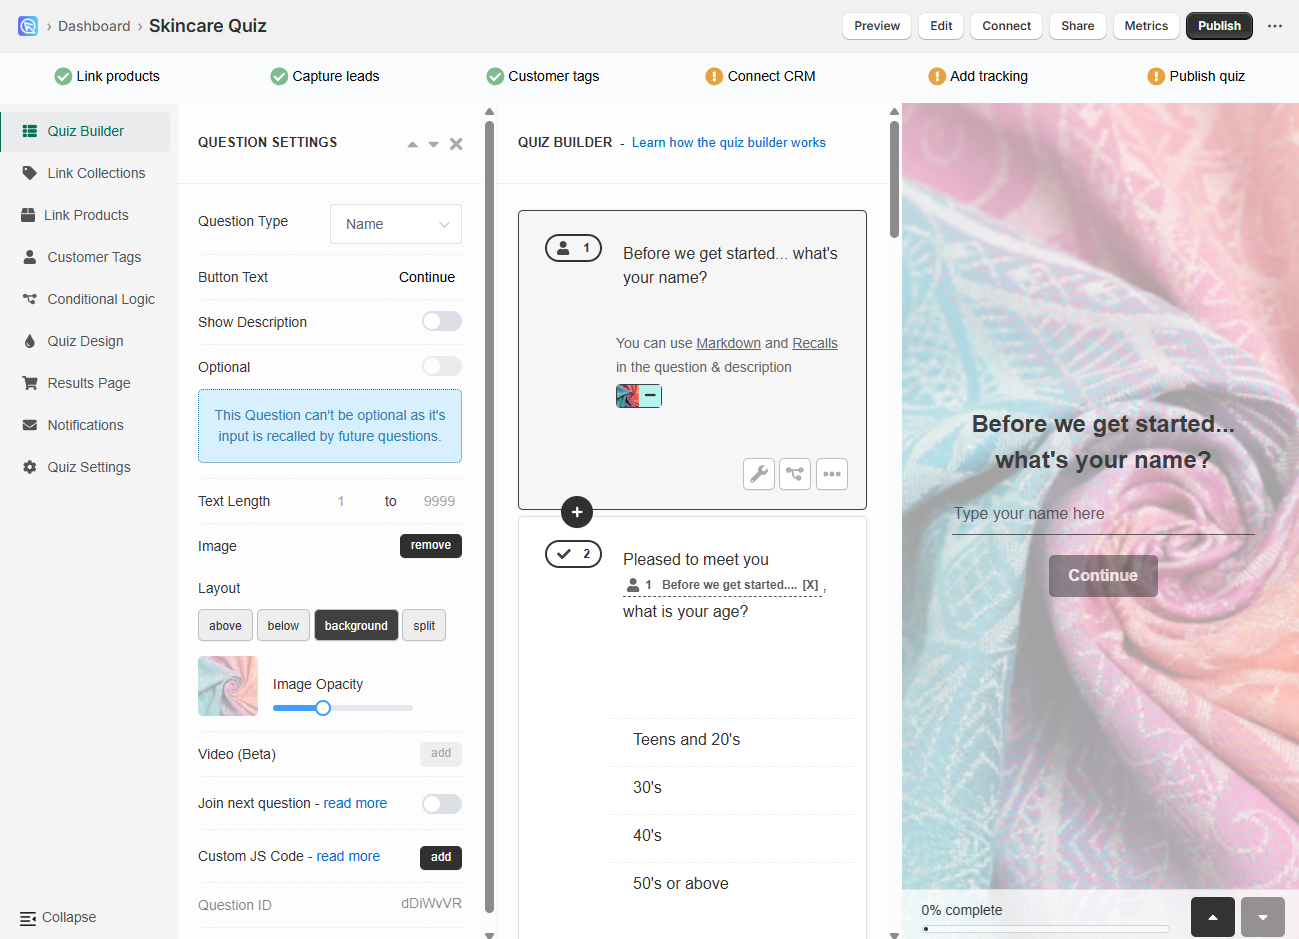
-
Video - Click
Addto upload a featured video to the question. An extra menu appears once activated. You can choose the video position and adjust the opacity. -
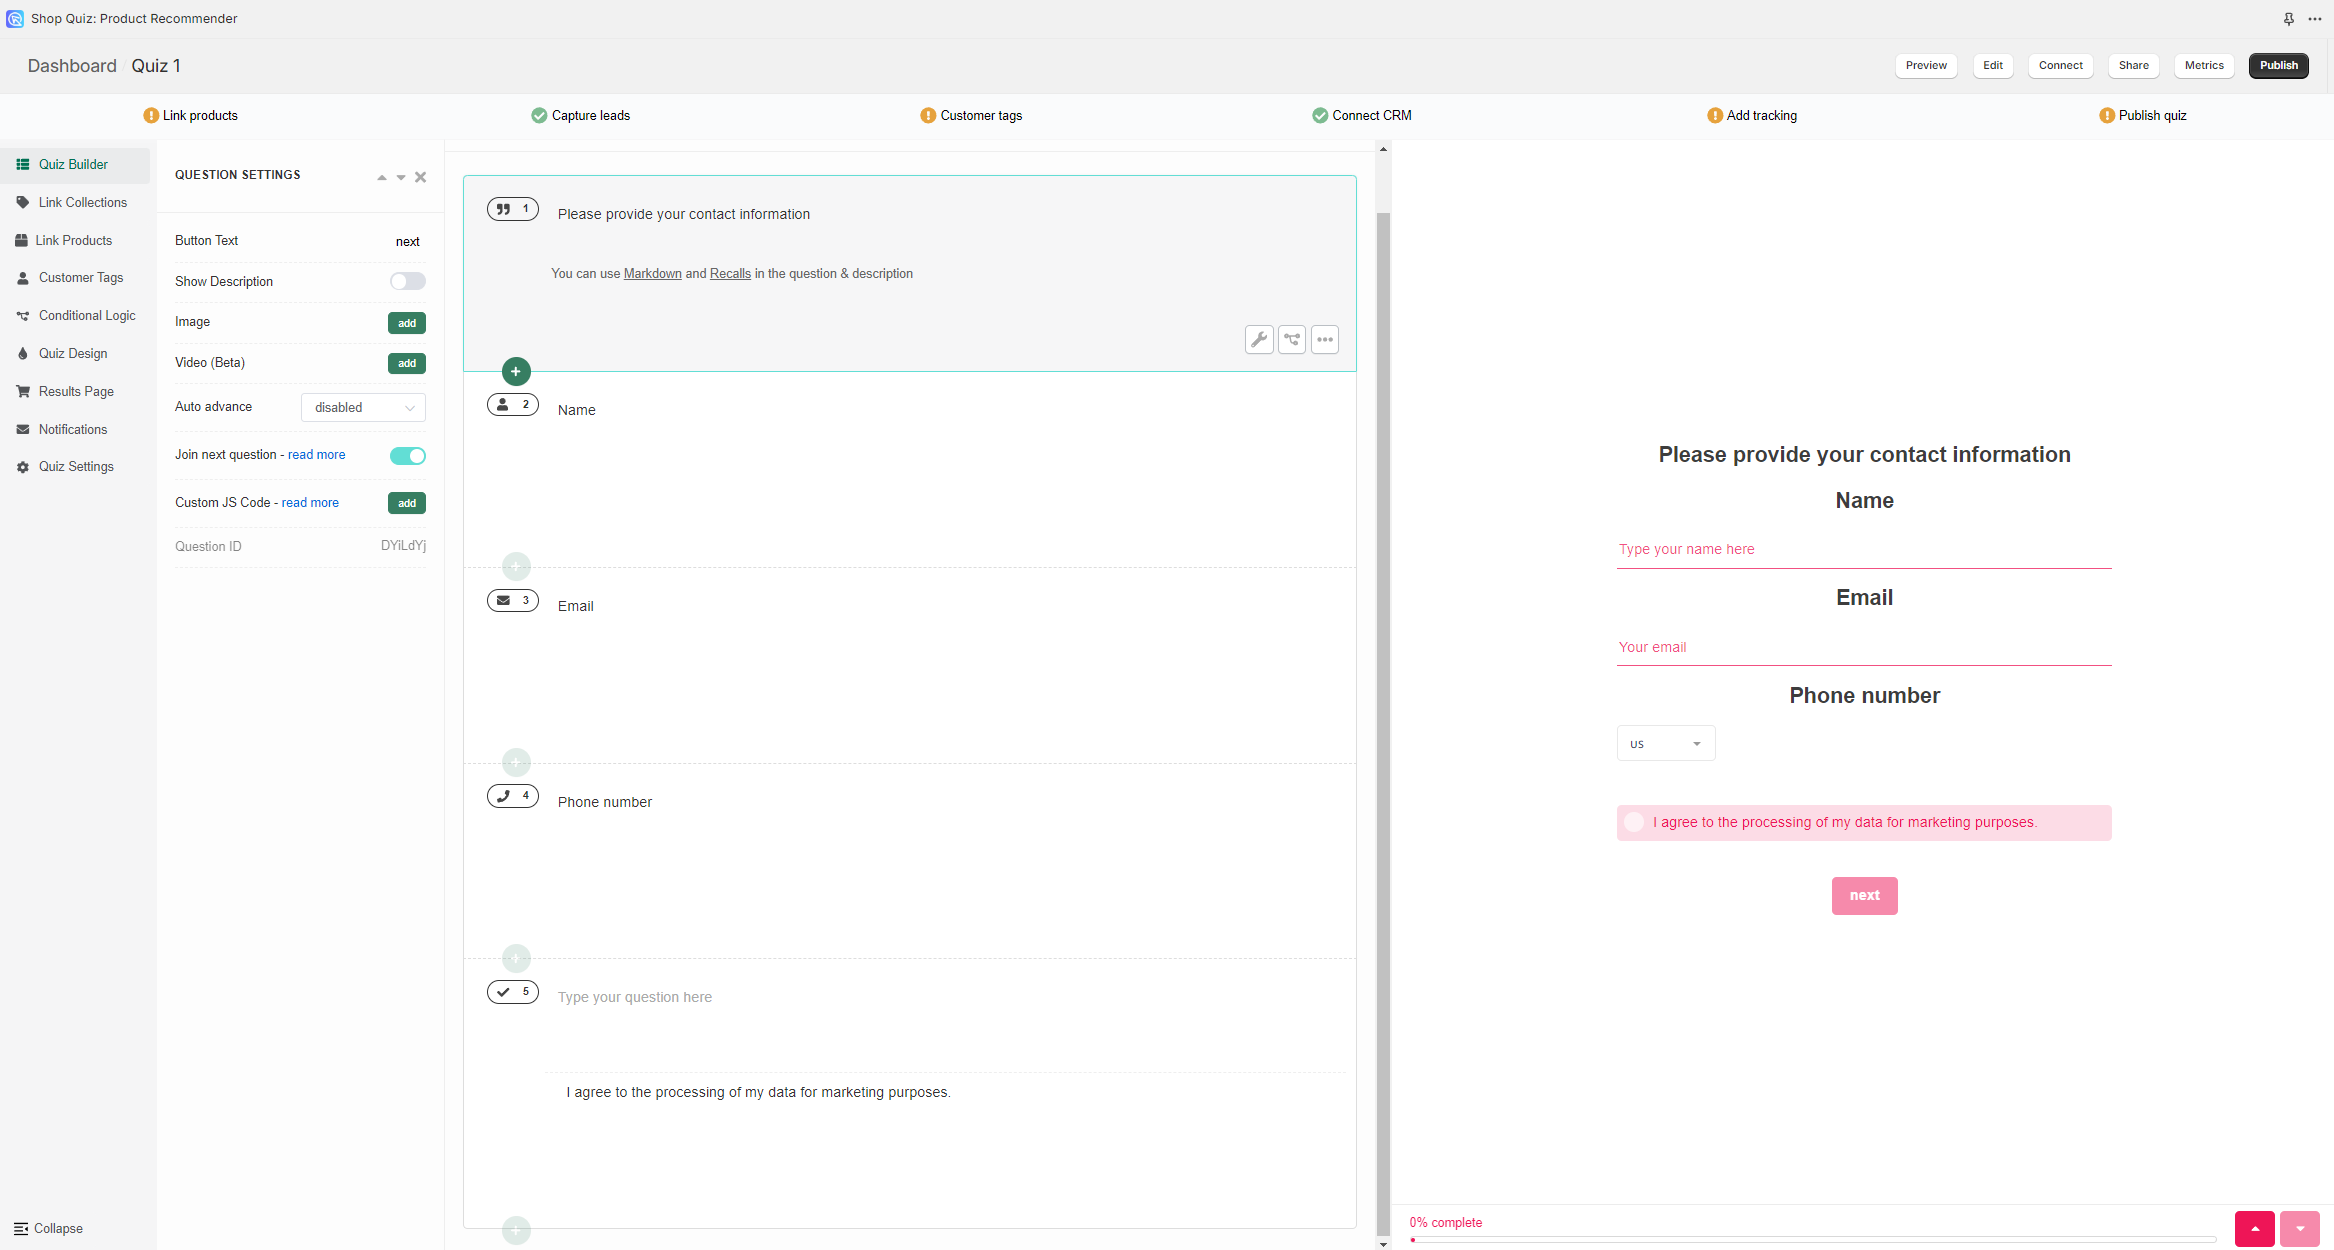
Join next question - Lets you join the current question with the next one.
Example
-
Custom JS Code - Click
Addto open a JavaScript console. It lets you add custom JavaScript to the quiz question.Custom JavaScript
You can add custom JavaScript to questions and the results page to extend behavior and layout.
Use cases - Inject custom texts, images, and conditional UI. - Adjust layout dynamically. - Render custom product recommendations. - Redirect to a specific store page. - Fire tracking on specific steps (GA, Meta Pixel, etc.).
See how to add JavaScript to the quiz for implementation details and best practices.
Adding Media
You can add media into quiz questions in two ways:
-
Per-question media in Question Settings. Upload one image per slide, as a background or a split, or add a short video block.
-
Embed via Markdown in text blocks such as question description or content blocks on the results page:
Tip
See how to add/adjust images for optimization guidance (dimensions, compression, readability).
Styling Text
For quick formatting, you can use Markdown inside text blocks (questions, choices, results).
Using Markdown
Headings
Text styles
Links
Images
Videos
Need brand fonts/colors?
Use Custom CSS in the Quiz Design tab.
Picture Choice Slides
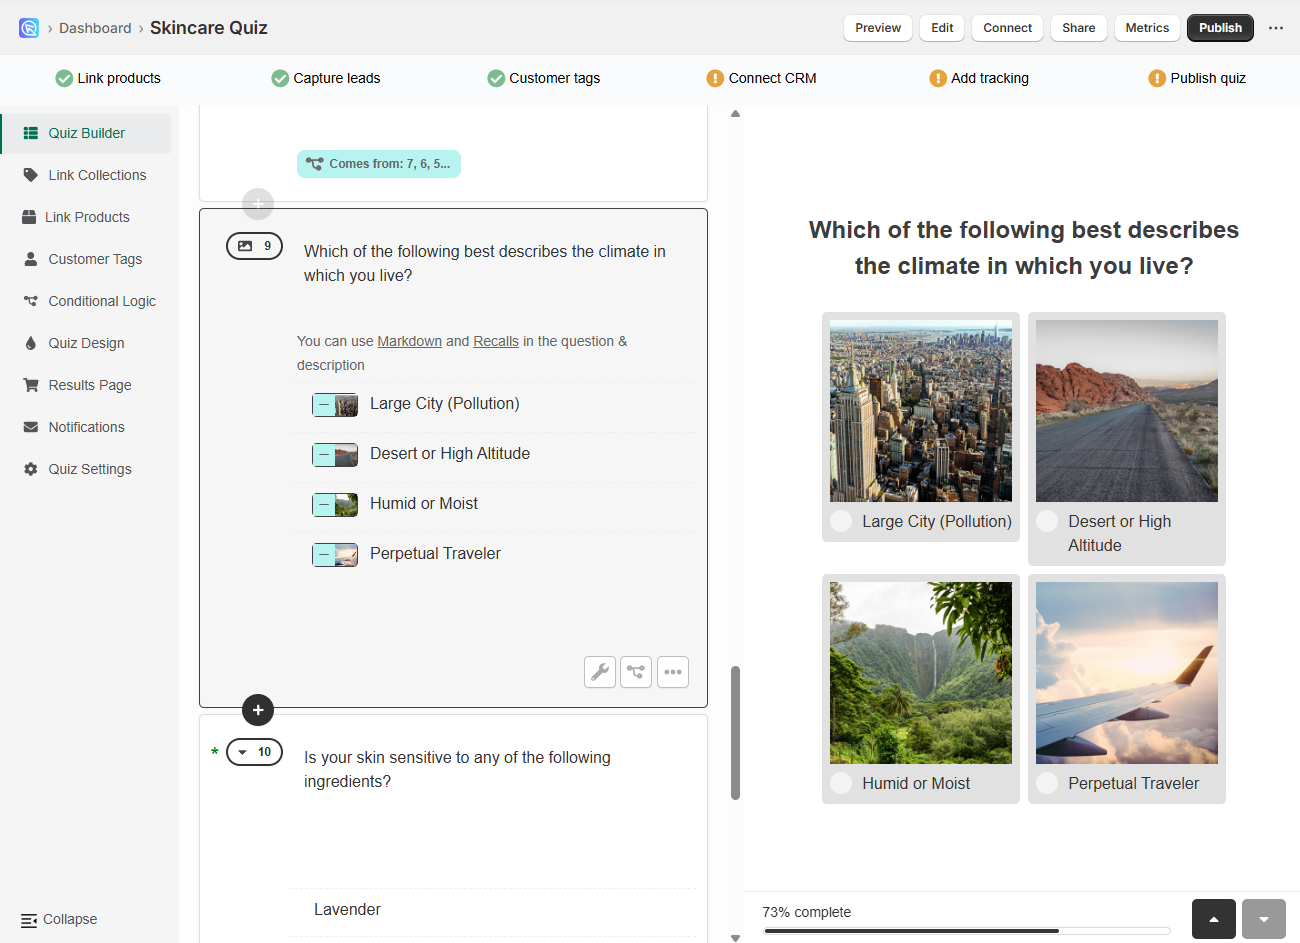
A Picture Choice question lets you add an image to each choice in a multiple-choice question.
-
Open the Quiz Builder and click
+ Add new question. This will open a list of available question types. -
Select
Picture choice. This creates a multiple-choice slide where each option is a clickable image. You can upload your own image for each choice.Image size
For best results, upload square images up to 400×400px.
Non-square images will be cropped automatically.
To avoid distortion, you can resize or crop them beforehand using a free online image editor.
All uploaded images are optimized by the app for faster loading.
-
Click
+ Add choiceto insert a new answer option into the block. -
For each choice, click
+ Imageto upload an image from your computer. -
Repeat the process by adding more choices until your picture choice question is complete.
In the Quiz Builder tab, you can design each question/slide.
Question Settings
Click on the wrench icon in the bottom-right corner to open the question settings.
The question settings hold many options to customize a question.
-
Show description - Activates an extra text field on the slide, below the main question field. It lets you add more text to a slide. Toggle to activate.
Show description
A description field lets you add extra text to the slide. You can style it with Markdown, embed images and videos, or use an information recall to show the customer's earlier answers.
-
Image - Click
Addto upload a featured image to the question. Image should be max 1000px x 1000px. An extra menu appears once activated. You can choose the image position and adjust the opacity. -
Video - Click
Addto upload a featured video to the question. An extra menu appears once activated. You can choose the video position and adjust the opacity. -
Join next question - Lets you join the current question with the next one.
Example
-
Custom JS Code - Click
Addto open a JavaScript console. It lets you add custom JavaScript to the quiz question.Custom JavaScript
You can add custom JavaScript to questions and the results page to extend behavior and layout.
Use cases - Inject custom texts, images, and conditional UI. - Adjust layout dynamically. - Render custom product recommendations. - Redirect to a specific store page. - Fire tracking on specific steps (GA, Meta Pixel, etc.).
See how to add JavaScript to the quiz for implementation details and best practices.
Adding Media
You can add media into quiz questions in two ways:
-
Per-question media in Question Settings. Upload one image per slide, as a background or a split, or add a short video block.
-
Embed via Markdown in text blocks such as question description or content blocks on the results page:
Tip
See how to add/adjust images for optimization guidance (dimensions, compression, readability).
Styling Text
For quick formatting, you can use Markdown inside text blocks (questions, choices, results).
Using Markdown
Headings
Text styles
Links
Images
Videos
Need brand fonts/colors?
Use Custom CSS in the Quiz Design tab.
Picture Choice Slides
A Picture Choice question lets you add an image to each choice in a multiple-choice question.
-
Open the Quiz Builder and click
+ Add new question. This will open a list of available question types. -
Select
Picture choice. This creates a multiple-choice slide where each option is a clickable image. You can upload your own image for each choice.Image size
For best results, upload square images up to 400×400px.
Non-square images will be cropped automatically.
To avoid distortion, you can resize or crop them beforehand using a free online image editor.
All uploaded images are optimized by the app for faster loading.
-
Click
+ Add choiceto insert a new answer option into the block. -
For each choice, click
+ Imageto upload an image from your computer. -
Repeat the process by adding more choices until your picture choice question is complete.
In the Quiz Builder tab, you can design each question/slide.
Question Settings
Click on the wrench icon in the bottom-right corner to open the question settings.
The question settings hold many options to customize a question.
-
Show description - Activates an extra text field on the slide, below the main question field. It lets you add more text to a slide. Toggle to activate.
Show description
A description field lets you add extra text to the slide. You can style it with Markdown, embed images and videos, or use an information recall to show the customer's earlier answers.
-
Image - Click
Addto upload a featured image to the question. Image should be max 1000px x 1000px. An extra menu appears once activated. You can choose the image position and adjust the opacity. -
Video - Click
Addto upload a featured video to the question. An extra menu appears once activated. You can choose the video position and adjust the opacity. -
Join next question - Lets you join the current question with the next one.
Example
-
Custom JS Code - Click
Addto open a JavaScript console. It lets you add custom JavaScript to the quiz question.Custom JavaScript
You can add custom JavaScript to questions and the results page to extend behavior and layout.
Use cases - Inject custom texts, images, and conditional UI. - Adjust layout dynamically. - Render custom product recommendations. - Redirect to a specific store page. - Fire tracking on specific steps (GA, Meta Pixel, etc.).
See how to add JavaScript to the quiz for implementation details and best practices.
Adding Media
You can add media into quiz questions in two ways:
-
Per-question media in Question Settings. Upload one image per slide, as a background or a split, or add a short video block.
-
Embed via Markdown in text blocks such as question description or content blocks on the results page:
Tip
See how to add/adjust images for optimization guidance (dimensions, compression, readability).
Styling Text
For quick formatting, you can use Markdown inside text blocks (questions, choices, results).
Using Markdown
Headings
Text styles
Links
Images
Videos
Need brand fonts/colors?
Use Custom CSS in the Quiz Design tab.
Picture Choice Slides
A Picture Choice question lets you add an image to each choice in a multiple-choice question.
-
Open the Quiz Builder and click
+ Add new question. This will open a list of available question types. -
Select
Picture choice. This creates a multiple-choice slide where each option is a clickable image. You can upload your own image for each choice.Image size
For best results, upload square images up to 400×400px.
Non-square images will be cropped automatically.
To avoid distortion, you can resize or crop them beforehand using a free online image editor.
All uploaded images are optimized by the app for faster loading.
-
Click
+ Add choiceto insert a new answer option into the block. -
For each choice, click
+ Imageto upload an image from your computer. -
Repeat the process by adding more choices until your picture choice question is complete.
In the Quiz Builder tab, you can design each question/slide.
Question Settings
Click on the wrench icon in the bottom-right corner to open the question settings.
The question settings hold many options to customize a question.
-
Show description - Activates an extra text field on the slide, below the main question field. It lets you add more text to a slide. Toggle to activate.
Show description
A description field lets you add extra text to the slide. You can style it with Markdown, embed images and videos, or use an information recall to show the customer's earlier answers.
-
Image - Click
Addto upload a featured image to the question. Image should be max 1000px x 1000px. An extra menu appears once activated. You can choose the image position and adjust the opacity. -
Video - Click
Addto upload a featured video to the question. An extra menu appears once activated. You can choose the video position and adjust the opacity. -
Join next question - Lets you join the current question with the next one.
Example
-
Custom JS Code - Click
Addto open a JavaScript console. It lets you add custom JavaScript to the quiz question.Custom JavaScript
You can add custom JavaScript to questions and the results page to extend behavior and layout.
Use cases - Inject custom texts, images, and conditional UI. - Adjust layout dynamically. - Render custom product recommendations. - Redirect to a specific store page. - Fire tracking on specific steps (GA, Meta Pixel, etc.).
See how to add JavaScript to the quiz for implementation details and best practices.
Adding Media
You can add media into quiz questions in two ways:
-
Per-question media in Question Settings. Upload one image per slide, as a background or a split, or add a short video block.
-
Embed via Markdown in text blocks such as question description or content blocks on the results page:
Tip
See how to add/adjust images for optimization guidance (dimensions, compression, readability).
Styling Text
For quick formatting, you can use Markdown inside text blocks (questions, choices, results).
Using Markdown
Headings
Text styles
Links
Images
Videos
Need brand fonts/colors?
Use Custom CSS in the Quiz Design tab.
Picture Choice Slides
A Picture Choice question lets you add an image to each choice in a multiple-choice question.
-
Open the Quiz Builder and click
+ Add new question. This will open a list of available question types. -
Select
Picture choice. This creates a multiple-choice slide where each option is a clickable image. You can upload your own image for each choice.Image size
For best results, upload square images up to 400×400px.
Non-square images will be cropped automatically.
To avoid distortion, you can resize or crop them beforehand using a free online image editor.
All uploaded images are optimized by the app for faster loading.
-
Click
+ Add choiceto insert a new answer option into the block. -
For each choice, click
+ Imageto upload an image from your computer. -
Repeat the process by adding more choices until your picture choice question is complete.
In the Quiz Builder tab, you can design each question/slide.
Question Settings
Click on the wrench icon in the bottom-right corner to open the question settings.
The question settings hold many options to customize a question.
-
Show description - Activates an extra text field on the slide, below the main question field. It lets you add more text to a slide. Toggle to activate.
Show description
A description field lets you add extra text to the slide. You can style it with Markdown, embed images and videos, or use an information recall to show the customer's earlier answers.
-
Image - Click
Addto upload a featured image to the question. Image should be max 1000px x 1000px. An extra menu appears once activated. You can choose the image position and adjust the opacity. -
Video - Click
Addto upload a featured video to the question. An extra menu appears once activated. You can choose the video position and adjust the opacity. -
Join next question - Lets you join the current question with the next one.
Example
-
Custom JS Code - Click
Addto open a JavaScript console. It lets you add custom JavaScript to the quiz question.Custom JavaScript
You can add custom JavaScript to questions and the results page to extend behavior and layout.
Use cases - Inject custom texts, images, and conditional UI. - Adjust layout dynamically. - Render custom product recommendations. - Redirect to a specific store page. - Fire tracking on specific steps (GA, Meta Pixel, etc.).
See how to add JavaScript to the quiz for implementation details and best practices.
Adding Media
You can add media into quiz questions in two ways:
-
Per-question media in Question Settings. Upload one image per slide, as a background or a split, or add a short video block.
-
Embed via Markdown in text blocks such as question description or content blocks on the results page:
Tip
See how to add/adjust images for optimization guidance (dimensions, compression, readability).
Styling Text
For quick formatting, you can use Markdown inside text blocks (questions, choices, results).
Using Markdown
Headings
Text styles
Links
Images
Videos
Need brand fonts/colors?
Use Custom CSS in the Quiz Design tab.
Picture Choice Slides
A Picture Choice question lets you add an image to each choice in a multiple-choice question.
-
Open the Quiz Builder and click
+ Add new question. This will open a list of available question types. -
Select
Picture choice. This creates a multiple-choice slide where each option is a clickable image. You can upload your own image for each choice.Image size
For best results, upload square images up to 400×400px.
Non-square images will be cropped automatically.
To avoid distortion, you can resize or crop them beforehand using a free online image editor.
All uploaded images are optimized by the app for faster loading.
-
Click
+ Add choiceto insert a new answer option into the block. -
For each choice, click
+ Imageto upload an image from your computer. -
Repeat the process by adding more choices until your picture choice question is complete.
Results page tab
The Results page tab is where you design what the customer sees after finishing the quiz.
You can add text, images, videos, product blocks, buttons and custom HTML. Each section and block has its own settings, like the Questions tab, so you can style and align the content.
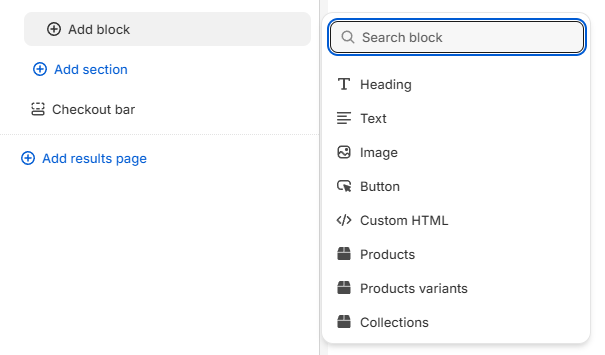
- Each block has design settings for styling and layout adjustments.
In the Results page settings, you can apply a dedicated background image, or inject CSS and JavaScript that only affect this page.
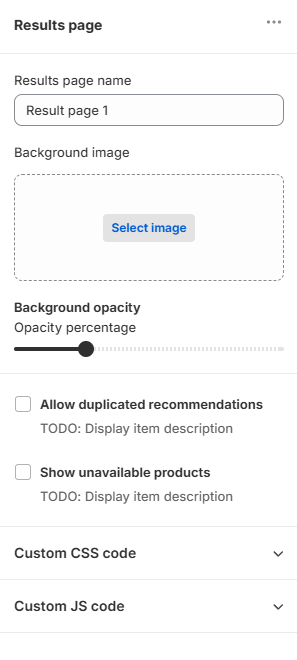
The most important part of this tab is the Product block.
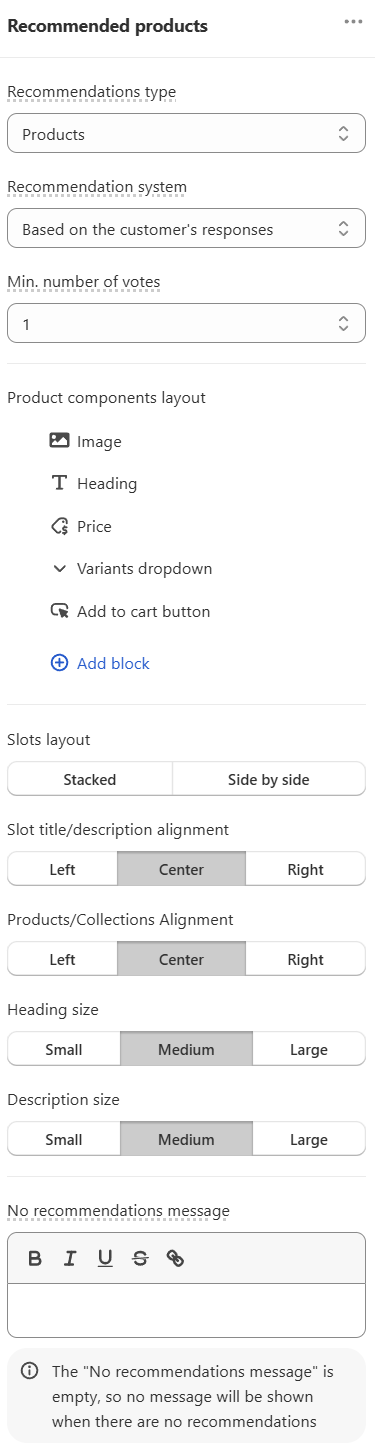
Here, you decide how recommended products appear. You can:
-
Choose alignment and text sizes.
-
Reorder product components (image, title, price, vendor, metafields, etc.) by dragging and dropping.
-
Add or remove components to build the product card you want.
-
Configure individual component settings, such as image quality for product photos or which metafields to display.
The Results Page tab is where you design what the customer sees after finishing the quiz.
You can add different blocks to the results page such as heading, text, image, custom HTML, products and slots. Click on the + icon to add a block.
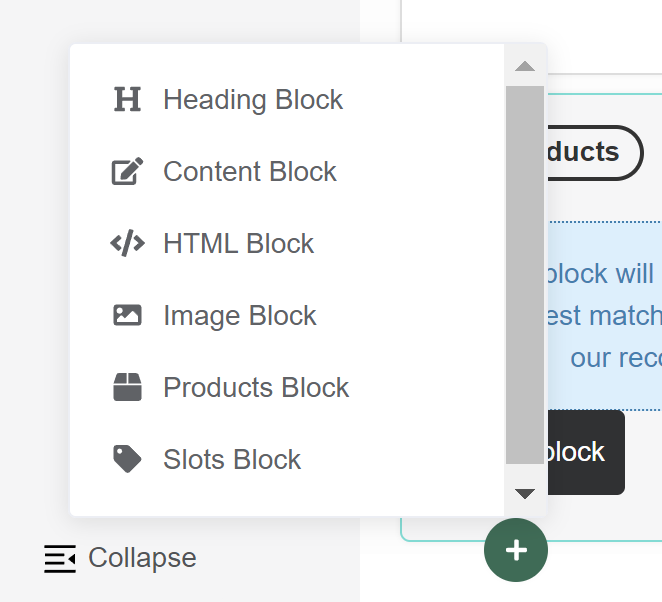
Each block has its own settings which you can use by clicking on the wrench icon in the bottom-right corner.
-
Click
addon the image block to upload an image to the results page and adjust its opacity. -
heading and content blocks let you add text to the results page. Style it with Markdown, or embed images, links or videos.
-
custom HTML blocks let you add custom HTML to the results page.
-
products blocks let you add products to the results page.
-
slots blocks let you add products to the results page, sorted into slots.
Results Page settings
Click on the gear icon in the top-right corner to open the results page settings.
-
In the Basic Settings section, you can add a dedicated background image for the results page.
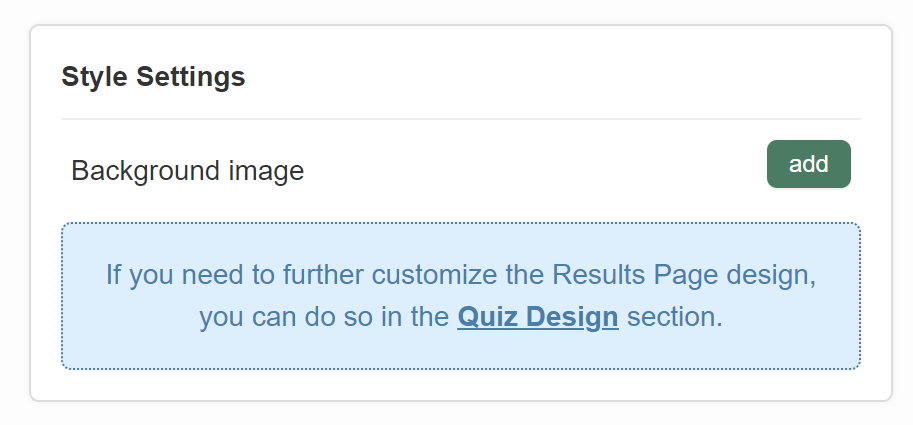
-
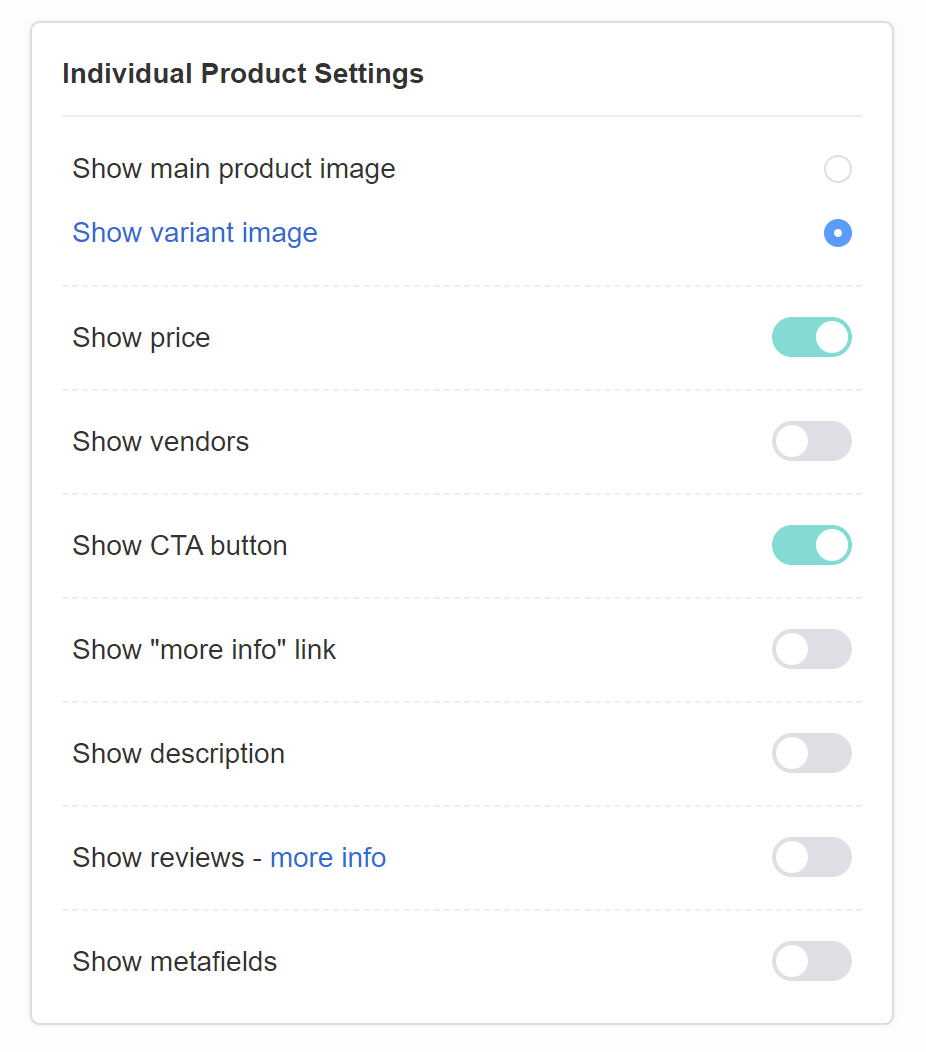
In the Basic Settings section, Individual Product Settings lets you show or hide product images, prices and vendors.
-
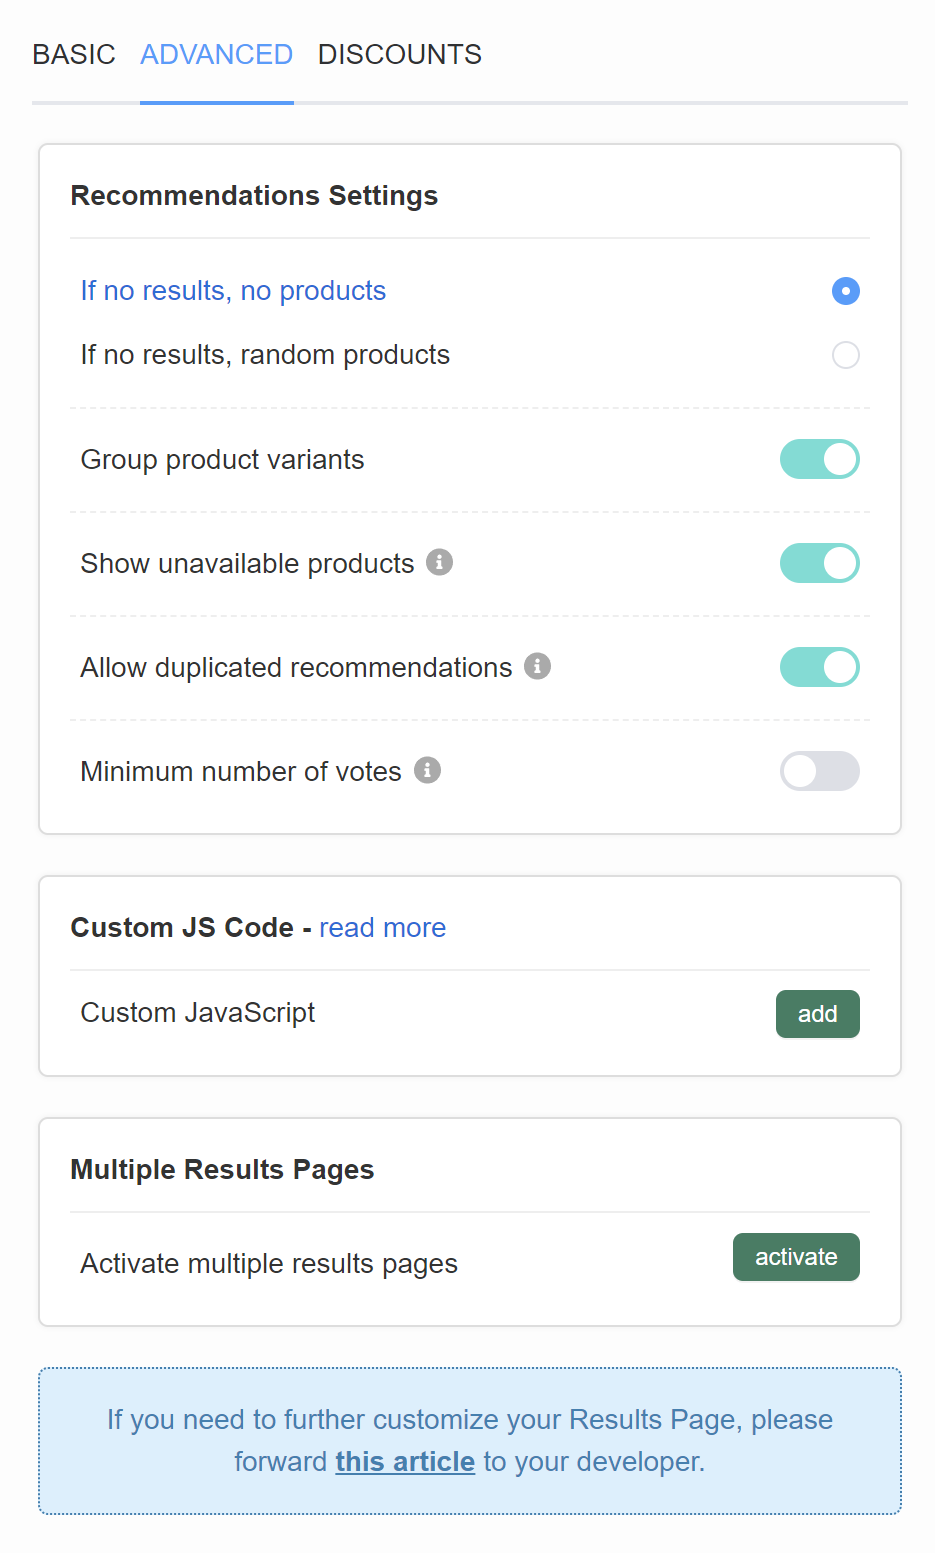
In the Advanced Settings section, you can inject Custom JavaScript that affects only the results page.
Need a fully custom layout?
Build a custom results page on your site and send quiz data to it with the Callback Function (receives responses as JSON). This gives you total control over layout and rendering.
Check how to use the callback function for detailed instructions.
The Results Page tab is where you design what the customer sees after finishing the quiz.
You can add different blocks to the results page such as heading, text, image, custom HTML, products and slots. Click on the + icon to add a block.
Each block has its own settings which you can use by clicking on the wrench icon in the bottom-right corner.
-
Click
addon the image block to upload an image to the results page and adjust its opacity. -
heading and content blocks let you add text to the results page. Style it with Markdown, or embed images, links or videos.
-
custom HTML blocks let you add custom HTML to the results page.
-
products blocks let you add products to the results page.
-
slots blocks let you add products to the results page, sorted into slots.
Results Page settings
Click on the gear icon in the top-right corner to open the results page settings.
-
In the Basic Settings section, you can add a dedicated background image for the results page.
-
In the Basic Settings section, Individual Product Settings lets you show or hide product images, prices and vendors.
-
In the Advanced Settings section, you can inject Custom JavaScript that affects only the results page.
Need a fully custom layout?
Build a custom results page on your site and send quiz data to it with the Callback Function (receives responses as JSON). This gives you total control over layout and rendering.
Check how to use the callback function for detailed instructions.
The Results Page tab is where you design what the customer sees after finishing the quiz.
You can add different blocks to the results page such as heading, text, image, custom HTML, products and slots. Click on the + icon to add a block.
Each block has its own settings which you can use by clicking on the wrench icon in the bottom-right corner.
-
Click
addon the image block to upload an image to the results page and adjust its opacity. -
heading and content blocks let you add text to the results page. Style it with Markdown, or embed images, links or videos.
-
custom HTML blocks let you add custom HTML to the results page.
-
products blocks let you add products to the results page.
-
slots blocks let you add products to the results page, sorted into slots.
Results Page settings
Click on the gear icon in the top-right corner to open the results page settings.
-
In the Basic Settings section, you can add a dedicated background image for the results page.
-
In the Basic Settings section, Individual Product Settings lets you show or hide product images, prices and vendors.
-
In the Advanced Settings section, you can inject Custom JavaScript that affects only the results page.
Need a fully custom layout?
Build a custom results page on your site and send quiz data to it with the Callback Function (receives responses as JSON). This gives you total control over layout and rendering.
Check how to use the callback function for detailed instructions.
The Results Page tab is where you design what the customer sees after finishing the quiz.
You can add different blocks to the results page such as heading, text, image, custom HTML, products and slots. Click on the + icon to add a block.
Each block has its own settings which you can use by clicking on the wrench icon in the bottom-right corner.
-
Click
addon the image block to upload an image to the results page and adjust its opacity. -
heading and content blocks let you add text to the results page. Style it with Markdown, or embed images, links or videos.
-
custom HTML blocks let you add custom HTML to the results page.
-
products blocks let you add products to the results page.
-
slots blocks let you add products to the results page, sorted into slots.
Results Page settings
Click on the gear icon in the top-right corner to open the results page settings.
-
In the Basic Settings section, you can add a dedicated background image for the results page.
-
In the Basic Settings section, Individual Product Settings lets you show or hide product images, prices and vendors.
-
In the Advanced Settings section, you can inject Custom JavaScript that affects only the results page.
Need a fully custom layout?
Build a custom results page on your site and send quiz data to it with the Callback Function (receives responses as JSON). This gives you total control over layout and rendering.
Check how to use the callback function for detailed instructions.
The Results Page tab is where you design what the customer sees after finishing the quiz.
You can add different blocks to the results page such as heading, text, image, custom HTML, products and slots. Click on the + icon to add a block.
Each block has its own settings which you can use by clicking on the wrench icon in the bottom-right corner.
-
Click
addon the image block to upload an image to the results page and adjust its opacity. -
heading and content blocks let you add text to the results page. Style it with Markdown, or embed images, links or videos.
-
custom HTML blocks let you add custom HTML to the results page.
-
products blocks let you add products to the results page.
-
slots blocks let you add products to the results page, sorted into slots.
Results Page settings
Click on the gear icon in the top-right corner to open the results page settings.
-
In the Basic Settings section, you can add a dedicated background image for the results page.
-
In the Basic Settings section, Individual Product Settings lets you show or hide product images, prices and vendors.
-
In the Advanced Settings section, you can inject Custom JavaScript that affects only the results page.
Need a fully custom layout?
Build a custom results page on your site and send quiz data to it with the Callback Function (receives responses as JSON). This gives you total control over layout and rendering.
Check how to use the callback function for detailed instructions.
This article explains all the options available for customizing the quiz design in the RevenueHunt app.