How to Add JavaScript to the Quiz
Custom JavaScript extends the RevenueHunt app. A developer can read the quiz response and get the individual answers, the triggered tags and the recommended products.
With custom JavaScript, you can:
- add custom behavior, images, texts or logic
- change quiz layout
- display custom product recommendations
- forward to any particular page on your store
- add tracking codes to specific questions (Google Analytics, Meta Pixel)
- and more
This article explains how to add JavaScript to quiz questions and the results page.
For developers and Shopify Partners
This article is for developers and Shopify Partners. If you do not know the basics of JavaScript and the Vue.js framework, ask a professional to implement this. You can find or hire a developer through Shopify Experts.
What you can use
Which technologies a quiz can use depends on the version you are running.
| Technology | What it is | Use it for |
|---|---|---|
| JavaScript | A programming language that runs in the browser | Custom logic, calculations, and behavior that reacts to the customer |
| HTML | The markup that gives a block its structure | Custom content blocks and layouts |
| Liquid | Shopify's templating language, rendered before the page reaches the browser | Putting quiz answers and store data straight into the markup |
Reach for Liquid when the value is known before the page loads, such as a product field or an answer already given. Reach for JavaScript when something has to change while the customer is on the page.
| Technology | What it is | Use it for |
|---|---|---|
| JavaScript | A programming language that runs in the browser | Custom logic, calculations, and behavior that reacts to the customer |
| HTML | The markup that gives a block its structure | Custom content blocks and layouts |
JavaScript is the route for anything dynamic here. It reads the quiz through the prq object and changes the page from there.
| Technology | What it is | Use it for |
|---|---|---|
| JavaScript | A programming language that runs in the browser | Custom logic, calculations, and behavior that reacts to the customer |
| HTML | The markup that gives a block its structure | Custom content blocks and layouts |
JavaScript is the route for anything dynamic here. It reads the quiz through the prq object and changes the page from there.
| Technology | What it is | Use it for |
|---|---|---|
| JavaScript | A programming language that runs in the browser | Custom logic, calculations, and behavior that reacts to the customer |
| HTML | The markup that gives a block its structure | Custom content blocks and layouts |
JavaScript is the route for anything dynamic here. It reads the quiz through the prq object and changes the page from there.
| Technology | What it is | Use it for |
|---|---|---|
| JavaScript | A programming language that runs in the browser | Custom logic, calculations, and behavior that reacts to the customer |
| HTML | The markup that gives a block its structure | Custom content blocks and layouts |
JavaScript is the route for anything dynamic here. It reads the quiz through the prq object and changes the page from there.
| Technology | What it is | Use it for |
|---|---|---|
| JavaScript | A programming language that runs in the browser | Custom logic, calculations, and behavior that reacts to the customer |
| HTML | The markup that gives a block its structure | Custom content blocks and layouts |
JavaScript is the route for anything dynamic here. It reads the quiz through the prq object and changes the page from there.
Where the code goes
You can add custom JavaScript to the quiz results page and to the quiz questions.
The results page console
Use JavaScript on Results page when you want to:
- Access all quiz data - See all answers, scores, and variables after quiz completion
- Work with recommendations - Access and manipulate recommended products/collections
- Cart operations - Add products to cart, apply discount codes
- Display calculations - Show results based on all collected answers (BMI, skin type, etc.)
- Conversion tracking - Fire analytics events with complete quiz data
- Customize recommendations - Modify or filter displayed products
-
Navigate to the Results page settings in the Quiz builder.
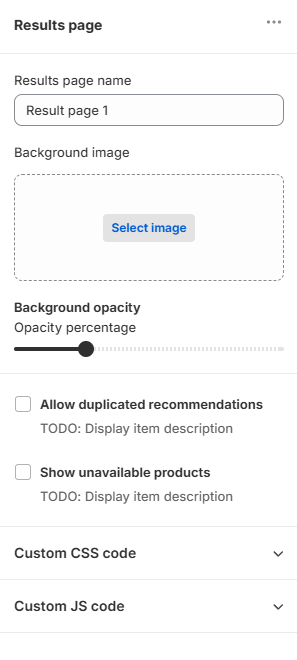
-
Scroll down to
Custom JavaScriptand open it.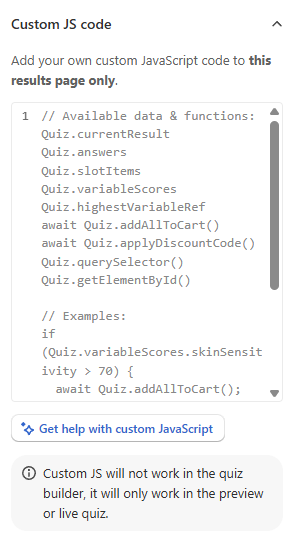
-
Write custom scripts here to change how the quiz behaves, based on what the customer does and on their results.
Run the custom code
▷ / ❚❚- Press this button to run the custom code or enable/disable the custom code execution.Get help with custom JavaScript
Click on
✨Get help with custom JavaScriptto open a chat window with the Quiz Copilot AI. It can directly write JavaScript code for you. -
Click the
Savebutton to update the preview and the live quiz.
- Navigate to the Results Page Settings in the Quiz Builder.
- Select Advanced Settings.
- Scroll down to
Custom JavaScriptand clickadd. - Write custom scripts here to change how the quiz behaves, based on what the customer does and on their results.
- Click the
Publishbutton to update the preview and the live quiz.
- Navigate to the Results Page Settings in the Quiz Builder.
- Select Advanced Settings.
- Scroll down to
Custom JavaScriptand clickadd. - Write custom scripts here to change how the quiz behaves, based on what the customer does and on their results.
- Click the
Publishbutton to update the preview and the live quiz.
- Navigate to the Results Page Settings in the Quiz Builder.
- Select Advanced Settings.
- Scroll down to
Custom JavaScriptand clickadd. - Write custom scripts here to change how the quiz behaves, based on what the customer does and on their results.
- Click the
Publishbutton to update the preview and the live quiz.
- Navigate to the Results Page Settings in the Quiz Builder.
- Select Advanced Settings.
- Scroll down to
Custom JavaScriptand clickadd. - Write custom scripts here to change how the quiz behaves, based on what the customer does and on their results.
- Click the
Publishbutton to update the preview and the live quiz.
- Navigate to the Results Page Settings in the Quiz Builder.
- Select Advanced Settings.
- Scroll down to
Custom JavaScriptand clickadd. - Write custom scripts here to change how the quiz behaves, based on what the customer does and on their results.
- Click the
Publishbutton to update the preview and the live quiz.
The question console
Use JavaScript on Questions when you want to:
- Control quiz flow - Auto-advance, skip questions, or go back based on answers
- Validate inputs - Check if answers meet certain criteria before allowing progression
- Dynamic question content - Change question text, show/hide elements based on previous answers
- Real-time interactions - Update the page as users select answers
- Set calculated values - Compute values to use in later questions
- Track individual questions - Fire analytics events for specific questions
- Navigate to the Quiz builder.
-
Open question settings.
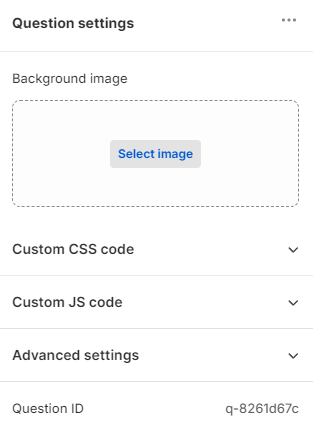
-
Scroll down to
Custom JavaScriptand open it.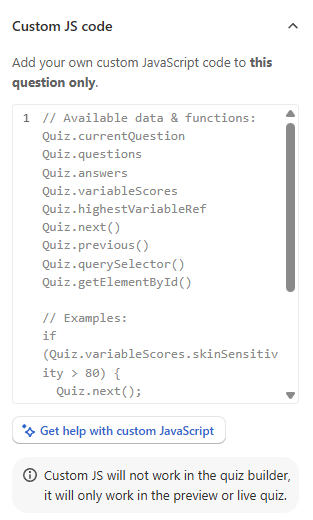
-
Write custom scripts here to change how the quiz behaves, based on what the customer does and on their results.
Run the custom code
▷ / ❚❚- Press this button to run the custom code or enable/disable the custom code execution.Get help with custom JavaScript
Click on
✨Get help with custom JavaScriptto open a chat window with the Quiz Copilot AI. It can directly write JavaScript code for you. -
Click the
Savebutton to update the preview and the live quiz.
- Navigate to the Quiz Builder.
- Open question settings.
- Scroll down to
Custom JavaScriptand clickadd. - Write custom scripts here to change how the quiz behaves, based on what the customer does and on their results.
- Click the
Publishbutton to update the preview and the live quiz.
- Navigate to the Quiz Builder.
- Open question settings.
- Scroll down to
Custom JavaScriptand clickadd. - Write custom scripts here to change how the quiz behaves, based on what the customer does and on their results.
- Click the
Publishbutton to update the preview and the live quiz.
- Navigate to the Quiz Builder.
- Open question settings.
- Scroll down to
Custom JavaScriptand clickadd. - Write custom scripts here to change how the quiz behaves, based on what the customer does and on their results.
- Click the
Publishbutton to update the preview and the live quiz.
- Navigate to the Quiz Builder.
- Open question settings.
- Scroll down to
Custom JavaScriptand clickadd. - Write custom scripts here to change how the quiz behaves, based on what the customer does and on their results.
- Click the
Publishbutton to update the preview and the live quiz.
- Navigate to the Quiz Builder.
- Open question settings.
- Scroll down to
Custom JavaScriptand clickadd. - Write custom scripts here to change how the quiz behaves, based on what the customer does and on their results.
- Click the
Publishbutton to update the preview and the live quiz.
A custom HTML block
You can also add custom JavaScript directly in HTML blocks throughout your quiz. These blocks support both JavaScript and Liquid templating for dynamic content.
When a Custom HTML block is the right place
- You want JavaScript to run in a specific location in your layout
- You need to combine HTML, Liquid, and JavaScript together
- You want different scripts for different content blocks
- You are adding a small script for one context, such as tracking a single element
- You need JavaScript to run multiple times (e.g., once per product in recommendations)
On the results page
- Navigate to the Results page in the Quiz builder.
- Add or edit a Custom HTML block in your results page layout.
-
Add your JavaScript using
<script>tags: -
Use Liquid templating alongside JavaScript for dynamic content:
-
Click
Saveto update the preview/live quiz.
Run the custom code
▷ / ❚❚ - Press this button to run the custom code or enable/disable the custom code execution.
In a question
- Navigate to the Quiz builder and open a question.
- Add or edit a Custom HTML block within the question.
-
Add your JavaScript using
<script>tags: -
Combine JavaScript with Liquid templating:
-
Click
Saveto update the preview/live quiz.
Run the custom code
▷ / ❚❚ - Press this button to run the custom code or enable/disable the custom code execution.
In a slot item composition
- Navigate to the Results page settings in the Quiz builder.
- Open the Product block and in the Slot settings you can find the Slot item composition settings for your product recommendations.
- Add or edit a Custom HTML block within a product slot.
-
Add JavaScript that interacts with individual product data:
<script> // Access the current product in the slot const productTitle = '{{ item.title }}'; const productPrice = '{{ item.priceRange.minVariantPrice.amount }}'; console.log('Product:', productTitle, 'Price:', productPrice); // Add custom behavior for this specific product if (productTitle.includes('Premium')) { // Special handling for premium products console.log('This is a premium product!'); } </script> -
Use the two Liquid variables a slot provides.
Variable What it holds itemThe Shopify product, variant or collection object itemType'product','variant'or'collection'itemTypetells you which kind of objectitemis, so one block can render all three. -
Click
Saveto update the preview/live quiz.
Run the custom code
▷ / ❚❚ - Press this button to run the custom code or enable/disable the custom code execution.
The HTML Block does not run JavaScript
This version has an HTML Block, but it takes HTML and CSS only. A <script> tag placed in it does not run.
Put your JavaScript in the results page console or the question console instead.
The HTML Block does not run JavaScript
This version has an HTML Block, but it takes HTML and CSS only. A <script> tag placed in it does not run.
Put your JavaScript in the results page console or the question console instead.
The HTML Block does not run JavaScript
This version has an HTML Block, but it takes HTML and CSS only. A <script> tag placed in it does not run.
Put your JavaScript in the results page console or the question console instead.
The HTML Block does not run JavaScript
This version has an HTML Block, but it takes HTML and CSS only. A <script> tag placed in it does not run.
Put your JavaScript in the results page console or the question console instead.
The HTML Block does not run JavaScript
This version has an HTML Block, but it takes HTML and CSS only. A <script> tag placed in it does not run.
Put your JavaScript in the results page console or the question console instead.
Find block and question IDs
Custom JavaScript needs the IDs, also called references, of your questions and blocks. They are how the code reaches a specific answer or element.
How to Find Block and Question IDs
Method 1: Copy from Quiz builder (Recommended)
- Open your quiz in the Quiz builder
- Click on any question or block element
- Look for the block ID in the settings panel. It is usually at the top
- Click the copy icon next to the ID to copy it to your clipboard
- Use this ID in your JavaScript (e.g.,
quiz.answers.byBlock['your-block-id'])
Method 2: Inspect Element in Browser
- Open your quiz in preview or on your live site
- Right-click on the question or element you want to reference
- Select "Inspect" or "Inspect Element" from the context menu
- Look for
idordata-block-refattributes in the HTML - The value of these attributes is your block reference
Example IDs you might see:
qbc-skintype(question block choice)qbi-email(question block input)q-concerns(question)r-results(results page)
Use the Exact ID
Block references are case-sensitive! Make sure to copy them exactly as they appear. qbc-skintype is different from qbc-SkinType.
In Shopify Legacy, find the Slide ID of each question. prq.getSlideValue(slideId) uses it to read the value.
How to Find Slide IDs
Inspect in Browser Console
- Open your quiz in preview or live
- Press F12 to open Developer Tools → Console tab
- Type
prq.quizSlides()and press Enter - Expand the results to see all slides with their IDs
- Look for the
idproperty of each slide
Method 3: Inspect Element
- Right-click on the question element
- Select "Inspect Element"
- Look for
data-slide-idor similar attributes in the HTML
Example Slide IDs: rgiq0oE, 0Mi2qLN, abc123
In WooCommerce, find the Slide ID of each question. prq.getSlideValue(slideId) uses it to read the value.
How to Find Slide IDs
Inspect in Browser Console
- Open your quiz in preview or live
- Press F12 to open Developer Tools → Console tab
- Type
prq.quizSlides()and press Enter - Expand the results to see all slides with their IDs
- Look for the
idproperty of each slide
Method 3: Inspect Element
- Right-click on the question element
- Select "Inspect Element"
- Look for
data-slide-idor similar attributes in the HTML
Example Slide IDs: rgiq0oE, 0Mi2qLN, abc123
In Magento, find the Slide ID of each question. prq.getSlideValue(slideId) uses it to read the value.
How to Find Slide IDs
Inspect in Browser Console
- Open your quiz in preview or live
- Press F12 to open Developer Tools → Console tab
- Type
prq.quizSlides()and press Enter - Expand the results to see all slides with their IDs
- Look for the
idproperty of each slide
Method 3: Inspect Element
- Right-click on the question element
- Select "Inspect Element"
- Look for
data-slide-idor similar attributes in the HTML
Example Slide IDs: rgiq0oE, 0Mi2qLN, abc123
In BigCommerce, find the Slide ID of each question. prq.getSlideValue(slideId) uses it to read the value.
How to Find Slide IDs
Inspect in Browser Console
- Open your quiz in preview or live
- Press F12 to open Developer Tools → Console tab
- Type
prq.quizSlides()and press Enter - Expand the results to see all slides with their IDs
- Look for the
idproperty of each slide
Method 3: Inspect Element
- Right-click on the question element
- Select "Inspect Element"
- Look for
data-slide-idor similar attributes in the HTML
Example Slide IDs: rgiq0oE, 0Mi2qLN, abc123
In Standalone, find the Slide ID of each question. prq.getSlideValue(slideId) uses it to read the value.
How to Find Slide IDs
Inspect in Browser Console
- Open your quiz in preview or live
- Press F12 to open Developer Tools → Console tab
- Type
prq.quizSlides()and press Enter - Expand the results to see all slides with their IDs
- Look for the
idproperty of each slide
Method 3: Inspect Element
- Right-click on the question element
- Select "Inspect Element"
- Look for
data-slide-idor similar attributes in the HTML
Example Slide IDs: rgiq0oE, 0Mi2qLN, abc123
The JavaScript API
What your code receives
In the Built for Shopify version of the RevenueHunt app, custom JavaScript receives two parameters: quiz (read-only context) and actions (methods).
The quiz object
Your JavaScript code has access to the quiz object containing all the current state data:
Quiz Context Properties
| Property | Description |
|---|---|
quiz.metadata.responseId |
Unique response identifier |
quiz.metadata.language |
Quiz language code |
quiz.metadata.inBuilder |
true if in builder preview |
Question Mode Properties
| Property | Type | Description |
|---|---|---|
quiz.id |
string | Quiz identifier |
quiz.mode |
string | Always 'question' on question pages |
quiz.currentQuestion |
object | Current question data |
quiz.questions |
array | All quiz questions |
quiz.results |
array | All results pages |
Accessing Answers (Question Mode)
| Property | Description |
|---|---|
quiz.answers.list |
Array of all answers in chronological order |
quiz.answers.byBlock['ref'] |
Answer object keyed by block reference |
quiz.answers.byQuestion['ref'] |
Answers grouped by question reference |
quiz.answers.latest |
Most recent answer |
Each answer object contains:
| Property | Description |
|---|---|
.value |
The answer value (string) |
.blockRef |
Block reference ID |
.questionRef |
Question reference ID |
.choicesRefs |
Array of selected choice IDs |
.isValid |
Whether answer passed validation |
Variables & Scoring
| Property | Description |
|---|---|
quiz.variables.scores |
Object with variable scores { varName: number } |
quiz.variables.highest |
Reference of highest-scoring variable |
Progress (Question Mode)
| Property | Description |
|---|---|
quiz.progress.index |
0-based question index |
quiz.progress.displayStep |
1-based step number (for display) |
quiz.progress.totalQuestions |
Total number of questions |
quiz.progress.percentComplete |
Completion percentage (0-100) |
quiz.progress.hasPrevious |
Can navigate back |
quiz.progress.hasNext |
Can navigate forward |
Results page Properties
| Property | Description |
|---|---|
quiz.mode |
Always 'result' on results pages |
quiz.currentResult |
Current results page data |
quiz.resultContext.slotItems |
Object of recommended products/collections keyed by Shopify GID |
quiz.resultContext.cartItems |
Array of items currently in cart |
quiz.resultContext.discounts |
Object with applied array and eligible boolean |
Actions
Navigation Actions
| Method | Description |
|---|---|
actions.next() |
Navigate to next question |
actions.previous() |
Navigate to previous question |
actions.overrideNext(ref) |
Redirect to specific question/result (e.g., 'q-skintype', 'r-results') |
Answer Management
| Method | Description |
|---|---|
actions.setAnswer(blockRef, value) |
Set answer value |
actions.setAnswers(obj) |
Batch update multiple answers |
actions.clearAnswer(blockRef) |
Clear an answer |
actions.removeAnswer(blockRef) |
Remove answer completely |
Cart Actions
For Shopify cart operations, the main API should be Shopify's native Ajax Cart API:
- Official overview: Shopify Ajax API
- Official cart reference: Shopify Cart API reference
- Official section rendering reference: Shopify Section Rendering API
RevenueHunt's quiz-specific cart bridge is:
| Method | Description |
|---|---|
actions.syncCart() |
Fetch Shopify cart state and replace the quiz result cart state (async, results page) |
DOM helpers
Since the quiz may render in a shadow DOM, use these helpers instead of document.querySelector:
| Method | Description |
|---|---|
window.quiz.querySelector(selector) |
Find element in quiz |
window.quiz.querySelectorAll(selector) |
Find all matching elements |
window.quiz.getElementById(id) |
Find element by ID |
The global change handler
Custom JavaScript Capabilities
The prq object is how you customize the quiz. Use it like this:
Quiz Data Manipulation
- Accessing Quiz Slides and Responses: Use
prq.quizSlides()to retrieve all quiz slides/questions, including user responses. - Fetching Specific Slide Values: Obtain the value of a particular slide by using
prq.getSlideValue(slideId).
Customer information
- Lead Details:
prq.leadEmail(),prq.leadPhone()andprq.leadName()return the email, phone number and name of the customer.
Results Page Customization
- Manipulating Results Page Content: Access and modify the contents of the results page, including blocks and products, using
prq.resultsPage(). - Product Recommendations: Leverage
prq.recommendedProducts()andprq.mostVotedProduct()to customize product suggestions. - Automatic Actions: Automatically add products to the cart or proceed to checkout using
prq.addAllToCart()andprq.checkout(). - Discount Codes: Apply specific discount codes with
prq.setDiscountCode('10-OFF').
Navigation and Engagement
- Quiz Navigation: Offer options to retake the quiz, close it, or open it in a popup through
prq.retakeQuiz(),prq.closeQuiz(), andwindow.openQuizPopup('quizID').
/* List of all the quiz slides/questions (including the responded values) */
prq.quizSlides();

/* get the slide/question value by passing the slide ID  */
prq.getSlideValue(slideId);

/* get the lead's email  */
prq.leadEmail();

/* get the lead's phone  */
prq.leadPhone();

/* get the lead's name  */
prq.leadName();

/* List contents of the results page, blocks, products, etc. */
prq.resultsPage();

/* List recommended products, sorted by number of votes */
prq.recommendedProducts();

/* Show most voted product */
prq.mostVotedProduct();

/* adds all the products to cart automatically */
prq.addAllToCart();

/* proceeds to cart/checkout automatically */
prq.checkout();

/* set specific discount code */
prq.setDiscountCode('10-OFF');

/* get the response permalink url */
prq.getResponsePermalink();

/* retake quiz */
prq.retakeQuiz();

/* close quiz */
prq.closeQuiz();

/* open quiz popup */
window.openQuizPopup('dbqHqN');
// dbqHqN is the quiz ID
Custom JavaScript Capabilities
The prq object is how you customize the quiz. Use it like this:
Quiz Data Manipulation
- Accessing Quiz Slides and Responses: Use
prq.quizSlides()to retrieve all quiz slides/questions, including user responses. - Fetching Specific Slide Values: Obtain the value of a particular slide by using
prq.getSlideValue(slideId).
Customer information
- Lead Details:
prq.leadEmail(),prq.leadPhone()andprq.leadName()return the email, phone number and name of the customer.
Results Page Customization
- Manipulating Results Page Content: Access and modify the contents of the results page, including blocks and products, using
prq.resultsPage(). - Product Recommendations: Leverage
prq.recommendedProducts()andprq.mostVotedProduct()to customize product suggestions. - Automatic Actions: Automatically add products to the cart or proceed to checkout using
prq.addAllToCart()andprq.checkout(). - Discount Codes: Apply specific discount codes with
prq.setDiscountCode('10-OFF').
Navigation and Engagement
- Quiz Navigation: Offer options to retake the quiz, close it, or open it in a popup through
prq.retakeQuiz(),prq.closeQuiz(), andwindow.openQuizPopup('quizID').
/* List of all the quiz slides/questions (including the responded values) */
prq.quizSlides();

/* get the slide/question value by passing the slide ID  */
prq.getSlideValue(slideId);

/* get the lead's email  */
prq.leadEmail();

/* get the lead's phone  */
prq.leadPhone();

/* get the lead's name  */
prq.leadName();

/* List contents of the results page, blocks, products, etc. */
prq.resultsPage();

/* List recommended products, sorted by number of votes */
prq.recommendedProducts();

/* Show most voted product */
prq.mostVotedProduct();

/* adds all the products to cart automatically */
prq.addAllToCart();

/* proceeds to cart/checkout automatically */
prq.checkout();

/* set specific discount code */
prq.setDiscountCode('10-OFF');

/* get the response permalink url */
prq.getResponsePermalink();

/* retake quiz */
prq.retakeQuiz();

/* close quiz */
prq.closeQuiz();

/* open quiz popup */
window.openQuizPopup('dbqHqN');
// dbqHqN is the quiz ID
Custom JavaScript Capabilities
The prq object is how you customize the quiz. Use it like this:
Quiz Data Manipulation
- Accessing Quiz Slides and Responses: Use
prq.quizSlides()to retrieve all quiz slides/questions, including user responses. - Fetching Specific Slide Values: Obtain the value of a particular slide by using
prq.getSlideValue(slideId).
Customer information
- Lead Details:
prq.leadEmail(),prq.leadPhone()andprq.leadName()return the email, phone number and name of the customer.
Results Page Customization
- Manipulating Results Page Content: Access and modify the contents of the results page, including blocks and products, using
prq.resultsPage(). - Product Recommendations: Leverage
prq.recommendedProducts()andprq.mostVotedProduct()to customize product suggestions. - Automatic Actions: Automatically add products to the cart or proceed to checkout using
prq.addAllToCart()andprq.checkout(). - Discount Codes: Apply specific discount codes with
prq.setDiscountCode('10-OFF').
Navigation and Engagement
- Quiz Navigation: Offer options to retake the quiz, close it, or open it in a popup through
prq.retakeQuiz(),prq.closeQuiz(), andwindow.openQuizPopup('quizID').
/* List of all the quiz slides/questions (including the responded values) */
prq.quizSlides();

/* get the slide/question value by passing the slide ID  */
prq.getSlideValue(slideId);

/* get the lead's email  */
prq.leadEmail();

/* get the lead's phone  */
prq.leadPhone();

/* get the lead's name  */
prq.leadName();

/* List contents of the results page, blocks, products, etc. */
prq.resultsPage();

/* List recommended products, sorted by number of votes */
prq.recommendedProducts();

/* Show most voted product */
prq.mostVotedProduct();

/* adds all the products to cart automatically */
prq.addAllToCart();

/* proceeds to cart/checkout automatically */
prq.checkout();

/* set specific discount code */
prq.setDiscountCode('10-OFF');

/* get the response permalink url */
prq.getResponsePermalink();

/* retake quiz */
prq.retakeQuiz();

/* close quiz */
prq.closeQuiz();

/* open quiz popup */
window.openQuizPopup('dbqHqN');
// dbqHqN is the quiz ID
Custom JavaScript Capabilities
The prq object is how you customize the quiz. Use it like this:
Quiz Data Manipulation
- Accessing Quiz Slides and Responses: Use
prq.quizSlides()to retrieve all quiz slides/questions, including user responses. - Fetching Specific Slide Values: Obtain the value of a particular slide by using
prq.getSlideValue(slideId).
Customer information
- Lead Details:
prq.leadEmail(),prq.leadPhone()andprq.leadName()return the email, phone number and name of the customer.
Results Page Customization
- Manipulating Results Page Content: Access and modify the contents of the results page, including blocks and products, using
prq.resultsPage(). - Product Recommendations: Leverage
prq.recommendedProducts()andprq.mostVotedProduct()to customize product suggestions. - Automatic Actions: Automatically add products to the cart or proceed to checkout using
prq.addAllToCart()andprq.checkout(). - Discount Codes: Apply specific discount codes with
prq.setDiscountCode('10-OFF').
Navigation and Engagement
- Quiz Navigation: Offer options to retake the quiz, close it, or open it in a popup through
prq.retakeQuiz(),prq.closeQuiz(), andwindow.openQuizPopup('quizID').
/* List of all the quiz slides/questions (including the responded values) */
prq.quizSlides();

/* get the slide/question value by passing the slide ID  */
prq.getSlideValue(slideId);

/* get the lead's email  */
prq.leadEmail();

/* get the lead's phone  */
prq.leadPhone();

/* get the lead's name  */
prq.leadName();

/* List contents of the results page, blocks, products, etc. */
prq.resultsPage();

/* List recommended products, sorted by number of votes */
prq.recommendedProducts();

/* Show most voted product */
prq.mostVotedProduct();

/* adds all the products to cart automatically */
prq.addAllToCart();

/* proceeds to cart/checkout automatically */
prq.checkout();

/* set specific discount code */
prq.setDiscountCode('10-OFF');

/* get the response permalink url */
prq.getResponsePermalink();

/* retake quiz */
prq.retakeQuiz();

/* close quiz */
prq.closeQuiz();

/* open quiz popup */
window.openQuizPopup('dbqHqN');
// dbqHqN is the quiz ID
Custom JavaScript Capabilities
The prq object is how you customize the quiz. Use it like this:
Quiz Data Manipulation
- Accessing Quiz Slides and Responses: Use
prq.quizSlides()to retrieve all quiz slides/questions, including user responses. - Fetching Specific Slide Values: Obtain the value of a particular slide by using
prq.getSlideValue(slideId).
Customer information
- Lead Details:
prq.leadEmail(),prq.leadPhone()andprq.leadName()return the email, phone number and name of the customer.
Results Page Customization
- Manipulating Results Page Content: Access and modify the contents of the results page, including blocks and products, using
prq.resultsPage(). - Product Recommendations: Leverage
prq.recommendedProducts()andprq.mostVotedProduct()to customize product suggestions. - Automatic Actions: Automatically add products to the cart or proceed to checkout using
prq.addAllToCart()andprq.checkout(). - Discount Codes: Apply specific discount codes with
prq.setDiscountCode('10-OFF').
Navigation and Engagement
- Quiz Navigation: Offer options to retake the quiz, close it, or open it in a popup through
prq.retakeQuiz(),prq.closeQuiz(), andwindow.openQuizPopup('quizID').
/* List of all the quiz slides/questions (including the responded values) */
prq.quizSlides();

/* get the slide/question value by passing the slide ID  */
prq.getSlideValue(slideId);

/* get the lead's email  */
prq.leadEmail();

/* get the lead's phone  */
prq.leadPhone();

/* get the lead's name  */
prq.leadName();

/* List contents of the results page, blocks, products, etc. */
prq.resultsPage();

/* List recommended products, sorted by number of votes */
prq.recommendedProducts();

/* Show most voted product */
prq.mostVotedProduct();

/* adds all the products to cart automatically */
prq.addAllToCart();

/* proceeds to cart/checkout automatically */
prq.checkout();

/* set specific discount code */
prq.setDiscountCode('10-OFF');

/* get the response permalink url */
prq.getResponsePermalink();

/* retake quiz */
prq.retakeQuiz();

/* close quiz */
prq.closeQuiz();

/* open quiz popup */
window.openQuizPopup('dbqHqN');
// dbqHqN is the quiz ID
Debug your code
To explore available data, you can add a debugger statement to your JavaScript code:
Open the quiz in your browser with Developer Tools open (F12). Execution pauses at the debugger statement, and the Sources tab shows the quiz and actions parameters:

You can then:
- Hover over these variables to inspect their values
- Use the console panel while paused to evaluate expressions
- Type
quizoractionsin the console to examine their structure
Alternatively, you can use console.log to output these objects to the console:
console.log('Quiz context:', quiz);
console.log('Available actions:', actions);
console.log('Current answers:', quiz.answers);
console.log('All answers by block:', quiz.answers.byBlock);
console.log('Variable scores:', quiz.variables.scores);
To access the console in your browser:
- Right-click anywhere on the page and select "Inspect" or press F12
- Click on the "Console" tab
- Look for your logged output
This will help you understand the structure of these objects so you can access the specific properties you need in your custom JavaScript.
Finding Block References
For how to find a block reference, see Find block and question IDs.
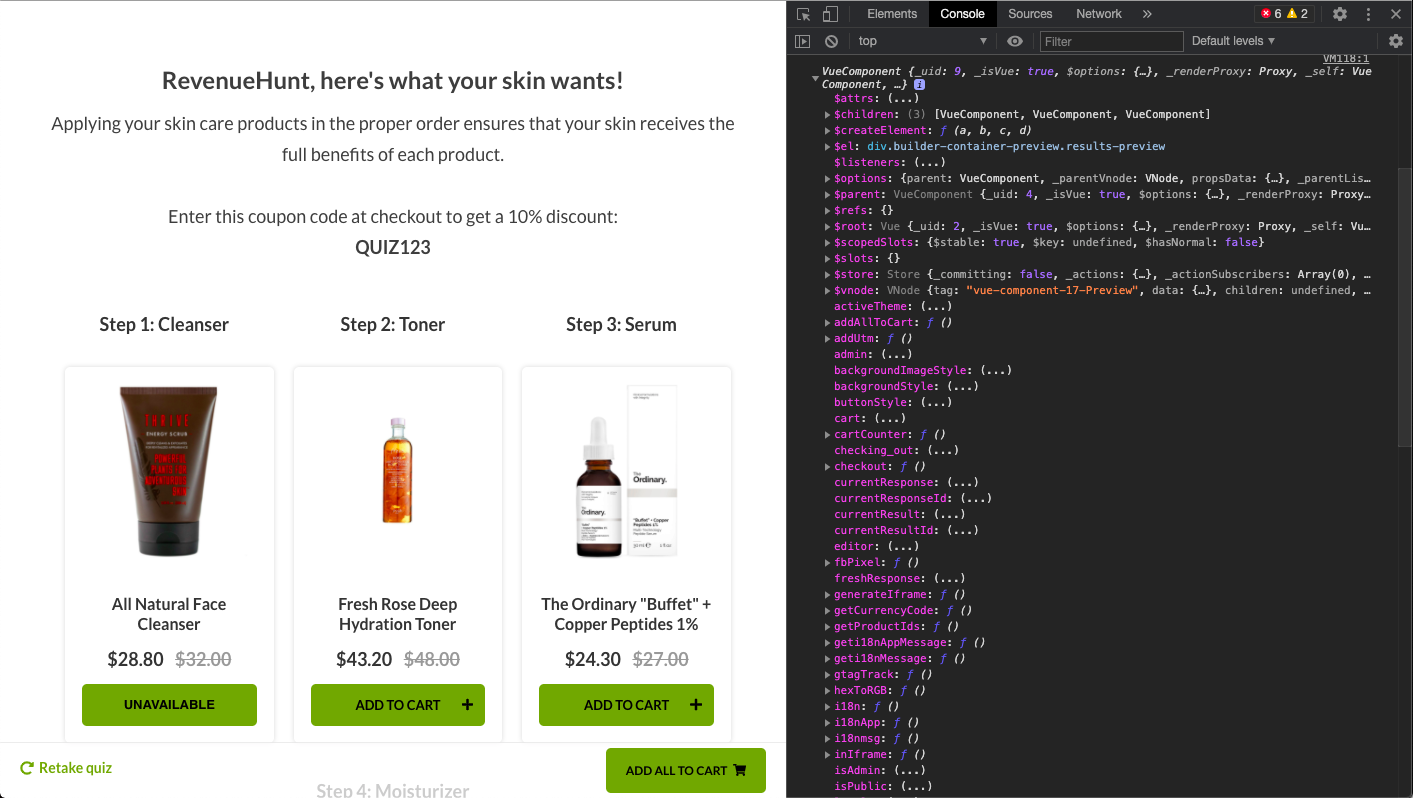
Start by logging the quiz response object to the console:
This line lists the Vue.js functions and properties in the prq scope in your browser console. You can then inspect the quiz data as it runs.
Start by logging the quiz response object to the console:
This line lists the Vue.js functions and properties in the prq scope in your browser console. You can then inspect the quiz data as it runs.
Start by logging the quiz response object to the console:
This line lists the Vue.js functions and properties in the prq scope in your browser console. You can then inspect the quiz data as it runs.
Start by logging the quiz response object to the console:
This line lists the Vue.js functions and properties in the prq scope in your browser console. You can then inspect the quiz data as it runs.
Examples
Trigger a function from an element on the results page
In the Built for Shopify version of the RevenueHunt app, you can add interactive elements to your quiz results page:
-
Create an element in the results page and add the
onclickfunctionality later via the Custom JavaScript.Add the
onclickfunctionality via the Custom JavaScript.<!-- In Result page in a HTML block --> <!-- add a HTML element such as --> <a id="special_retake_quiz">Click here to retake the quiz</a>/* In the Custom JavaScript section */ // get the element var element = document.getElementById("special_retake_quiz"); // add the onclick function to the element element.onclick = function() { // Implement retake with the window.quiz object // For example, you could redirect to the quiz URL window.location.href = window.location.href.split('#')[0] + '#quiz'; } -
Or you can create the element in the Custom JavaScript section and inject it into the results page.
Create the element with an
onclickevent first and then inject it in the results page./* In the Custom JavaScript section */ // create the element const element = document.createElement("a"); element.innerHTML = "Click here to retake the quiz"; element.style.cursor = "pointer"; // add the onclick function element.onclick = function() { window.location.href = window.location.href.split('#')[0] + '#quiz'; }; // find a place to append the element const container = window.quiz.querySelector('.result-section'); if (container) container.appendChild(element);
You can do it two ways:
-
Create an element in the results page and add the
onclickfunctionality later via the Custom JavaScript. -
You can also create the element in the Custom JavaScript section with an
onclickevent, then inject it.Create the element with an
onclickevent first and then inject it in the results page./* In the Custom JavaScript section */ // create the element var element = document.createElement("a"); element.innerHTML = "Click here to retake the quiz" // add the onclick function to the element element.onclick = function() { prq.retakeQuiz(); } // get element that we are going to append in the result // in this case at the end of the first block var destination_element = document.querySelectorAll(".lq-block")[0]; destination_element.appendChild(element);
You can do it two ways:
-
Create an element in the results page and add the
onclickfunctionality later via the Custom JavaScript. -
You can also create the element in the Custom JavaScript section with an
onclickevent, then inject it.Create the element with an
onclickevent first and then inject it in the results page./* In the Custom JavaScript section */ // create the element var element = document.createElement("a"); element.innerHTML = "Click here to retake the quiz" // add the onclick function to the element element.onclick = function() { prq.retakeQuiz(); } // get element that we are going to append in the result // in this case at the end of the first block var destination_element = document.querySelectorAll(".lq-block")[0]; destination_element.appendChild(element);
You can do it two ways:
-
Create an element in the results page and add the
onclickfunctionality later via the Custom JavaScript. -
You can also create the element in the Custom JavaScript section with an
onclickevent, then inject it.Create the element with an
onclickevent first and then inject it in the results page./* In the Custom JavaScript section */ // create the element var element = document.createElement("a"); element.innerHTML = "Click here to retake the quiz" // add the onclick function to the element element.onclick = function() { prq.retakeQuiz(); } // get element that we are going to append in the result // in this case at the end of the first block var destination_element = document.querySelectorAll(".lq-block")[0]; destination_element.appendChild(element);
You can do it two ways:
-
Create an element in the results page and add the
onclickfunctionality later via the Custom JavaScript. -
You can also create the element in the Custom JavaScript section with an
onclickevent, then inject it.Create the element with an
onclickevent first and then inject it in the results page./* In the Custom JavaScript section */ // create the element var element = document.createElement("a"); element.innerHTML = "Click here to retake the quiz" // add the onclick function to the element element.onclick = function() { prq.retakeQuiz(); } // get element that we are going to append in the result // in this case at the end of the first block var destination_element = document.querySelectorAll(".lq-block")[0]; destination_element.appendChild(element);
You can do it two ways:
-
Create an element in the results page and add the
onclickfunctionality later via the Custom JavaScript. -
You can also create the element in the Custom JavaScript section with an
onclickevent, then inject it.Create the element with an
onclickevent first and then inject it in the results page./* In the Custom JavaScript section */ // create the element var element = document.createElement("a"); element.innerHTML = "Click here to retake the quiz" // add the onclick function to the element element.onclick = function() { prq.retakeQuiz(); } // get element that we are going to append in the result // in this case at the end of the first block var destination_element = document.querySelectorAll(".lq-block")[0]; destination_element.appendChild(element);
Insert a calculation
In the Built for Shopify version of the RevenueHunt app, the answers object holds the answers, and you can calculate from them. This example builds a BMI calculator:
Create a BMI calculator
Step 1: Add a placeholder element in the Results page (HTML block)
Step 2: Add custom JavaScript
/* In the Custom JavaScript section */

// Get the target element inside the quiz
const element = window.quiz.getElementById("body_mass_index_calculation");

// Use quiz.answers to find responses for weight and height
// Replace these IDs with your actual block references from your quiz
const weightAnswer = quiz.answers.byBlock['weight-question-id']?.value;
const heightAnswer = quiz.answers.byBlock['height-question-id']?.value;

if (element && weightAnswer && heightAnswer) {
  const weight = parseFloat(weightAnswer);
  const height = parseFloat(heightAnswer);

  if (!isNaN(weight) && !isNaN(height) && height > 0) {
    // Calculate BMI: weight (kg) / height^2 (m)
    const bmi = weight / (height * height);
    element.innerHTML = `Your BMI is: <b>${bmi.toFixed(2)}</b>`;
  } else {
    element.innerHTML = "Invalid data for BMI calculation.";
  }
} else if (element) {
  element.innerHTML = "Required data not found.";
}
Step 3: Debugging (find your actual block references)
When you run the quiz, check the Console in DevTools to see the structure of Quiz.answers and copy the correct IDs to use in the code above.
You can display the information you have gathered throughout the quiz and mash it up however you want. For example, you could create a BMI (body mass index) calculator the following way.
Create a BMI calculator
<!-- In Result page in a HTML block -->
<!-- add an HTML element such as -->
<div id="body_mass_index_calculation"></div>
/* In the Custom JavaScript section */
// get the element
var element = document.getElementById("body_mass_index_calculation");

// get the values of the slides
var weight = prq.getSlideValue("rgiq0oE");
var height = prq.getSlideValue("0Mi2qLN");

// instead of using prq.getSlideValue you could do the same with this code:
/*
var slide_weight = prq.quiz.attributes.slides.data.find(s => s.id === "rgiq0oE");
var slide_height = prq.quiz.attributes.slides.data.find(s => s.id === "0Mi2qLN");

var weight = slide_weight.attributes.values[0];
var height = slide_height.attributes.values[0];
*/

// calculate the Body Mass Index
var bmi = weight / (height * height);

// insert the calculation on the element in the result page
element.innerHTML = bmi.toFixed(2);
You can also load jQuery this way.
You can display the information you have gathered throughout the quiz and mash it up however you want. For example, you could create a BMI (body mass index) calculator the following way.
Create a BMI calculator
<!-- In Result page in a HTML block -->
<!-- add an HTML element such as -->
<div id="body_mass_index_calculation"></div>
/* In the Custom JavaScript section */
// get the element
var element = document.getElementById("body_mass_index_calculation");

// get the values of the slides
var weight = prq.getSlideValue("rgiq0oE");
var height = prq.getSlideValue("0Mi2qLN");

// instead of using prq.getSlideValue you could do the same with this code:
/*
var slide_weight = prq.quiz.attributes.slides.data.find(s => s.id === "rgiq0oE");
var slide_height = prq.quiz.attributes.slides.data.find(s => s.id === "0Mi2qLN");

var weight = slide_weight.attributes.values[0];
var height = slide_height.attributes.values[0];
*/

// calculate the Body Mass Index
var bmi = weight / (height * height);

// insert the calculation on the element in the result page
element.innerHTML = bmi.toFixed(2);
You can also load jQuery this way.
You can display the information you have gathered throughout the quiz and mash it up however you want. For example, you could create a BMI (body mass index) calculator the following way.
Create a BMI calculator
<!-- In Result page in a HTML block -->
<!-- add an HTML element such as -->
<div id="body_mass_index_calculation"></div>
/* In the Custom JavaScript section */
// get the element
var element = document.getElementById("body_mass_index_calculation");

// get the values of the slides
var weight = prq.getSlideValue("rgiq0oE");
var height = prq.getSlideValue("0Mi2qLN");

// instead of using prq.getSlideValue you could do the same with this code:
/*
var slide_weight = prq.quiz.attributes.slides.data.find(s => s.id === "rgiq0oE");
var slide_height = prq.quiz.attributes.slides.data.find(s => s.id === "0Mi2qLN");

var weight = slide_weight.attributes.values[0];
var height = slide_height.attributes.values[0];
*/

// calculate the Body Mass Index
var bmi = weight / (height * height);

// insert the calculation on the element in the result page
element.innerHTML = bmi.toFixed(2);
You can also load jQuery this way.
You can display the information you have gathered throughout the quiz and mash it up however you want. For example, you could create a BMI (body mass index) calculator the following way.
Create a BMI calculator
<!-- In Result page in a HTML block -->
<!-- add an HTML element such as -->
<div id="body_mass_index_calculation"></div>
/* In the Custom JavaScript section */
// get the element
var element = document.getElementById("body_mass_index_calculation");

// get the values of the slides
var weight = prq.getSlideValue("rgiq0oE");
var height = prq.getSlideValue("0Mi2qLN");

// instead of using prq.getSlideValue you could do the same with this code:
/*
var slide_weight = prq.quiz.attributes.slides.data.find(s => s.id === "rgiq0oE");
var slide_height = prq.quiz.attributes.slides.data.find(s => s.id === "0Mi2qLN");

var weight = slide_weight.attributes.values[0];
var height = slide_height.attributes.values[0];
*/

// calculate the Body Mass Index
var bmi = weight / (height * height);

// insert the calculation on the element in the result page
element.innerHTML = bmi.toFixed(2);
You can also load jQuery this way.
You can display the information you have gathered throughout the quiz and mash it up however you want. For example, you could create a BMI (body mass index) calculator the following way.
Create a BMI calculator
<!-- In Result page in a HTML block -->
<!-- add an HTML element such as -->
<div id="body_mass_index_calculation"></div>
/* In the Custom JavaScript section */
// get the element
var element = document.getElementById("body_mass_index_calculation");

// get the values of the slides
var weight = prq.getSlideValue("rgiq0oE");
var height = prq.getSlideValue("0Mi2qLN");

// instead of using prq.getSlideValue you could do the same with this code:
/*
var slide_weight = prq.quiz.attributes.slides.data.find(s => s.id === "rgiq0oE");
var slide_height = prq.quiz.attributes.slides.data.find(s => s.id === "0Mi2qLN");

var weight = slide_weight.attributes.values[0];
var height = slide_height.attributes.values[0];
*/

// calculate the Body Mass Index
var bmi = weight / (height * height);

// insert the calculation on the element in the result page
element.innerHTML = bmi.toFixed(2);
You can also load jQuery this way.
Select all or none in a multiple-choice question
A choice can act as select all or select none. Set that in the Multiple-Choice settings.
Custom JavaScript can make a multiple-choice question select every answer, or none of them. It works as long as one choice contains the word "All" and one contains the word "None". The order and the question number do not matter.
Select all, select none
This code may require adjustments by a developer. Use it as an example only.
// Initializes an object to hold the current slide's state, ensuring it doesn't overwrite if already exists.
var prq = prq || {
  currentSlide: {
    values: [], // An array to store the values (identifiers) of selected choices.
  },
};

// Selects all elements with class `.lq-choice` as the choices available on the current slide/view.
const choices = document.querySelectorAll(".lq-choice");

// Retrieves the currently selected choice values from the global state.
var values = prq.currentSlide.values;

// Iterates over each choice and attaches a click event listener to handle selection/deselection.
choices.forEach((selector) => {
  selector.addEventListener("click", function () {
    refresh(this.id); // Calls the refresh function on click, passing the clicked choice's ID.
  });
});

// Defines the logic to update choice selections based on user interaction.
function refresh(id) {
  var choice = document.getElementById(id); // Retrieves the DOM element for the clicked choice.

  // Logic to deselect a choice if it's already selected.
  if (valuesIncludes(values, choice)) {
    values = removeChoice(values, choice);
  }
  // Logic to select all choices except "none" when "all" is clicked.
  else if (isAll(choice)) {
    const cs = [...choices].filter((c) => !isNone(c));
    values = cs.map((c) => choiceId(c));
  }
  // Logic to handle "none" selection, deselecting all other choices or selecting none only.
  else if (isNone(choice)) {
    if (valuesIncludes(values, choice)) {
      values = [];
    } else {
      const cs = [...choices].filter((c) => !isNone(c));
      values = [choiceId(choice)];
    }
  }
  // General logic for ticking a choice and unticking "none".
  else {
    addChoice(values, choice);
    values = removeChoice(values, choiceNone(choices));
  }

  // Updates the UI to reflect the current selection state.
  choices.forEach((c) =>
    values.includes(choiceId(c))
      ? c.classList.add("lq-selected")
      : c.classList.remove("lq-selected")
  );
}

// Helper function to add a choice's ID to the selection.
function addChoice(values, choice) {
  values.push(choiceId(choice));
}

// Helper function to remove a choice's ID from the selection.
function removeChoice(values, choice) {
  return values.filter((v) => v !== choiceId(choice));
}

// Returns the "none" choice element.
function choiceNone(choices) {
  return [...choices].find((c) => isNone(c));
}

// Unused in the given code but presumably intended to return the "all" choice element.
function choiceAll(choices) {
  return [...choices].find((c) => isAll(c));
}

// Extracts and returns the ID part of a choice's DOM ID.
function choiceId(choice) {
  return choice.id.split("-")[1];
}

// Determines if a choice is meant to select all options.
function isAll(c) {
  return c.innerHTML.toLowerCase().includes("all");
}

// Determines if a choice represents a "none" selection.
function isNone(c) {
  return c.innerHTML.toLowerCase().includes("none");
}

// Checks if the current selection includes a specific choice's ID.
function valuesIncludes(values, c) {
  return values.includes(choiceId(c));
}
Custom JavaScript can make a multiple-choice question select every answer, or none of them. It works as long as one choice contains the word "All" and one contains the word "None". The order and the question number do not matter.
Select all, select none
This code may require adjustments by a developer. Use it as an example only.
// Initializes an object to hold the current slide's state, ensuring it doesn't overwrite if already exists.
var prq = prq || {
  currentSlide: {
    values: [], // An array to store the values (identifiers) of selected choices.
  },
};

// Selects all elements with class `.lq-choice` as the choices available on the current slide/view.
const choices = document.querySelectorAll(".lq-choice");

// Retrieves the currently selected choice values from the global state.
var values = prq.currentSlide.values;

// Iterates over each choice and attaches a click event listener to handle selection/deselection.
choices.forEach((selector) => {
  selector.addEventListener("click", function () {
    refresh(this.id); // Calls the refresh function on click, passing the clicked choice's ID.
  });
});

// Defines the logic to update choice selections based on user interaction.
function refresh(id) {
  var choice = document.getElementById(id); // Retrieves the DOM element for the clicked choice.

  // Logic to deselect a choice if it's already selected.
  if (valuesIncludes(values, choice)) {
    values = removeChoice(values, choice);
  }
  // Logic to select all choices except "none" when "all" is clicked.
  else if (isAll(choice)) {
    const cs = [...choices].filter((c) => !isNone(c));
    values = cs.map((c) => choiceId(c));
  }
  // Logic to handle "none" selection, deselecting all other choices or selecting none only.
  else if (isNone(choice)) {
    if (valuesIncludes(values, choice)) {
      values = [];
    } else {
      const cs = [...choices].filter((c) => !isNone(c));
      values = [choiceId(choice)];
    }
  }
  // General logic for ticking a choice and unticking "none".
  else {
    addChoice(values, choice);
    values = removeChoice(values, choiceNone(choices));
  }

  // Updates the UI to reflect the current selection state.
  choices.forEach((c) =>
    values.includes(choiceId(c))
      ? c.classList.add("lq-selected")
      : c.classList.remove("lq-selected")
  );
}

// Helper function to add a choice's ID to the selection.
function addChoice(values, choice) {
  values.push(choiceId(choice));
}

// Helper function to remove a choice's ID from the selection.
function removeChoice(values, choice) {
  return values.filter((v) => v !== choiceId(choice));
}

// Returns the "none" choice element.
function choiceNone(choices) {
  return [...choices].find((c) => isNone(c));
}

// Unused in the given code but presumably intended to return the "all" choice element.
function choiceAll(choices) {
  return [...choices].find((c) => isAll(c));
}

// Extracts and returns the ID part of a choice's DOM ID.
function choiceId(choice) {
  return choice.id.split("-")[1];
}

// Determines if a choice is meant to select all options.
function isAll(c) {
  return c.innerHTML.toLowerCase().includes("all");
}

// Determines if a choice represents a "none" selection.
function isNone(c) {
  return c.innerHTML.toLowerCase().includes("none");
}

// Checks if the current selection includes a specific choice's ID.
function valuesIncludes(values, c) {
  return values.includes(choiceId(c));
}
Custom JavaScript can make a multiple-choice question select every answer, or none of them. It works as long as one choice contains the word "All" and one contains the word "None". The order and the question number do not matter.
Select all, select none
This code may require adjustments by a developer. Use it as an example only.
// Initializes an object to hold the current slide's state, ensuring it doesn't overwrite if already exists.
var prq = prq || {
  currentSlide: {
    values: [], // An array to store the values (identifiers) of selected choices.
  },
};

// Selects all elements with class `.lq-choice` as the choices available on the current slide/view.
const choices = document.querySelectorAll(".lq-choice");

// Retrieves the currently selected choice values from the global state.
var values = prq.currentSlide.values;

// Iterates over each choice and attaches a click event listener to handle selection/deselection.
choices.forEach((selector) => {
  selector.addEventListener("click", function () {
    refresh(this.id); // Calls the refresh function on click, passing the clicked choice's ID.
  });
});

// Defines the logic to update choice selections based on user interaction.
function refresh(id) {
  var choice = document.getElementById(id); // Retrieves the DOM element for the clicked choice.

  // Logic to deselect a choice if it's already selected.
  if (valuesIncludes(values, choice)) {
    values = removeChoice(values, choice);
  }
  // Logic to select all choices except "none" when "all" is clicked.
  else if (isAll(choice)) {
    const cs = [...choices].filter((c) => !isNone(c));
    values = cs.map((c) => choiceId(c));
  }
  // Logic to handle "none" selection, deselecting all other choices or selecting none only.
  else if (isNone(choice)) {
    if (valuesIncludes(values, choice)) {
      values = [];
    } else {
      const cs = [...choices].filter((c) => !isNone(c));
      values = [choiceId(choice)];
    }
  }
  // General logic for ticking a choice and unticking "none".
  else {
    addChoice(values, choice);
    values = removeChoice(values, choiceNone(choices));
  }

  // Updates the UI to reflect the current selection state.
  choices.forEach((c) =>
    values.includes(choiceId(c))
      ? c.classList.add("lq-selected")
      : c.classList.remove("lq-selected")
  );
}

// Helper function to add a choice's ID to the selection.
function addChoice(values, choice) {
  values.push(choiceId(choice));
}

// Helper function to remove a choice's ID from the selection.
function removeChoice(values, choice) {
  return values.filter((v) => v !== choiceId(choice));
}

// Returns the "none" choice element.
function choiceNone(choices) {
  return [...choices].find((c) => isNone(c));
}

// Unused in the given code but presumably intended to return the "all" choice element.
function choiceAll(choices) {
  return [...choices].find((c) => isAll(c));
}

// Extracts and returns the ID part of a choice's DOM ID.
function choiceId(choice) {
  return choice.id.split("-")[1];
}

// Determines if a choice is meant to select all options.
function isAll(c) {
  return c.innerHTML.toLowerCase().includes("all");
}

// Determines if a choice represents a "none" selection.
function isNone(c) {
  return c.innerHTML.toLowerCase().includes("none");
}

// Checks if the current selection includes a specific choice's ID.
function valuesIncludes(values, c) {
  return values.includes(choiceId(c));
}
Custom JavaScript can make a multiple-choice question select every answer, or none of them. It works as long as one choice contains the word "All" and one contains the word "None". The order and the question number do not matter.
Select all, select none
This code may require adjustments by a developer. Use it as an example only.
// Initializes an object to hold the current slide's state, ensuring it doesn't overwrite if already exists.
var prq = prq || {
  currentSlide: {
    values: [], // An array to store the values (identifiers) of selected choices.
  },
};

// Selects all elements with class `.lq-choice` as the choices available on the current slide/view.
const choices = document.querySelectorAll(".lq-choice");

// Retrieves the currently selected choice values from the global state.
var values = prq.currentSlide.values;

// Iterates over each choice and attaches a click event listener to handle selection/deselection.
choices.forEach((selector) => {
  selector.addEventListener("click", function () {
    refresh(this.id); // Calls the refresh function on click, passing the clicked choice's ID.
  });
});

// Defines the logic to update choice selections based on user interaction.
function refresh(id) {
  var choice = document.getElementById(id); // Retrieves the DOM element for the clicked choice.

  // Logic to deselect a choice if it's already selected.
  if (valuesIncludes(values, choice)) {
    values = removeChoice(values, choice);
  }
  // Logic to select all choices except "none" when "all" is clicked.
  else if (isAll(choice)) {
    const cs = [...choices].filter((c) => !isNone(c));
    values = cs.map((c) => choiceId(c));
  }
  // Logic to handle "none" selection, deselecting all other choices or selecting none only.
  else if (isNone(choice)) {
    if (valuesIncludes(values, choice)) {
      values = [];
    } else {
      const cs = [...choices].filter((c) => !isNone(c));
      values = [choiceId(choice)];
    }
  }
  // General logic for ticking a choice and unticking "none".
  else {
    addChoice(values, choice);
    values = removeChoice(values, choiceNone(choices));
  }

  // Updates the UI to reflect the current selection state.
  choices.forEach((c) =>
    values.includes(choiceId(c))
      ? c.classList.add("lq-selected")
      : c.classList.remove("lq-selected")
  );
}

// Helper function to add a choice's ID to the selection.
function addChoice(values, choice) {
  values.push(choiceId(choice));
}

// Helper function to remove a choice's ID from the selection.
function removeChoice(values, choice) {
  return values.filter((v) => v !== choiceId(choice));
}

// Returns the "none" choice element.
function choiceNone(choices) {
  return [...choices].find((c) => isNone(c));
}

// Unused in the given code but presumably intended to return the "all" choice element.
function choiceAll(choices) {
  return [...choices].find((c) => isAll(c));
}

// Extracts and returns the ID part of a choice's DOM ID.
function choiceId(choice) {
  return choice.id.split("-")[1];
}

// Determines if a choice is meant to select all options.
function isAll(c) {
  return c.innerHTML.toLowerCase().includes("all");
}

// Determines if a choice represents a "none" selection.
function isNone(c) {
  return c.innerHTML.toLowerCase().includes("none");
}

// Checks if the current selection includes a specific choice's ID.
function valuesIncludes(values, c) {
  return values.includes(choiceId(c));
}
Custom JavaScript can make a multiple-choice question select every answer, or none of them. It works as long as one choice contains the word "All" and one contains the word "None". The order and the question number do not matter.
Select all, select none
This code may require adjustments by a developer. Use it as an example only.
// Initializes an object to hold the current slide's state, ensuring it doesn't overwrite if already exists.
var prq = prq || {
  currentSlide: {
    values: [], // An array to store the values (identifiers) of selected choices.
  },
};

// Selects all elements with class `.lq-choice` as the choices available on the current slide/view.
const choices = document.querySelectorAll(".lq-choice");

// Retrieves the currently selected choice values from the global state.
var values = prq.currentSlide.values;

// Iterates over each choice and attaches a click event listener to handle selection/deselection.
choices.forEach((selector) => {
  selector.addEventListener("click", function () {
    refresh(this.id); // Calls the refresh function on click, passing the clicked choice's ID.
  });
});

// Defines the logic to update choice selections based on user interaction.
function refresh(id) {
  var choice = document.getElementById(id); // Retrieves the DOM element for the clicked choice.

  // Logic to deselect a choice if it's already selected.
  if (valuesIncludes(values, choice)) {
    values = removeChoice(values, choice);
  }
  // Logic to select all choices except "none" when "all" is clicked.
  else if (isAll(choice)) {
    const cs = [...choices].filter((c) => !isNone(c));
    values = cs.map((c) => choiceId(c));
  }
  // Logic to handle "none" selection, deselecting all other choices or selecting none only.
  else if (isNone(choice)) {
    if (valuesIncludes(values, choice)) {
      values = [];
    } else {
      const cs = [...choices].filter((c) => !isNone(c));
      values = [choiceId(choice)];
    }
  }
  // General logic for ticking a choice and unticking "none".
  else {
    addChoice(values, choice);
    values = removeChoice(values, choiceNone(choices));
  }

  // Updates the UI to reflect the current selection state.
  choices.forEach((c) =>
    values.includes(choiceId(c))
      ? c.classList.add("lq-selected")
      : c.classList.remove("lq-selected")
  );
}

// Helper function to add a choice's ID to the selection.
function addChoice(values, choice) {
  values.push(choiceId(choice));
}

// Helper function to remove a choice's ID from the selection.
function removeChoice(values, choice) {
  return values.filter((v) => v !== choiceId(choice));
}

// Returns the "none" choice element.
function choiceNone(choices) {
  return [...choices].find((c) => isNone(c));
}

// Unused in the given code but presumably intended to return the "all" choice element.
function choiceAll(choices) {
  return [...choices].find((c) => isAll(c));
}

// Extracts and returns the ID part of a choice's DOM ID.
function choiceId(choice) {
  return choice.id.split("-")[1];
}

// Determines if a choice is meant to select all options.
function isAll(c) {
  return c.innerHTML.toLowerCase().includes("all");
}

// Determines if a choice represents a "none" selection.
function isNone(c) {
  return c.innerHTML.toLowerCase().includes("none");
}

// Checks if the current selection includes a specific choice's ID.
function valuesIncludes(values, c) {
  return values.includes(choiceId(c));
}
Redirect to a translated product URL
In this version of the RevenueHunt app, the App settings > Shopify Markets tab sends a customer to the right market. The product then shows in the right language and currency.
The app syncs only the base products from your store. A translated product has no unique ID to sync against. You can change the quiz language, but product names and descriptions stay in the original language.
As a workaround, create a quiz for each language and send the customer to the translated product page with JavaScript. Redirect to Translated Product URL covers that approach.
The app syncs only the base products from your store. A translated product has no unique ID to sync against. You can change the quiz language, but product names and descriptions stay in the original language.
As a workaround, create a quiz for each language and send the customer to the translated product page with JavaScript. Redirect to Translated Product URL covers that approach.
The app syncs only the base products from your store. A translated product has no unique ID to sync against. You can change the quiz language, but product names and descriptions stay in the original language.
As a workaround, create a quiz for each language and send the customer to the translated product page with JavaScript. Redirect to Translated Product URL covers that approach.
The app syncs only the base products from your store. A translated product has no unique ID to sync against. You can change the quiz language, but product names and descriptions stay in the original language.
As a workaround, create a quiz for each language and send the customer to the translated product page with JavaScript. Redirect to Translated Product URL covers that approach.
The app syncs only the base products from your store. A translated product has no unique ID to sync against. You can change the quiz language, but product names and descriptions stay in the original language.
As a workaround, create a quiz for each language and send the customer to the translated product page with JavaScript. Redirect to Translated Product URL covers that approach.
More examples
Questions
Skip a question automatically if a score is high
Auto-go back if a user picks a certain answer
Style the next button
Change question text dynamically
Show a hidden element based on answers
Results page
Add all recommended products with Shopify cart API, then sync the quiz UI
(async () => {
const toNumericVariantId = (gid) => {
  const raw = String(gid || '').split('/').pop();
  return raw ? Number(raw) : null;
};

const itemsToAdd = Object.values(quiz.resultContext.slotItems || {})
  .map((item) => {
    const variantGid = item?.__typename === 'ProductVariant'
      ? item.id
      : item?.variants?.edges?.[0]?.node?.id;
    const variantId = toNumericVariantId(variantGid);
    return variantId ? { id: variantId, quantity: 1 } : null;
  })
  .filter(Boolean);

if (itemsToAdd.length > 0) {
  await fetch(`${window.Shopify.routes.root}cart/add.js`, {
    method: 'POST',
    headers: { 'Content-Type': 'application/json' },
    body: JSON.stringify({ items: itemsToAdd })
  });

  await actions.syncCart();
}
})();
Apply discount code if sensitivity is high
Change product title styling
Replace a product image
Highlight recommended products
Display a message based on result
Analytics & Tracking
Track quiz completion with Google Analytics 4
// Results Page Custom JavaScript
// Send quiz completion event to GA4
if (typeof gtag !== 'undefined') {
  gtag('event', 'quiz_completed', {
    'event_category': 'Quiz',
    'event_label': quiz.currentResult.ref,
    'quiz_id': quiz.id,
    'response_id': quiz.metadata.responseId,
    'highest_score': quiz.variables.highest,
    'total_questions': quiz.progress?.totalQuestions || 0
  });
}
Track quiz start with Google Analytics 4
Track specific question with Meta Pixel
Track quiz completion with Meta Pixel
// Results Page Custom JavaScript
// Send quiz completion event to Meta Pixel
if (typeof fbq !== 'undefined') {
  fbq('trackCustom', 'QuizCompleted', {
    content_name: quiz.currentResult.ref,
    quiz_id: quiz.id,
    highest_variable: quiz.variables.highest,
    num_recommendations: Object.keys(quiz.resultContext.slotItems || {}).length
  });
}
Common patterns
Conditional navigation based on score:
Update element based on answer:
const name = quiz.answers.byBlock['qbi-name']?.value || 'Guest';
const el = window.quiz.getElementById('greeting');
if (el) el.textContent = `Welcome, ${name}!`;
Auto-advance based on selection:
window.quiz.onChange = (event) => {
  if (event.blockRef === 'qbc-skintype' && event.selectedLabel === 'Oily') {
    actions.overrideNext('q-oily-concerns');
  }
};
Batch update answers:
const age = parseInt(quiz.answers.byBlock['qbi-age']?.value || '0');
actions.setAnswers({
  'qbc-age-group': age < 25 ? 'young' : 'mature',
  'qbc-eligible': age >= 18 ? 'yes' : 'no'
});
Capture URL parameters for webhooks:
const urlParams = new URLSearchParams(window.location.search);
actions.setAnswers({
  'hidden-utm-source': urlParams.get('utm_source') || '',
  'hidden-utm-medium': urlParams.get('utm_medium') || '',
  'hidden-utm-campaign': urlParams.get('utm_campaign') || '',
  'hidden-full-url': window.location.href
});
answersByBlock payload of your webhook, so attribution data travels with the quiz response.
Use Shopify AJAX cart APIs, then sync the quiz UI (Results page):
if ((quiz.variables.scores.premium ?? 0) > 80) {
  await fetch(`${window.Shopify.routes.root}cart/add.js`, {
    method: 'POST',
    headers: { 'Content-Type': 'application/json' },
    body: JSON.stringify({
      items: [{ id: 12345678901234, quantity: 1 }]
    })
  });

  await actions.syncCart();
}
Apply discount based on cart value (Results page):
const itemCount = Object.keys(quiz.resultContext.slotItems || {}).length;
if (itemCount >= 3) {
  await fetch(`${window.Shopify.routes.root}cart/update.js`, {
    method: 'POST',
    headers: { 'Content-Type': 'application/json' },
    body: JSON.stringify({
      discount: 'BUNDLE20'
    })
  });
}
Save selected quiz data to Shopify note + cart attributes:
if (quiz.metadata.isStoreRenderer && !quiz.metadata.inBuilder) {
  await fetch(`${window.Shopify.routes.root}cart/update.js`, {
    method: 'POST',
    headers: { 'Content-Type': 'application/json' },
    body: JSON.stringify({
      note: 'Quiz completed',
      attributes: {
        __result_ref: quiz.currentResult?.ref || '',
        skincare_segment: quiz.variables.highest || ''
      }
    })
  });
}
RevenueHunt already tags the cart with internal quiz identifiers automatically. Use custom cart attributes for additional merchant-defined data.
In RevenueHunt storefront experiments, the hidden/private cart-attribute pattern that works in practice is the __prefix convention. Leave off the prefix for attributes you want visible in Shopify cart or order surfaces.
Keep RevenueHunt cart UI in sync after native line-item mutations:
await fetch(`${window.Shopify.routes.root}cart/change.js`, {
  method: 'POST',
  headers: { 'Content-Type': 'application/json' },
  body: JSON.stringify({ id: 12345678901234, quantity: 0 })
});

await actions.syncCart();
Call syncCart() after native cart/add.js, cart/change.js, or cart/clear.js so the quiz result UI replaces its local cart state with Shopify's current cart. For cart/update.js note/attribute/discount updates, sync is usually not required unless your custom quiz UI depends on refreshed cart state immediately.
Add all recommended items with Shopify cart/add.js:
const toNumericVariantId = (gid) => {
  const raw = String(gid || '').split('/').pop();
  return raw ? Number(raw) : null;
};

const itemsToAdd = Object.values(quiz.resultContext.slotItems || {})
  .map((item) => {
    const variantGid = item?.__typename === 'ProductVariant'
      ? item.id
      : item?.variants?.edges?.[0]?.node?.id;

    const variantId = toNumericVariantId(variantGid);
    return variantId ? { id: variantId, quantity: 1 } : null;
  })
  .filter(Boolean);

if (itemsToAdd.length > 0) {
  await fetch(`${window.Shopify.routes.root}cart/add.js`, {
    method: 'POST',
    headers: { 'Content-Type': 'application/json' },
    body: JSON.stringify({ items: itemsToAdd })
  });

  await actions.syncCart();
}
To add products from one slot only, put that logic in the Custom HTML or Slot Item Composition of the slot. The code is then already scoped to the right item.
Compact Shopify cart recipes:
// Read cart
const cart = await fetch(`${window.Shopify.routes.root}cart.js`).then((r) => r.json());

// Remove one existing line item by key
const line = cart.items.find((item) => item.variant_id === 12345678901234);
if (line?.key) {
  await fetch(`${window.Shopify.routes.root}cart/change.js`, {
    method: 'POST',
    headers: { 'Content-Type': 'application/json' },
    body: JSON.stringify({ id: line.key, quantity: 0 })
  });
  await actions.syncCart();
}

// Clear cart
await fetch(`${window.Shopify.routes.root}cart/clear.js`, { method: 'POST' });
await actions.syncCart();
Legacy RevenueHunt cart helpers:
Older quiz code may still use actions.addToCart(...), actions.addAllToCart(), actions.applyDiscountCode(...), or actions.updateCartAttributes(...). These remain useful for backwards compatibility, but for new Shopify cart work, prefer native Shopify Ajax endpoints plus syncCart().
Track quiz completion with analytics (Results page):
// Send quiz completion data to your analytics
const data = {
  responseId: quiz.metadata.responseId,
  skinType: quiz.variables.highest,
  scores: quiz.variables.scores,
  recommendedProducts: Object.keys(quiz.resultContext.slotItems || {}).length
};

// Example: Send to your analytics endpoint
fetch('/api/quiz-completed', {
  method: 'POST',
  headers: { 'Content-Type': 'application/json' },
  body: JSON.stringify(data)
});
See What your code receives for the prq functions these patterns are built from.
See What your code receives for the prq functions these patterns are built from.
See What your code receives for the prq functions these patterns are built from.
See What your code receives for the prq functions these patterns are built from.
See What your code receives for the prq functions these patterns are built from.
This article explains how to add custom JavaScript to a RevenueHunt quiz, with worked examples.