How to Add a Discount to Your Quiz
With the Built for Shopify version of the RevenueHunt app, it is possible to:
- add your Shopify discount code to be applied automatically at checkout,
- add a discount code as text to quiz questions or results page,
- add the discount code to the result emails.
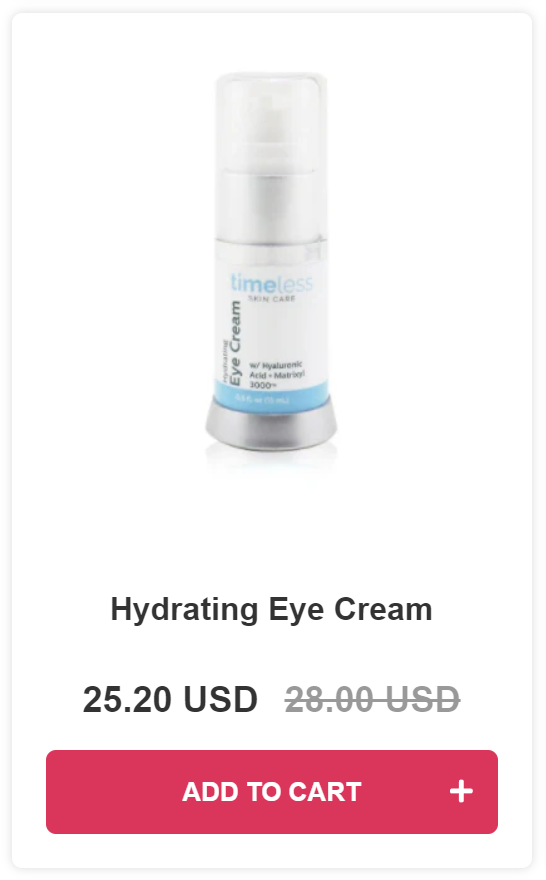
If you have a discount applied to certain products in your store via Shopify Products, these reduced prices will be reflected in the quiz results page automatically. Otherwise, the discount code will be applied automatically at checkout and reduced prices will be visible at checkout stage only.
Adding discount coupons into your quiz allows customers to enjoy special offers on the results page or through a follow-up email.
This guide explains how to implement Discount Coupons for Checkout with the RevenueHunt app.
Include Discount Code as text
You can also add the discount code as text to the quiz questions or results page by typing the discount code in the text field. Then customers will be able to copy and paste the discount code at checkout.
Set Up Discount on the Results Page
Automatic Discount Code
You can add a discount code to be applied automatically at checkout when users finish the quiz and proceed to cart.
Discount code is only applied at Shopify checkout
The discount code will not be visible on the quiz preview or the results page. It is applied automatically when the customer proceeds to Shopify checkout.
-
Create a Discount Code in Shopify: You need to create a discount code in Shopify first before adding it to the quiz results page.
Create a Discount Code in Shopify
You need to create a discount code in Shopify first before adding it to the quiz results page.
- Navigate to the Shopify admin panel and select the
Discountstab. - Click on
Create Discountto set up a new discount code. - Choose the type of discount (e.g., percentage, fixed amount). Enter a discount code name (e.g.,
quiz123) or specify the discount amount (e.g., 20%). - Select applicable products from your catalog.
- Save the discount settings and copy the discount code.
- Navigate to the Shopify admin panel and select the
-
Configuring the Discount Code in Quiz Results Page: You need to configure the discount code in the quiz results page before it can be applied automatically at checkout.
- Open the RevenueHunt Quizzes app and open your quiz by clicking
Customize. -
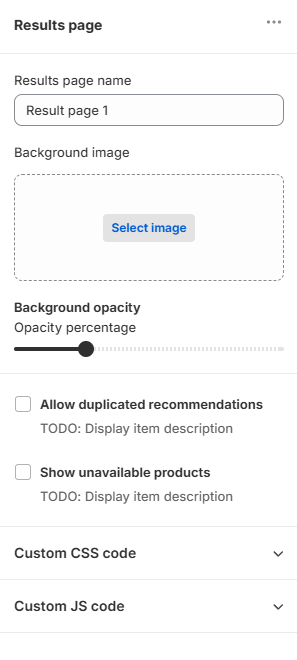
Navigate to the 'Results page > Results page settings' by clicking on the Results page name.
-
Scroll to the
Discount codesettings section.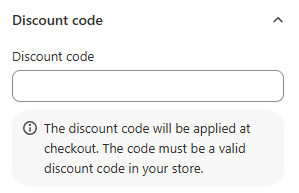
-
Paste the copied discount code from Shopify into the designated field.
- Save the changes with the top-right
Savebutton to apply the discount code to the quiz results.
- Open the RevenueHunt Quizzes app and open your quiz by clicking
-
Testing the Discount Code: Test the live quiz to ensure the discount code is applied correctly at checkout.
- After setting up the discount code, visit your website and take a sample quiz.
- Proceed to the cart and then to checkout.
- Verify that the discount code
quiz123is automatically applied to eligible products in the cart.
Discount Code only works on live quiz
The discount code will not be visible on the quiz preview or the results page. It is applied automatically when the customer proceeds to Shopify checkout.
Discount Code as Text
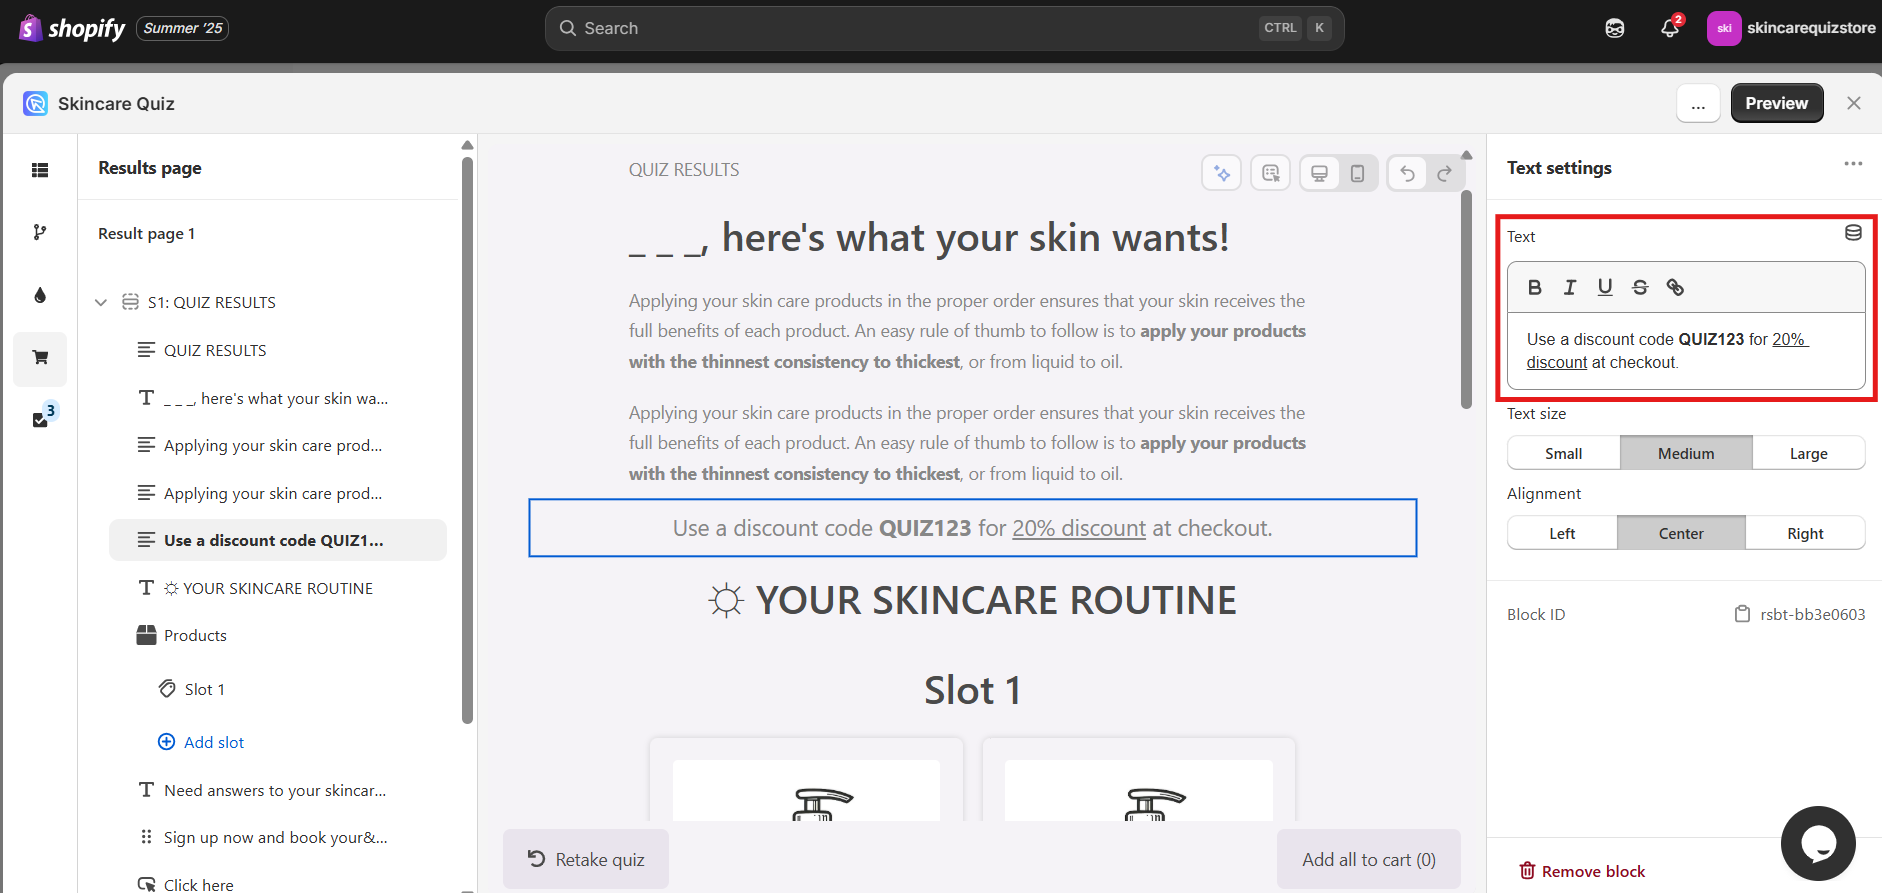
You can add a discount code as text within a text block on the quiz Results page. Users will be able to copy and paste the discount code at checkout.
- Open the Results Page.
- Click on
Add block. - Select
Textblock. - Add the discount code to the text field.
- Save the changes with the top-right
Savebutton.
Discount Code with JavaScript
Check JavaScript guide
Check this article to learn how to add custom JavaScript to the results page: How to Add JavaScript to the Quiz.
You can use JavaScript to add a discount code to the results page.
- Open the Results Page.
- Open the Results Page settings.
- Scroll down to the
Custom JavaScriptsection. -
Ask your developer to use the
await Quiz.applyDiscountCode()function to apply the discount code to the Custom JavaScript block.Get help with custom JavaScript
Click on
✨Get help with custom JavaScriptto open a chat window with the Quiz Copilot AI. It can directly write JavaScript code for you. -
Save the changes with the top-right
Savebutton.
Products Discounted in Shopify Products
If you have a discount applied to certain products in your store, these reduced prices will be reflected in the quiz results page automatically.
Step 1: Generate a Discount Code
To create a Shopify discount code, refer to this helpful guide. Activation of this code is necessary before integrating it with your quiz to ensure functionality at checkout.
It's essential to select the manual option for discount codes in Shopify, as our app can only synchronize with manually created codes.
Note
Please remember, that the management of these discounts is handled through Shopify, not directly within our app.
Step 2: Configure Your Discount Code on the Results Page
You can add Static or Dynamic discount codes to your quiz.
Static Discount
- Navigate to Results Page Settings > Discount Settings and access the Discount Code Settings section.
-
Here, you'll find a
Codefield. This field is for entering the discount code that will be automatically applied at checkout.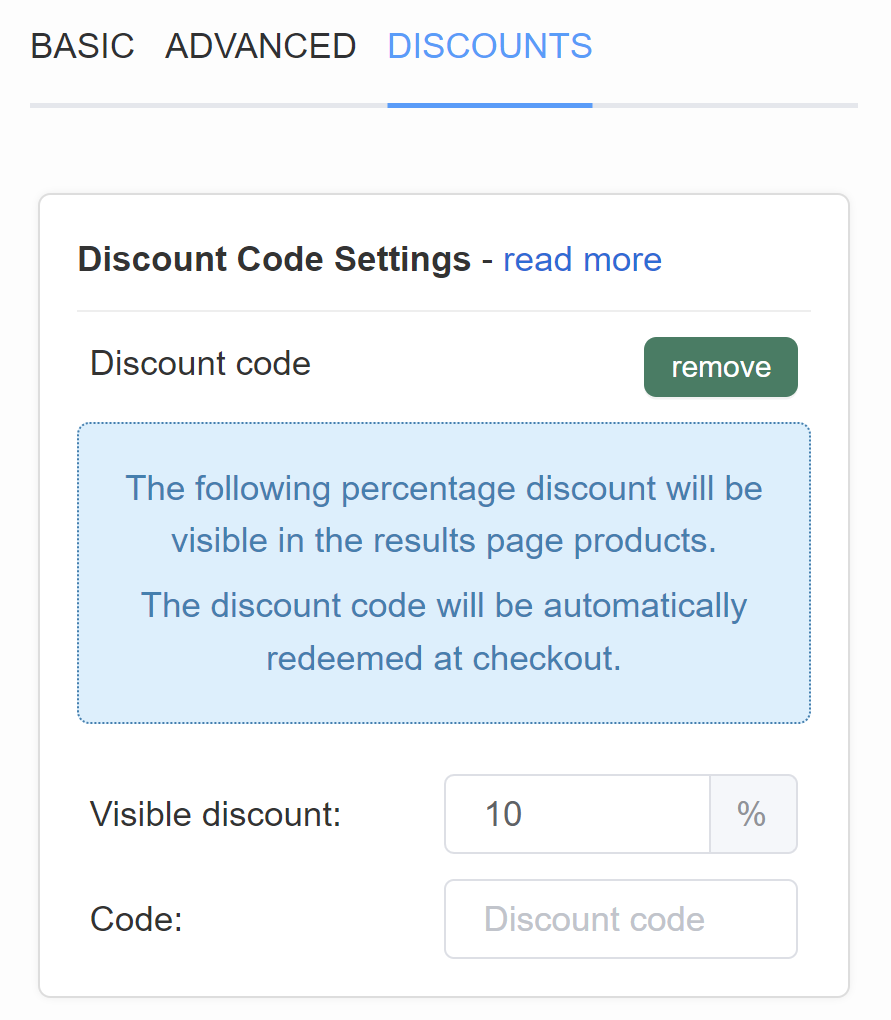
Visible discount- Select thediscount %from the dropdown. The percentage discount will be visible on the results page products. The discount code will be automatically redeemed at checkout.Code- Type a discount code that corresponds to this discount. You have to set up this discount code in your store > Shopify Discounts first.
Dynamic Discount
Our system supports the addition of multiple Shopify discount codes on the results page, applied dynamically according to the cart's total value.
-
Start by creating your Shopify discount codes as explained in Step 1.
Note
Remember, only manual discount codes are compatible with our app.
-
Proceed to the quiz's Results Page tab. Within Results Page Settings > Discounts, activate Dynamic Discounts. Click "activate" to open the discount menu.
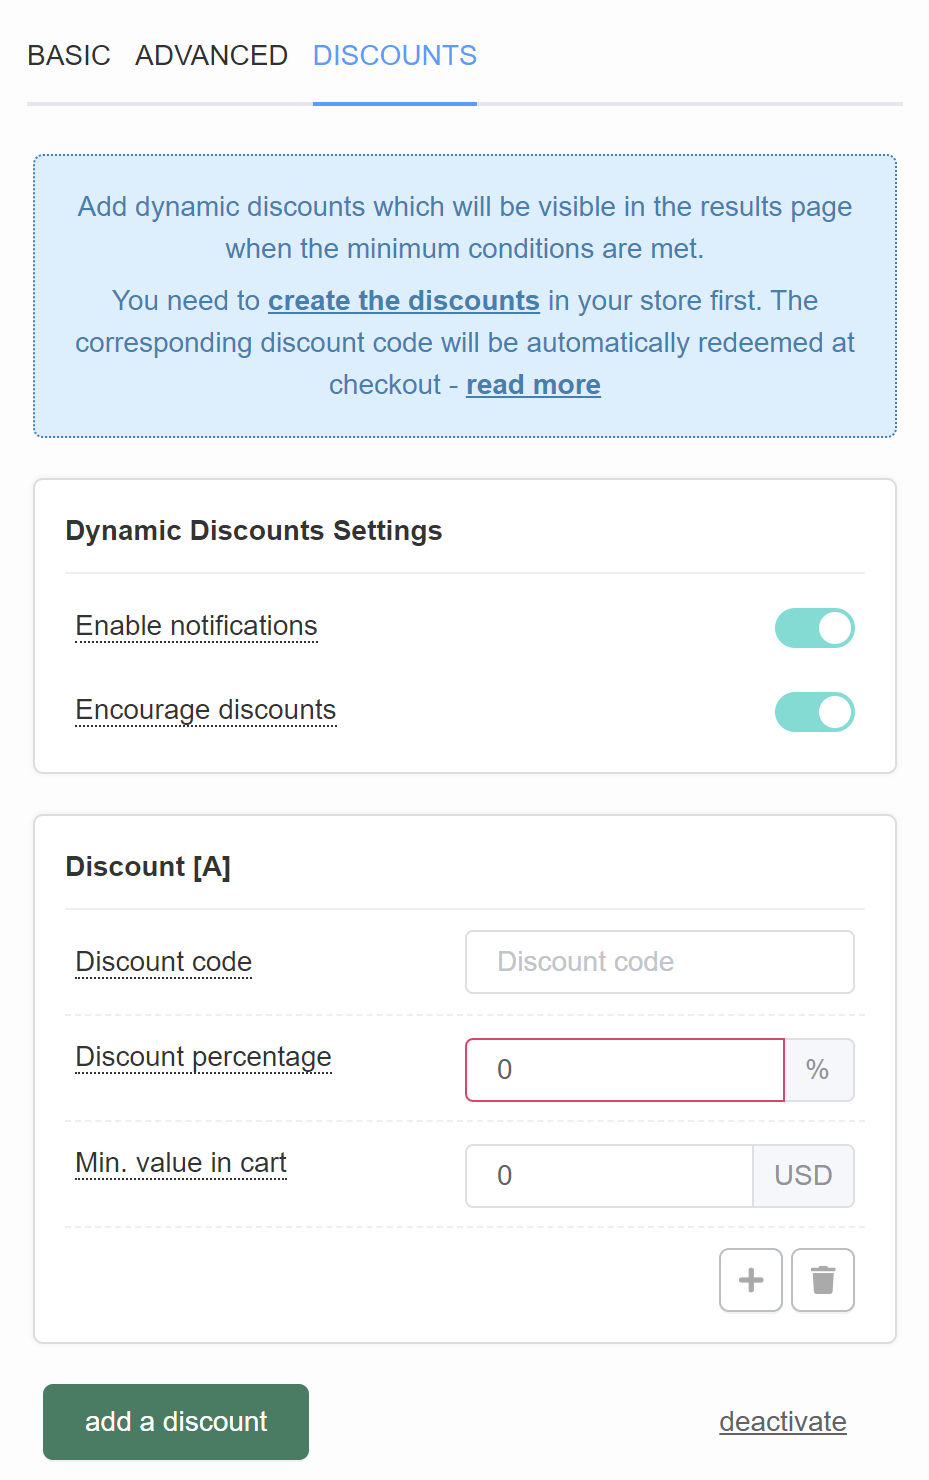
Enable notifications- A toast notification will appear when a customer qualifies for a discount. Toggle to enable/disable.Encourage discounts- The notification will also include a message telling the customer how close they are to receiving the next highest discount. Toggle to enable/disable.Discount [A] Settings
Discount code- Type a discount code that corresponds to this discount. You have to set up this discount code in your store > Shopify Discounts first.Discount percentage- Type the discount %. The percentage discount will be visible in the results page products. The discount code will be automatically redeemed at checkout.Min. value in cart- Type the value of products added to the cart on the results page above which the discount will be applied.+ / add another discount- Adds a new dynamic discount (Discount [B]).bin / delete this discount- deletes this dynamic discount.add a discount- Adds a new dynamic discount below (Discount [B]).deactivate- Deactivates dynamic discounts.
Step 3: Publish Changes
- Click the top-right
Publishbutton to apply your changes to the live quiz/preview.
Alternatively
Your developer can also add a discount code to the results page using custom JavaScript code added to the Results page.
Info
Check out this article for more information on how to add custom JavaScript code to your results page.
Step 1: Generate a Discount Code
If your store is built on WooCommerce, you’ll need the Advanced Coupons for WooCommerce plugin for this to work.
Create a coupon code, then navigate to the URL Coupons section. Make sure the Redirect To URL points to your cart page. Copy the URI (it’s the end part of the URL, excluding the https + your domain name):
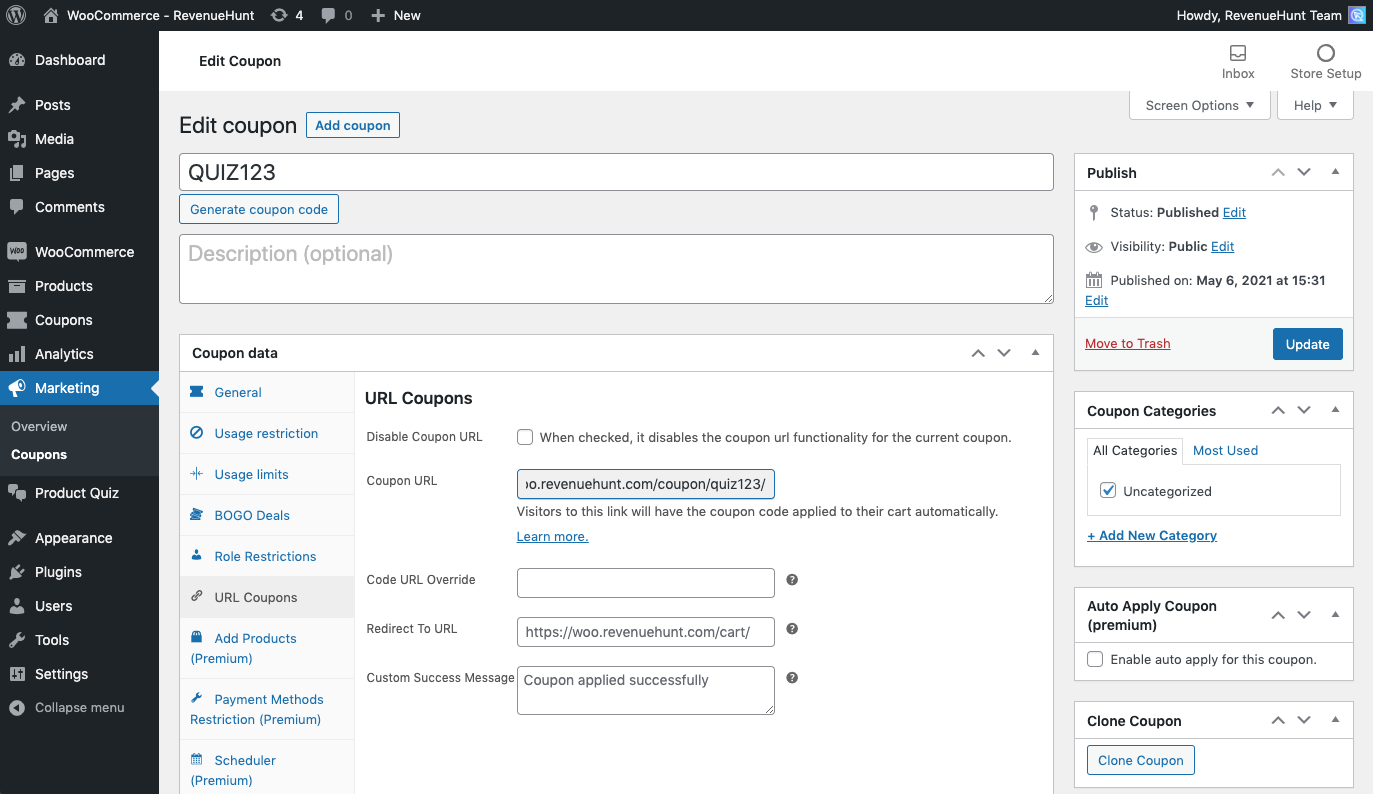
Example: if the Coupon URL which appears is https://yourdomain.com/coupon/codexyz/, then the part you need to copy is /coupon/codexyz/.
Step 2: Configure Your Discount Code on the Results Page
Then in the Product Recommendation Quiz, go to the Results Page Settings > Checkout Settings and paste the copied URI in the Cart URL field.
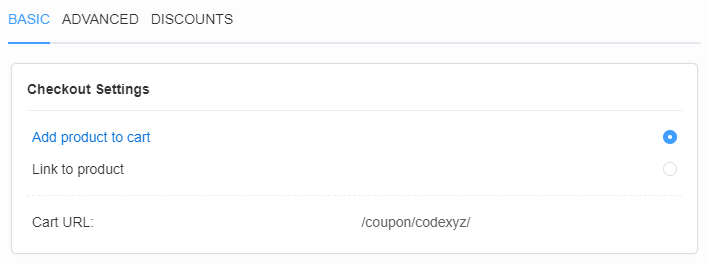
This will apply the coupon code when your customers finish the quiz and proceed to cart, then it will redirect them automatically to the cart page in your store.
Step 3: Publish Changes
- Click the top-right
Publishbutton to apply your changes to the live quiz/preview.
Alternatively
Your developer can also add a discount code to the results page using custom JavaScript code added to the Results page. Check out this article for more information.
Info
Check out this article for more information on how to add custom JavaScript code to your results page.
It is not currently possible to add discount coupons into your quiz built with RevenueHunt app for Magento.
Your developer can, however, add a discount code to the results page using custom JavaScript code added to the Results page.
Info
Check out this article for more information on how to add custom JavaScript code to your results page.
It is not currently possible to add discount coupons into your quiz built with RevenueHunt app for BigCommerce.
Your developer can, however, add a discount code to the results page using custom JavaScript code added to the Results page.
Info
Check out this article for more information on how to add custom JavaScript code to your results page.
It is not currently possible to add discount coupons into your quiz built with Standalone version of the RevenueHunt app.
Your developer can, however, add a discount code to the results page using custom JavaScript code added to the Results page. Check out this article for more information.
Info
Check out this article for more information on how to add custom JavaScript code to your results page.
Include Discount Codes in Follow-Up Emails
To further personalize the customer experience, you can incorporate the discount code within the follow-up email sent to the customer with quiz results. This allows customers to conveniently copy and paste the code at checkout.
Simply go to the Quiz Settings, find the Emails to respondents tab, and edit the message to include your discount code text.
Info
Check out this article for more information on how to set up and customize the quiz result email.
To further personalize the customer experience, you can incorporate the discount code within the follow-up email and results page. This allows customers to conveniently copy and paste the code at checkout.
Simply go to the Quiz Builder, find the Notifications > TO RESPONDENT tab, and edit the message to include your discount code text.
Info
Check out this article for more information on how to set up and customize the quiz result email.
Apply Discount Only if Customer Leaves Their Email
Yes, you can apply a discount at checkout only for customers who leave their email in the quiz. The idea is to send customers to one of two results pages depending on whether they complete the email question: a default page with no discount, and a second page that carries the discount code.
-
Create multiple results pages: Go to
Results Page Settings -> Multiple Results Pagesand clickActivate. A second results page is added.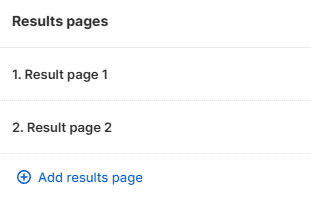
-
Add the discount code to Results Page 2 only: Leave Results Page 1 as the default with no discount. Open Results Page 2 settings, scroll to the
Discount codesection, and paste your Shopify discount code (create it in Shopify first, as described in the first part of this article). -
Add a discount question: In the Quiz Builder, add a question asking whether the customer wants a discount (e.g. a Yes/No choice question).
-
Add an email question: Add an email question so customers can leave their email.
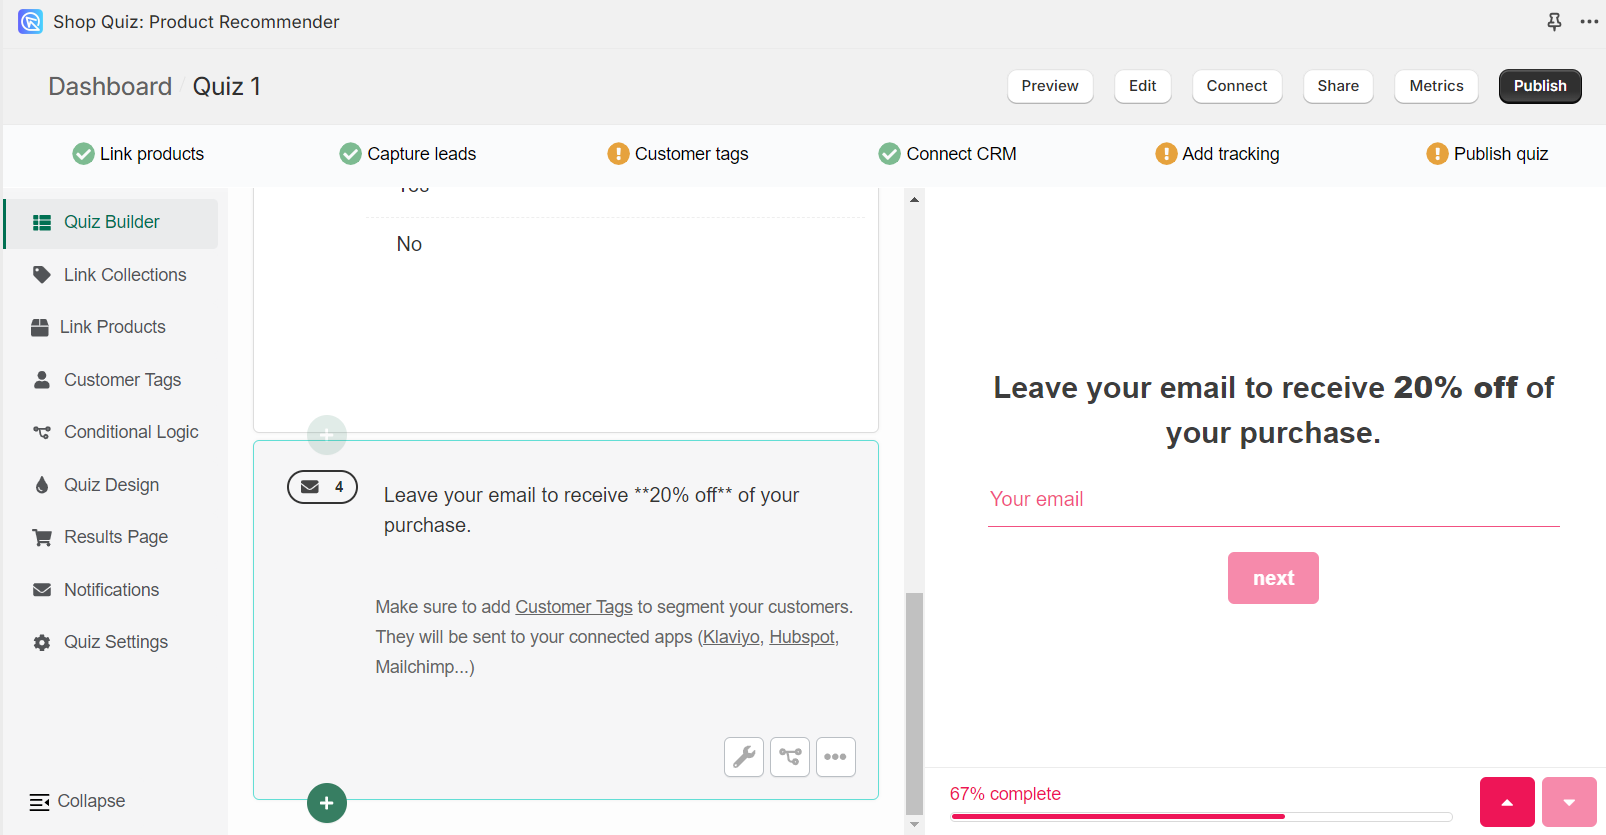
-
Add Jump Logic to the discount question: Open the question's
Conditional logicand add a rule:- If the customer answers
Yes, they continue to the email question. - If the customer answers
No, they jump straight to Results Page 1 (no discount).
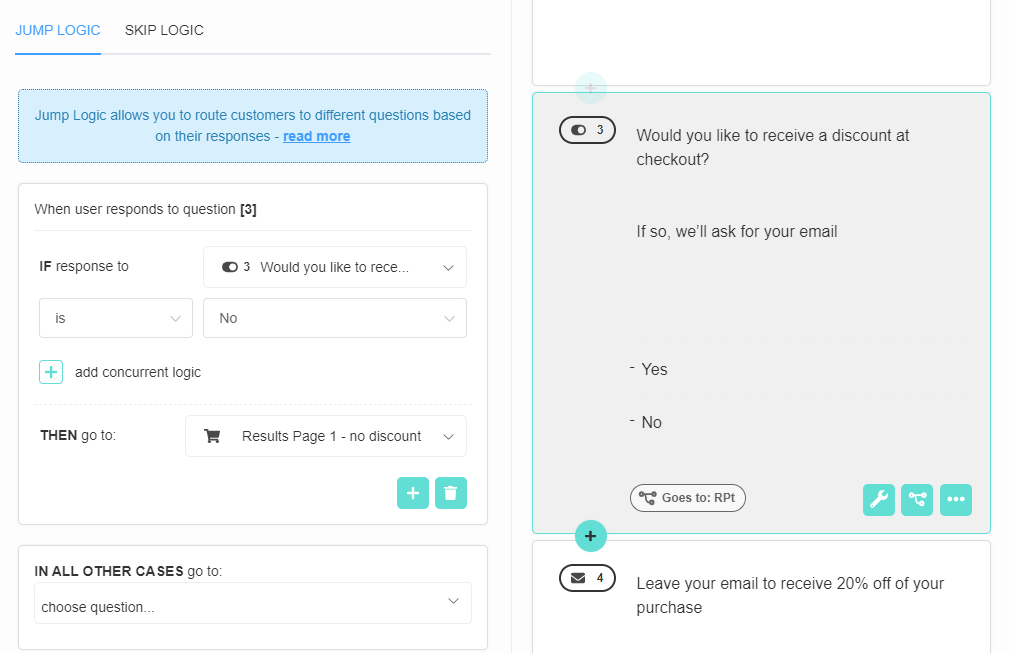
- If the customer answers
-
Add Jump Logic to the email question: Set the email question to
Always jump toResults Page 2 (discount), so everyone who leaves their email lands on the page that carries the code.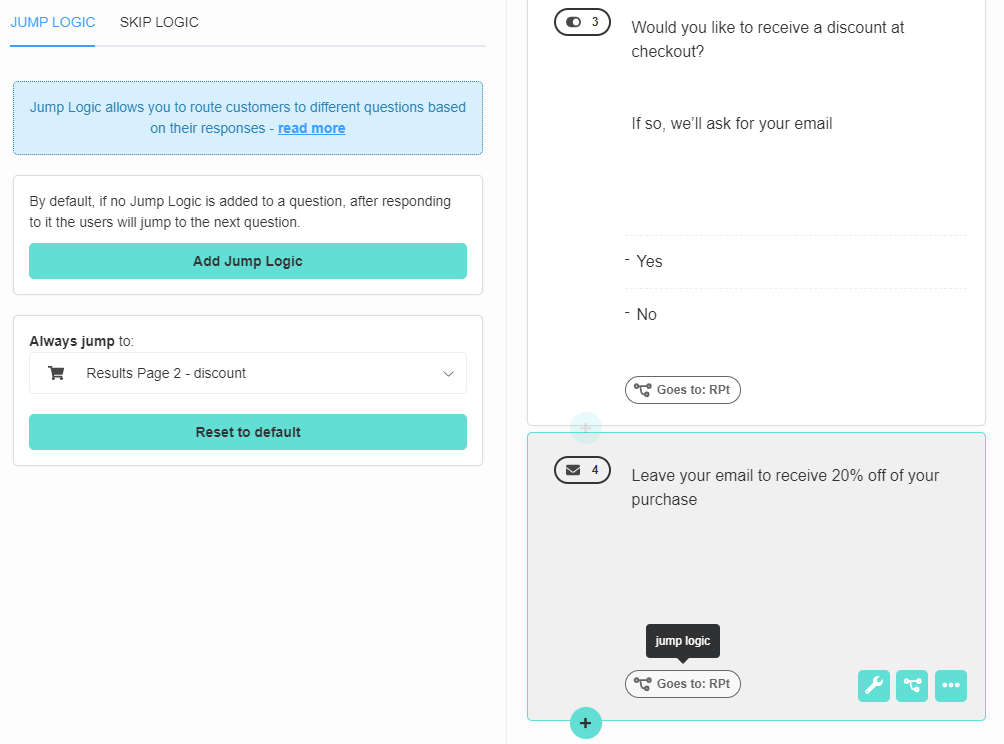
-
Save and test: Save your changes and test the flow with the
Previewbutton.
Simpler alternative
If you don't need to fully block the discount, add the code as a Text block on the results page and use Display Logic to reveal that block only to customers who answered a certain way.
Products discounted in Shopify
If you have a discount applied to certain products in your store, these reduced prices are reflected on the quiz results page automatically.
In RevenueHunt app, it is possible to apply a discount at checkout only for the customers who leave their email in the quiz. To set this up you need to follow these steps:
- Create multiple results pages: To do that, go to the
Results Page Settings -> Advanced -> Multiple Results Pagesand click`Activate. Multiple Results Pages Settings screen will appear and a second Results page will be added.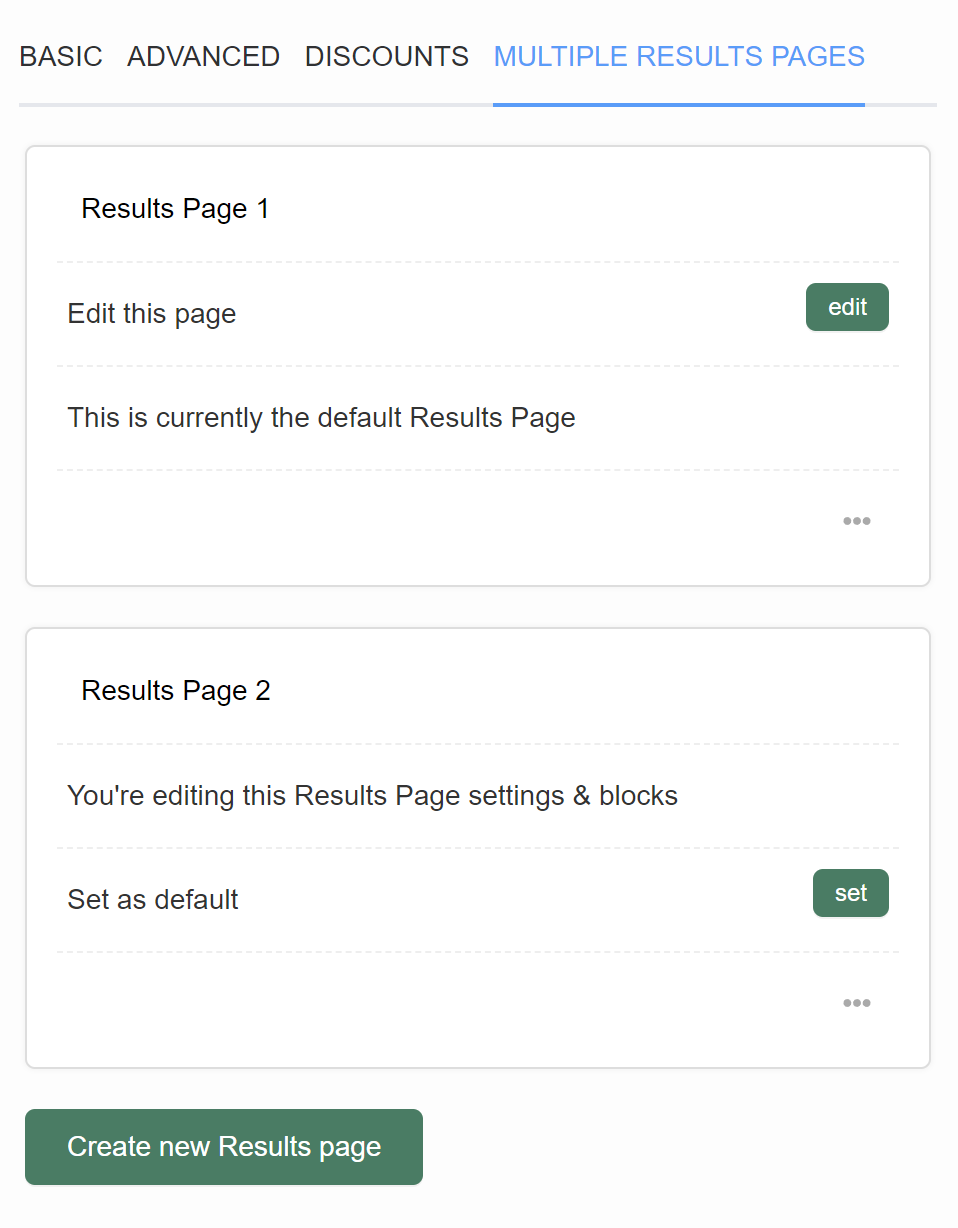
- You can then rename the page and edit it by clicking
edit.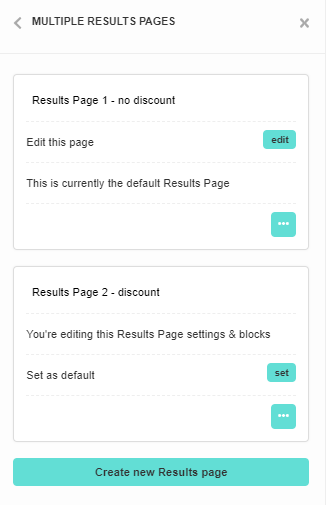
-
Add discount code: In this case, Results Page 1 will be left as default with no discount and the discount will be applied to Results Page 2. To do that, open the
Results Page 2 Settings -> Discount code settings -> Discount codeand clickadd. You can then edit theVisible % discountand add the code.Warning
For the discount to work, you need to set it up first in your Shopify store. Check the first part of this article for instructions.
-
Add a discount question: Next, navigate to the Quiz Builder and add a
discount questionby clicking+.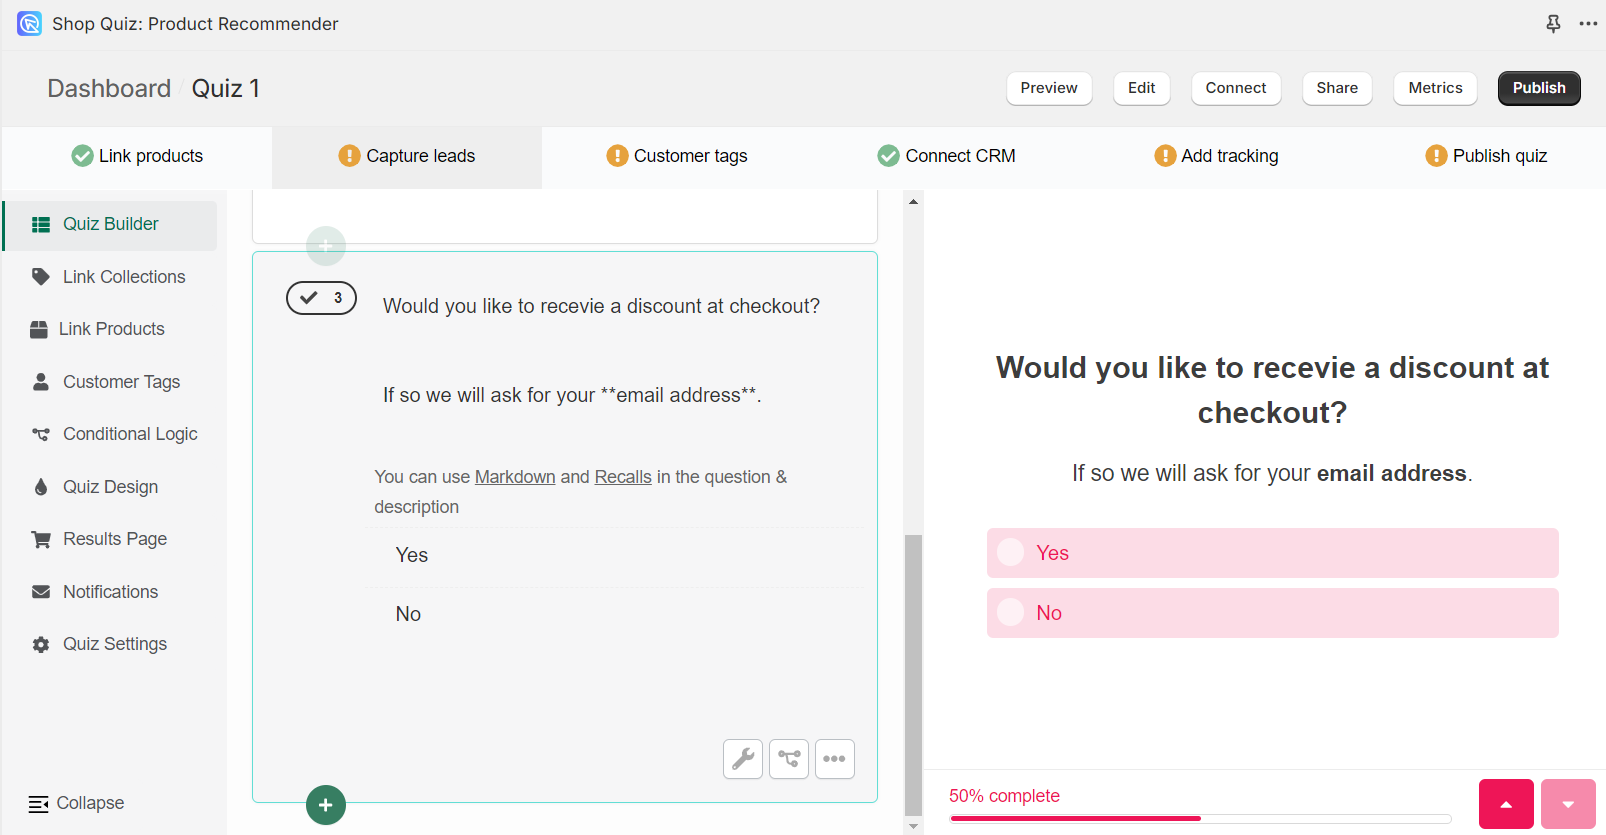
-
Add an email question: Then, add an
email questionby clicking+. -
Add Jump Logic: Now you can redirect customers to either the Results Page 1 (no discount) or the Results Page 2 (discount) depending on their answer to the discount question. To do that you’ll need to add two Jump Logic statements.
Tip
To learn more about Jump Logic, check this article.
-
FIRST JUMP LOGIC – DISCOUNT QUESTION: To add Jump Logic to the discount question, click the
conditional logicbutton. In theJump Logicmenu, selectAdd Jump Logic. Add the following logic condition:- If the customer answers ‘Yes’ to the discount question, they will automatically go to the next question (the email question).
- If the customer answers ‘No’ to the discount question, they will be automatically redirected to the Results Page 1 (no discount).
-
SECOND JUMP LOGIC – EMAIL QUESTION: Next, you’ll have to add Jump Logic to the email question. In this case, it is enough to always send the customer to the Results Page 2 (discount) with the
Always Jump to...function. - Test the quiz: Once the discounts are set up, update the preview/live quiz with the
Publishbutton. Then, test the quiz by clicking thePreviewbutton in the top right corner of the app.
In RevenueHunt app, it is possible to apply a discount at checkout only for the customers who leave their email in the quiz. To set this up you need to follow these steps:
- Create multiple results pages: To do that, go to the
Results Page Settings -> Advanced -> Multiple Results Pagesand click`Activate. Multiple Results Pages Settings screen will appear and a second Results page will be added. - You can then rename the page and edit it by clicking
edit. - Add discount code: Follow the instructions in the first part of this article to add a discount code to your quiz.
-
Add a discount question: Next, navigate to the Quiz Builder and add a
discount questionby clicking+. -
Add an email question: Then, add an
email questionby clicking+. -
Add Jump Logic: Now you can redirect customers to either the Results Page 1 (no discount) or the Results Page 2 (discount) depending on their answer to the discount question. To do that you’ll need to add two Jump Logic statements.
Tip
To learn more about Jump Logic, check this article.
-
FIRST JUMP LOGIC – DISCOUNT QUESTION: To add Jump Logic to the discount question, click the
conditional logicbutton. In theJump Logicmenu, selectAdd Jump Logic. Add the following logic condition:- If the customer answers ‘Yes’ to the discount question, they will automatically go to the next question (the email question).
- If the customer answers ‘No’ to the discount question, they will be automatically redirected to the Results Page 1 (no discount).
-
SECOND JUMP LOGIC – EMAIL QUESTION: Next, you’ll have to add Jump Logic to the email question. In this case, it is enough to always send the customer to the Results Page 2 (discount) with the
Always Jump to...function. - Test the quiz: Once the discounts are set up, update the preview/live quiz with the
Publishbutton. Then, test the quiz by clicking thePreviewbutton in the top right corner of the app.
By following these steps, you can integrate discounts into your quiz, improve customer engagement and potentially increase conversions.