How to Redirect Quiz to Another Page
This article explains three ways to send a customer to another page after they finish a quiz.
Using jump logic for conditional redirection
Jump Logic sends a customer to a specific URL, based on the answers they gave. To set it up:
- Open the Conditional logic tab: In the Quiz builder, open Conditional logic. Select the last question, or whichever question should trigger the redirect. In the menu that opens, go to the
Jump Logictab. - Configure URL Redirection: Specify the URL to which customers should be redirected to. This can be set to occur after a specific question or based on selected answers.
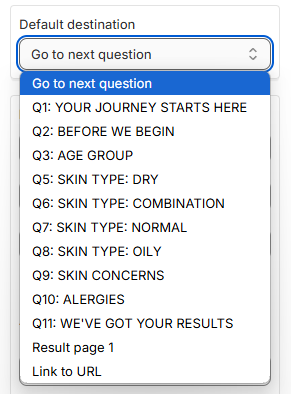
- Publish & Test Your Setup: Click the top-right
Publish/Savebutton to update the preview/live quiz. Then,Previewthe quiz to ensure the redirection works correctly.
Even if you redirect the customer with Jump logic to another page the quiz responses will be saved in the Quiz builder's Metrics section.
- Open the Conditional Logic tab: In the Quiz Builder, open Conditional Logic. Select the last question, or whichever question should trigger the redirect. In the menu that opens, go to the
Jump Logictab. - Configure URL Redirection: Specify the URL to which customers should be redirected to. This can be set to occur after a specific question or based on selected answers.
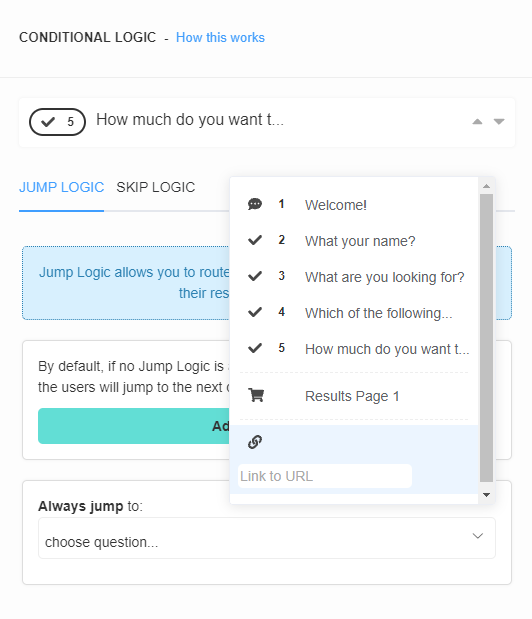
- Publish & Test Your Setup: Click the top-right
Publish/Savebutton to update the preview/live quiz. Then,Previewthe quiz to ensure the redirection works correctly.
Even if you redirect the customer with Jump Logic to another page the quiz responses will be saved in the Quiz Builder's Metrics section.
- Open the Conditional Logic tab: In the Quiz Builder, open Conditional Logic. Select the last question, or whichever question should trigger the redirect. In the menu that opens, go to the
Jump Logictab. - Configure URL Redirection: Specify the URL to which customers should be redirected to. This can be set to occur after a specific question or based on selected answers.
- Publish & Test Your Setup: Click the top-right
Publish/Savebutton to update the preview/live quiz. Then,Previewthe quiz to ensure the redirection works correctly.
Even if you redirect the customer with Jump Logic to another page the quiz responses will be saved in the Quiz Builder's Metrics section.
- Open the Conditional Logic tab: In the Quiz Builder, open Conditional Logic. Select the last question, or whichever question should trigger the redirect. In the menu that opens, go to the
Jump Logictab. - Configure URL Redirection: Specify the URL to which customers should be redirected to. This can be set to occur after a specific question or based on selected answers.
- Publish & Test Your Setup: Click the top-right
Publish/Savebutton to update the preview/live quiz. Then,Previewthe quiz to ensure the redirection works correctly.
Even if you redirect the customer with Jump Logic to another page the quiz responses will be saved in the Quiz Builder's Metrics section.
- Open the Conditional Logic tab: In the Quiz Builder, open Conditional Logic. Select the last question, or whichever question should trigger the redirect. In the menu that opens, go to the
Jump Logictab. - Configure URL Redirection: Specify the URL to which customers should be redirected to. This can be set to occur after a specific question or based on selected answers.
- Publish & Test Your Setup: Click the top-right
Publish/Savebutton to update the preview/live quiz. Then,Previewthe quiz to ensure the redirection works correctly.
Even if you redirect the customer with Jump Logic to another page the quiz responses will be saved in the Quiz Builder's Metrics section.
- Open the Conditional Logic tab: In the Quiz Builder, open Conditional Logic. Select the last question, or whichever question should trigger the redirect. In the menu that opens, go to the
Jump Logictab. - Configure URL Redirection: Specify the URL to which customers should be redirected to. This can be set to occur after a specific question or based on selected answers.
- Publish & Test Your Setup: Click the top-right
Publish/Savebutton to update the preview/live quiz. Then,Previewthe quiz to ensure the redirection works correctly.
Even if you redirect the customer with Jump Logic to another page the quiz responses will be saved in the Quiz Builder's Metrics section.
Info
Redirecting with Jump Logic does not transfer quiz data to this new redirection page. If you want to send quiz data to another URL use the callback function.
Redirecting to a custom results page via callback function
You can use the callback function to redirect the customers to another (custom-built) Results Page. This allows for greater flexibility in handling quiz data and customizing the quiz results look.
Warning
The callback function is not supported in the Built for Shopify version of the RevenueHunt app.
The results page can do this work instead. It can show sections conditionally, based on quiz answers or custom scores, take custom JavaScript, and hold fixed products. It also has layout and alignment options, so you can build a custom results page without redirecting the customer.
Warning
To do this, you need basic knowledge of JavaScript and JSON.
- Set Up the Callback Function: Implement the callback function on your website to capture quiz results in JSON format.
- Store and Redirect: Store the results locally, in the browser local storage or cookies. Then redirect the customer to your custom Results Page.
- Access the Results Page First: The callback fires when the results page is reached. The page has to load, even for a fraction of a second, for the data to transfer. The callback then saves the quiz response as JSON in local storage or cookies, before any redirect.
- Use the Data: On your custom page, use the
console.log(quizResponse)function to retrieve and use the quiz data as needed.
For a more detailed guide on setting up the callback function, refer to this resource.
Warning
To do this, you need basic knowledge of JavaScript and JSON.
- Set Up the Callback Function: Implement the callback function on your website to capture quiz results in JSON format.
- Store and Redirect: Store the results locally, in the browser local storage or cookies. Then redirect the customer to your custom Results Page.
- Access the Results Page First: The callback fires when the results page is reached. The page has to load, even for a fraction of a second, for the data to transfer. The callback then saves the quiz response as JSON in local storage or cookies, before any redirect.
- Use the Data: On your custom page, use the
console.log(quizResponse)function to retrieve and use the quiz data as needed.
For a more detailed guide on setting up the callback function, refer to this resource.
Warning
To do this, you need basic knowledge of JavaScript and JSON.
- Set Up the Callback Function: Implement the callback function on your website to capture quiz results in JSON format.
- Store and Redirect: Store the results locally, in the browser local storage or cookies. Then redirect the customer to your custom Results Page.
- Access the Results Page First: The callback fires when the results page is reached. The page has to load, even for a fraction of a second, for the data to transfer. The callback then saves the quiz response as JSON in local storage or cookies, before any redirect.
- Use the Data: On your custom page, use the
console.log(quizResponse)function to retrieve and use the quiz data as needed.
For a more detailed guide on setting up the callback function, refer to this resource.
Warning
To do this, you need basic knowledge of JavaScript and JSON.
- Set Up the Callback Function: Implement the callback function on your website to capture quiz results in JSON format.
- Store and Redirect: Store the results locally, in the browser local storage or cookies. Then redirect the customer to your custom Results Page.
- Access the Results Page First: The callback fires when the results page is reached. The page has to load, even for a fraction of a second, for the data to transfer. The callback then saves the quiz response as JSON in local storage or cookies, before any redirect.
- Use the Data: On your custom page, use the
console.log(quizResponse)function to retrieve and use the quiz data as needed.
For a more detailed guide on setting up the callback function, refer to this resource.
Warning
To do this, you need basic knowledge of JavaScript and JSON.
- Set Up the Callback Function: Implement the callback function on your website to capture quiz results in JSON format.
- Store and Redirect: Store the results locally, in the browser local storage or cookies. Then redirect the customer to your custom Results Page.
- Access the Results Page First: The callback fires when the results page is reached. The page has to load, even for a fraction of a second, for the data to transfer. The callback then saves the quiz response as JSON in local storage or cookies, before any redirect.
- Use the Data: On your custom page, use the
console.log(quizResponse)function to retrieve and use the quiz data as needed.
For a more detailed guide on setting up the callback function, refer to this resource.
Add a redirection button to the results page
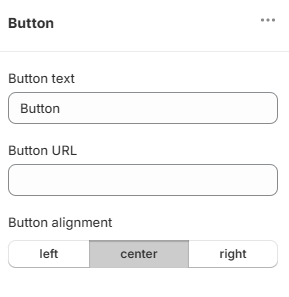
A Button block on your Results page links straight to another page.
- Add a Button: In the Results page editor, click the
+ Add blockbutton to insert aButtonblock. -
Insert the Button URL: In the Button URL field, enter the address you want to send the customer to:
An HTML button on your Results Page links straight to another page.
- Add an HTML Block: In the Results Page editor, click the
+button to insert anHTML block. -
Insert the Button Code: Use the following HTML snippet to add a button:
```html <a class="button" href="https://revenuehunt.com/">Visit RevenueHunt.com</a> ``` Edit the link URL and text to your liking. -
Customize Appearance: Style the button with CSS. You can add custom styles in the Quiz Design tab, targeting the button with
.lq-results a.button.
An HTML button on your Results Page links straight to another page.
- Add an HTML Block: In the Results Page editor, click the
+button to insert anHTML block. -
Insert the Button Code: Use the following HTML snippet to add a button:
```html <a class="button" href="https://revenuehunt.com/">Visit RevenueHunt.com</a> ``` Edit the link URL and text to your liking. -
Customize Appearance: Style the button with CSS. You can add custom styles in the Quiz Design tab, targeting the button with
.lq-results a.button.
An HTML button on your Results Page links straight to another page.
- Add an HTML Block: In the Results Page editor, click the
+button to insert anHTML block. -
Insert the Button Code: Use the following HTML snippet to add a button:
```html <a class="button" href="https://revenuehunt.com/">Visit RevenueHunt.com</a> ``` Edit the link URL and text to your liking. -
Customize Appearance: Style the button with CSS. You can add custom styles in the Quiz Design tab, targeting the button with
.lq-results a.button.
An HTML button on your Results Page links straight to another page.
- Add an HTML Block: In the Results Page editor, click the
+button to insert anHTML block. -
Insert the Button Code: Use the following HTML snippet to add a button:
```html <a class="button" href="https://revenuehunt.com/">Visit RevenueHunt.com</a> ``` Edit the link URL and text to your liking. -
Customize Appearance: Style the button with CSS. You can add custom styles in the Quiz Design tab, targeting the button with
.lq-results a.button.
An HTML button on your Results Page links straight to another page.
- Add an HTML Block: In the Results Page editor, click the
+button to insert anHTML block. -
Insert the Button Code: Use the following HTML snippet to add a button:
```html <a class="button" href="https://revenuehunt.com/">Visit RevenueHunt.com</a> ``` Edit the link URL and text to your liking. -
Customize Appearance: Style the button with CSS. You can add custom styles in the Quiz Design tab, targeting the button with
.lq-results a.button.
Info
Redirecting with a Button/ HTML link does not transfer quiz data to this new redirection page. If you want to send quiz data to another URL use the callback function.
By following these steps, you can effectively guide customers to relevant pages mid or post-quiz.