How to Set Up Automatic Popups
This guide walks you through setting up automatic popups on your eCommerce store, including popups that appear based on time spent on a page, across all pages, on the homepage, with exit intent, and options for showing popups multiple times per session.
What's an Automatic Popup?
It's a quiz popup that appears after X seconds. The popup is shown only once per session unless Exit Intent option is enabled in the popup settings. Automatic popups can significantly enhance user engagement by presenting timely content or interactive elements like quizzes.
Warning
Automatic popups can be very intrusive which is why, by default, they are shown only once per customer session.
Before you start
Before you start ensure you have a quiz created with the RevenueHunt app, access to the theme editor and (optional) basic understanding of HTML for editing themes.
Note: Directly editing your Shopify or other eCommerce theme's source code can potentially disrupt your store's functionality. If unsure about some steps, consider hiring a developer.
Auto-Popup on the Main Page
What's an Automatic Popup Quiz on the Main Page?
It's a quiz popup that appears after X seconds on the main page of your store. The popup is shown only once per session unless Exit Intent option is enabled in the popup settings.
Shopify 1.0 Theme Compatibility
Quizzes created with 💎Built for Shopify version of the RevenueHunt app cannot be published on Shopify 1.0 themes. Shopify 1.0 themes do not support app embeds, which are required for the V2 integration. App embeds are a feature available in Online Store 2.0 themes, which allow you to add app functionality without touching any code. If you want to use app embeds, you would need to upgrade to an Online Store 2.0 theme.
- Access Theme Customization: Log in to your Shopify admin dashboard. Navigate to
Online Store > Themes. Find your current theme and click on theCustomizebutton. -
Add a section for the app embed: In the Home page Template, add a section for the app embed called
Auto Popup Quizby Revenue Hunt Quizzes. This will enable the quiz pop-up on the home page.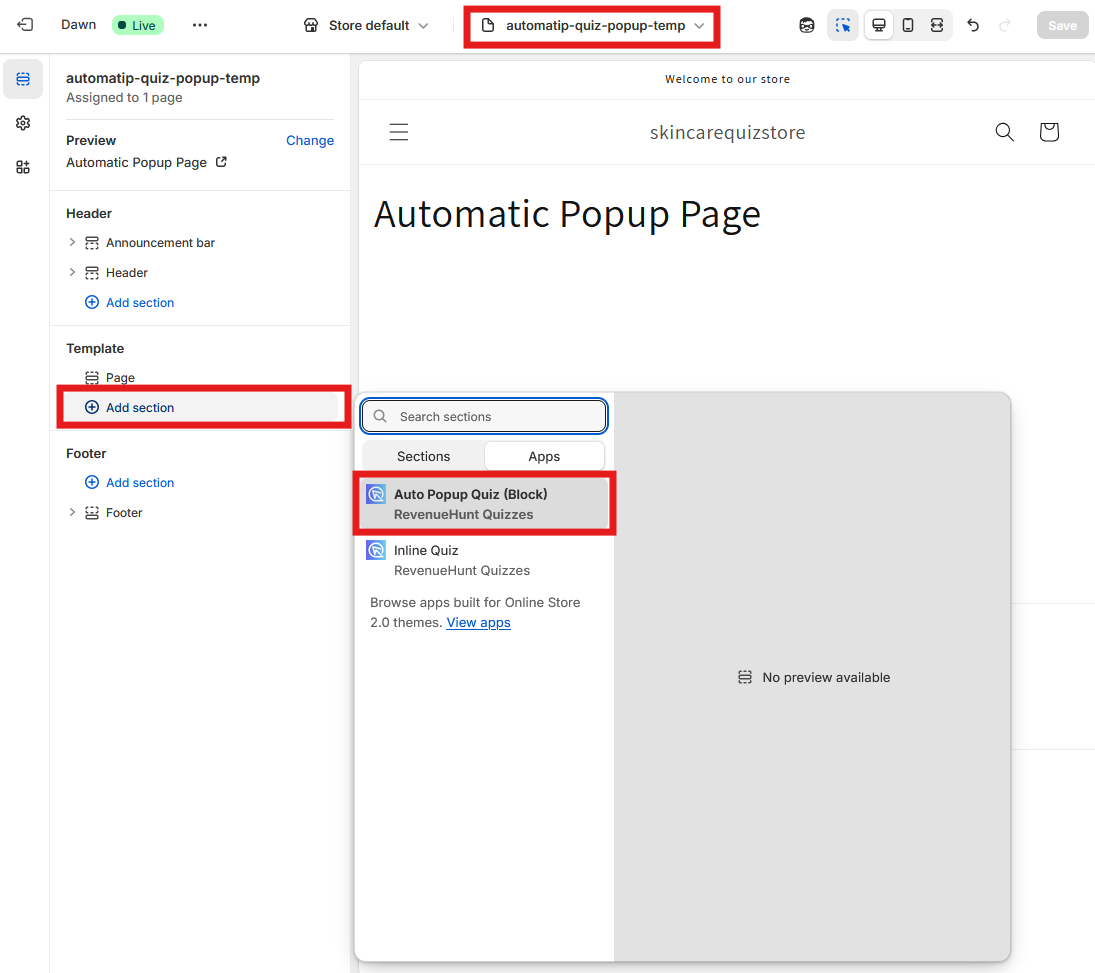
-
Configure Popup Settings:
- Set the
Popup Delay(in seconds) - how long to wait before showing the popup - Adjust the
Popup WidthandHeight(as percentage of screen) - Set the
Popup z-indexto control layering with other elements - Set the
Quiz ID(optional) to show a specific quiz. Leave blank to load the default. - Toggle
Trigger Popup on Exit Intentif you want the popup to appear when users try to leave the page
- Set the
-
Save Changes: Click on the
Savebutton to ensure all changes are saved before exiting the theme editor. - Test the Automatic Pop-up: To view the Automatic Pop-up, ensure you are in an incognito or private browsing window, as pop-ups are shown only once per user session.
Note
When visitors come to your store, the default quiz for your store will open automatically based on your settings.
If you've configured Shopify Markets, the default quiz for that specific market will be shown instead.
If you want to show a specific quiz, you can do so by setting the Quiz ID in the popup settings. Check this section for more information.
Option 1: Through Shopify Theme
- Copy Quiz ID: Go to your RevenueHunt app dashboard, select a quiz and click the
...button. Copy your Quiz ID. - Open Store Themes: Go to
Online Store > Themes, clickCustomize, then openApp Embeds. - Embed Popup Quiz: Select
Automatic Popup Quiz, enter the Quiz ID, adjust settings, and activate the toggle. - Save Changes: Ensure all changes are saved before exiting the theme editor.
Option 2: Manual
- Obtain Automatic Embed Code: From the quiz builder, click
Share, selectAutomaticmode, andShow Instructions for Legacy Themes. - Generate Popup Code: Adjust settings like popup duration, width or height and click
Get codeto generate an HTML code. - Open Store Themes: In
Themes, clickCustomize, add aCustom contentsection, then aCustom HTML/Custom liquidblock. - Paste Popup Code: In the HTML/custom liquid block, paste your popup code.
- Save Changes: Ensure all changes are saved before exiting the theme editor.
- Obtain Automatic Embed Code: From the quiz builder, click
Share, selectAutomaticmode. - Generate Popup Code: Adjust settings like popup duration, width or height and click
Get codeto generate an HTML code. Copy the HTML code. - In WordPress, open
Pagesand find the Front Page. ClickEditto open the page. - In the editor, find a
Custom HTMLelement and add it to the page. - In the element, paste the code copied from the app.
- Save the changes and
updatethe page. - From now on, the automatic popup quiz will be visible on the main page.
- Add the following embed.js script before the
</head>close tag in the header. Without it, the quiz won't be loaded on your website. - Obtain Automatic Embed Code: From the quiz builder, click
Share, selectAutomaticmode. - Generate Popup Code: Adjust settings like popup duration, width or height and click
Get codeto generate an HTML code. Copy the HTML code. - In your Magento dashboard go to
Content>Blocks. ClickAdd New Block. - Edit the Block Title, Identifier and Store View and click
Edit with Page Builder. - Select
Elements>Rowsand drag a row into the canvas. - Next open
Elementsand pickHTML Code. Drag theHTML Codeonto the Row. - Click the gear icon to open
HTML settings. - Under
Enter HTML, CSS or JavaScript codepaste the HTML code copied from the app. - Remember to save the changes.
- From now on, the automatic popup quiz will be visible on the main page.
- Add the following embed.js script before the
</head>close tag in the header. Without it, the quiz won't be loaded on your website. - Obtain Automatic Embed Code: From the quiz builder, click
Share, selectAutomaticmode. - Generate Popup Code: Adjust settings like popup duration, width or height and click
Get codeto generate an HTML code. Copy the HTML code. - In BigCommerce, go to
Storefront>Web Pages. Find the main page. - Switch to the
HTMLeditor. Paste the HTML code copied from the app. - Save the changes.
- From now on, the automatic popup will be visible on the main page.
- Add the following embed.js script before the
</head>close tag in the header. Without it, the quiz won't be loaded on your website. - Obtain Automatic Embed Code: From the quiz builder, click
Share, selectAutomaticmode. - Generate Popup Code: Adjust settings like popup duration, width or height and click
Get codeto generate an HTML code. Copy the HTML code. - In your store customization options find the main page.
- Find a
Custom HTMLelement. In the element settings paste the code copied from the app. - Save the changes.
- From now on, the automatic popup quiz will be visible on the main page.
Auto-Popup on a Specific Page
What's an Automatic Popup Quiz on a Specific Page?
It's a quiz popup that appears after X seconds on a specifc page of your store. The popup is shown only once per session unless Exit Intent option is enabled in the popup settings.
Shopify 1.0 Theme Compatibility
Quizzes created with 💎Built for Shopify version of the RevenueHunt app cannot be published on Shopify 1.0 themes. Shopify 1.0 themes do not support app embeds, which are required for the V2 integration. App embeds are a feature available in Online Store 2.0 themes, which allow you to add app functionality without touching any code. If you want to use app embeds, you would need to upgrade to an Online Store 2.0 theme.
- Create a new page: Navigate to Shopify
Online Store > Pages. Click onAdd New Pageto create a new page (e.g.,Automatic Pop-up Page). Set the visibility toVisibleand save the changes. - Access Theme Customization: Log in to your Shopify admin dashboard. Navigate to
Online Store > Themes. Find your current theme and click on theCustomizebutton. - Create a new template: Go to
Online Store > Themes > Customize. Access the Homepage menu > Pages and click+ Create a new template. Name the template something likeAutomatic Quiz Pop-up Templateand edit it. -
Add a section for the app embed: In the new template, add a section for the app embed called
Automatic Pop-up Quiz (Block)by Revenue Hunt Quizzes. This will enable the quiz pop-up on the specified page. -
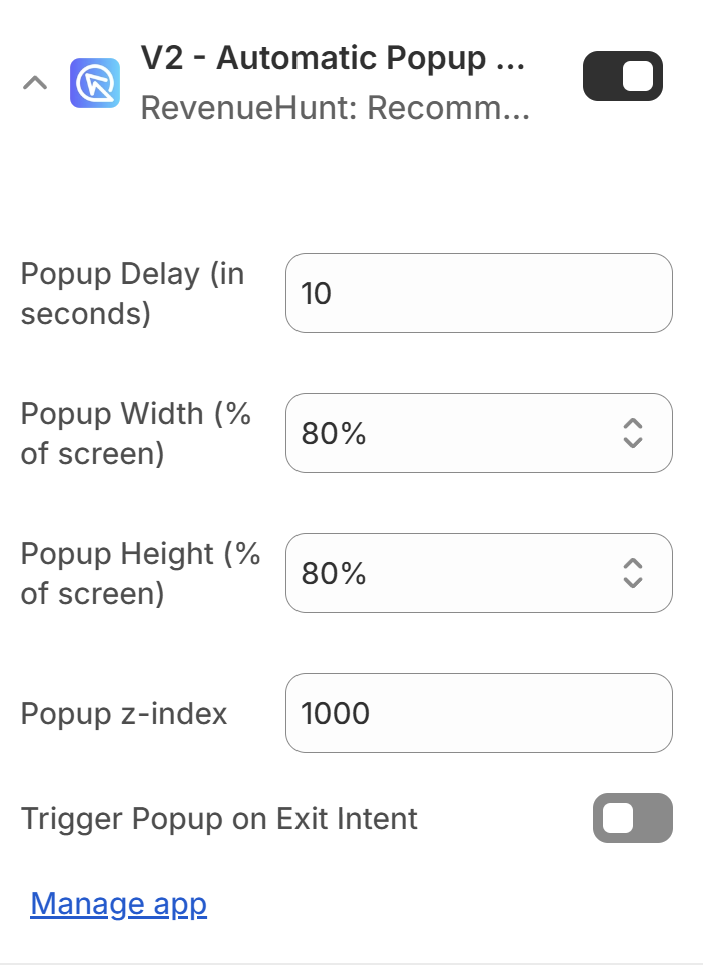
Configure Popup Settings:
- Set the
Popup Delay(in seconds) - how long to wait before showing the popup - Adjust the
Popup WidthandHeight(as percentage of screen) - Set the
Popup z-indexto control layering with other elements - Set the
Quiz ID(optional) to show a specific quiz. Leave blank to load the default. - Toggle
Trigger Popup on Exit Intentif you want the popup to appear when users try to leave the page
- Set the
-
Save Changes: Click on the
Savebutton to ensure all changes are saved before exiting the theme editor. -
Assign the template to the page: Go to
Online Store > Pagesand select the page you created. UnderPage Templateselect the template you created.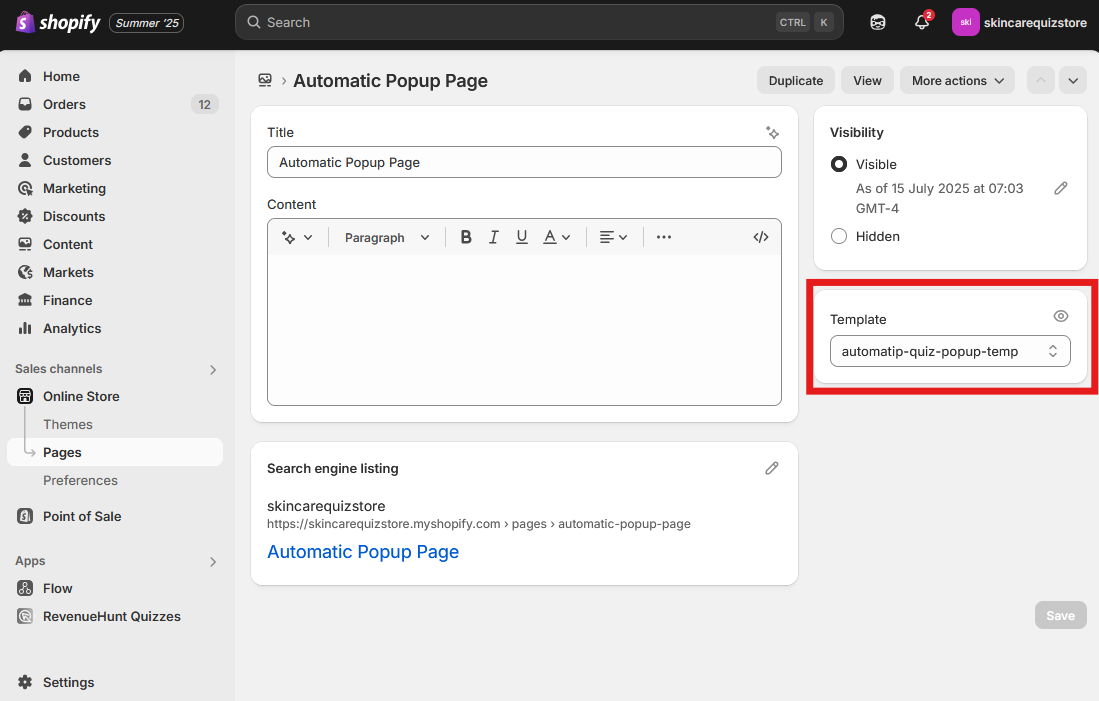
-
Save Changes: Click on the
Savebutton to ensure all changes are saved before exiting the theme editor. - Test the Automatic Pop-up: To view the Automatic Pop-up, ensure you are in an incognito or private browsing window, as pop-ups are shown only once per user session.
Note
When visitors come to your store, the default quiz for your store will open automatically based on your settings.
If you've configured Shopify Markets, the default quiz for that specific market will be shown instead.
If you want to show a specific quiz, you can do so by setting the Quiz ID in the popup settings. Check this section for more information.
- Obtain Automatic Embed Code: From the quiz builder, click
Share, selectAutomaticmode, andShow Instructions for Legacy Themes. - Generate Popup Code: Adjust settings like popup duration, width or height and click
Get codeto generate an HTML code. - Embed Code on Page: In Shopify, go to
Online Store > Pages, select the page, clickShow HTML, and paste the popup code. - Save Changes: Ensure all changes are saved before exiting the theme editor.
- Obtain Automatic Embed Code: From the quiz builder, click
Share, selectAutomaticmode. - Generate Popup Code: Adjust settings like popup duration, width or height and click
Get codeto generate an HTML code. Copy the HTML code. - In WordPress, open
Pagesand find the page where you want the popup to show. ClickEditto open the page. - In the editor, find a
Custom HTMLelement and add it to the page. - In the element, paste the code copied from the app.
- Save the changes and
updatethe page. - From now on, the automatic popup quiz will be visible on that page.
- Add the following embed.js script before the
</head>close tag in the header. Without it, the quiz won't be loaded on your website. - Obtain Automatic Embed Code: From the quiz builder, click
Share, selectAutomaticmode. - Generate Popup Code: Adjust settings like popup duration, width or height and click
Get codeto generate an HTML code. Copy the HTML code. - In your Magento dashbaord go to
Content>Pages. ClickAdd New Pageor open an existing page. - Edit the Page and open the
Contenttab. ClickEdit with Page Builder. - Select
Elements>Rowsand drag a row into the canvas. - Next open
Elementsand pickHTML Code. Drag theHTML Codeonto the Row. - Click the gear icon to open
HTML settings. - Under
Enter HTML, CSS or JavaScript codepaste the HTML code copied from the app. - Remember to save the changes.
- From now on, the automatic popup quiz will be visible on that page.
- Add the following embed.js script before the
</head>close tag in the header. Without it, the quiz won't be loaded on your website. - Obtain Automatic Embed Code: From the quiz builder, click
Share, selectAutomaticmode. - Generate Popup Code: Adjust settings like popup duration, width or height and click
Get codeto generate an HTML code. Copy the HTML code. - In BigCommerce, go to
Storefront>Web Pages. ClickCreate a Web Pageor pen an existing page. - Under
Web Page Details>Page Contentswitch to theHTMLeditor. Paste the HTML code copied from the app. - Save the changes.
- From now on, the automatic popup quiz will be visible on that page.
- Add the following embed.js script before the
</head>close tag in the header. Without it, the quiz won't be loaded on your website. - Obtain Automatic Embed Code: From the quiz builder, click
Share, selectAutomaticmode. - Generate Popup Code: Adjust settings like popup duration, width or height and click
Get codeto generate an HTML code. Copy the HTML code. - In your store customization options find the page you want the quiz to show on.
- Find a
Custom HTMLelement. In the element settings paste the code copied from the app. - Save the changes.
- From now on, the automatic popup quiz will be visible on that page.
Auto-Popup on All Pages
What's an Automatic Popup Quiz on All Pages?
It's a quiz popup that appears after X seconds on all pages of your store that have the same template/theme applied. The popup is shown only once per session unless Exit Intent option is enabled in the popup settings.
Shopify 1.0 Theme Compatibility
Quizzes created with 💎Built for Shopify version of the RevenueHunt app cannot be published on Shopify 1.0 themes. Shopify 1.0 themes do not support app embeds, which are required for the V2 integration. App embeds are a feature available in Online Store 2.0 themes, which allow you to add app functionality without touching any code. If you want to use app embeds, you would need to upgrade to an Online Store 2.0 theme.
- Access Theme Customization: Log in to your Shopify admin dashboard. Navigate to
Online Store > Themes. Find your current theme and click on theCustomizebutton. - Activate App Embeds: Make sure you are editing the
Defaulttheme for your store. Within the theme customization area, go toApp Embeds. Look for theAutomatic Popup Quizoption and toggle it on.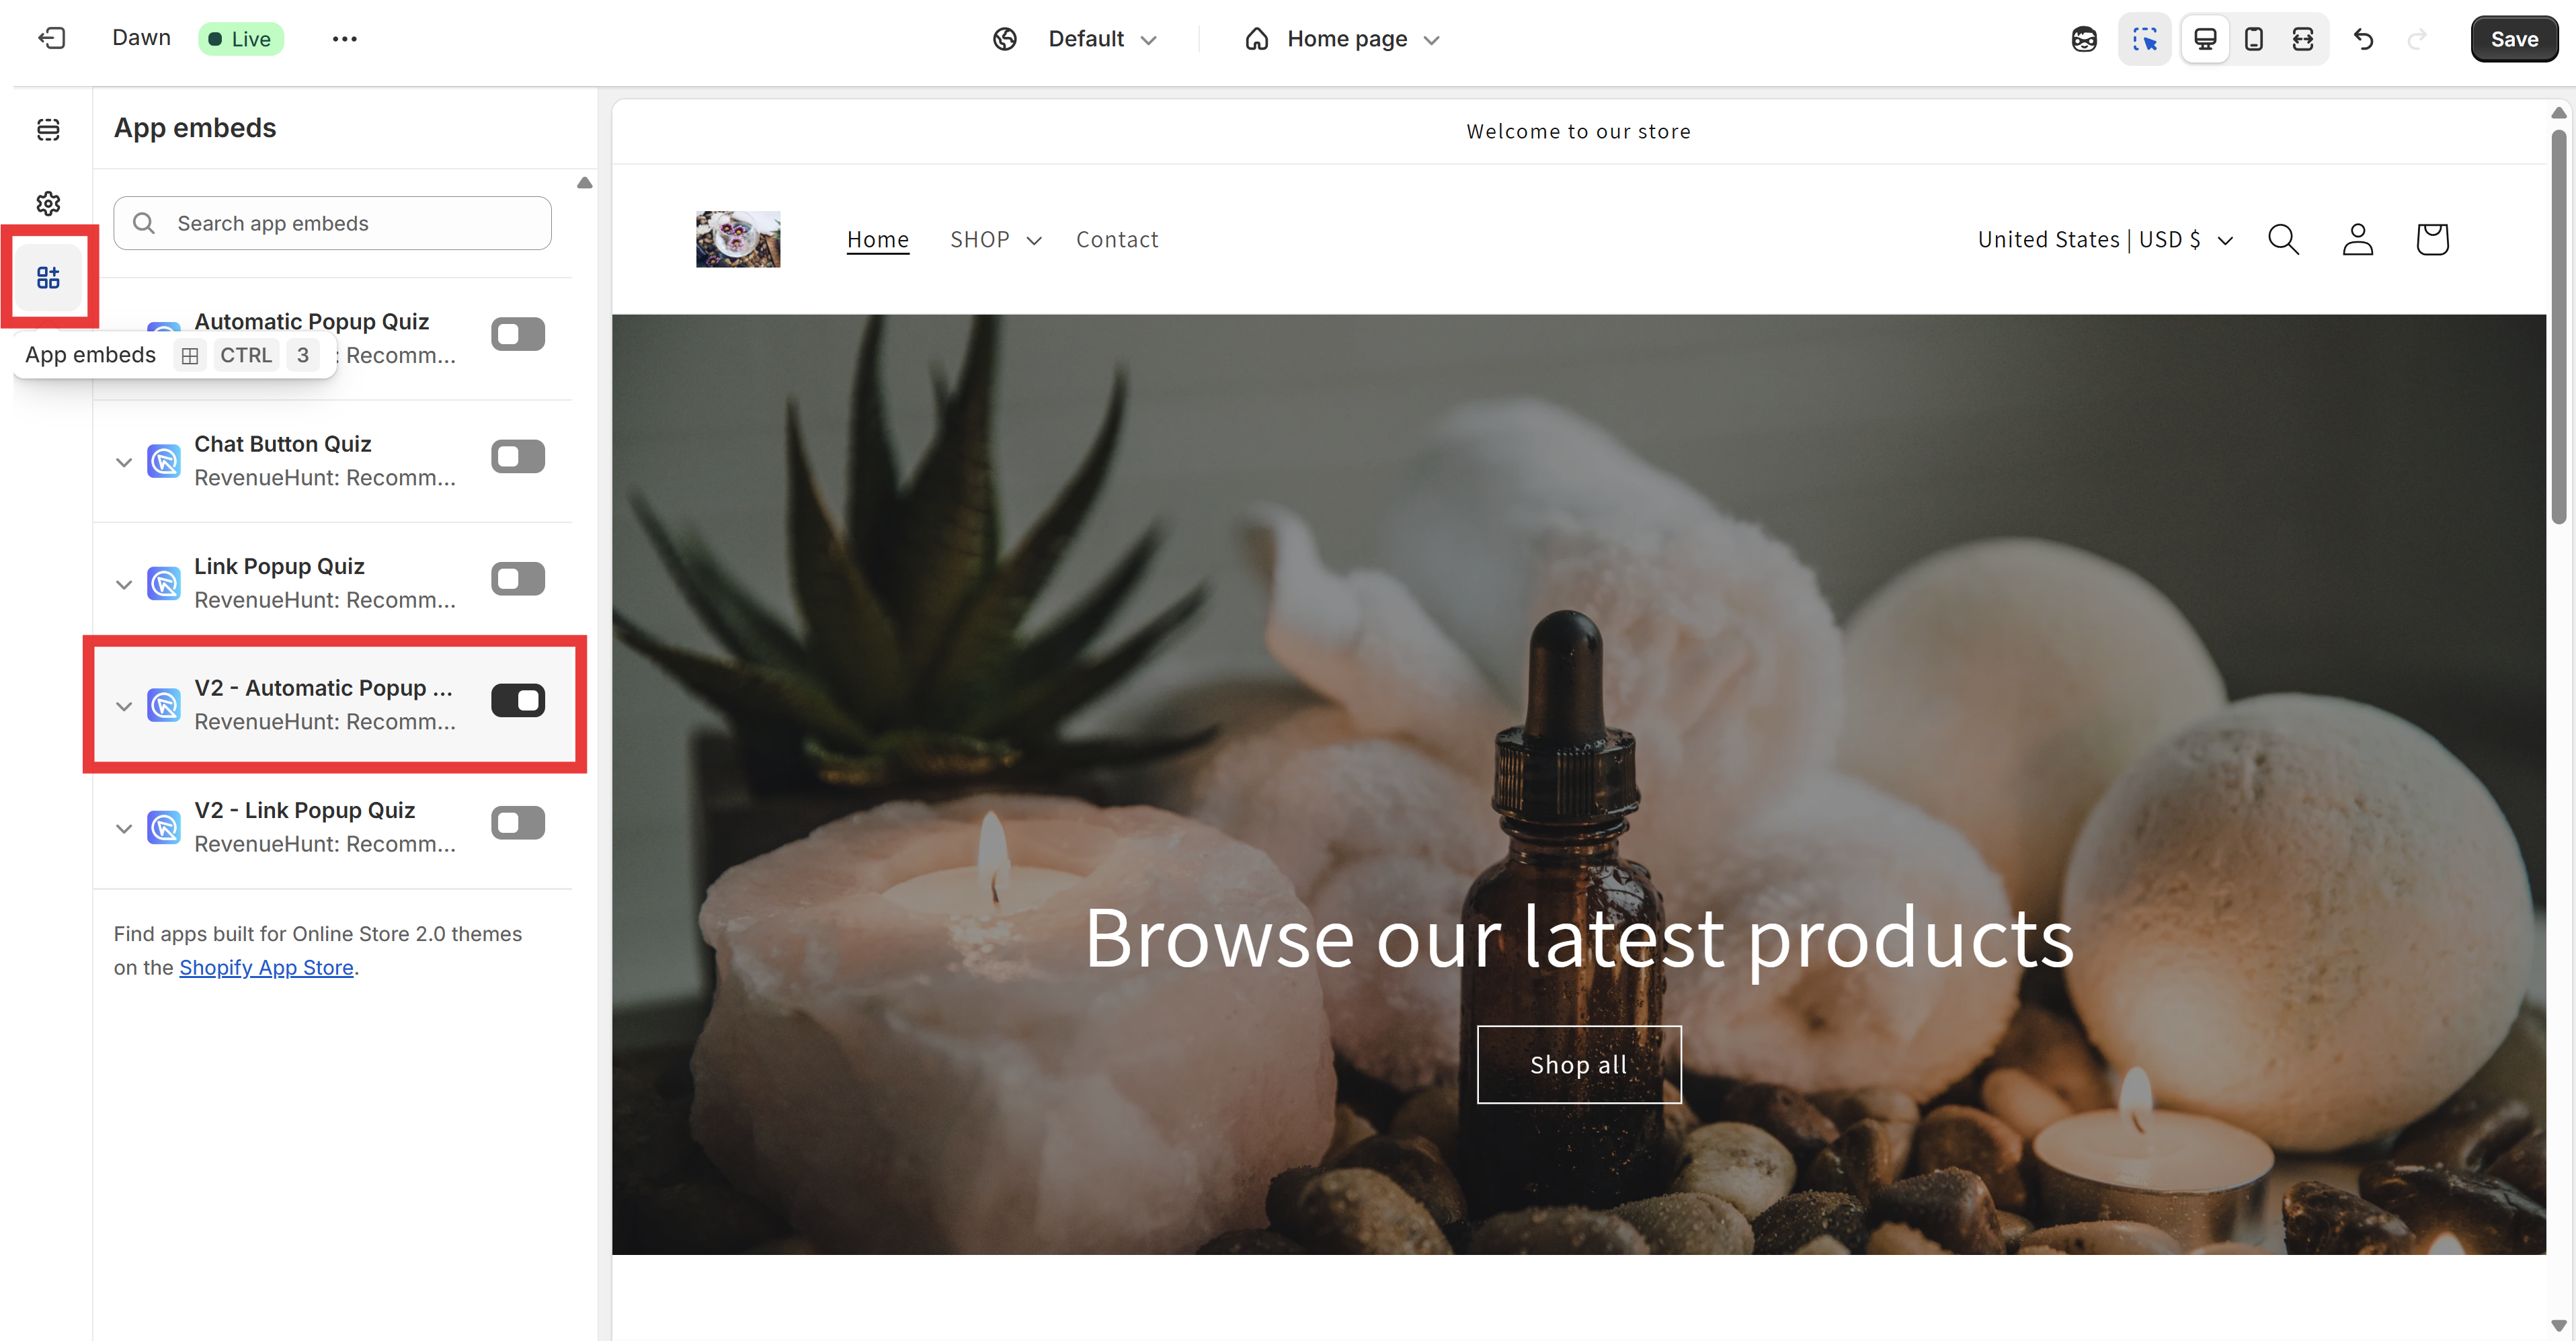
-
Configure Popup Settings:
- Set the
Popup Delay(in seconds) - how long to wait before showing the popup - Adjust the
Popup WidthandHeight(as percentage of screen) - Set the
Popup z-indexto control layering with other elements - Set the
Quiz ID(optional) to show a specific quiz. Leave blank to load the default. - Toggle
Trigger Popup on Exit Intentif you want the popup to appear when users try to leave the page
- Set the
-
Save Changes: Click on the Save button to ensure all changes are saved before exiting the theme editor.
- Test the Automatic Pop-up: To view the Automatic Pop-up, ensure you are in an incognito or private browsing window, as pop-ups are shown only once per user session.
The popup will now appear across all pages that have the same template/theme applied according to the configured settings.
Note
When visitors come to your store, the default quiz for your store will open automatically based on your settings.
If you've configured Shopify Markets, the default quiz for that specific market will be shown instead.
If you want to show a specific quiz, you can do so by setting the Quiz ID in the popup settings. Check this section for more information.
- Obtain Automatic Embed Code: From the quiz builder, click
Share, selectAutomaticmode, andShow Instructions for Legacy Themes. - Generate Popup Code: Adjust settings like popup duration, width or height and click
Get codeto generate an HTML code. - Edit Theme's Source Code: Navigate to
Online Store > Themes, clickActions > Edit Codeto access the theme editor. - Locate and Edit File: Find the
</body>tag intheme.liquidorfooter.liquid. Paste the popup code just before this tag. - Save Changes: Ensure all changes are saved before exiting the theme editor.
- Install a Popup Plugin: First, you'll need a plugin that can create and manage popups. Popular options include 'Popup Maker' or 'Elementor' if you're looking for something with more design flexibility. Install and activate your chosen plugin through the WordPress dashboard.
- Obtain Automatic Embed Code: From the quiz builder, click
Share, selectAutomaticmode, andShow Instructions for Legacy Themes. - Generate Popup Code: Adjust settings like popup duration, width or height and click
Get codeto generate an HTML code. - Create a New Popup: Navigate to the popup plugin's section in your WordPress dashboard. Select the option to create a new popup. Name your popup and start designing it. Most popup plugins offer a visual editor to customize the look and layout.
- Embed the Quiz: In the popup editor, add a
custom HTMLblock and paste the code copied from the app. - Set Popup Conditions: Configure when and where the popup should appear on your site.
- Publish and Test: After configuring your popup, publish it. Then, visit your site to ensure the popup appears as expected and that the quiz functions properly within the popup.
- Add the following embed.js script before the
</head>close tag in the header. Without it, the quiz won't be loaded on your website. - Find and Install a Popup Extension: Search the Magento Marketplace for a popup extension that fits your needs. Extensions like "Magento 2 Popup Extension" by Mageplaza or similar can be used. Download and install the extension via Composer or by uploading it to your server.
- Configure the Extension: Once installed, navigate to the backend of your Magento store. Go to the extension settings via the admin panel. Here you can create a new popup and configure its settings.
- Obtain Automatic Embed Code: From the quiz builder, click
Share, selectAutomaticmode, andShow Instructions for Legacy Themes. - Generate Popup Code: Adjust settings like popup duration, width or height and click
Get codeto generate an HTML code. - Embed the Quiz: In the popup configuration, insert the HTML or JavaScript code for your quiz. This could will be the code generated from your "Product Recommendation Quiz".
- Set Display Rules: Configure the extension to show the popup on all pages. You might also set additional conditions like display timing, animation effects, and user interaction triggers (e.g., exit intent, time on site).
- Save and Test: After setting up everything, save your changes and test the popup on your live site to ensure it works correctly across different pages and devices.
Using Script Manager
- Add the following embed.js script before the
</head>close tag in the header. Without it, the quiz won't be loaded on your website. - Access the Script Manager: Log into your BigCommerce admin dashboard. Navigate to
Storefront>Script Manager. - Create a New Script: Click on
Create a Script. Fill in the details: - Name: Give your script a name, e.g., "Product Recommendation Quiz".
- Location on Page: Choose Footer to ensure the script loads at the end of the page, which is typical for popups.
- Select Pages where script will be added: Choose All Pages to ensure the popup appears throughout your site.
- Obtain Automatic Embed Code: From the quiz builder, click
Share, selectAutomaticmode, andShow Instructions for Legacy Themes. - Generate Popup Code: Adjust settings like popup duration, width or height and click
Get codeto generate an HTML code. - Insert the Popup Code: In the Script Content area, paste the HTML code for your popup. This will include the quiz code from your quiz builder.
- Save and Test: Save your script settings. Visit your store's front end in an incognito window to ensure the popup appears correctly on all pages.
Modifying Theme Files
Alternatively, if you need more control or if the Script Manager does not meet your requirements, you can modify the theme files directly:
- Add the following embed.js script before the
</head>close tag in the header. Without it, the quiz won't be loaded on your website. - Obtain Automatic Embed Code: From the quiz builder, click
Share, selectAutomaticmode, andShow Instructions for Legacy Themes. - Generate Popup Code: Adjust settings like popup duration, width or height and click
Get codeto generate an HTML code. - Access the Theme Files: Navigate to
Storefront>My Themes. Click onAdvanced>Edit Theme Files. - Modify the Footer File: Locate the file typically named
footer.htmlor similar under theTemplatesdirectory. Paste your popup's HTML code just before the closing


