Making Your First Product Recommendation Quiz: Recommending the Best Cleanser
In this tutorial you will learn how to make and publish a short quiz that recommends the best cosmetic (skincare) product to your customers.
What you will learn
- how to build a quiz from scratch
- different question types and how to use them
- how to recall information from the previous questions
- how to customize quiz design
- how to link products
- how the recommendation algorithm works
- how to edit the results page
- how to publish the quiz as a link popup in the site menu
In this tutorial you will learn how to make and publish a short quiz that recommends the best cosmetic (skincare) product to your customers.
What you will learn
- how to build a quiz from scratch
- different question types and how to use them
- how to recall information from the previous questions
- how to customize quiz design
- how to link products
- how the recommendation algorithm works
- how to edit the results page
- how to use Markdown Language
- how to publish the quiz
In this tutorial you will learn how to make and publish a short quiz that recommends the best cosmetic (skincare) product to your customers.
What you will learn
- how to build a quiz from scratch
- different question types and how to use them
- how to recall information from the previous questions
- how to customize quiz design
- how to link products
- how the recommendation algorithm works
- how to edit the results page
- how to use Markdown Language
- how to publish the quiz
In this tutorial you will learn how to make and publish a short quiz that recommends the best cosmetic (skincare) product to your customers.
What you will learn
- how to build a quiz from scratch
- different question types and how to use them
- how to recall information from the previous questions
- how to customize quiz design
- how to link products
- how the recommendation algorithm works
- how to edit the results page
- how to use Markdown Language
- how to publish the quiz
In this tutorial you will learn how to make and publish a short quiz that recommends the best cosmetic (skincare) product to your customers.
What you will learn
- how to build a quiz from scratch
- different question types and how to use them
- how to recall information from the previous questions
- how to customize quiz design
- how to link products
- how the recommendation algorithm works
- how to edit the results page
- how to use Markdown Language
- how to publish the quiz
In this tutorial you will learn how to make and publish a short quiz that recommends the best cosmetic (skincare) product to your customers.
What you will learn
- how to build a quiz from scratch
- different question types and how to use them
- how to recall information from the previous questions
- how to customize quiz design
- how to link products
- how the recommendation algorithm works
- how to edit the results page
- how to use Markdown Language
- how to publish the quiz
Intro
So you are ready to create your first Product Recommendation Quiz.
The most successful quizzes have two things in common. They are short and they are informative. You do not need a long questionnaire to turn a browser into a customer.
Objective: Say you run a cosmetics shop with a selection of cleansers for different skin types. This tutorial builds a short quiz that helps a customer choose the best cleanser.
Add a new quiz
- Add a new quiz from your dashboard by clicking
Create new quiz. - Open the Quiz builder. This is where you create your quiz.
-
Click on the
+ Add Questionbutton and select the question type you want to add.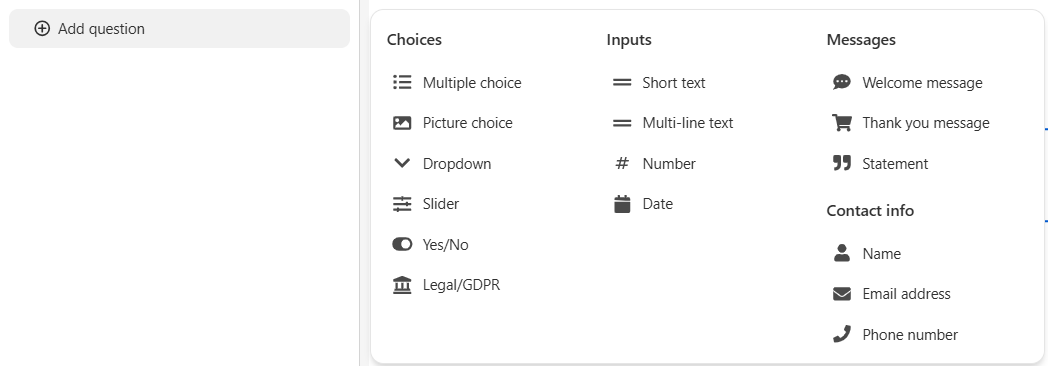
-
Edit the question and see how it looks in the preview.
- To change question settings, click on the question card and use the settings panel on the right. Here, you can change things like adding a question description or an image.
- To make the quiz more personal, add a
Name question. You can then recall the answer elsewhere in the quiz with a content dynamic source. - Add a question for each thing the recommendation needs. To select the best cleanser you need the customer's age, skin type and environment. A
Multiple-choice questionis usually the best way to collect all three. Start by asking about skin type. - Finally, find out the environment they live in. Use a
Picture questionhere, to make the quiz more interesting. - Remember to add an
email question. That is how you collect leads for your marketing campaigns. In the question settings you can make this one optional. - Once you have all your questions you can move them around by drag and drop.
- Keep the quiz short. Customers typically drop out after question 8, and almost nobody reaches question 12. There is power in simplicity.
- Add a new quiz from your dashboard.
- Open the Quiz Builder. This is where you create your quiz.
-
Click on the
+plus sign and choose a question type.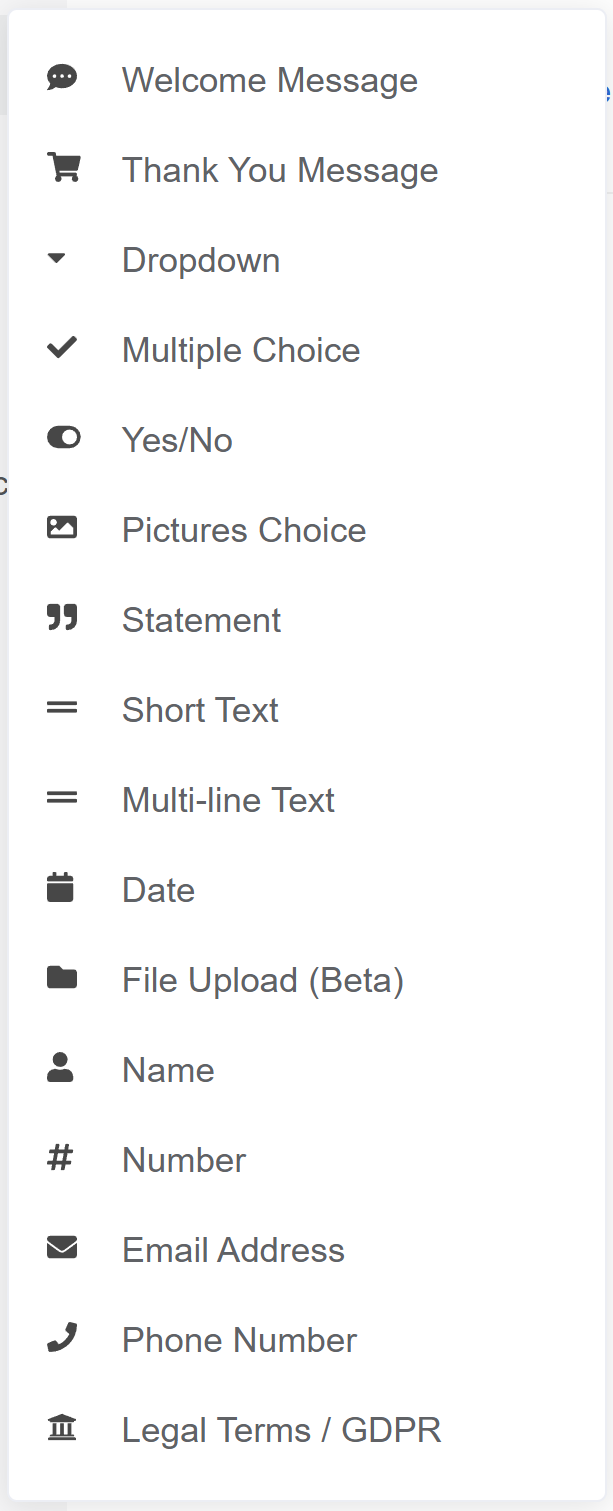
-
Edit the question and see how it looks in the preview.
- To change question settings, click on , a little wrench icon. Here, you can change things like adding a question description or an image.
- To make the quiz more personal, add a
Name question. You can then recall the answer elsewhere in the quiz with an information recall (@). - Add a question for each thing the recommendation needs. To select the best cleanser you need the customer's age, skin type and environment. A
Multiple-choice questionis usually the best way to collect all three. Start by asking about skin type. - Finally, find out the environment they live in. Use a
Picture questionhere, to make the quiz more interesting. - Remember to add an
email question. That is how you collect leads for your marketing campaigns. In the question settings you can make this one optional. - Once you have all your questions you can move them around by drag and drop.
- Keep the quiz short. Customers typically drop out after question 8, and almost nobody reaches question 12. There is power in simplicity.
- Add a new quiz from your dashboard.
- Open the Quiz Builder. This is where you create your quiz.
-
Click on the
+plus sign and choose a question type. -
Edit the question and see how it looks in the preview.
- To change question settings, click on , a little wrench icon. Here, you can change things like adding a question description or an image.
- To make the quiz more personal, add a
Name question. You can then recall the answer elsewhere in the quiz with an information recall (@). - Add a question for each thing the recommendation needs. To select the best cleanser you need the customer's age, skin type and environment. A
Multiple-choice questionis usually the best way to collect all three. Start by asking about skin type. - Finally, find out the environment they live in. Use a
Picture questionhere, to make the quiz more interesting. - Remember to add an
email question. That is how you collect leads for your marketing campaigns. In the question settings you can make this one optional. - Once you have all your questions you can move them around by drag and drop.
- Keep the quiz short. Customers typically drop out after question 8, and almost nobody reaches question 12. There is power in simplicity.
- Add a new quiz from your dashboard.
- Open the Quiz Builder. This is where you create your quiz.
-
Click on the
+plus sign and choose a question type. -
Edit the question and see how it looks in the preview.
- To change question settings, click on , a little wrench icon. Here, you can change things like adding a question description or an image.
- To make the quiz more personal, add a
Name question. You can then recall the answer elsewhere in the quiz with an information recall (@). - Add a question for each thing the recommendation needs. To select the best cleanser you need the customer's age, skin type and environment. A
Multiple-choice questionis usually the best way to collect all three. Start by asking about skin type. - Finally, find out the environment they live in. Use a
Picture questionhere, to make the quiz more interesting. - Remember to add an
email question. That is how you collect leads for your marketing campaigns. In the question settings you can make this one optional. - Once you have all your questions you can move them around by drag and drop.
- Keep the quiz short. Customers typically drop out after question 8, and almost nobody reaches question 12. There is power in simplicity.
- Add a new quiz from your dashboard.
- Open the Quiz Builder. This is where you create your quiz.
-
Click on the
+plus sign and choose a question type. -
Edit the question and see how it looks in the preview.
- To change question settings, click on , a little wrench icon. Here, you can change things like adding a question description or an image.
- To make the quiz more personal, add a
Name question. You can then recall the answer elsewhere in the quiz with an information recall (@). - Add a question for each thing the recommendation needs. To select the best cleanser you need the customer's age, skin type and environment. A
Multiple-choice questionis usually the best way to collect all three. Start by asking about skin type. - Finally, find out the environment they live in. Use a
Picture questionhere, to make the quiz more interesting. - Remember to add an
email question. That is how you collect leads for your marketing campaigns. In the question settings you can make this one optional. - Once you have all your questions you can move them around by drag and drop.
- Keep the quiz short. Customers typically drop out after question 8, and almost nobody reaches question 12. There is power in simplicity.
- Add a new quiz from your dashboard.
- Open the Quiz Builder. This is where you create your quiz.
-
Click on the
+plus sign and choose a question type. -
Edit the question and see how it looks in the preview.
- To change question settings, click on , a little wrench icon. Here, you can change things like adding a question description or an image.
- To make the quiz more personal, add a
Name question. You can then recall the answer elsewhere in the quiz with an information recall (@). - Add a question for each thing the recommendation needs. To select the best cleanser you need the customer's age, skin type and environment. A
Multiple-choice questionis usually the best way to collect all three. Start by asking about skin type. - Finally, find out the environment they live in. Use a
Picture questionhere, to make the quiz more interesting. - Remember to add an
email question. That is how you collect leads for your marketing campaigns. In the question settings you can make this one optional. - Once you have all your questions you can move them around by drag and drop.
- Keep the quiz short. Customers typically drop out after question 8, and almost nobody reaches question 12. There is power in simplicity.
Changing design
Now style the quiz.
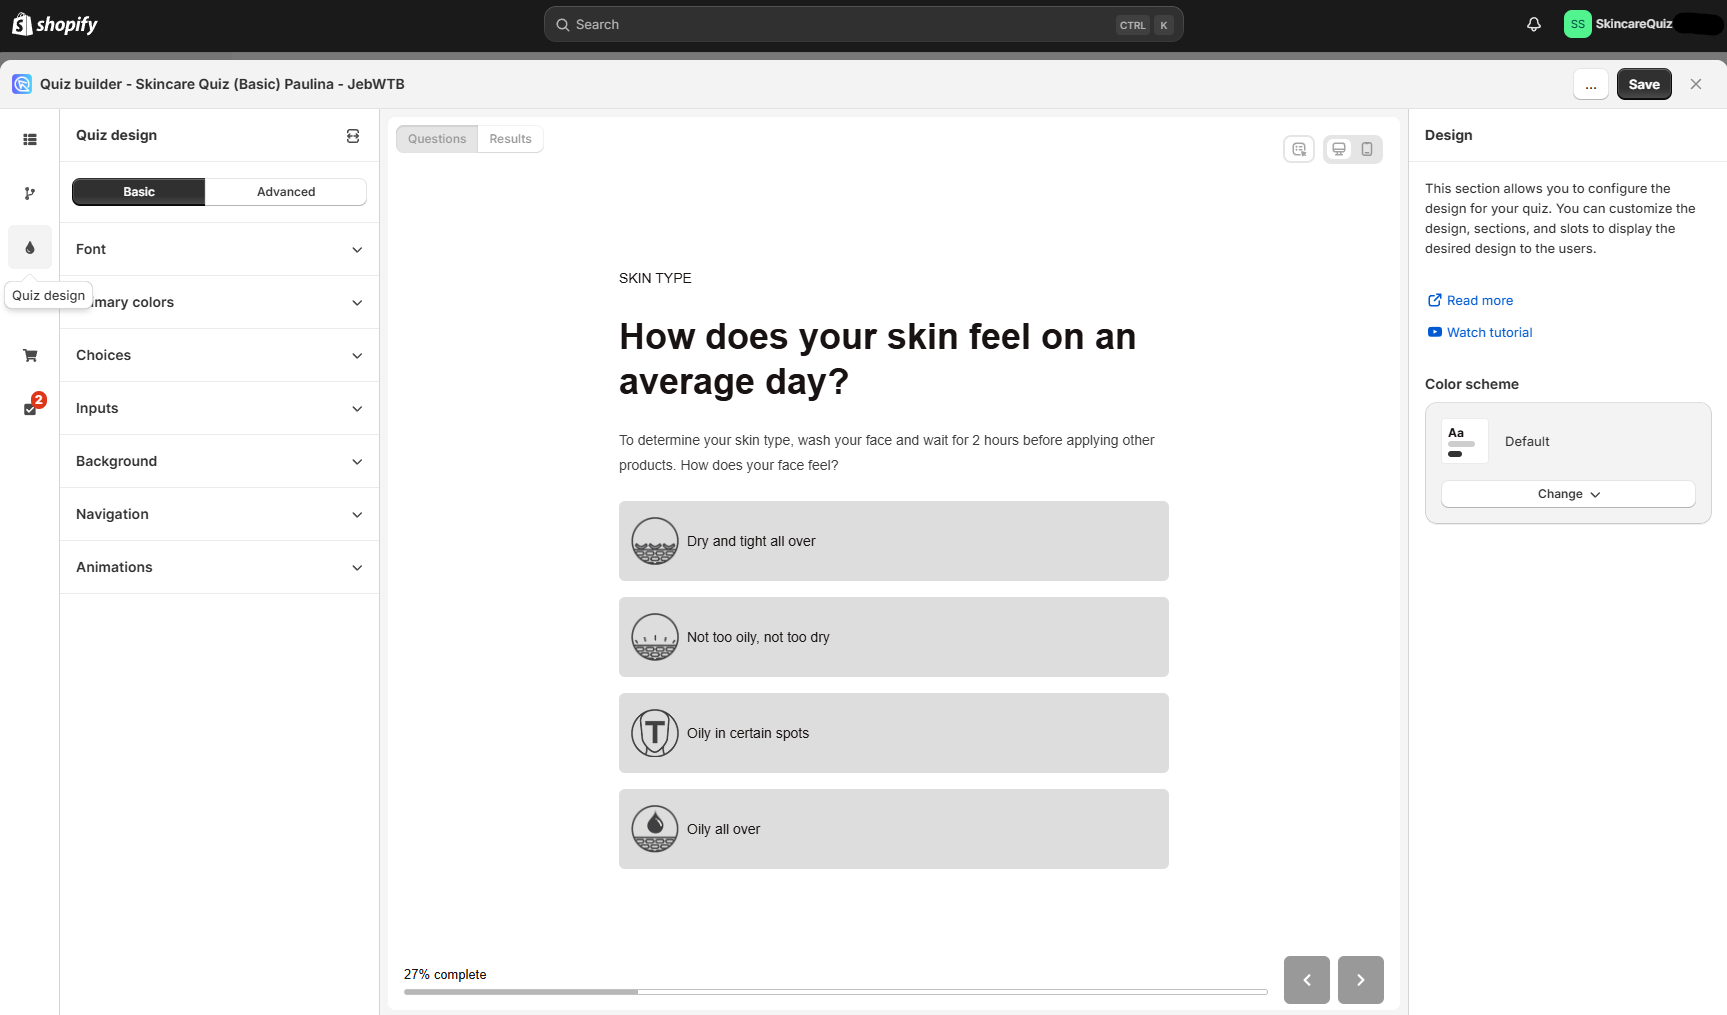
- Open the Quiz design tab.
- Pick a theme under
Color scheme. It holds a set of ready-made themes. - Or you can create your own design by clicking on different elements in the editing panel.
- Match the quiz to your store's style:
- edit the font,
- change the background color,
- remove or add a background image,
- and change the color of the buttons and choices.
- Add custom CSS if you want the quiz to look like nothing else.
- Leave the design when you are happy with it. Your changes save automatically.
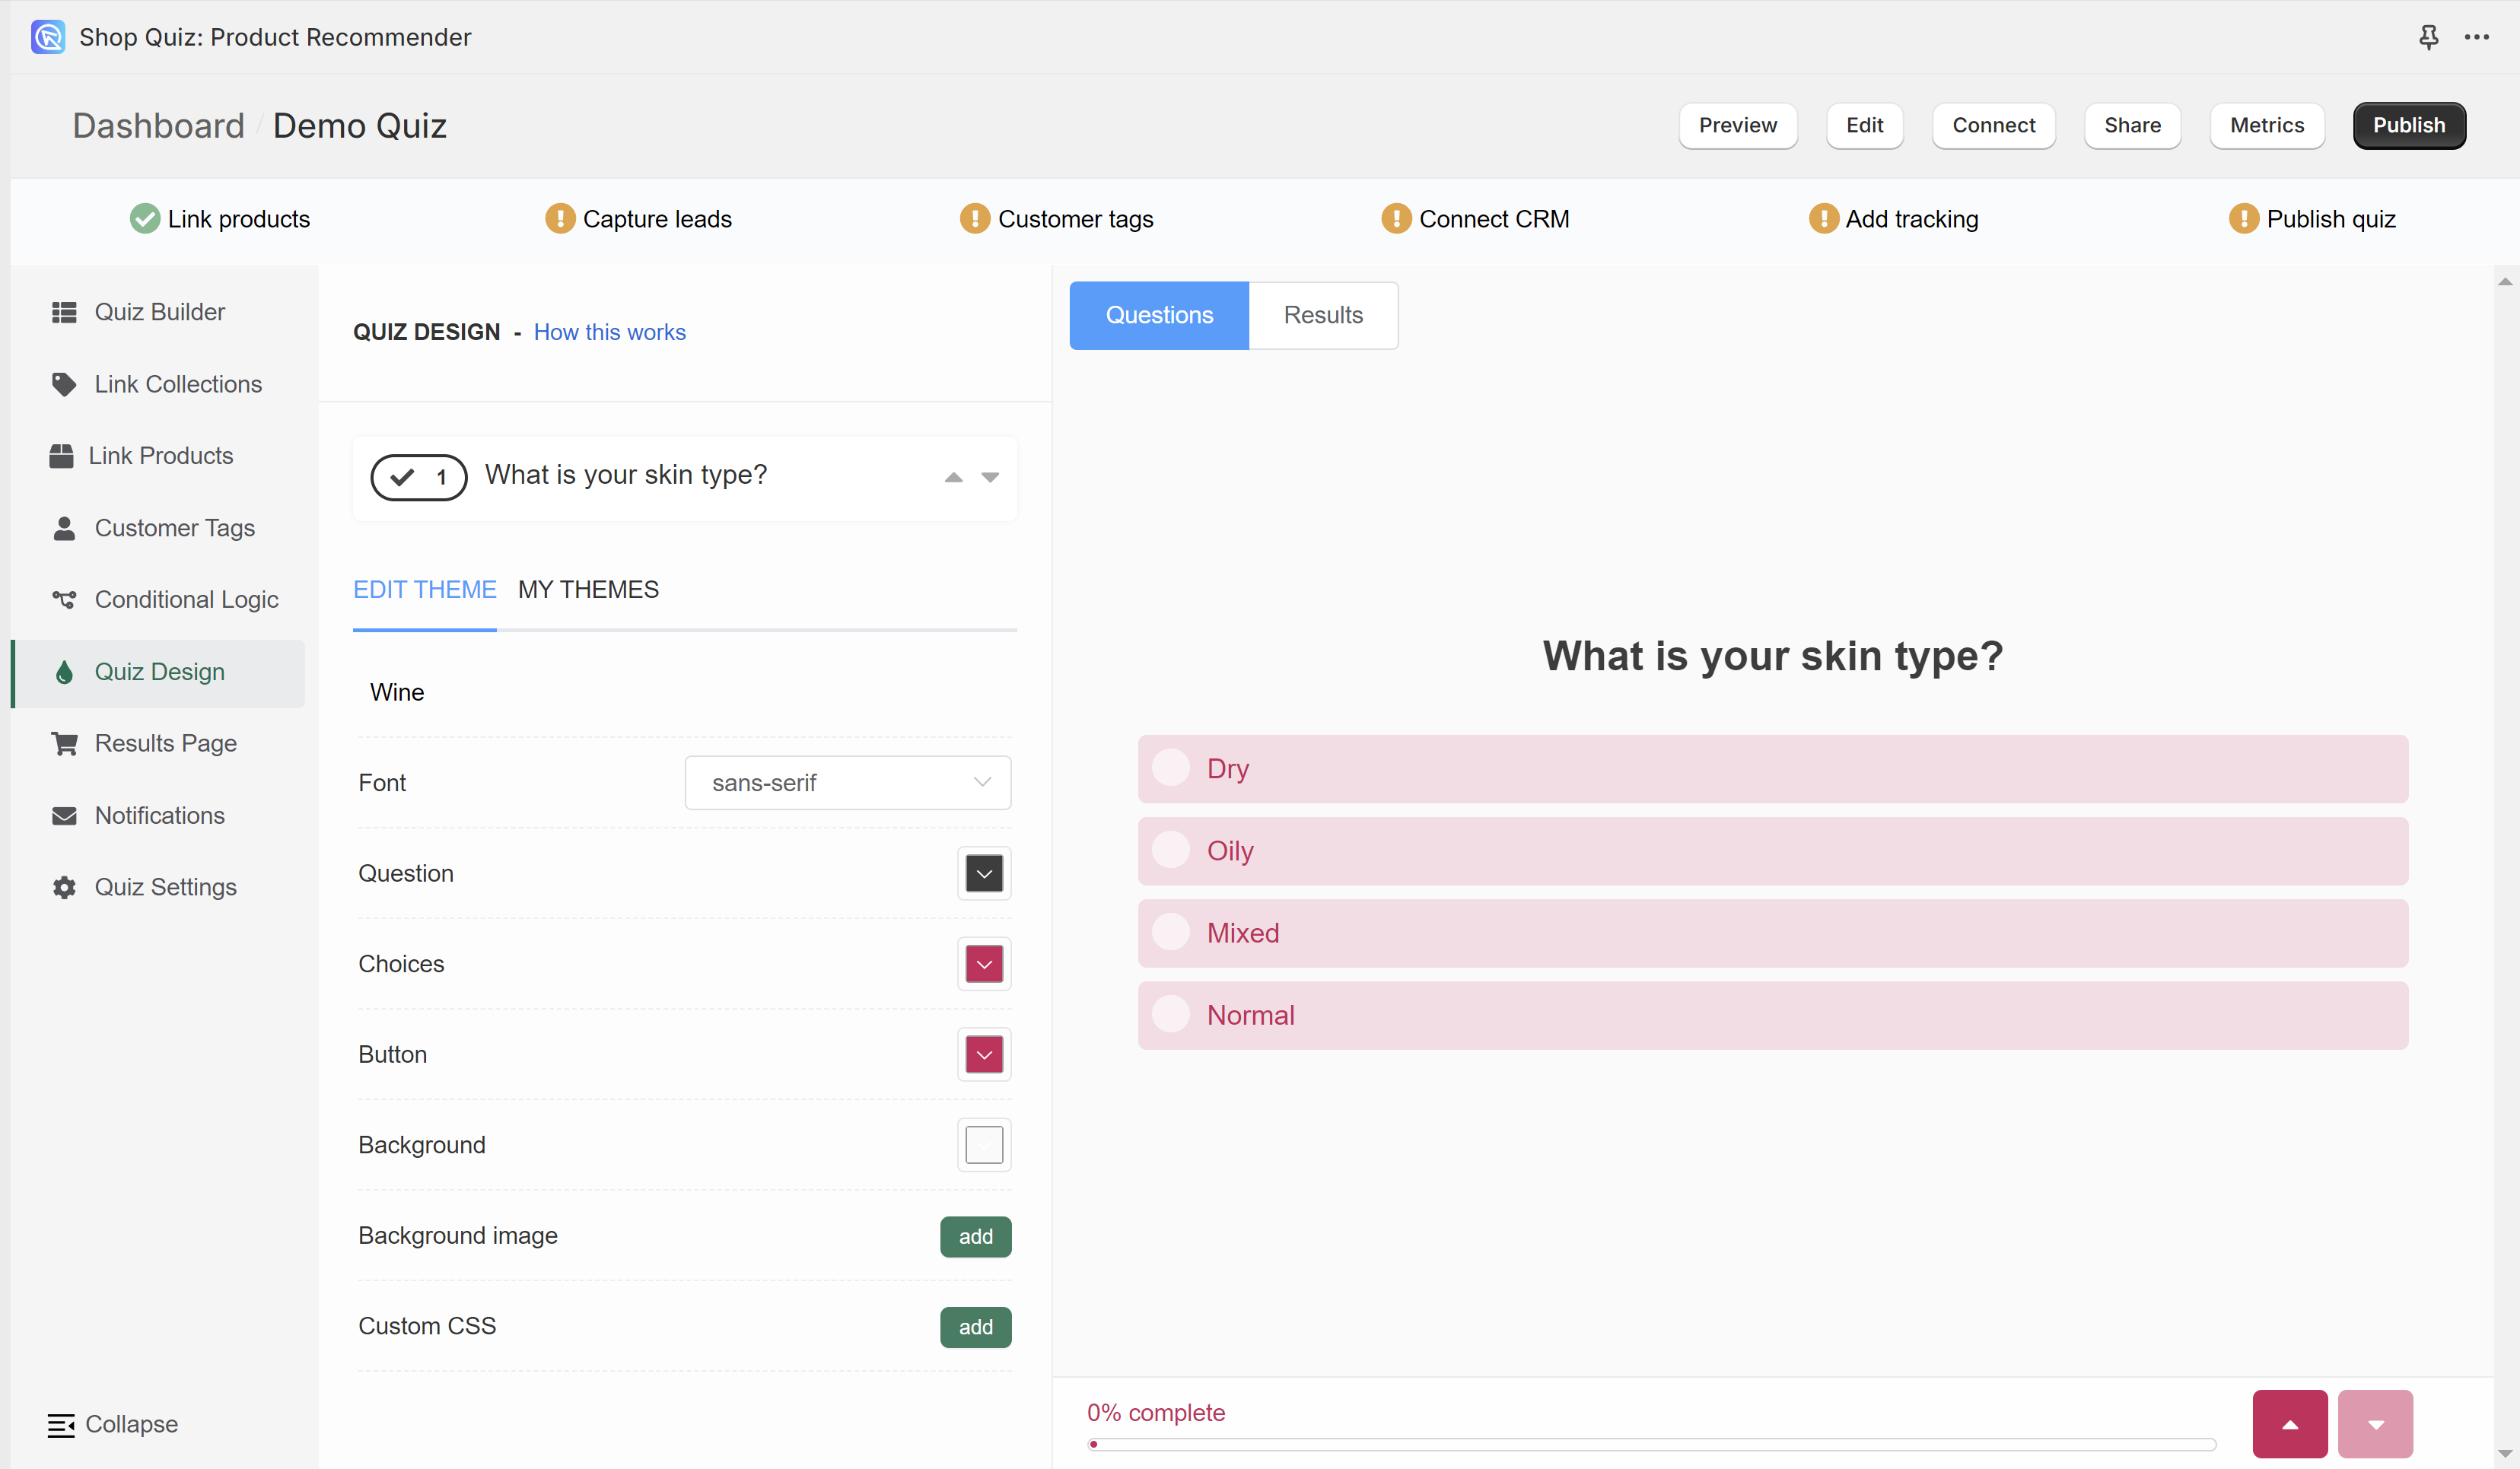
- Open the Quiz Design tab.
- In the My Themes gallery, you see some premade themes that you can choose from.
- Or you can create your own design by clicking Edit Theme.
- Match the quiz to your store's style:
- edit the font,
- change the background color,
- remove or add a background image,
- and change the color of the buttons and choices.
- Add custom CSS if you want the quiz to look like nothing else.
- Leave the design when you are happy with it. Your changes save automatically.
- Once you are done, you can change the name of your theme and it will be saved in My Themes gallery. You can then apply it to other quizzes that you create.
- Open the Quiz Design tab.
- In the My Themes gallery, you see some premade themes that you can choose from.
- Or you can create your own design by clicking Edit Theme.
- Match the quiz to your store's style:
- edit the font,
- change the background color,
- remove or add a background image,
- and change the color of the buttons and choices.
- Add custom CSS if you want the quiz to look like nothing else.
- Leave the design when you are happy with it. Your changes save automatically.
- Once you are done, you can change the name of your theme and it will be saved in My Themes gallery. You can then apply it to other quizzes that you create.
- Open the Quiz Design tab.
- In the My Themes gallery, you see some premade themes that you can choose from.
- Or you can create your own design by clicking Edit Theme.
- Match the quiz to your store's style:
- edit the font,
- change the background color,
- remove or add a background image,
- and change the color of the buttons and choices.
- Add custom CSS if you want the quiz to look like nothing else.
- Leave the design when you are happy with it. Your changes save automatically.
- Once you are done, you can change the name of your theme and it will be saved in My Themes gallery. You can then apply it to other quizzes that you create.
- Open the Quiz Design tab.
- In the My Themes gallery, you see some premade themes that you can choose from.
- Or you can create your own design by clicking Edit Theme.
- Match the quiz to your store's style:
- edit the font,
- change the background color,
- remove or add a background image,
- and change the color of the buttons and choices.
- Add custom CSS if you want the quiz to look like nothing else.
- Leave the design when you are happy with it. Your changes save automatically.
- Once you are done, you can change the name of your theme and it will be saved in My Themes gallery. You can then apply it to other quizzes that you create.
- Open the Quiz Design tab.
- In the My Themes gallery, you see some premade themes that you can choose from.
- Or you can create your own design by clicking Edit Theme.
- Match the quiz to your store's style:
- edit the font,
- change the background color,
- remove or add a background image,
- and change the color of the buttons and choices.
- Add custom CSS if you want the quiz to look like nothing else.
- Leave the design when you are happy with it. Your changes save automatically.
- Once you are done, you can change the name of your theme and it will be saved in My Themes gallery. You can then apply it to other quizzes that you create.
Linking products
Once you are happy with the design, add products to each question. This step matters.
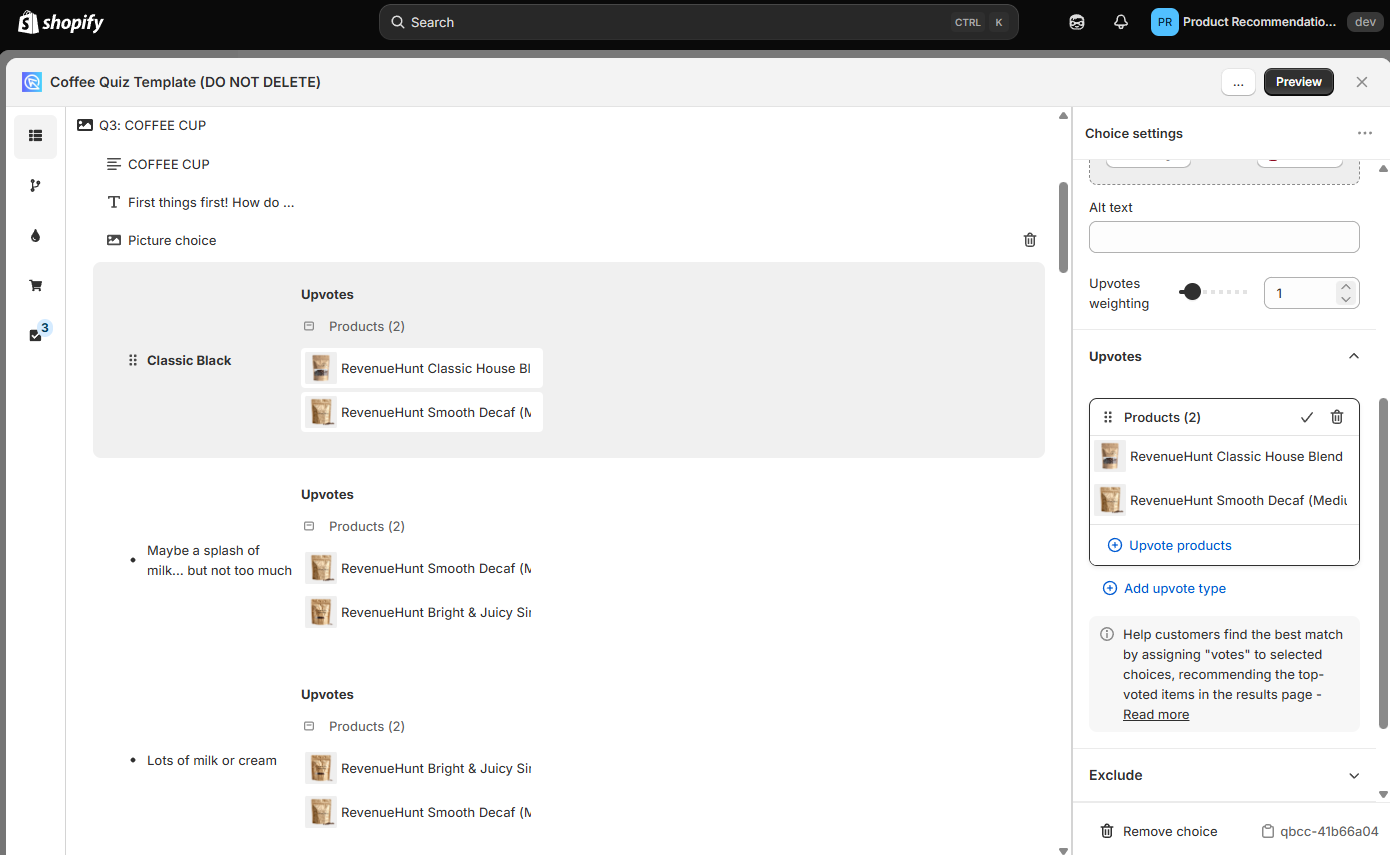
- Check the dashboard. It tells you when answers have no products linked to them.
- To add a product, open the choice settings and click on the Upvote section.
- Pick products from the list, by scrolling or by typing a name. The list holds your synced store products.
- Assign as many products to one answer as you need.
- The quiz works like an upvoting system.
- Products are linked to each choice.
- When a customer picks that choice, all linked products receive one upvote.
- After the customer takes the quiz, the results page will show the products sorted by the number of upvotes.
- If there is a draw in the number of upvotes, the order depends on your Catalog mode setting. By default, ties are randomized. Turn on
Preserve collection orderinApp settings > Catalogto show products in the same order as your Shopify collections.
- Link products to every question and choice in the quiz.
- Click
Save, thenPreviewto test different answering routes and their results.
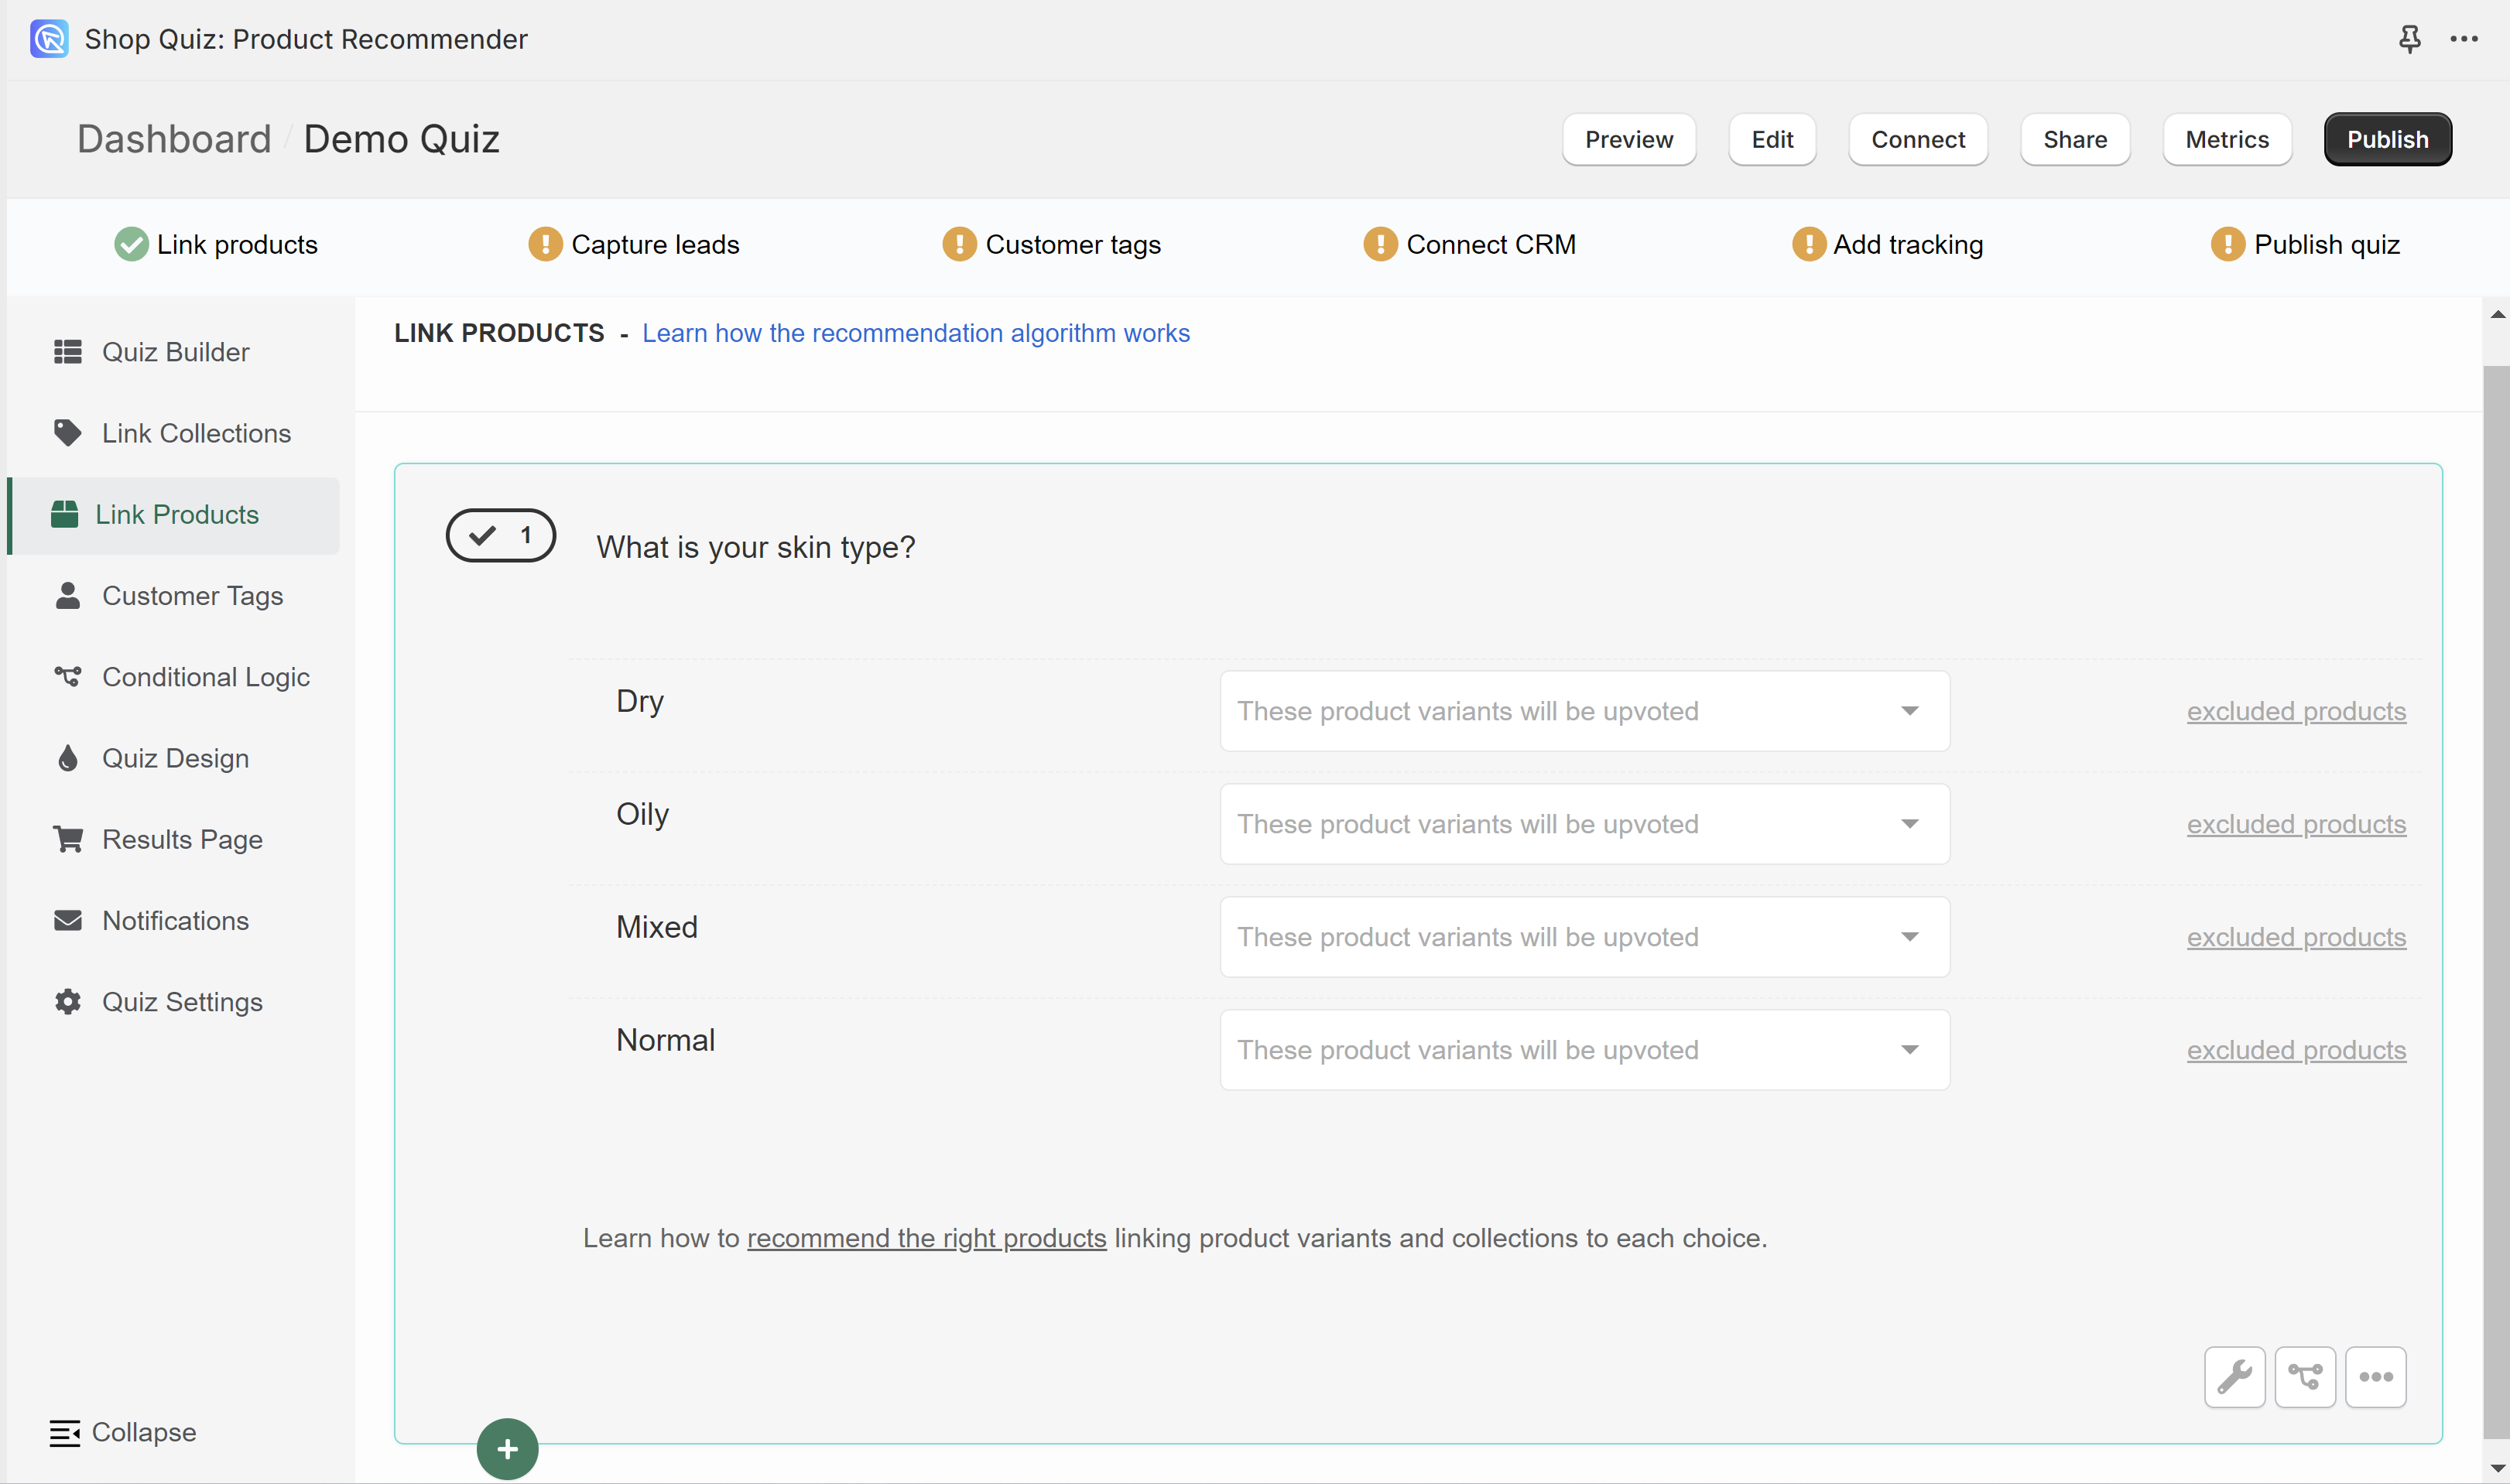
- Check the success checklist. It tells you when answers have no products linked to them.
- To add a product, go to the Link Products tab and click on the blank space after the answer.
- Pick products from the list, by scrolling or by typing a name. The list holds your synced store products.
- Assign as many products to one answer as you need.
- The quiz works like an upvoting system.
- Products are linked to each choice.
- When a customer picks that choice, all linked products receive one upvote.
- After the customer takes the quiz, the results page will show the products sorted by the number of upvotes.
- If there is a draw in the number of upvotes, the app will randomize the products.
- Link products to every question and choice in the quiz.
- Click
Publishto update the preview and the live quiz. Then clickPreviewto test different answering routes and results.
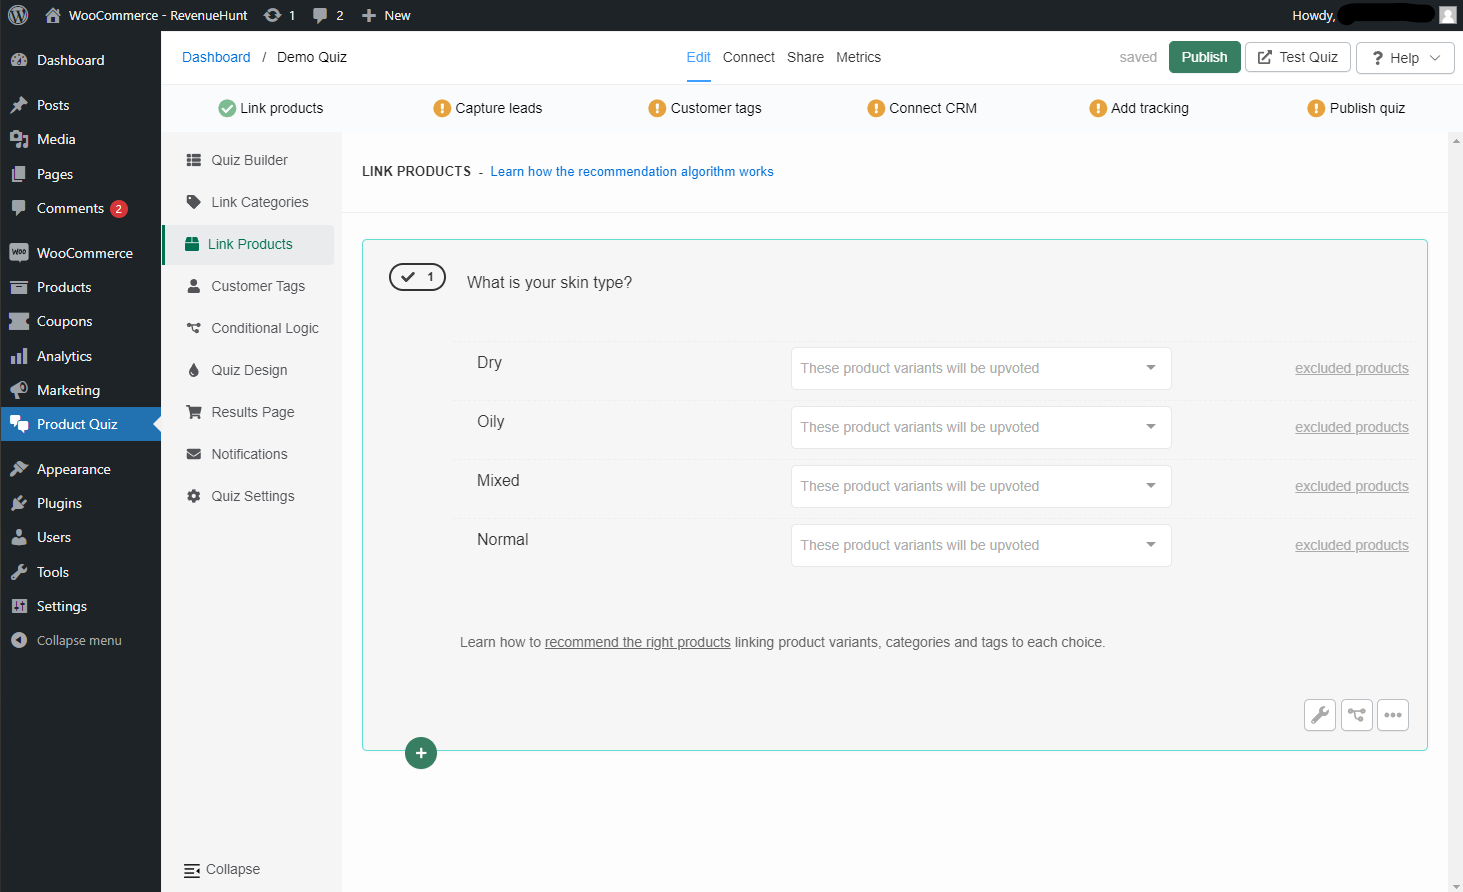
- Check the success checklist. It tells you when answers have no products linked to them.
- To add a product, go to the Link Products tab and click on the blank space after the answer.
- Pick products from the list, by scrolling or by typing a name. The list holds your synced store products.
- Assign as many products to one answer as you need.
- The quiz works like an upvoting system.
- Products are linked to each choice.
- When a customer picks that choice, all linked products receive one upvote.
- After the customer takes the quiz, the results page will show the products sorted by the number of upvotes.
- If there is a draw in the number of upvotes, the app will randomize the products.
- Link products to every question and choice in the quiz.
- Click
Publishto update the preview and the live quiz. Then clickPreviewto test different answering routes and results.
- Check the success checklist. It tells you when answers have no products linked to them.
- To add a product, go to the Link Products tab and click on the blank space after the answer.
- Pick products from the list, by scrolling or by typing a name. The list holds your synced store products.
- Assign as many products to one answer as you need.
- The quiz works like an upvoting system.
- Products are linked to each choice.
- When a customer picks that choice, all linked products receive one upvote.
- After the customer takes the quiz, the results page will show the products sorted by the number of upvotes.
- If there is a draw in the number of upvotes, the app will randomize the products.
- Link products to every question and choice in the quiz.
- Click
Publishto update the preview and the live quiz. Then clickPreviewto test different answering routes and results.
- Check the success checklist. It tells you when answers have no products linked to them.
- To add a product, go to the Link Products tab and click on the blank space after the answer.
- Pick products from the list, by scrolling or by typing a name. The list holds your synced store products.
- Assign as many products to one answer as you need.
- The quiz works like an upvoting system.
- Products are linked to each choice.
- When a customer picks that choice, all linked products receive one upvote.
- After the customer takes the quiz, the results page will show the products sorted by the number of upvotes.
- If there is a draw in the number of upvotes, the app will randomize the products.
- Link products to every question and choice in the quiz.
- Click
Publishto update the preview and the live quiz. Then clickPreviewto test different answering routes and results.
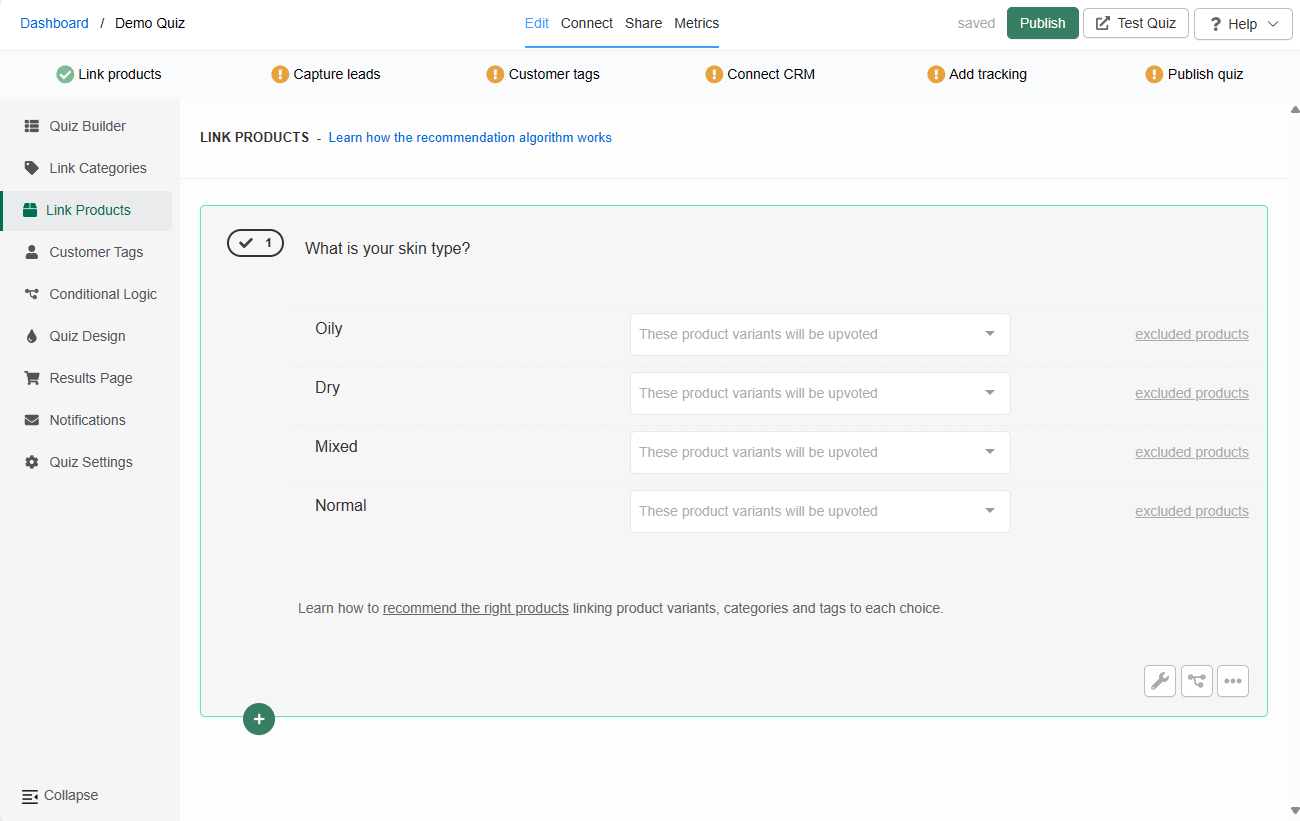
- Check the success checklist. It tells you when answers have no products linked to them.
- To add a product, go to the Link Products tab and click on the blank space after the answer.
- Pick products from the list, by scrolling or by typing a name. The list holds your synced store products.
- Assign as many products to one answer as you need.
- The quiz works like an upvoting system.
- Products are linked to each choice.
- When a customer picks that choice, all linked products receive one upvote.
- After the customer takes the quiz, the results page will show the products sorted by the number of upvotes.
- If there is a draw in the number of upvotes, the app will randomize the products.
- Link products to every question and choice in the quiz.
- Click
Publishto update the preview and the live quiz. Then clickPreviewto test different answering routes and results.
Editing the results page
Speaking of results. Make sure to also edit the Results Page.
- As in the Quiz builder, you can add multiple sections to your Results page by clicking on the
Results Pagetab. -
Click on the
+ Add Blockbutton to select a block type.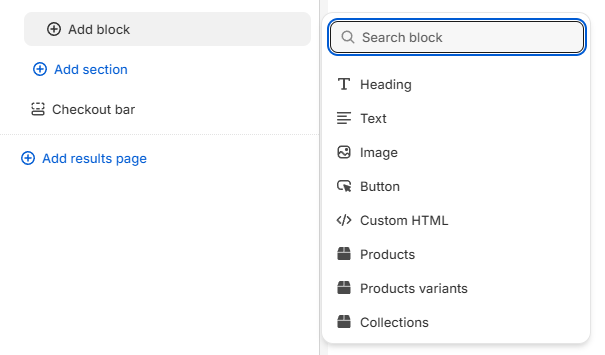 - In
- In text blocks, you can write insightful information about the product recommended. - With animage block, you can add your brand's logo. - In thebutton block, you can add a button to a custom URL. - In theProducts block, you can select how many products will be recommended.
- Add sections to your Results Page, the same way you do in the Quiz Builder.
-
Click on a
+plus sign to select a block type.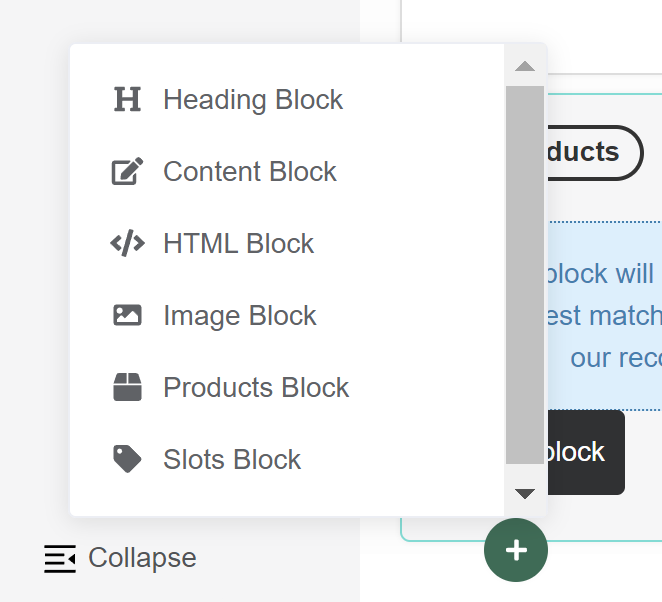 - In
- In content blocks, you can write insightful information about the product recommended. - With animage block, you can add your brand's logo. - In theProducts block, you can select how many products will be recommended. -
You can use the Markdown language to make your quiz pop. Markdown lets you add bold or emphasis to your text. You can also insert links, images and videos. For more about Markdown, see how to use markdown language.
- The Results Page settings let you add a background image to the quiz.
- Add sections to your Results Page, the same way you do in the Quiz Builder.
-
Click on a
+plus sign to select a block type.
- In content blocks, you can write insightful information about the product recommended. - With animage block, you can add your brand's logo. - In theProducts block, you can select how many products will be recommended. -
You can use the Markdown language to make your quiz pop. Markdown lets you add bold or emphasis to your text. You can also insert links, images and videos. For more about Markdown, see how to use markdown language.
- The Results Page settings let you add a background image to the quiz.
- Add sections to your Results Page, the same way you do in the Quiz Builder.
-
Click on a
+plus sign to select a block type.
- In content blocks, you can write insightful information about the product recommended. - With animage block, you can add your brand's logo. - In theProducts block, you can select how many products will be recommended. -
You can use the Markdown language to make your quiz pop. Markdown lets you add bold or emphasis to your text. You can also insert links, images and videos. For more about Markdown, see how to use markdown language.
- The Results Page settings let you add a background image to the quiz.
- Add sections to your Results Page, the same way you do in the Quiz Builder.
-
Click on a
+plus sign to select a block type.
- In content blocks, you can write insightful information about the product recommended. - With animage block, you can add your brand's logo. - In theProducts block, you can select how many products will be recommended. -
You can use the Markdown language to make your quiz pop. Markdown lets you add bold or emphasis to your text. You can also insert links, images and videos. For more about Markdown, see how to use markdown language.
- The Results Page settings let you add a background image to the quiz.
- Add sections to your Results Page, the same way you do in the Quiz Builder.
-
Click on a
+plus sign to select a block type.
- In content blocks, you can write insightful information about the product recommended. - With animage block, you can add your brand's logo. - In theProducts block, you can select how many products will be recommended. -
You can use the Markdown language to make your quiz pop. Markdown lets you add bold or emphasis to your text. You can also insert links, images and videos. For more about Markdown, see how to use markdown language.
- The Results Page settings let you add a background image to the quiz.
Publishing the quiz
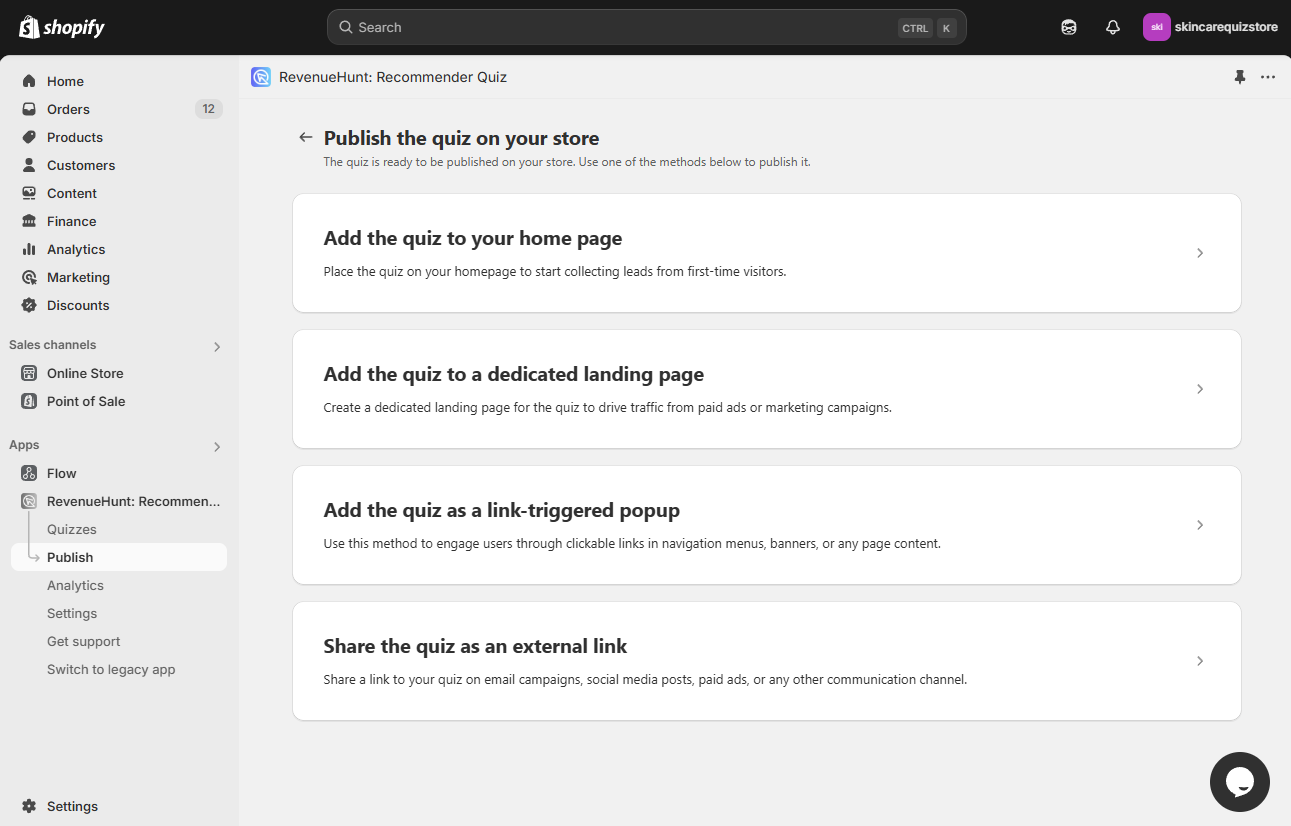
- Once your quiz is set up, go to your Dashboard and click
Make default. - Go to the
Publishsection to see all the publishing options. - For example, you can embed a link to the quiz in your website's menu.
- In Shopify, go to
Online Store > Themesand clickCustomize. - Under
App embeds, findLink Popup Quizand activate it. - In the settings, adjust the quiz width and height. Then click
Save. - In Shopify, go to
Content > Menus, select the main menu and click+ Add menu item. - In the
Titlefield, enter a title such asTake our Quiz. Under thelinksection, type#quizand click the link to accept it. - Save the menu.
- Test the quiz on your live site by clicking the link in the menu.
You are done.
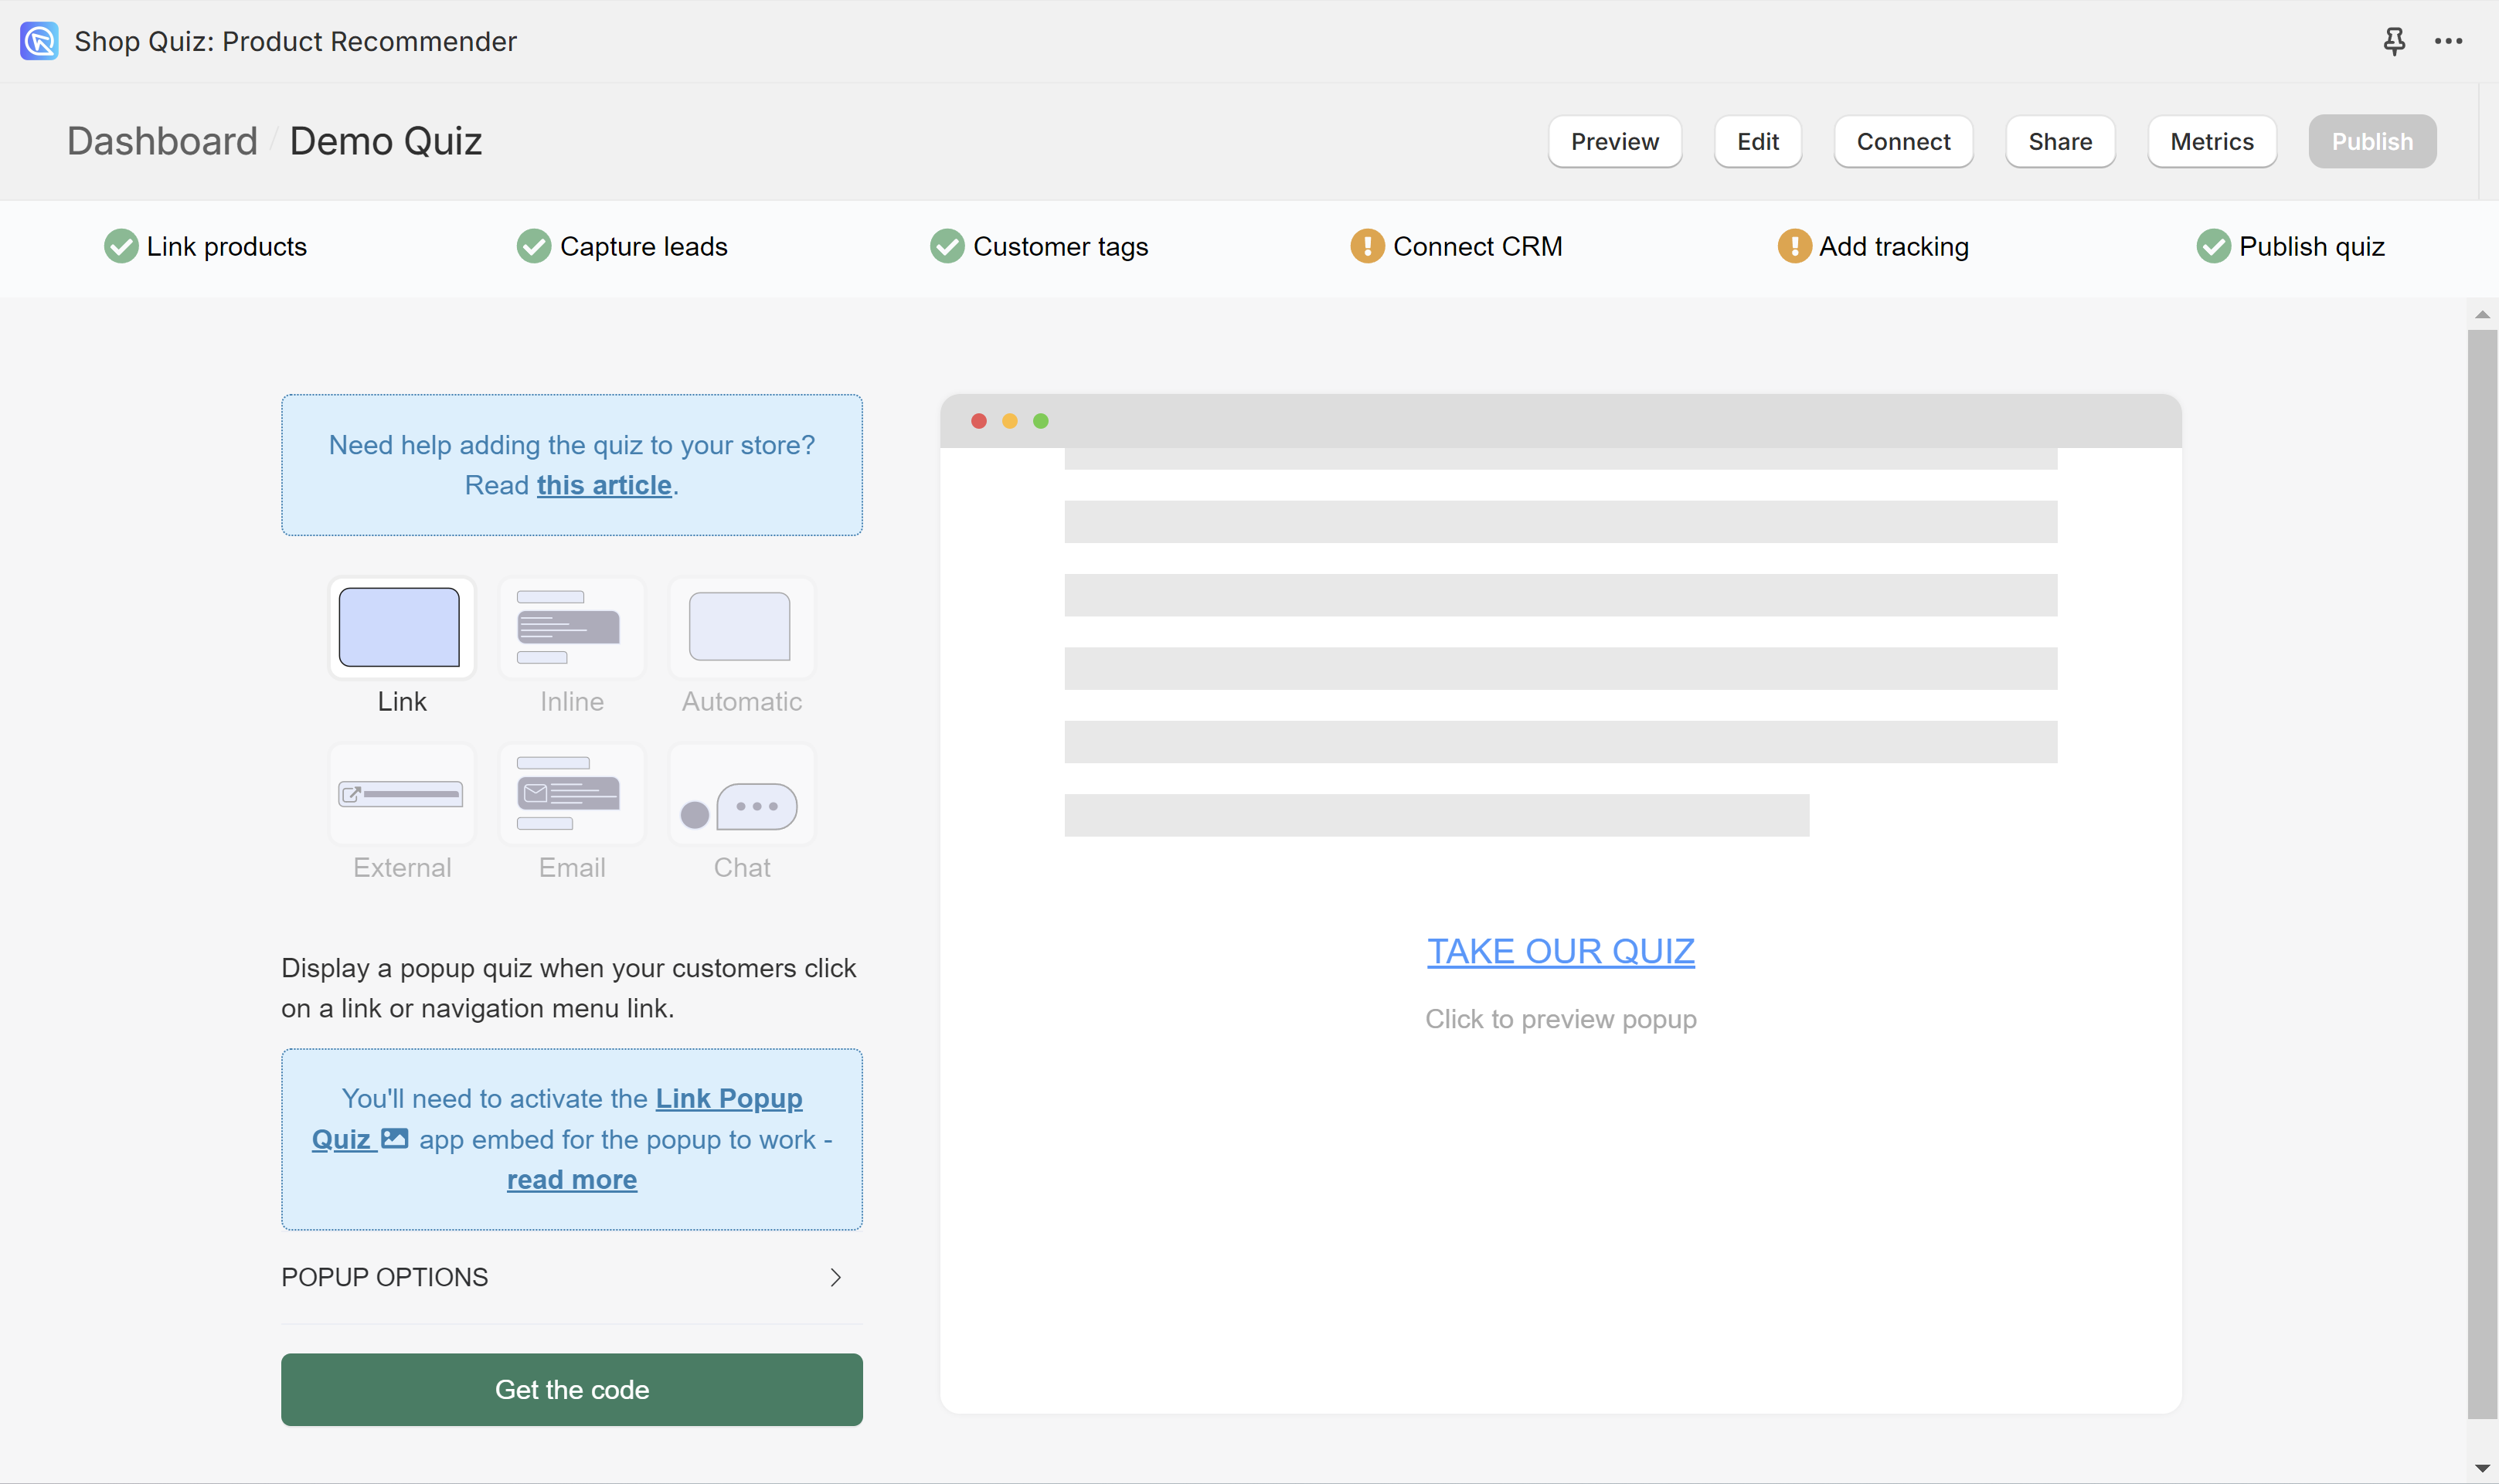
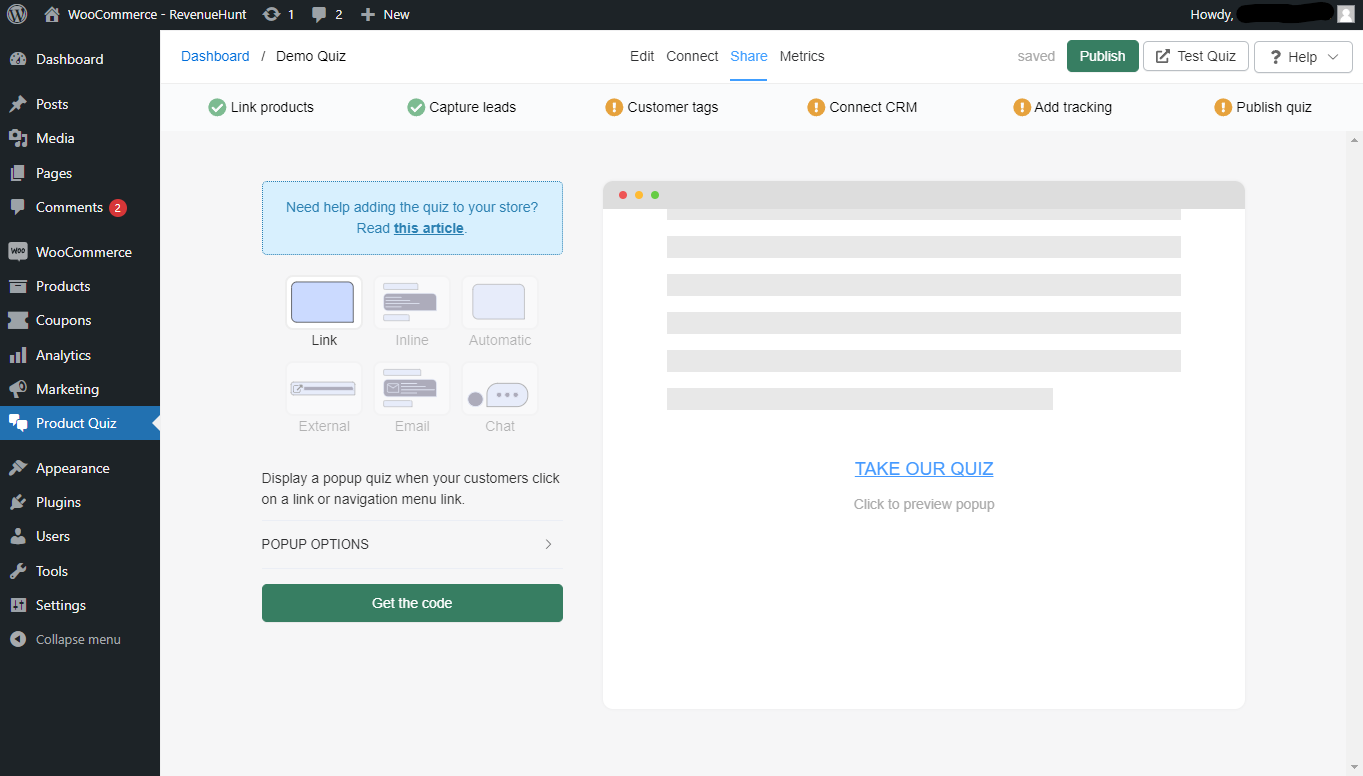
- Once your quiz is set up, click
Sharein the top right corner. It shows every publishing option. - For example, you can embed a link to the quiz in your website's menu.
- Adjust the quiz's width and height and generate a code.
- In your website's menu, you can add a new section and paste the code.
You have created your first Product Recommendation Quiz.
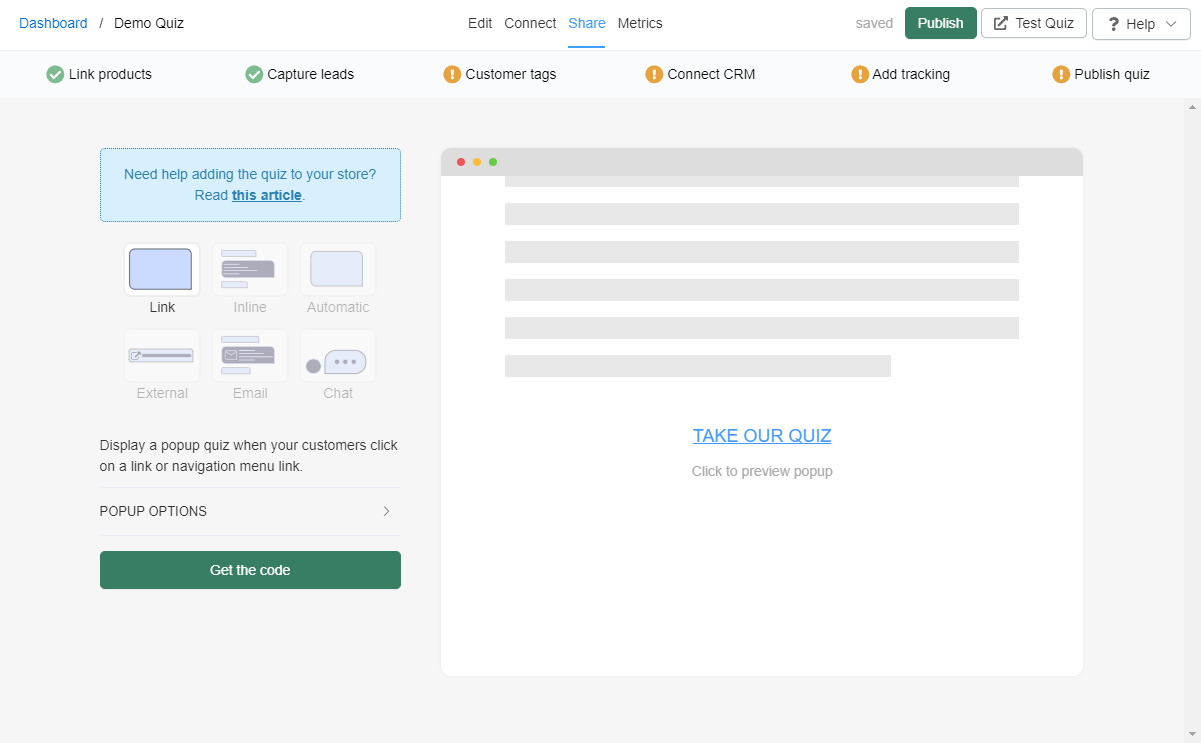
- Once your quiz is set up, click
Sharein the top right corner. It shows every publishing option. - For example, you can embed a link to the quiz in your website's menu.
- Adjust the quiz's width and height and generate a code.
- In your website's menu, you can add a new section and paste the code.
You have created your first Product Recommendation Quiz.
- Once your quiz is set up, click
Sharein the top right corner. It shows every publishing option. - For example, you can embed a link to the quiz in your website's menu.
- Adjust the quiz's width and height and generate a code.
- In your website's menu, you can add a new section and paste the code.
You have created your first Product Recommendation Quiz.
- Once your quiz is set up, click
Sharein the top right corner. It shows every publishing option. - For example, you can embed a link to the quiz in your website's menu.
- Adjust the quiz's width and height and generate a code.
- In your website's menu, you can add a new section and paste the code.
You have created your first Product Recommendation Quiz.
- Once your quiz is set up, click
Sharein the top right corner. It shows every publishing option. - For example, you can embed a link to the quiz in your website's menu.
- Adjust the quiz's width and height and generate a code.
- In your website's menu, you can add a new section and paste the code.
You have created your first Product Recommendation Quiz.
This article has a step-by-step video tutorial. It shows how to create a short quiz that recommends the best skincare product to a customer.