How to Add and Adjust Images in the Quiz
A quiz can carry images in five places, and each one is set up differently.
This article explains how to add each kind, and how to keep the images sharp on every screen.
Images in the quiz
-
Quiz background image sits behind the whole quiz. You upload it in the Quiz design tab.
-
Question background or split image sits behind one question, or beside it. You upload it in the question settings.
-
Image block places a single picture inside a question or on the results page.
-
Picture choice gives every choice in a multiple-choice question its own image. See the Picture choice block.
-
Product image comes from your catalog, and shows in a Product, Variants or Collection block on the results page.
Quiz background image
The background image sits behind the whole quiz. You upload it in the Quiz design tab.
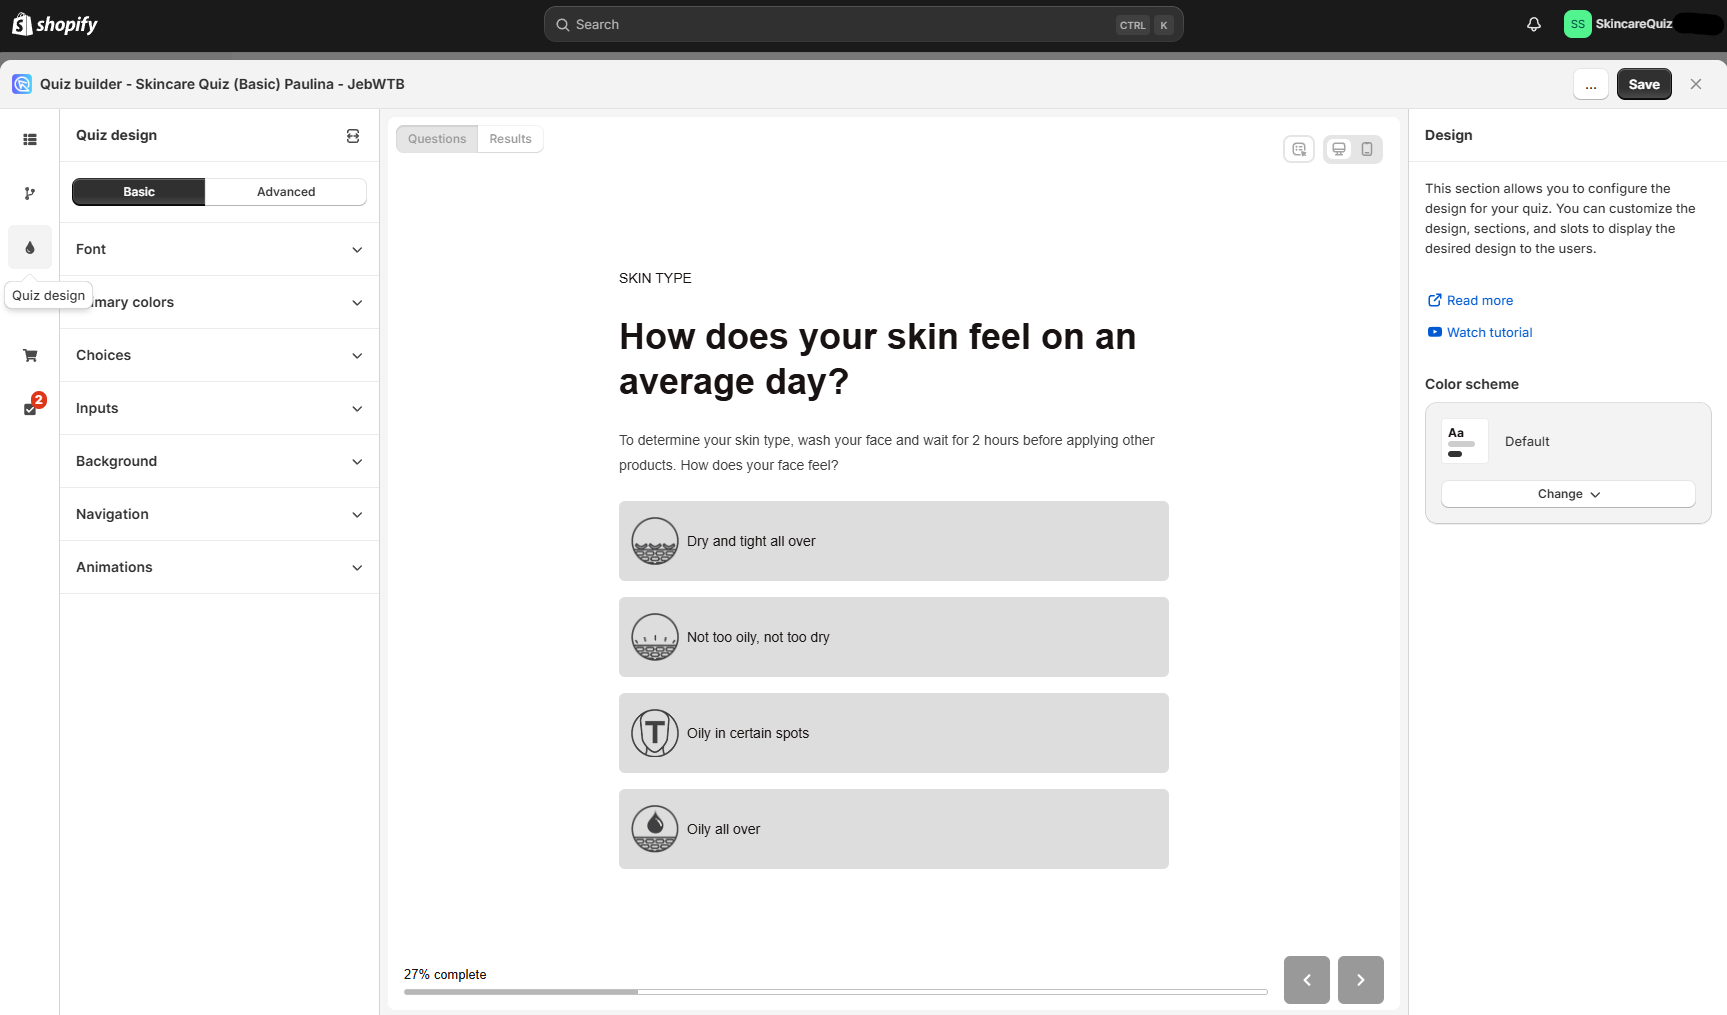
-
Open the Quiz design tab.
-
Click
Background.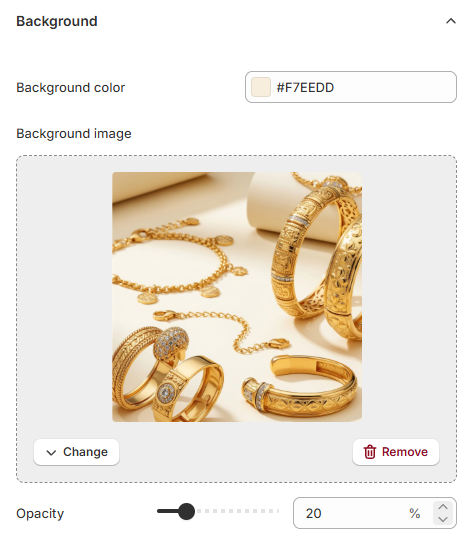
-
Click the color to change the background color.
Pick the color before the image
The background color shows through the image once you lower its opacity. A light color leaves the image clearer, a dark one makes it subtler.
-
Click
Select imageand upload the background image. -
Set how strongly it shows with the opacity slider.
-
Click
Changeto swap the image later, orRemoveto take it out.
Background images on small screens
The quiz is responsive, so it adjusts to desktop, tablet and mobile screens. The same image can crop or scale differently on each one.
- Use a large, high-resolution image, at least 1920x1080px.
- Avoid images with text in them, because the text can be cut off.
- Keep anything that matters, such as a logo, near the center.
- Choose soft, neutral pictures that do not compete with the quiz text.
- Open the quiz on a phone and a desktop before you publish it.
A plain background usually survives every screen size best.
The background image sits behind the whole quiz. You upload it in the Quiz Design tab.
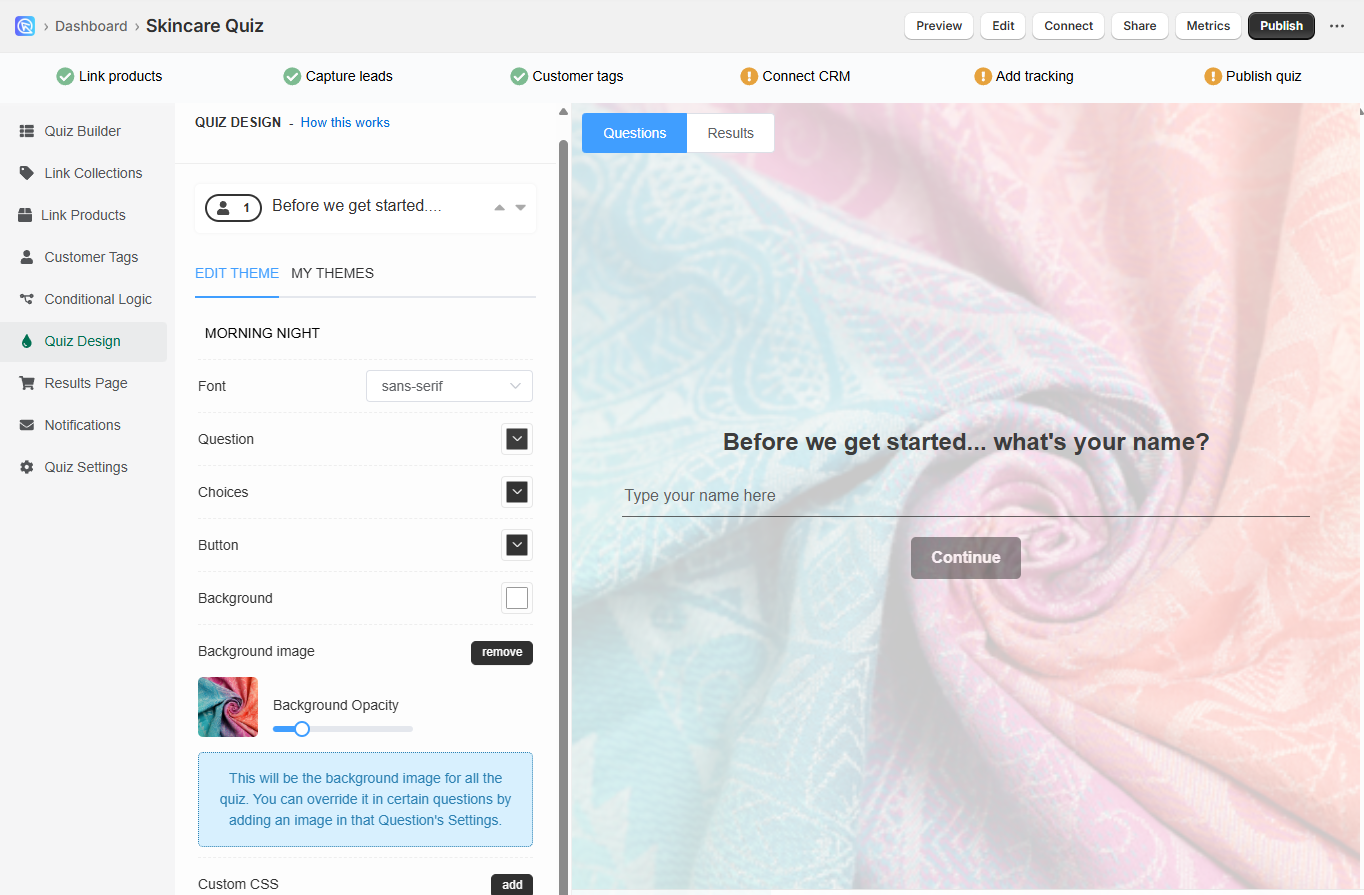
-
Open your quiz and go to the Quiz Design tab. It controls how the Questions and the Results Page look.
-
Open the theme editor. It holds the color palette, the font and the background image.
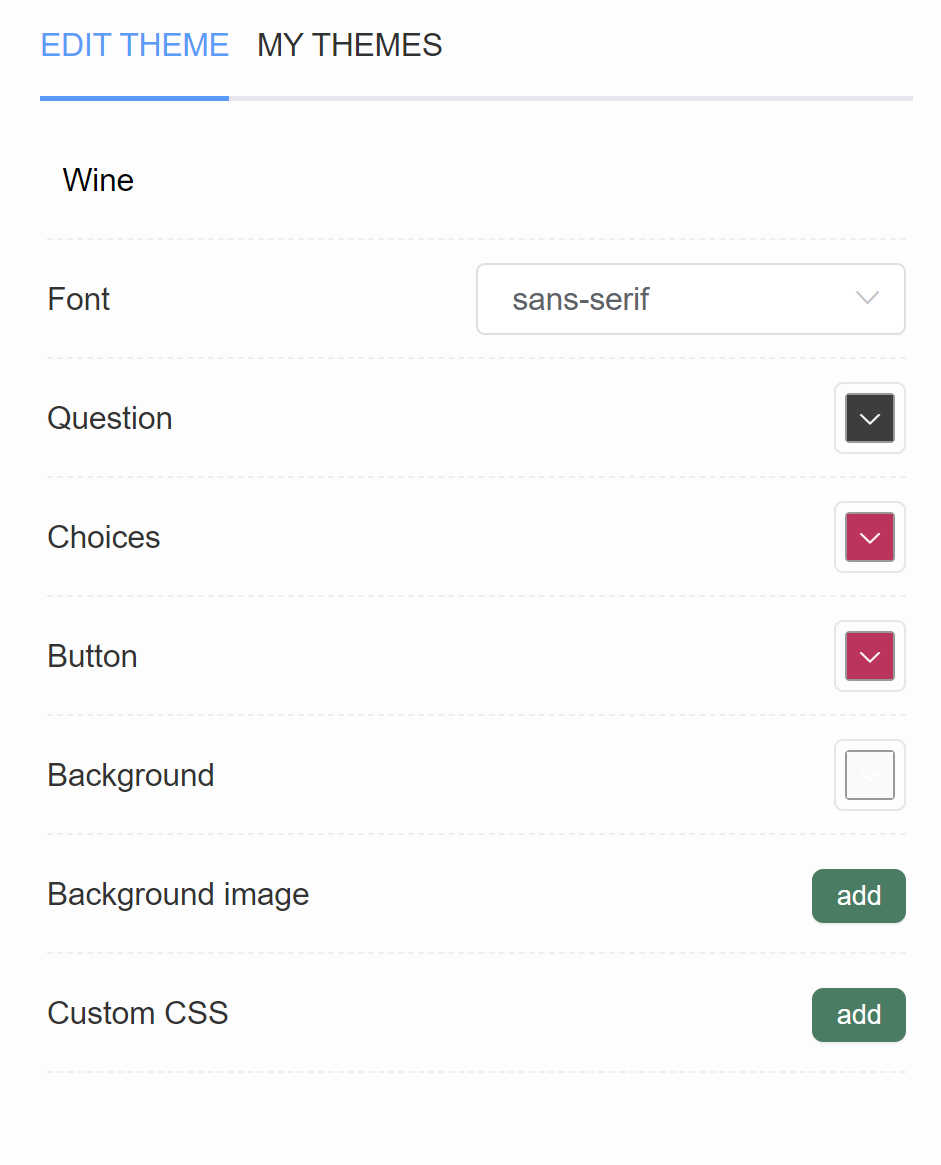
-
Click
Backgroundand pick the background color. To use a color of your own, paste its hex code, for example #ecb3b3. -
Click
Addnext toBackground imageand upload the image. It can be up to 1000x1000px and 2MB. A further menu appears once an image is there. -
Set how strongly it shows with the
Background Opacityslider.
Background images on small screens
The quiz is responsive, so it adjusts to desktop, tablet and mobile screens. The same image can crop or scale differently on each one.
- Use a high-resolution image, up to 1000x1000px and 2MB.
- Avoid images with text in them, because the text can be cut off.
- Keep anything that matters, such as a logo, near the center.
- Choose soft, neutral pictures that do not compete with the quiz text.
- Open the quiz on a phone and a desktop before you publish it.
A plain background usually survives every screen size best.
A background image at a higher resolution
The Custom CSS console in the Quiz Design tab can load a background image at whatever resolution you want.
A different image on mobile and desktop
The Custom CSS console can also load a different image per screen size. A developer writes a media query for the smaller screen.
The background image sits behind the whole quiz. You upload it in the Quiz Design tab.
-
Open your quiz and go to the Quiz Design tab. It controls how the Questions and the Results Page look.
-
Open the theme editor. It holds the color palette, the font and the background image.
-
Click
Backgroundand pick the background color. To use a color of your own, paste its hex code, for example #ecb3b3. -
Click
Addnext toBackground imageand upload the image. It can be up to 1000x1000px and 2MB. A further menu appears once an image is there. -
Set how strongly it shows with the
Background Opacityslider.
Background images on small screens
The quiz is responsive, so it adjusts to desktop, tablet and mobile screens. The same image can crop or scale differently on each one.
- Use a high-resolution image, up to 1000x1000px and 2MB.
- Avoid images with text in them, because the text can be cut off.
- Keep anything that matters, such as a logo, near the center.
- Choose soft, neutral pictures that do not compete with the quiz text.
- Open the quiz on a phone and a desktop before you publish it.
A plain background usually survives every screen size best.
A background image at a higher resolution
The Custom CSS console in the Quiz Design tab can load a background image at whatever resolution you want.
A different image on mobile and desktop
The Custom CSS console can also load a different image per screen size. A developer writes a media query for the smaller screen.
The background image sits behind the whole quiz. You upload it in the Quiz Design tab.
-
Open your quiz and go to the Quiz Design tab. It controls how the Questions and the Results Page look.
-
Open the theme editor. It holds the color palette, the font and the background image.
-
Click
Backgroundand pick the background color. To use a color of your own, paste its hex code, for example #ecb3b3. -
Click
Addnext toBackground imageand upload the image. It can be up to 1000x1000px and 2MB. A further menu appears once an image is there. -
Set how strongly it shows with the
Background Opacityslider.
Background images on small screens
The quiz is responsive, so it adjusts to desktop, tablet and mobile screens. The same image can crop or scale differently on each one.
- Use a high-resolution image, up to 1000x1000px and 2MB.
- Avoid images with text in them, because the text can be cut off.
- Keep anything that matters, such as a logo, near the center.
- Choose soft, neutral pictures that do not compete with the quiz text.
- Open the quiz on a phone and a desktop before you publish it.
A plain background usually survives every screen size best.
A background image at a higher resolution
The Custom CSS console in the Quiz Design tab can load a background image at whatever resolution you want.
A different image on mobile and desktop
The Custom CSS console can also load a different image per screen size. A developer writes a media query for the smaller screen.
The background image sits behind the whole quiz. You upload it in the Quiz Design tab.
-
Open your quiz and go to the Quiz Design tab. It controls how the Questions and the Results Page look.
-
Open the theme editor. It holds the color palette, the font and the background image.
-
Click
Backgroundand pick the background color. To use a color of your own, paste its hex code, for example #ecb3b3. -
Click
Addnext toBackground imageand upload the image. It can be up to 1000x1000px and 2MB. A further menu appears once an image is there. -
Set how strongly it shows with the
Background Opacityslider.
Background images on small screens
The quiz is responsive, so it adjusts to desktop, tablet and mobile screens. The same image can crop or scale differently on each one.
- Use a high-resolution image, up to 1000x1000px and 2MB.
- Avoid images with text in them, because the text can be cut off.
- Keep anything that matters, such as a logo, near the center.
- Choose soft, neutral pictures that do not compete with the quiz text.
- Open the quiz on a phone and a desktop before you publish it.
A plain background usually survives every screen size best.
A background image at a higher resolution
The Custom CSS console in the Quiz Design tab can load a background image at whatever resolution you want.
A different image on mobile and desktop
The Custom CSS console can also load a different image per screen size. A developer writes a media query for the smaller screen.
The background image sits behind the whole quiz. You upload it in the Quiz Design tab.
-
Open your quiz and go to the Quiz Design tab. It controls how the Questions and the Results Page look.
-
Open the theme editor. It holds the color palette, the font and the background image.
-
Click
Backgroundand pick the background color. To use a color of your own, paste its hex code, for example #ecb3b3. -
Click
Addnext toBackground imageand upload the image. It can be up to 1000x1000px and 2MB. A further menu appears once an image is there. -
Set how strongly it shows with the
Background Opacityslider.
Background images on small screens
The quiz is responsive, so it adjusts to desktop, tablet and mobile screens. The same image can crop or scale differently on each one.
- Use a high-resolution image, up to 1000x1000px and 2MB.
- Avoid images with text in them, because the text can be cut off.
- Keep anything that matters, such as a logo, near the center.
- Choose soft, neutral pictures that do not compete with the quiz text.
- Open the quiz on a phone and a desktop before you publish it.
A plain background usually survives every screen size best.
A background image at a higher resolution
The Custom CSS console in the Quiz Design tab can load a background image at whatever resolution you want.
A different image on mobile and desktop
The Custom CSS console can also load a different image per screen size. A developer writes a media query for the smaller screen.
Question background/split image
Each question can carry its own image, either behind the question or beside it. You upload it in the question settings.
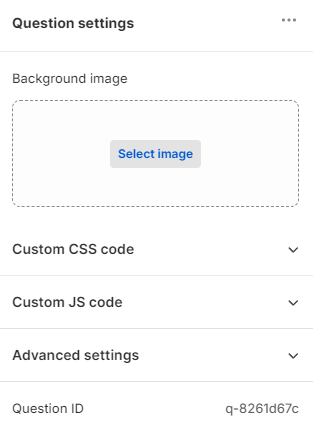
-
Open the question settings.
-
Click
Image upload. -
Click
Select imageand upload the image. You can also pick one you have already used, from the quiz gallery. -
Choose
backgroundorsplitunderImage position. A background image sits behind the question, a split image takes half the screen.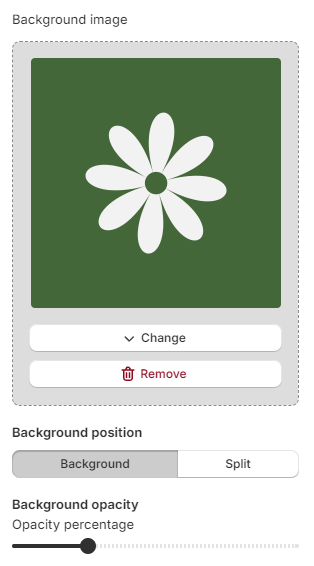
-
Set how strongly it shows with the
Image opacityslider. -
Click
Changeto swap the image later, orRemoveto take it out.
Question images on small screens
The quiz is responsive, so it adjusts to desktop, tablet and mobile screens. The same image can crop or scale differently on each one.
- Use a large, high-resolution image, at least 1920x1080px.
- Avoid images with text in them, because the text can be cut off.
- Keep anything that matters, such as a logo, near the center.
- Choose soft, neutral pictures that do not compete with the quiz text.
- Open the quiz on a phone and a desktop before you publish it.
A plain background usually survives every screen size best.
The background and split image settings
Background image
Layout - Place the image behind the question as a background, or split the screen in half with it.
Opacity - Sets how strongly the image shows.
Split image
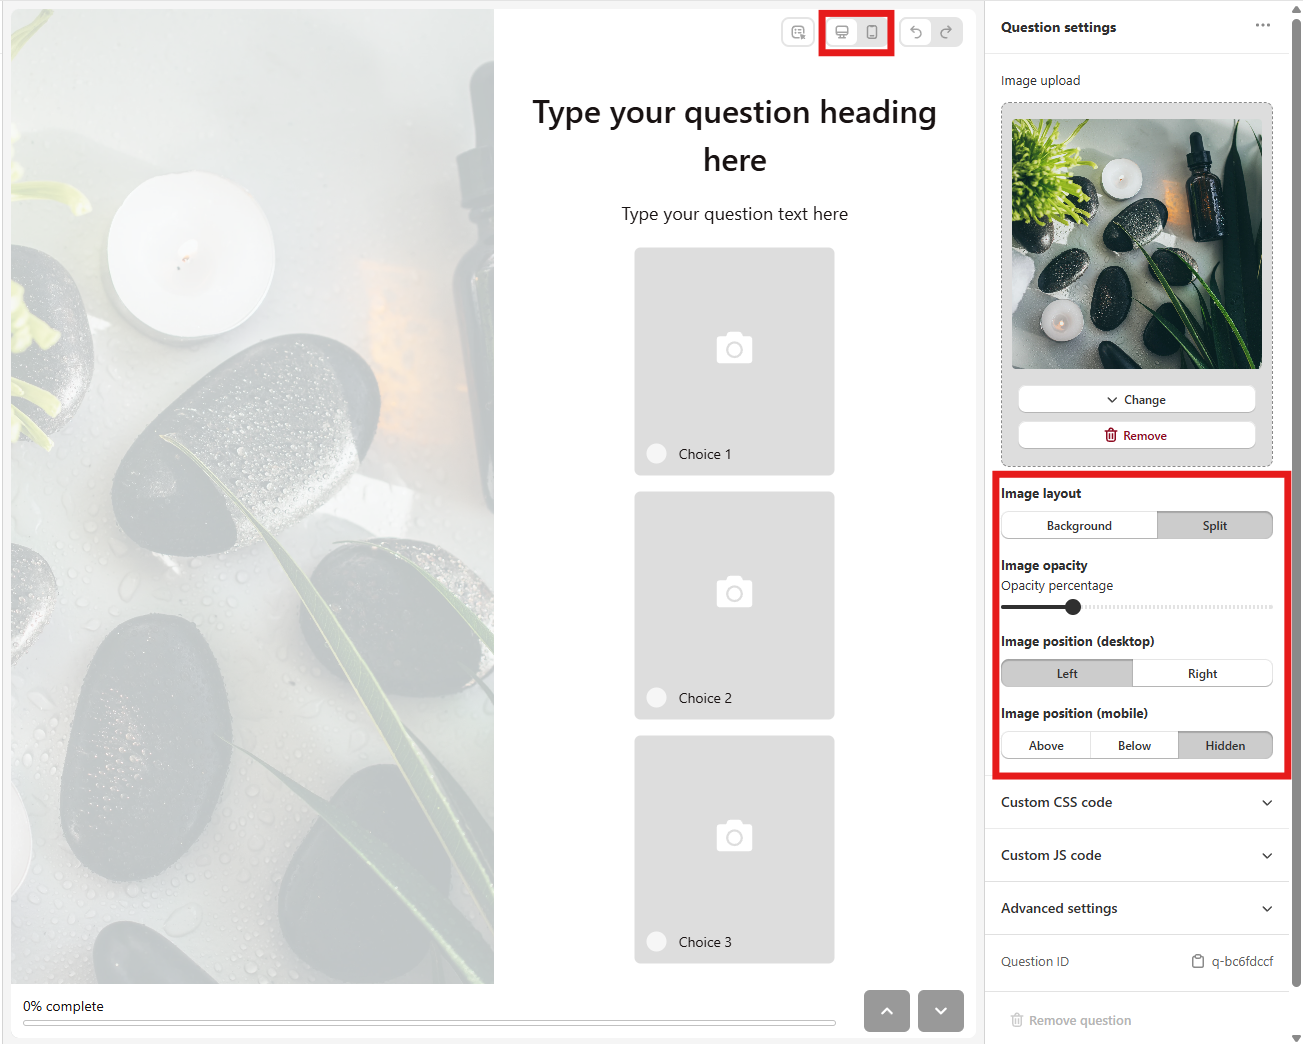
Layout - Place the image behind the question as a background, or split the screen in half with it.
Opacity - Sets how strongly the image shows.
Position (desktop) - Put the image left or right of the question on a desktop.
Position (mobile) - Put the image above or below the question on a phone, or hidden.
Switch between the two views with the desktop and mobile icons above the preview.
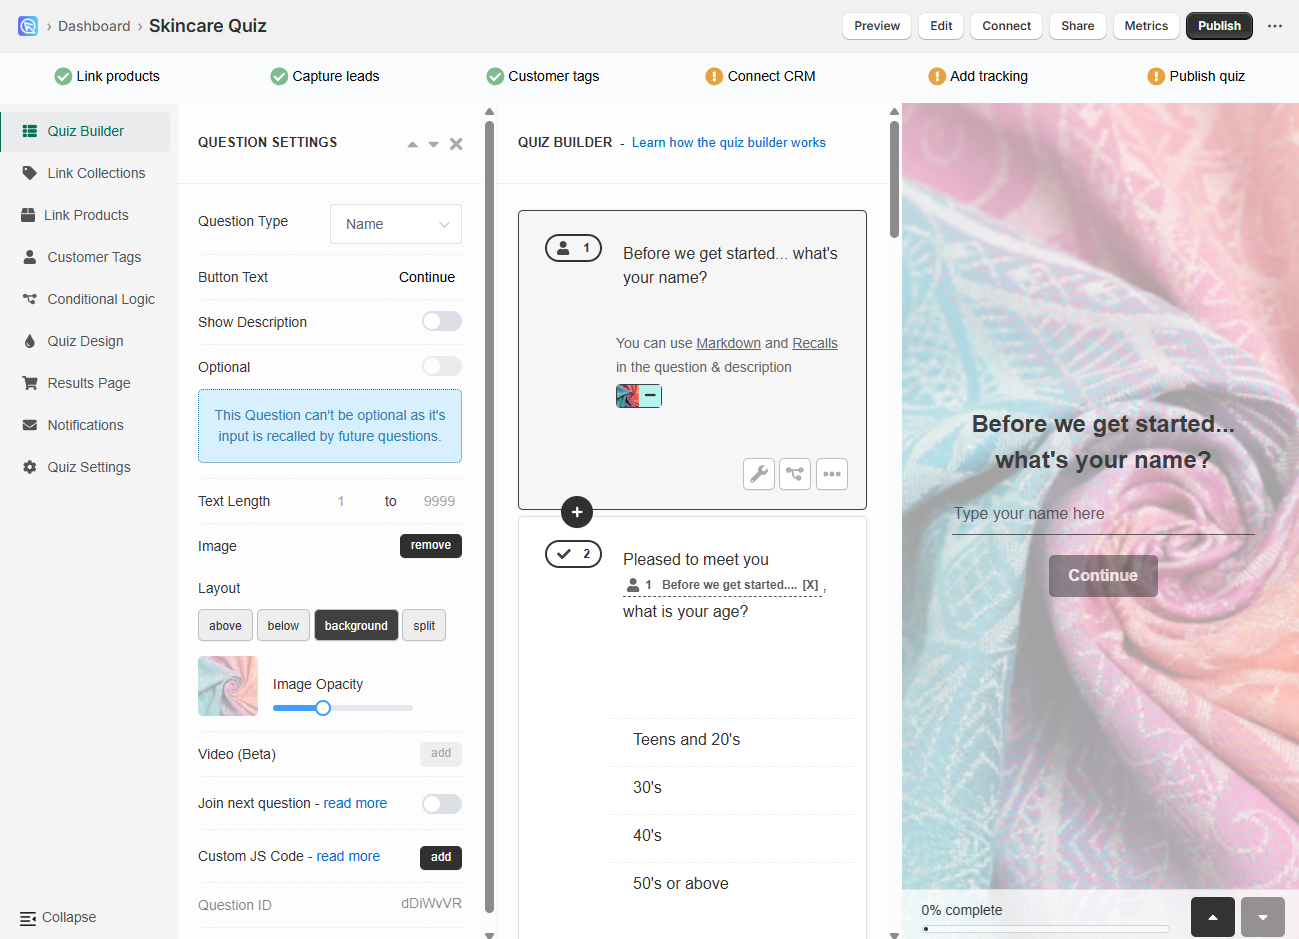
Each question can carry its own image, either behind the question or beside it. You upload it in the question settings.
-
Go to the Quiz Builder and click the question you want to illustrate.
-
Click the
wrenchicon to open the question settings. -
Find the
Imagesection and clickAddto upload the image. It can be up to 1000x1000px. A further menu appears once an image is there. -
Choose where the image goes.
above- Above the question, at the top of the slide.below- Below the question, above the choices.background- Behind the whole slide. This overrides the quiz background.split- Beside the question, dividing the slide in two. On a phone the image moves above the question. -
Set how strongly it shows with the
Image Opacityslider.
Question images on small screens
The quiz is responsive, so it adjusts to desktop, tablet and mobile screens. The same image can crop or scale differently on each one.
- Use a high-resolution image, up to 1000x1000px and 2MB.
- Avoid images with text in them, because the text can be cut off.
- Keep anything that matters, such as a logo, near the center.
- Choose soft, neutral pictures that do not compete with the quiz text.
- Open the quiz on a phone and a desktop before you publish it.
A plain background usually survives every screen size best.
A background or split image at a higher resolution
The Custom CSS console in the Quiz Design tab can load a background image at whatever resolution you want.
A different image on mobile and desktop
The Custom CSS console can also load a different image per screen size. A developer writes a media query for the smaller screen.
Each question can carry its own image, either behind the question or beside it. You upload it in the question settings.
-
Go to the Quiz Builder and click the question you want to illustrate.
-
Click the
wrenchicon to open the question settings. -
Find the
Imagesection and clickAddto upload the image. It can be up to 1000x1000px. A further menu appears once an image is there. -
Choose where the image goes.
above- Above the question, at the top of the slide.below- Below the question, above the choices.background- Behind the whole slide. This overrides the quiz background.split- Beside the question, dividing the slide in two. On a phone the image moves above the question. -
Set how strongly it shows with the
Image Opacityslider.
Question images on small screens
The quiz is responsive, so it adjusts to desktop, tablet and mobile screens. The same image can crop or scale differently on each one.
- Use a high-resolution image, up to 1000x1000px and 2MB.
- Avoid images with text in them, because the text can be cut off.
- Keep anything that matters, such as a logo, near the center.
- Choose soft, neutral pictures that do not compete with the quiz text.
- Open the quiz on a phone and a desktop before you publish it.
A plain background usually survives every screen size best.
A background or split image at a higher resolution
The Custom CSS console in the Quiz Design tab can load a background image at whatever resolution you want.
A different image on mobile and desktop
The Custom CSS console can also load a different image per screen size. A developer writes a media query for the smaller screen.
Each question can carry its own image, either behind the question or beside it. You upload it in the question settings.
-
Go to the Quiz Builder and click the question you want to illustrate.
-
Click the
wrenchicon to open the question settings. -
Find the
Imagesection and clickAddto upload the image. It can be up to 1000x1000px. A further menu appears once an image is there. -
Choose where the image goes.
above- Above the question, at the top of the slide.below- Below the question, above the choices.background- Behind the whole slide. This overrides the quiz background.split- Beside the question, dividing the slide in two. On a phone the image moves above the question. -
Set how strongly it shows with the
Image Opacityslider.
Question images on small screens
The quiz is responsive, so it adjusts to desktop, tablet and mobile screens. The same image can crop or scale differently on each one.
- Use a high-resolution image, up to 1000x1000px and 2MB.
- Avoid images with text in them, because the text can be cut off.
- Keep anything that matters, such as a logo, near the center.
- Choose soft, neutral pictures that do not compete with the quiz text.
- Open the quiz on a phone and a desktop before you publish it.
A plain background usually survives every screen size best.
A background or split image at a higher resolution
The Custom CSS console in the Quiz Design tab can load a background image at whatever resolution you want.
A different image on mobile and desktop
The Custom CSS console can also load a different image per screen size. A developer writes a media query for the smaller screen.
Each question can carry its own image, either behind the question or beside it. You upload it in the question settings.
-
Go to the Quiz Builder and click the question you want to illustrate.
-
Click the
wrenchicon to open the question settings. -
Find the
Imagesection and clickAddto upload the image. It can be up to 1000x1000px. A further menu appears once an image is there. -
Choose where the image goes.
above- Above the question, at the top of the slide.below- Below the question, above the choices.background- Behind the whole slide. This overrides the quiz background.split- Beside the question, dividing the slide in two. On a phone the image moves above the question. -
Set how strongly it shows with the
Image Opacityslider.
Question images on small screens
The quiz is responsive, so it adjusts to desktop, tablet and mobile screens. The same image can crop or scale differently on each one.
- Use a high-resolution image, up to 1000x1000px and 2MB.
- Avoid images with text in them, because the text can be cut off.
- Keep anything that matters, such as a logo, near the center.
- Choose soft, neutral pictures that do not compete with the quiz text.
- Open the quiz on a phone and a desktop before you publish it.
A plain background usually survives every screen size best.
A background or split image at a higher resolution
The Custom CSS console in the Quiz Design tab can load a background image at whatever resolution you want.
A different image on mobile and desktop
The Custom CSS console can also load a different image per screen size. A developer writes a media query for the smaller screen.
Each question can carry its own image, either behind the question or beside it. You upload it in the question settings.
-
Go to the Quiz Builder and click the question you want to illustrate.
-
Click the
wrenchicon to open the question settings. -
Find the
Imagesection and clickAddto upload the image. It can be up to 1000x1000px. A further menu appears once an image is there. -
Choose where the image goes.
above- Above the question, at the top of the slide.below- Below the question, above the choices.background- Behind the whole slide. This overrides the quiz background.split- Beside the question, dividing the slide in two. On a phone the image moves above the question. -
Set how strongly it shows with the
Image Opacityslider.
Question images on small screens
The quiz is responsive, so it adjusts to desktop, tablet and mobile screens. The same image can crop or scale differently on each one.
- Use a high-resolution image, up to 1000x1000px and 2MB.
- Avoid images with text in them, because the text can be cut off.
- Keep anything that matters, such as a logo, near the center.
- Choose soft, neutral pictures that do not compete with the quiz text.
- Open the quiz on a phone and a desktop before you publish it.
A plain background usually survives every screen size best.
A background or split image at a higher resolution
The Custom CSS console in the Quiz Design tab can load a background image at whatever resolution you want.
A different image on mobile and desktop
The Custom CSS console can also load a different image per screen size. A developer writes a media query for the smaller screen.
Image blocks
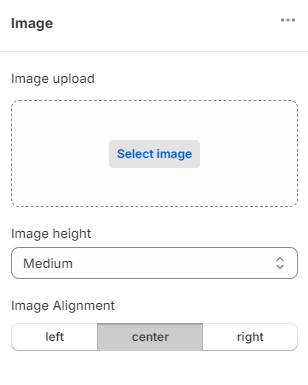
An Image block places a single picture inside a question, or in a section of the results page.
-
Open the Questions or Results page tab in the quiz builder.
-
Click
+ Add block. -
Click
Image. The block is added to the question, or to the section on the results page. -
Open the block settings.
-
Click
Select imageand upload the picture. You can also pick one you have already used, from the quiz gallery. -
Click
Changeto swap the image later, orRemoveto take it out. -
Write the
Alt text. A screen reader reads it aloud to a customer who cannot see the image. -
Set the size in the
Image heightdropdown. The choices areTiny,Small,Medium,LargeandAdapt to image.Adapt to image
Adapt to imagekeeps the picture at the size you uploaded it, rather than fitting it to a preset height. -
Align the image left, right or center.
In a question
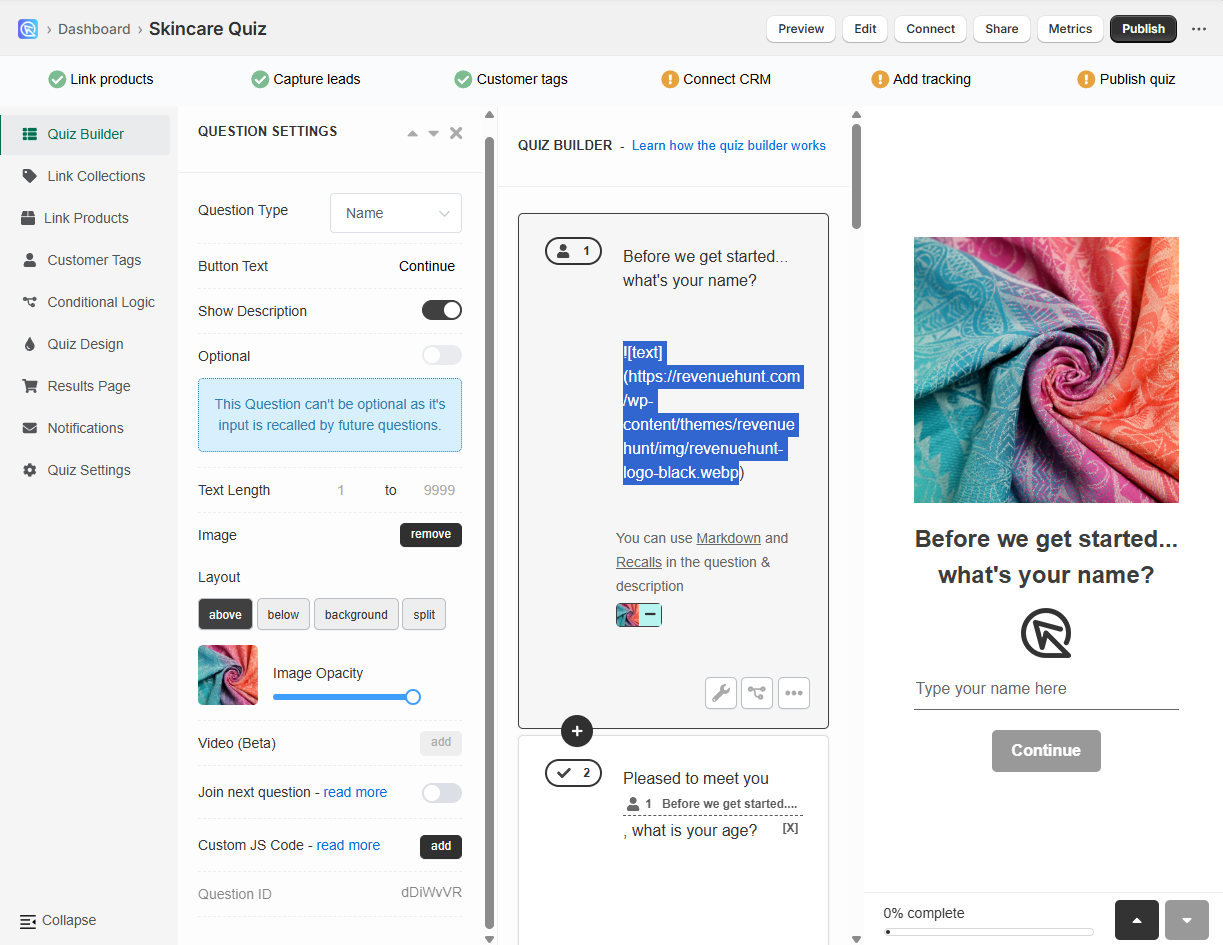
You can put an image in a question through the question settings, or with Markdown in the question description.
Through the question settings
-
Open the Quiz Builder.
-
Click the question you want to illustrate.
-
Click the
wrenchicon to open the question settings. -
Find the
Imagesection and clickAddto upload the picture. -
Choose whether it goes
above,below, in thebackgroundor in asplit. -
Click the top-right
Publishbutton.
With Markdown
-
Open the Quiz Builder.
-
Click the question you want to illustrate.
-
Click the
wrenchicon to open the question settings. -
Turn on the
question descriptiontoggle. -
Write the image into the text field that appears.
Replace the address with the address of your own image.
-
Click the top-right
Publishbutton.
On the Results Page
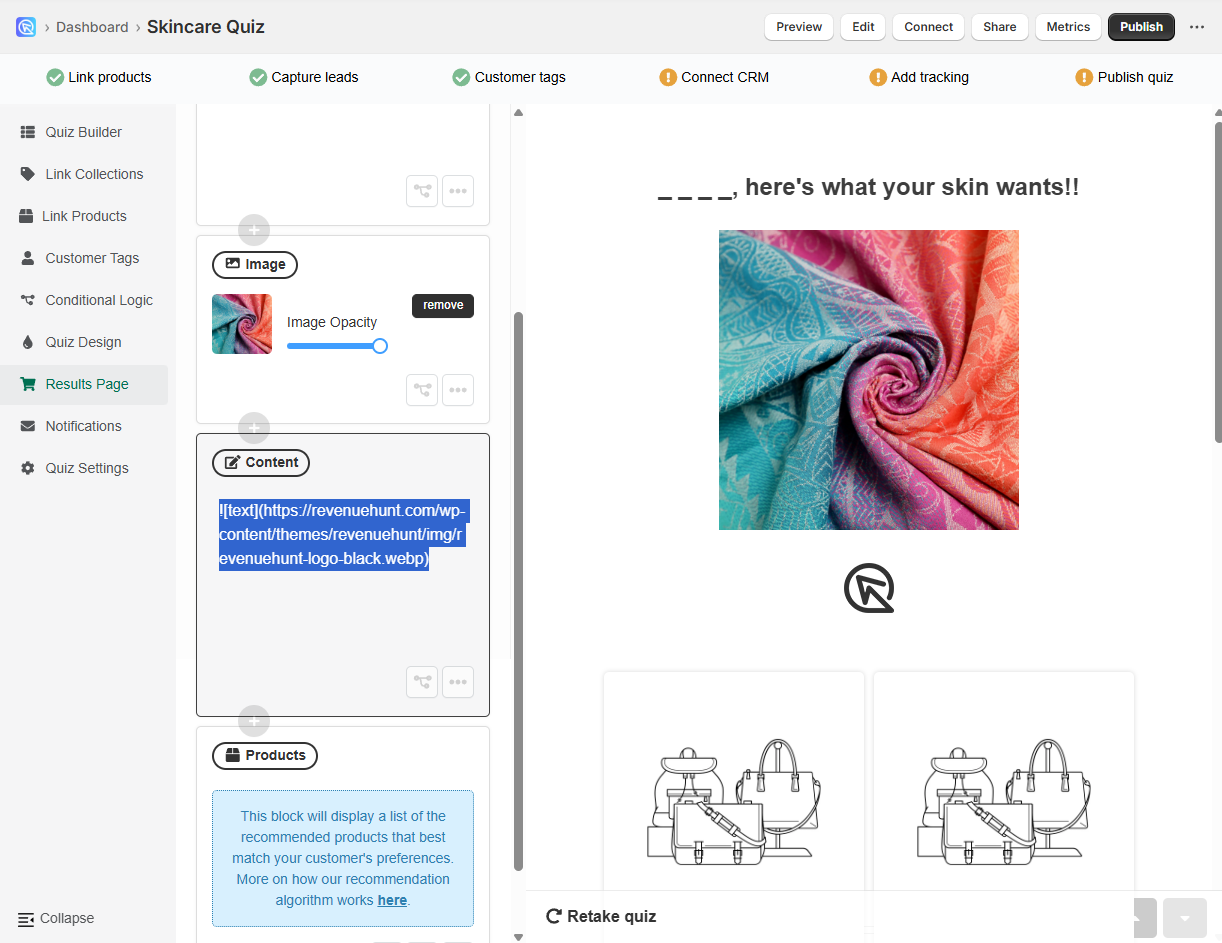
You can put an image on the Results Page with an Image Block, or with Markdown in a Content block.
With an Image Block
-
Open the Quiz Builder.
-
Go to the Results Page tab.
-
Click
+ Add block. -
Click
Image. The block is added to the Results Page. -
Click
Addand upload the picture. The slider next to it sets how strongly the image shows. -
Click the top-right
Publishbutton.
With Markdown
-
Open the Quiz Builder.
-
Go to the Results Page tab.
-
Click
+ Add blockand select aContentblock. -
Write the image into the text field that appears.
Replace the address with the address of your own image.
-
Click the top-right
Publishbutton.
In a question
You can put an image in a question through the question settings, or with Markdown in the question description.
Through the question settings
-
Open the Quiz Builder.
-
Click the question you want to illustrate.
-
Click the
wrenchicon to open the question settings. -
Find the
Imagesection and clickAddto upload the picture. -
Choose whether it goes
above,below, in thebackgroundor in asplit. -
Click the top-right
Publishbutton.
With Markdown
-
Open the Quiz Builder.
-
Click the question you want to illustrate.
-
Click the
wrenchicon to open the question settings. -
Turn on the
question descriptiontoggle. -
Write the image into the text field that appears.
Replace the address with the address of your own image.
-
Click the top-right
Publishbutton.
On the Results Page
You can put an image on the Results Page with an Image Block, or with Markdown in a Content block.
With an Image Block
-
Open the Quiz Builder.
-
Go to the Results Page tab.
-
Click
+ Add block. -
Click
Image. The block is added to the Results Page. -
Click
Addand upload the picture. The slider next to it sets how strongly the image shows. -
Click the top-right
Publishbutton.
With Markdown
-
Open the Quiz Builder.
-
Go to the Results Page tab.
-
Click
+ Add blockand select aContentblock. -
Write the image into the text field that appears.
Replace the address with the address of your own image.
-
Click the top-right
Publishbutton.
In a question
You can put an image in a question through the question settings, or with Markdown in the question description.
Through the question settings
-
Open the Quiz Builder.
-
Click the question you want to illustrate.
-
Click the
wrenchicon to open the question settings. -
Find the
Imagesection and clickAddto upload the picture. -
Choose whether it goes
above,below, in thebackgroundor in asplit. -
Click the top-right
Publishbutton.
With Markdown
-
Open the Quiz Builder.
-
Click the question you want to illustrate.
-
Click the
wrenchicon to open the question settings. -
Turn on the
question descriptiontoggle. -
Write the image into the text field that appears.
Replace the address with the address of your own image.
-
Click the top-right
Publishbutton.
On the Results Page
You can put an image on the Results Page with an Image Block, or with Markdown in a Content block.
With an Image Block
-
Open the Quiz Builder.
-
Go to the Results Page tab.
-
Click
+ Add block. -
Click
Image. The block is added to the Results Page. -
Click
Addand upload the picture. The slider next to it sets how strongly the image shows. -
Click the top-right
Publishbutton.
With Markdown
-
Open the Quiz Builder.
-
Go to the Results Page tab.
-
Click
+ Add blockand select aContentblock. -
Write the image into the text field that appears.
Replace the address with the address of your own image.
-
Click the top-right
Publishbutton.
In a question
You can put an image in a question through the question settings, or with Markdown in the question description.
Through the question settings
-
Open the Quiz Builder.
-
Click the question you want to illustrate.
-
Click the
wrenchicon to open the question settings. -
Find the
Imagesection and clickAddto upload the picture. -
Choose whether it goes
above,below, in thebackgroundor in asplit. -
Click the top-right
Publishbutton.
With Markdown
-
Open the Quiz Builder.
-
Click the question you want to illustrate.
-
Click the
wrenchicon to open the question settings. -
Turn on the
question descriptiontoggle. -
Write the image into the text field that appears.
Replace the address with the address of your own image.
-
Click the top-right
Publishbutton.
On the Results Page
You can put an image on the Results Page with an Image Block, or with Markdown in a Content block.
With an Image Block
-
Open the Quiz Builder.
-
Go to the Results Page tab.
-
Click
+ Add block. -
Click
Image. The block is added to the Results Page. -
Click
Addand upload the picture. The slider next to it sets how strongly the image shows. -
Click the top-right
Publishbutton.
With Markdown
-
Open the Quiz Builder.
-
Go to the Results Page tab.
-
Click
+ Add blockand select aContentblock. -
Write the image into the text field that appears.
Replace the address with the address of your own image.
-
Click the top-right
Publishbutton.
In a question
You can put an image in a question through the question settings, or with Markdown in the question description.
Through the question settings
-
Open the Quiz Builder.
-
Click the question you want to illustrate.
-
Click the
wrenchicon to open the question settings. -
Find the
Imagesection and clickAddto upload the picture. -
Choose whether it goes
above,below, in thebackgroundor in asplit. -
Click the top-right
Publishbutton.
With Markdown
-
Open the Quiz Builder.
-
Click the question you want to illustrate.
-
Click the
wrenchicon to open the question settings. -
Turn on the
question descriptiontoggle. -
Write the image into the text field that appears.
Replace the address with the address of your own image.
-
Click the top-right
Publishbutton.
On the Results Page
You can put an image on the Results Page with an Image Block, or with Markdown in a Content block.
With an Image Block
-
Open the Quiz Builder.
-
Go to the Results Page tab.
-
Click
+ Add block. -
Click
Image. The block is added to the Results Page. -
Click
Addand upload the picture. The slider next to it sets how strongly the image shows. -
Click the top-right
Publishbutton.
With Markdown
-
Open the Quiz Builder.
-
Go to the Results Page tab.
-
Click
+ Add blockand select aContentblock. -
Write the image into the text field that appears.
Replace the address with the address of your own image.
-
Click the top-right
Publishbutton.
Picture choices
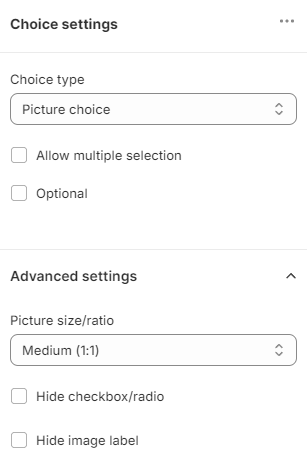
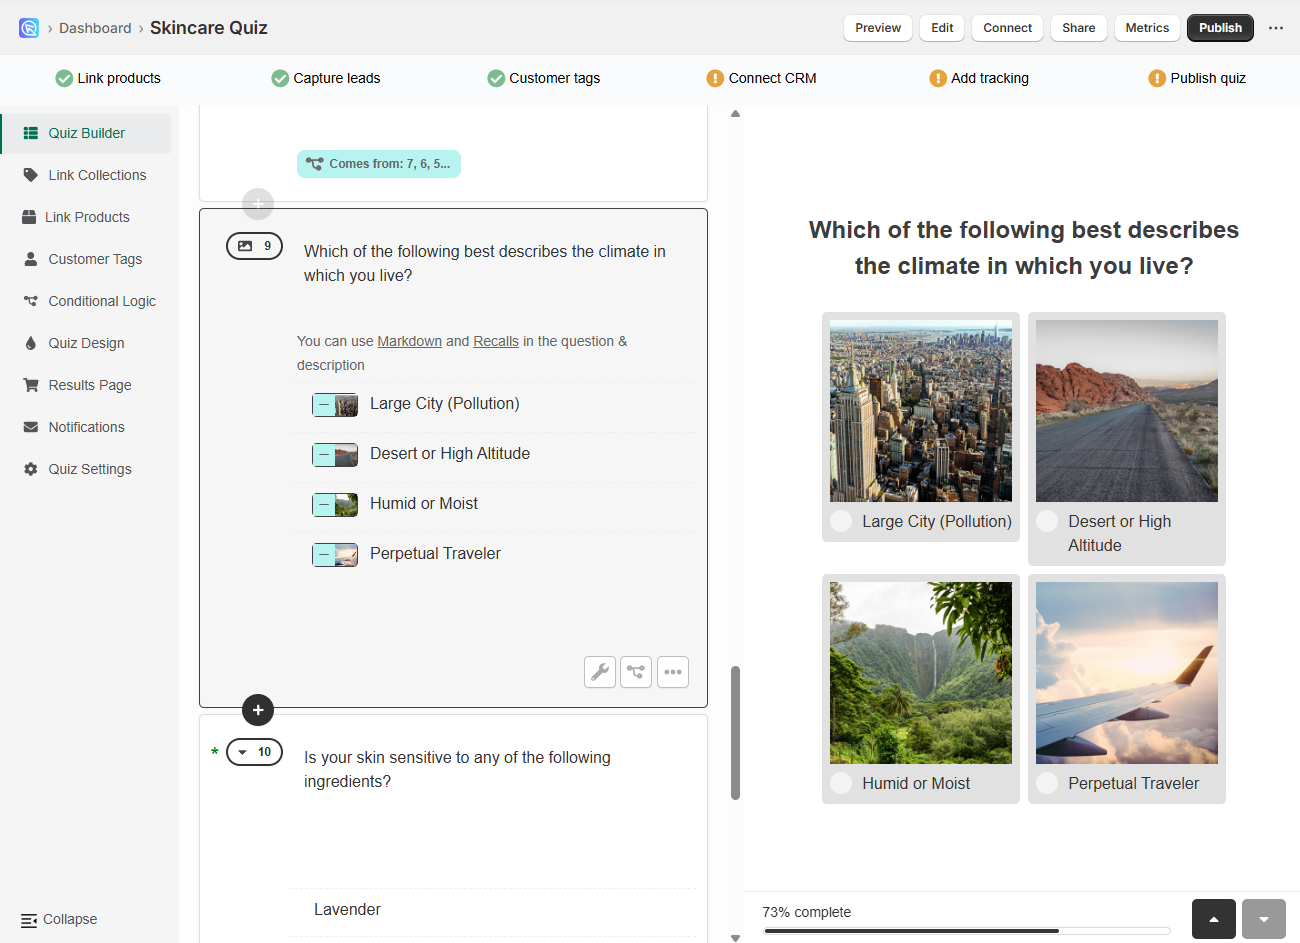
A Picture choice block gives every choice in a multiple-choice question its own image.
-
Open the question you want to illustrate, or click
+ Add questionto make a new one. -
Click
+ Add block, then clickPicture choice. -
Click
+ Add choice. -
Click
Select imageand upload the picture for that choice. You can also pick one you have already used, from the quiz gallery. -
Click
Changeto swap the image later, orRemoveto take it out. -
Repeat for every choice.
-
Open the
Picture Choice Settingsand go to the advanced settings. -
Pick a
Picture size/ratio. The choices areTiny icon 24px,Small icon 48px,Medium icon 1:1andLarge icon 4:3.Medium adds a mobile layout setting
Choosing
Medium (1:1)reveals aMobile layoutoption, which shows the choices on a phone as aCarousel,One per roworTwo per row. -
Turn on any of the display options you need.
Hide checkbox/radiotakes the checkbox or radio button off each picture.Hide image labeltakes the text off each picture.Fit full image in box (no cropping)shows the whole picture rather than cropping it to the box.Enable horizontal carousel on mobileturns the choices into a row a customer swipes through on a phone.
Check the mobile options on the mobile view
Switch to it with the
mobileicon above the preview.
A Picture Choice block gives every choice in a multiple-choice question its own image.
-
Open the Quiz Builder.
-
Click
+ Add new question.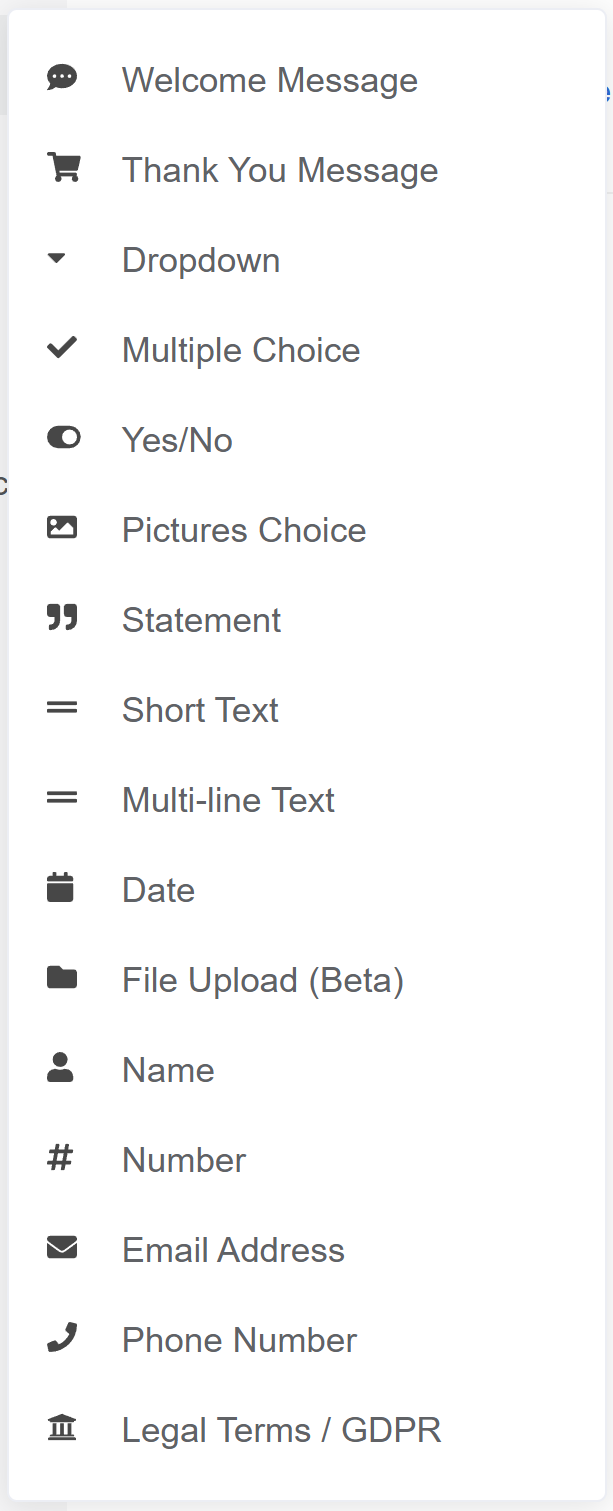
-
Click
Picture choice. This is a multiple-choice slide whose choices are clickable images, each with a picture of your own. -
Click
+ Add choice. -
Click
+ imageand upload the picture for that choice. -
Repeat for every choice.
-
Click the top-right
Publishbutton.
Use square images
Square pictures up to 400x400px work best. A picture that is not square is cropped to a square. Crop it yourself in an image editor first, so the crop does not cut off what matters.
The app compresses whatever you upload, so the quiz still loads quickly.
A Picture Choice block gives every choice in a multiple-choice question its own image.
-
Open the Quiz Builder.
-
Click
+ Add new question. -
Click
Picture choice. This is a multiple-choice slide whose choices are clickable images, each with a picture of your own. -
Click
+ Add choice. -
Click
+ imageand upload the picture for that choice. -
Repeat for every choice.
-
Click the top-right
Publishbutton.
Use square images
Square pictures up to 400x400px work best. A picture that is not square is cropped to a square. Crop it yourself in an image editor first, so the crop does not cut off what matters.
The app compresses whatever you upload, so the quiz still loads quickly.
A Picture Choice block gives every choice in a multiple-choice question its own image.
-
Open the Quiz Builder.
-
Click
+ Add new question. -
Click
Picture choice. This is a multiple-choice slide whose choices are clickable images, each with a picture of your own. -
Click
+ Add choice. -
Click
+ imageand upload the picture for that choice. -
Repeat for every choice.
-
Click the top-right
Publishbutton.
Use square images
Square pictures up to 400x400px work best. A picture that is not square is cropped to a square. Crop it yourself in an image editor first, so the crop does not cut off what matters.
The app compresses whatever you upload, so the quiz still loads quickly.
A Picture Choice block gives every choice in a multiple-choice question its own image.
-
Open the Quiz Builder.
-
Click
+ Add new question. -
Click
Picture choice. This is a multiple-choice slide whose choices are clickable images, each with a picture of your own. -
Click
+ Add choice. -
Click
+ imageand upload the picture for that choice. -
Repeat for every choice.
-
Click the top-right
Publishbutton.
Use square images
Square pictures up to 400x400px work best. A picture that is not square is cropped to a square. Crop it yourself in an image editor first, so the crop does not cut off what matters.
The app compresses whatever you upload, so the quiz still loads quickly.
A Picture Choice block gives every choice in a multiple-choice question its own image.
-
Open the Quiz Builder.
-
Click
+ Add new question. -
Click
Picture choice. This is a multiple-choice slide whose choices are clickable images, each with a picture of your own. -
Click
+ Add choice. -
Click
+ imageand upload the picture for that choice. -
Repeat for every choice.
-
Click the top-right
Publishbutton.
Use square images
Square pictures up to 400x400px work best. A picture that is not square is cropped to a square. Crop it yourself in an image editor first, so the crop does not cut off what matters.
The app compresses whatever you upload, so the quiz still loads quickly.
Product image
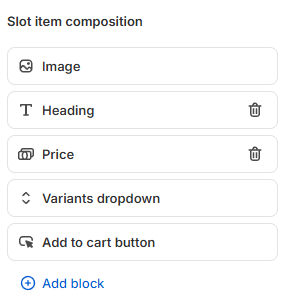
A Product, Variants or Collection block shows a picture from your catalog on the results page.
-
Open the Results page tab in the quiz builder.
-
Click
+ Add block. -
Click
Product,VariantorCollection. The block is added to the results page. -
Open the block settings.
-
Choose which parts of the product to show, under
Product components layout. Drag a part to move it up or down.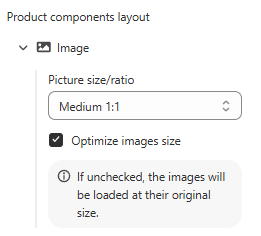
-
Open
Imageand adjust how the picture is shown.Picture size/ratio-Medium (1:1), orOriginalas uploaded to Shopify.Shape-SquareorOriginal.Source-Variantshows the picture of the selected variant, and falls back to the product picture when that variant has none.Productalways shows the main product picture.Optimize images size- Compresses the picture for the quiz. Clear it to serve the picture at its original weight.
The pictures come from your catalog
A product slot shows the first picture of the product, variant or collection, exactly as uploaded to your Shopify products and collections. You cannot replace it from inside the quiz.
No picture on a recommended collection
Check that the Shopify collection itself has an image.
Product pictures on the Results Page come straight from your Shopify catalog. A product slot shows the first picture of the product or variant, exactly as uploaded to your Shopify Products section.
Change the size of a product picture
The Custom CSS console in the Quiz Design tab can resize the slot.
Product pictures on the Results Page come straight from your WooCommerce catalog. A product slot shows the first picture of the product or variant, exactly as uploaded to your WooCommerce Products section.
Change the size of a product picture
The Custom CSS console in the Quiz Design tab can resize the slot.
Product pictures on the Results Page come straight from your Magento catalog. A product slot shows the first picture of the product or variant, exactly as uploaded to your Magento Products section.
Change the size of a product picture
The Custom CSS console in the Quiz Design tab can resize the slot.
Product pictures on the Results Page come straight from your BigCommerce catalog. A product slot shows the first picture of the product or variant, exactly as uploaded to your BigCommerce Products section.
Change the size of a product picture
The Custom CSS console in the Quiz Design tab can resize the slot.
Product pictures on the Results Page come straight from your Standalone catalog or Google Product Feed. A product slot shows the first picture of the product or variant, exactly as uploaded to your Standalone Products section or Google Product Feed.
Change the size of a product picture
The Custom CSS console in the Quiz Design tab can resize the slot.
This article explains how to add a background image, a question image, an image block, picture choices and a product image to a quiz. It also covers image quality.