Using Conditional Logic in RevenueHunt App
In this tutorial, you’ll learn how to use Jump Logic, Skip Logic, and Display Logic to show (or hide) questions/content in the quiz as well as the Results Page.
You’ll learn:
- how to use Jump Logic to show different skin advice in the quiz,
- how to use Jump Logic to redirect the customer to an external URL from the quiz,
- how to use Jump Logic to create branching in the quiz to show different questions,
- how to use Jump Logic to send customers to different Results Pages,
- how to use Skip Logic to show different skin advice in the quiz (statement),
- how to use Skip Logic to show or hide a number of follow-up questions,
- how to use Skip Logic to show or hide follow-up questions based on questions that allow multiple answers,
- how to add varaibles and scores to choices in the quiz,
- how to use Display Logic to show different personalized advice on the Results Page based on customer answers,
- how to use Display Logic to show different quiz results based on a winning variable (personality type quiz),
- how to use Display Logic to show different quiz results based on a total custom score.
In this tutorial, you’ll learn how to use Jump Logic, Skip Logic, and Display Logic to show (or hide) questions/content in the quiz as well as the Results Page.
You’ll learn:
- how to add statement questions to your quiz
- how to use Jump Logic to show different skin advice in the quiz (statement)
- how to use Jump Logic to redirect the customer to an external URL from the quiz
- how to use Jump Logic to create branching in the quiz to show different questions
- how to use Jump Logic to create branching in the quiz to link different products to the same answers
- how to use Jump Logic to send customers to different Results Pages
- how to use Skip Logic to show different skin advice in the quiz (statement)
- how to use Skip Logic to show or hide a number of follow-up questions
- how to use Skip Logic to show or hide follow-up questions based on questions that allow multiple answers
- how to use Display Logic to show different personalized advice on the Results Page based on customer answers
- how to use Display Logic to show different image results based on customer answers
- how to use Display Logic to show product blocks with different numbers of recommended products
- how to add content blocks to your Results Page
- how to use markdown language
Intro
Conditional Logic controls the quiz flow, determining exactly which questions, texts, or results are shown to customers based on their answers.
This tutorial covers the three logic types: Jump Logic, Skip Logic, and Display Logic, with practical examples of each.
Objective: In this tutorial, we’ll teach you how to show custom content based on customer answers using Jump Logic, Skip Logic, or Display Logic on the results page.
In this tutorial, you’ll learn how to use simple conditional logic to give personalized advice.
A quiz can act as a professional shopping assistant. It can react to the answers given by the customer and provide valuable feedback. All it takes is a bit of logic.
In this Skin Care Quiz, there are four blocks of text. Each describes in more detail what a skin type needs in terms of skincare.
With RevenueHunt app, you can show customers with dry skin certain questions (specifically targeted for them), while customers with oily skin would skip these questions. This can be done in many ways within the app.
Objective: In this video, we’ll teach you how to show these texts using Jump Logic, Skip Logic, or Display Logic on the results page.
Jump Logic
Jump Logic is used to redirect users to different questions, results pages, or external URLs, based on their responses.
Branching the Quiz
Jump Logic allows you to branch the quiz based on the participant's responses.
Example: Skincare Quiz that shows only the relevant statement based on the user's skin type
For example, you can create a quiz that asks the participant about their skin type and then based on the answer, you can redirect them to a different question or content.

-
Add Questions and Follow-up Statements. Create a quiz with a main question and follow-up questions or statement.
Example
For example, a skincare quiz with a skin type question and four different texts based on user responses.
- You have Dry Skin: The itchiness, tightness and dryness – we know your struggle! Your skin wants a routine that’s deeply nourishing and hydrating.
- You have Normal Skin: Your skin feels balanced, just like you! Even though your skin doesn’t experience major issues, it deserves amazing care! Your skin wants a routine that sustains your skin’s natural harmony.
- You have Oily Skin: Your skin is oh-so shiny, but with excess oil instead of your natural glow! Your skin wants a routine that reduces oil to provide balance and clarity, all while giving your skin the proper amount of light hydration.
- You have Combination-Type Skin: Your skin has multiple things going on at once: you experience your T-zone to be on the oily side, while the rest of your face is either normal or dry.
-
Navigate to the Conditional Logic tab and select the main question.
- Click on the main question and open the Jump Logic tab. Click
+ Add another rule(OR)and set up a redirection rule. -
Set up the first redirection rule. It follows the format:
Jump Logic format
IF the response to the question
Pick your quesionsis/is notPick the choice, THEN go to...Set the destination.Example
If the responses to
Q4: SKIN TYPEisOily all over, THEN go to...Q8: SKIN TYPE: OILY.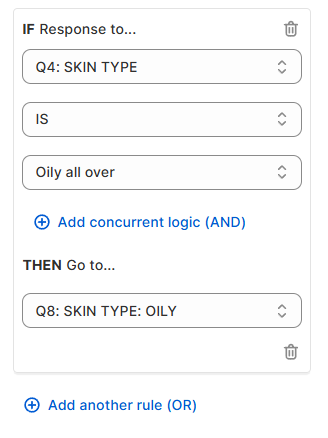
-
Click
+ Add another rule(OR)and set up the other redirection rules for the same question.Example
- If the response to
Q4: SKIN TYPEisDry and tight all over, THEN go to...Q8: SKIN TYPE: DRY.
OR
- If the response to
Q4: SKIN TYPEisNot too oily, not too dry, THEN go to...Q8: SKIN TYPE: NORMAL.
OR
- If the response to
Q4: SKIN TYPEisOily in certain spots, THEN go to...Q8: SKIN TYPE: COMBINATION.
OR
- If the response to
Q4: SKIN TYPEisOily all over, THEN go to...Q8: SKIN TYPE: OILY.
- If the response to
-
Adjust Default Destinations for Each Statement. Click on each statement slide one by one and in the Jump Logic tab change
Default destinationto the next question in the pipeline, avoiding the other statements.Example

- Dry skin type → Default destination: Next question (Q8: SKIN CONCERNS)
OR
- Combination skin type → Default destination: Next question (Q8: SKIN CONCERNS)
OR
- Normal skin type → Default destination: Next question (Q8: SKIN CONCERNS)
OR
- Oily skin type → Default destination: Next question (Q8: SKIN CONCERNS).
-
Save & Test the Logic. Save changes with the top-right
Savebutton andPreviewthe quiz. Test each skin type option to ensure correct text is displayed.
Redirecting to different Results Pages
With Jump Logic, you can send users to different results pages based on their answers.
Example: Skincare Quiz that sends users to different results pages based on their answers
For example, you can create a quiz that asks the participant about their skin type and then based on the answer, you can redirect them to a different results page with custom content relevant to their skin type.
-
Set up Multiple Result Pages in your quiz.
Tip
Check out this guide to learn how to create multiple result pages.
-
Go to the Conditional Logic tab.
- Pick the question you want to add redirect logic to.
- Click on that question and open the
Jump Logictab. -
Click
+ Add another rule(OR)and set up a redirection rule.Jump Logic format
IF the response to the question
Pick your quesionsis/is notPick the choice, THEN go to...Set the destination.Example
IF the response to the question
Q4: SKIN TYPEisOily all over, THEN go to...Results Page 2. -
Click
+ Add another rule(OR)and set up the other redirection rules for the same question.Example
IF the response to the question
Q1: What is your skin type?isDry, then go toResults Page 1.OR
IF the response to the question
Q1: What is your skin type?isOily, then go toResults Page 2.OR
IF the response to the question
Q1: What is your skin type?isNormal, then go toResults Page 3.OR
IF the response to the question
Q1: What is your skin type?isCombination, then go toResults Page 4. -
Click the top-right
Savebutton to update the preview/live quiz. Preview the quiz with the top-rightPreviewbutton and test the logic.
Redirecting to an External URL
With Jump Logic, you can send users to an external URL based on their answers.
Example: Skincare Quiz that sends users to an external URL based on their answers
For example, you can create a quiz that asks the participant about their allergies and then based on the answer, you can redirect them to an external URL with custom content explaining the allergens in your products.
- Go to the Conditional Logic tab.
- Pick the question you want to add redirect logic to.
- Click on that question and open the Jump Logic tab.
-
Click
+ Add another rule(OR)and set up a redirection rule andLink to URL.Jump Logic format
IF the response to the question
Pick your quesionsis/is notPick the choice, THEN go to...Link to URL.Example
IF the answer to the question
Q10: ALERGIESisRose, THEN go to...Link to URLand paste the desired URL, for examplehttps://yourstore.com/alergies.Tip: Always redirect to URL after a question
To always redirect users to a specific page after a certain question, you can set up a
Default destinationrule.- Click on a question and open the Jump Logic tab.
- In the
Default destinationsection, selectLink to URLand paste the desired URL, for examplehttps://yourstore.com/. - This way users will be redirected to the desired page after answering the question.
-
Click the top-right
Savebutton to update the preview/live quiz. Preview the quiz with the top-rightPreviewbutton and test the logic.
Let’s start with Jump Logic.
- To display text advice in the quiz, you’ll need a
Statement question. - Make it longer by adding a description.
- One statement will be needed for each type of skin advice.
Now, how can we make only one block appear, instead of all of them, one after the other? We can use Jump Logic.
- Open the Conditional Logic tab and select a question.
- Let’s add the first Jump logic condition:
- If the answer to
‘How does your skin feel on an average day?’is‘Dry and tight all over’then Dry skin advice should appear.
- If the answer to
- Click on the
+plus sign to add another statement that can be true. This creates an additionalORconditional statement.- If the answer to
‘How does your skin feel on an average day?’is‘Oily all over’then Oily skin advice should appear.
- If the answer to
- The
ORseparator between conditions means that only one of these has to be true for the logic to work. - Let’s add conditions for the Combination and Normal skin.
- To ensure the customer doesn’t see all four statements additional Jump logic should be added to each of them.
- Click on a
statementquestion. - In the
Always jump to…section, indicate the question or a page that should preceed it. - Do the same for the other three statements.
- Now that all is set, let’s update the preview/live quiz with the top-right
Publishbutton and test it withPreview.- First, select
Dry skin. - Now let’s go back and select
Oily skin.
- First, select
It seems that everything works correctly, well done!
You’ve successfully added Jump Logic to your quiz. Your customers will now be able to see this personalized advice whenever they take the quiz.
Jump Logic - other use cases
Jump Logic is a powerful tool. It can also be used to:
- redirect the customer to another, external URL directly from the quiz,
- create branching in the quiz to send the customer to different answering paths,
- create branching to link different products to the same choices,
- or send customers to different Result Pages.
Skip Logic
Skip Logic hides specific slides when they are not relevant, based on user responses.
Skip Slides
Example: Skincare Quiz that shows only the relevant statement based on the user's skin type
You want to provide personalized advice based on the customer's skin type. Imagine creating a quiz that determines a personalized skincare routine. Question 4 might ask about the participant's skin type, and depending on the answer, a different statement or recommendation about their skincare is shown. This individualized response is made possible by Skip Logic, which then continues the quiz based on the participant's specific path.

- Open the Quiz Builder and add a
Multiple choice questionasking the customer about their skin type: Dry, Normal, Oily, or Combination-type skin. -
Add multiple
Statementslides describing the specific skin type and its challenges. For example:Statement Slides
- You have Dry Skin: The itchiness, tightness and dryness – we know your struggle! Your skin wants a routine that’s deeply nourishing and hydrating.
- You have Normal Skin: Your skin feels balanced, just like you! Even though your skin doesn’t experience major issues, it deserves amazing care! Your skin wants a routine that sustains your skin’s natural harmony.
- You have Oily Skin: Your skin is oh-so shiny, but with excess oil instead of your natural glow! Your skin wants a routine that reduces oil to provide balance and clarity, all while giving your skin the proper amount of light hydration.
- You have Combination-Type Skin: Your skin has multiple things going on at once: you experience your T-zone to be on the oily side, while the rest of your face is either normal or dry.
Note
If we don’t add skip logic to the quiz, our statement questions will just appear one after the other, regardless of the choice we made.
-
To add Skip logic, you should go the Conditional Logic tab and select the first statement quesiton that should be skipped.
- Next, in the right-hand menu locate the
Skip Logicsection. -
Click
+ Add another rule (OR)to add a skip logic rule to the selected statement slide.Skip Logic format
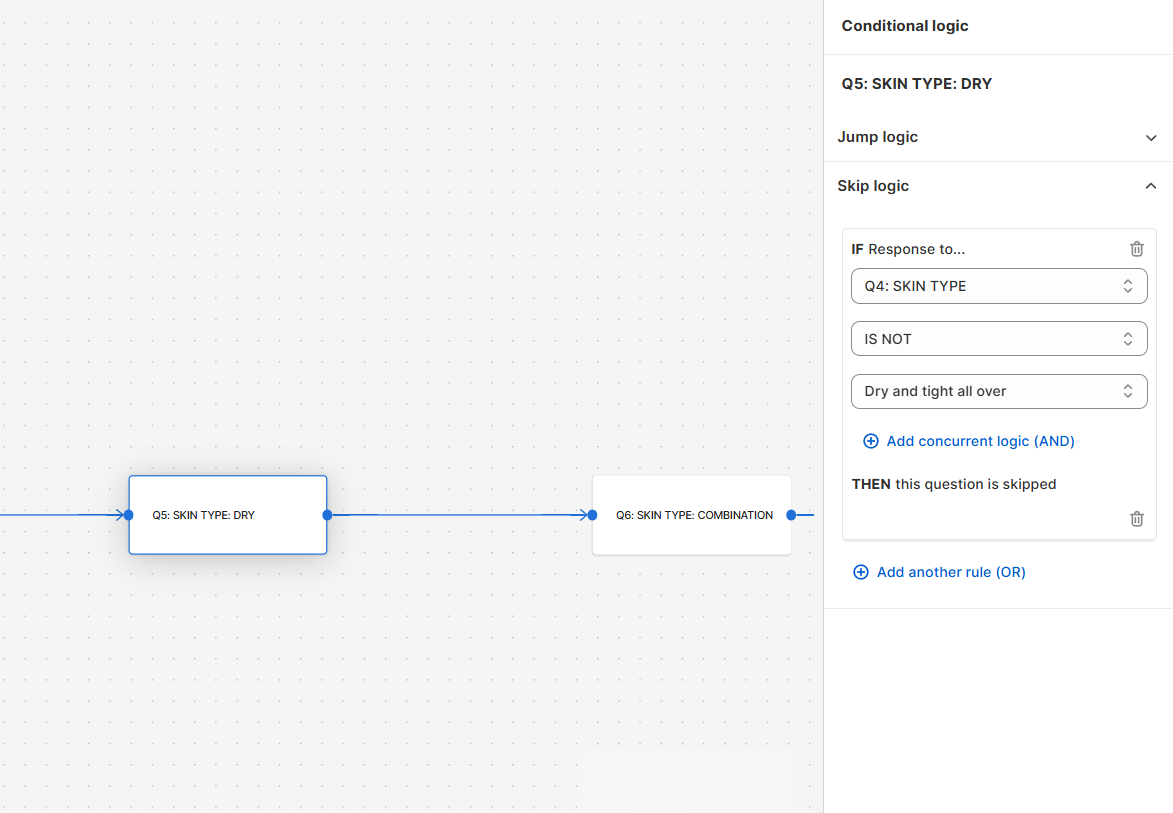
IF the response to the question
Pick your quesionsis/is notPick the choice, THEN this question will be skipped.Example
IF the response to the question
Q4: SKIN TYPEisDry and tight all over, THEN this question will be skipped.Meaning that if any other answer than "Dry and tight all over" is selected, then this question will be skipped.
-
Use similar skip logic rules on the other statements to ensure that only relevant statement questions appear based on the customer's skin type selection.
Skip Logic for other statements
IF the response to the question
Q4: SKIN TYPEisDry and tight all over, THEN this question will be skipped.IF the response to the question
Q4: SKIN TYPEisNot too oily, not too dry, THEN this question will be skipped.IF the response to the question
Q4: SKIN TYPEisOily all over, THEN this question will be skipped.IF the response to the question
Q4: SKIN TYPEisOily in certain areas, THEN this question will be skipped. -
Click the top-right
Savebutton to update the preview/live quiz. Preview the quiz with the top-rightPreviewbutton and test the logic.
Skip Follow-up Questions (Multiple Selection Questions)
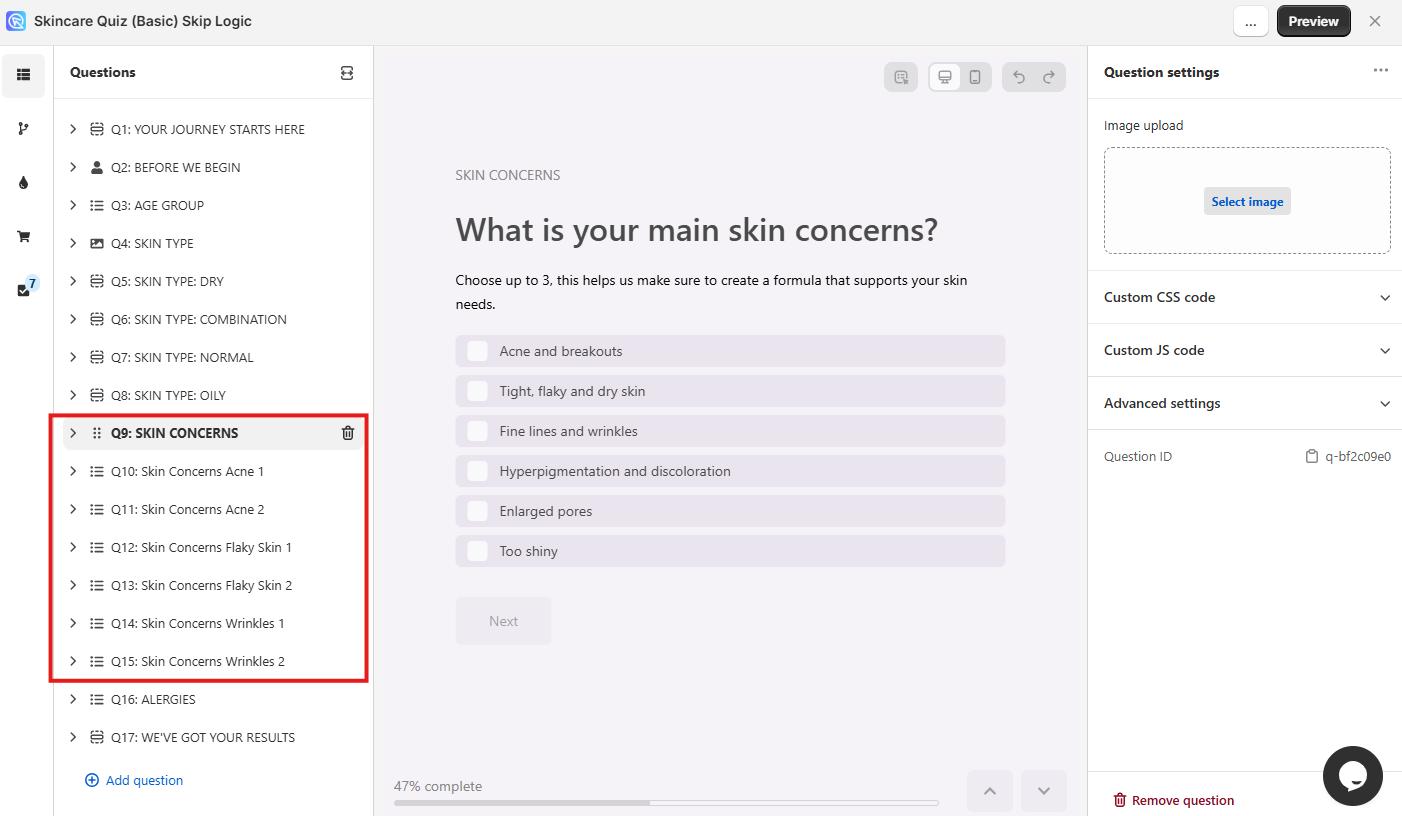
Skincare Quiz that shows only follow-up questions relevant to the user's selections
You want to create a beauty quiz where customers can select multiple areas of concern (acne, flaky skin, wrinkles, etc.) and then only see follow-up questions relevant to their selections. The goal is to display only the follow-up questions that are relevant to the user's selections. For example, if a user selects 'acne' as a skin concern, only questions related to acne should be displayed, all the others skipped.
-
Use the Quiz Builder to add a multiple-choice question that allows multiple selections (this can be done via the Multiple Choice Block Settings) and create several follow-up questions that match the choices in the initial question.
Setting Up Follow-up Questions
For example, if a Skin Concerns question has the following choices:
- Acne
- Flaky Skin
- Wrinkles
The following follow-up questions can be created:
Warning
Follow-up questions should be ordered in the same order as the choices presented in the initial question. So if the first choice is 'acne', the first follow-up question should be the one related to acne, and so on.
-
Head over to the Conditional Logic tab and select the first follow-up question, right after the multiple selection question.
- Open the Skip Logic tab.
-
Click
+ Add another rule (OR)to add a skip logic rule to the selected follow-up question.Skip Logic format
IF the response to the question
Pick your quesionsis/is notPick the choice, THEN this question will be skipped.Example
IF the response to the question
Q9: Skin Concernsisacne, THEN this question will be skipped.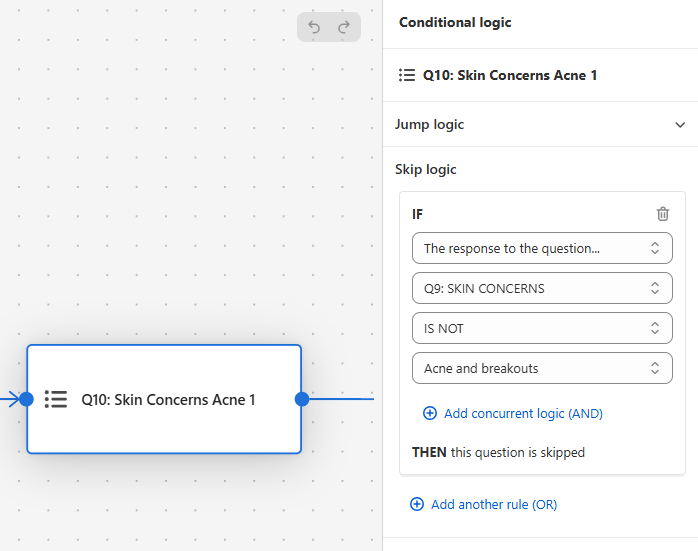
-
For each subsequent follow-up question, add a similar skip logic rule.
-
After setting up the skip logic, make sure to save the changes with the top-right
Savebutton. Then,Previewthe quiz and test the functionality by selecting different options in the quiz.Testing Skip Logic Functionality
For instance, selecting 'acne' and 'wrinkles' should display only the relevant follow-up questions while skipping others. If 'tight flaky skin' is selected, only questions related to flaky skin should appear, confirming that the skip logic is functioning correctly.
For linear quizzes, using Skip Logic instead is recommended.
To achieve the same effect you can set up your statements to be shown one after another.
- Navigate to the Conditional Logic tab, select a question and open the Skip Logic menu.
- Then, add a Skip Logic rule to each statement. For example, when selecting a Dry skin statement, the rule states:
- If the answer question
‘How does your skin feel on an average day?’IS NOTDry and tight all over, then this question is skipped. - This implies that the Dry skin statement will NOT be skipped only if the answer to that question is
Dry and thigh all over. In all other cases, the statement will NOT be shown.
- If the answer question
- Similar rules shall be applied to the statements about the Oily, Combination, and Normal skin.
- Once all is set up, make sure to publish the changes with the top-right
Publishbutton. - Let’s test the quiz with the
Previewbutton.
It worked! The correct statement is shown and all the others are skipped based on the skin type the customer selected in the previous question.
Skip Logic - other use cases
Skip logic can also be used to:
- show or hide a number of follow-up questions,
- show or hide follow-up content based on questions that allow multiple answers.
Display Logic
Display Logic controls which sections appear on the results page, based on answers, variables, or scores.
Add Scores or Variables to Choices
Custom scores or variables can be assigned to choices in the quiz in order to set up a scoring quiz, personality type quiz, dosha quiz, etc.
To add scores or variables to choices, follow these steps:
- Create Quiz: Open the Quiz Builder and add your
Multiple choice questionsasking the customer about their needs. For example: age, skincondition, etc. if you are building a quzi that determines a skin type. - Open the Choice Settings.
- Find the
Scores and calculationssection. -
You can adjust the pre-made 'score' variable for each choice with the up/down arrows. You can assign negative values if needed
Example
- For choice one, set the score to 1.
- For choice two, set the score to 2.
- For choice three, set the score to 3.
-
To create a new variable, click on the
Search or create variablesearch bar and start typing the name of the variable you want to create (e.g.dry skinorvariable1). -
Once you've typed the full name, a dropdown will appear that will allow you to
Create a new variable "xxx". Click on it to add a new variable. -
Once a new variable is created, you can assign a score to it.
- Repeat the process for each choice in that question and move on to the next question in your quiz.
Based on Customer Answers
Example: Show a different section on a Results Page based on the customer's answer to a question
You want to show a different section on a Results Page based on the customer's answer to a question. Imagine creating a quiz that determines a personalized skincare routine. Question 4 might ask about the participant's skin type, and depending on the answer, a different text and recommendation about their skincare is shown on the Results Page. This individualized response is made possible by Display Logic.
-
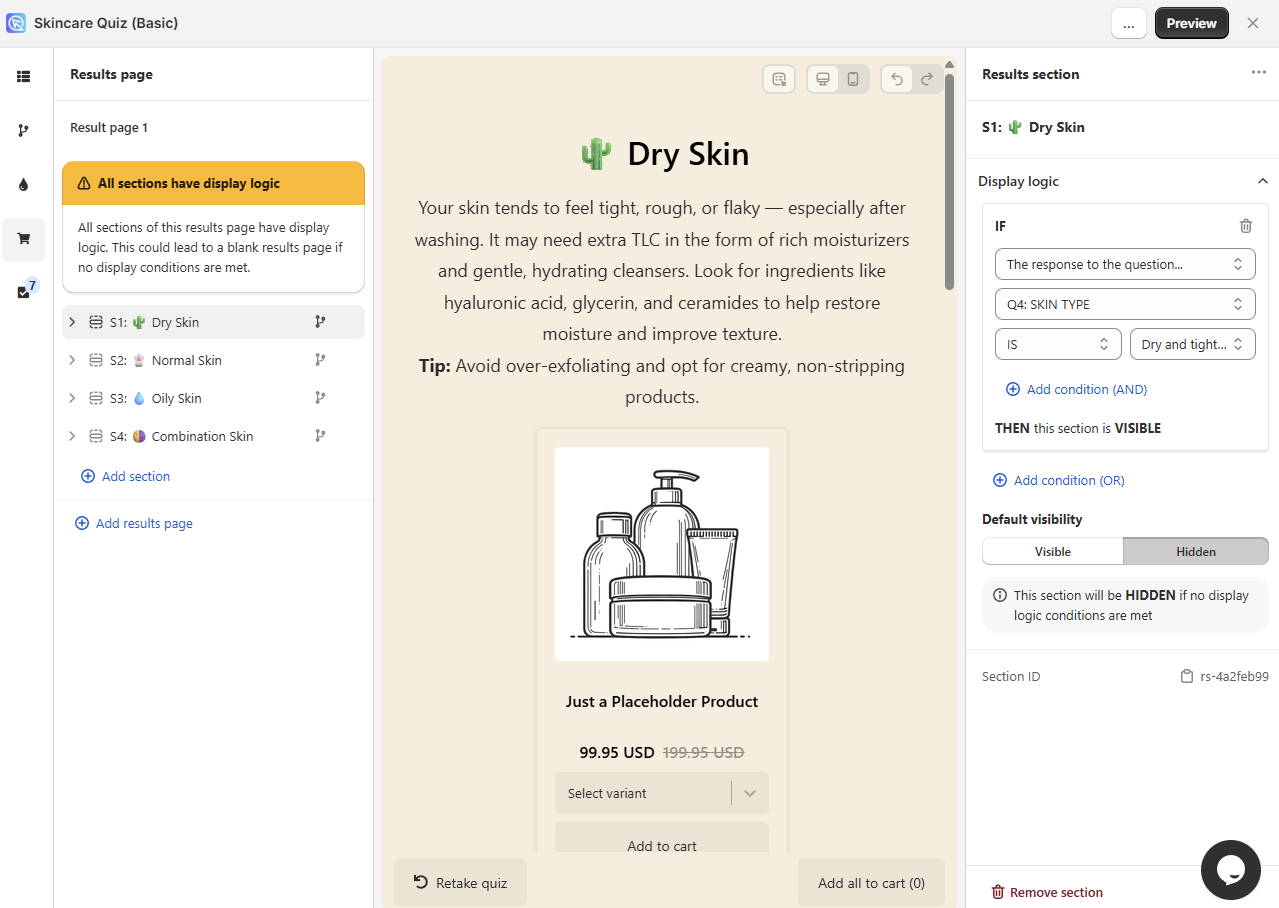
Add sections to the Results Page. Open the Results Page and add different sections.
Example: Results Page with four sections
The quiz has four sections on the Results Page for different skin types: Dry Skin, Normal Skin, Oily Skin, and Combination Skin. Without display logic, all sections would be visible at once.To show only one section based on user responses, display logic must be applied to each section.
-
Click on a section title to open the Section settings. From the side menu, click
+ Add logic condition (OR)to create a new Display Logic rule. -
Add a Display Logic rule for the first section.
Display Logic format
- If
The response to question- Choose thequestionthat determines the skin type. - is - Select the choice that corresponds to
Dry Skin. - THEN section is VISIBLE
- Choose
Default visibilityto beHidden.
Example: Display Logic rule for the Dry Skinsection
- If
The response to question- Choose thequestionthat determines the skin type. - is - Select the choice that corresponds to
Dry Skin. - THEN section is VISIBLE
- Choose
Default visibilityto beHidden.
- If
-
Repeat the process for other skin types.
Example: Display Logic rule for other sections
- If the response to the question
Q4: SKIN TYPEisDry and tight all over, then the section is visible. Default visibility is set toHidden. - If the response to the question
Q4: SKIN TYPEisNot too oily, not too dry, then the section is visible. Default visibility is set toHidden. - If the response to the question
Q4: SKIN TYPEisOily all over, then the section is visible. Default visibility is set toHidden. - If the response to the question
Q4: SKIN TYPEisOily in certain areas, then the section is visible. Default visibility is set toHidden.
- If the response to the question
-
Publish the changes with the top-right
Savebutton to update the preview/live quiz and test the setup. Preview the quiz by clickingPreviewbutton and select different skin types to ensure only the relevant section is displayed.Advanced Display Logic Conditions
You can set multiple conditions for the same section in Display logic:
- Example 1: A section can be visible if the skin type is "dry and tight" OR if the age group is "teens".
- Example 2: A section can be visible if both conditions are met: skin type is "dry and tight" AND skin concerns include "acne".
Warning
If your display logic depends on many different conditions, you can use the
ANDoperator to combine them.However, using too many conditions can make the logic complex and difficult to understand. In that case, it's better to use a different approach. Consider building a quiz that is Based on a Winning Variable or a Total Score.
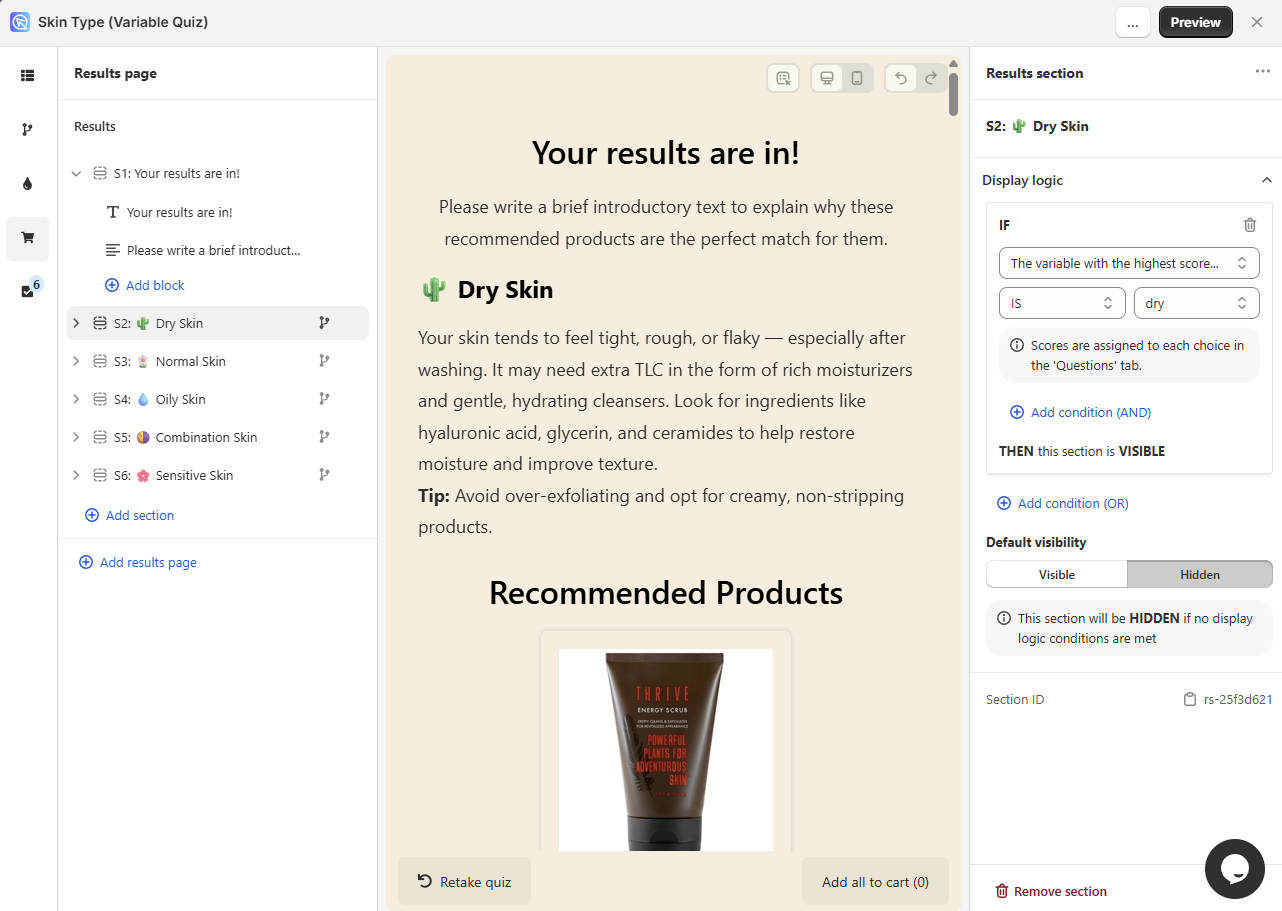
Based on Winning Variable
Example: Show a different section on a Results Page based on the winning variable
You're building a personality-type or Dosha quiz. You want to show a different text and product recommendations based on the winning variable. For examples, if the user chooses mostly A's, B's, C's, etc. a different section with different text and product recommendations is shown.
-
Open the Questions tab and add Questions and Choices.
Example: Quiz with five questions, each with five choices
The quiz consists of five questions, each with five choices. Each question and choice should help the user determine their skin type.
-
Assign varaibles to choices. Each choice is associated with a custom variable and a score via the
Choices Settingssection.Tip
To learn how to add scores or variables to choices, check out this section.
Example: Assigning variables to choices
Each answer contributes a score of +1 to the corresponding skin type variable:
- Dry skin:
dry +1 - Normal skin:
normal +1 - Oily skin:
oily +1 - Combination skin:
combination +1 - Sensitive skin:
sensitive +1
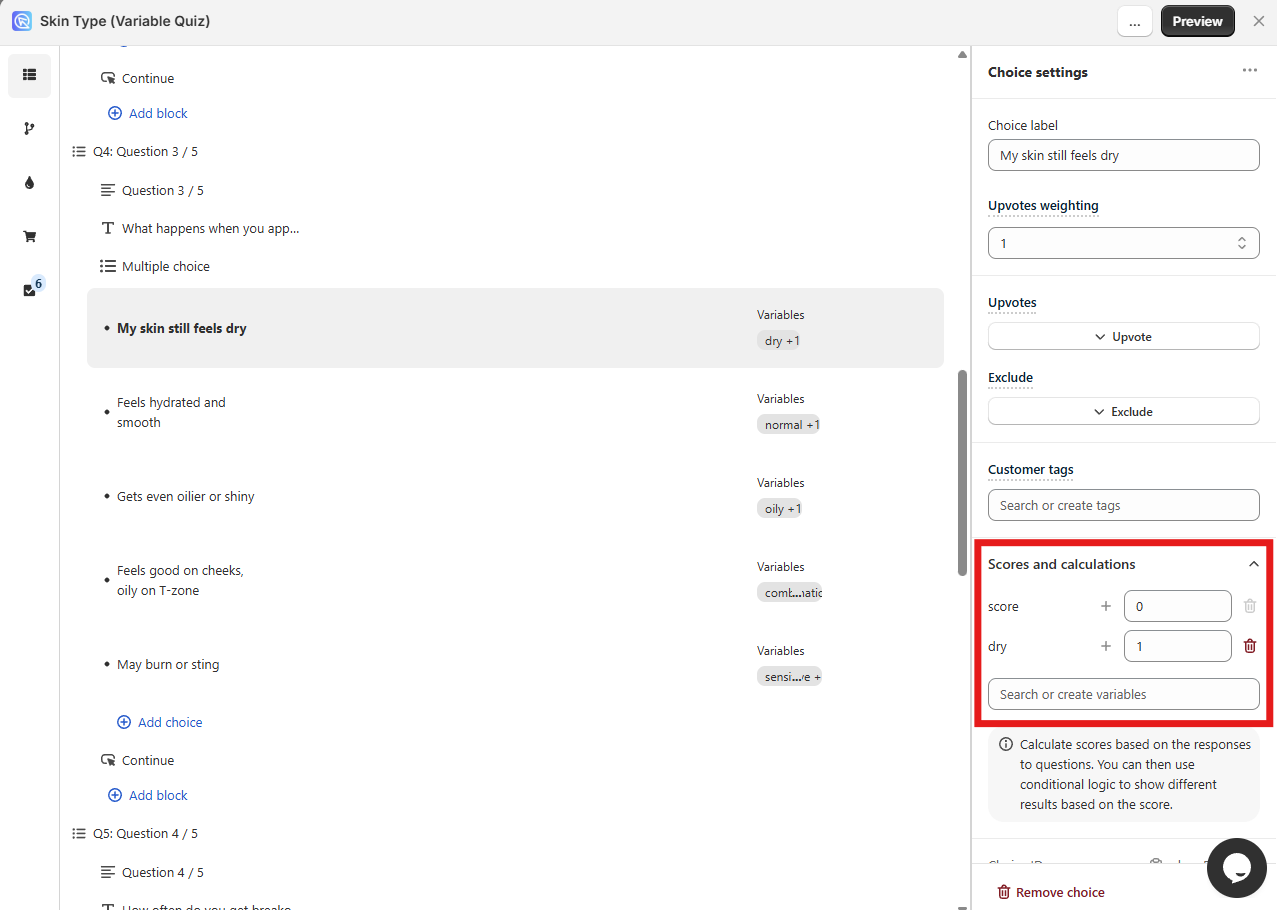
This scoring will help determine the user's skin type based on their responses.
- Dry skin:
-
Go to the Results Page tab and add different sections to the Results Page.
Example: Results Page with five sections
The results page contains five sections, each corresponding to a skin type. Each section contains a heading, text and a product block to recommend products for that skin type.
-
Make sure each section contains a product block to recommend products for that skin type.
Product recommendations
Each section can display recommended products in a product block based on user responses or fixed recommendations:
- Dynamic Recommendations: Requires upvoting products via choice settings to influence the recommendation algorithm.
- Fixed Recommendations: Set specific products to always display for each skin type section by changing the recommendation system to fixed and selecting items for each block. Ensure to configure fixed recommendations for all sections to provide consistent product suggestions.
Change the
Recommendation Systemin theProduct Block Settingsto whatever best suits your needs. For a personality-type quiz, we recommend usingFixed Recommendationsand selecting products for each section. -
To display the correct section based on the highest scoring variable, go to Section Settings, find
Display Logicand click+ Add condition (OR). -
Add Display Logic to the Section. Set up the rule like this:
Display Logic format
- If
The variable with the highest score is/is not-Pick the variable- THEN this section is VISIBLE
Default visibilityisVisible/Hidden.
Example: Display Logic rule for the Dry Skin section
- If
The variable with the highest score is-dry- THEN this section is VISIBLE
- Set the
Default visibilitytoHidden.
- If
-
For each section, set a similar rule for the visibility condition.
Example: Display Logic rule for other skin type sections
- If the highest score is
dry, show the dry skin section. - If the highest score is
normal, show the normal skin section. - If the highest score is
oily, show the oily skin section. - If the highest score is
combination, show the combination section. - If the highest score is
sensitive, show the sensitive skin section.
- If the highest score is
-
Publish the changes with the top-right
Savebutton to update the preview/live quiz and clickPreviewto test the setup.Testing the setup
Select answers that correspond to a specific skin type (e.g., mostly dry skin). Verify that the correct results section is displayed based on the selected answers.
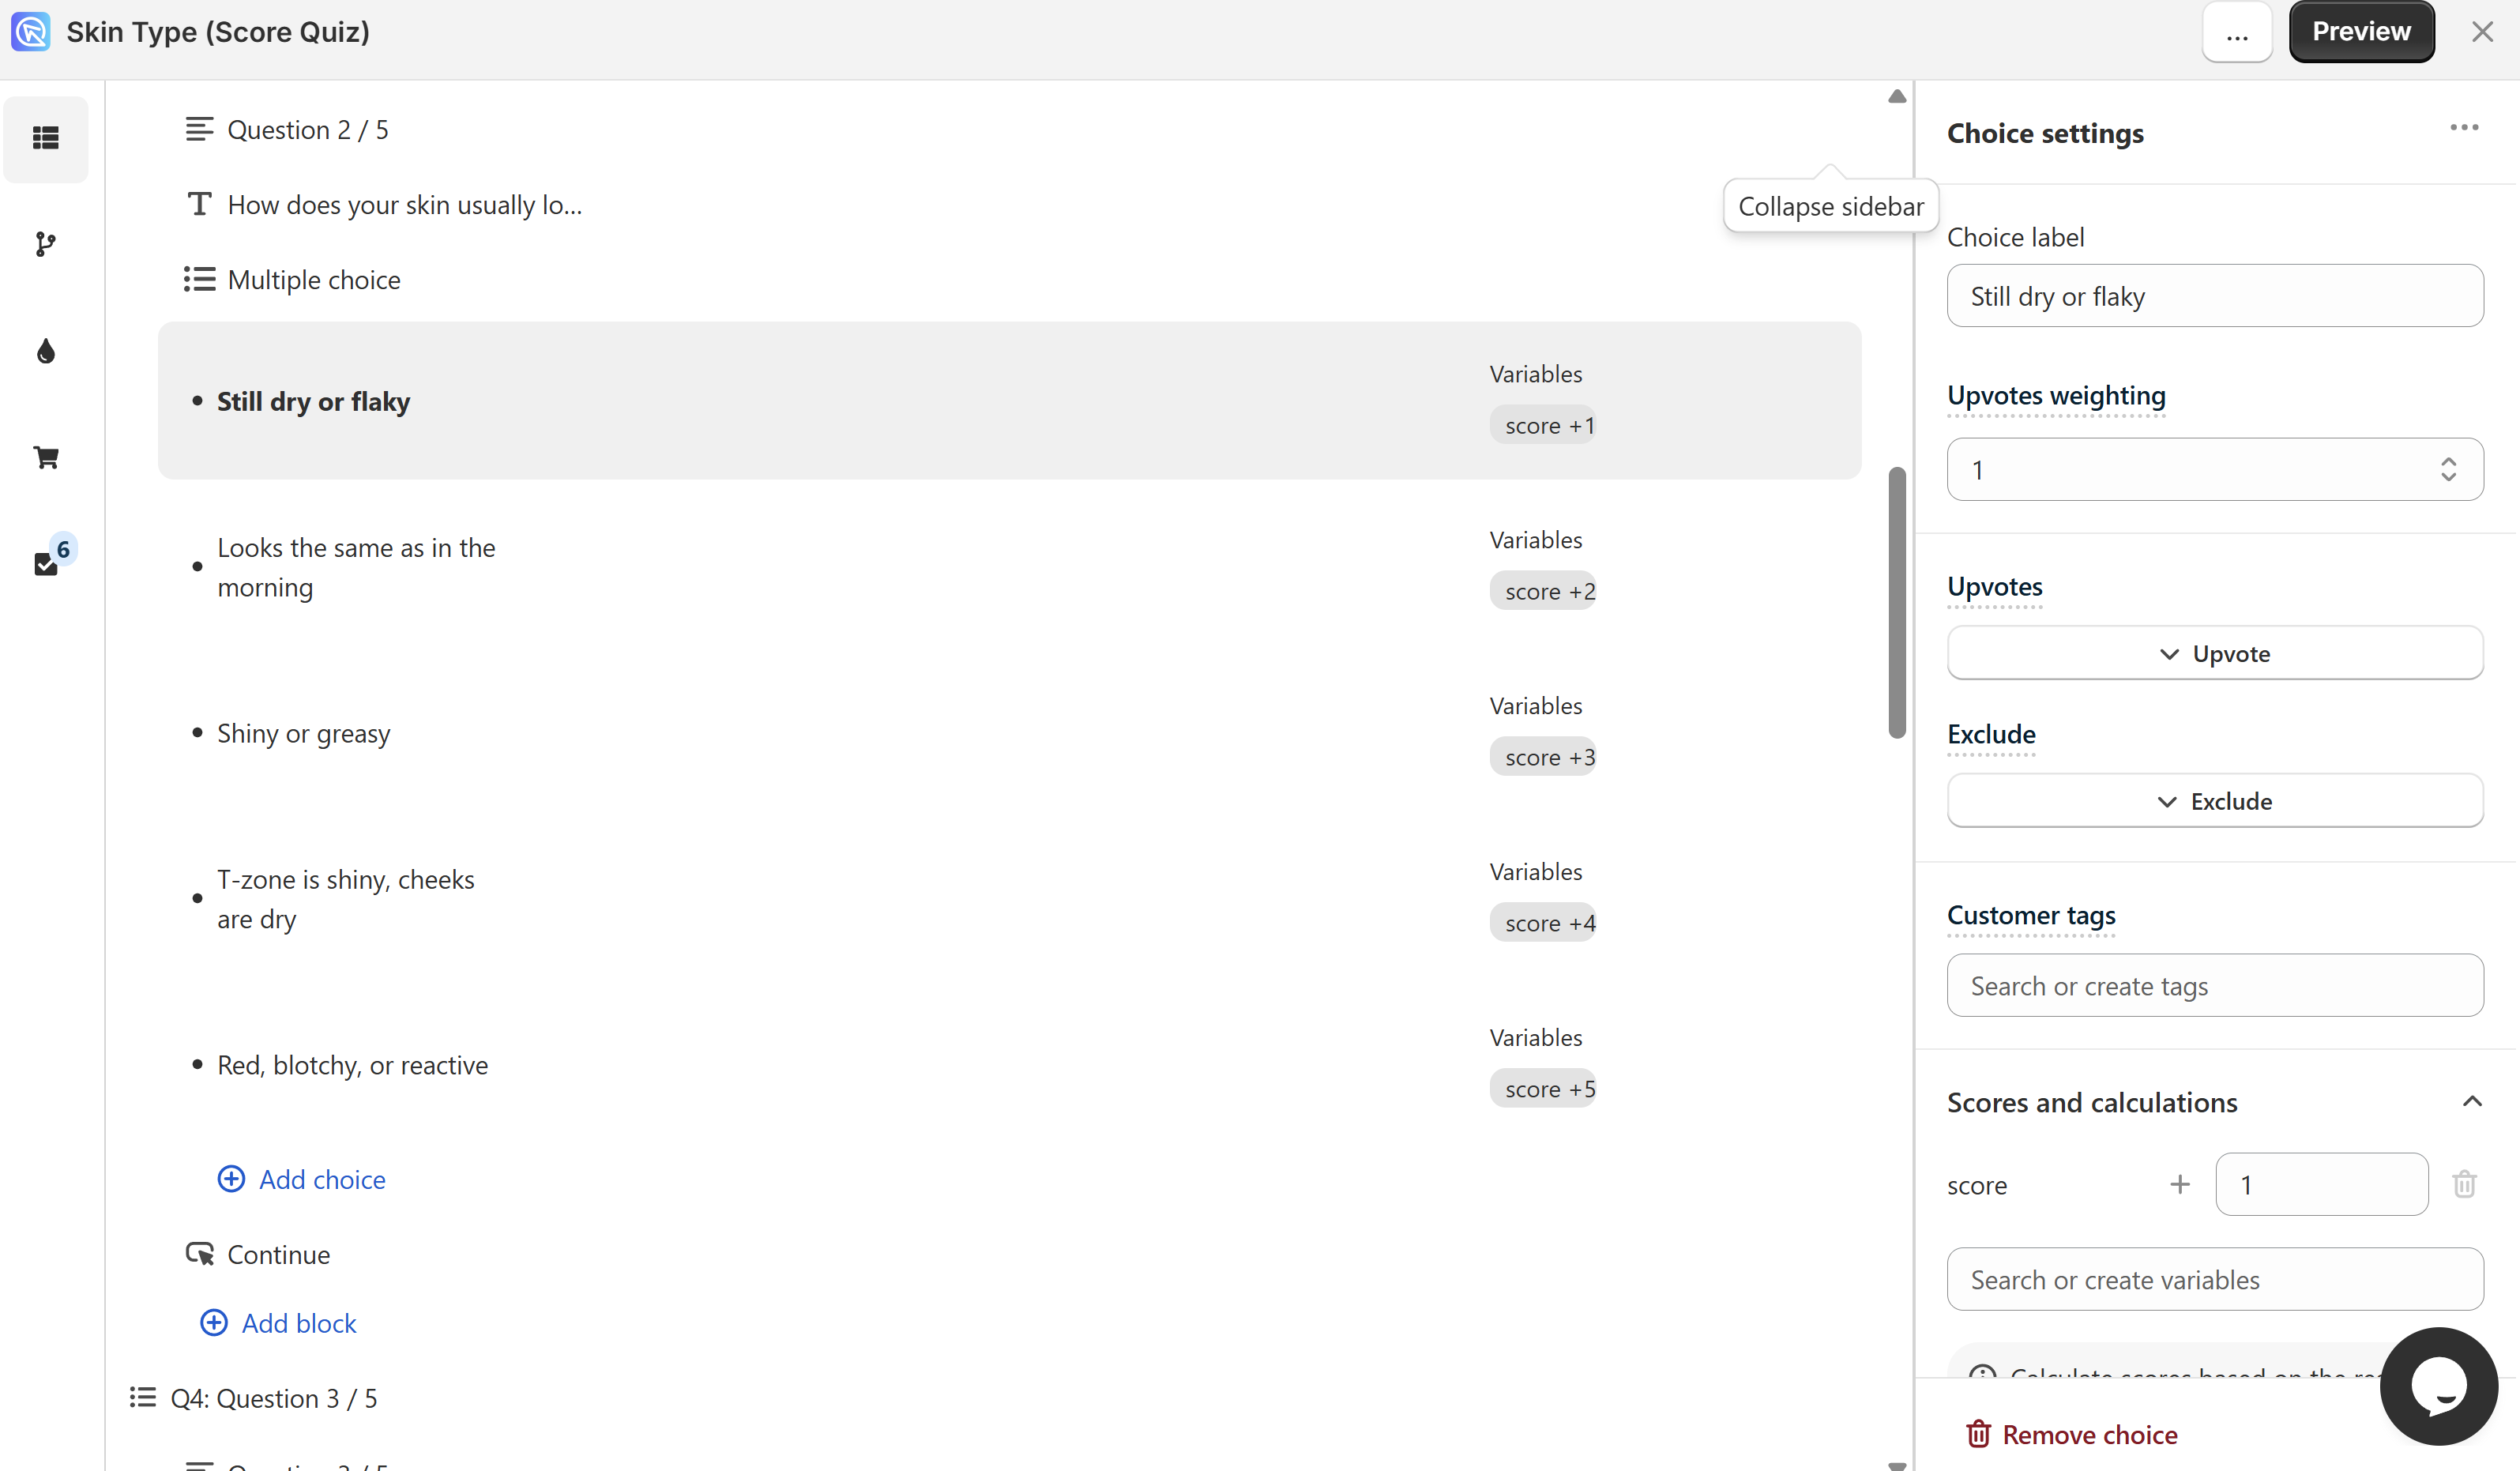
Based on Total Score
Example: Show a different section on a Results Page based on the total score
You're building a custom scoring or presonality-type quiz. You want to show a different text and product recommendations based on the score of a variable. For examples, if the user's score is above 50, a different section with different text and product recommendations is shown.
-
Open the Questions tab and add Questions and Choices.
Example: Quiz with five questions, each with five choices
The quiz consists of five questions, each with five choices. Each question and choice should help the user determine their skin type.
-
Assign varaibles to choices. Each choice is associated with a custom variable and a score via the
Choices Settingssection.Tip
To learn how to add scores or variables to choices, check out this section.
Example: Assigning scoresto choices
Each answer contributes a score of +1 to the corresponding skin type variable:
- First choice:
+1 point - Second choice:
+2 points - Third choice:
+3 points - Fourth choice:
+4 points - Fifth choice:
+5 points
The total score helps determine the user's skin type based on their selections.
- First choice:
-
Go to the Results Page tab and add different sections to the Results Page.
Example: Results Page with five sections
The results page contains five sections, each corresponding to a skin type. Each section contains a heading, text and a product block to recommend products for that skin type.
-
Make sure each section contains a product block to recommend products for that skin type.
Product recommendations
Each section can display recommended products in a product block based on user responses or fixed recommendations:
- Dynamic Recommendations: Requires upvoting products via choice settings to influence the recommendation algorithm.
- Fixed Recommendations: Set specific products to always display for each skin type section by changing the recommendation system to fixed and selecting items for each block. Ensure to configure fixed recommendations for all sections to provide consistent product suggestions.
Change the
Recommendation Systemin theProduct Block Settingsto whatever best suits your needs. For a personality-type quiz, we recommend usingFixed Recommendationsand selecting products for each section. -
Come up with score ranges that should determine the visibility of the sections.
Example: Score ranges
- Dry skin should be shown if the score is between 5 and 7 (inclusive):
score >= 5 && score <= 7 - Normal skin should be shown if the score is between 8 and 12 (inclusive):
score >= 8 && score <= 12 - Oily skin should be shown if the score is between 13 and 17 (inclusive):
score >= 13 && score <= 17 - Combination skin should be shown if the score is between 18 and 22 (inclusive):
score >= 18 && score <= 22 - Sensitive skin should be shown if the score is between 23 and 25 (inclusive):
score >= 23 && score <= 25
- Dry skin should be shown if the score is between 5 and 7 (inclusive):
-
To display the correct section based on the total score, go to Section Settings, find
Display Logicand click+ Add condition (OR). -
Add Display Logic to the Section. Set up the rule like this:
Display Logic format
- If
The score of a variableselect the varaibleSelected variable is greater than or equal to-Number-Add your number- AND
- IF
The score of a variableselect the varaibleSelected variable is less than or equal to-Number-Add your number- THEN this section is VISIBLE
- Set the
Default visibilitytoHidden.
Example: Display Logic rule for the Dry Skin section
- If
The score of a variableselect the varaiblescore is greater than or equal to-5- AND
- IF
The score of a variableselect the varaiblescore is less than or equal to-7- THEN this section is VISIBLE
- Set the
Default visibilitytoHidden.

This rule will show the section only if the total score is between 5 and 7 (inclusive).
- If
-
For each section, set a similar rule for the visibility condition.
Example: Display Logic rule for different skin type sections
- Show dry skin section if score is between 5 and 7 (inclusive). Condition:
score >= 5 && score <= 7 - Show normal skin section if score is between 8 and 12 (inclusive). Condition:
score >= 8 && score <= 12 - Show oily skin section if score is between 13 and 17 (inclusive). Condition:
score >= 13 && score <= 17 - Show combination skin section if score is between 18 and 22 (inclusive). Condition:
score >= 18 && score <= 22 - Show sensitive skin section if score is between 23 and 25 (inclusive). Condition:
score >= 23 && score <= 25
- Show dry skin section if score is between 5 and 7 (inclusive). Condition:
-
Publish the changes with the top-right
Savebutton to update the preview/live quiz and clickPreviewto test the setup.Testing the setup
Select answers that correspond to a specific skin type (e.g., mostly dry skin). Verify that the correct results section is displayed based on the selected answers.
Logic can also be applied to the contents of your Results Page.
With Display logic, you can show or hide elements of your results page based on the customer's answers.
- Let’s add four
Content blockswith the skin type advice to your Results Page. - You can edit the block text with Markdown language.
- Now, how can we make only one block appear, instead of all of them? We can add Display logic.
- To do that, activate it in the lower right corner with the
...button. - Let’s add the first logic condition.
- If the answer to
‘How does your skin feel on an average day?’is‘Dry and tight all over’then this block (Dry skin block) will be Visible. - In all other cases, it will be Hidden.
- If the answer to
- Now, let’s add similar rules to other content blocks.
- Let’s publish the changes with the top-right
Publishbutton and test the quiz again withPreview.
You’ve now successfully used Display logic to show and hide content on the Results page.
Display Logic - other use cases
Display Logic is a powerful tool that can also be used to:
- show different image results depending on customer answers
- or show product blocks with different numbers of recommendations.
Congratulations! You’ve learned how to use simple logic to show personalized advice to your customers.
This article explains how to use conditional logic to show personalized advice to your customers in the RevnueHunt app.