Zero-Party Data: How to Turn Quiz Answers into a Segmented Revenue Engine
Why the quiz is the most powerful data collection tool you're not using to its full potential.
Most merchants think of a product recommendation quiz as a conversion tool: someone takes it, gets a recommendation, maybe buys. That's the surface level.
The merchants generating serious, compounding revenue from their quizzes understand something different: the quiz is a data collection engine. Every answer a customer gives is a declared preference - their hair type, their skin concern, their budget, their goals. That data, properly tagged and passed to your CRM, powers a segmented email funnel that sells on autopilot, long after the quiz session is over.
This article explains how to build that system.
What this covers
This is a strategic guide to using customer tags, CRM segmentation, and automated email flows together. It uses Klaviyo as the primary example, but the principles apply to any CRM that integrates with RevenueHunt: Omnisend, Mailchimp, ActiveCampaign, HubSpot, or custom Webhooks.
Why Quiz Data is Different: Zero-Party Data
There are three kinds of customer data:
| Type | What it is | How it's collected | Reliability |
|---|---|---|---|
| Third-party data | Behavioral data bought from data brokers | Purchased; tracks users across the web | Low - inferred, cookie-dependent, increasingly blocked |
| First-party data | Behavioral data from your own store | Purchase history, browsing, click patterns | Medium - inferred from behavior |
| Zero-party data | Declared preferences from the customer themselves | Explicitly given, like quiz answers | High - intentional, direct, consented |
Zero-party data is the most valuable kind. A customer who answers "I have dry, curly hair and my main concern is frizz" has told you exactly what they need. You didn't infer it from their browsing history. You didn't buy it from a data broker. They gave it to you directly, in exchange for a personalized recommendation they wanted.
That's what a quiz captures - at scale, for every customer who takes it.
The compounding advantage
Unlike third-party cookies, which are being deprecated across every major browser, zero-party data belongs to you permanently. The quiz data you collect today powers your email flows next month, next quarter, and next year. Every quiz submission makes your segmentation smarter.
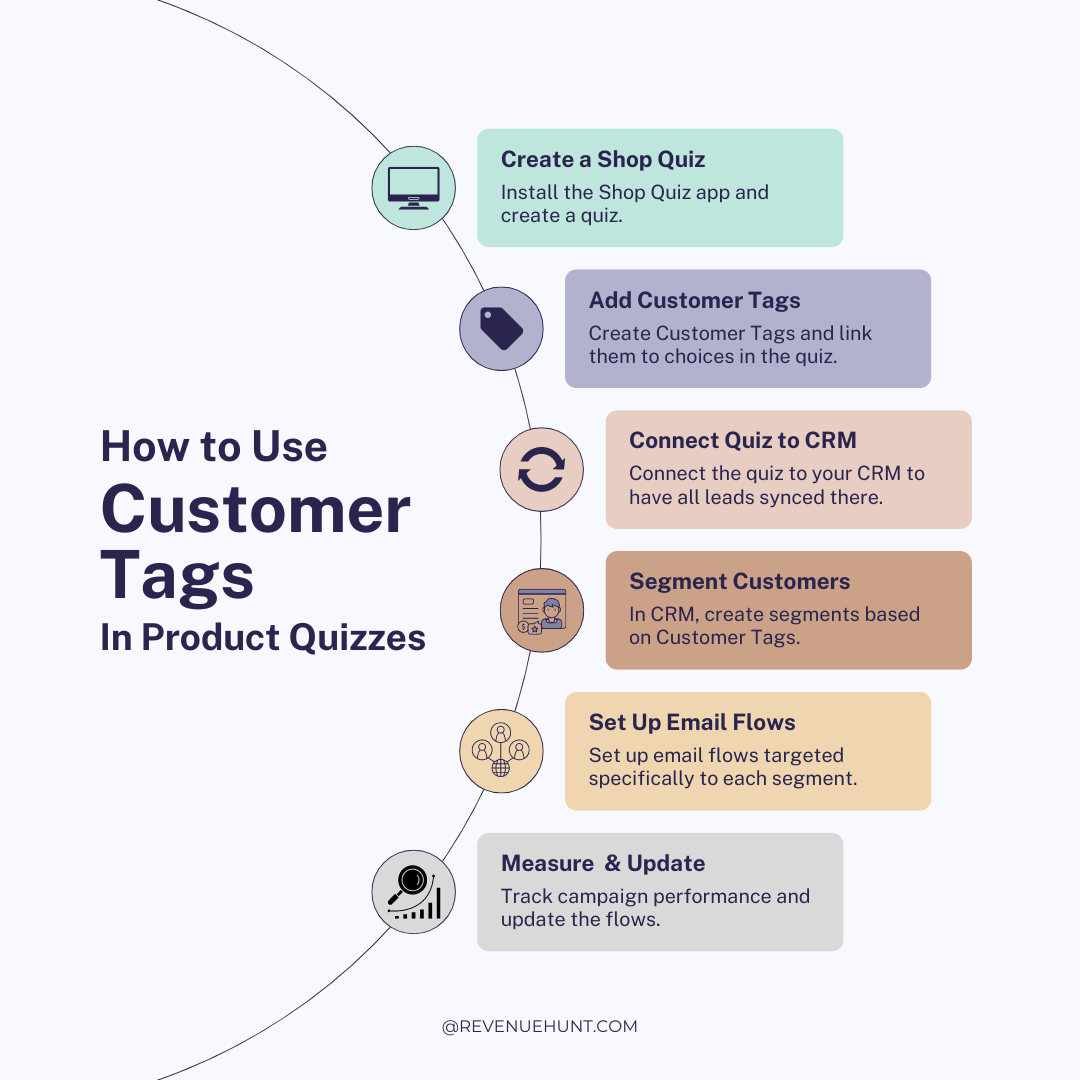
The Funnel Architecture
A quiz without a downstream funnel is a missed opportunity. The full system looks like this:
Customer takes quiz
        ↓
Quiz captures email + assigns tags based on answers
        ↓
Tags flow into your CRM (Klaviyo, Omnisend, etc.)
        ↓
CRM creates dynamic segments from tags
        ↓
Segment-specific email flows trigger automatically
        ↓
Customer receives relevant content + recommendations
        ↓
Purchase → Repeat purchase → Brand loyalty
Each step only works if the previous one is set up correctly. Most merchants stop at step one (the quiz) or step two (email capture) and wonder why the quiz "isn't converting well." The quiz is fine. The funnel is missing.
Step 1: Design Your Tag Taxonomy Before Building the Quiz
The biggest mistake merchants make is adding tags reactively - tagging a few choices here and there after the quiz is built. A well-designed tag system starts with a plan.
Think in three categories:
Profile tags (who they are)
These describe the customer's characteristics. They change rarely and form the foundation of long-term segmentation.
Examples: hair-type:curly, skin-type:dry, age-group:30s, gender:female, hair-concern:frizz
Intent tags (what they want right now)
These describe the customer's goals at the time of taking the quiz. They inform the immediate recommendation and the first email flow.
Examples: goal:repair, goal:volume, goal:anti-aging, goal:hydration, concern:acne
Behavioral tags (how they engage)
These describe purchase intent signals captured in the quiz. Use these to prioritize your most qualified leads.
Examples: budget:premium, buys-for:self, buys-for:gift, routine:full, routine:minimal
Tag naming conventions matter
Use consistent, lowercase, descriptive names. hair-type:curly is better than Curly because it's clear what dimension it describes and won't conflict with other tags. Your CRM filters will be much cleaner. Agree on a naming convention before you start and stick to it.
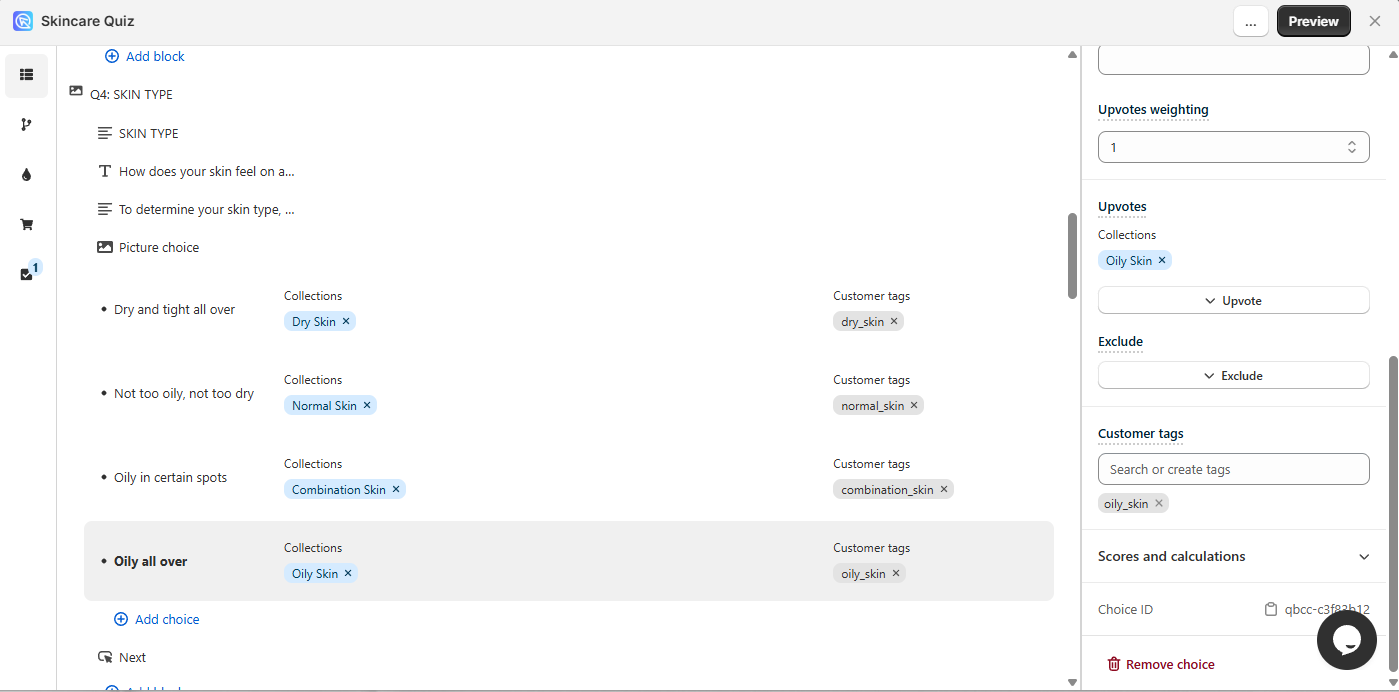
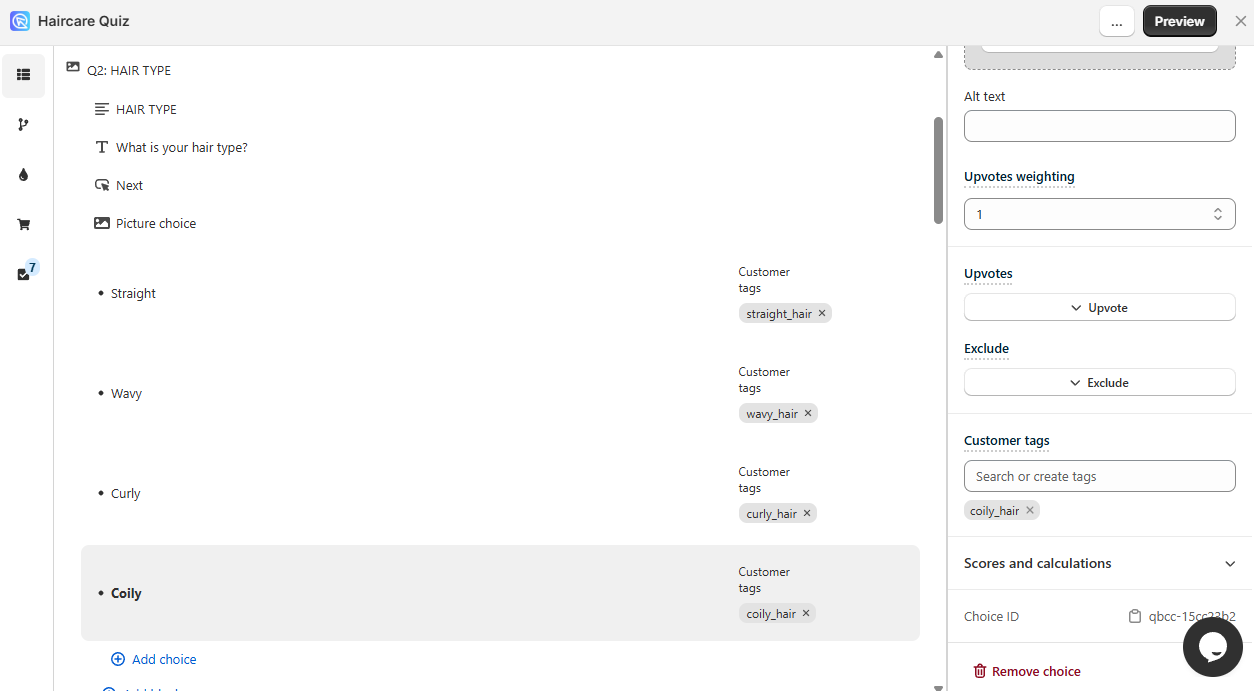
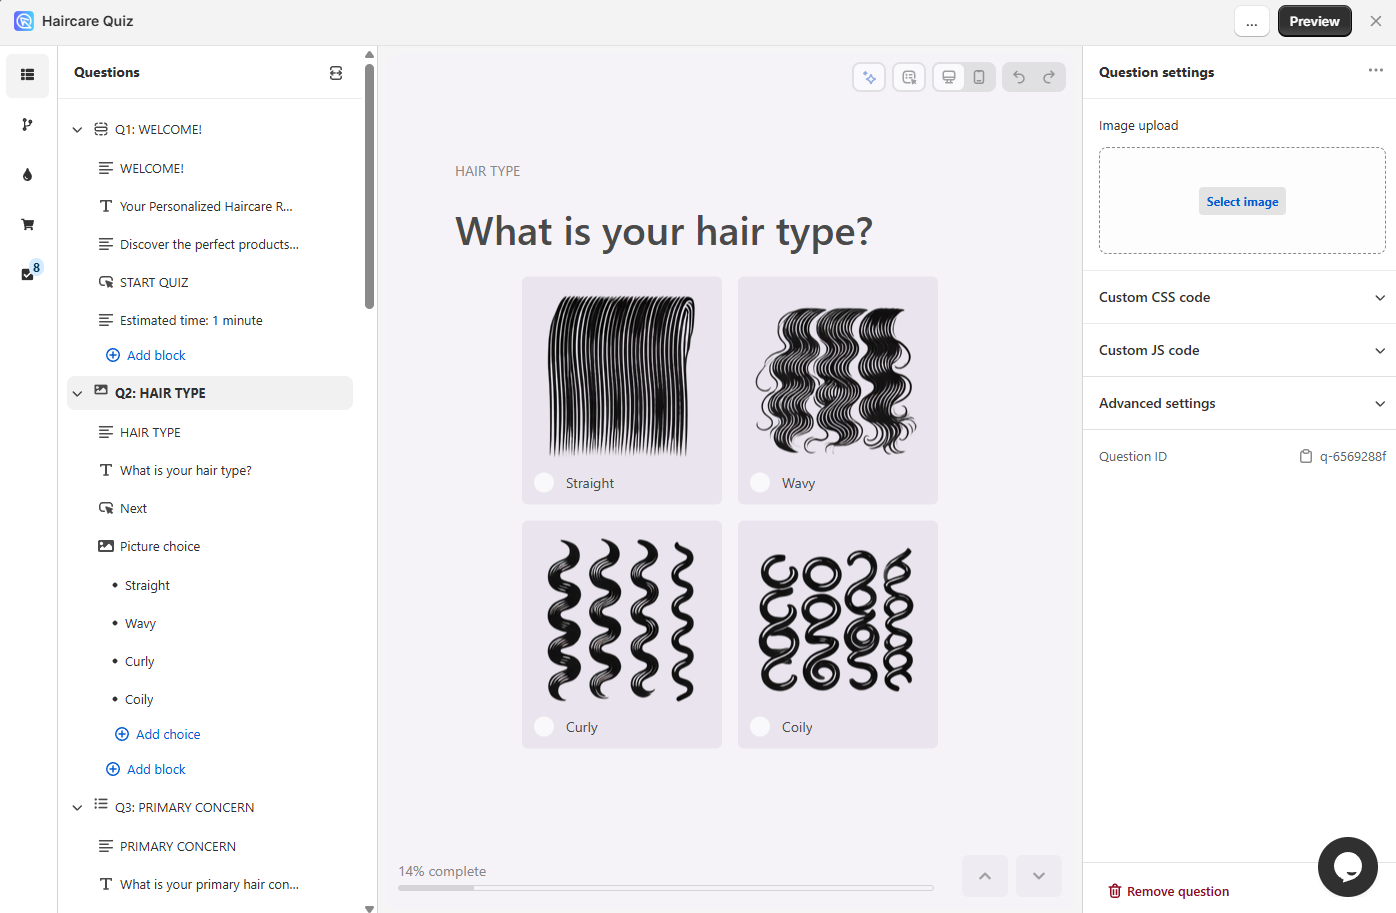
Step 2: Add Customer Tags to Quiz Choices
Once you have your tag taxonomy, add tags to choices in the Quiz Builder. Every answer choice can carry one or more tags, and a customer's full tag profile is built from the combination of all their answers.
- Open your quiz in the Quiz Builder and click
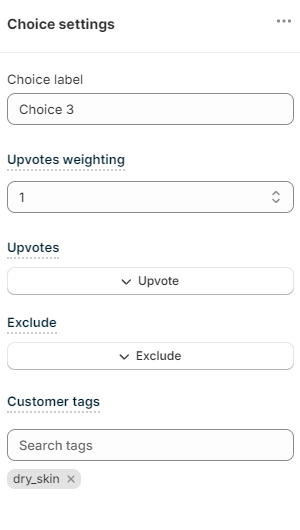
Customize. - Click on any answer choice to open its settings panel.
- Find the
Customer Tagssection. Use the search bar to find existing tags or type a new name and pressCreate new tag. -
Add all relevant tags to the choice (a choice can carry multiple tags).
-
Click
Save. Tags are automatically assigned to customers when they select that choice.
Tip
To tag every quiz taker with a shared identifier (e.g., source:quiz to identify all quiz leads in your CRM), add that tag to every choice in one of your questions. No matter what they answer, the tag gets assigned.
Note
Tags are forwarded to all connected integrations. A tag assigned in the quiz will appear in Shopify Customer profiles, Klaviyo contact properties, or any other connected platform automatically.
- Open the Quiz Builder and navigate to the
Customer Tagssection. - Type a tag name next to a choice and confirm with
Enterto create it. - Link the same tag to additional choices as needed.
-
Click
Publishto apply the changes to your live quiz.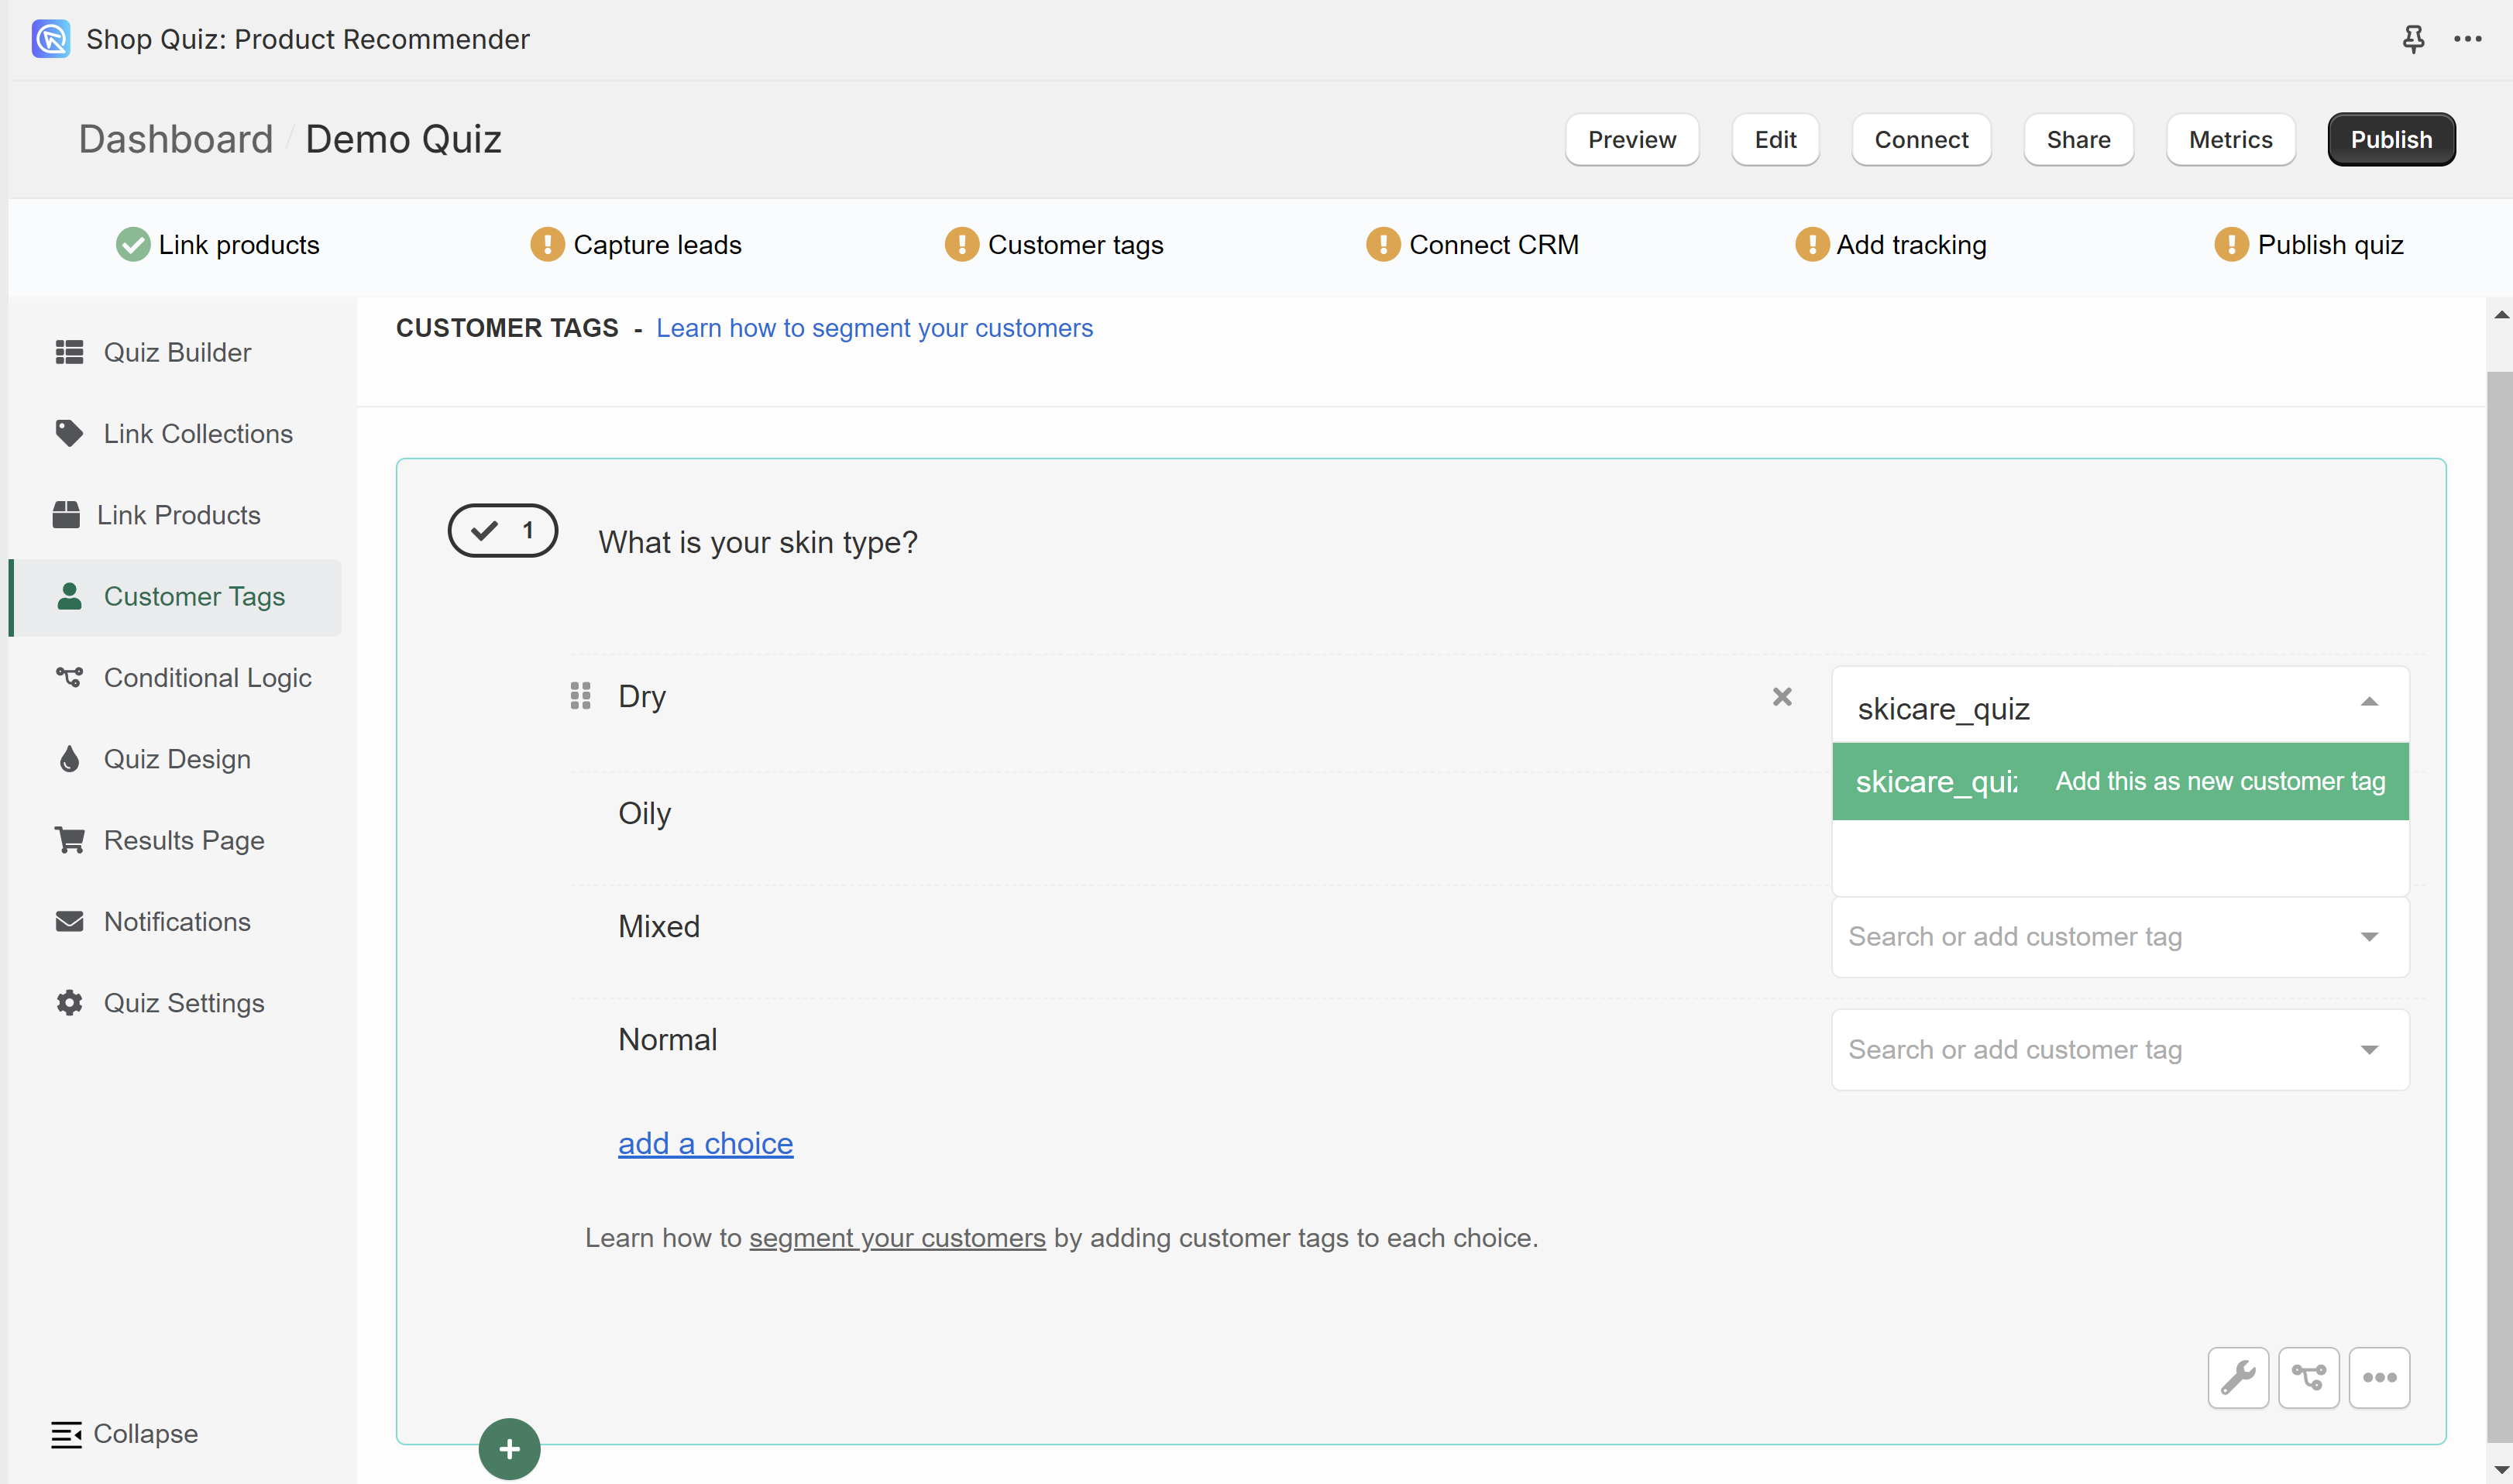
- Open the Quiz Builder and navigate to the
Customer Tagssection. - Type a tag name next to a choice and confirm with
Enterto create it. - Link the same tag to additional choices as needed.
-
Click
Publishto apply the changes to your live quiz.
- Open the Quiz Builder and navigate to the
Customer Tagssection. - Type a tag name next to a choice and confirm with
Enterto create it. - Link the same tag to additional choices as needed.
-
Click
Publishto apply the changes to your live quiz.
- Open the Quiz Builder and navigate to the
Customer Tagssection. - Type a tag name next to a choice and confirm with
Enterto create it. - Link the same tag to additional choices as needed.
-
Click
Publishto apply the changes to your live quiz.
- Open the Quiz Builder and navigate to the
Customer Tagssection. - Type a tag name next to a choice and confirm with
Enterto create it. - Link the same tag to additional choices as needed.
-
Click
Publishto apply the changes to your live quiz.
Step 3: Connect Your Quiz to Your CRM
Tags are only useful if they reach your email platform. Connect RevenueHunt to your CRM so that every quiz submission - including all assigned tags, quiz answers, and recommended products - flows into your contact database automatically.
- Klaviyo: How to connect your quiz to Klaviyo
- Omnisend, Mailchimp, and others: How to connect your quiz to a CRM
- Custom integrations: Use Webhooks to pass quiz data to any platform
Once connected, every new quiz submission creates or updates a contact in your CRM with their full tag profile. Existing contacts are enriched with new tags without overwriting previous data.
Step 4: Build Segments in Your CRM
With tags flowing into your CRM, you can create dynamic segments - groups of contacts that automatically update as new quiz submissions arrive.
Lists vs. Segments
Lists are static. Segments are dynamic. Add a customer to a list and they stay until you remove them. A segment updates automatically whenever a contact meets (or no longer meets) its conditions. Always build quiz-based segments as dynamic segments - not static lists.
A worked example: haircare store
A haircare brand runs a quiz asking customers about hair type, concerns, and goals. Here's how their segments look:
| Segment name | Condition |
|---|---|
| Curly Hair | Tagged with hair-type:curly |
| Dry/Damaged Hair | Tagged with hair-concern:dryness OR goal:repair |
| Frizz Concern | Tagged with hair-concern:frizz |
| Volume Seekers | Tagged with goal:volume |
| Full Routine Buyers | Tagged with routine:full |
| Premium Budget | Tagged with budget:premium |
| Quiz Leads (all) | Tagged with source:quiz |
Each segment is independent, and a single contact can belong to multiple segments. Someone tagged with hair-type:curly AND goal:volume will be in both the Curly Hair and Volume Seekers segments - and can receive flows from both.
How to create segments in Klaviyo
Check this video to learn how to create segments based on quiz submissions in Klaviyo: How to Create Segments in Klaviyo

Step 5: Build Your Email Flows
Segments are the input. Email flows are the output. Every segment should have at least one automated flow triggered by joining that segment.
The core flow structure
Email 1: Immediate - Send within 5-10 minutes of quiz completion
This is the highest-performing email in any post-quiz sequence. The customer just expressed their preferences and received a recommendation. They're engaged. Send them:
- Their personalized product recommendation (with images and a direct add-to-cart link)
- A brief explanation of why these products match their profile
- A discount code to close the sale
- A clear single CTA
First email drives ~45% of the revenue in a post-quiz sequence
The first email in a drip sequence consistently generates the majority of sales. The customer is still warm. Don't delay it.
Email 2: Educational - Send 2-3 days later
Content specific to their segment. Not a sales email - an educational one.
Examples: "5 tips for managing curly hair in humid weather" / "How to build a repair routine from scratch" / "The difference between moisturizing and protein treatments for dry hair"
This email builds credibility and keeps you top of mind before the next sales nudge.
Email 3: Social Proof + Offer - Send 5-7 days later
Customer reviews, before/after results, or user-generated content relevant to their segment's concern. Include a secondary product recommendation or a bundle offer. Reinforce the discount if it hasn't been used.
Email 4: Re-engagement - Send 10-14 days later
For contacts who haven't purchased: a gentle re-engagement with a fresh angle (different product, new benefit, or urgency trigger like low stock or sale ending).
Tailor every email to the segment, not just the subject line
Personalization isn't just using {{ first_name }}. It means the product images, the copy, the concerns addressed, and the CTA are all specific to what that customer told you in the quiz. A dry hair email and a curly hair email should look and feel completely different - even if they're in the same flow template.
Segment-specific examples
| Segment | Email 1 content | Email 2 content | Email 3 content |
|---|---|---|---|
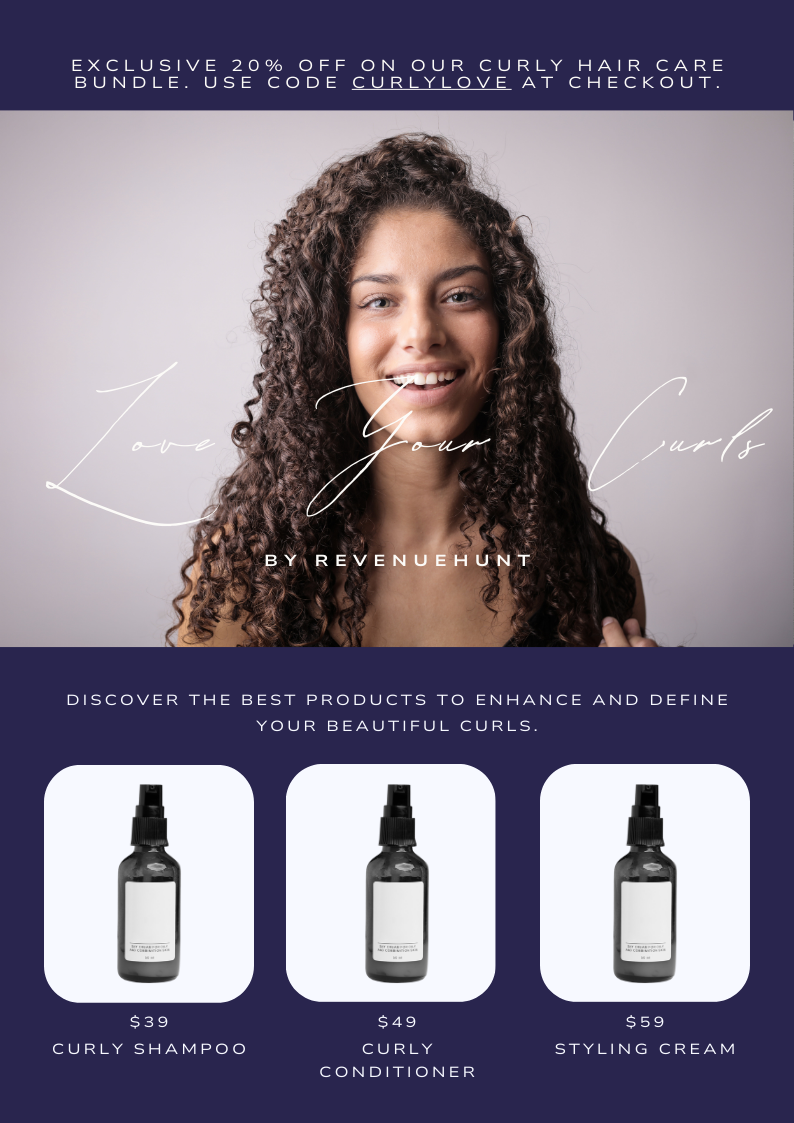
| Curly Hair | Curl-enhancing shampoo + styling cream recommendation | "How to define curls without frizz" | Reviews from curly-haired customers + curl bundle offer |
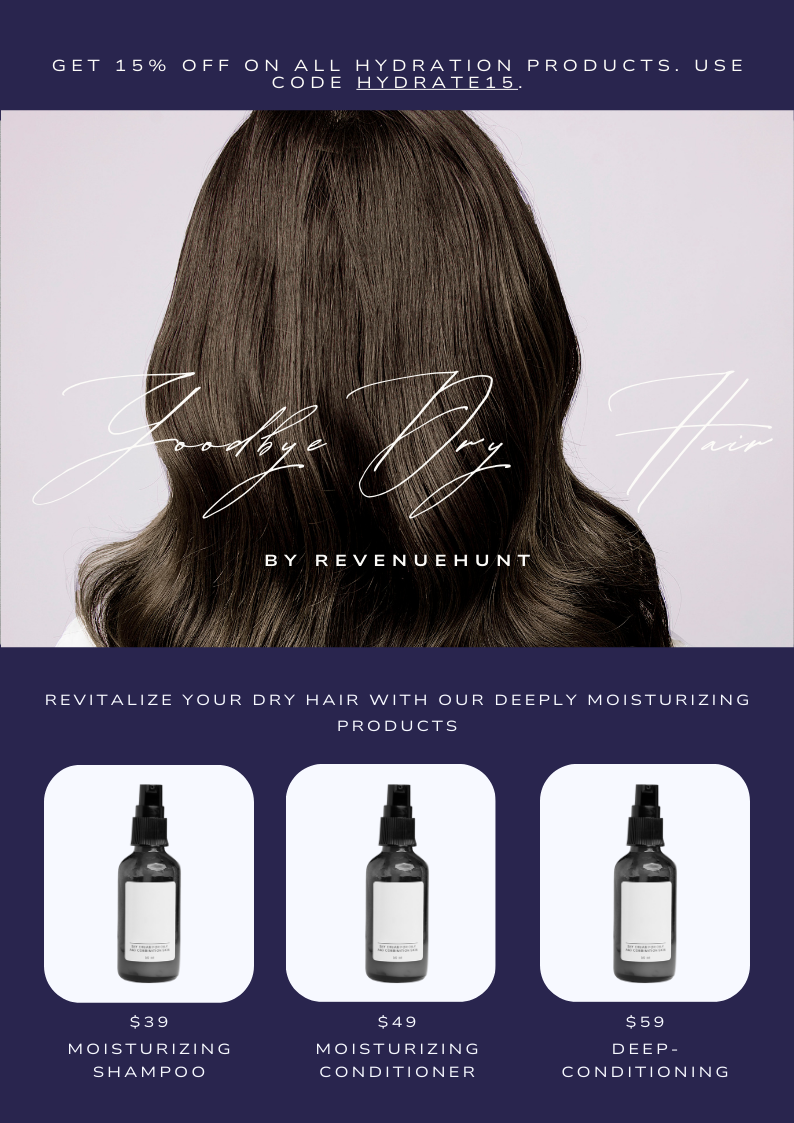
| Dry/Damaged | Moisturizing shampoo + deep conditioner | "Signs your hair needs a protein treatment" | Before/after repair results + treatment set |
| Volume Seekers | Volumizing shampoo + root spray | "Why your hair falls flat (and how to fix it)" | Bestselling volume kit with bundle discount |
| Full Routine | Complete routine (cleanser, treatment, styler) | "How to layer haircare products for best results" | Routine bundle with loyalty offer |
Step 6: Keep the Data Fresh
Zero-party data has a shelf life. A customer who told you they had dry hair two years ago may have changed their routine, their concerns, or their goals. Build a process to refresh it.
Practical approaches:
☐ Re-engagement quiz: When a customer has been inactive for 6+ months, trigger an email inviting them to retake the quiz. Frame it as "Your routine, updated" - not as a re-marketing pitch.
☐ Seasonal quiz variants: Run a new version of the quiz for seasonal campaigns (e.g., summer haircare, winter skincare). New quiz, new tags, updated segments.
☐ Post-purchase tags: After a purchase, tag the customer with the product category they bought. Cross-reference with quiz tags to identify gaps (e.g., bought shampoo but not conditioner) and target accordingly.
☐ Review segment performance quarterly: Check open rates, click rates, and conversion rates by segment. Weak-performing segments may indicate a tagging problem (too broad), a content problem (wrong message), or a product problem (nothing compelling to recommend to this group).
The Platform Data
This isn't theoretical. Here's what the numbers show for quizzes that use this full-funnel approach:
| Setup | Avg. conversion rate | Avg. orders per quiz |
|---|---|---|
| Quiz only (no CRM) | 9.7% | 146 |
| Quiz + Klaviyo connected | 12.0% | 242 |
Quizzes with a connected CRM generate 24% higher conversion rates and 66% more orders on average. The quiz content is the same. The funnel makes the difference.
Works With Any CRM
The strategy above is built around Klaviyo because it's the most common integration, but every component works with any CRM that connects to RevenueHunt:
| Platform | Integration |
|---|---|
| Klaviyo | Send leads to Klaviyo |
| Omnisend | Send leads to Omnisend |
| Mailchimp | Send leads to Mailchimp |
| ActiveCampaign, HubSpot, others | Connect via Webhooks |
The tags, answers, and recommended products pass through in all cases. The segmentation logic lives in your CRM, not in the quiz.
The key insight
The quiz is not a conversion widget. It's the front door of a segmented revenue system. The recommendation on the results page is the first sale. The email flows - built on zero-party data the customer willingly gave you - are every sale after that.
Related articles: