How to Add a Welcome Screen to Your Quiz
The welcome screen is the first slide of your quiz: a short headline, a line of supporting text and a button that starts the quiz. Merchants also call it the welcome page, the welcome slide or the start screen. In the Quiz builder it is a question type called Welcome Message.
A welcome screen is optional. Without one, the quiz opens on your first question.
Why it is worth adding
The welcome screen is where customers decide whether the quiz is worth their time. Tell them what they get and how long it takes. See how to reduce quiz drop-off for what to put on it.
Add a welcome screen
-
Open your quiz in the Quiz builder.
-
Click
+ Add question. -
Choose
Welcome Message, underMessages.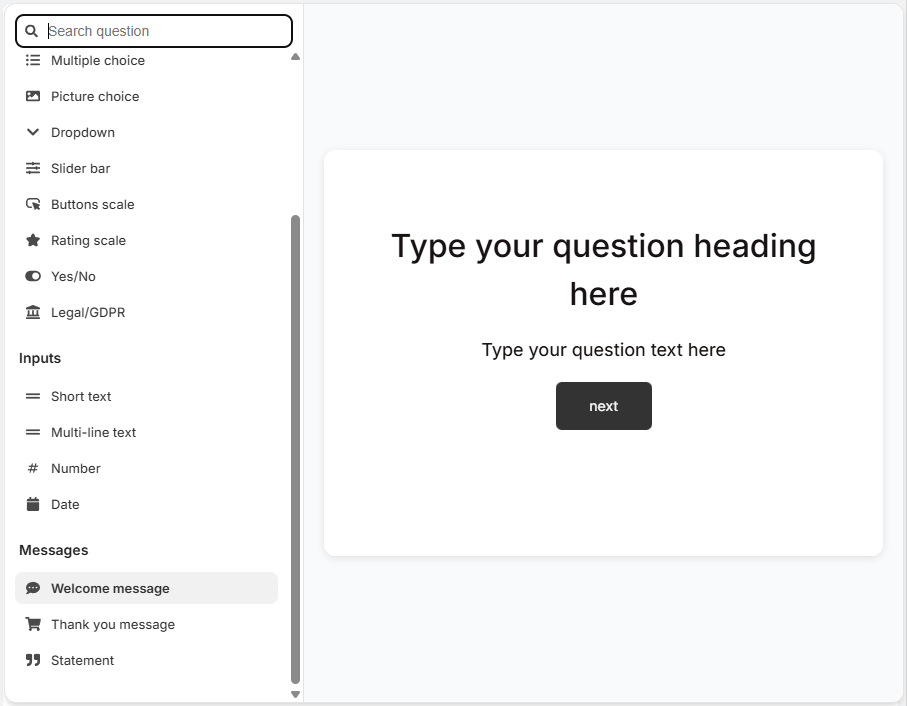
-
Click the top-right
Savebutton. This updates both the preview and the live quiz.
-
Open your quiz in the Quiz Builder.
-
Click
+/Add new question.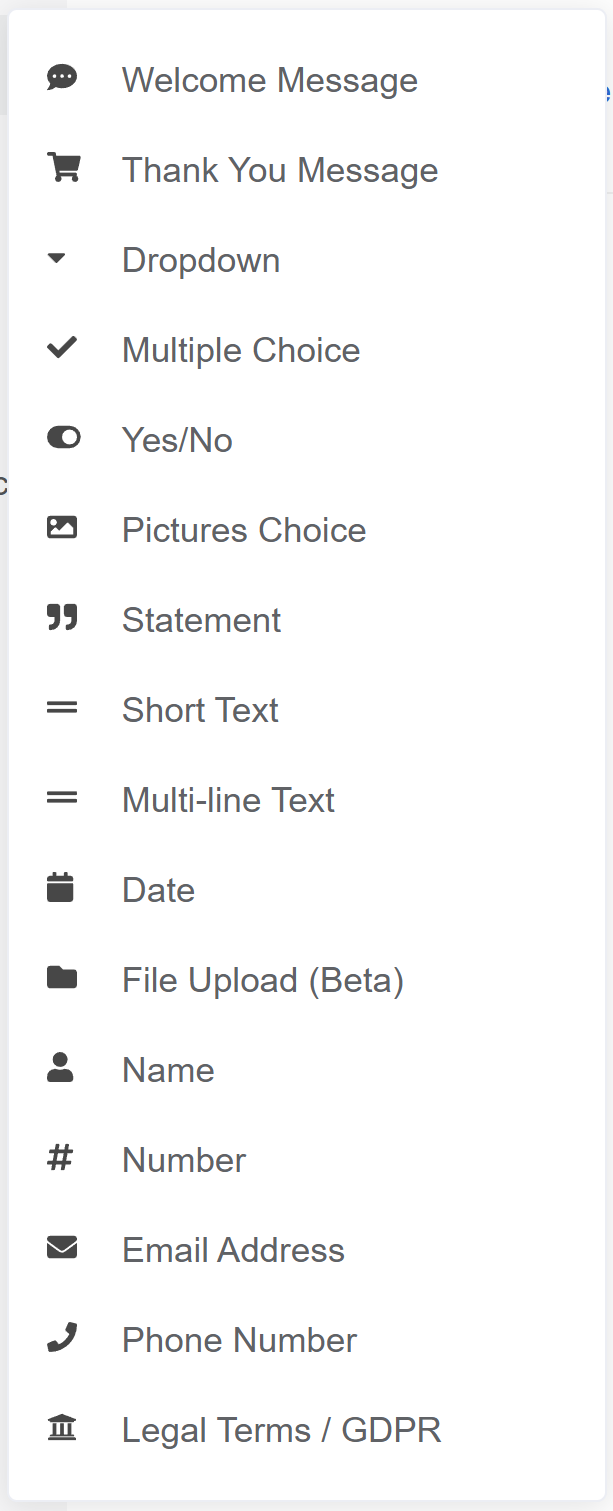
-
Choose
Welcome Message. -
Click
Publishin the top menu. This updates both the preview and the live quiz.
-
Open your quiz in the Quiz Builder.
-
Click
+/Add new question. -
Choose
Welcome Message. -
Click
Publishin the top menu. This updates both the preview and the live quiz.
-
Open your quiz in the Quiz Builder.
-
Click
+/Add new question. -
Choose
Welcome Message. -
Click
Publishin the top menu. This updates both the preview and the live quiz.
-
Open your quiz in the Quiz Builder.
-
Click
+/Add new question. -
Choose
Welcome Message. -
Click
Publishin the top menu. This updates both the preview and the live quiz.
-
Open your quiz in the Quiz Builder.
-
Click
+/Add new question. -
Choose
Welcome Message. -
Click
Publishin the top menu. This updates both the preview and the live quiz.
It has to be the first slide
The welcome screen only comes before your questions if it sits first in the question list. If you add one to a quiz you already built, check where it landed.
Write the welcome copy
The welcome screen is built from blocks, the same way every other slide is.
- Click the
Headingblock to write your main line, and set itsSizeandAlignment. - Click
+ Add blockand chooseTextfor the supporting sentence. - Both blocks take information recalls and Liquid templates, if you want to pull in something dynamic.
Keep it to one clear promise and one line of detail. Long welcome copy is a common cause of drop-off.
-
Click the slide, then click the
wrenchicon to open the question settings. -
Type your main line into the question field on the slide.
-
Turn on
Show Description, and write your supporting sentence in the field that appears below it.
Keep it to one clear promise and one line of detail. Long welcome copy is a common cause of drop-off.
-
Click the slide, then click the
wrenchicon to open the question settings. -
Type your main line into the question field on the slide.
-
Turn on
Show Description, and write your supporting sentence in the field that appears below it.
Keep it to one clear promise and one line of detail. Long welcome copy is a common cause of drop-off.
-
Click the slide, then click the
wrenchicon to open the question settings. -
Type your main line into the question field on the slide.
-
Turn on
Show Description, and write your supporting sentence in the field that appears below it.
Keep it to one clear promise and one line of detail. Long welcome copy is a common cause of drop-off.
-
Click the slide, then click the
wrenchicon to open the question settings. -
Type your main line into the question field on the slide.
-
Turn on
Show Description, and write your supporting sentence in the field that appears below it.
Keep it to one clear promise and one line of detail. Long welcome copy is a common cause of drop-off.
-
Click the slide, then click the
wrenchicon to open the question settings. -
Type your main line into the question field on the slide.
-
Turn on
Show Description, and write your supporting sentence in the field that appears below it.
Keep it to one clear promise and one line of detail. Long welcome copy is a common cause of drop-off.
Add a logo or a background image
For a logo or an inline image
Click + Add block, choose Image, and upload your file. The image then sits in the flow of the slide, with the rest of your blocks.
For a background or split-screen image
-
Click the slide to open its settings, then click
Image upload. -
Click
Select image, thenAdd imagein the popup, and upload your file. You can also pick one already in your quiz gallery. -
Set
Layouttobackgroundto place it behind the text, orsplitto put it beside the text. -
Fade it back with
Opacity, so your copy stays readable. -
For a
splitimage, setPosition (desktop)andPosition (mobile). On a desktop the image goesleftorright, and on a phone it goesabove,beloworhidden.
See how to add/adjust images for what size to upload.
-
Click the slide, then click the
wrenchicon to open the question settings. -
Click
Addnext toImageand upload your file. An image can be up to 1000px by 1000px. -
Choose where the image goes.
above- On top of the slide, above your text.below- Under your text.background- Behind everything, replacing the default quiz background.split- Beside your text, splitting the slide in two. On a phone the image moves to the top. -
Fade it back with
Image Opacity, so your copy stays readable.
A video works here too
The same setting takes a video instead of an image, as a responsive, widget or background element.
See how to add/adjust images for what size to upload.
-
Click the slide, then click the
wrenchicon to open the question settings. -
Click
Addnext toImageand upload your file. An image can be up to 1000px by 1000px. -
Choose where the image goes.
above- On top of the slide, above your text.below- Under your text.background- Behind everything, replacing the default quiz background.split- Beside your text, splitting the slide in two. On a phone the image moves to the top. -
Fade it back with
Image Opacity, so your copy stays readable.
A video works here too
The same setting takes a video instead of an image, as a responsive, widget or background element.
See how to add/adjust images for what size to upload.
-
Click the slide, then click the
wrenchicon to open the question settings. -
Click
Addnext toImageand upload your file. An image can be up to 1000px by 1000px. -
Choose where the image goes.
above- On top of the slide, above your text.below- Under your text.background- Behind everything, replacing the default quiz background.split- Beside your text, splitting the slide in two. On a phone the image moves to the top. -
Fade it back with
Image Opacity, so your copy stays readable.
A video works here too
The same setting takes a video instead of an image, as a responsive, widget or background element.
See how to add/adjust images for what size to upload.
-
Click the slide, then click the
wrenchicon to open the question settings. -
Click
Addnext toImageand upload your file. An image can be up to 1000px by 1000px. -
Choose where the image goes.
above- On top of the slide, above your text.below- Under your text.background- Behind everything, replacing the default quiz background.split- Beside your text, splitting the slide in two. On a phone the image moves to the top. -
Fade it back with
Image Opacity, so your copy stays readable.
A video works here too
The same setting takes a video instead of an image, as a responsive, widget or background element.
See how to add/adjust images for what size to upload.
-
Click the slide, then click the
wrenchicon to open the question settings. -
Click
Addnext toImageand upload your file. An image can be up to 1000px by 1000px. -
Choose where the image goes.
above- On top of the slide, above your text.below- Under your text.background- Behind everything, replacing the default quiz background.split- Beside your text, splitting the slide in two. On a phone the image moves to the top. -
Fade it back with
Image Opacity, so your copy stays readable.
A video works here too
The same setting takes a video instead of an image, as a responsive, widget or background element.
See how to add/adjust images for what size to upload.
Change the start button text
Click the Button block on the slide and edit Button text. Alignment moves it left, right or center.
Click the slide, click the wrench icon to open the question settings, and edit Button Text.
Click the slide, click the wrench icon to open the question settings, and edit Button Text.
Click the slide, click the wrench icon to open the question settings, and edit Button Text.
Click the slide, click the wrench icon to open the question settings, and edit Button Text.
Click the slide, click the wrench icon to open the question settings, and edit Button Text.
Name the action, not the step
Write the button as the action the customer is taking, such as Find my match or Start the quiz, rather than a bare Next.
Remove the welcome screen
Removing the welcome screen makes your first question the first thing customers see.
Click the slide to open its settings, click ..., then click Remove. To keep it for later instead, click Duplicate first.
Click the slide, open more options / ..., then click Delete. To keep a copy instead, click Duplicate first.
Click the slide, open more options / ..., then click Delete. To keep a copy instead, click Duplicate first.
Click the slide, open more options / ..., then click Delete. To keep a copy instead, click Duplicate first.
Click the slide, open more options / ..., then click Delete. To keep a copy instead, click Duplicate first.
Click the slide, open more options / ..., then click Delete. To keep a copy instead, click Duplicate first.
Related guides
- Create Your First Quiz
- Customize Quiz Design
- Add & Adjust Images
- How to reduce quiz drop-off
- Quiz Builder - Questions reference
This article explains how to add a welcome screen to a quiz, what to put on it, and how to remove it again.