Automate Quiz Completions with Shopify Flow
Shopify Flow can run an automation every time a customer completes your quiz. Follow up, segment, or update your store based on the answers.
What the automation can read, and which trigger starts it, depends on the version you are running.
This version has a Quiz Completed trigger
Shopify Flow starts a workflow the moment a customer finishes the quiz. Your actions then receive the whole completion: every answer, the customer tags, the recommended products and the variable scores.
That is what makes the automation quiz-aware. You can email the answers to your team, branch on what the customer picked, or write a recommendation onto their profile.
Before you start
The trigger runs on a Shopify customer record, not on an anonymous quiz session. RevenueHunt matches the customer to that record by the email address they type into the quiz. That is why the next two steps matter.
- Add an email question to your quiz. Without one, no customer record is created, and the trigger never fires. A phone number is not enough. Make the question required to start a workflow run on every completion.
- Turn on customer syncing. In RevenueHunt, open App settings > Shopify Customers. Turn on Enable pushing quiz leads to Shopify Customers and save. The Shopify Flow section sits on the same page, under that checkbox.
- Install Shopify Flow if your store does not have it. It is free.
- Publish the quiz.
For more on customer syncing, including how marketing consent is recorded, see how to send quiz leads to Shopify Customers.
Create the workflow
- Open Shopify Flow.
- Select Create workflow.
- Select Select a trigger.
- Choose Product Recommendation Quiz and then Quiz Completed.
- Add the conditions and actions you want to run after a quiz completion.
- Select Turn on workflow.
The trigger carries the Shopify customer along with the full quiz completion. See What data is sent for every available field.
Tip
If you are not sure how to assemble a workflow, describe what you want in plain language. Shopify Sidekick can draft it for you in Flow.
What data is sent
When a customer completes a quiz, RevenueHunt sends a structured payload to Shopify Flow using the quiz-completed trigger. The payload has two top level fields:
customer_id, the numeric Shopify customer IDQuiz completion, an object holding everything about the completion.
Under Add variable in any action, the quiz data is nested under Quiz completion. Which fields you see depends on what the customer submitted and on how the quiz is configured.
Completion fields
| Field | Description |
|---|---|
eventId |
A stable ID for deduplication, in the form quiz-completed:<response-sqid> |
schemaVersion |
The payload schema version, currently 1.0 |
responseId, quizId |
Internal RevenueHunt identifiers |
quizName |
The name of the quiz |
completedAt |
ISO 8601 UTC timestamp of the completion |
email |
The customer's email address. Always present, since the trigger requires it |
phone, firstName, lastName, fullName |
Contact details, when the quiz captured them |
resultRef, resultName |
Identifiers for the quiz result the customer reached |
tags |
A list of all customer tags associated with the response |
marketId |
The market identifier |
highestVariableRef |
The reference of the variable with the highest score |
recommendationsIncomplete |
true when product data was partially missing at delivery |
answers
A list with one object per answered question.
| Field | Description |
|---|---|
questionRef, questionTitle |
Reference and title of the question |
blockRef, answerType |
Reference of the block and the type of answer it collects |
value |
The answer itself, stringified |
choiceRefs, choiceLabels |
The choices picked, for multiple-choice questions |
position |
Order of the question in the quiz |
recommendations
A list of the recommended products or items.
| Field | Description |
|---|---|
slotRef |
The slot identifier |
itemId, productId, variantId |
Product identifiers |
title, url |
The product title and link |
rank, score |
Position in the recommendation list and its matching score |
price, currency |
The price and its currency |
variableScores
A list of the calculated variable scores.
| Field | Description |
|---|---|
variableRef |
The reference of the variable |
score |
Its calculated score |
Limits and eligibility
- The trigger needs an email address in the response, and a Shopify customer record. A completion without an email produces no workflow run.
- The payload is capped at 45 KB, to stay inside Shopify's 50 KB limit. A completion over that size is pruned in order: the recommendation metadata such as URLs and prices, then the oldest answers.
recommendationsIncompleteis then set totrue. A long quiz with many recommendations is the usual cause. Do not rely on every optional field being present in every run.
Example 1: email your team after every quiz completion
This is the fastest way to prove the chain works. You control both ends, and you see the quiz data arrive in your inbox.
- Create a workflow with the Quiz Completed trigger.
- Under the trigger, select the + button and choose Action.
- Search for
Send internal emailand select it. -
In Email address, type the address that should receive the notification, for example your own. To notify several people, separate the addresses with commas.
Warning
The recipient must be a fixed address. Shopify does not let you insert a variable here, so this action cannot email the customer. It is built for notifying staff.
-
In Subject, type the static part of your subject line, for example
Quiz completed by. - Place your cursor where the dynamic part goes, select Add variable, and pick the field you want. To identify the customer and the quiz, insert the customer's first name and the quiz name.
- In Message, write the body the same way, mixing text with Add variable. The quiz completion data is worth using here. Insert the product recommendations, so the email lists the recommended titles with their price or URL.
- Select Turn on workflow.
- Complete your published quiz with a real email address and check your inbox.
The result is an email such as "Skincare Quiz completed by Anna", listing the products the quiz recommended to her.
Tip
Formatting in the message body is up to you. Add line breaks and labels around the variables so the email stays readable once several fields are filled in.
Example 2: branch on a quiz answer
Most workflows should not treat every customer the same. Use a condition to split the workflow on what they answered, then run a different action on each side.
The cleanest thing to branch on is a customer tag, because you decide in the quiz builder exactly which answers produce which tag.
First, tag the choices you want to branch on
- Open the RevenueHunt app and select your quiz.
- Click the choice you want to tag to open its settings.
- Under Customer tags, create a new tag or pick an existing one. For example, tag the dry skin choice with
dry skin. - Repeat for the other choices you want to identify later.
- Add a common tag such as
quizto every choice in one of the questions, so that every customer carries it. - Click
Save.
Every tag attached to the choices a customer picks is written to their Shopify customer profile, and arrives with the trigger.
Then build the condition
- Under the trigger, select the + button and choose Condition.
- Select Add variable.
- Search for
tagsand select the tags field belonging to the quiz completion. Flow lists variables in dot notation, so read the full path before selecting, since several unrelatedtagsfields exist. - Because tags are a list, set the list operator to At least one of.
-
Leave the field operator as Equal to. Type the tag exactly as you named it in the quiz builder, for example
dry skin.Note
Tags are sent to Shopify with no prefix, so the value here is the same string you typed into the quiz builder. Match the spelling and the spacing.
-
Check the plain language summary Flow displays above the condition. It should read as the rule you intended.
- Attach an action to the True branch, for example an email about your dry skin range.
- Attach a different action to the False branch, or leave it empty to end the workflow there.
- Select Turn on workflow.
To test both sides, complete the quiz twice, once choosing the answer that carries the tag and once choosing an answer that does not.
Send a marketing email to the customer
Send internal email cannot email the customer who took the quiz. That needs a marketing email action, which Shopify Flow does not provide. Your email app contributes it, so the name you search for depends on your setup, for example Shopify Messaging, Klaviyo or Seguno.
Warning
A marketing email only reaches a customer who is subscribed to marketing. For anyone who is not subscribed, the action fails on that run. Quiz leads are marked as subscribed by default, as Change subscribed/consent status for email and phone questions describes.
Shopify's own email automations moved
Since 24 March 2026, marketing automations that use Shopify Messaging emails are managed in the Shopify Messaging app, under Apps > Messaging > Automations. Automations whose marketing action comes from another app stay in Shopify Flow. Existing automations kept working through the move, so nothing needs rebuilding.
To add one:
- Under the trigger or on a condition branch, select the + button and choose Action.
- Search for the sending action provided by your email app.
- Select the template or campaign you want to send.
- Select Turn on workflow.
Other actions worth combining with the trigger
Everything below is built into Shopify Flow, so it is available without installing anything else.
| Action | Typical use with quiz data |
|---|---|
| Add customer tags | Build a segment from a quiz answer, or mark that someone has taken a particular quiz |
| Remove customer tags | Clear a previous answer when a customer retakes the quiz |
| Update customer note or a customer metafield | Store the recommended products on the profile so your team, or your theme, can read them later |
| Send HTTP request or Send Admin API request | Pass the completion to a system that has no Flow app |
| Wait | Delay a follow-up, for example send a reminder three days after the quiz |
| Condition | Branch on tags, answers, or quiz variable scores, as in Example 2 |
Note
Storing the recommendations in a metafield makes them available to your theme. Displaying them on the storefront is theme work, which Flow does not do.
Check the connection in RevenueHunt
Return to RevenueHunt > App settings > Shopify Customers and find the Shopify Flow section.
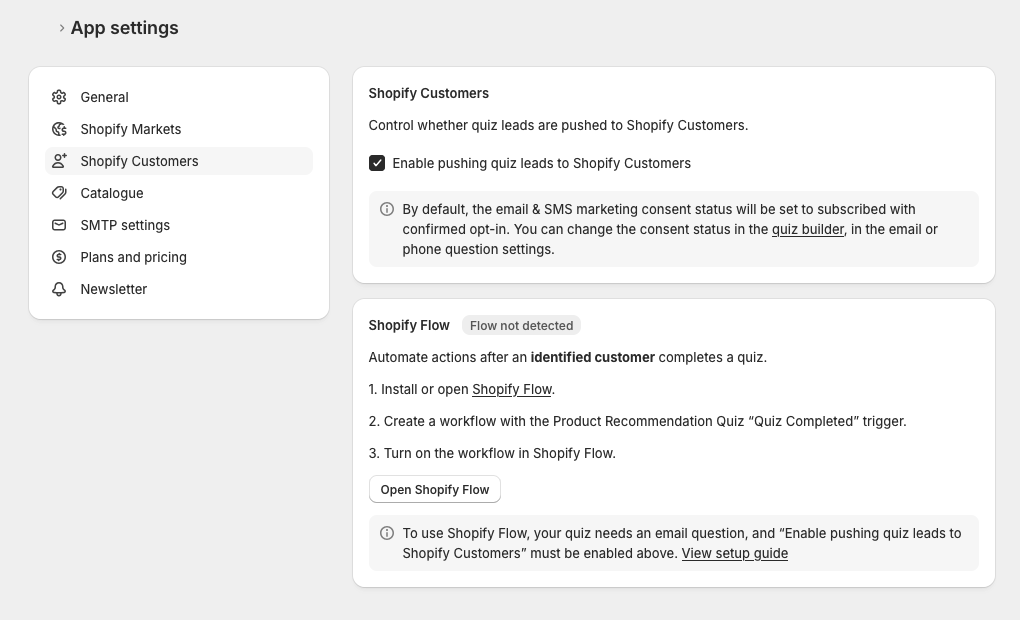
- Flow active means Shopify has reported that a workflow using the Quiz Completed trigger from Product Recommendation Quiz is turned on.
- Flow inactive means a workflow was detected but is not currently turned on.
- Flow not detected means Shopify has not reported a workflow using this trigger yet.
Note
Shopify may take a short time to report a workflow status change. The lifecycle timestamp shows when RevenueHunt last received an update from Shopify.
Test the workflow
- Complete the published quiz with an email address.
- In Shopify Flow, open the workflow and review its recent runs.
- Confirm that the expected conditions and actions completed successfully.
If no run appears, a setup step is usually the cause. Check in this order: the email question was filled in during the test, customer syncing is on, and the workflow is turned on. Then complete the quiz again.
Note
The Quiz Completed trigger is different from workflows that start with Shopify's Customer created trigger and filter by customer tags. Use Quiz Completed when you want the workflow to run directly from the Product Recommendation Quiz completion event.
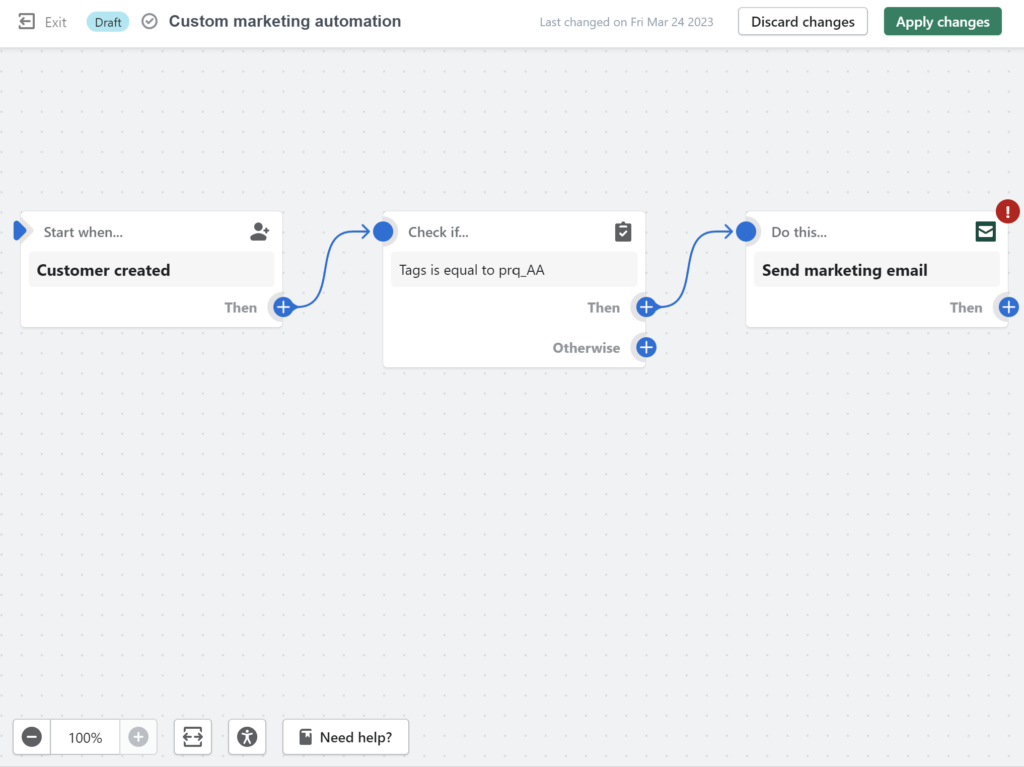
In this version the workflow starts on Shopify's own Customer created trigger, when the quiz writes a new customer to your Shopify Customers list. A condition on customer tags then decides what happens next.
Customer tags are what make this work
The trigger carries the customer record, not the quiz. Nothing about the answers reaches Shopify unless you tag the choices first.
A tag on a choice is the only thing the automation can read. Decide which answers you want to act on, and tag those choices before building anything in Shopify.
Your quiz needs an email question
Without one, no customer record is created and the automation has nothing to run on.
Connect the quiz to Shopify Customers
-
Open your quiz and go to the Connect tab.
-
Click
Connectin theShopify Customerssection. This authorizes the app to write to your Shopify Customers list. -
Click the top-right
Publishbutton.
Tag your quiz choices
-
Open the Customer Tags section of your quiz.
-
Create a tag for each choice you want to identify later. For example, tag the relevant choice
teen. -
Add a common tag such as
quizto every choice in one question, so that every customer carries it. -
Click the top-right
Publishbutton.
Tags arrive with a prq_ prefix
A tag you called teen reads as prq_teen on the Shopify profile.
Build the automation
-
Go to
Apps > Messaging > Automationsin your Shopify admin and clickCreate automation. Older stores may still reach the same screen fromMarketing > Automations > View templates. -
Select
Create custom automation.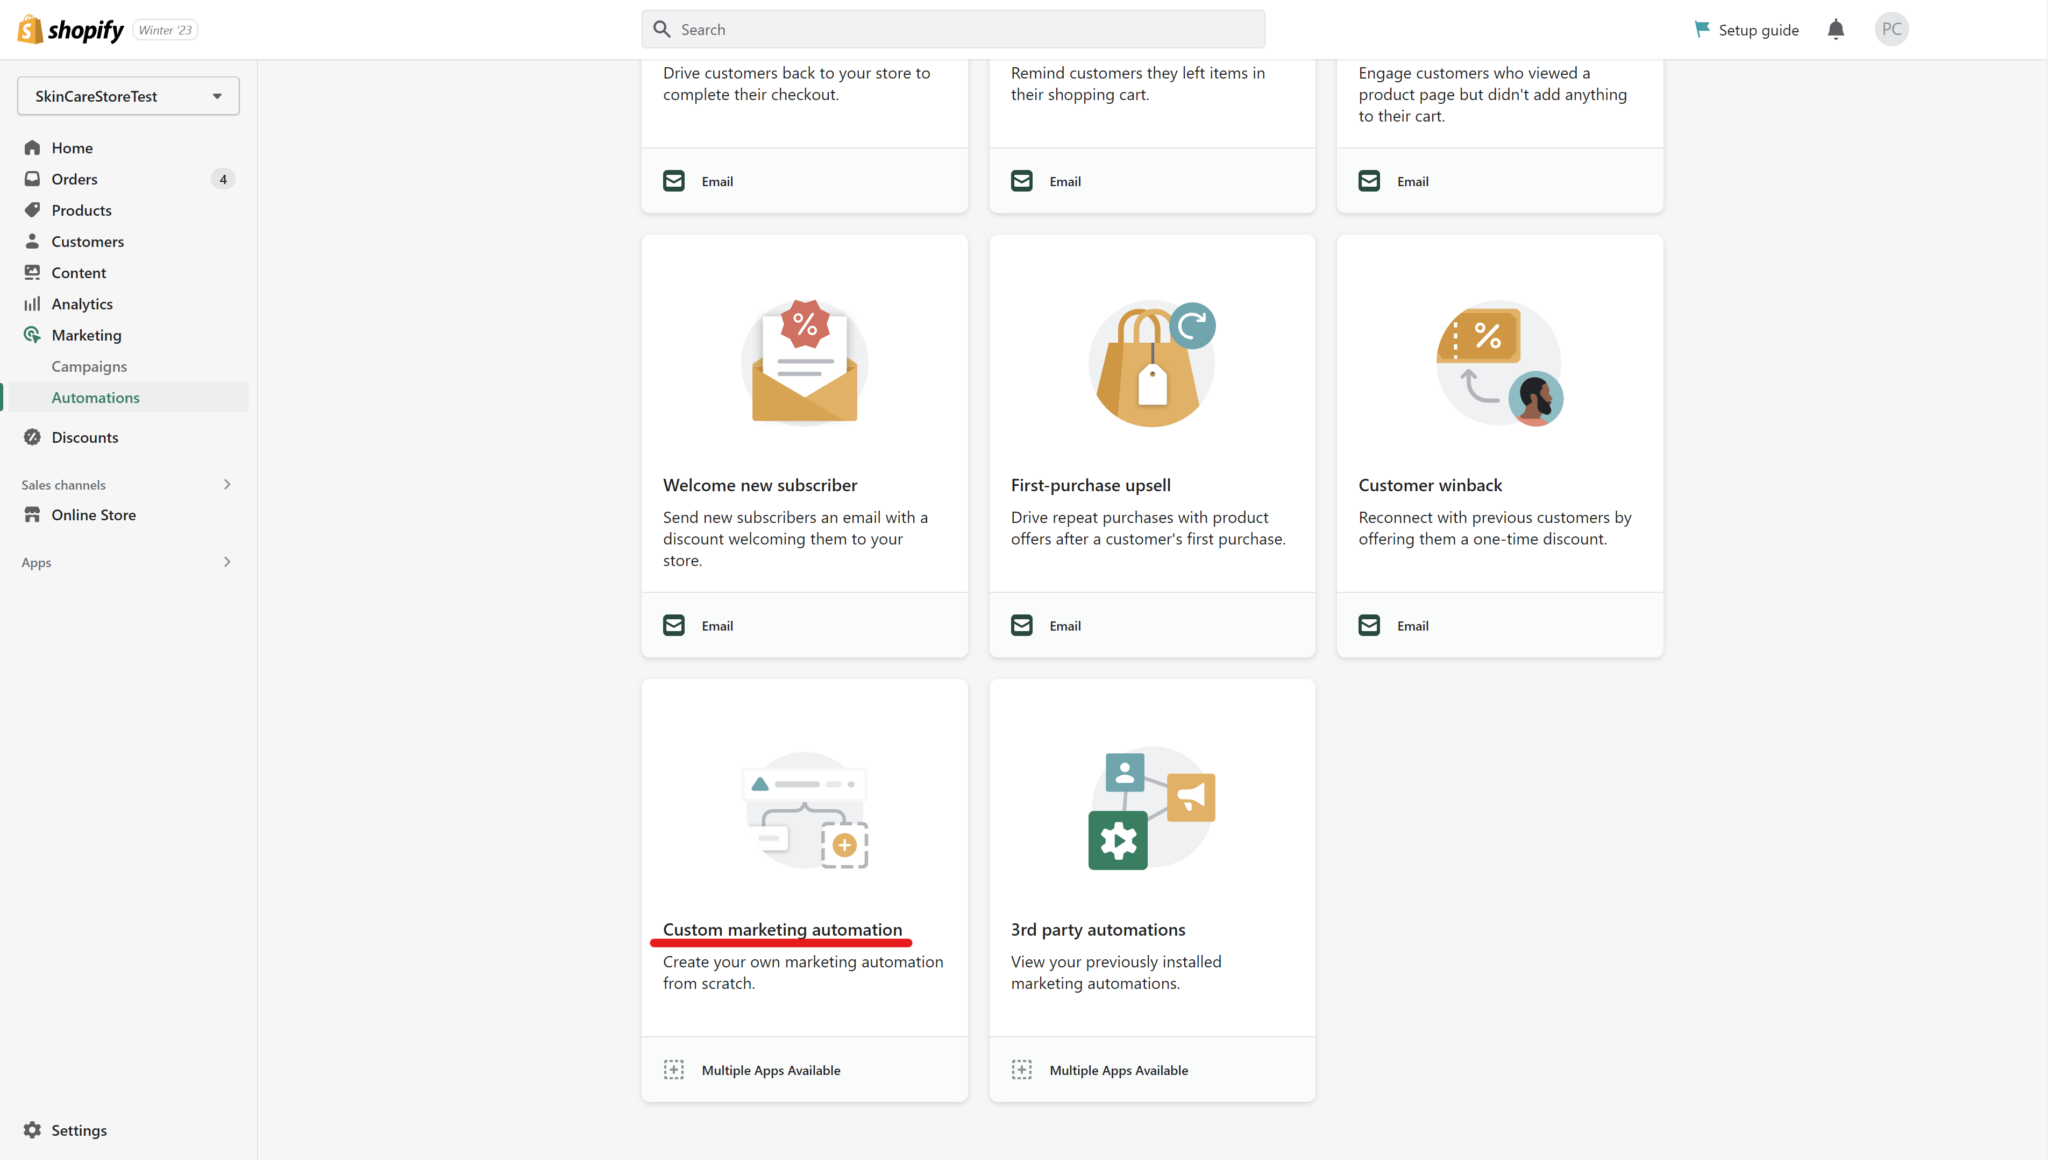
-
Click anywhere and set the trigger to
Customer created.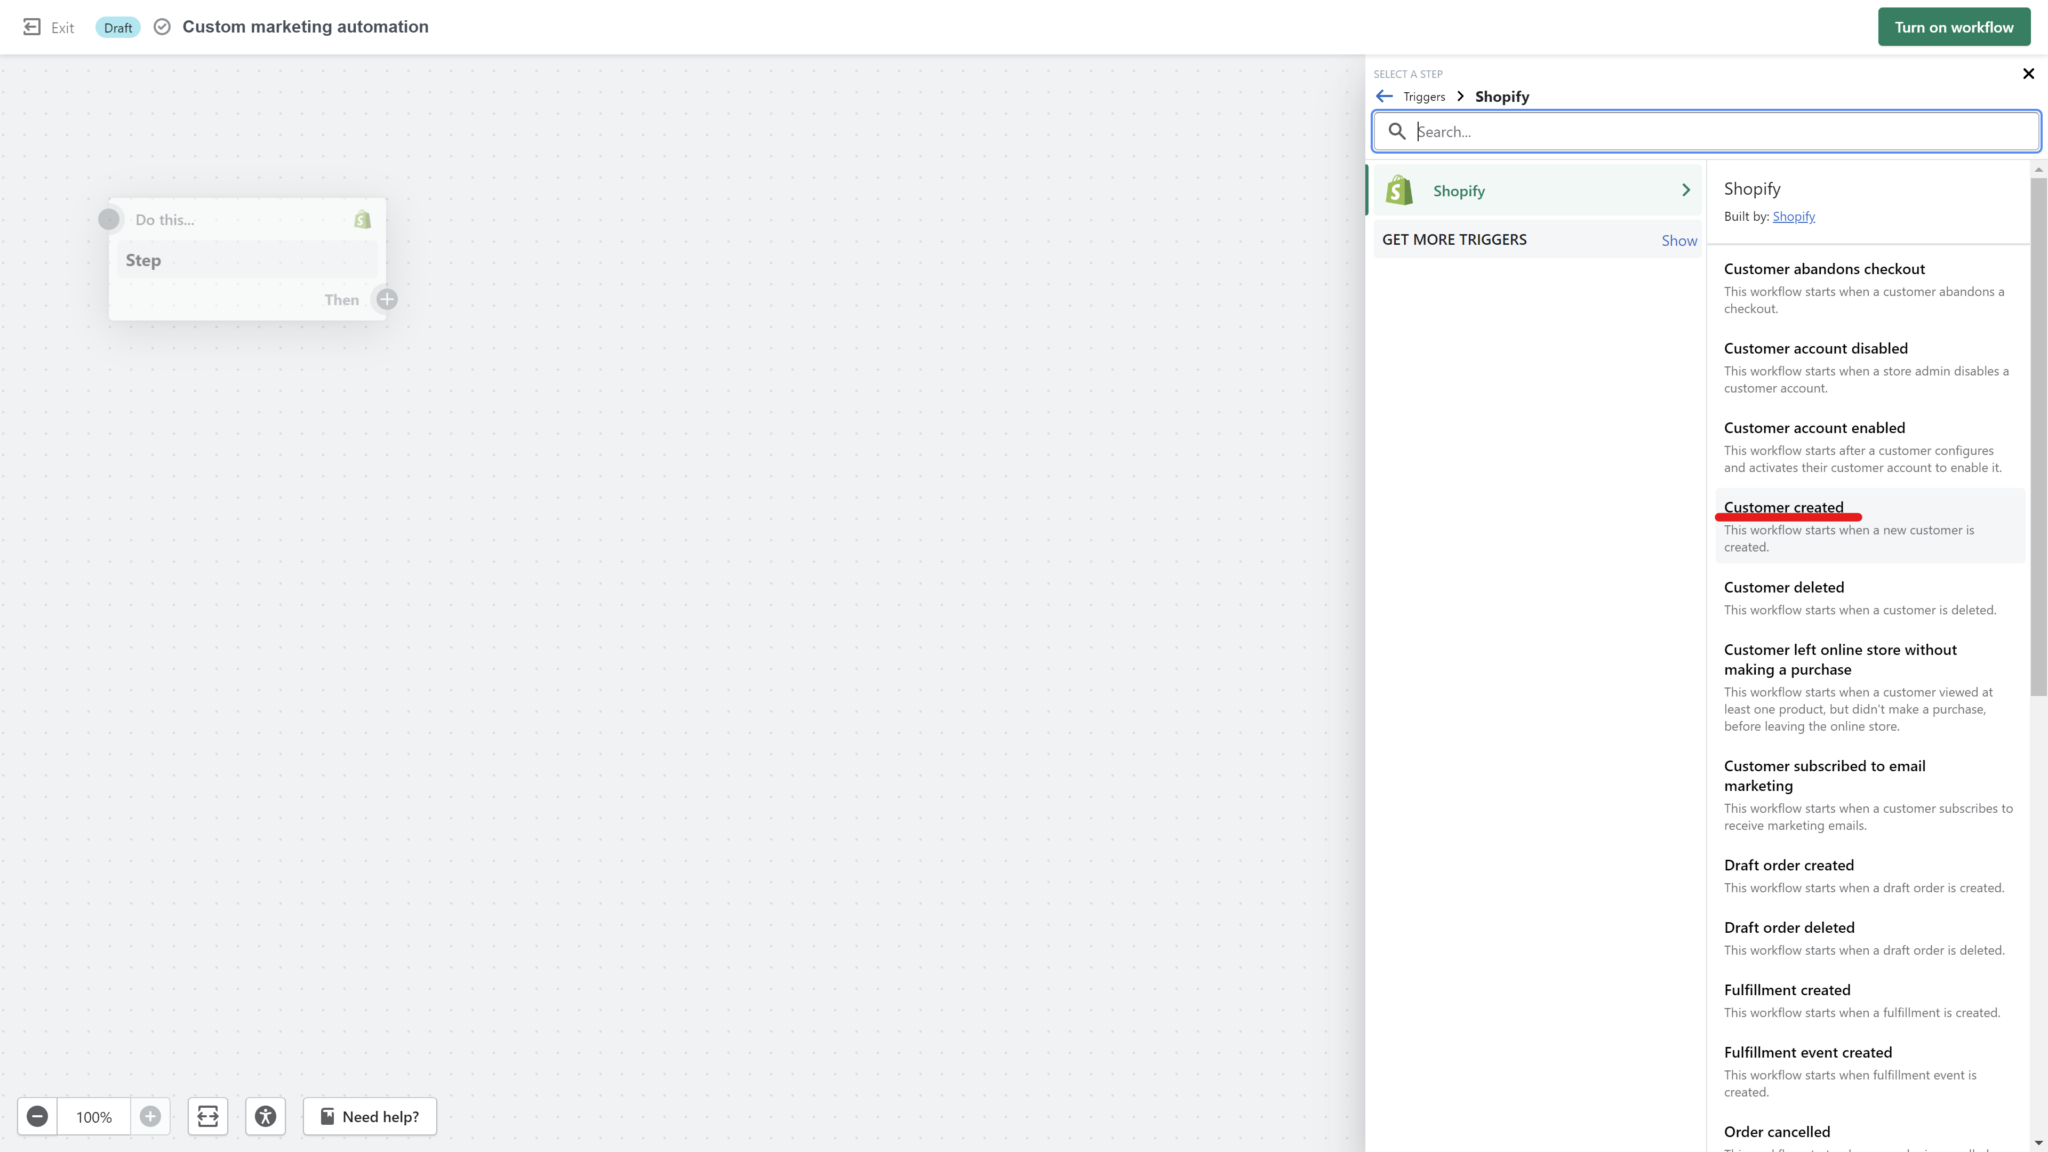
This fires for new customers only
Anyone already in your Shopify Customers list is updated rather than created, so the automation does not run for them.
-
Add a
Conditionafter the trigger, clickAdd variable, and pickcustomerthentags. -
Set the condition to read: at least one customer / tags
includestags_itemprq_quiz.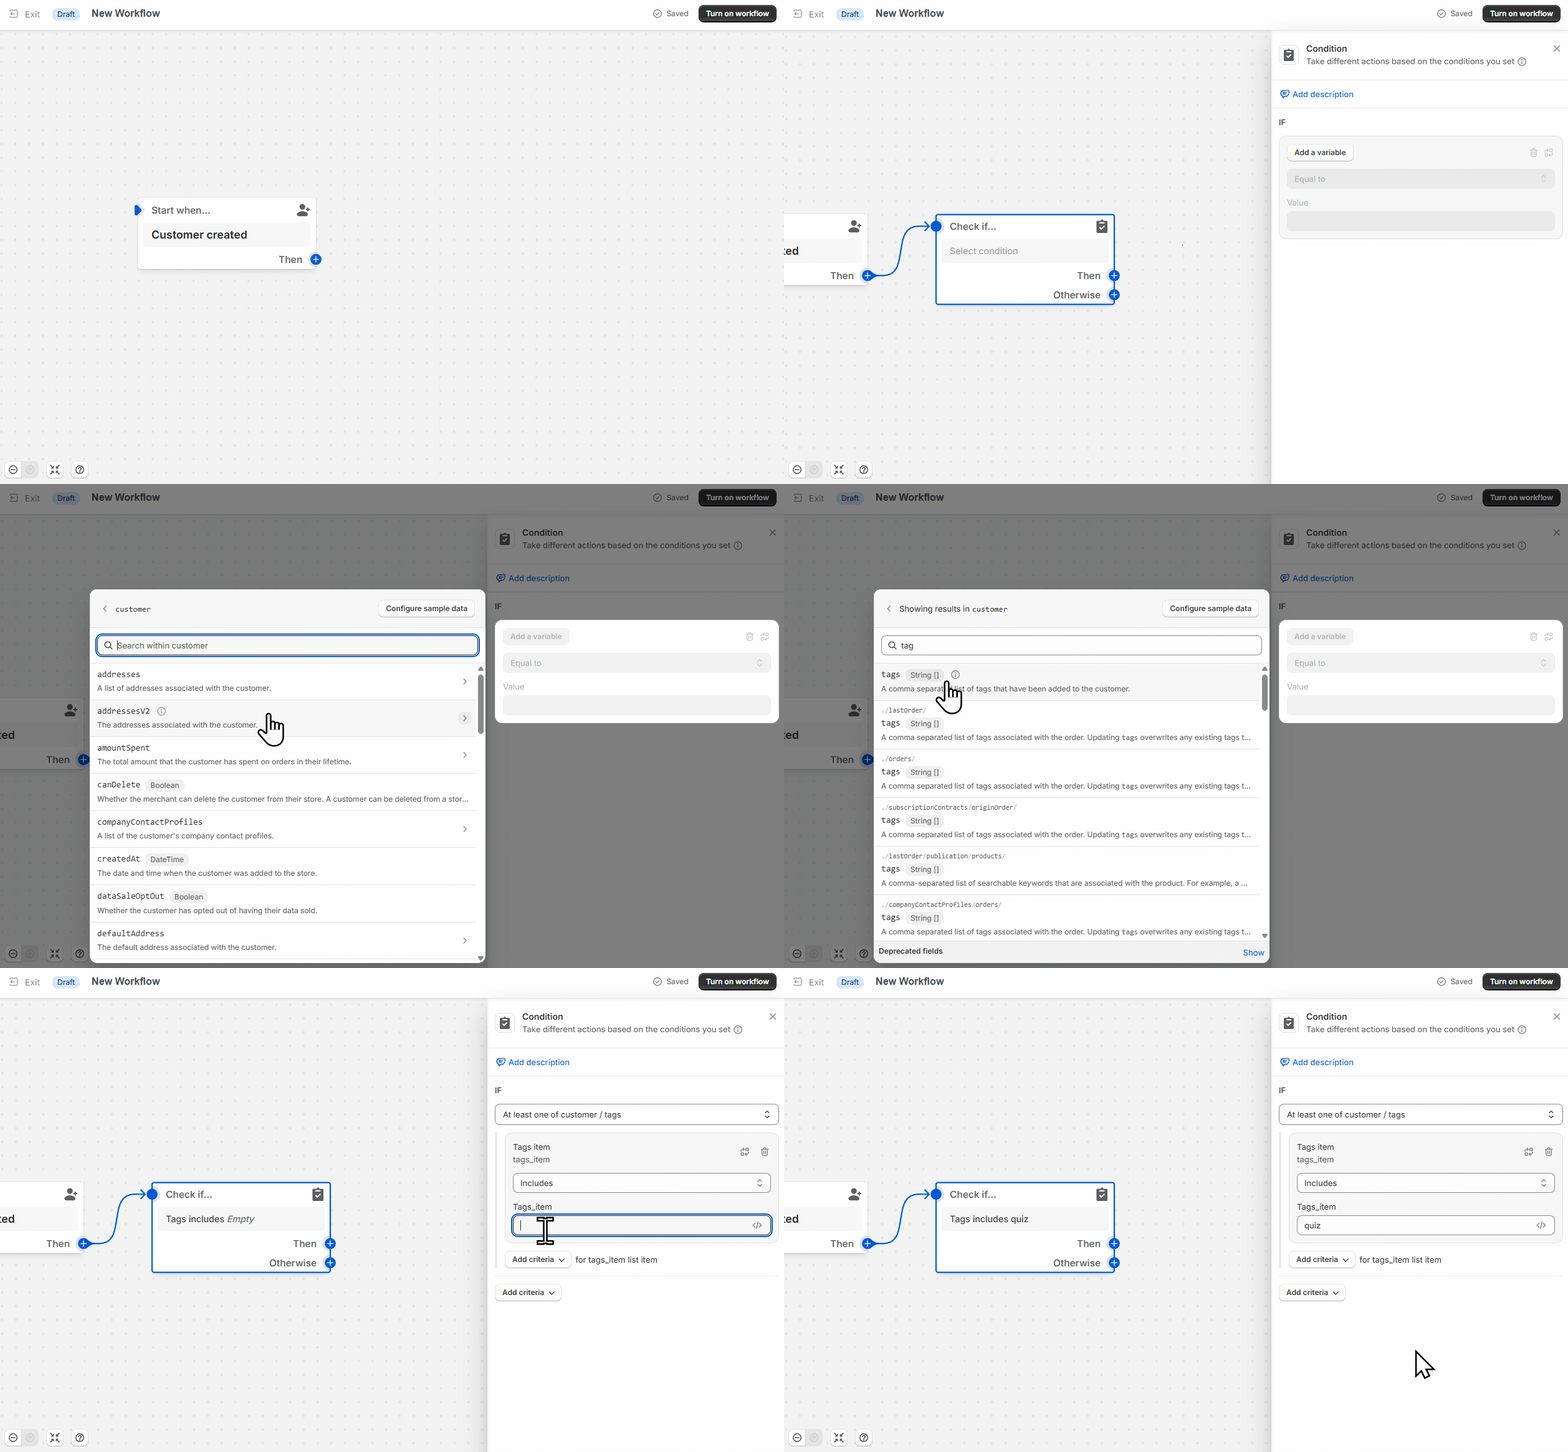
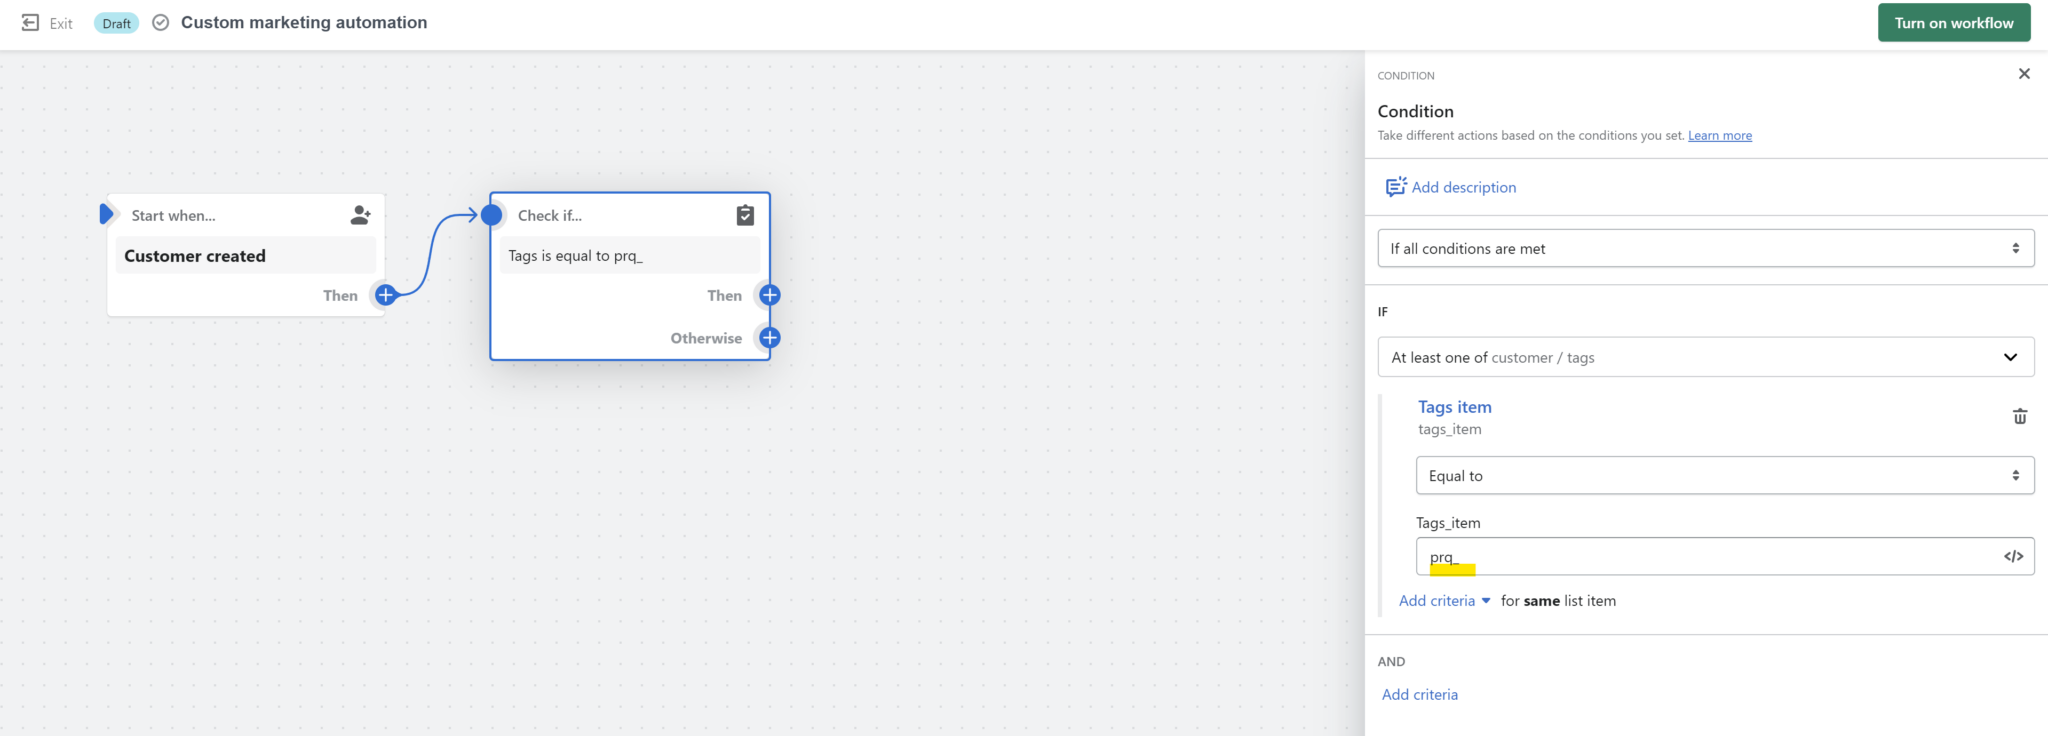
Type the tag in full
For example
prq_oilyskin, orprq_Oily Skinwith the space. -
Click
Then > Action, selectSend marketing email, and pick your template. Everyone carrying that tag is then sent the email as soon as the tag is added.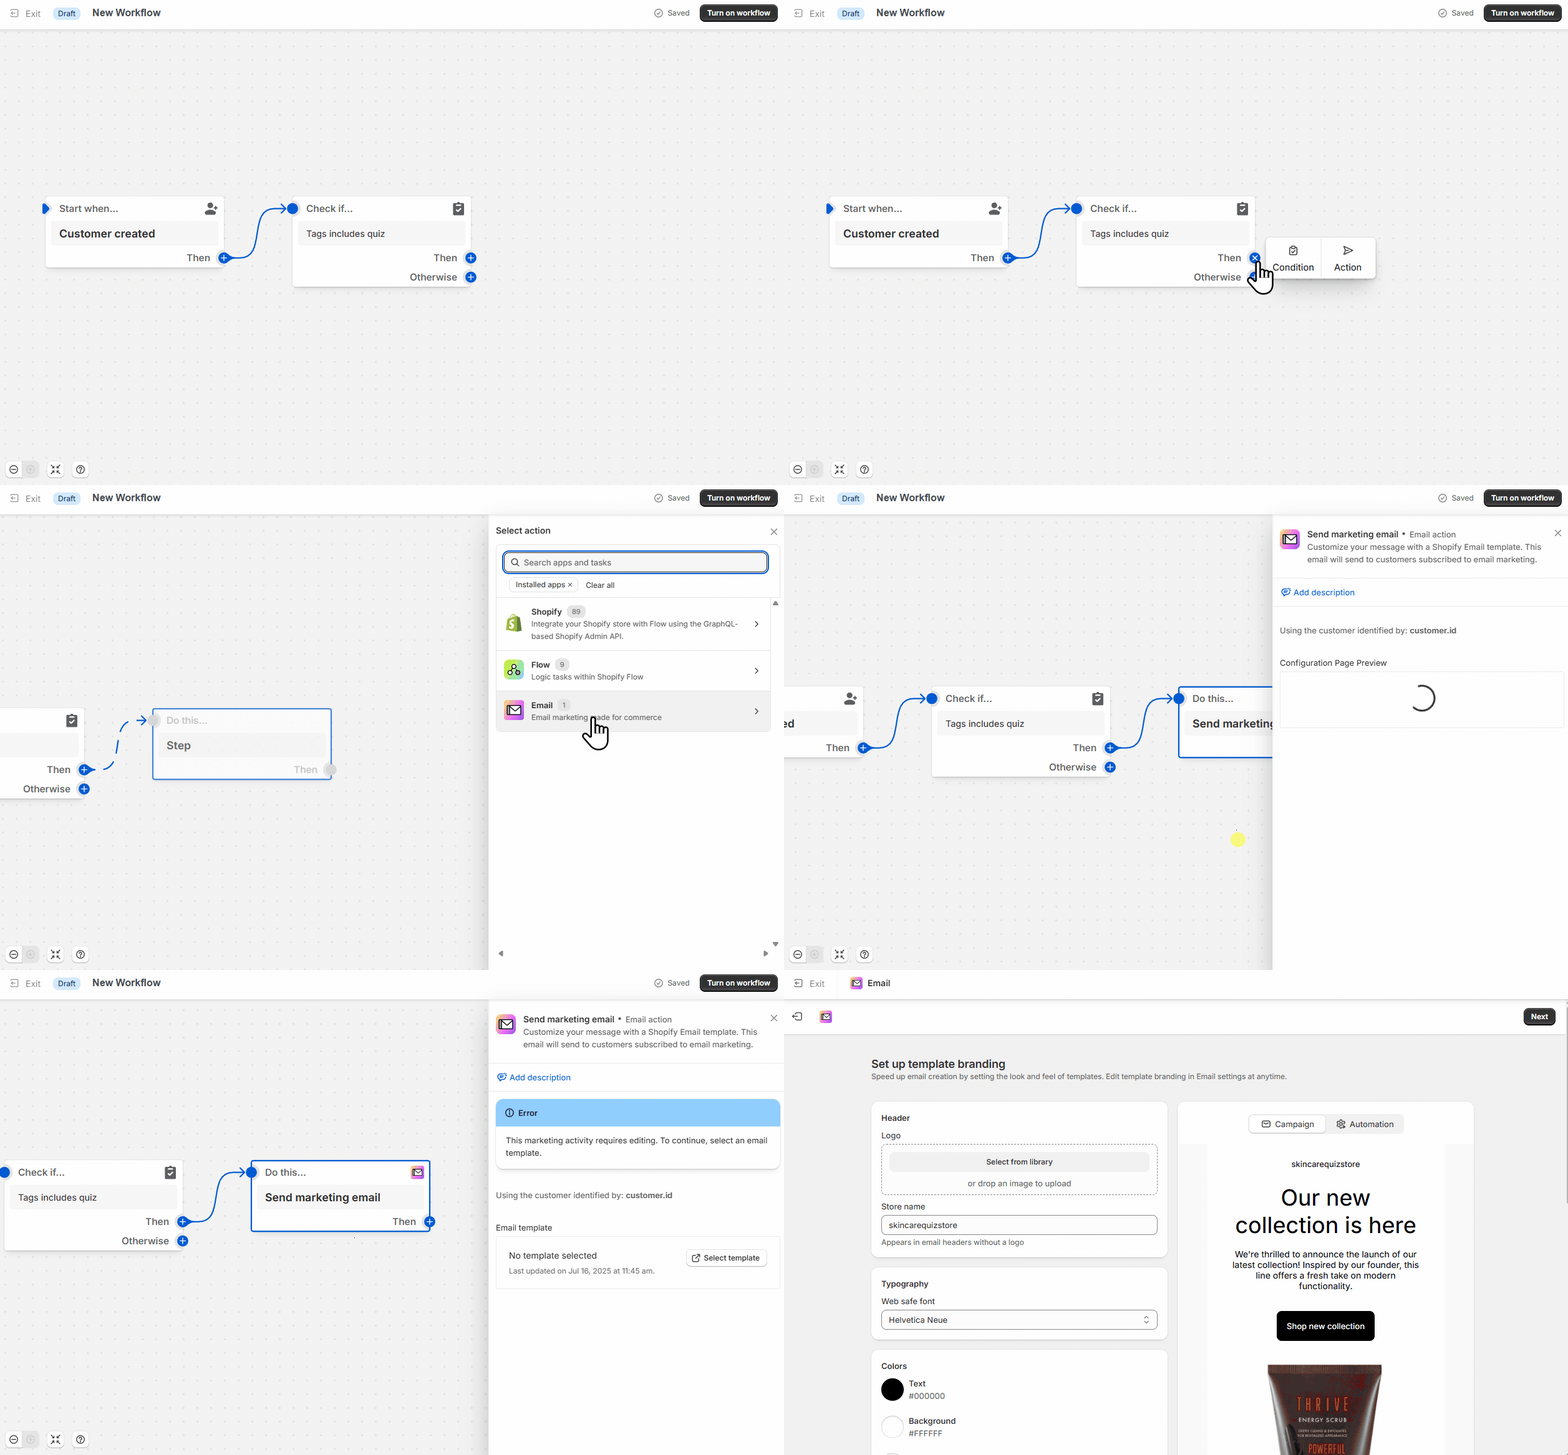
-
Click
Turn on workflow.
Test it
Complete your published quiz with an email address that is not yet in your Shopify Customers list. Then open the automation and check its recent runs.
To learn more about Shopify Automations, check their FAQ page.
Tip
The Built for Shopify version gives you the Quiz Completed trigger. It also drops the prq_ prefix from your tags, and makes the full quiz completion available to your actions. See Migrate a Legacy Quiz to Built for Shopify.
For the same walkthrough in context, see the Shopify (Legacy) tab of Set up Shopify Flow.
Shopify Flow is a Shopify product
There is no equivalent automation tool in this version.
To automate a follow-up, connect the quiz to an email or CRM service and build the automation there. See how to send quiz leads to your CRM.
Shopify Flow is a Shopify product
There is no equivalent automation tool in this version.
To automate a follow-up, connect the quiz to an email or CRM service and build the automation there. See how to send quiz leads to your CRM.
Shopify Flow is a Shopify product
There is no equivalent automation tool in this version.
To automate a follow-up, connect the quiz to an email or CRM service and build the automation there. See how to send quiz leads to your CRM.
Shopify Flow is a Shopify product
There is no equivalent automation tool in this version.
To automate a follow-up, connect the quiz to an email or CRM service and build the automation there. See how to send quiz leads to your CRM.
This article explains how to start a Shopify Flow workflow when a customer finishes your quiz.