How to Track Your Ad to Purchase Funnel
You are paying for clicks and you want two answers: which ads produce orders, and where customers drop off. The path has four steps, and no single tool covers all four.
| Part of the funnel | What measures it | Setup |
|---|---|---|
| Ad click to landing page | UTM parameters plus your store analytics | 10 minutes, no code |
| Landing page to quiz start to results page | GA4 quiz events | One click, then a funnel exploration |
| Quiz to order | The app's Analytics panel | Already running |
| Ad campaign to an individual lead | Custom JS that captures UTMs into the response | Advanced, optional |
The last row is the one most stores skip, and the first three are enough for almost everyone. Work through the sections in order, and stop when you have what you need.
Before you start:
- Publish the quiz on its own page. One quiz per page keeps the funnel readable and is also how GA4 tracking works best.
- Install GA4 on your store. On Shopify, the Google & YouTube sales channel does this and sends the
purchaseevent from checkout. You need that event for the last step of the funnel.
Tag your ads with UTM parameters
UTM parameters are labels you add to the end of a link. Your analytics reads them and tells you which ad the customer came from.
| Parameter | What to put in it | Example |
|---|---|---|
utm_source |
The platform | facebook, google, tiktok |
utm_medium |
The type of traffic | cpc, paid_social |
utm_campaign |
The campaign name | hair_quiz_q3 |
utm_content |
The specific creative | video_before_after |
utm_term |
The keyword, search ads only | hair+loss+treatment |
- Open Google's Campaign URL Builder.
- Set the website URL to your quiz landing page.
- Fill in
utm_source,utm_medium,utm_campaignandutm_content. - Copy the generated URL and paste it into the ad.
- Repeat for every creative, changing only
utm_content.
One campaign per name, one creative per content
If every ad in a campaign shares the same utm_content, the reports collapse into a single row. You then cannot tell your creatives apart. Decide the naming scheme once, write it down, and use it everywhere. Lowercase, no spaces.
Do not tag your own internal links
UTM parameters are for traffic arriving from outside your site. Adding them to a link between two of your own pages restarts the session attribution. It then looks like the customer arrived from an ad twice.
Redirects keep the parameters
This applies to the Built for Shopify version. If the quiz ends by redirecting to another page, the utm_ parameters on the quiz page are carried through to the destination URL. Attribution survives the redirect, and parameters you set on the destination are never overwritten.
Read ad to purchase in your store analytics
This is the outer measurement: what you spend against what you earn. It works as soon as the ads are tagged, with nothing else to configure.
- In your Shopify admin, go to
Analytics → Reports. Both reports live under theMarketingcategory.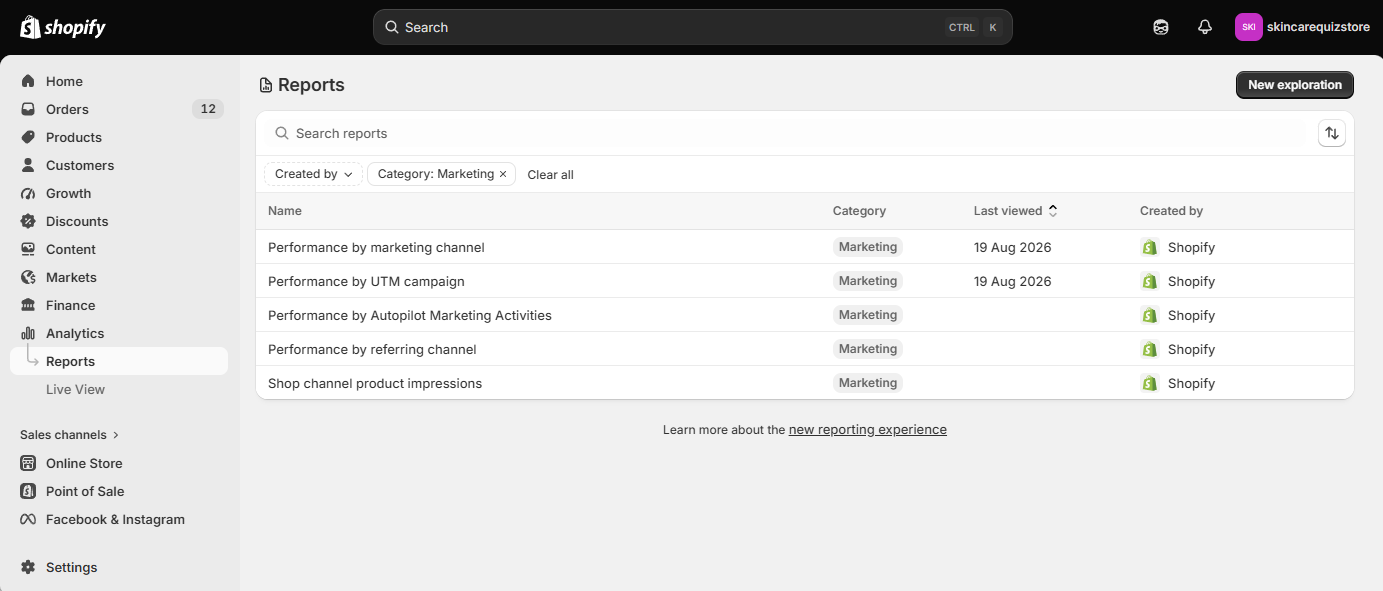
- Open Performance by UTM campaign to see sessions, orders and sales for each tagged campaign.
- Open Performance by marketing channel to see how paid ads compare with your other channels.
- Compare the campaign sales against your ad spend for the same period.
- In your Shopify admin, go to
Analytics → Reports. - Open Performance by UTM campaign to see sessions, orders and sales for each tagged campaign.
- Open Performance by marketing channel to see how paid ads compare with your other channels.
- Compare the campaign sales against your ad spend for the same period.
- In GA4, go to
Reports → Acquisition → Traffic acquisition. - Change the primary dimension to Session campaign.
- Add Total revenue and Conversions as columns.
- Compare the campaign revenue against your ad spend for the same period.
- In GA4, go to
Reports → Acquisition → Traffic acquisition. - Change the primary dimension to Session campaign.
- Add Total revenue and Conversions as columns.
- Compare the campaign revenue against your ad spend for the same period.
- In GA4, go to
Reports → Acquisition → Traffic acquisition. - Change the primary dimension to Session campaign.
- Add Total revenue and Conversions as columns.
- Compare the campaign revenue against your ad spend for the same period.
- In GA4, go to
Reports → Acquisition → Traffic acquisition. - Change the primary dimension to Session campaign.
- Add Total revenue and Conversions as columns.
- Compare the campaign revenue against your ad spend for the same period.
At this point you know which ads make money. What you do not know is where the weaker ads lose customers. The GA4 events answer that.
Connect the quiz to Google Analytics
This makes the middle of the funnel visible: how many people who land actually start the quiz, and how many reach the results page.
The quiz sends its own GA4 events, so no code is needed.
- Open your quiz and go to the
Integrationstab. - Click
Activatein the Google Analytics section.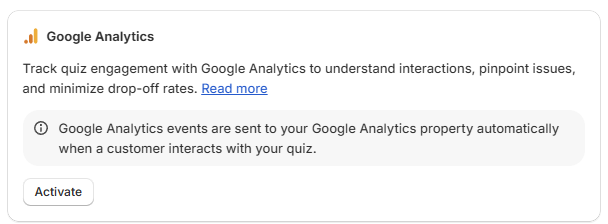
- Click
Save. - Take the quiz once, then check
Reports → Realtimein GA4 to confirm the events arrive.
The events you get, without writing any code:
| Step in the funnel | Event name |
|---|---|
| Quiz started | quiz_started_{quiz_name} |
| Question viewed | question_viewed_{question_title} |
| Choice picked | block_answered_{choice_text} |
| Email submitted | email_lead_{quiz_name} and generate_lead |
| Results page reached | results_page_viewed_{results_page_title} |
| Product clicked | product_clicked_{product_name} |
| Product added to cart | product_added_to_cart_{product_name} |
| Checkout started | proceed_to_checkout_{quiz_name} |
The event name includes the quiz name
Events arrive as quiz_started_my_quiz, not as a plain quiz_started. Search by the prefix under Reports → Engagement → Events. This is deliberate: it lets you read per-quiz numbers straight from the Event name report without registering custom dimensions.
Video walkthrough
See how to track quiz performance with Google Analytics for a video and step-by-step instructions on connecting your quiz to GA4.
The quiz does not send GA4 events on its own here. You add them with the callback functions, and you choose the event names.
- Make sure GA4 (
gtag.js) is installed on your site and loads before RevenueHunt'sembed.js. -
Add the following script to the page where the quiz is embedded.
<script> var prqStarted = false; // Fires each time a customer answers a question function prqSlideCallback(event) { if (!prqStarted) { prqStarted = true; gtag('event', 'quiz_started', { event_category: 'quiz' }); } } // Fires once, when the customer reaches the results page function prqQuizCallback(quizResponse) { gtag('event', 'results_page_viewed', { event_category: 'quiz', quiz_name: quizResponse.quiz.attributes.name }); } </script> -
Take the quiz once, then check
Reports → Realtimein GA4 to confirm the events arrive.
The two events this gives you are the two middle steps of the funnel in Step 4. Keep the names exactly as written, or change them in both places.
| Step in the funnel | Event name | Where it comes from |
|---|---|---|
| Quiz started | quiz_started |
prqSlideCallback, first answer only |
| Results page reached | results_page_viewed |
prqQuizCallback |
Full callback reference, including per-answer tracking and the rest of the prq object: How to track quiz performance with Google Analytics and how to use the callback function.
The quiz does not send GA4 events on its own here. You add them with the callback functions, and you choose the event names.
- Make sure GA4 (
gtag.js) is installed on your site and loads before RevenueHunt'sembed.js. -
Add the following script to the page where the quiz is embedded.
<script> var prqStarted = false; // Fires each time a customer answers a question function prqSlideCallback(event) { if (!prqStarted) { prqStarted = true; gtag('event', 'quiz_started', { event_category: 'quiz' }); } } // Fires once, when the customer reaches the results page function prqQuizCallback(quizResponse) { gtag('event', 'results_page_viewed', { event_category: 'quiz', quiz_name: quizResponse.quiz.attributes.name }); } </script> -
Take the quiz once, then check
Reports → Realtimein GA4 to confirm the events arrive.
The two events this gives you are the two middle steps of the funnel in Step 4. Keep the names exactly as written, or change them in both places.
| Step in the funnel | Event name | Where it comes from |
|---|---|---|
| Quiz started | quiz_started |
prqSlideCallback, first answer only |
| Results page reached | results_page_viewed |
prqQuizCallback |
Full callback reference, including per-answer tracking and the rest of the prq object: How to track quiz performance with Google Analytics and how to use the callback function.
The quiz does not send GA4 events on its own here. You add them with the callback functions, and you choose the event names.
- Make sure GA4 (
gtag.js) is installed on your site and loads before RevenueHunt'sembed.js. -
Add the following script to the page where the quiz is embedded.
<script> var prqStarted = false; // Fires each time a customer answers a question function prqSlideCallback(event) { if (!prqStarted) { prqStarted = true; gtag('event', 'quiz_started', { event_category: 'quiz' }); } } // Fires once, when the customer reaches the results page function prqQuizCallback(quizResponse) { gtag('event', 'results_page_viewed', { event_category: 'quiz', quiz_name: quizResponse.quiz.attributes.name }); } </script> -
Take the quiz once, then check
Reports → Realtimein GA4 to confirm the events arrive.
The two events this gives you are the two middle steps of the funnel in Step 4. Keep the names exactly as written, or change them in both places.
| Step in the funnel | Event name | Where it comes from |
|---|---|---|
| Quiz started | quiz_started |
prqSlideCallback, first answer only |
| Results page reached | results_page_viewed |
prqQuizCallback |
Full callback reference, including per-answer tracking and the rest of the prq object: How to track quiz performance with Google Analytics and how to use the callback function.
The quiz does not send GA4 events on its own here. You add them with the callback functions, and you choose the event names.
- Make sure GA4 (
gtag.js) is installed on your site and loads before RevenueHunt'sembed.js. -
Add the following script to the page where the quiz is embedded.
<script> var prqStarted = false; // Fires each time a customer answers a question function prqSlideCallback(event) { if (!prqStarted) { prqStarted = true; gtag('event', 'quiz_started', { event_category: 'quiz' }); } } // Fires once, when the customer reaches the results page function prqQuizCallback(quizResponse) { gtag('event', 'results_page_viewed', { event_category: 'quiz', quiz_name: quizResponse.quiz.attributes.name }); } </script> -
Take the quiz once, then check
Reports → Realtimein GA4 to confirm the events arrive.
The two events this gives you are the two middle steps of the funnel in Step 4. Keep the names exactly as written, or change them in both places.
| Step in the funnel | Event name | Where it comes from |
|---|---|---|
| Quiz started | quiz_started |
prqSlideCallback, first answer only |
| Results page reached | results_page_viewed |
prqQuizCallback |
Full callback reference, including per-answer tracking and the rest of the prq object: How to track quiz performance with Google Analytics and how to use the callback function.
The quiz does not send GA4 events on its own here. You add them with the callback functions, and you choose the event names.
- Make sure GA4 (
gtag.js) is installed on your site and loads before RevenueHunt'sembed.js. -
Add the following script to the page where the quiz is embedded.
<script> var prqStarted = false; // Fires each time a customer answers a question function prqSlideCallback(event) { if (!prqStarted) { prqStarted = true; gtag('event', 'quiz_started', { event_category: 'quiz' }); } } // Fires once, when the customer reaches the results page function prqQuizCallback(quizResponse) { gtag('event', 'results_page_viewed', { event_category: 'quiz', quiz_name: quizResponse.quiz.attributes.name }); } </script> -
Take the quiz once, then check
Reports → Realtimein GA4 to confirm the events arrive.
The two events this gives you are the two middle steps of the funnel in Step 4. Keep the names exactly as written, or change them in both places.
| Step in the funnel | Event name | Where it comes from |
|---|---|---|
| Quiz started | quiz_started |
prqSlideCallback, first answer only |
| Results page reached | results_page_viewed |
prqQuizCallback |
Full callback reference, including per-answer tracking and the rest of the prq object: How to track quiz performance with Google Analytics and how to use the callback function.
Build the funnel in GA4
-
Open the Funnel exploration template. In GA4, click
Explorein the left sidebar, then pick Funnel exploration. It opens with four placeholder steps, which you are going to replace. -
Set your date range. The picker sits at the top of the Variables panel.
The three panels
Variables is on the left, Tab Settings in the middle, and the funnel chart on the right.
-
Import the campaign dimension. In Variables, click the
+next to Dimensions. Search for Session campaign, tick it, then click Import.Import it before you touch Breakdown
A dimension you have not imported does not appear in the Breakdown field. That is the usual reason people cannot find it.
-
Open the step editor. In Tab Settings, hover over Steps and click the pencil icon.
-
Replace the four placeholder steps.
Each step has two separate parts. The name is only a label for you to read, so it can be anything. The condition underneath is what GA4 actually matches on.
Step Name it Condition to set 1 Landed on the quiz page Click Add new condition and choose the event page_view. Then add a second condition to the same step: the Page path dimension, operatorcontains, value/pages/your-quiz-page. Both must be true, so leave them joined by AND2 Started the quiz Add new condition, event quiz_started_{your_quiz_name}3 Reached the results Add new condition, event results_page_viewed_{your_results_page_title}4 Purchased Add new condition, event purchase -
Apply the steps. Click Apply in the top right of the editor.
-
Split the funnel by campaign. Drag Session campaign from Variables onto the Breakdown field in Tab Settings. The funnel then shows a row per campaign instead of one combined total.
-
Switch on Show elapsed time. It is also in Tab Settings. It adds the average time between steps, so you see where customers stall as well as where they leave.
-
Open the Funnel exploration template. In GA4, click
Explorein the left sidebar, then pick Funnel exploration. It opens with four placeholder steps, which you are going to replace. -
Set your date range. The picker sits at the top of the Variables panel.
The three panels
Variables is on the left, Tab Settings in the middle, and the funnel chart on the right.
-
Import the campaign dimension. In Variables, click the
+next to Dimensions. Search for Session campaign, tick it, then click Import.Import it before you touch Breakdown
A dimension you have not imported does not appear in the Breakdown field. That is the usual reason people cannot find it.
-
Open the step editor. In Tab Settings, hover over Steps and click the pencil icon.
-
Replace the four placeholder steps.
Each step has two separate parts. The name is only a label for you to read, so it can be anything. The condition underneath is what GA4 actually matches on.
Step Name it Condition to set 1 Landed on the quiz page Click Add new condition and choose the event page_view. Then add a second condition to the same step: the Page path dimension, operatorcontains, value/pages/your-quiz-page. Both must be true, so leave them joined by AND2 Started the quiz Add new condition, event quiz_started3 Reached the results Add new condition, event results_page_viewed4 Purchased Add new condition, event purchase -
Apply the steps. Click Apply in the top right of the editor.
-
Split the funnel by campaign. Drag Session campaign from Variables onto the Breakdown field in Tab Settings. The funnel then shows a row per campaign instead of one combined total.
-
Switch on Show elapsed time. It is also in Tab Settings. It adds the average time between steps, so you see where customers stall as well as where they leave.
-
Open the Funnel exploration template. In GA4, click
Explorein the left sidebar, then pick Funnel exploration. It opens with four placeholder steps, which you are going to replace. -
Set your date range. The picker sits at the top of the Variables panel.
The three panels
Variables is on the left, Tab Settings in the middle, and the funnel chart on the right.
-
Import the campaign dimension. In Variables, click the
+next to Dimensions. Search for Session campaign, tick it, then click Import.Import it before you touch Breakdown
A dimension you have not imported does not appear in the Breakdown field. That is the usual reason people cannot find it.
-
Open the step editor. In Tab Settings, hover over Steps and click the pencil icon.
-
Replace the four placeholder steps.
Each step has two separate parts. The name is only a label for you to read, so it can be anything. The condition underneath is what GA4 actually matches on.
Step Name it Condition to set 1 Landed on the quiz page Click Add new condition and choose the event page_view. Then add a second condition to the same step: the Page path dimension, operatorcontains, value/pages/your-quiz-page. Both must be true, so leave them joined by AND2 Started the quiz Add new condition, event quiz_started3 Reached the results Add new condition, event results_page_viewed4 Purchased Add new condition, event purchase -
Apply the steps. Click Apply in the top right of the editor.
-
Split the funnel by campaign. Drag Session campaign from Variables onto the Breakdown field in Tab Settings. The funnel then shows a row per campaign instead of one combined total.
-
Switch on Show elapsed time. It is also in Tab Settings. It adds the average time between steps, so you see where customers stall as well as where they leave.
-
Open the Funnel exploration template. In GA4, click
Explorein the left sidebar, then pick Funnel exploration. It opens with four placeholder steps, which you are going to replace. -
Set your date range. The picker sits at the top of the Variables panel.
The three panels
Variables is on the left, Tab Settings in the middle, and the funnel chart on the right.
-
Import the campaign dimension. In Variables, click the
+next to Dimensions. Search for Session campaign, tick it, then click Import.Import it before you touch Breakdown
A dimension you have not imported does not appear in the Breakdown field. That is the usual reason people cannot find it.
-
Open the step editor. In Tab Settings, hover over Steps and click the pencil icon.
-
Replace the four placeholder steps.
Each step has two separate parts. The name is only a label for you to read, so it can be anything. The condition underneath is what GA4 actually matches on.
Step Name it Condition to set 1 Landed on the quiz page Click Add new condition and choose the event page_view. Then add a second condition to the same step: the Page path dimension, operatorcontains, value/pages/your-quiz-page. Both must be true, so leave them joined by AND2 Started the quiz Add new condition, event quiz_started3 Reached the results Add new condition, event results_page_viewed4 Purchased Add new condition, event purchase -
Apply the steps. Click Apply in the top right of the editor.
-
Split the funnel by campaign. Drag Session campaign from Variables onto the Breakdown field in Tab Settings. The funnel then shows a row per campaign instead of one combined total.
-
Switch on Show elapsed time. It is also in Tab Settings. It adds the average time between steps, so you see where customers stall as well as where they leave.
-
Open the Funnel exploration template. In GA4, click
Explorein the left sidebar, then pick Funnel exploration. It opens with four placeholder steps, which you are going to replace. -
Set your date range. The picker sits at the top of the Variables panel.
The three panels
Variables is on the left, Tab Settings in the middle, and the funnel chart on the right.
-
Import the campaign dimension. In Variables, click the
+next to Dimensions. Search for Session campaign, tick it, then click Import.Import it before you touch Breakdown
A dimension you have not imported does not appear in the Breakdown field. That is the usual reason people cannot find it.
-
Open the step editor. In Tab Settings, hover over Steps and click the pencil icon.
-
Replace the four placeholder steps.
Each step has two separate parts. The name is only a label for you to read, so it can be anything. The condition underneath is what GA4 actually matches on.
Step Name it Condition to set 1 Landed on the quiz page Click Add new condition and choose the event page_view. Then add a second condition to the same step: the Page path dimension, operatorcontains, value/pages/your-quiz-page. Both must be true, so leave them joined by AND2 Started the quiz Add new condition, event quiz_started3 Reached the results Add new condition, event results_page_viewed4 Purchased Add new condition, event purchase -
Apply the steps. Click Apply in the top right of the editor.
-
Split the funnel by campaign. Drag Session campaign from Variables onto the Breakdown field in Tab Settings. The funnel then shows a row per campaign instead of one combined total.
-
Switch on Show elapsed time. It is also in Tab Settings. It adds the average time between steps, so you see where customers stall as well as where they leave.
-
Open the Funnel exploration template. In GA4, click
Explorein the left sidebar, then pick Funnel exploration. It opens with four placeholder steps, which you are going to replace. -
Set your date range. The picker sits at the top of the Variables panel.
The three panels
Variables is on the left, Tab Settings in the middle, and the funnel chart on the right.
-
Import the campaign dimension. In Variables, click the
+next to Dimensions. Search for Session campaign, tick it, then click Import.Import it before you touch Breakdown
A dimension you have not imported does not appear in the Breakdown field. That is the usual reason people cannot find it.
-
Open the step editor. In Tab Settings, hover over Steps and click the pencil icon.
-
Replace the four placeholder steps.
Each step has two separate parts. The name is only a label for you to read, so it can be anything. The condition underneath is what GA4 actually matches on.
Step Name it Condition to set 1 Landed on the quiz page Click Add new condition and choose the event page_view. Then add a second condition to the same step: the Page path dimension, operatorcontains, value/pages/your-quiz-page. Both must be true, so leave them joined by AND2 Started the quiz Add new condition, event quiz_started3 Reached the results Add new condition, event results_page_viewed4 Purchased Add new condition, event purchase -
Apply the steps. Click Apply in the top right of the editor.
-
Split the funnel by campaign. Drag Session campaign from Variables onto the Breakdown field in Tab Settings. The funnel then shows a row per campaign instead of one combined total.
-
Switch on Show elapsed time. It is also in Tab Settings. It adds the average time between steps, so you see where customers stall as well as where they leave.
The drop between each pair of steps is the number you act on. The purchase event comes from your store's own GA4 setup, not from the quiz, so if the last step is empty, check that first.
GA4 event tracking reliability
Since Google moved from Universal Analytics to GA4, event tracking reliability has dropped. The implementation can be correct and the events can fire as expected, and GA4 can still fail to read, process, or report them accurately. If that happens, contact Google Support: the issue is on their end.
Attach the campaign to each response (optional)
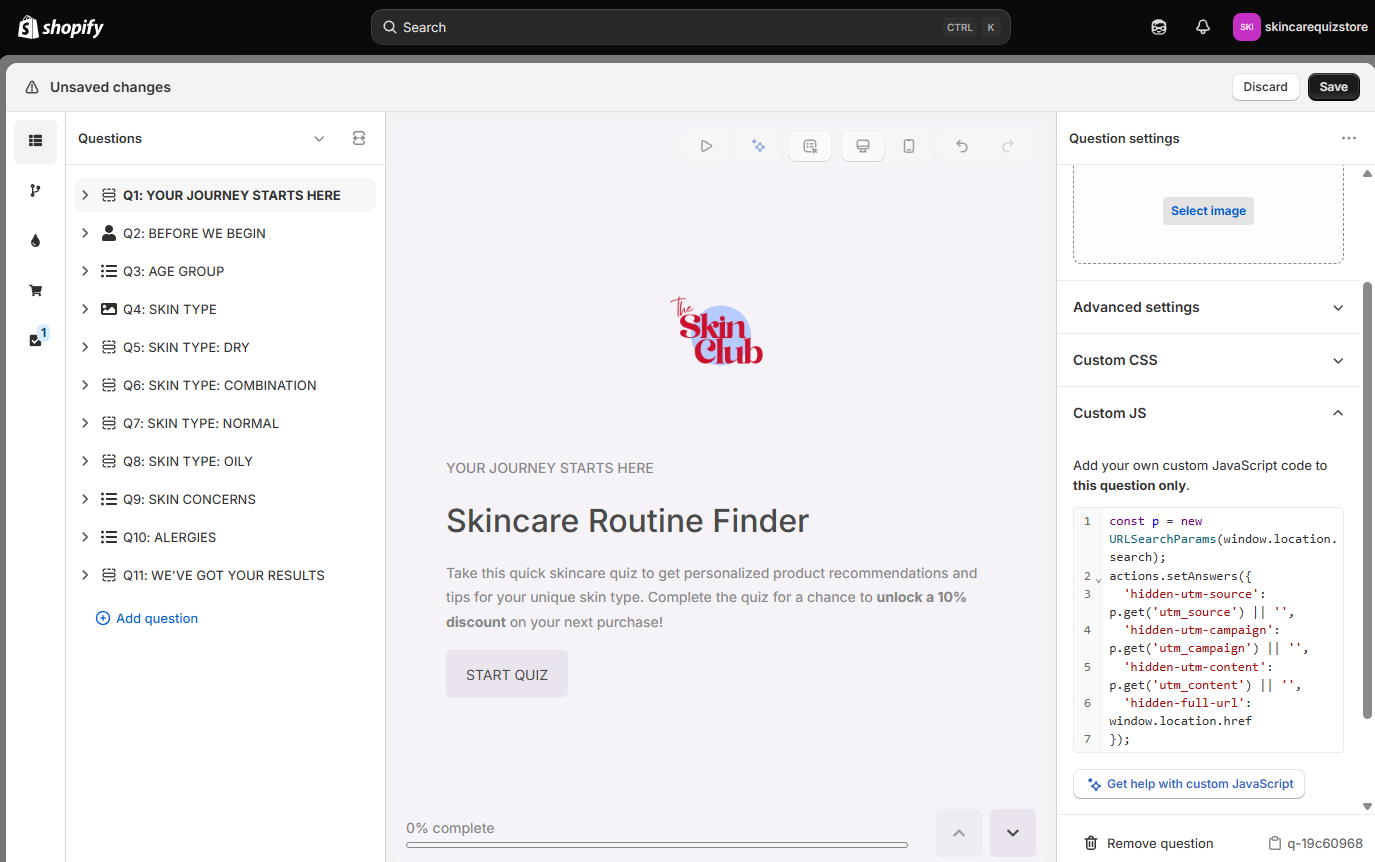
Everything so far gives you totals per campaign. This step puts the campaign on each individual quiz response, so you can tell which ad produced a specific lead.
- Open the first question of your quiz and expand its
Custom JSsection. -
Paste the following. No
<script>tags.
Guides: How to add JavaScript and how to send leads to webhooks.
Pass the campaign in on the URL and store it in a hidden question. The actions API is not available here, so you use window.prq_vars instead.
- Add three
Short Textquestions to your quiz to hold the source, campaign and content. See Question Types. - Copy each question ID from question settings.
-
On the landing page, before RevenueHunt's
embed.jsloads, add the following script. ReplaceqIdSource,qIdCampaignandqIdContentwith your own question IDs.
A question is skipped automatically once a parameter has been passed for it. Always assign the empty string as a fallback, as above, or customers arriving without UTM parameters will be shown the hidden questions.
Guides: How to pass parameters to pre-fill quiz responses and how to send leads to webhooks.
Pass the campaign in on the URL and store it in a hidden question. The actions API is not available here, so you use window.prq_vars instead.
- Add three
Short Textquestions to your quiz to hold the source, campaign and content. See Question Types. - Copy each question ID from question settings.
-
On the landing page, before RevenueHunt's
embed.jsloads, add the following script. ReplaceqIdSource,qIdCampaignandqIdContentwith your own question IDs.
A question is skipped automatically once a parameter has been passed for it. Always assign the empty string as a fallback, as above, or customers arriving without UTM parameters will be shown the hidden questions.
Guides: How to pass parameters to pre-fill quiz responses and how to send leads to webhooks.
Pass the campaign in on the URL and store it in a hidden question. The actions API is not available here, so you use window.prq_vars instead.
- Add three
Short Textquestions to your quiz to hold the source, campaign and content. See Question Types. - Copy each question ID from question settings.
-
On the landing page, before RevenueHunt's
embed.jsloads, add the following script. ReplaceqIdSource,qIdCampaignandqIdContentwith your own question IDs.
A question is skipped automatically once a parameter has been passed for it. Always assign the empty string as a fallback, as above, or customers arriving without UTM parameters will be shown the hidden questions.
Guides: How to pass parameters to pre-fill quiz responses and how to send leads to webhooks.
Pass the campaign in on the URL and store it in a hidden question. The actions API is not available here, so you use window.prq_vars instead.
- Add three
Short Textquestions to your quiz to hold the source, campaign and content. See Question Types. - Copy each question ID from question settings.
-
On the landing page, before RevenueHunt's
embed.jsloads, add the following script. ReplaceqIdSource,qIdCampaignandqIdContentwith your own question IDs.
A question is skipped automatically once a parameter has been passed for it. Always assign the empty string as a fallback, as above, or customers arriving without UTM parameters will be shown the hidden questions.
Guides: How to pass parameters to pre-fill quiz responses and how to send leads to webhooks.
Pass the campaign in on the URL and store it in a hidden question. The actions API is not available here, so you use window.prq_vars instead.
- Add three
Short Textquestions to your quiz to hold the source, campaign and content. See Question Types. - Copy each question ID from question settings.
-
On the landing page, before RevenueHunt's
embed.jsloads, add the following script. ReplaceqIdSource,qIdCampaignandqIdContentwith your own question IDs.
A question is skipped automatically once a parameter has been passed for it. Always assign the empty string as a fallback, as above, or customers arriving without UTM parameters will be shown the hidden questions.
Guides: How to pass parameters to pre-fill quiz responses and how to send leads to webhooks.
Whichever platform you are on, these values travel with the response and arrive in your webhook payload under answersByBlock. That is where you join campaign to lead in your own reporting.
Reading the funnel: what each drop means
| Where the drop is | Likely cause | Where to look |
|---|---|---|
Clicks, but few page_view |
Slow page, or a redirect stripping the parameters | Check quiz loading speed |
Page views, but few quiz_started |
The quiz is too far down the page, or the call to action is weak | Get more quiz engagement |
Quiz starts, but few results_page_viewed |
Too many questions, or one question is causing the drop | The Drop-off panel in Metrics, and Reduce drop-off |
| Results reached, but few orders | The recommendations or the offer, not the funnel | Why your quiz is not converting |
Related
- Track Quiz Revenue: the quiz to order half, native and already running.
- Integrate Meta Pixel: the same events sent to Meta, for optimizing the ads themselves.
- Use Quiz Data to Lower Your Ad Costs: what to do with the data once you can read it.
This article explains how to follow a customer from an ad through the quiz to a purchase, and what each drop in the funnel means.