How to Set Up a Funnel Quiz
A funnel quiz helps a customer find the right product. Every choice the customer makes gives an upvote to the products linked to that choice. At the end, the quiz recommends the products with the most upvotes.
Use this method for:
- Helping customers narrow down a large product catalog
- Most quizzes, especially product finders
- Your first product recommendation quiz
- Quizzes without complex branching
There are five ways to build one. They all count upvotes the same way, and differ only in how the questions are arranged and how the results page is built.
| Method | Use it when |
|---|---|
| Funnel quiz | Every customer answers the same questions and gets one list of recommendations |
| Funnel quiz with slots | The result is a routine or a set, such as a cleanser, then a serum, then a moisturizer |
| Funnel quiz that skips slides | Follow-up questions apply only to the concerns the customer selected |
| Funnel quiz with branching | Different answers send the customer down different paths |
| Funnel quiz that shows custom text based on choices | The text on the results page has to change with the answers |
Upvoting system
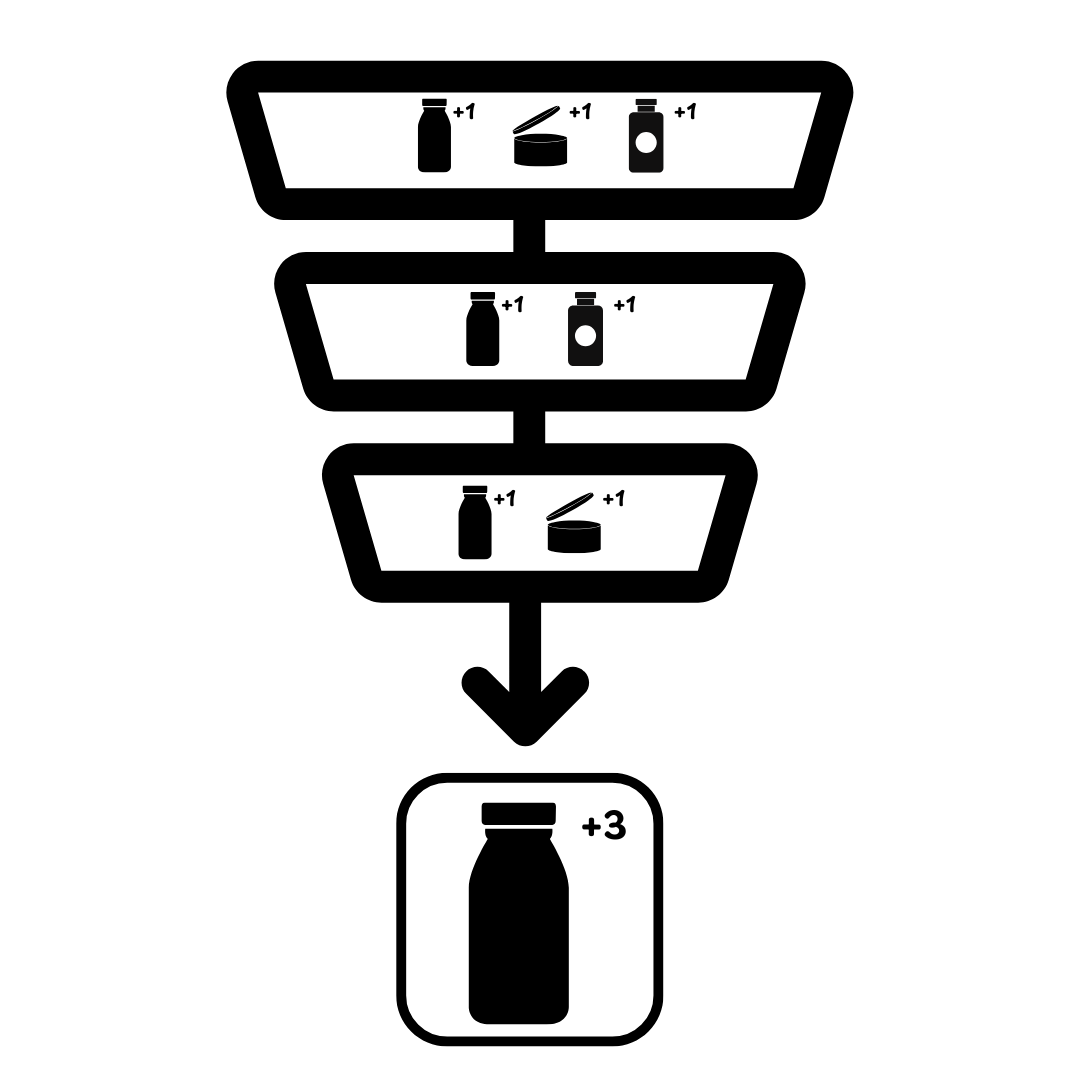
An upvote is the signal a choice gives a product. This is how an upvote becomes a recommendation:
- You link products, variants or collections to each choice.
- A customer picks that choice, and every linked item gets one upvote.
- The results page lists them, highest upvote count first.
An empty results page has two causes
Either nothing was linked to the choices the customer made, or Exclusions removed everything that was upvoted.
Two settings refine the list:
- A minimum upvote count hides products that did not get enough upvotes.
- Exclusions keep a product out entirely, even when another choice upvoted it.
When two products have the same upvote count
By default the app randomizes their order.
To use your own order instead, set Catalog mode to Preserve collection order in Settings > Catalog. Products then appear in the order you arranged them in your Shopify collections.
Click Import now after you change the setting. The new order applies only after a fresh import.
The app randomizes their order.
The app randomizes their order.
The app randomizes their order.
The app randomizes their order.
The app randomizes their order.
Upvote inclusion and exclusion decide which products can be recommended at all. Inclusion adds a product to the upvote count. Exclusion keeps it out of the results, whatever its count.
Upvote inclusion
To link products or collections to choices, open the Choice settings and go to the Upvotes section.
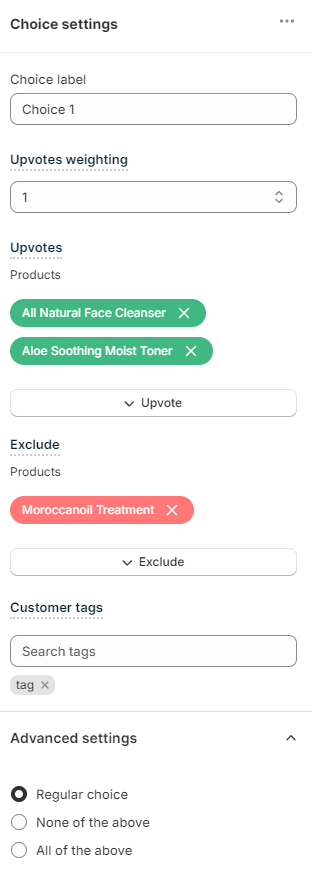
-
Click
+ Add upvote type.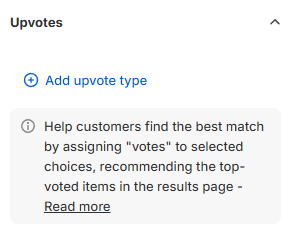
-
Choose what the choice upvotes.
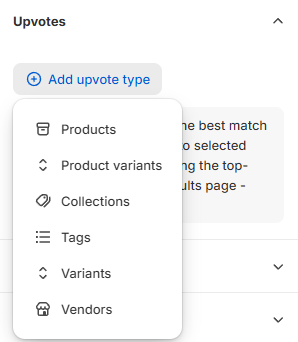
-
Select the products, collections or tags themselves.
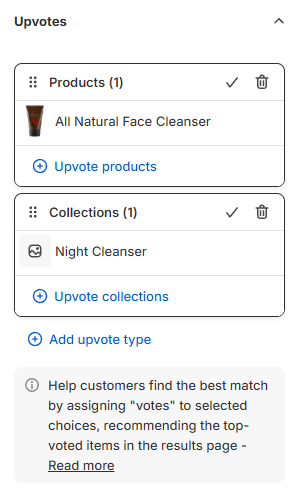
What each upvote type does:
- Main Products / All variants of the same product at once - the whole product is upvoted, not one variant. Every variant of it receives the upvote when the linked choice is selected.
- Product variants - an individual variant receives an upvote when its linked choice is selected. Only variants link to choices directly, but the results page can group variants under their parent product.
- Collections - every product in a linked collection receives an upvote when its linked choice is selected.
- Tags - every product with a linked tag receives an upvote when its linked choice is selected.
- Variant collections - created automatically by the app. Every product in a linked variant collection receives an upvote when its linked choice is selected.
- Vendor collections - created automatically by the app. Every product in a linked vendor collection receives an upvote when its linked choice is selected.
Recommending text instead of products
A quiz can also recommend pure text. Add one section per result to the results page, then control which section appears with Display logic. Text results do not use the upvoting system. They use the scoring system or conditional logic instead.
Products or collections added in the include/upvotes field of the Link Products/Collections/Upvote tab are upvoted in the final recommendations.
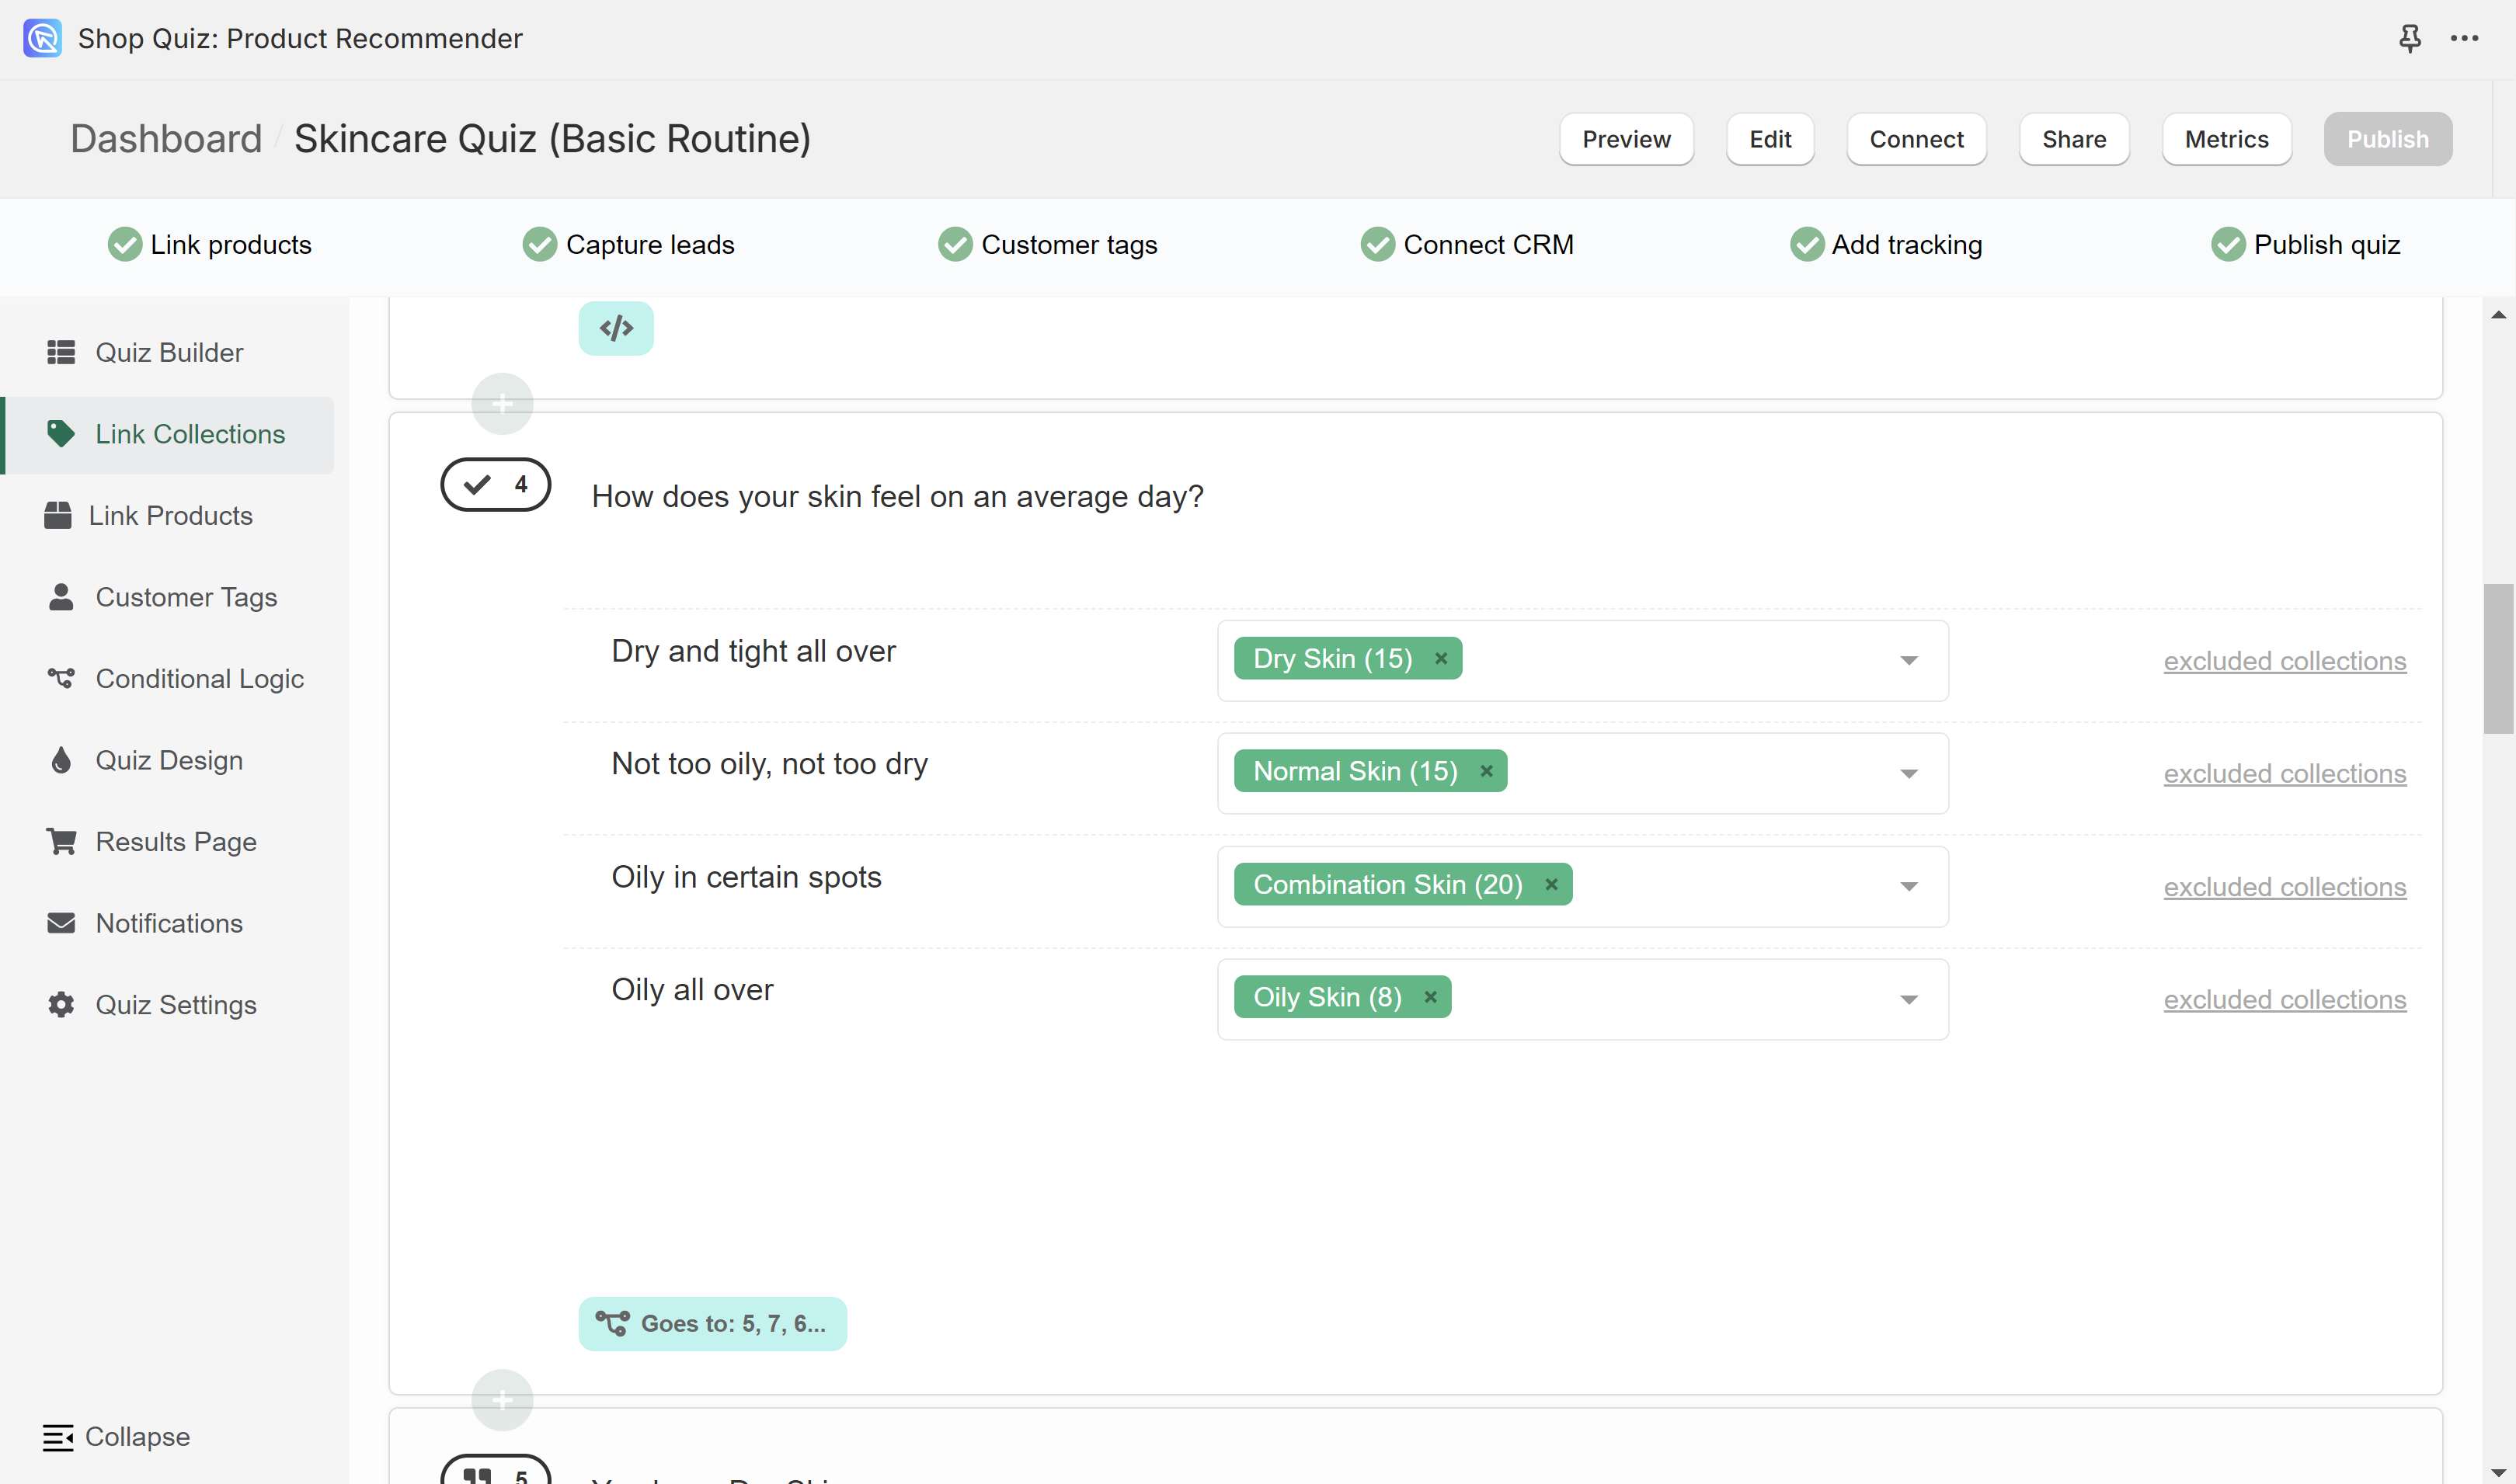
What each upvote type does:
- Product variants - an individual variant receives an upvote when its linked choice is selected. Only variants link to choices directly, but the results page can group variants under their parent product.
- Collections - every product in a linked collection receives an upvote when its linked choice is selected.
- Tags - every product with a linked tag receives an upvote when its linked choice is selected.
- Variant collections - created automatically by the app. Every product in a linked variant collection receives an upvote when its linked choice is selected.
- Vendor collections - created automatically by the app. Every product in a linked vendor collection receives an upvote when its linked choice is selected.
- All variants of the same product at once - every variant of a product is upvoted at once when its linked choice is selected.
Upvoting all variants at once
Use top-level product in Quiz Settings has to be active before All variants of the same product at once appears in the Link Products section.
Products or categories added in the include/upvotes field of the Link Products/Collections/Upvote tab are upvoted in the final recommendations.
What each upvote type does:
- Simple Products - an individual product receives an upvote when its linked choice is selected.
- Product variants - an individual variant receives an upvote when its linked choice is selected. Only variants link to choices directly, but the results page can group variants under their parent product.
- Product Bundles - a bundle counts as one product, and receives one upvote when its linked choice is selected.
- Affiliate Products - an individual product receives an upvote when its linked choice is selected. On the results page the customer goes to the affiliate link, not to the store link.
- Categories - every product in a linked category receives an upvote when its linked choice is selected.
- Tags - every product with a linked tag receives an upvote when its linked choice is selected.
- All variants of the same product at once - every variant of a product is upvoted at once when its linked choice is selected.
Upvoting all variants at once
Use top-level product in Quiz Settings has to be active before All variants of the same product at once appears in the Link Products section.
Products or categories added in the include/upvotes field of the Link Products/Collections/Upvote tab are upvoted in the final recommendations.
What each upvote type does:
- Product variants - an individual variant receives an upvote when its linked choice is selected. Only variants link to choices directly, but the results page can group variants under their parent product.
- Categories - every product in a linked category receives an upvote when its linked choice is selected.
Products or categories added in the include/upvotes field of the Link Products/Collections/Upvote tab are upvoted in the final recommendations.
What each upvote type does:
- Product variants - an individual variant receives an upvote when its linked choice is selected. Only variants link to choices directly, but the results page can group variants under their parent product.
- Categories - every product in a linked category receives an upvote when its linked choice is selected.
- Tags - every product with a linked tag receives an upvote when its linked choice is selected.
Using custom fields as tags
Products or collections added in the include/upvotes field of the Link Products/Collections/Upvote tab are upvoted in the final recommendations.
What each upvote type does:
- Product variants - an individual variant receives an upvote when its linked choice is selected. Only variants link to choices directly, but the results page can group variants under their parent product.
- Collections - every product in a linked collection receives an upvote when its linked choice is selected.
One choice can upvote the same variant twice
A variant can be upvoted twice by one choice: once through the Upvote tab directly, and again through a collection that contains it. That choice then gives it 2 upvotes.
Exclusion
To exclude products or collections from a choice, open the Choice settings and go to the Exclude section.
-
Click
+ Add exclude type.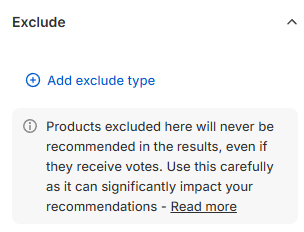
-
Choose what the choice excludes.
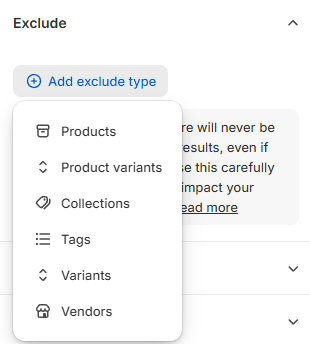
-
Select the products, collections or tags themselves. Each one joins the excluded list.
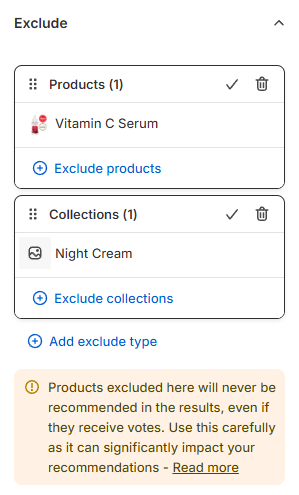
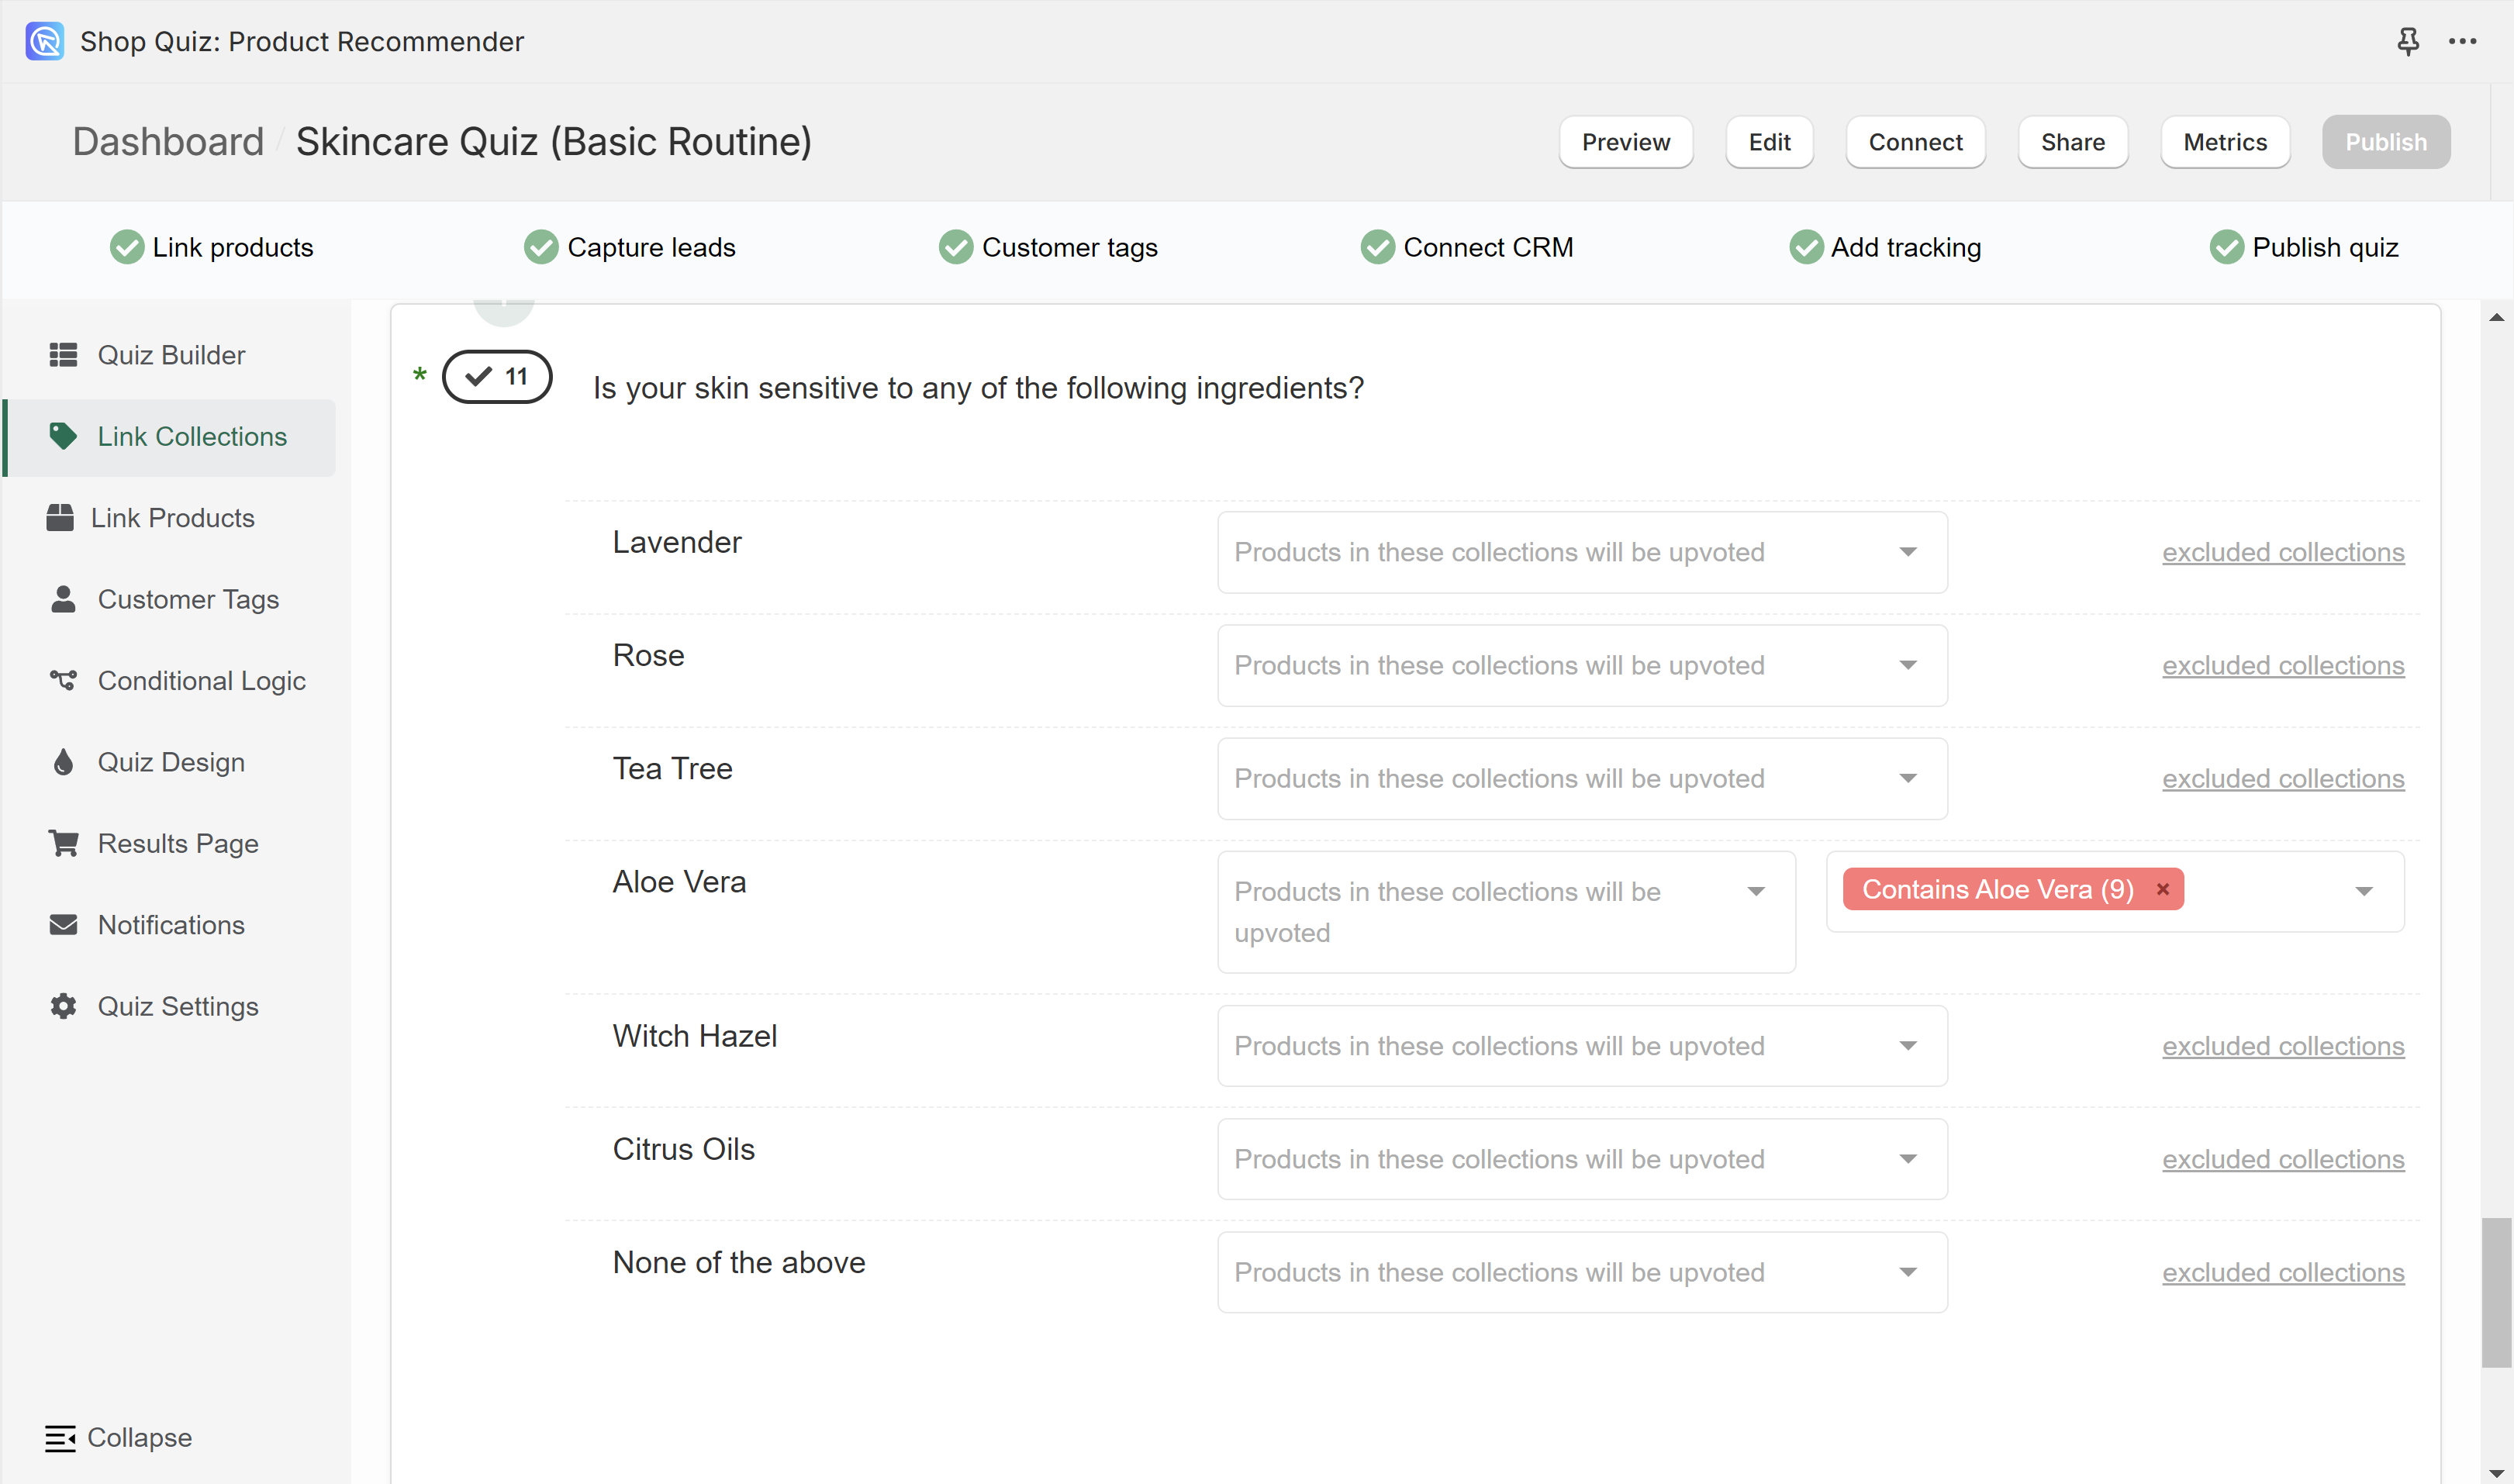
Use the exclude field of the Link Products/Collections/Exclude tab to keep products or collections out of the recommendations. This is useful for items with allergens or sensitive ingredients.
Use the exclude field of the Link Products/Collections/Exclude tab to keep products or collections out of the recommendations. This is useful for items with allergens or sensitive ingredients.
Use the exclude field of the Link Products/Collections/Exclude tab to keep products or collections out of the recommendations. This is useful for items with allergens or sensitive ingredients.
Use the exclude field of the Link Products/Collections/Exclude tab to keep products or collections out of the recommendations. This is useful for items with allergens or sensitive ingredients.
Use the exclude field of the Link Products/Collections/Exclude tab to keep products or collections out of the recommendations. This is useful for items with allergens or sensitive ingredients.
An exclusion always wins
Once a choice excludes a product, it never shows as a recommendation, even if another choice upvotes it.
Filtering recommendations by price
Exclusions can filter the recommendations question by question. To keep the results inside a budget, exclude a collection of products above that price from the matching choice.
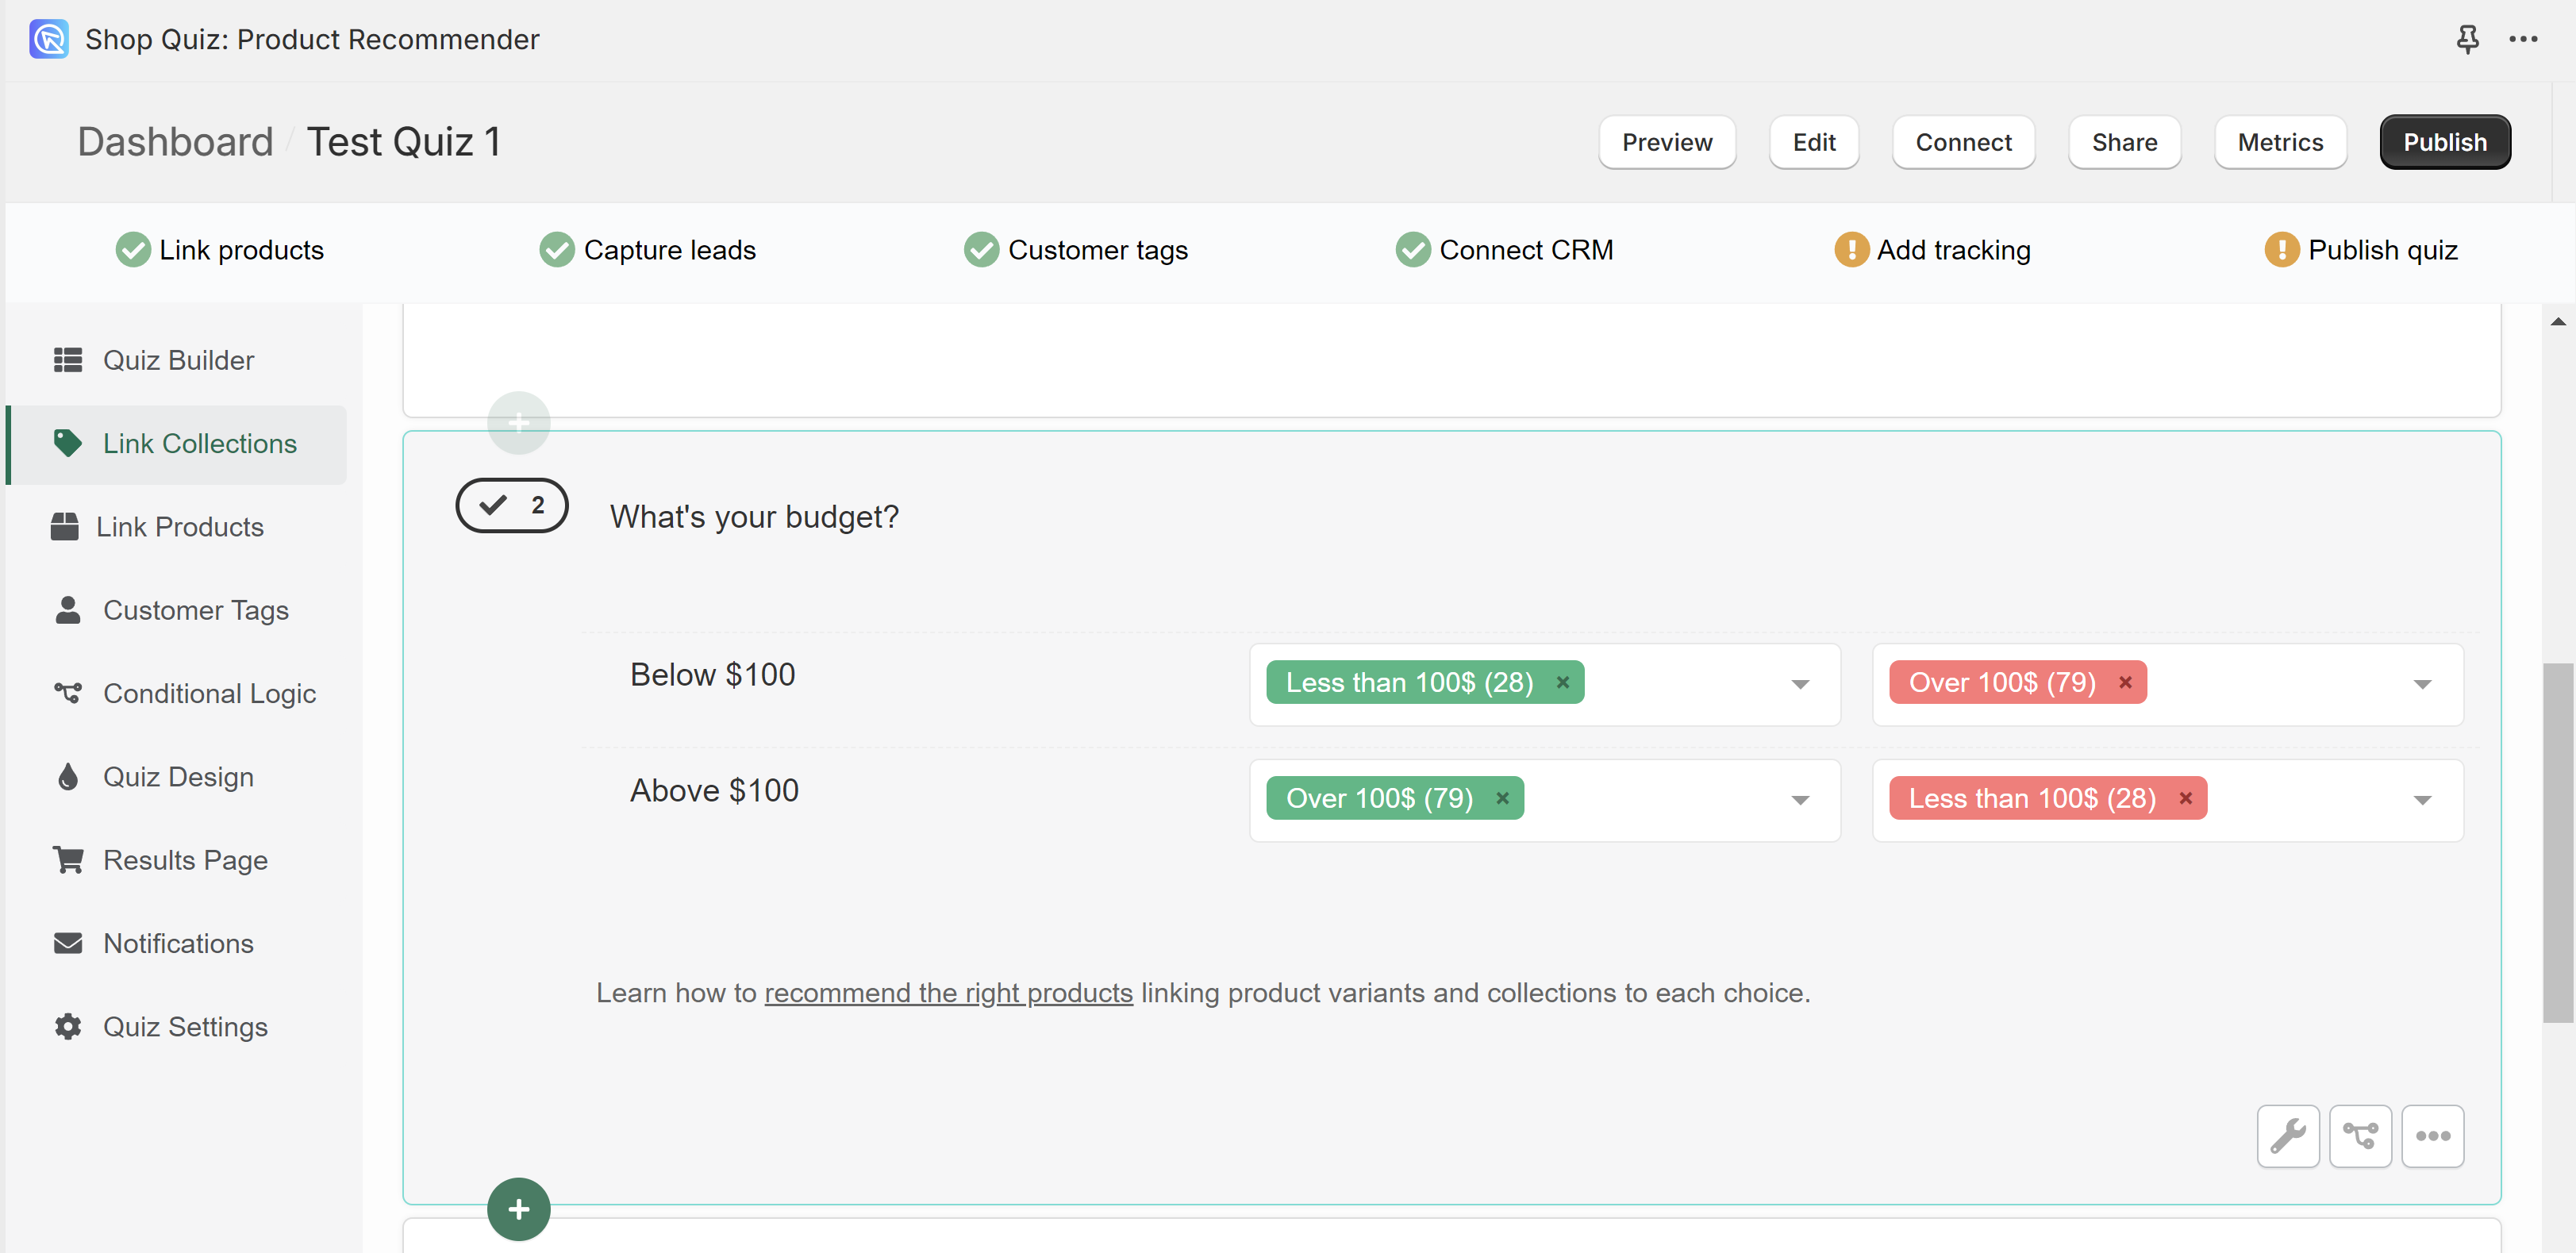
A customer who says they do not want to spend more than $100 then sees no products above that price.
Funnel quiz
Every customer answers the same questions. Each choice upvotes the products linked to it, and the results page lists the products with the most upvotes first.
This method uses the upvoting system.
The results page can show product variants, main products and collections.
-
Link products to your choices. Open the Upvote tab, then upvote the relevant products for each choice.
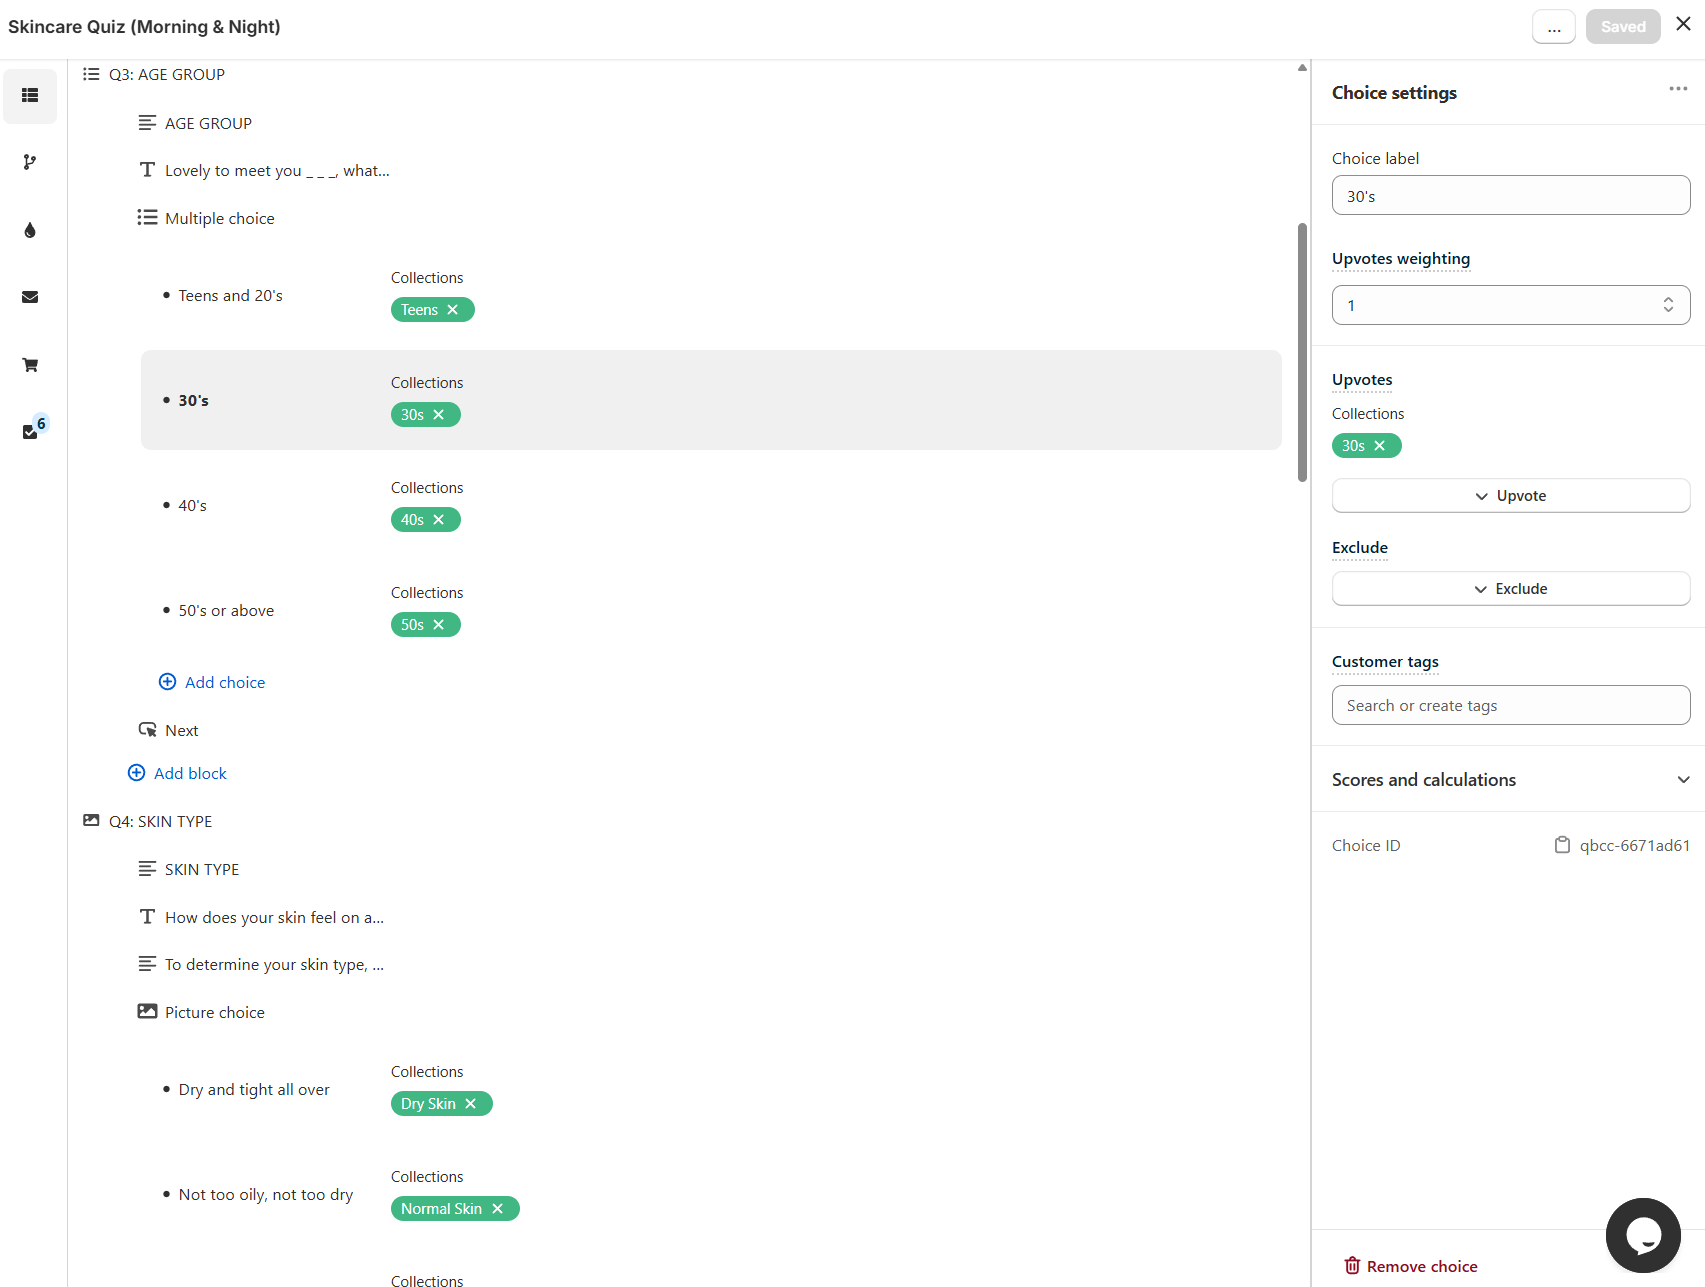
Link one collection instead of twenty products
Create a hidden collection in Shopify for each choice, and put only the relevant products in it. One collection per choice is easier to maintain than a long list of single products.
What each upvote type does
See Upvote inclusion for how variants, collections, tags and vendor collections are counted, and Exclusion for how to keep a product out of the results.
-
Edit the results page. Open the Results page tab and add a heading, a content block, an image block or an HTML block.
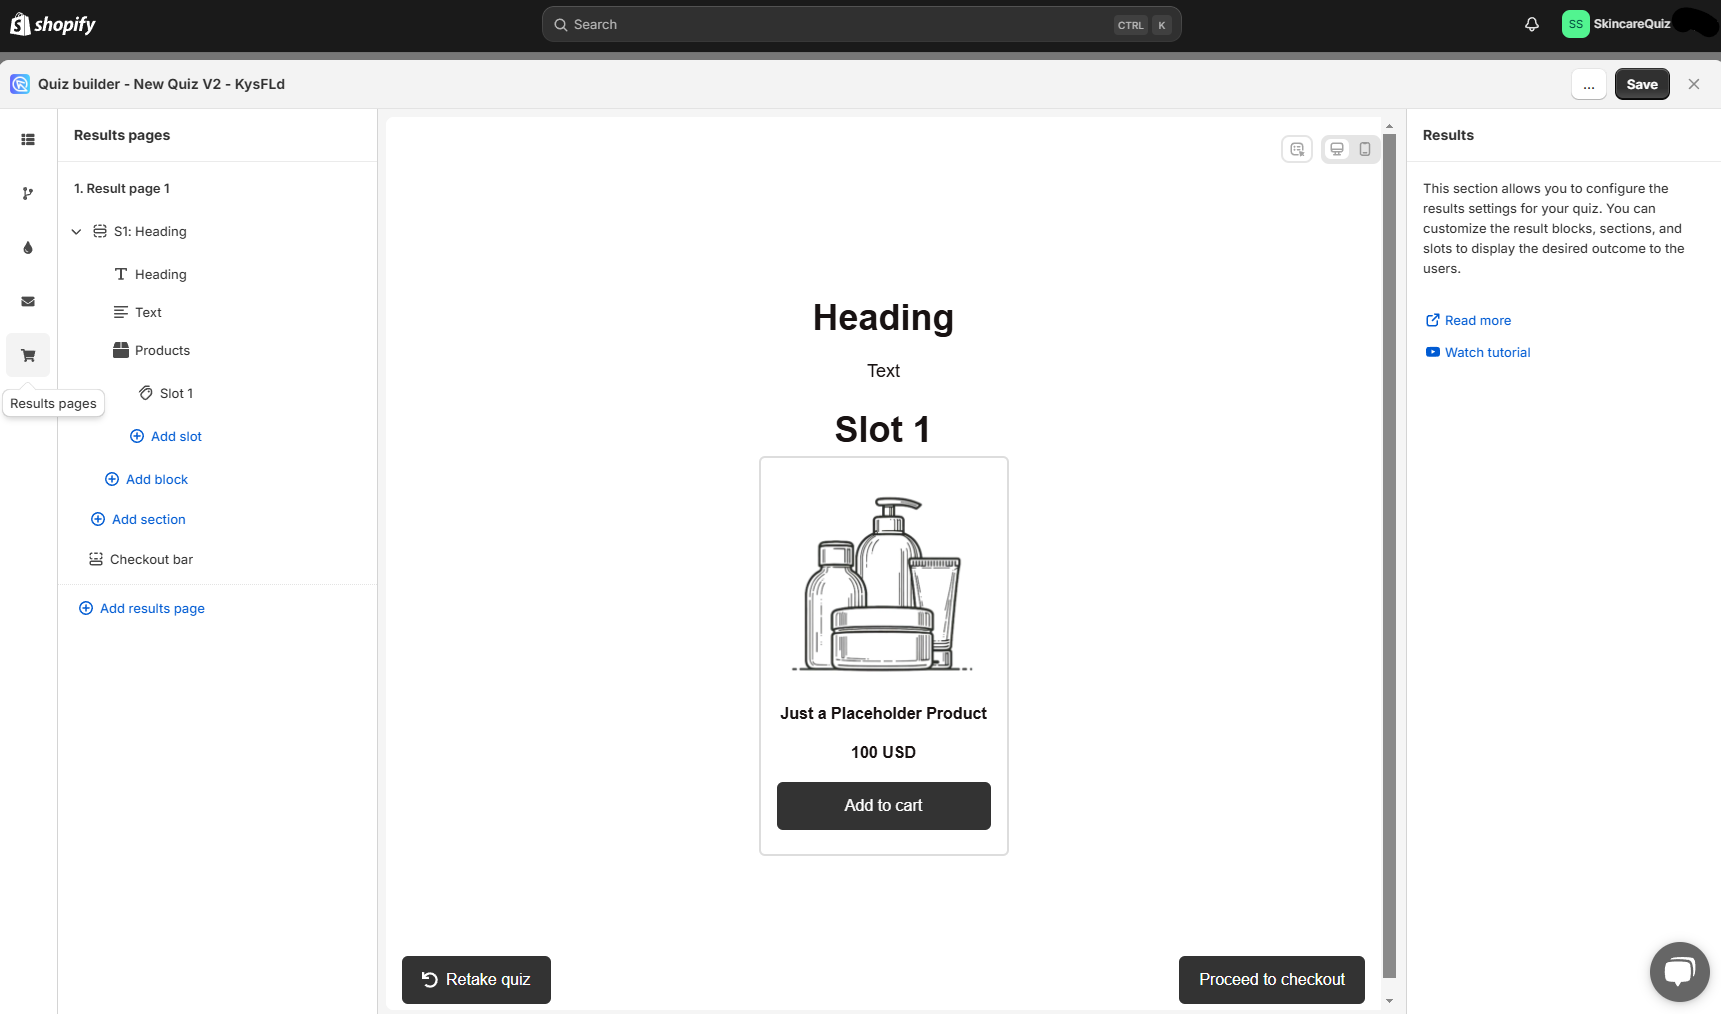
Editing the results page
-
Add a
Products Block. Click+ Add Blockand selectProducts Block.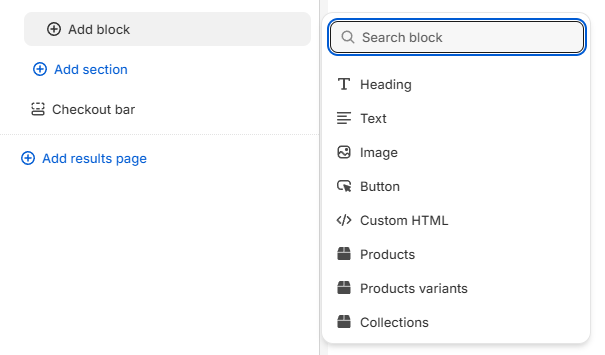
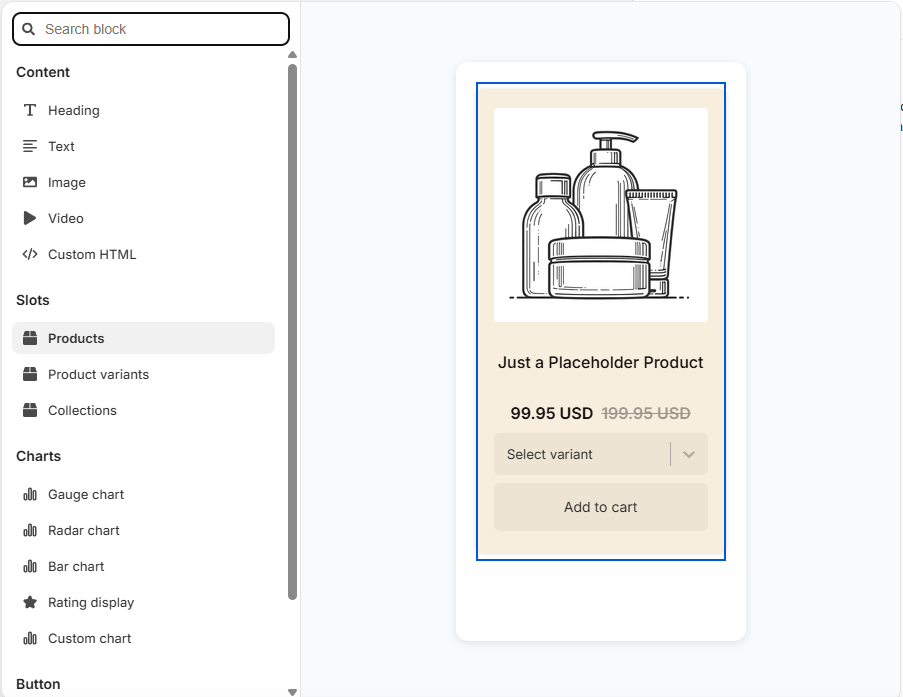
-
Set
Recommendation systemtoUpvotesin the block settings. The block then lists the products by upvote count, most upvoted first.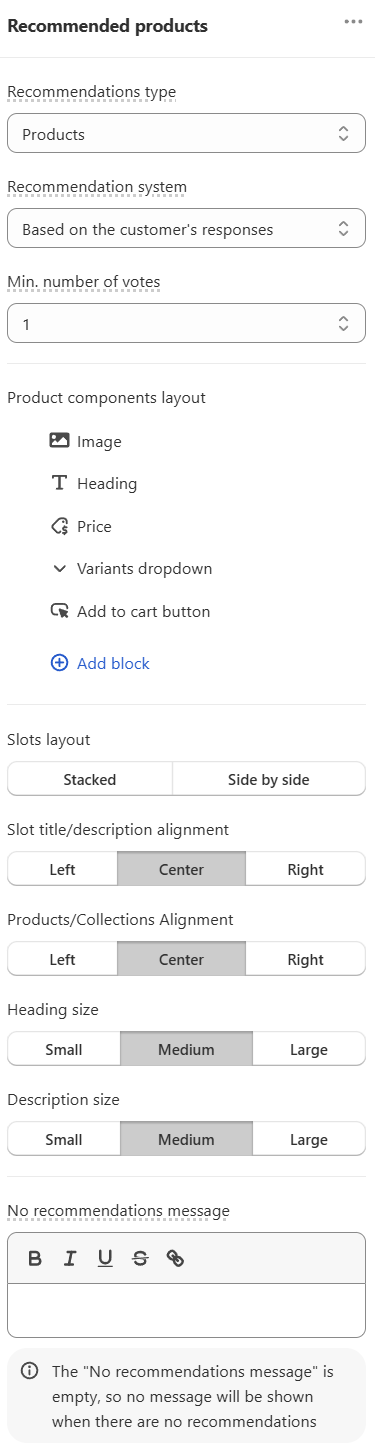
-
Choose how many products to show in the slot settings. Every products block has one default
Slot, and that slot holds the recommended products.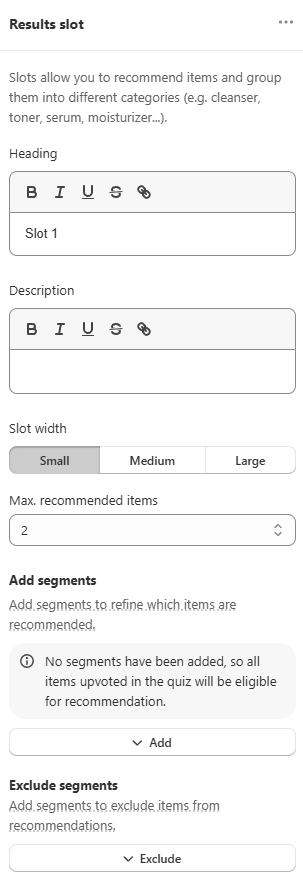
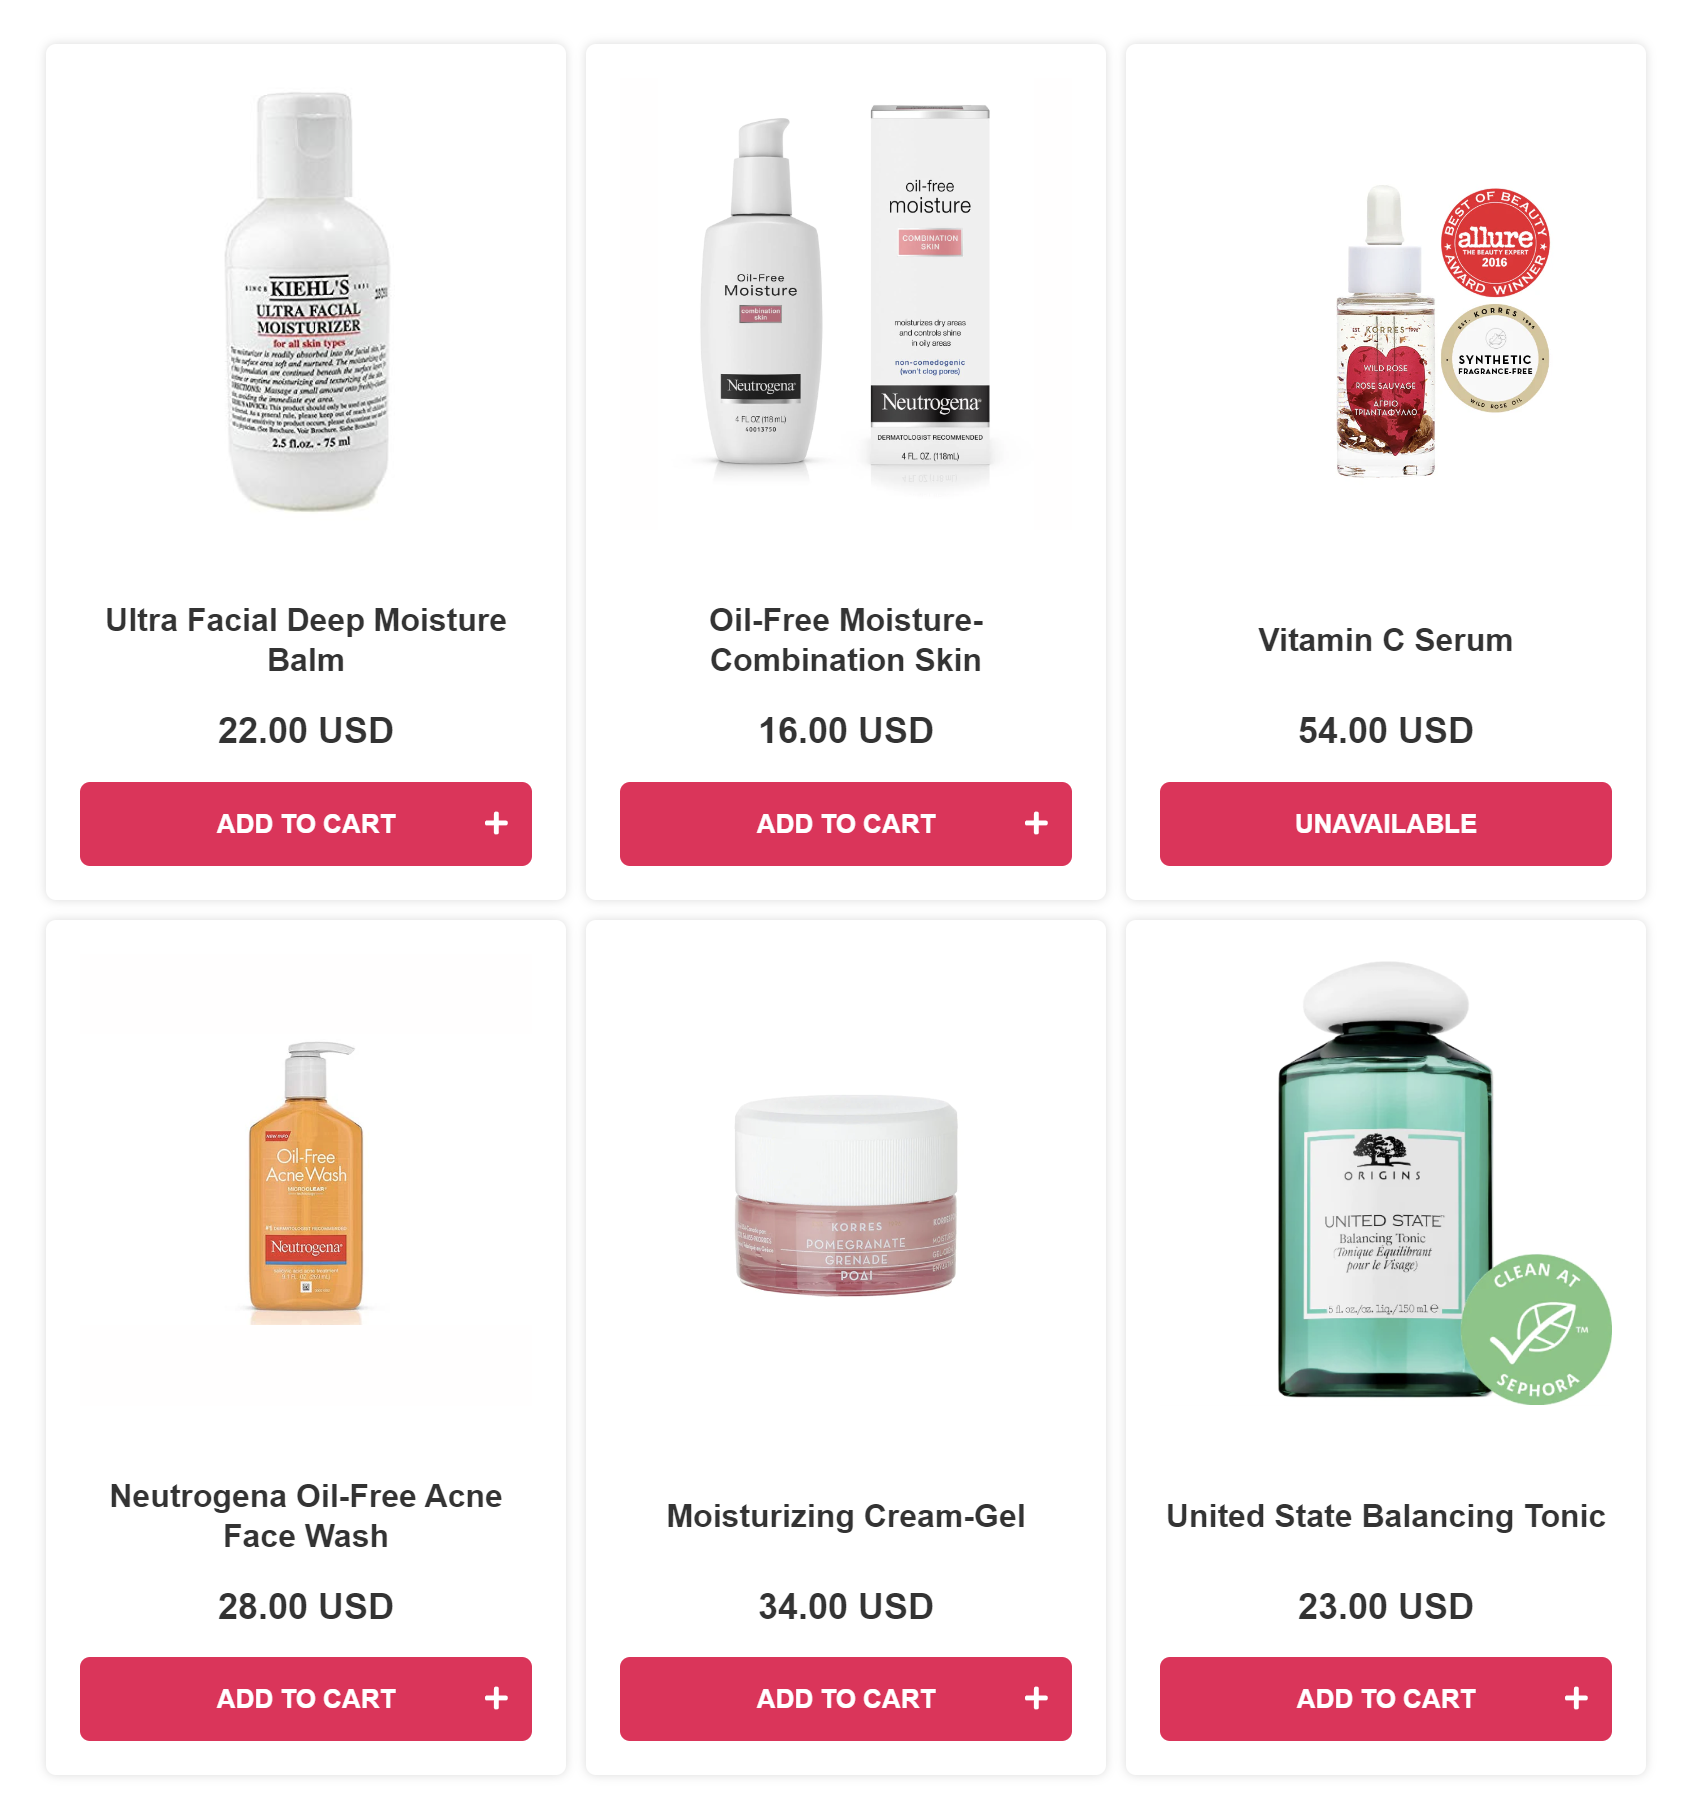
The results page then shows the products like this, sorted by upvote count:
Recommending a routine instead of a list
A products block can also show products in clear steps, such as a skincare routine. Give a slot a Segment Filter and it recommends the most upvoted product from the collection linked to it. See how to recommend a skincare routine with slots.
-
Click
Save. This updates both the preview and the live quiz. -
Click
Previewand take the quiz in a new window.Test responses do not count towards your quota
You can test the quiz as often as you like, as long as you open a new preview window each time. Responses you make as an admin are removed automatically after one hour.
-
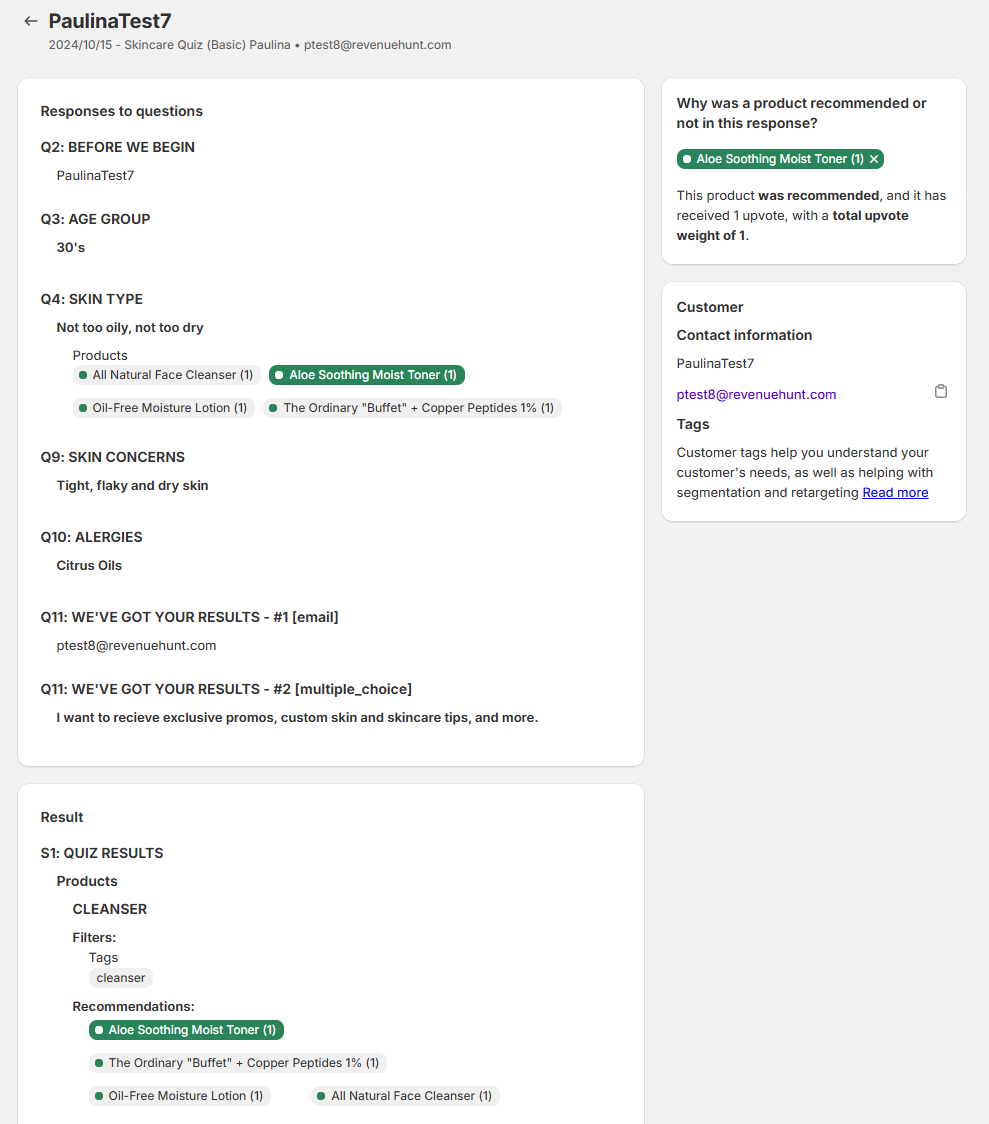
Check a recommendation in the Responses section. The built-in search tool shows why a product was recommended, or why it was missing.
Troubleshooting the results
See how to troubleshoot quiz results for how to use this tool.
Refining the results
- Set a minimum upvote count. Show only the products that reached it. See how to only recommend products with X upvotes or more.
- Use exclusions. Exclusions keep unwanted products out of the results, even when an earlier choice upvoted them.
The results page can show product variants, main products and Recharge subscription products.
The quiz cannot recommend collections of products. You can, however, recommend products from one collection only.
-
Link products to your choices. Go to the Link Products/Collections/Upvote tab, then upvote the relevant products for each choice.
See Upvote inclusion for what each upvote type does, and Exclusion for how to keep a product out of the results.
-
Edit the Results Page. In the Results Page tab, add a heading, a content block, an image block or an HTML block.
Editing the Results Page
-
Add a
Product Blockto the Results Page. It lists the products by upvote count, most upvoted first. -
Choose how many products to show in the Product Block settings.
Recommending a routine instead of a list
A
Product Slot Blockdivides the recommendations into slots, such as the steps of a skincare routine. Each slot recommends the most upvoted product from the collection linked to it. See how to recommend a skincare routine with slots.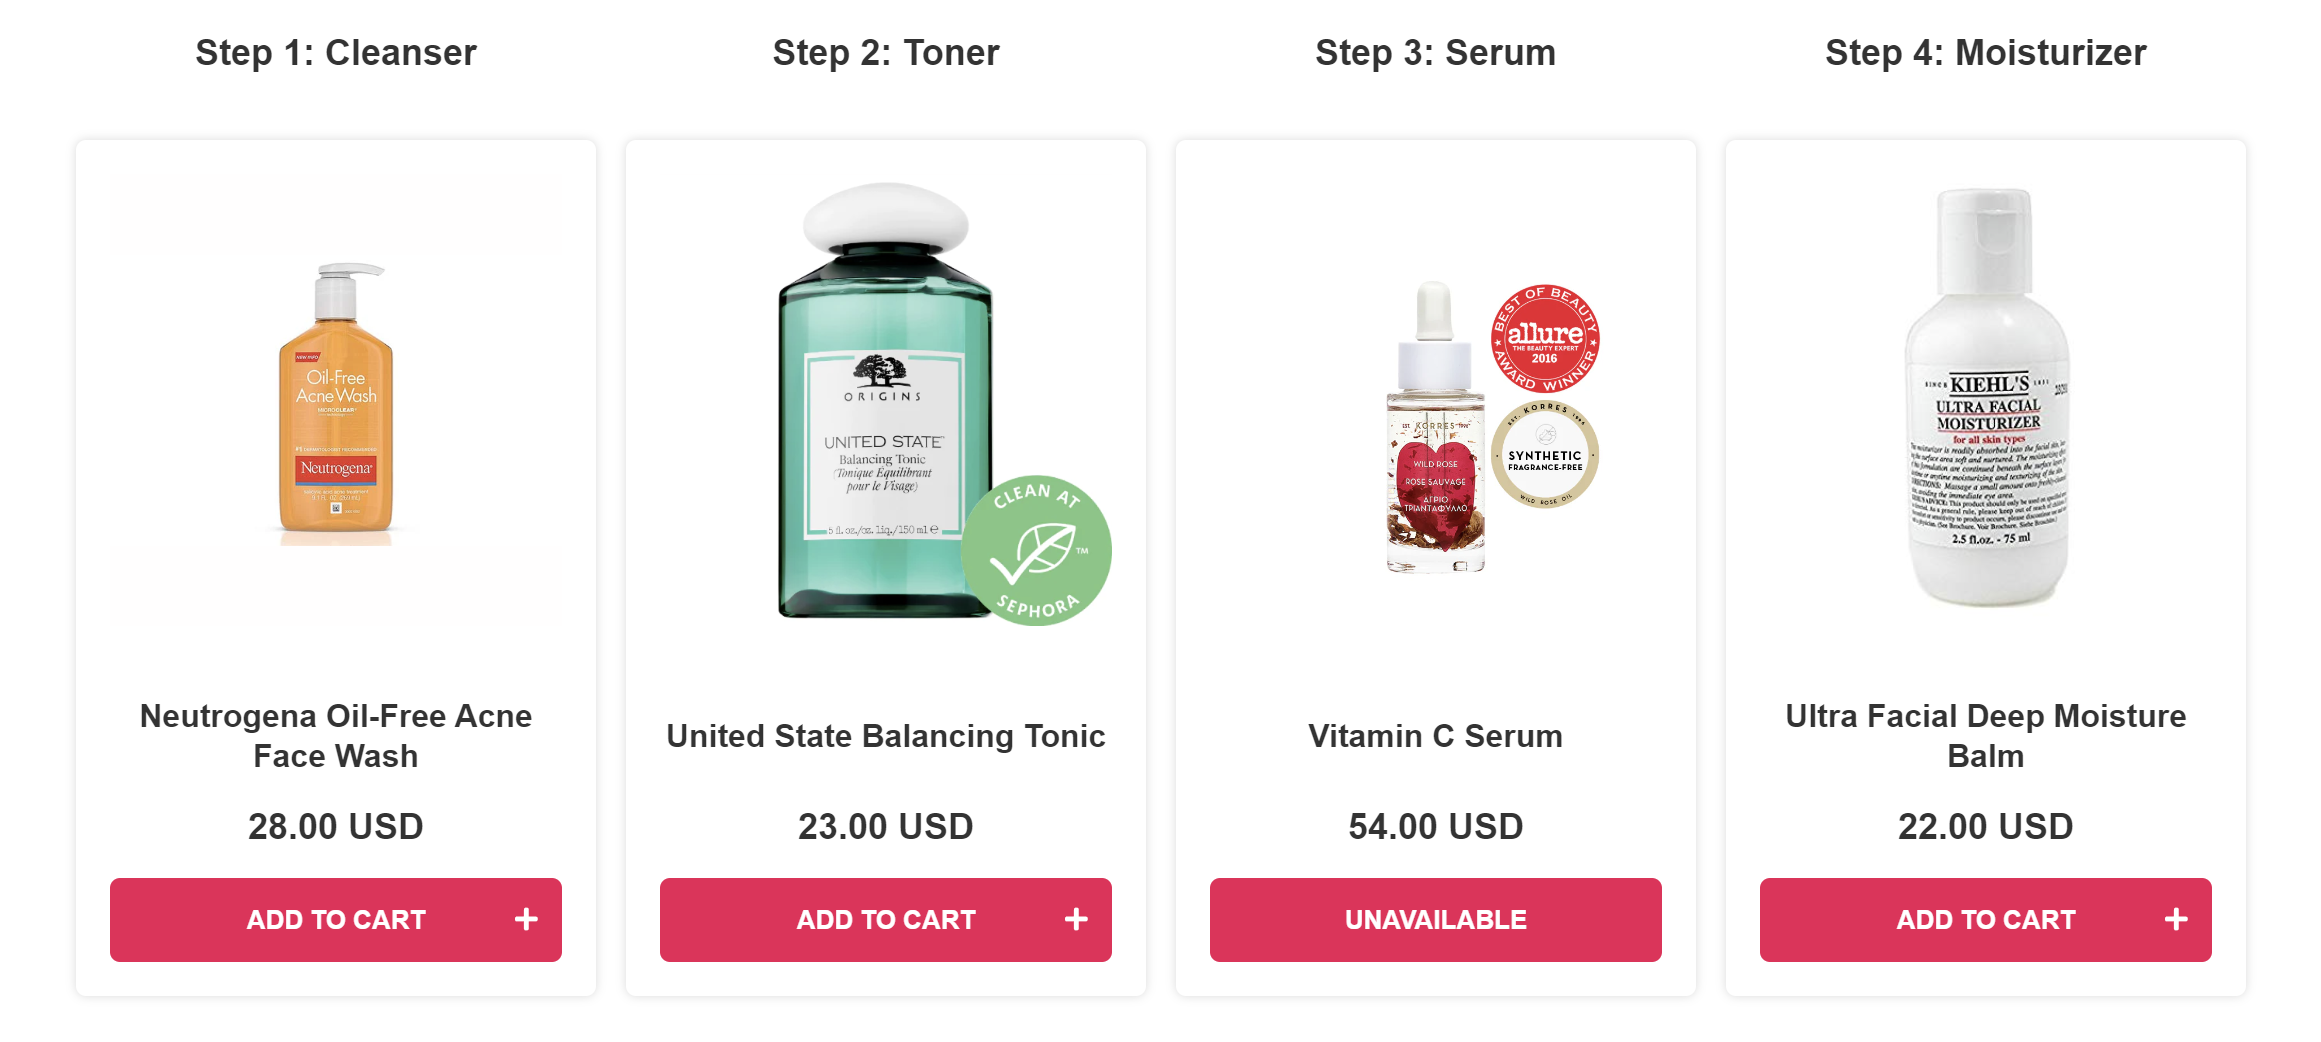
-
Click
Publish/Savein the top-right menu. This updates both the preview and the live quiz. -
Click
Previewand take the quiz in a new window.Test responses do not count towards your quota
You can test the quiz as often as you like, as long as you open a new preview window each time. Responses you make as an admin are removed automatically after one hour.
-
Check a recommendation with the built-in search tool in the
Responsessection. It shows why a product was recommended, or why it was missing.Troubleshooting the results
See how to troubleshoot quiz results for how to use this tool.
Refining the results
- Set a minimum upvote count. Show only the products that reached it. See how to only recommend products with X upvotes or more.
- Use exclusions. Exclusions keep unwanted products out of the results, even when an earlier choice upvoted them.
The results page can show simple products, variable products, grouped products, external/affiliate products and WooCommerce subscription products.
The quiz cannot recommend categories of products. You can, however, recommend products from one category, tag or attribute.
One variant type per product
The app syncs only one type of variant per variable product. If a product varies by both size and color, the app syncs the size variants only.
-
Link products to your choices. Go to the Link Products/Collections/Upvote tab, then upvote the relevant products for each choice.
See Upvote inclusion for what each upvote type does, and Exclusion for how to keep a product out of the results.
-
Edit the Results Page. In the Results Page tab, add a heading, a content block, an image block or an HTML block.
Editing the Results Page
-
Add a
Product Blockto the Results Page. It lists the products by upvote count, most upvoted first. -
Choose how many products to show in the Product Block settings.
Recommending a routine instead of a list
A
Product Slot Blockdivides the recommendations into slots, such as the steps of a skincare routine. Each slot recommends the most upvoted product from the collection linked to it. See how to recommend a skincare routine with slots. -
Click
Publish/Savein the top-right menu. This updates both the preview and the live quiz. -
Click
Previewand take the quiz in a new window.Test responses do not count towards your quota
You can test the quiz as often as you like, as long as you open a new preview window each time. Responses you make as an admin are removed automatically after one hour.
-
Check a recommendation with the built-in search tool in the
Responsessection. It shows why a product was recommended, or why it was missing.Troubleshooting the results
See how to troubleshoot quiz results for how to use this tool.
Refining the results
- Set a minimum upvote count. Show only the products that reached it. See how to only recommend products with X upvotes or more.
- Use exclusions. Exclusions keep unwanted products out of the results, even when an earlier choice upvoted them.
The results page can show product variants and main products.
The quiz cannot recommend categories of products. You can, however, recommend products from one category, tag or attribute.
-
Link products to your choices. Go to the Link Products/Collections/Upvote tab, then upvote the relevant products for each choice.
See Upvote inclusion for what each upvote type does, and Exclusion for how to keep a product out of the results.
-
Edit the Results Page. In the Results Page tab, add a heading, a content block, an image block or an HTML block.
Editing the Results Page
-
Add a
Product Blockto the Results Page. It lists the products by upvote count, most upvoted first. -
Choose how many products to show in the Product Block settings.
Recommending a routine instead of a list
A
Product Slot Blockdivides the recommendations into slots, such as the steps of a skincare routine. Each slot recommends the most upvoted product from the collection linked to it. See how to recommend a skincare routine with slots. -
Click
Publish/Savein the top-right menu. This updates both the preview and the live quiz. -
Click
Previewand take the quiz in a new window.Test responses do not count towards your quota
You can test the quiz as often as you like, as long as you open a new preview window each time. Responses you make as an admin are removed automatically after one hour.
-
Check a recommendation with the built-in search tool in the
Responsessection. It shows why a product was recommended, or why it was missing.Troubleshooting the results
See how to troubleshoot quiz results for how to use this tool.
Refining the results
- Set a minimum upvote count. Show only the products that reached it. See how to only recommend products with X upvotes or more.
- Use exclusions. Exclusions keep unwanted products out of the results, even when an earlier choice upvoted them.
The results page can show product variants and main products.
The quiz cannot recommend categories of products. You can, however, recommend products from one category, tag or attribute.
-
Link products to your choices. Go to the Link Products/Collections/Upvote tab, then upvote the relevant products for each choice.
See Upvote inclusion for what each upvote type does, and Exclusion for how to keep a product out of the results.
-
Edit the Results Page. In the Results Page tab, add a heading, a content block, an image block or an HTML block.
Editing the Results Page
-
Add a
Product Blockto the Results Page. It lists the products by upvote count, most upvoted first. -
Choose how many products to show in the Product Block settings.
Recommending a routine instead of a list
A
Product Slot Blockdivides the recommendations into slots, such as the steps of a skincare routine. Each slot recommends the most upvoted product from the collection linked to it. See how to recommend a skincare routine with slots. -
Click
Publish/Savein the top-right menu. This updates both the preview and the live quiz. -
Click
Previewand take the quiz in a new window.Test responses do not count towards your quota
You can test the quiz as often as you like, as long as you open a new preview window each time. Responses you make as an admin are removed automatically after one hour.
-
Check a recommendation with the built-in search tool in the
Responsessection. It shows why a product was recommended, or why it was missing.Troubleshooting the results
See how to troubleshoot quiz results for how to use this tool.
Refining the results
- Set a minimum upvote count. Show only the products that reached it. See how to only recommend products with X upvotes or more.
- Use exclusions. Exclusions keep unwanted products out of the results, even when an earlier choice upvoted them.
The results page can show product variants and main products.
The quiz cannot recommend collections of products. You can, however, recommend products from one collection only.
-
Link products to your choices. Go to the Link Products/Collections/Upvote tab, then upvote the relevant products for each choice.
See Upvote inclusion for what each upvote type does, and Exclusion for how to keep a product out of the results.
-
Edit the Results Page. In the Results Page tab, add a heading, a content block, an image block or an HTML block.
Editing the Results Page
-
Add a
Product Blockto the Results Page. It lists the products by upvote count, most upvoted first. -
Choose how many products to show in the Product Block settings.
Recommending a routine instead of a list
A
Product Slot Blockdivides the recommendations into slots, such as the steps of a skincare routine. Each slot recommends the most upvoted product from the collection linked to it. See how to recommend a skincare routine with slots. -
Click
Publish/Savein the top-right menu. This updates both the preview and the live quiz. -
Click
Previewand take the quiz in a new window.Test responses do not count towards your quota
You can test the quiz as often as you like, as long as you open a new preview window each time. Responses you make as an admin are removed automatically after one hour.
-
Check a recommendation with the built-in search tool in the
Responsessection. It shows why a product was recommended, or why it was missing.Troubleshooting the results
See how to troubleshoot quiz results for how to use this tool.
Refining the results
- Set a minimum upvote count. Show only the products that reached it. See how to only recommend products with X upvotes or more.
- Use exclusions. Exclusions keep unwanted products out of the results, even when an earlier choice upvoted them.
Funnel quiz with slots
The quiz counts the upvotes, then fills every slot with the highest upvoted product that matches that slot. Use it to recommend a full routine, such as a cleanser, then a serum, then a moisturizer.
This method uses the upvoting system.
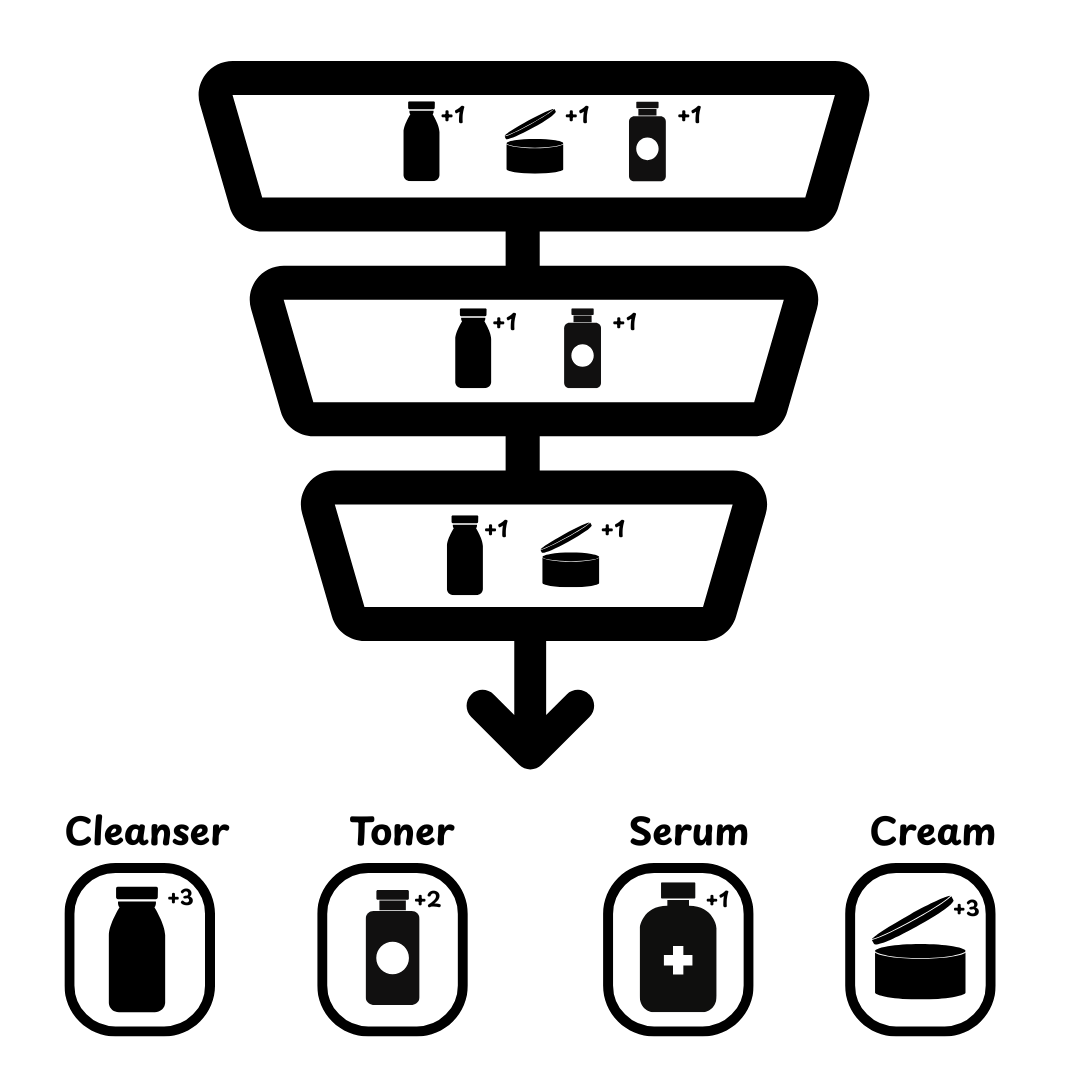
-
List the steps your routine needs. A skincare routine might be cleansers, toners, serums and moisturizers.
-
Create a collection in your Shopify store for each step.
-
Add the matching products to each collection. Every cleanser goes in the Cleansers collection.
-
Open the app dashboard and click
add new quiz. -
Choose a template, or start from scratch. A template such as Basic or Advanced Skincare Quiz arrives with its questions already written.
-
Name the quiz. You can rename it later.
-
Add your questions in the Quiz builder. Click
+ Add question, then pick a question type. -
Open a multiple-choice question in Questions and select a choice.
-
Link the relevant products or collections in the Choice settings. Every choice needs at least one product or collection.
-
Open the Results page tab and add your design elements. Headings, logos and content blocks.
-
Add a
Products Block. Click the+button. -
Add one slot per routine step in the block settings. For each slot:
- Add a title and a description
- Add a segment with the product collection for that step
- Choose how many products to recommend, usually one
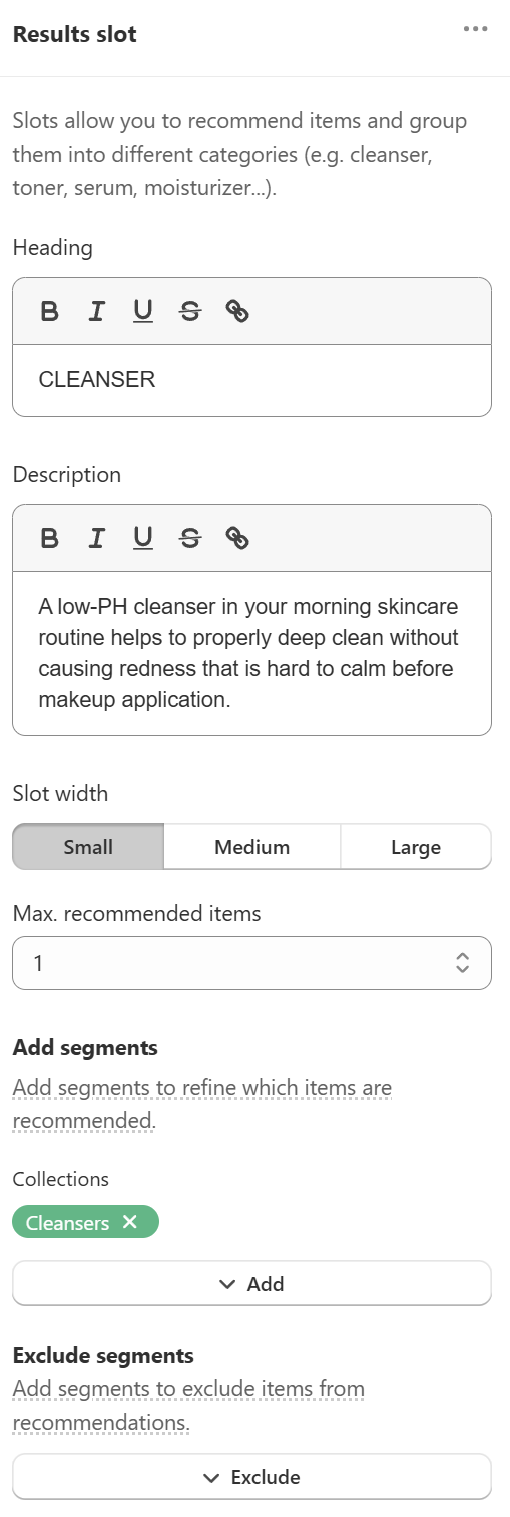
-
Click
Save. This updates both the preview and the live quiz. -
Click
Previewand take the quiz in a new window.Test responses do not count towards your quota
You can test the quiz as often as you like, as long as you open a new preview window each time. Responses you make as an admin are removed automatically after one hour.
-
Check the recommendations with the built-in search bar in the
Responsessection.
-
List the steps your routine needs. A skincare routine might be cleansers, toners, serums and moisturizers.
-
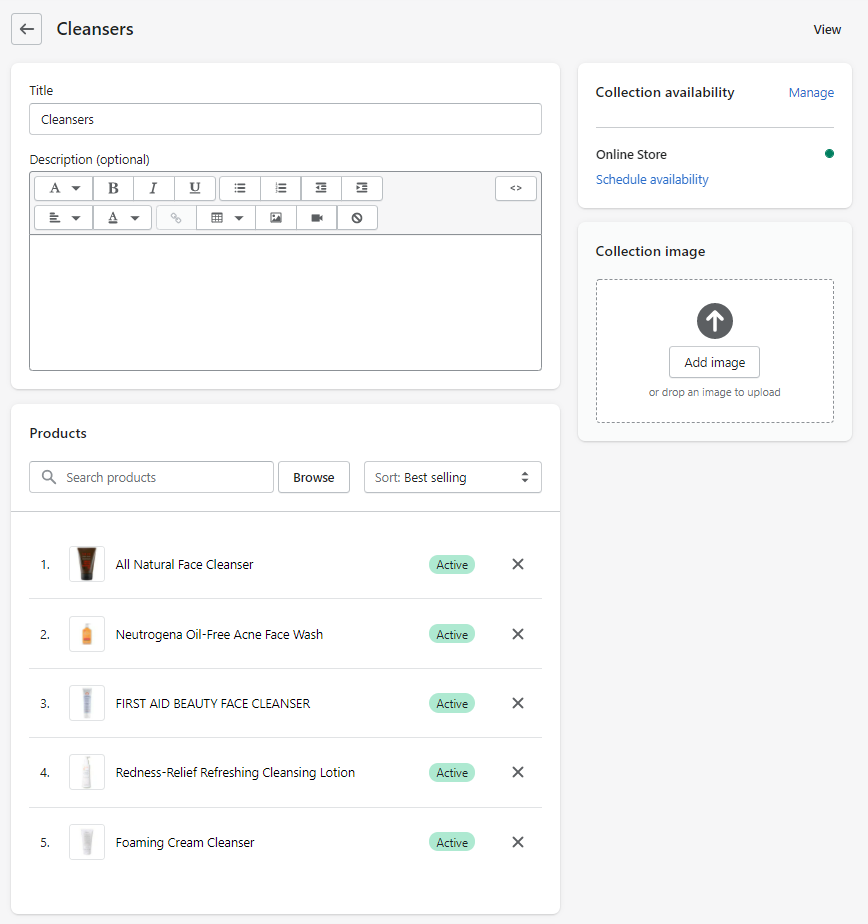
Create a collection in your Shopify store for each step.
-
Add the matching products to each collection. Every cleanser goes in the Cleansers collection.
-
Run a catalog sync. This is what tells the app about your new collections.
-
Open the app dashboard and click
add new quiz. -
Choose a template, or start from scratch. A template such as Basic or Advanced Skincare Quiz arrives with its questions already written.
-
Name the quiz. You can rename it later.
-
Add your questions in the Quiz Builder. Click
+ Add question, then pick a question type. -
Go to the Link Products tab, or the Link Collections/Categories tab.
-
Link the relevant product variants or collections to each choice. Every choice needs at least one product or collection.
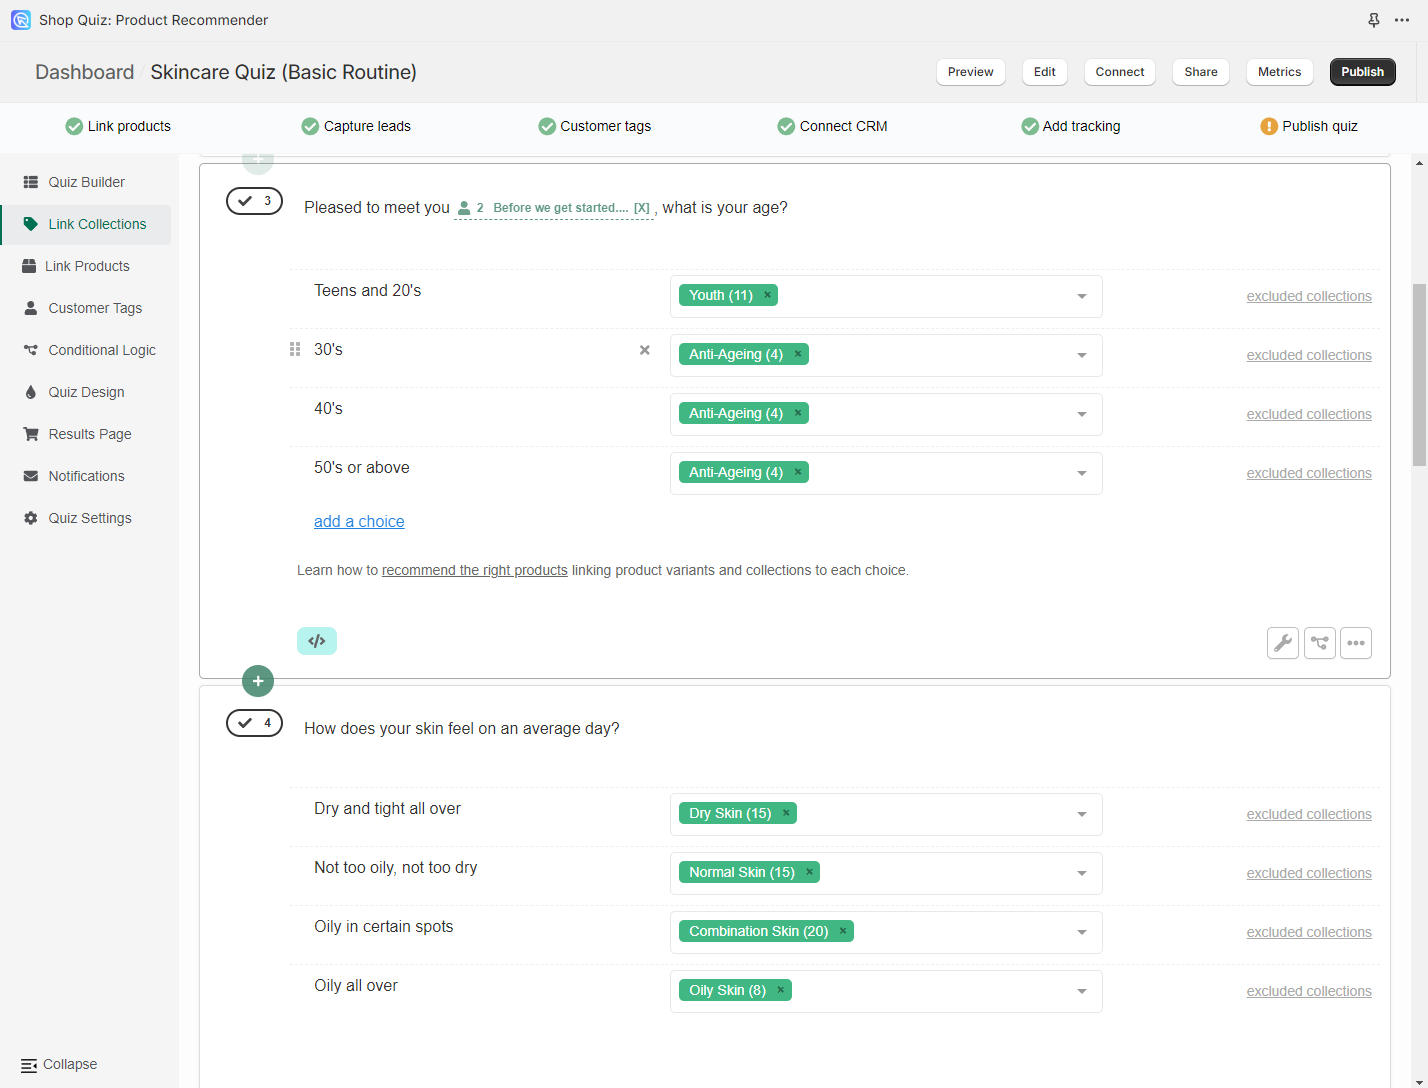
-
Open the Results Page tab and add your design elements. Headings, logos and content blocks.
-
Add a
Product Slots Block. Click the+button. -
Add one slot per routine step in the
Slot Block settings. For each slot:- Add a title and a description
- Link the product collection for that step in the
Includesection - Choose how many products to recommend, usually one
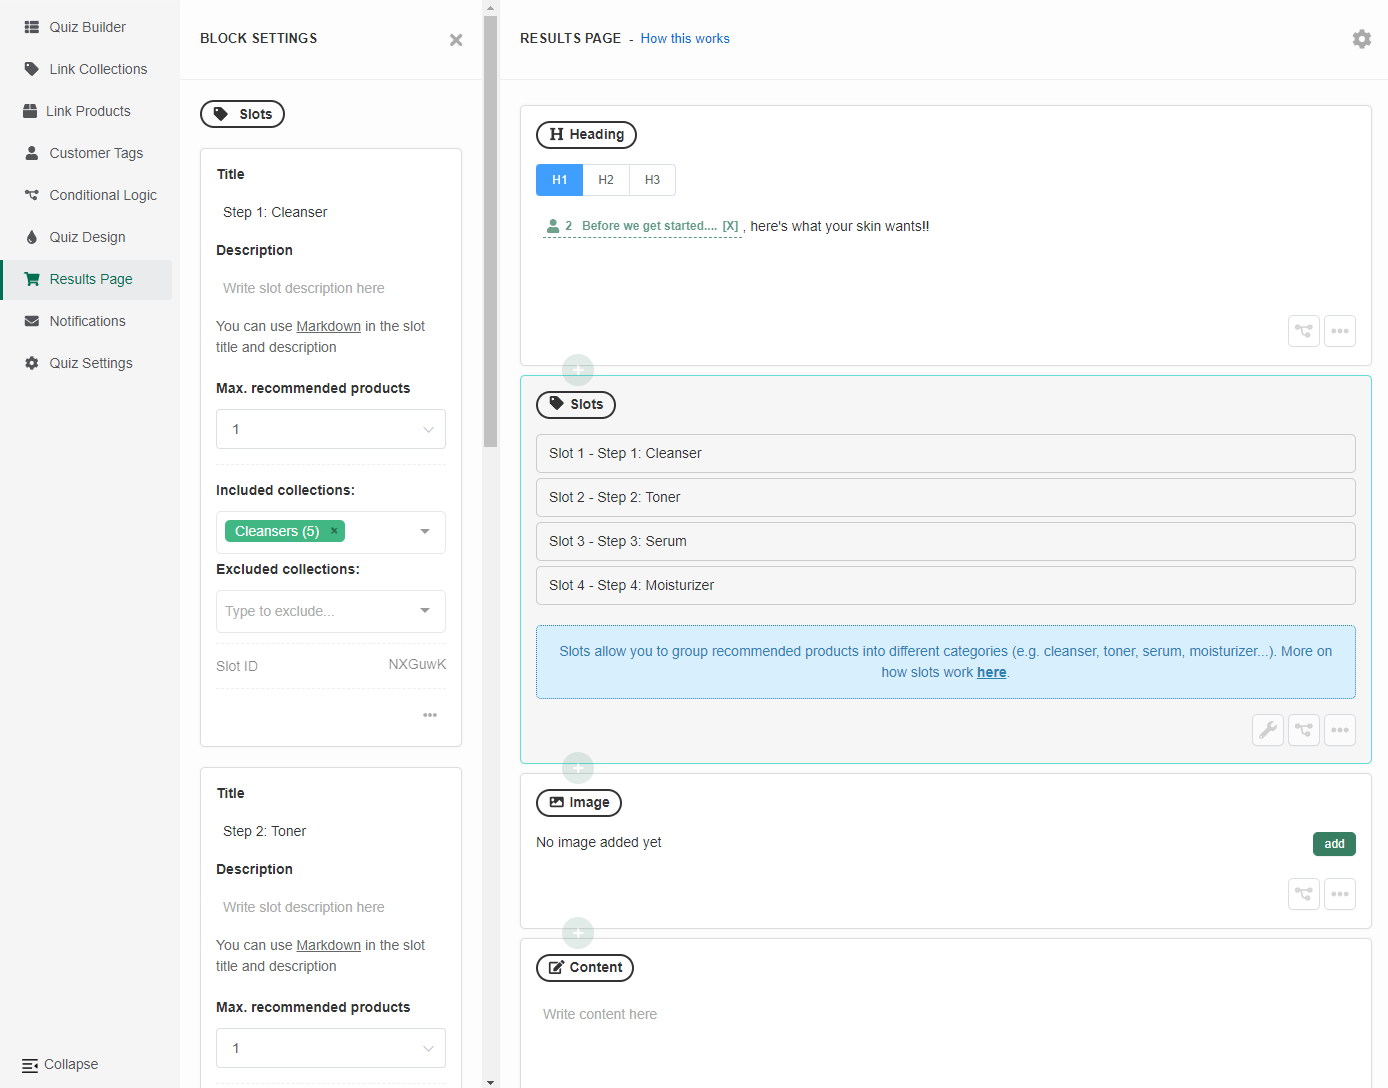
-
Click
Publish/Save. This updates both the preview and the live quiz. -
Click
Previewand take the quiz in a new window.Test responses do not count towards your quota
You can test the quiz as often as you like, as long as you open a new preview window each time. Responses you make as an admin are removed automatically after one hour.
-
Check the recommendations with the built-in search bar in
Metrics > Responses.
-
List the steps your routine needs. A skincare routine might be cleansers, toners, serums and moisturizers.
-
Create a category in your WooCommerce store for each step.
-
Add the matching products to each category. Every cleanser goes in the Cleansers category.
-
Run a catalog sync. This is what tells the app about your new categories.
-
Open the app dashboard and click
add new quiz. -
Choose a template, or start from scratch. A template such as Basic or Advanced Skincare Quiz arrives with its questions already written.
-
Name the quiz. You can rename it later.
-
Add your questions in the Quiz Builder. Click
+ Add question, then pick a question type. -
Go to the Link Products tab, or the Link Collections/Categories tab.
-
Link the relevant product variants or categories to each choice. Every choice needs at least one product or category.
-
Open the Results Page tab and add your design elements. Headings, logos and content blocks.
-
Add a
Product Slots Block. Click the+button. -
Add one slot per routine step in the
Slot Block settings. For each slot:- Add a title and a description
- Link the product category for that step in the
Includesection - Choose how many products to recommend, usually one
-
Click
Publish/Save. This updates both the preview and the live quiz. -
Click
Previewand take the quiz in a new window.Test responses do not count towards your quota
You can test the quiz as often as you like, as long as you open a new preview window each time. Responses you make as an admin are removed automatically after one hour.
-
Check the recommendations with the built-in search bar in
Metrics > Responses.
-
List the steps your routine needs. A skincare routine might be cleansers, toners, serums and moisturizers.
-
Create a category in your Magento store for each step.
-
Add the matching products to each category. Every cleanser goes in the Cleansers category.
-
Run a catalog sync. This is what tells the app about your new categories.
-
Open the app dashboard and click
add new quiz. -
Choose a template, or start from scratch. A template such as Basic or Advanced Skincare Quiz arrives with its questions already written.
-
Name the quiz. You can rename it later.
-
Add your questions in the Quiz Builder. Click
+ Add question, then pick a question type. -
Go to the Link Products tab, or the Link Collections/Categories tab.
-
Link the relevant product variants or categories to each choice. Every choice needs at least one product or category.
-
Open the Results Page tab and add your design elements. Headings, logos and content blocks.
-
Add a
Product Slots Block. Click the+button. -
Add one slot per routine step in the
Slot Block settings. For each slot:- Add a title and a description
- Link the product category for that step in the
Includesection - Choose how many products to recommend, usually one
-
Click
Publish/Save. This updates both the preview and the live quiz. -
Click
Previewand take the quiz in a new window.Test responses do not count towards your quota
You can test the quiz as often as you like, as long as you open a new preview window each time. Responses you make as an admin are removed automatically after one hour.
-
Check the recommendations with the built-in search bar in
Metrics > Responses.
-
List the steps your routine needs. A skincare routine might be cleansers, toners, serums and moisturizers.
-
Create a category in your BigCommerce store for each step.
-
Add the matching products to each category. Every cleanser goes in the Cleansers category.
-
Run a catalog sync. This is what tells the app about your new categories.
-
Open the app dashboard and click
add new quiz. -
Choose a template, or start from scratch. A template such as Basic or Advanced Skincare Quiz arrives with its questions already written.
-
Name the quiz. You can rename it later.
-
Add your questions in the Quiz Builder. Click
+ Add question, then pick a question type. -
Go to the Link Products tab, or the Link Collections/Categories tab.
-
Link the relevant product variants or categories to each choice. Every choice needs at least one product or category.
-
Open the Results Page tab and add your design elements. Headings, logos and content blocks.
-
Add a
Product Slots Block. Click the+button. -
Add one slot per routine step in the
Slot Block settings. For each slot:- Add a title and a description
- Link the product category for that step in the
Includesection - Choose how many products to recommend, usually one
-
Click
Publish/Save. This updates both the preview and the live quiz. -
Click
Previewand take the quiz in a new window.Test responses do not count towards your quota
You can test the quiz as often as you like, as long as you open a new preview window each time. Responses you make as an admin are removed automatically after one hour.
-
Check the recommendations with the built-in search bar in
Metrics > Responses.
-
List the steps your routine needs. A skincare routine might be cleansers, toners, serums and moisturizers.
-
Create a collection in your Standalone account, through the Catalogue tab or a Google Product Feed for each step.
-
Add the matching products to each collection. Every cleanser goes in the Cleansers collection.
-
Run a catalog sync. This is what tells the app about your new collections.
-
Open the app dashboard and click
add new quiz. -
Choose a template, or start from scratch. A template such as Basic or Advanced Skincare Quiz arrives with its questions already written.
-
Name the quiz. You can rename it later.
-
Add your questions in the Quiz Builder. Click
+ Add question, then pick a question type. -
Go to the Link Products tab, or the Link Collections/Categories tab.
-
Link the relevant product variants or collections to each choice. Every choice needs at least one product or collection.
-
Open the Results Page tab and add your design elements. Headings, logos and content blocks.
-
Add a
Product Slots Block. Click the+button. -
Add one slot per routine step in the
Slot Block settings. For each slot:- Add a title and a description
- Link the product collection for that step in the
Includesection - Choose how many products to recommend, usually one
-
Click
Publish/Save. This updates both the preview and the live quiz. -
Click
Previewand take the quiz in a new window.Test responses do not count towards your quota
You can test the quiz as often as you like, as long as you open a new preview window each time. Responses you make as an admin are removed automatically after one hour.
-
Check the recommendations with the built-in search bar in
Metrics > Responses.
Funnel quiz that skips slides
Skip logic hides the follow-up questions that do not apply to a customer. Ask about skin concerns first, then show only the questions that match the concerns the customer selected.
This method uses the upvoting system.
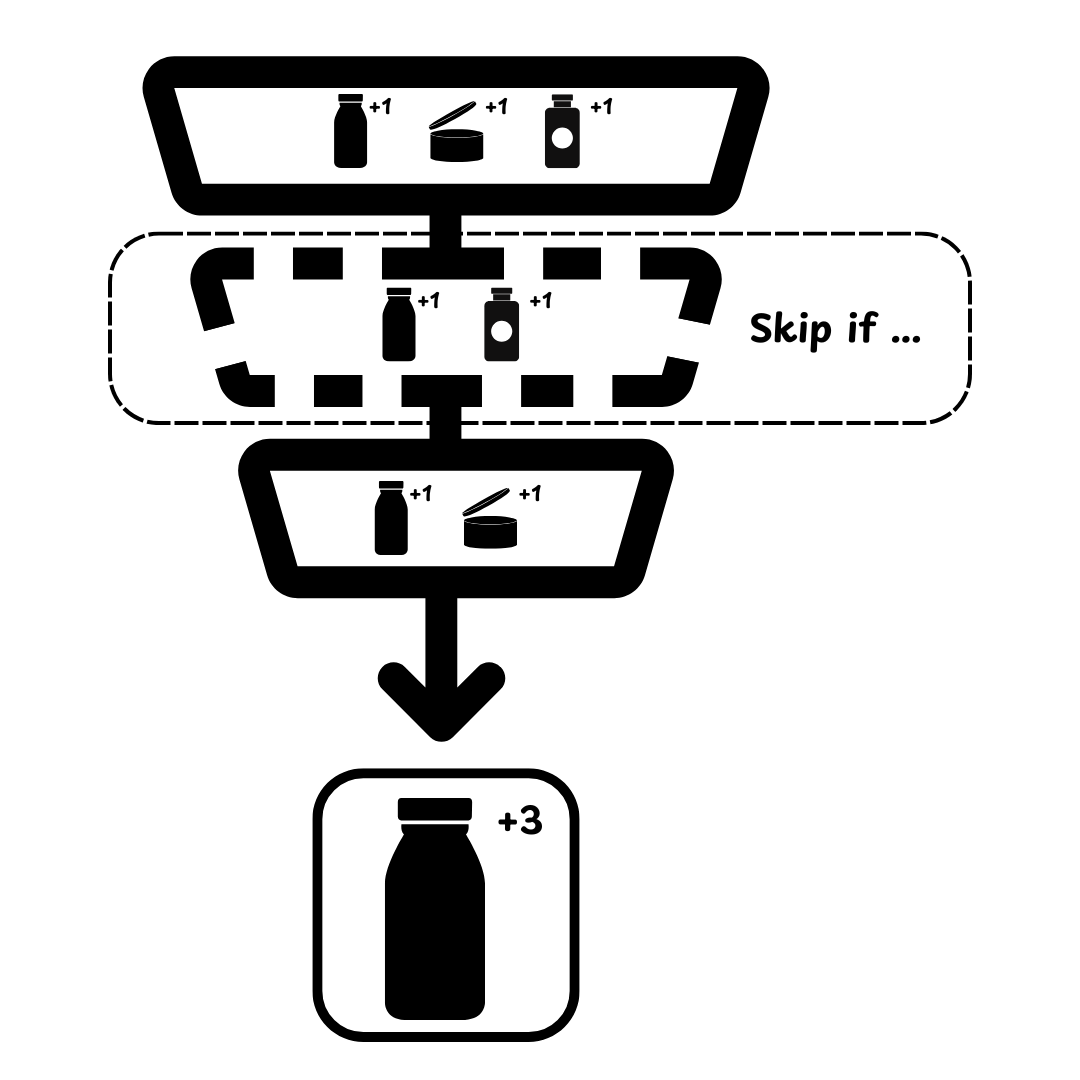

The quiz shows different follow-up questions depending on what the customer chose, and skips the questions that do not apply.
-
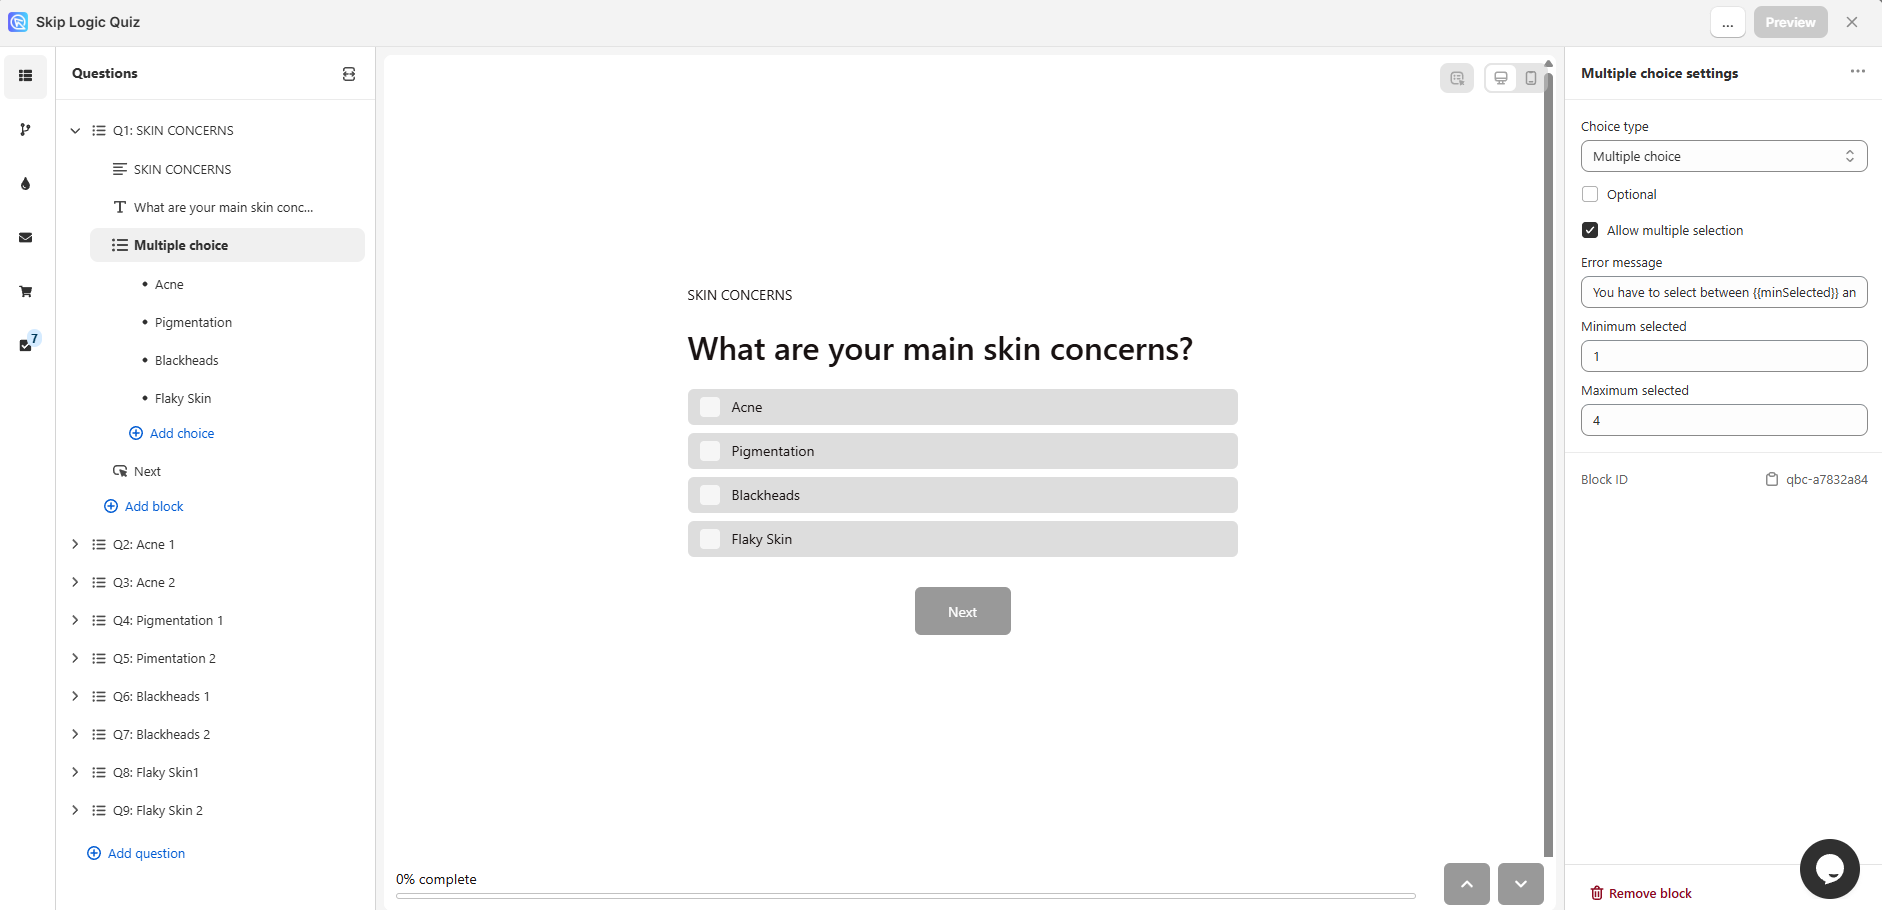
Add a multiple-choice question about the customer's main concerns.
-
Add a choice for each concern. For a skincare quiz: Acne, Pigmentation, Blackheads and Flaky Skin.
-
Turn on
Allow Multiple Selectionin the multiple-choice settings. The customer can then pick more than one concern. -
Add one follow-up question per concern. Keep them in the same order as the choices in the first question.
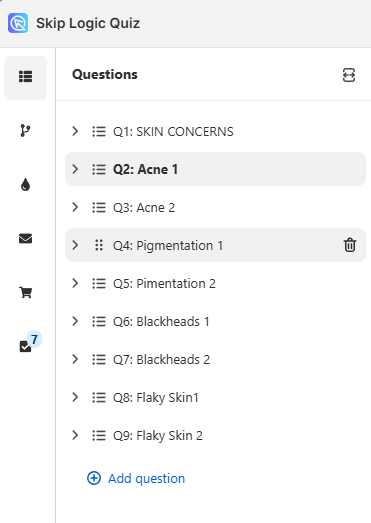
-
Write each follow-up question for its own concern.
-
Go to the Conditional logic tab and select the first follow-up question.
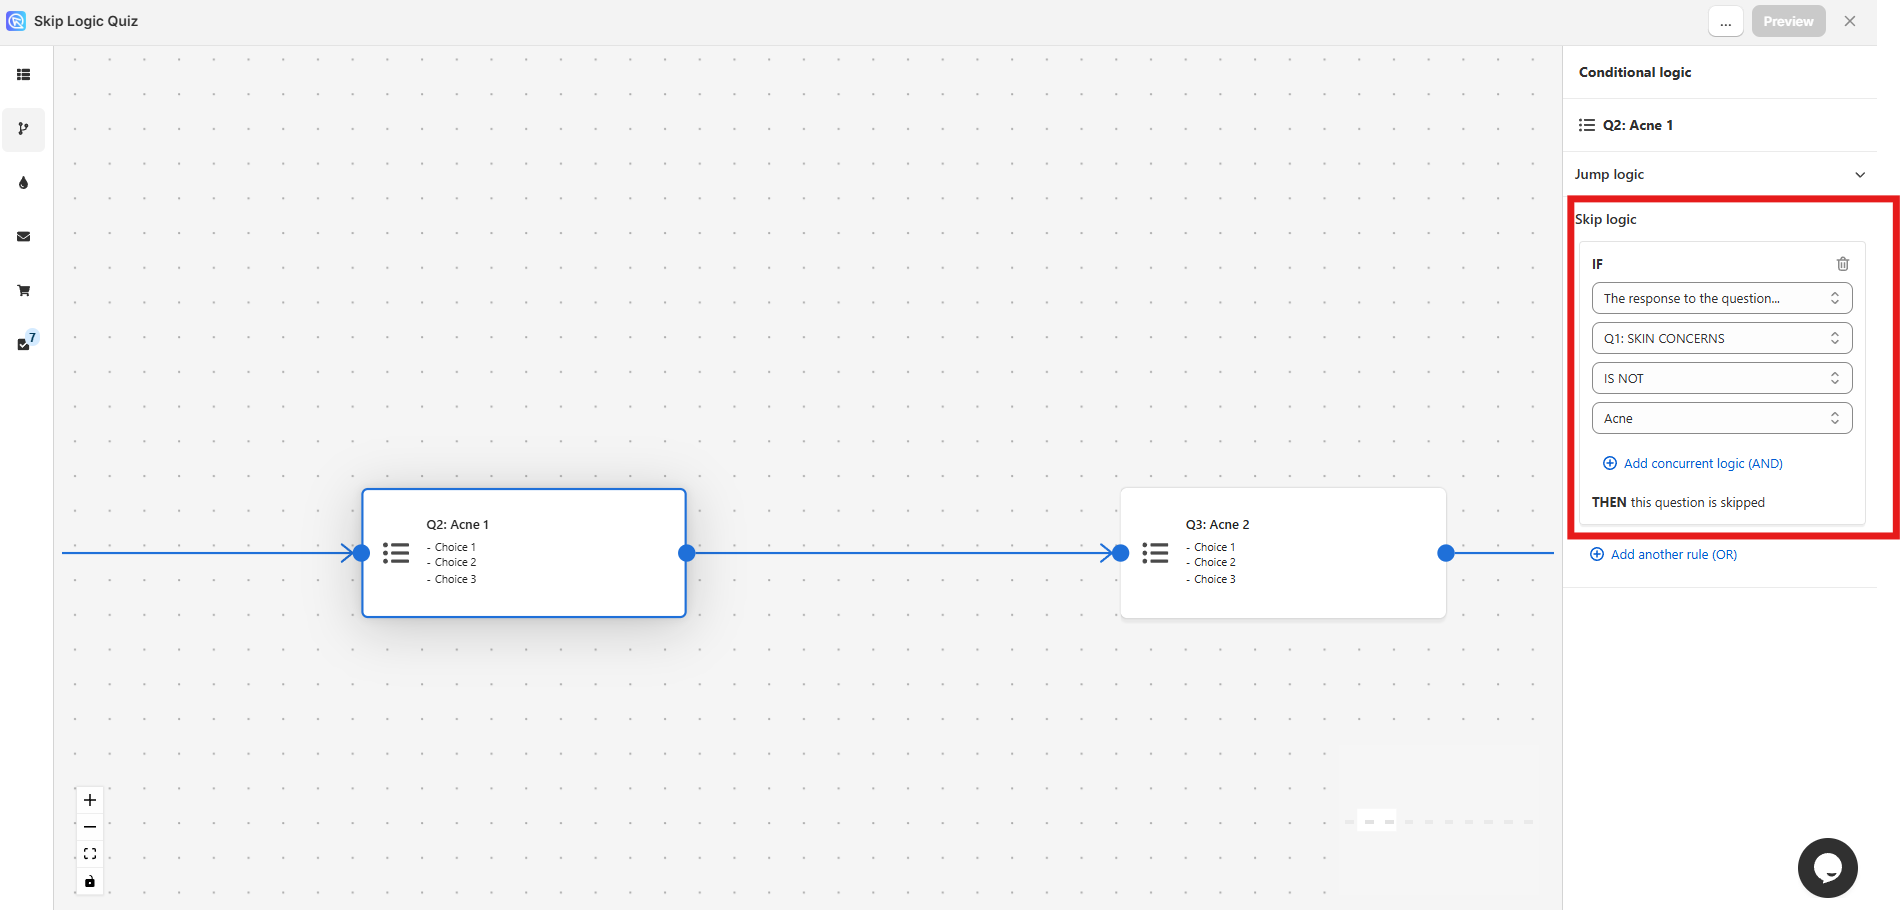
-
Find
Skip logicin the menu on the right, and click+ Add another rule (OR). -
Set the rule to
IF the response tothe concerns questionis notthat question's own concern.The rule on the acne question
IF the response toSkin Concernsis notAcne.The question is then skipped for everyone who did not pick acne.
-
Repeat for every follow-up question, each reading its own concern.
-
Link products to your choices in the Upvote tab. Upvote the relevant products for each choice.
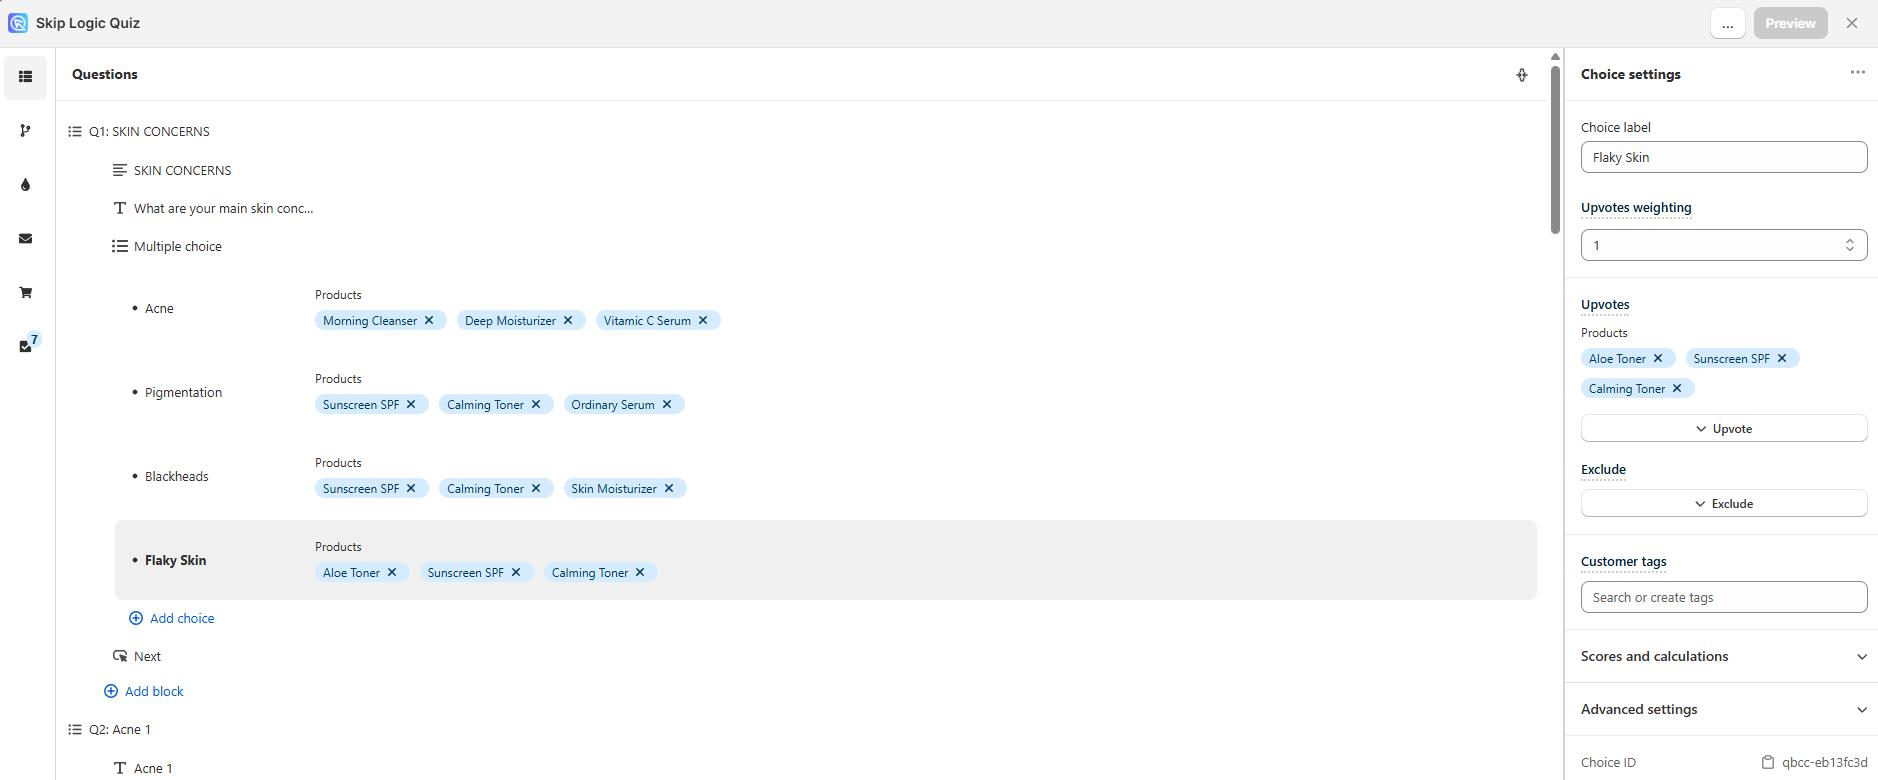
Only the questions the customer saw are counted
A question the customer never sees upvotes nothing. The quiz counts upvotes only from the questions it showed.
-
Click
Save. This updates both the preview and the live quiz. -
Preview the quiz and select two concerns. Check that only the matching follow-up questions appear.
-
Repeat the preview with other combinations of concerns.
-
Check the built-in search tool in the
Responsessection if a result looks wrong. It shows why a question was shown or skipped, and why a product was recommended.
The quiz shows different follow-up questions depending on what the customer chose, and skips the questions that do not apply.
-
Add a multiple-choice question about the customer's main concerns.
-
Add a choice for each concern. For a skincare quiz: Acne, Pigmentation, Blackheads and Flaky Skin.
-
Turn on
Allow Multiple Selectionin the multiple-choice settings. The customer can then pick more than one concern. -
Add one follow-up question per concern. Keep them in the same order as the choices in the first question.
-
Write each follow-up question for its own concern.
-
Open the Conditional Logic settings of the first follow-up question.
-
Open the
Skip Logictab and clickAdd Skip Logic. -
Set the rule to
IF response tothe concerns questionis notthat question's own concern.The rule on the acne question
IF response toSkin Concernsis notAcne.The question is then skipped for everyone who did not pick acne.
-
Repeat for every follow-up question, each reading its own concern.
-
Link products to your choices in the Link Products tab. Link the relevant products or variants to each choice.
Only the questions the customer saw are counted
A question the customer never sees upvotes nothing. The quiz counts upvotes only from the questions it showed.
-
Click
Publish/Save. This updates both the preview and the live quiz. -
Preview the quiz and select two concerns. Check that only the matching follow-up questions appear.
-
Repeat the preview with other combinations of concerns.
-
Check the built-in search tool in the
Responsessection if a result looks wrong. It shows why a question was shown or skipped, and why a product was recommended.
The quiz shows different follow-up questions depending on what the customer chose, and skips the questions that do not apply.
-
Add a multiple-choice question about the customer's main concerns.
-
Add a choice for each concern. For a skincare quiz: Acne, Pigmentation, Blackheads and Flaky Skin.
-
Turn on
Allow Multiple Selectionin the multiple-choice settings. The customer can then pick more than one concern. -
Add one follow-up question per concern. Keep them in the same order as the choices in the first question.
-
Write each follow-up question for its own concern.
-
Open the Conditional Logic settings of the first follow-up question.
-
Open the
Skip Logictab and clickAdd Skip Logic. -
Set the rule to
IF response tothe concerns questionis notthat question's own concern.The rule on the acne question
IF response toSkin Concernsis notAcne.The question is then skipped for everyone who did not pick acne.
-
Repeat for every follow-up question, each reading its own concern.
-
Link products to your choices in the Link Products tab. Link the relevant simple, variable or grouped products to each choice.
Only the questions the customer saw are counted
A question the customer never sees upvotes nothing. The quiz counts upvotes only from the questions it showed.
-
Click
Publish/Save. This updates both the preview and the live quiz. -
Preview the quiz and select two concerns. Check that only the matching follow-up questions appear.
-
Repeat the preview with other combinations of concerns.
-
Check the built-in search tool in the
Responsessection if a result looks wrong. It shows why a question was shown or skipped, and why a product was recommended.
The quiz shows different follow-up questions depending on what the customer chose, and skips the questions that do not apply.
-
Add a multiple-choice question about the customer's main concerns.
-
Add a choice for each concern. For a skincare quiz: Acne, Pigmentation, Blackheads and Flaky Skin.
-
Turn on
Allow Multiple Selectionin the multiple-choice settings. The customer can then pick more than one concern. -
Add one follow-up question per concern. Keep them in the same order as the choices in the first question.
-
Write each follow-up question for its own concern.
-
Open the Conditional Logic settings of the first follow-up question.
-
Open the
Skip Logictab and clickAdd Skip Logic. -
Set the rule to
IF response tothe concerns questionis notthat question's own concern.The rule on the acne question
IF response toSkin Concernsis notAcne.The question is then skipped for everyone who did not pick acne.
-
Repeat for every follow-up question, each reading its own concern.
-
Link products to your choices in the Link Products tab. Link the relevant products or variants to each choice.
Only the questions the customer saw are counted
A question the customer never sees upvotes nothing. The quiz counts upvotes only from the questions it showed.
-
Click
Publish/Save. This updates both the preview and the live quiz. -
Preview the quiz and select two concerns. Check that only the matching follow-up questions appear.
-
Repeat the preview with other combinations of concerns.
-
Check the built-in search tool in the
Responsessection if a result looks wrong. It shows why a question was shown or skipped, and why a product was recommended.
The quiz shows different follow-up questions depending on what the customer chose, and skips the questions that do not apply.
-
Add a multiple-choice question about the customer's main concerns.
-
Add a choice for each concern. For a skincare quiz: Acne, Pigmentation, Blackheads and Flaky Skin.
-
Turn on
Allow Multiple Selectionin the multiple-choice settings. The customer can then pick more than one concern. -
Add one follow-up question per concern. Keep them in the same order as the choices in the first question.
-
Write each follow-up question for its own concern.
-
Open the Conditional Logic settings of the first follow-up question.
-
Open the
Skip Logictab and clickAdd Skip Logic. -
Set the rule to
IF response tothe concerns questionis notthat question's own concern.The rule on the acne question
IF response toSkin Concernsis notAcne.The question is then skipped for everyone who did not pick acne.
-
Repeat for every follow-up question, each reading its own concern.
-
Link products to your choices in the Link Products tab. Link the relevant products or variants to each choice.
Only the questions the customer saw are counted
A question the customer never sees upvotes nothing. The quiz counts upvotes only from the questions it showed.
-
Click
Publish/Save. This updates both the preview and the live quiz. -
Preview the quiz and select two concerns. Check that only the matching follow-up questions appear.
-
Repeat the preview with other combinations of concerns.
-
Check the built-in search tool in the
Responsessection if a result looks wrong. It shows why a question was shown or skipped, and why a product was recommended.
The quiz shows different follow-up questions depending on what the customer chose, and skips the questions that do not apply.
-
Add a multiple-choice question about the customer's main concerns.
-
Add a choice for each concern. For a skincare quiz: Acne, Pigmentation, Blackheads and Flaky Skin.
-
Turn on
Allow Multiple Selectionin the multiple-choice settings. The customer can then pick more than one concern. -
Add one follow-up question per concern. Keep them in the same order as the choices in the first question.
-
Write each follow-up question for its own concern.
-
Open the Conditional Logic settings of the first follow-up question.
-
Open the
Skip Logictab and clickAdd Skip Logic. -
Set the rule to
IF response tothe concerns questionis notthat question's own concern.The rule on the acne question
IF response toSkin Concernsis notAcne.The question is then skipped for everyone who did not pick acne.
-
Repeat for every follow-up question, each reading its own concern.
-
Link products to your choices in the Link Products tab. Link the relevant products or variants to each choice.
Only the questions the customer saw are counted
A question the customer never sees upvotes nothing. The quiz counts upvotes only from the questions it showed.
-
Click
Publish/Save. This updates both the preview and the live quiz. -
Preview the quiz and select two concerns. Check that only the matching follow-up questions appear.
-
Repeat the preview with other combinations of concerns.
-
Check the built-in search tool in the
Responsessection if a result looks wrong. It shows why a question was shown or skipped, and why a product was recommended.
Funnel quiz with branching
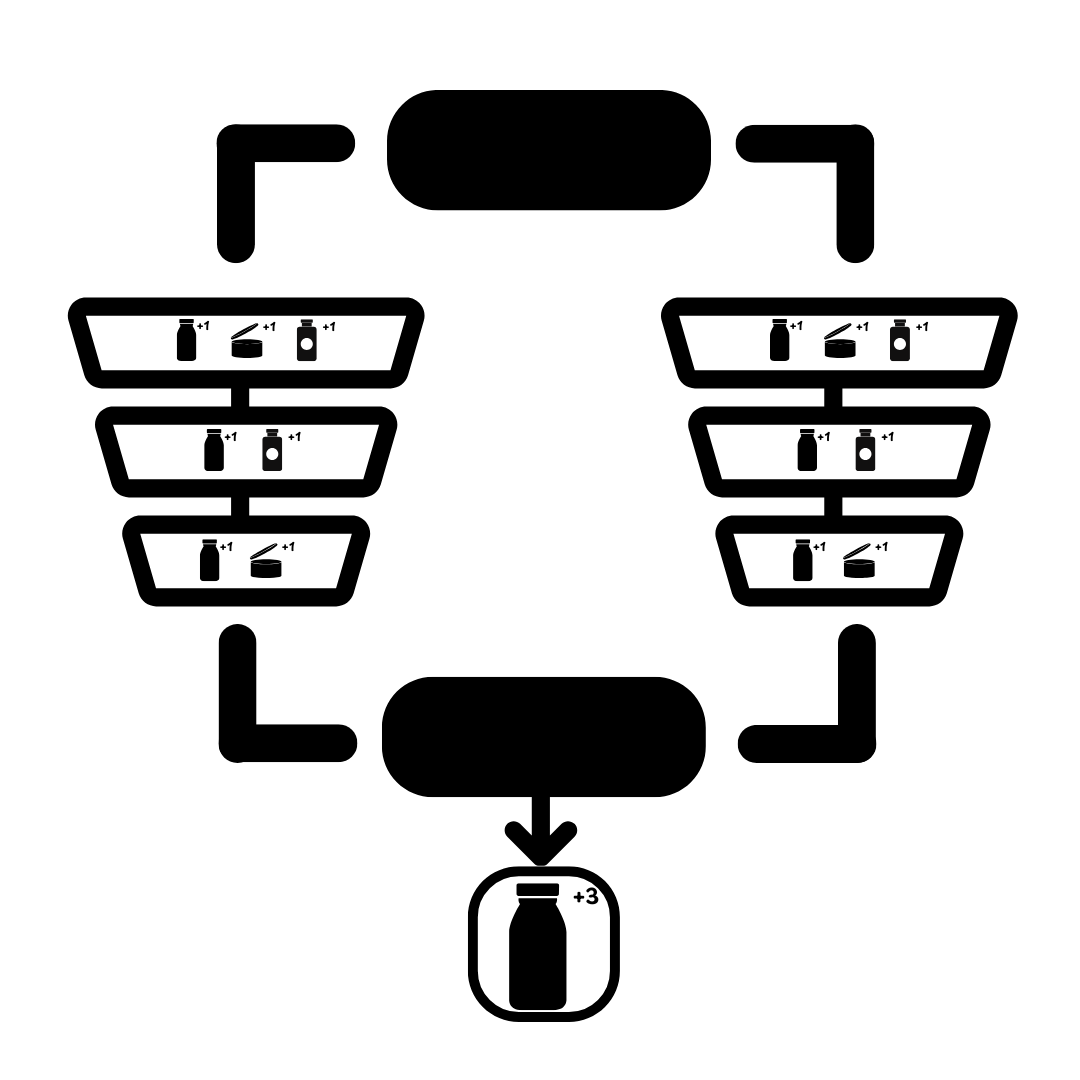
Jump logic sends the customer down a different path depending on their answers. Each branch asks its own questions, and the recommendations still come from the upvotes collected along the way.
This method uses the upvoting system.
-
Create every question each branch needs in the Quiz builder.
-
Add every choice each question needs.
Question order does not matter yet
Jump logic sets the order the customer sees, so the order you add the questions in is not the order they are asked in.
-
Go to the Conditional logic tab and select the question the branches start from.
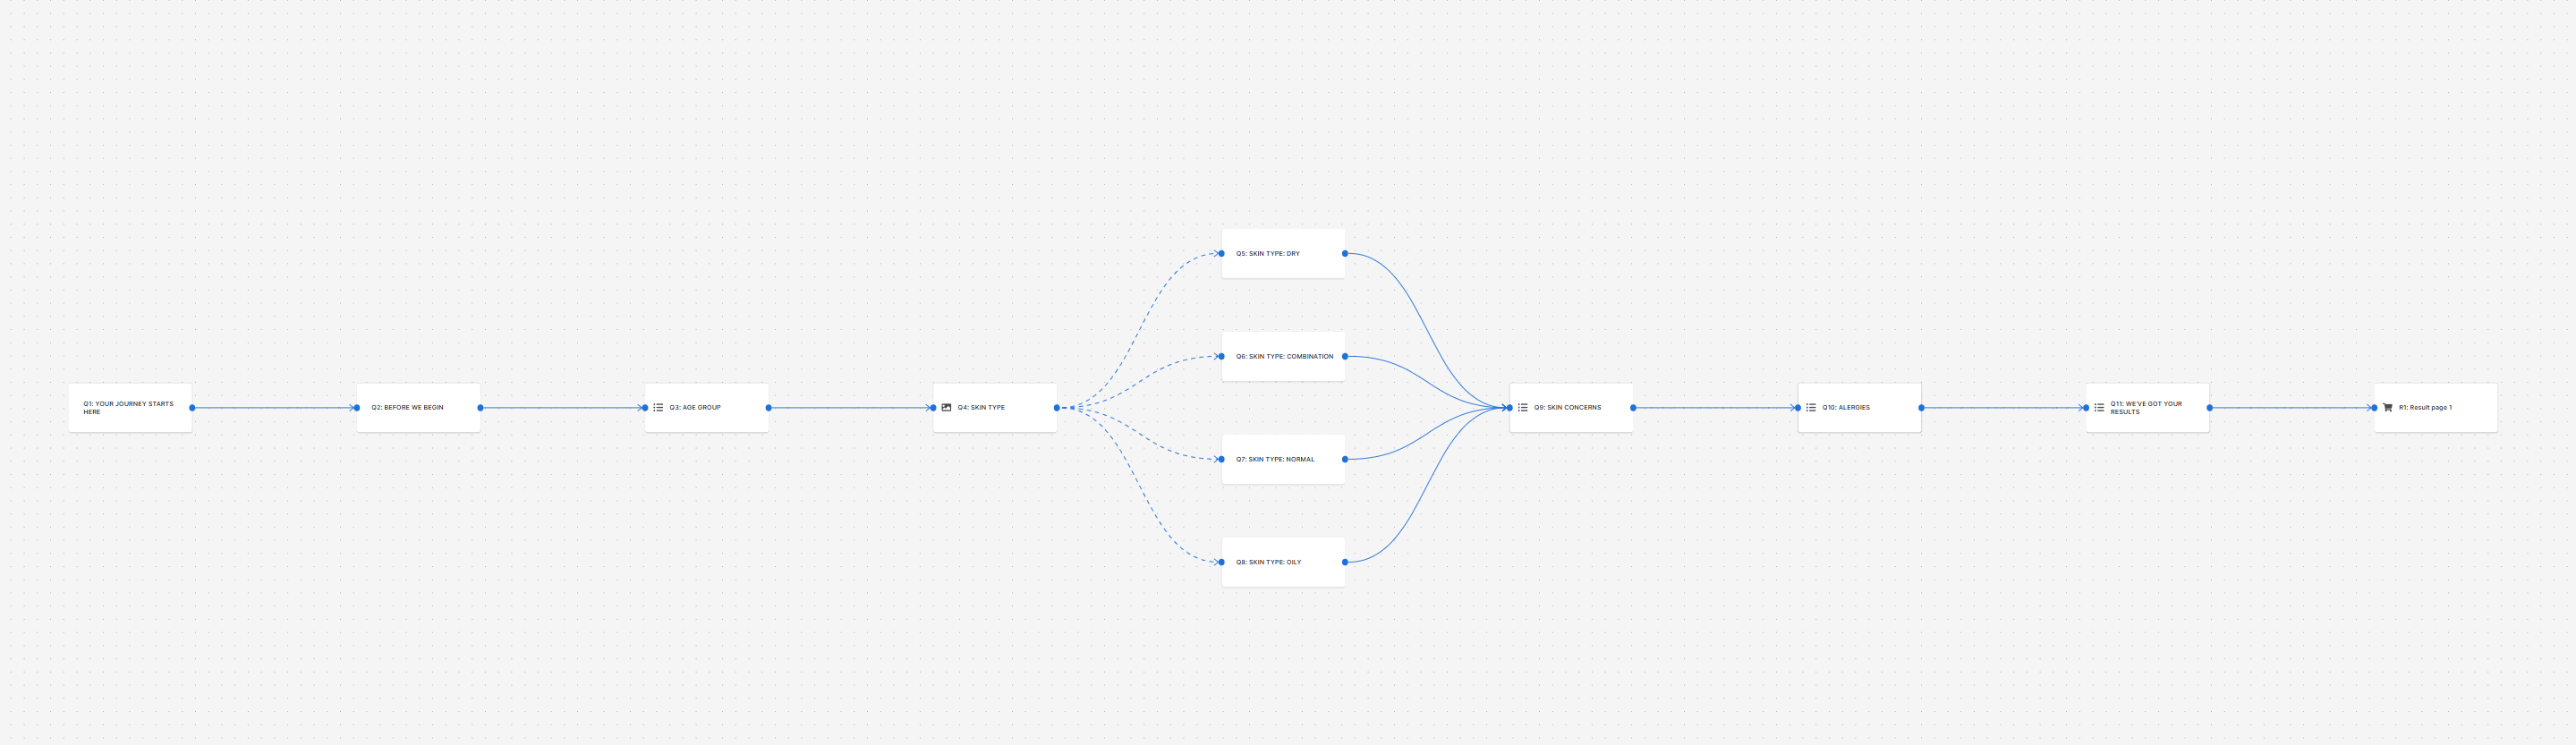
-
Find
Jump Logicin the menu on the right, and click+ Add another rule (OR). -
Set the rule to
IF the response tothat questionisone answer,THEN go tothe first question of that answer's branch.The rule that opens the oily skin branch
IF the response toWhat is your skin type?isOily,THEN go toOily Skin Concerns. -
Click
+ Add another rule (OR)again for every other answer that opens a branch. -
End every branch with a question that collects an email or phone number, or with the results page.
-
Open the Choice settings of each choice and upvote the relevant products or collections.
Only the questions the customer saw are counted
A question the customer never sees upvotes nothing. The quiz counts upvotes only from the questions it showed.
-
Add a
Products Blockto the results page. -
Set
Recommendation systemtoUpvotes, then choose how many products to show. -
Click
Save. This updates both the preview and the live quiz. -
Preview the quiz and take every branch. Check that the right questions appear, and that the recommendations match the answers.
-
Check the logic with the Response Analysis tool.
Grouping the recommendations
Slots arrange the recommendations into fixed positions instead of one list. Give a slot a Segment Filter to control which products it can recommend. See how to recommend a skincare routine with slots.
-
Create every question each branch needs in the Quiz Builder.
-
Add every choice each question needs.
Question order does not matter yet
Jump Logic sets the order the customer sees, so the order you add the questions in is not the order they are asked in.
-
Open the Conditional Logic settings of the question the branches start from.
-
Open the
Jump Logicsection and clickAdd Jump Logic. -
Set the rule to
IF response tothat questionisone answer,THEN go tothe first question of that answer's branch.The rule that opens the oily skin branch
IF response toWhat is your skin type?isOily,THEN go toOily Skin Concerns. -
Click the
+button to add a rule for every other answer that opens a branch. -
End every branch with a question that collects an email or phone number, or with the Results Page.
-
Go to the Link Products tab and link the relevant products, variants or collections to each choice.
Only the questions the customer saw are counted
A question the customer never sees upvotes nothing. The quiz counts upvotes only from the questions it showed.
-
Add a
Product Blockto the Results Page. -
Choose how many products to show in the Product Block settings.
-
Click
Publish/Save. This updates both the preview and the live quiz. -
Preview the quiz and take every branch. Check that the right questions appear, and that the recommendations match the answers.
-
Check the logic with the Response Analysis tool.
Grouping the recommendations
Slots arrange the recommendations into fixed positions instead of one list, such as a cleanser, then a serum, then a moisturizer. See how to recommend a skincare routine with slots.
-
Create every question each branch needs in the Quiz Builder.
-
Add every choice each question needs.
Question order does not matter yet
Jump Logic sets the order the customer sees, so the order you add the questions in is not the order they are asked in.
-
Open the Conditional Logic settings of the question the branches start from.
-
Open the
Jump Logicsection and clickAdd Jump Logic. -
Set the rule to
IF response tothat questionisone answer,THEN go tothe first question of that answer's branch.The rule that opens the oily skin branch
IF response toWhat is your skin type?isOily,THEN go toOily Skin Concerns. -
Click the
+button to add a rule for every other answer that opens a branch. -
End every branch with a question that collects an email or phone number, or with the Results Page.
-
Go to the Link Products tab and link the relevant products, variants or collections to each choice.
Only the questions the customer saw are counted
A question the customer never sees upvotes nothing. The quiz counts upvotes only from the questions it showed.
-
Add a
Product Blockto the Results Page. -
Choose how many products to show in the Product Block settings.
-
Click
Publish/Save. This updates both the preview and the live quiz. -
Preview the quiz and take every branch. Check that the right questions appear, and that the recommendations match the answers.
-
Check the logic with the Response Analysis tool.
Grouping the recommendations
Slots arrange the recommendations into fixed positions instead of one list, such as a cleanser, then a serum, then a moisturizer. See how to recommend a skincare routine with slots.
-
Create every question each branch needs in the Quiz Builder.
-
Add every choice each question needs.
Question order does not matter yet
Jump Logic sets the order the customer sees, so the order you add the questions in is not the order they are asked in.
-
Open the Conditional Logic settings of the question the branches start from.
-
Open the
Jump Logicsection and clickAdd Jump Logic. -
Set the rule to
IF response tothat questionisone answer,THEN go tothe first question of that answer's branch.The rule that opens the oily skin branch
IF response toWhat is your skin type?isOily,THEN go toOily Skin Concerns. -
Click the
+button to add a rule for every other answer that opens a branch. -
End every branch with a question that collects an email or phone number, or with the Results Page.
-
Go to the Link Products tab and link the relevant products, variants or collections to each choice.
Only the questions the customer saw are counted
A question the customer never sees upvotes nothing. The quiz counts upvotes only from the questions it showed.
-
Add a
Product Blockto the Results Page. -
Choose how many products to show in the Product Block settings.
-
Click
Publish/Save. This updates both the preview and the live quiz. -
Preview the quiz and take every branch. Check that the right questions appear, and that the recommendations match the answers.
-
Check the logic with the Response Analysis tool.
Grouping the recommendations
Slots arrange the recommendations into fixed positions instead of one list, such as a cleanser, then a serum, then a moisturizer. See how to recommend a skincare routine with slots.
-
Create every question each branch needs in the Quiz Builder.
-
Add every choice each question needs.
Question order does not matter yet
Jump Logic sets the order the customer sees, so the order you add the questions in is not the order they are asked in.
-
Open the Conditional Logic settings of the question the branches start from.
-
Open the
Jump Logicsection and clickAdd Jump Logic. -
Set the rule to
IF response tothat questionisone answer,THEN go tothe first question of that answer's branch.The rule that opens the oily skin branch
IF response toWhat is your skin type?isOily,THEN go toOily Skin Concerns. -
Click the
+button to add a rule for every other answer that opens a branch. -
End every branch with a question that collects an email or phone number, or with the Results Page.
-
Go to the Link Products tab and link the relevant products, variants or collections to each choice.
Only the questions the customer saw are counted
A question the customer never sees upvotes nothing. The quiz counts upvotes only from the questions it showed.
-
Add a
Product Blockto the Results Page. -
Choose how many products to show in the Product Block settings.
-
Click
Publish/Save. This updates both the preview and the live quiz. -
Preview the quiz and take every branch. Check that the right questions appear, and that the recommendations match the answers.
-
Check the logic with the Response Analysis tool.
Grouping the recommendations
Slots arrange the recommendations into fixed positions instead of one list, such as a cleanser, then a serum, then a moisturizer. See how to recommend a skincare routine with slots.
-
Create every question each branch needs in the Quiz Builder.
-
Add every choice each question needs.
Question order does not matter yet
Jump Logic sets the order the customer sees, so the order you add the questions in is not the order they are asked in.
-
Open the Conditional Logic settings of the question the branches start from.
-
Open the
Jump Logicsection and clickAdd Jump Logic. -
Set the rule to
IF response tothat questionisone answer,THEN go tothe first question of that answer's branch.The rule that opens the oily skin branch
IF response toWhat is your skin type?isOily,THEN go toOily Skin Concerns. -
Click the
+button to add a rule for every other answer that opens a branch. -
End every branch with a question that collects an email or phone number, or with the Results Page.
-
Go to the Link Products tab and link the relevant products, variants or collections to each choice.
Only the questions the customer saw are counted
A question the customer never sees upvotes nothing. The quiz counts upvotes only from the questions it showed.
-
Add a
Product Blockto the Results Page. -
Choose how many products to show in the Product Block settings.
-
Click
Publish/Save. This updates both the preview and the live quiz. -
Preview the quiz and take every branch. Check that the right questions appear, and that the recommendations match the answers.
-
Check the logic with the Response Analysis tool.
Grouping the recommendations
Slots arrange the recommendations into fixed positions instead of one list, such as a cleanser, then a serum, then a moisturizer. See how to recommend a skincare routine with slots.
Funnel quiz that shows custom text based on choices
Display logic shows and hides individual blocks on the results page, so the text can change with the answers. Every customer answers the same questions, and every answer combination needs its own rule.
This method uses the upvoting system.

Not the best fit for a personality quiz
The number of rules grows with every question. For a personality quiz, try the 🎯 Custom Scoring System (Most Upvoted Variable) or 🧩 Fixed Recommendations with Display logic instead.
-
Create every question the quiz needs in the Quiz builder, with all of its choices.
-
Open the Choice settings of each choice and upvote the relevant products.
Every question counts here
Every customer sees every question in this method, so the quiz counts upvotes from all of them.
-
Add a
Products Blockto the results page and setRecommendation systemtoUpvotes. -
Add one section per answer combination to the results page. Put the text, image or HTML blocks for that combination inside its own section.
-
Add a display logic rule to each content block in the block settings. Combine the conditions with AND and OR.
How a display logic rule reads
Show this block if:
Question 1 is Choice A AND Question 2 is Choice B AND Question 3 is Choice C
OR
Question 1 is Choice A AND Question 2 is Choice B AND Question 3 is Choice D
In practice: when "Skin Type" is "Oily" AND "Main Concern" is "Acne", show the skincare routine for oily, acne-prone skin.
-
Write a rule for every possible answer combination.
Every route needs a rule
This method needs a display logic rule for each way through the quiz. A combination you miss has no rule to show its block.
-
Click
Save. This updates both the preview and the live quiz. -
Preview the quiz with different answer combinations. Check that the right content appears each time.
-
Check the logic with Response Analysis.
Not the best fit for a personality quiz
The number of rules grows with every question. For a personality quiz, try the 🎯 Custom Scoring System (Most Upvoted Variable) or 🧩 Fixed Recommendations with Display logic instead.
-
Create every question the quiz needs in the Quiz Builder, with all of its choices.
-
Go to the Link Products tab and link the relevant products, variants or collections to each choice.
Every question counts here
Every customer sees every question in this method, so the quiz counts upvotes from all of them.
-
Add a
Product Blockto the Results Page and setRecommendation systemtoUpvotes. -
Add a content block, an image block or an HTML block for each answer combination.
-
Add a Display Logic rule to each content block in the block settings. Combine the conditions with AND and OR.
How a display logic rule reads
Show this block if:
Question 1 is Choice A AND Question 2 is Choice B AND Question 3 is Choice C
OR
Question 1 is Choice A AND Question 2 is Choice B AND Question 3 is Choice D
In practice: when "Skin Type" is "Oily" AND "Main Concern" is "Acne", show the skincare routine for oily, acne-prone skin.
-
Write a rule for every possible answer combination.
Every route needs a rule
This method needs a Display Logic rule for each way through the quiz. A combination you miss has no rule to show its block.
-
Click
Publish/Save. This updates both the preview and the live quiz. -
Preview the quiz with different answer combinations. Check that the right content appears each time.
-
Check the logic with Response Analysis.
Not the best fit for a personality quiz
The number of rules grows with every question. For a personality quiz, try the 🎯 Custom Scoring System (Most Upvoted Variable) or 🧩 Fixed Recommendations with Display logic instead.
-
Create every question the quiz needs in the Quiz Builder, with all of its choices.
-
Go to the Link Products tab and link the relevant products, variants or collections to each choice.
Every question counts here
Every customer sees every question in this method, so the quiz counts upvotes from all of them.
-
Add a
Product Blockto the Results Page and setRecommendation systemtoUpvotes. -
Add a content block, an image block or an HTML block for each answer combination.
-
Add a Display Logic rule to each content block in the block settings. Combine the conditions with AND and OR.
How a display logic rule reads
Show this block if:
Question 1 is Choice A AND Question 2 is Choice B AND Question 3 is Choice C
OR
Question 1 is Choice A AND Question 2 is Choice B AND Question 3 is Choice D
In practice: when "Skin Type" is "Oily" AND "Main Concern" is "Acne", show the skincare routine for oily, acne-prone skin.
-
Write a rule for every possible answer combination.
Every route needs a rule
This method needs a Display Logic rule for each way through the quiz. A combination you miss has no rule to show its block.
-
Click
Publish/Save. This updates both the preview and the live quiz. -
Preview the quiz with different answer combinations. Check that the right content appears each time.
-
Check the logic with Response Analysis.
Not the best fit for a personality quiz
The number of rules grows with every question. For a personality quiz, try the 🎯 Custom Scoring System (Most Upvoted Variable) or 🧩 Fixed Recommendations with Display logic instead.
-
Create every question the quiz needs in the Quiz Builder, with all of its choices.
-
Go to the Link Products tab and link the relevant products, variants or collections to each choice.
Every question counts here
Every customer sees every question in this method, so the quiz counts upvotes from all of them.
-
Add a
Product Blockto the Results Page and setRecommendation systemtoUpvotes. -
Add a content block, an image block or an HTML block for each answer combination.
-
Add a Display Logic rule to each content block in the block settings. Combine the conditions with AND and OR.
How a display logic rule reads
Show this block if:
Question 1 is Choice A AND Question 2 is Choice B AND Question 3 is Choice C
OR
Question 1 is Choice A AND Question 2 is Choice B AND Question 3 is Choice D
In practice: when "Skin Type" is "Oily" AND "Main Concern" is "Acne", show the skincare routine for oily, acne-prone skin.
-
Write a rule for every possible answer combination.
Every route needs a rule
This method needs a Display Logic rule for each way through the quiz. A combination you miss has no rule to show its block.
-
Click
Publish/Save. This updates both the preview and the live quiz. -
Preview the quiz with different answer combinations. Check that the right content appears each time.
-
Check the logic with Response Analysis.
Not the best fit for a personality quiz
The number of rules grows with every question. For a personality quiz, try the 🎯 Custom Scoring System (Most Upvoted Variable) or 🧩 Fixed Recommendations with Display logic instead.
-
Create every question the quiz needs in the Quiz Builder, with all of its choices.
-
Go to the Link Products tab and link the relevant products, variants or collections to each choice.
Every question counts here
Every customer sees every question in this method, so the quiz counts upvotes from all of them.
-
Add a
Product Blockto the Results Page and setRecommendation systemtoUpvotes. -
Add a content block, an image block or an HTML block for each answer combination.
-
Add a Display Logic rule to each content block in the block settings. Combine the conditions with AND and OR.
How a display logic rule reads
Show this block if:
Question 1 is Choice A AND Question 2 is Choice B AND Question 3 is Choice C
OR
Question 1 is Choice A AND Question 2 is Choice B AND Question 3 is Choice D
In practice: when "Skin Type" is "Oily" AND "Main Concern" is "Acne", show the skincare routine for oily, acne-prone skin.
-
Write a rule for every possible answer combination.
Every route needs a rule
This method needs a Display Logic rule for each way through the quiz. A combination you miss has no rule to show its block.
-
Click
Publish/Save. This updates both the preview and the live quiz. -
Preview the quiz with different answer combinations. Check that the right content appears each time.
-
Check the logic with Response Analysis.
Not the best fit for a personality quiz
The number of rules grows with every question. For a personality quiz, try the 🎯 Custom Scoring System (Most Upvoted Variable) or 🧩 Fixed Recommendations with Display logic instead.
-
Create every question the quiz needs in the Quiz Builder, with all of its choices.
-
Go to the Link Products tab and link the relevant products, variants or collections to each choice.
Every question counts here
Every customer sees every question in this method, so the quiz counts upvotes from all of them.
-
Add a
Product Blockto the Results Page and setRecommendation systemtoUpvotes. -
Add a content block, an image block or an HTML block for each answer combination.
-
Add a Display Logic rule to each content block in the block settings. Combine the conditions with AND and OR.
How a display logic rule reads
Show this block if:
Question 1 is Choice A AND Question 2 is Choice B AND Question 3 is Choice C
OR
Question 1 is Choice A AND Question 2 is Choice B AND Question 3 is Choice D
In practice: when "Skin Type" is "Oily" AND "Main Concern" is "Acne", show the skincare routine for oily, acne-prone skin.
-
Write a rule for every possible answer combination.
Every route needs a rule
This method needs a Display Logic rule for each way through the quiz. A combination you miss has no rule to show its block.
-
Click
Publish/Save. This updates both the preview and the live quiz. -
Preview the quiz with different answer combinations. Check that the right content appears each time.
-
Check the logic with Response Analysis.
This article explains how to set up a quiz that recommends products based on customer choices using a built-in upvoting system.